文章目录
- 前言
- 一、场景1
- 1.1 删除分支
- 1.2 修改message信息
- 1.2.1 最新一次commit的message
- 1.2.2 过去commit的message
- 1.3 合并commit
- 1.3.1 多个连续commit合并
- 1.3.2 不连续commit合并
- 二、场景2
- 2.1 比较暂存区和HEAD所含文件的差异
- 2.2 比较工作区和暂存区所含文件的差异
- 2.3 将暂存区恢复成和HEAD的一样
- 2.4 将工作区文件恢复为和暂存区一样
- 2.5 取消暂存区部分文件的更改
- 三、场景3
- 3.1 消除最近几次提交
- 3.2 查看不同commit的指定文件的差异
- 3.3 删除文件
- 3.4 临时存放
- 四、场景4
- 4.1 指定不需要Git管理的文件
- 4.2 备份
- 4.2.1 Git备份
- 4.2.2 传输协议
- 4.2.3 备份操作
- 4.2.4 同步
- 五、总结
前言
一、场景1
1.1 删除分支
git branch -av查看所有分支详细信息
git branch -d branch_name 删除指定分支
git branch -av
* detach_branch 32b1bb0 add file1master        11067be add file2temp          1395813 add readme# 此时处于detach_branch分支中,所以未能删除成功
git branch -d detach_branch
error: Cannot delete branch 'detach_branch' checked out at 'C:/Users/asdfv/Desktop/test'git checkout master
Switched to branch 'master'
# 切换到master分支后,就能成功删除detach_branch分支
git branch -d detach_branch
Deleted branch detach_branch (was 32b1bb0).git branch -av
* master 11067be add file2temp   1395813 add readme
1.2 修改message信息
1.2.1 最新一次commit的message
通过git commit --amend命令修改最新一次commit的message信息,即HEAD指向的commit的message。
git log
commit 11067be5b6012377a079c3a9635f5f7af56f7de4 (HEAD -> master)
Author: tom <tom@123.com>
Date:   Thu Nov 9 22:09:51 2023 +0800add file2commit 32b1bb0bac4ccac8665c998fbd7cf1491bbeeda5
Author: tom <tom@123.com>
Date:   Thu Nov 9 22:09:03 2023 +0800add file1commit 1395813160b9b8f42f8a42f84eb7845fdfaf0424 (temp)
Author: xxxx@163.com <xxx@163.com>
Date:   Wed Nov 8 15:29:01 2023 +0800add readmegit commit --amend     # 会弹出信息,直接编辑修改首行的内容并保存即可,首行内容即message信息
[master cb27ad9] add file2 second editDate: Thu Nov 9 22:09:51 2023 +08001 file changed, 0 insertions(+), 0 deletions(-)create mode 100644 file2git log
commit cb27ad90d2aeac53968b4d74a0b5cf17f92ab06e (HEAD -> master)
Author: tom <tom@123.com>
Date:   Thu Nov 9 22:09:51 2023 +0800add file2 second edit      # message信息已发生变化commit 32b1bb0bac4ccac8665c998fbd7cf1491bbeeda5
Author: tom <tom@123.com>
Date:   Thu Nov 9 22:09:03 2023 +0800add file1commit 1395813160b9b8f42f8a42f84eb7845fdfaf0424 (temp)
Author: xxx@163.com <xxx@163.com>
Date:   Wed Nov 8 15:29:01 2023 +0800add readme
1.2.2 过去commit的message
修改过去commit的message信息,分为两步骤
1)rebase到目标commit的父亲
查看下当前版本历史
git log --graph --all
* commit 69cde788edb4184538f2155ea5e062f5649e8781 (detach_branch)
| Author: xxx<xxx@163.com>
| Date:   Thu Nov 9 15:56:42 2023 +0800
|
|     detach modify file
|
| * commit e5d60c7d913d427b2e2161f717dff97249dd1f9b (temp)
| | Author: xxx<xxx@163.com>
| | Date:   Thu Nov 9 10:22:51 2023 +0800
| |
| |     add temp_test
| |
| * commit 01df9fd5e046f104312468746168b027f4285c5c (HEAD -> master)
|/  Author: xxx<xxx@163.com>
|   Date:   Thu Nov 9 10:22:04 2023 +0800
|
|       add file1
|
* commit db2d096bf27e4e8f4ca42e8b185e973b05e186dfAuthor: xxx<xxx@163.com>Date:   Thu Nov 9 10:21:31 2023 +0800add readme
拟修改detach_branch分支对应的commit的message信息,此时就需要先进入到该commit的父亲commit中:
git rebase -i db2d096bf
进入到如下界面:
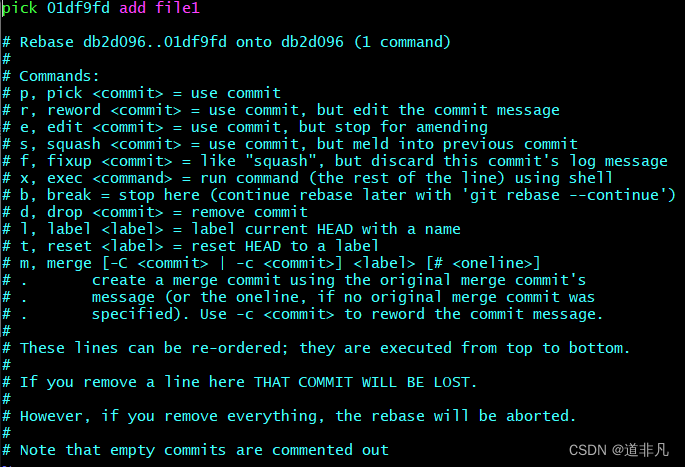
2)修改command
将上图中的command命令从pick修改为reword或r,保存退出后会自动进入目标commit的内容编辑页面,直接编辑修改首行的message信息,保存退出即可。

git rebase -i db2d096bf
[detached HEAD f554f2d] add file1 rebaseDate: Thu Nov 9 10:22:04 2023 +08001 file changed, 0 insertions(+), 0 deletions(-)create mode 100644 file1
Successfully rebased and updated refs/heads/master.
1.3 合并commit
1.3.1 多个连续commit合并
git log
commit ccad7ee6c3065a3bac0deaa4df8cb65f36802ea6 (HEAD -> master)
Author: xxx<xxx@163.com>
Date:   Mon Aug 1 14:53:09 2022 +0800add newnewnew css# 合并下面两个commit
commit 46d4543880a2864511fa7d1cef3419b5bdc87367
Author: xxx<xxx@163.com>
Date:   Mon Aug 1 14:52:27 2022 +0800add aaa index.htmlcommit 7d1a828cc8c3e45cb98605dc9032de372e1d0c4c
Author: xxx<xxx@163.com>
Date:   Mon Aug 1 14:51:21 2022 +0800add cpp# 父亲commit
commit b36e3b75d6129902a7251ec74b5a14b521c16839
Author: xxx<xxx@163.com>
Date:   Mon Aug 1 13:17:59 2022 +0800add readme
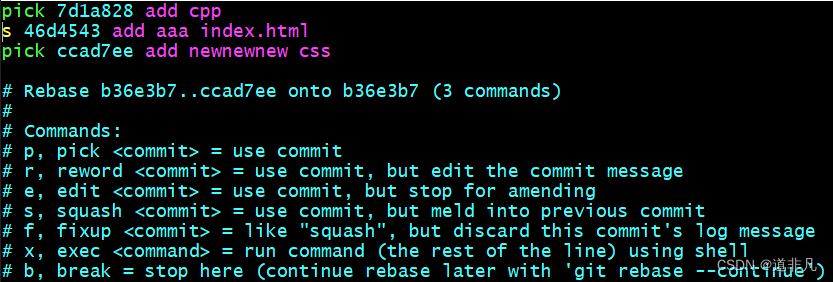
当要合并多个连续的commit时,需要找到这几个commit的parent父亲,并进入rebase:
git rebase -i b36e3b75d # 进入到父亲commit的rebase环境
因为是将多个连续的commit合并,所以实际上是将这些commit都整合到这些commit中的第一个commit(时间线最远的那个)。
此时该第一个commit的command保持不变,即pick;后面需要整合的commit,它们的command就要改为s(squash,合并),保存退出后进入到第一个commit中。
进入到第一个commit的信息编辑中,添加上相关message信息即可,保存退出。
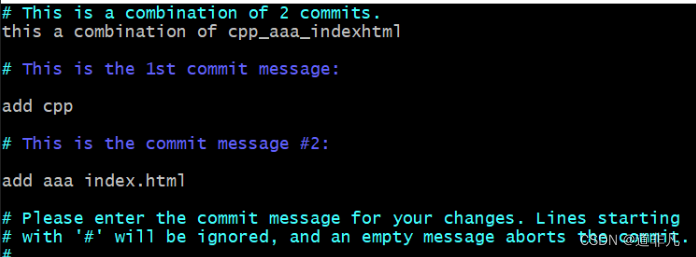
commit合并退出。
git rebase -i b36e3b75d6
[detached HEAD 15b3bed] this a combination of cpp_aaa_indexhtml
Author: xxx<xxx@163.com>
Date: Mon Aug 1 14:51:21 2022 +0800
2 files changed, 0 insertions(+), 0 deletions(-)
create mode 100644 index.html
create mode 100644 test1.cpp
Successfully rebased and updated refs/heads/master.git log
commit 5333266fd52079006ff91ce038e93555cd8d9805 (HEAD -> master)
Author: xxx<xxx@163.com>
Date:   Mon Aug 1 14:53:09 2022 +0800add newnewnew csscommit 15b3bed924f8670f71fb878401f9e93ed52b85b6
Author: xxx<xxx@163.com>
Date:   Mon Aug 1 14:51:21 2022 +0800this a combination of cpp_aaa_indexhtmladd cppadd aaa index.htmlcommit b36e3b75d6129902a7251ec74b5a14b521c16839
Author: xxx <xxx@163.com>
Date:   Mon Aug 1 13:17:59 2022 +0800add readme
1.3.2 不连续commit合并
现欲将两个不连续的commit整合成一个commit:
选择时间线最远(git树中最靠前)的commit来作为base,进行合并:
git rebase -i
弹出内容编辑页面,初始内容如下:
但目标是要合并自身和不连续的另一个commit,这边就在首行插入内容:
pick
s
修改完保存并返回,界面跳出告警
执行continue即可,表示仍按照间隔commit合并的操作来:
弹出内容框,添加message即可
保存退出后,会看到成功信息
二、场景2
这个场景主要是对暂存区和工作区两者之间的相关处理。
2.1 比较暂存区和HEAD所含文件的差异
git add head_filegit status
On branch master
Changes to be committed:(use "git restore --staged <file>..." to unstage)new file:   head_filegit diff --cached
diff --git a/head_file b/head_file
new file mode 100644
index 0000000..e69de29
2.2 比较工作区和暂存区所含文件的差异
git diff      # 默认比较工作区所有文件
diff --git a/index.css b/index.css
index e69de29..dac138d 100644
--- a/index.css
+++ b/index.css
@@ -0,0 +1 @@
+css
diff --git a/index.html b/index.html
index e69de29..dd6a11e 100644
--- a/index.html
+++ b/index.html
@@ -0,0 +1,4 @@
+index.html
+
+
+git diff -- index.html    # -- 指定文件与暂存区比较,可指定多个文件
diff --git a/index.html b/index.html
index e69de29..dd6a11e 100644
--- a/index.html
+++ b/index.html
@@ -0,0 +1,4 @@
+index.html
+
+
+
2.3 将暂存区恢复成和HEAD的一样
git status           # 此时暂存区内容
On branch master
Changes to be committed:(use "git restore --staged <file>..." to unstage)new file:   head_filegit restore --staged head_file    # 将暂存区内容恢复成和HEAD指针指向的内容一致,即撤销暂存区内的改动git diff --cached     # 恢复完成后,此时暂存区和HEAD应该无差异,输出为空
2.4 将工作区文件恢复为和暂存区一样
在将文件添加至暂存区后,又对工作区内该文件进行了修改。
若此时修改的内容不符合预期,现在想将暂存区内该文件恢复到工作区(覆盖修改,即撤销工作区内文件的改动)。
git add head_file         # 添加至暂存区
warning: LF will be replaced by CRLF in head_file.
The file will have its original line endings in your working directorygit status               # 此时git提示有个head_file文件需要commit
On branch master
Changes to be committed:(use "git restore --staged <file>..." to unstage)new file:   head_filevi head_file             # 修改head_file内容git status
On branch master
Changes to be committed:(use "git restore --staged <file>..." to unstage)new file:   head_fileChanges not staged for commit:(use "git add <file>..." to update what will be committed)(use "git restore <file>..." to discard changes in working directory)modified:   head_filecat head_file         # 文件内容添加了第二行,但此时感觉这个内容不满意,需要回退成暂存区时文件内容
test test test
second editgit restore head_file    # 将工作区指定文件恢复成和暂存区一样,即删除之前修改的部分cat head_file
test test testgit restore -- head_file index.css   # 可同时对多个文件进行恢复
若暂存区没有某一文件,而却执行了该文件的恢复操作,则会清空工作区内该文件的内容。
2.5 取消暂存区部分文件的更改
git status
On branch master
Changes to be committed:(use "git restore --staged <file>..." to unstage)new file:   head_fileChanges not staged for commit:(use "git add <file>..." to update what will be committed)(use "git restore <file>..." to discard changes in working directory)modified:   head_filegit restore --staged head_file     # 将暂存区指定文件的修改撤销git status
On branch master
Untracked files:(use "git add <file>..." to include in what will be committed)head_filenothing added to commit but untracked files present (use "git add" to track)
三、场景3
3.1 消除最近几次提交
首先将分支切换到temp上,用于测试演示。可以看到目前有下列几个commit提交。
git checkout temp
Switched to branch 'temp'git log
commit e5d60c7d913d427b2e2161f717dff97249dd1f9b (HEAD -> temp)
Author: xxx<xxx@163.com>
Date:   Thu Nov 9 10:22:51 2023 +0800add temp_testcommit 01df9fd5e046f104312468746168b027f4285c5c
Author: xxx<xxx@163.com>
Date:   Thu Nov 9 10:22:04 2023 +0800add file1commit db2d096bf27e4e8f4ca42e8b185e973b05e186df     # 拟删除该commit之后的所有提交
Author: xxx<xxx@163.com>
Date:   Thu Nov 9 10:21:31 2023 +0800add readme
删除temp分支的最近几次提交,也就是将HEAD指针指向前面某次commit(删除该commit后的所有提交)。
git reset --hard db2d096bf27e     # 删除该commit之后的所有commit,同时HEAD指向该commit
HEAD is now at db2d096 add readmegit log
commit db2d096bf27e4e8f4ca42e8b185e973b05e186df (HEAD -> temp)
Author: xxx <xxx@163.com>
Date:   Thu Nov 9 10:21:31 2023 +0800add readme
3.2 查看不同commit的指定文件的差异
git diff后跟两个commit的哈希ID,或者是两个分支名称,最后是指定需要比较查看的文件名称。
git diff temp master -- file1
diff --git a/file1 b/file1
new file mode 100644
index 0000000..e69de29
3.3 删除文件
git rm 删除指定文件,并将该操作同步到暂存区,待后续commit完成后,便会在仓库内删除。
git rm readme
rm 'readme'git status
On branch master
Changes to be committed:(use "git restore --staged <file>..." to unstage)new file:   head_filedeleted:    readme
3.4 临时存放
比如说,在开发过程中,突然加塞进一个紧急任务,此时就可将现有编辑操作(现有工作区)存入stash区;当在工作区的操作结束之后,可直接将stash区内的内容恢复回来。
git stash
Saved working directory and index state WIP on master: f554f2d add file1 rebasegit stash list
stash@{0}: WIP on master: f554f2d add file1 rebase
当紧急任务(修改文件、添加至暂存区、commit提交)完成后,将stash区恢复:
- git stash apply
- 不会删除stash区内信息
- git stash pop
- 会删除stash内容
git stash apply
On branch master
Changes to be committed:(use "git restore --staged <file>..." to unstage)new file:   head_filegit stash list
stash@{0}: WIP on master: f554f2d add file1 rebase
git reset --hard HEAD     # 清一下暂存区,恢复暂存区状态
HEAD is now at f554f2d add file1 rebasegit status
On branch master
nothing to commit, working tree cleangit log
commit f554f2dd10181c867f08c6c5ae2e90157ba8919e (HEAD -> master)
Author: xxx<xxx@163.com>
Date:   Thu Nov 9 10:22:04 2023 +0800add file1 rebasecommit db2d096bf27e4e8f4ca42e8b185e973b05e186df (temp)
Author: xxx<xxx@163.com>
Date:   Thu Nov 9 10:21:31 2023 +0800add readmegit stash list
stash@{0}: WIP on master: f554f2d add file1 rebasegit stash pop      # 将stash区恢复,pop是同时会删除stash区内容的
On branch master
Changes to be committed:(use "git restore --staged <file>..." to unstage)new file:   head_fileDropped refs/stash@{0} (099ac55e8e11781ad41d9b2112cf0c8d9573eeef)git stash list    # 再次查看stash区,此时已无内容
四、场景4
4.1 指定不需要Git管理的文件
.gitignore文件设定项目中哪些文件不需要被纳入Git管理。
git status
On branch master
Untracked files:(use "git add <file>..." to include in what will be committed)head_filenothing added to commit but untracked files present (use "git add" to track)vi .gitignore
head_filegit status
On branch master
Untracked files:(use "git add <file>..." to include in what will be committed).gitignorenothing added to commit but untracked files present (use "git add" to track)
若存在目录以及同名文件,例如都为
web,此时在.gitignore文件中的内容应为:
web       # 表示包括web文件以及web目录及其里面的文件
web/      # 只表示web目录及其里面的文件,不包含web文件
4.2 备份
4.2.1 Git备份
Git备份,是将原有的Git仓库从一个地方传输到另一个地方做备份,需要用到传输协议。
4.2.2 传输协议
| 常用协议 | 语法格式 | 说明 |
|---|---|---|
| 本地协议1 | /path/to/repo.git | 哑协议 |
| 本地协议2 | file:///path/to/repo.git | 智能协议 |
| http/https协议 | http://server.com:port/path/to/repo.git https://server.com:port/path/to/repo.git | 智能协议 |
| ssh协议 | user@git-server.com:path/to/repo.git | 工作中常接触的智能协议 |
除了哑协议,其他都是智能协议。两者的直观区别:
1)哑协议传输进度不可见,智能协议传输进度可见
2)智能协议比哑协议传输速度要快
4.2.3 备份操作
进入要备份的仓库目录,通过命令git clone --bare [file://]仓库源路径/.git 目标备份仓库名.git来实现项目仓库的备份。
# 哑协议
/g/test (master)
git clone --bare G:\\test\\.git bck.git
Cloning into bare repository 'bck.git'...
done.# 智能协议,有进度提示
/g/test (master)
git clone --bare file://G:\\test\\.git zhineng.git
Cloning into bare repository 'zhineng.git'...
remote: Enumerating objects: 69, done.
remote: Counting objects: 100% (69/69), done.
remote: Compressing objects: 100% (55/55), done.
remote: Total 69 (delta 28), reused 21 (delta 7), pack-reused 0
Receiving objects: 100% (69/69), 6.50 KiB | 2.17 MiB/s, done.
Resolving deltas: 100% (28/28), done./g/test (master)
git clone file://G:\\test\\.git zhineng2.git
Cloning into 'zhineng2.git'...
remote: Enumerating objects: 69, done.
remote: Counting objects: 100% (69/69), done.
remote: Compressing objects: 100% (55/55), done.
remote: Total 69 (delta 28), reused 21 (delta 7), pack-reused 0
Receiving objects: 100% (69/69), 6.50 KiB | 739.00 KiB/s, done.
Resolving deltas: 100% (28/28), done.
--bare表示只拷贝.git文件夹及其内容,不拷贝项目工程文件;
不加--bare的话,就会拷贝包括.git目录以及工程文件的所有文件。
4.2.4 同步
仓库备份之后,后续对于源仓库修改的内容也要及时地同步到备份仓库那里。
要想同步,首先需要把源仓库和备份关联起来,通过git remote add添加远程库。
/g/test (master)
git remote add zhineng file://G:\\test\\zhineng2.git/g/test (master)
git remote -v
zhineng file://G:/test/zhineng2.git (fetch)
zhineng file://G:/test/zhineng2.git (push)
不管是备份到本地还是备份到云端,在Git看来都是远程仓库。
远程仓库用什么协议(哑协议、智能协议)创建的,后续在进行关联(添加远程库)的时候就要指定同样的协议。
后续源仓库有变动时,提交push到对应远程库即可更新到备份库中。
/g/test (master)
git checkout -b test
Switched to a new branch 'test'/g/test (test)
git push zhineng
Total 0 (delta 0), reused 0 (delta 0), pack-reused 0
To file://G:/test/zhineng2.git* [new branch]      test -> test
五、总结
本节有很多在使用Git时遇到的场景,得熟悉熟用。