前言
文章性质:实操记录 💻
主要内容:主要记录了如何配置项目环境以及如何在远程服务器上跑 yolov3 模型。
项目源码:GitHub - SZU-AdvTech-2022/213-Rethinking-Image-Restoration-for-Object-Detection
冷知识+1:小伙伴们不经意的 点赞 👍🏻 与 收藏 ✨ 可以让作者更有创作动力!
目录
前言
一、租用 AutoDL 远程服务器
1、获取 SSH 登录指令与密码
二、使用 Tabby 传输项目数据集
1、Tabby 的下载与使用
2、Tabby 传输项目数据集
3、解压 VOC2007.zip 压缩包
三、配置 PyCharm 项目运行环境
1、配置 Python 解释器
2、创建 Python 虚拟环境
(1)更新 bashrc 中的环境变量
(2)创建项目的虚拟环境
(3)更新 bashrc 中的环境变量
(4)激活项目的虚拟环境
3、安装 pytorch 与 torchvision
(1)使用官网提供的命令安装
(2)安装过程出现 killed 问题
(3)检查是否安装对应版本
4、更改 Python 解释器
5、根据 requirements.txt 安装依赖
四、运行 yolov3 时的问题与解决
1、ModuleNotFoundError: No module named 'tensorboard'
2、ModuleNotFoundError: No module named 'past'
3、ValueError: Error initializing torch.distributed using env:// ...
4、KeyError: 'LOCAL_RANK'
5、FileNotFoundError: [Errno 2] No such file or directory: ...
6、FileNotFoundError: [Errno 2] No such file or directory: ...
五、在 PyCharm 运行 train.py 训练权重
六、在 Tabby 运行 train.py 训练权重
1、将项目文件更新至远程服务器
2、不挂断运行 train.py 训练权重
3、为何 NVIDIA-SMI 进程不显示
4、初步训练得到 300 轮模型权重
七、在 PyCharm 运行 predict.py 预测
八、在 PyCharm 运行 get_map.py 评估
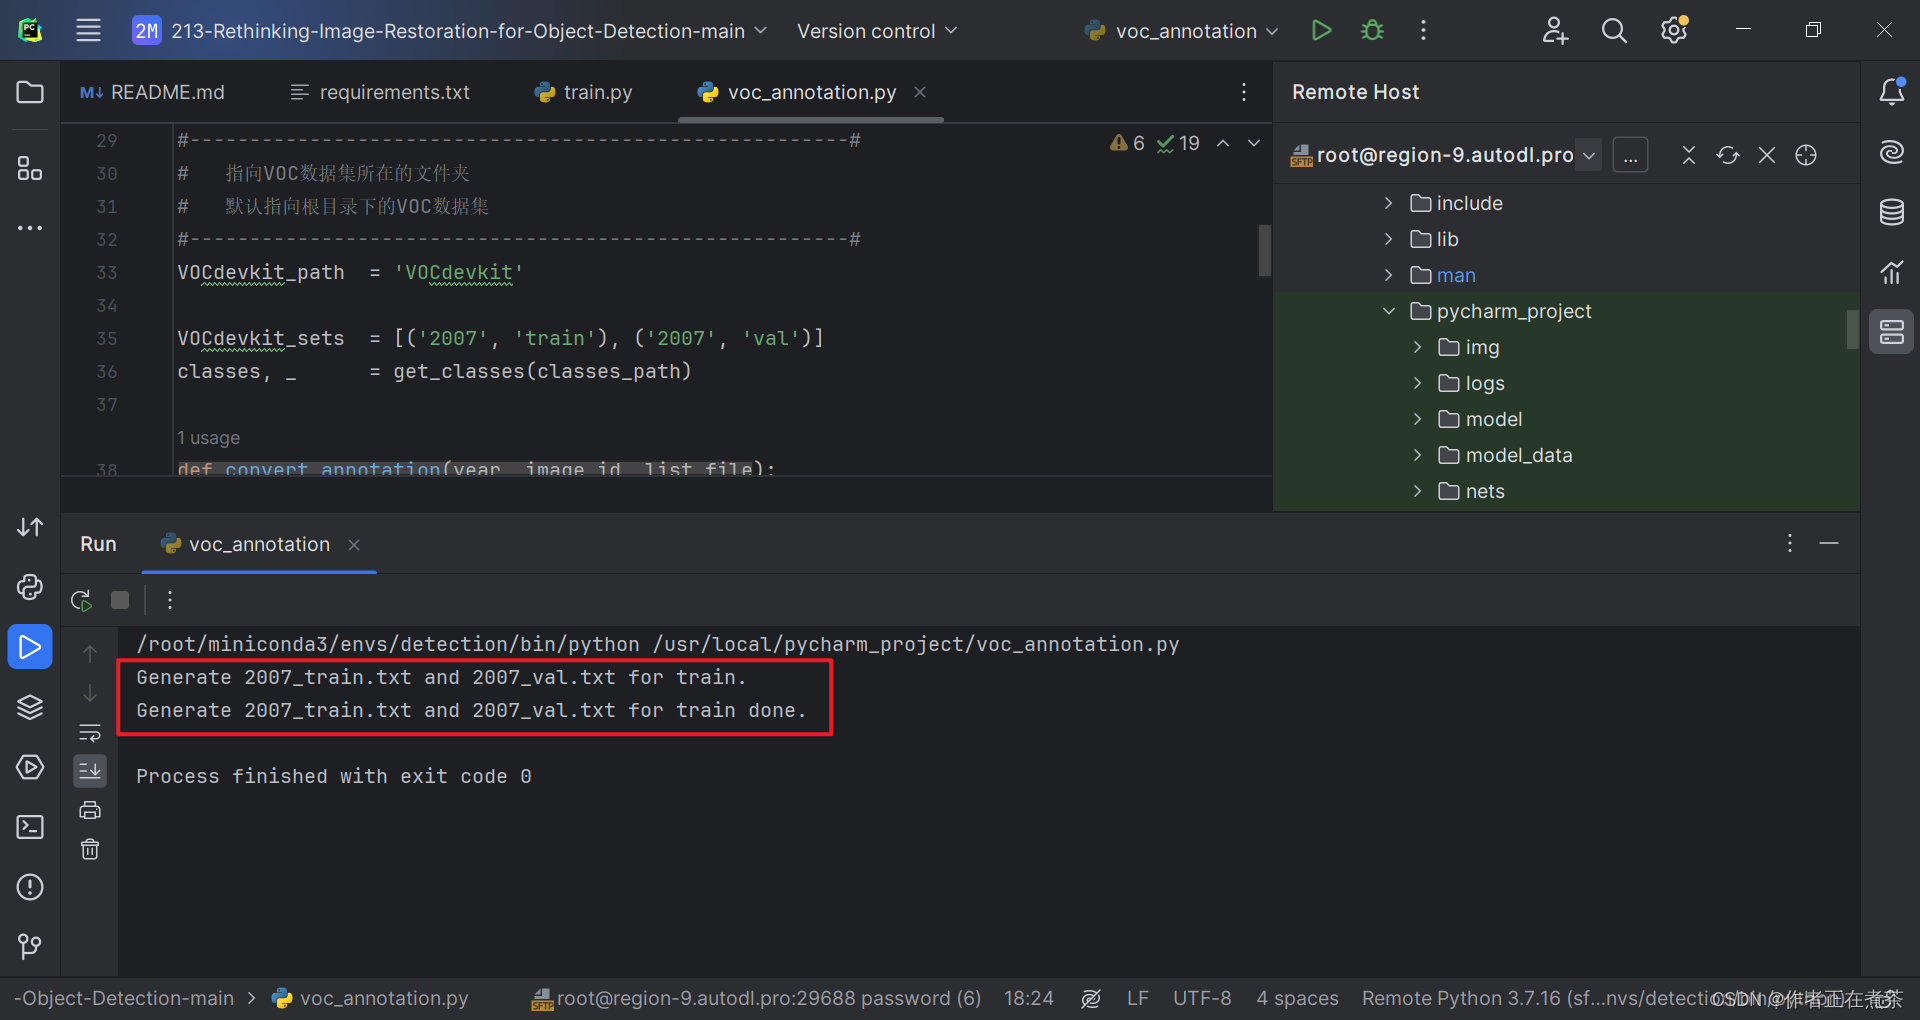
附录1:voc_annotation.py
附录2:yolo.py
一、租用 AutoDL 远程服务器
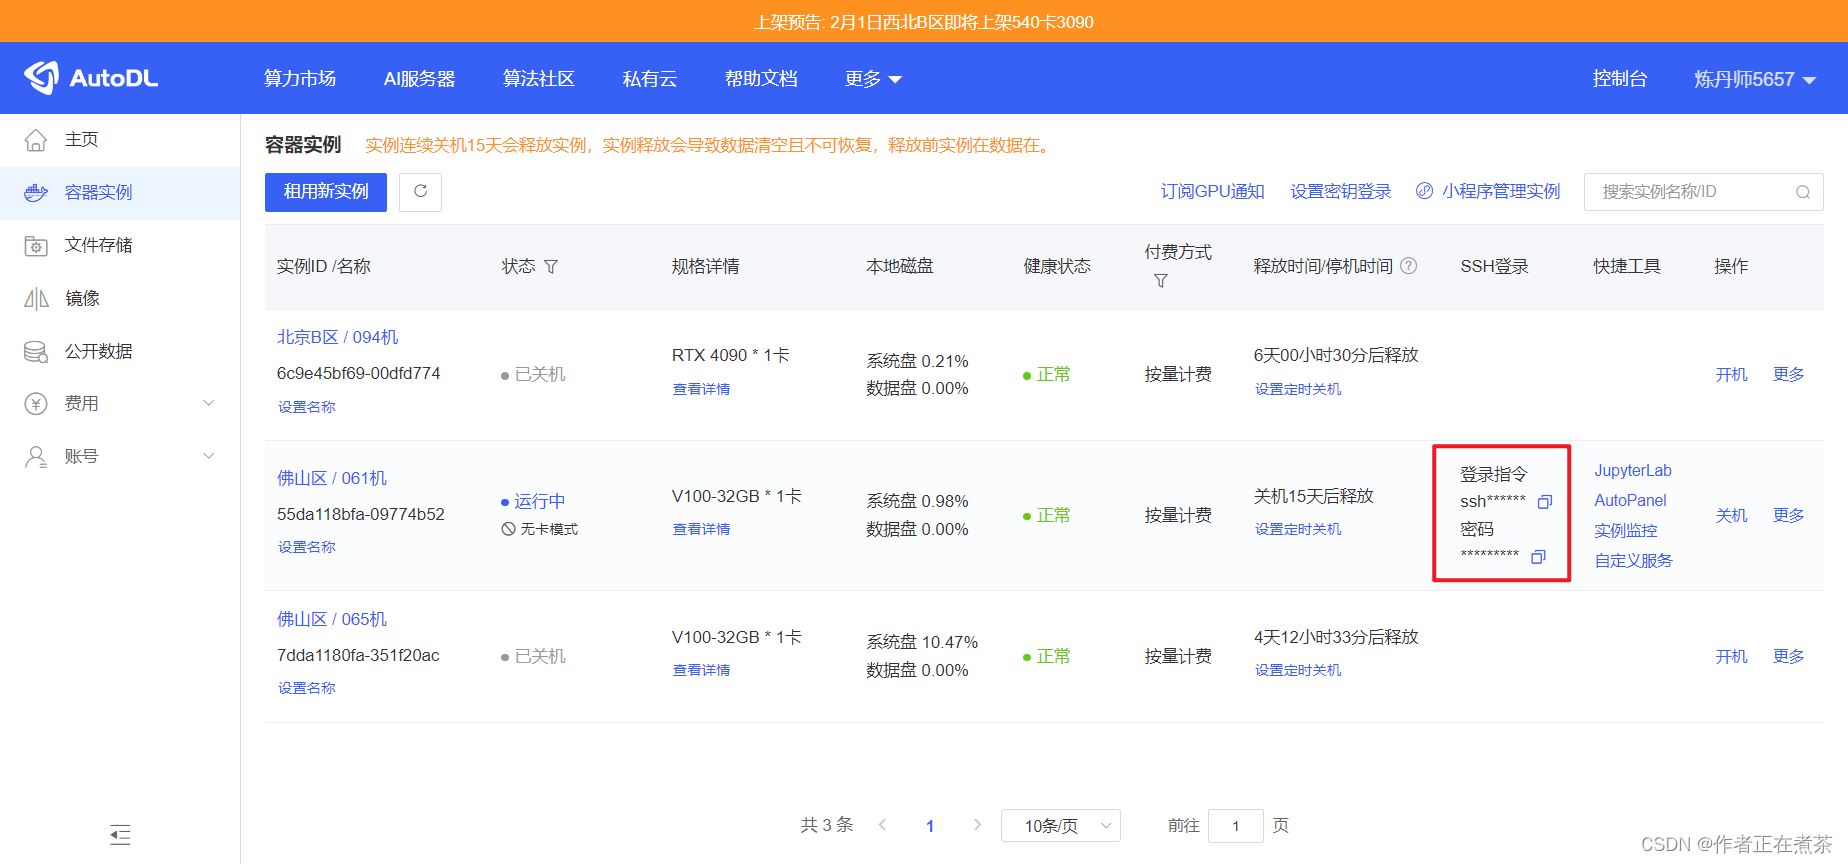
1、获取 SSH 登录指令与密码
在 AutoDL 官网的控制台中查看我们已经租用的容器实例,如图所示,我们可以得到用于 SSH 登录的指令与密码。
二、使用 Tabby 传输项目数据集
1、Tabby 的下载与使用
Tabby 的下载地址:Release Alpha 205 · Eugeny/tabby · GitHub
https://github.com/Eugeny/tabby/releases/tag/v1.0.205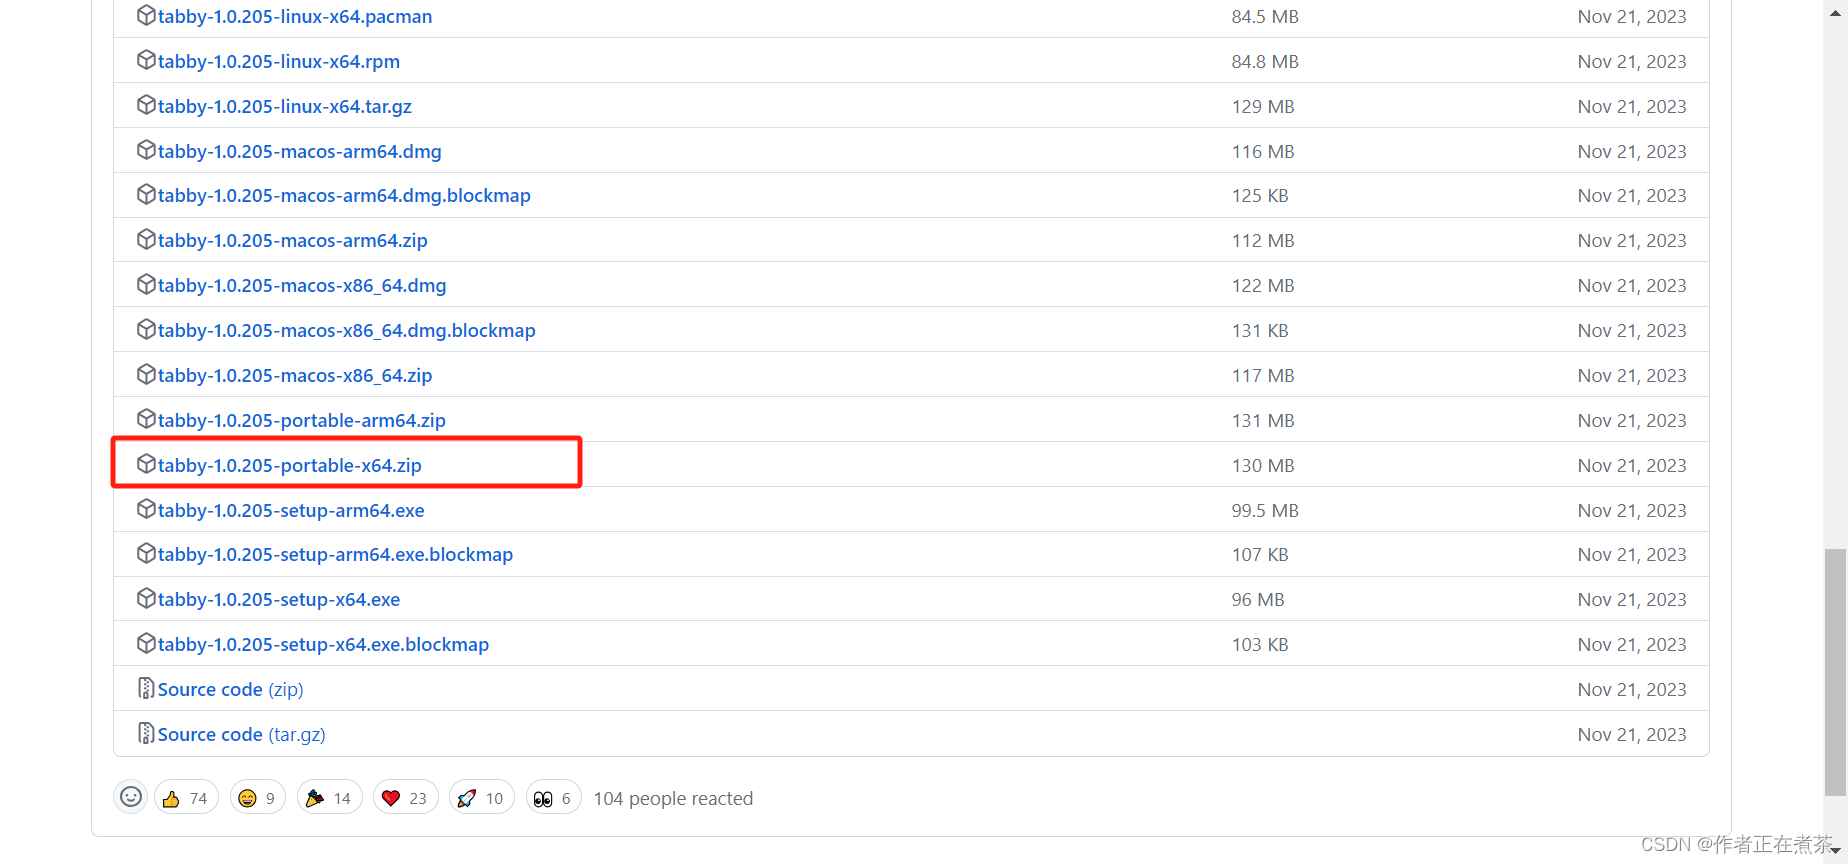
Tabby 的使用指导:Download Tabby for Win10
https://blog.csdn.net/qq_22938603/article/details/1242756952、Tabby 传输项目数据集
使用 Tabby 将项目需要的数据集上传到远程服务器,配置 SSH Connection 后用 SFTP 传输文件。
【注意】在下面这张图中,我们上传压缩包的路径有所不妥,应该将其上传至 pycharm_project 文件夹中。

【说明】这里的 VOC2007.zip.tabby-upload 表示 Tabby 正在上传 VOC2007.zip 压缩包。
3、解压 VOC2007.zip 压缩包
Step1 在 Tabby 中,右键点击压缩包,选择 Copy full path 得到数据集压缩包的绝对路径 /usr/local/pycharm_project/VOC2007.zip
Step2 在 SSH 命令窗口先执行 cd /usr/local/pycharm_project 进入对应目录,再执行 unzip VOC2007.zip 解压缩

三、配置 PyCharm 项目运行环境
1、配置 Python 解释器
在 PyCharm 专业版的设置中,选择 Project 中的 Python Interpreter 进行配置,具体操作如图所示。
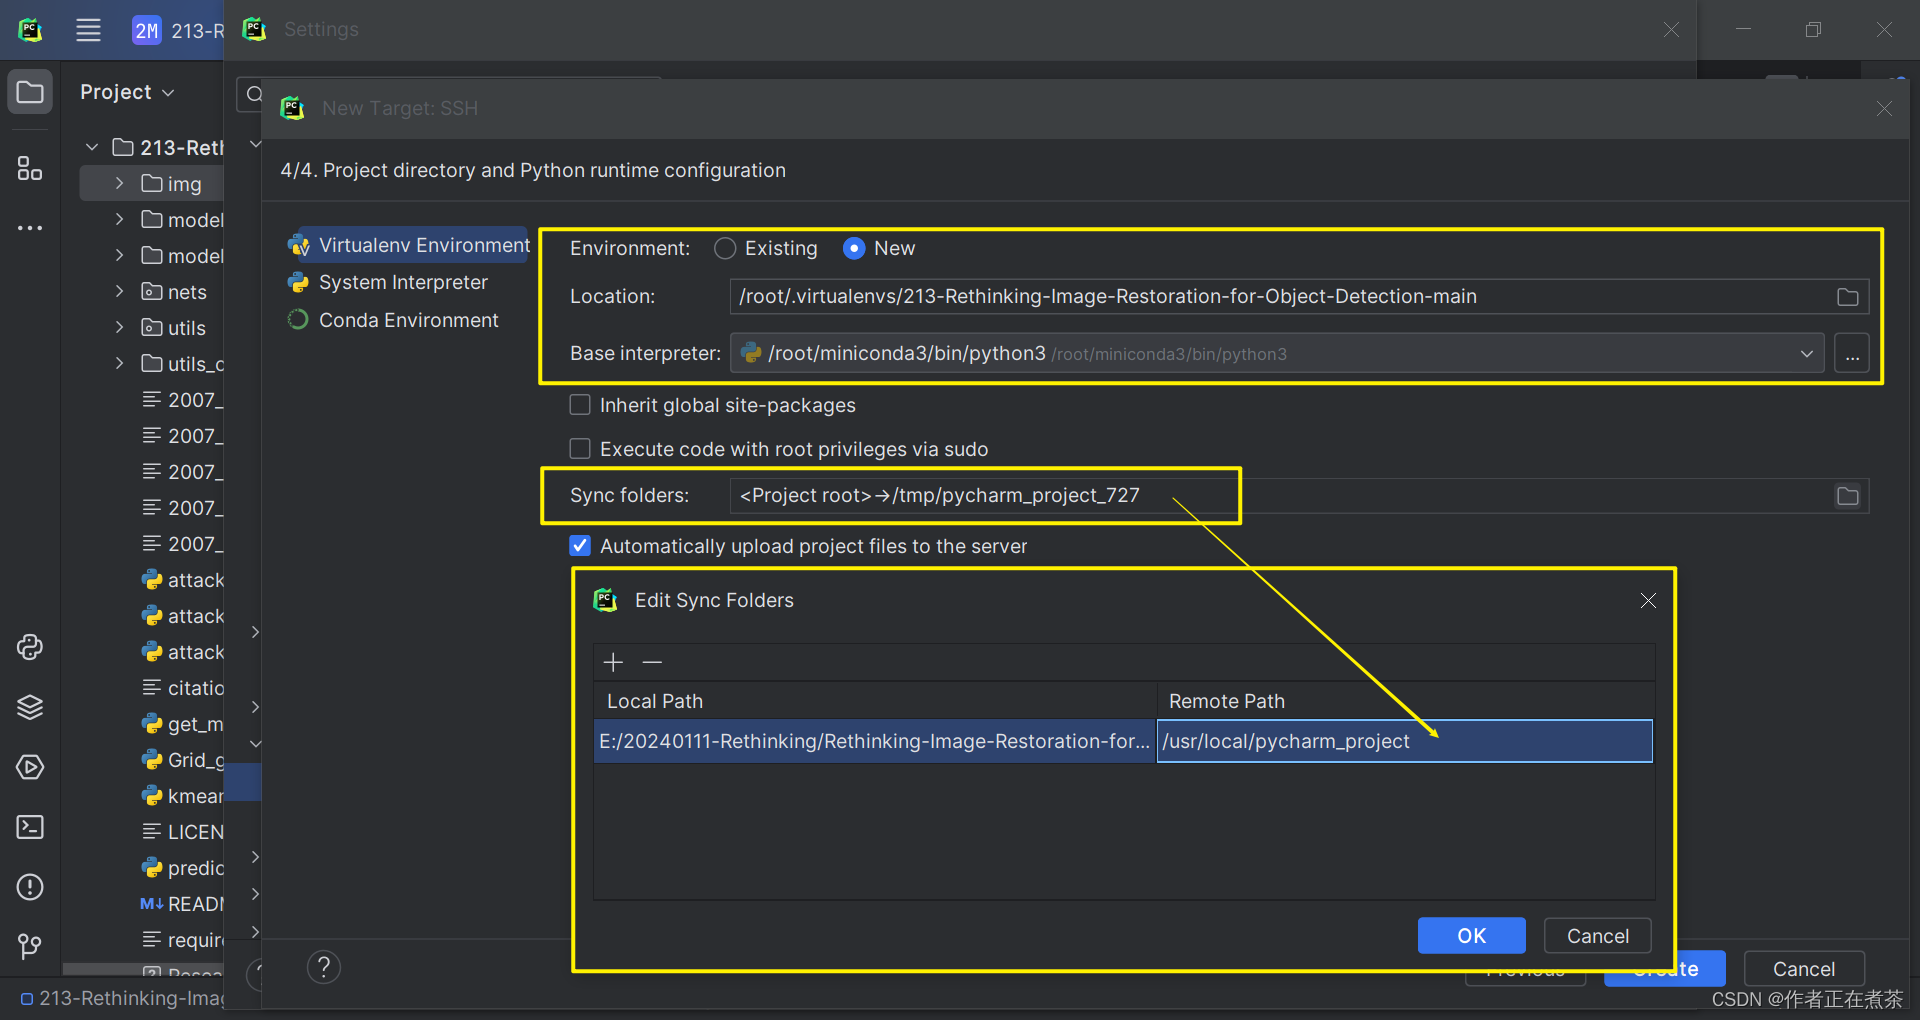
【说明1】若使用默认的 base 虚拟环境,则 Base interpreter 选择 /root/miniconda3/bin/python3 即可。
【说明2】这里的 Sync Folders 大家可以自行选择项目在远程服务器中所处的路径。
2、创建 Python 虚拟环境
在 PyCharm 中为项目创建虚拟环境,在 Tools - Start SSH Session 中选择指定的远程服务器命令窗口。
(1)更新 bashrc 中的环境变量
首先,进入远程服务器终端命令窗口后,我们应该更新 bashrc 中的环境变量:
conda init bash && source /root/.bashrc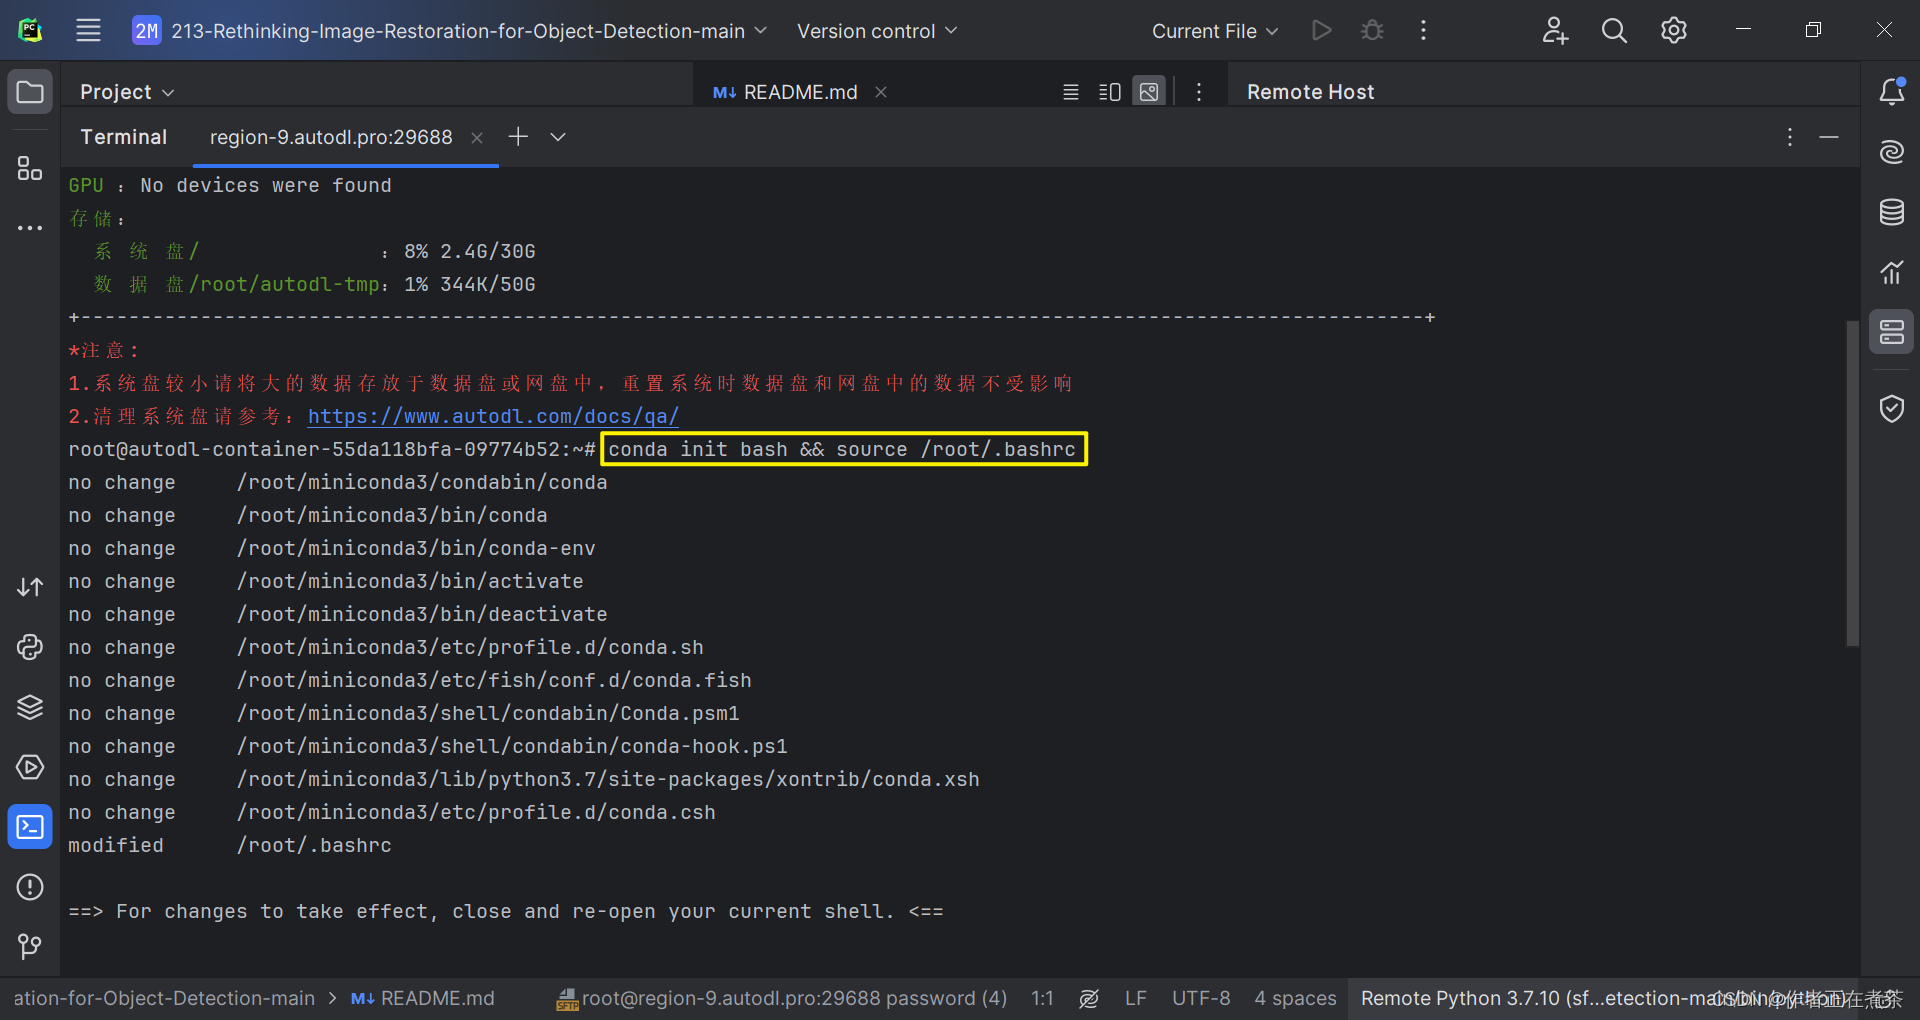
(2)创建项目的虚拟环境
接着,我们会默认进入 base 环境,我们可以为项目创建新的虚拟环境:
conda create -n detection(虚拟环境名) python=3.7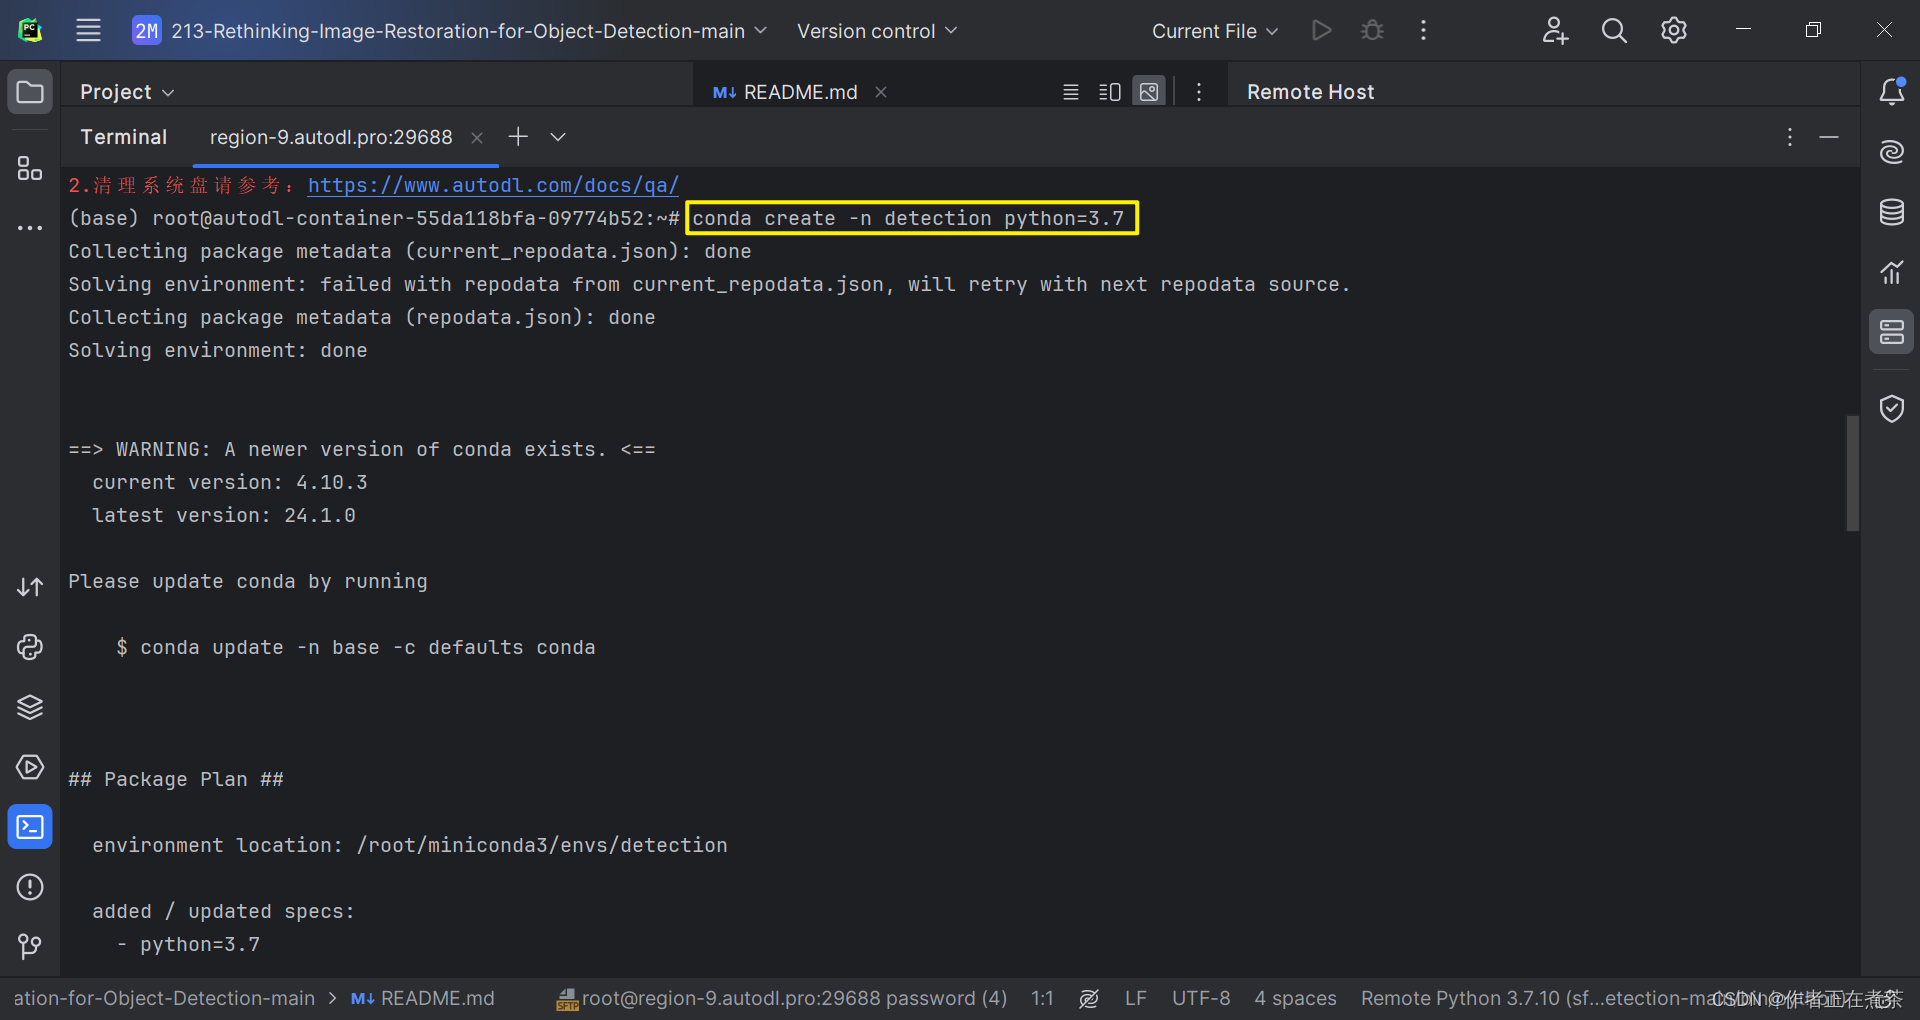
(3)更新 bashrc 中的环境变量
然后,我们需要再次更新 bashrc 中的环境变量:
conda init bash && source /root/.bashrc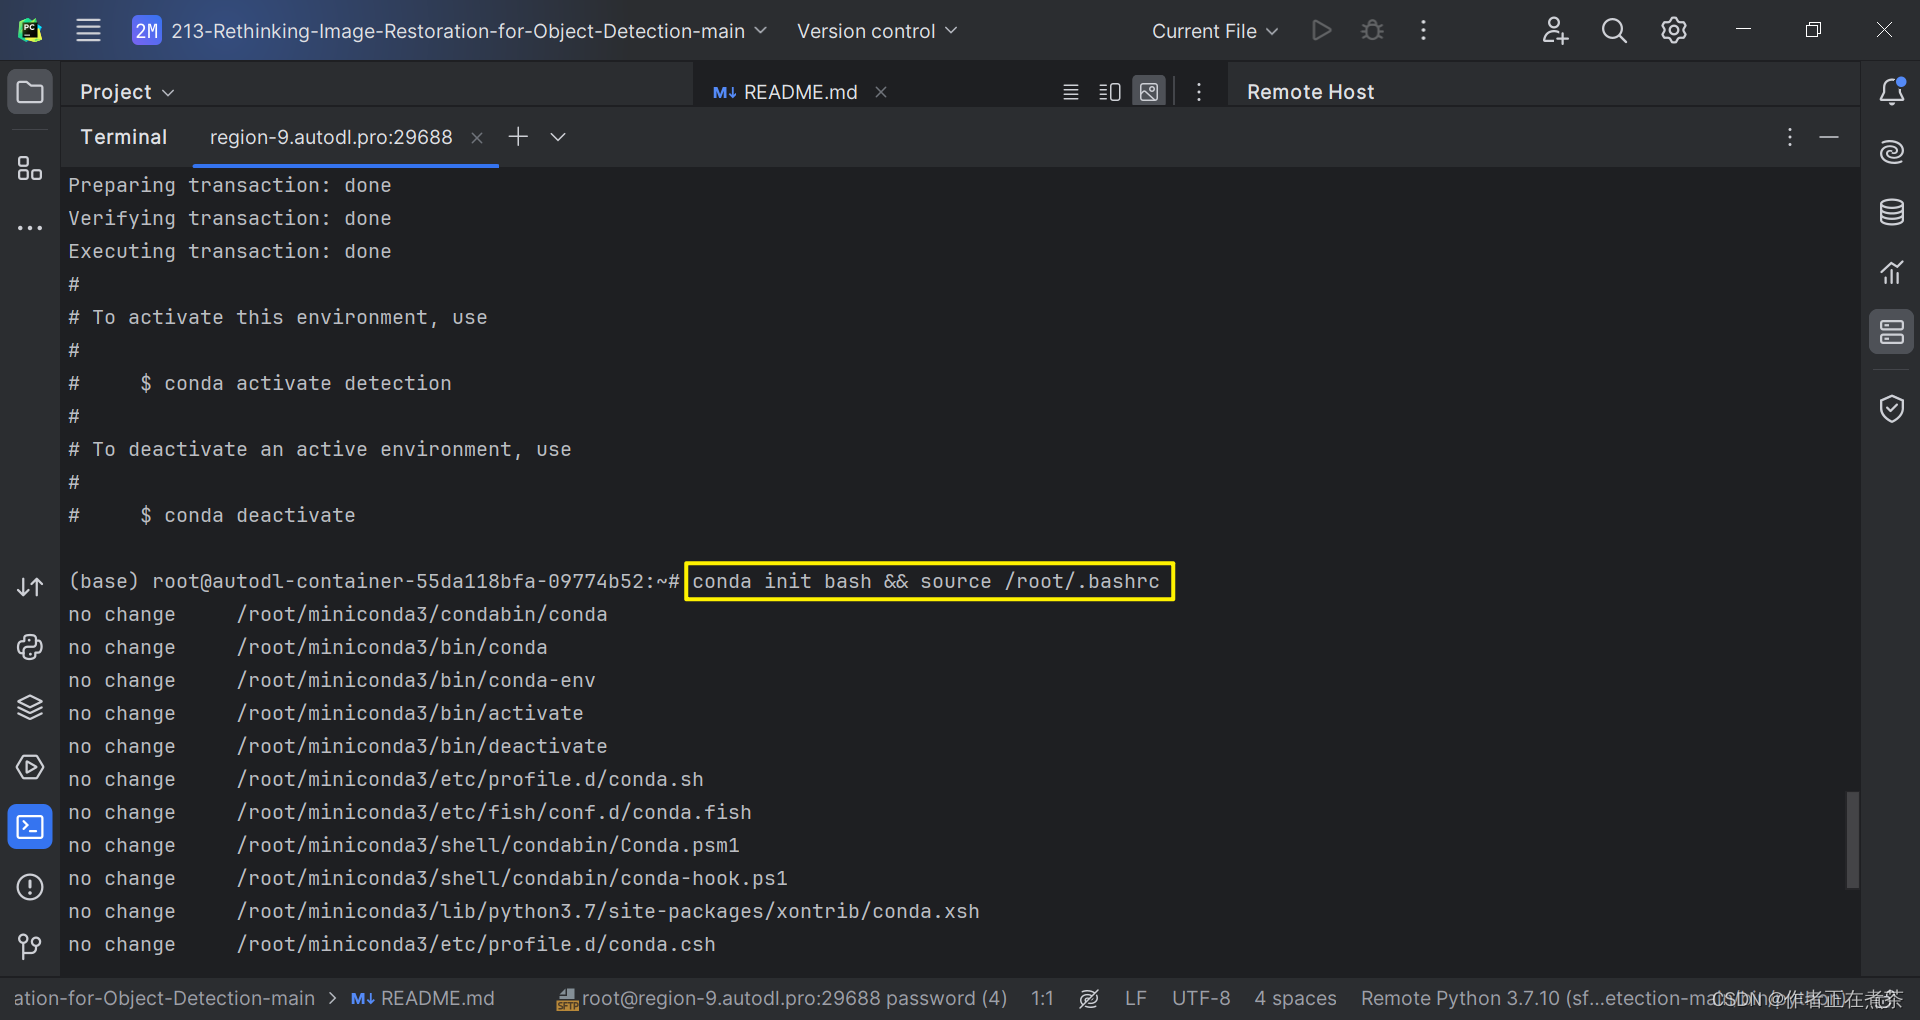
(4)激活项目的虚拟环境
最后,我们可以激活刚刚新建的虚拟环境:
conda activate detection(虚拟环境名)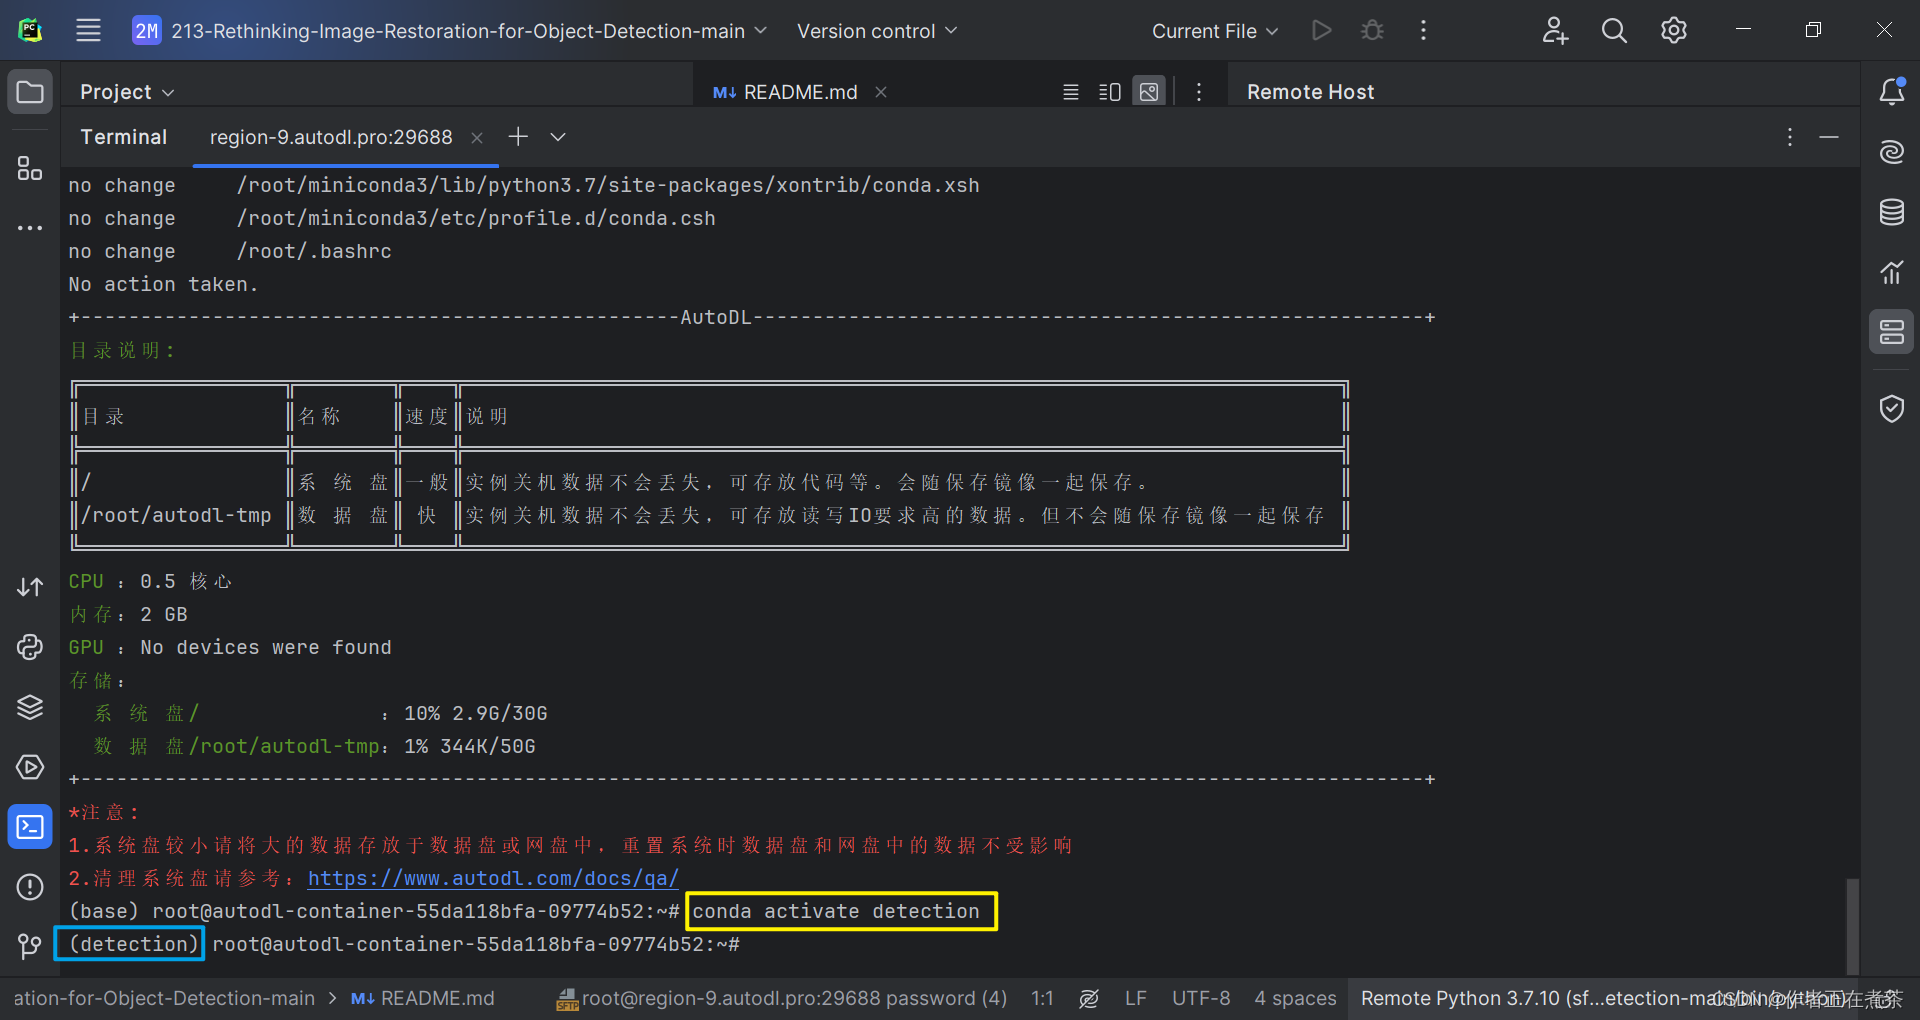
3、安装 pytorch 与 torchvision
(1)使用官网提供的命令安装
由于我们想要运行的项目源代码要求 torch=1.2.0 ,因此我们使用 PyToch 官方提供的命令进行安装。
pip install torch===1.2.0 torchvision===0.4.0 -f https://download.pytorch.org/whl/torch_stable.html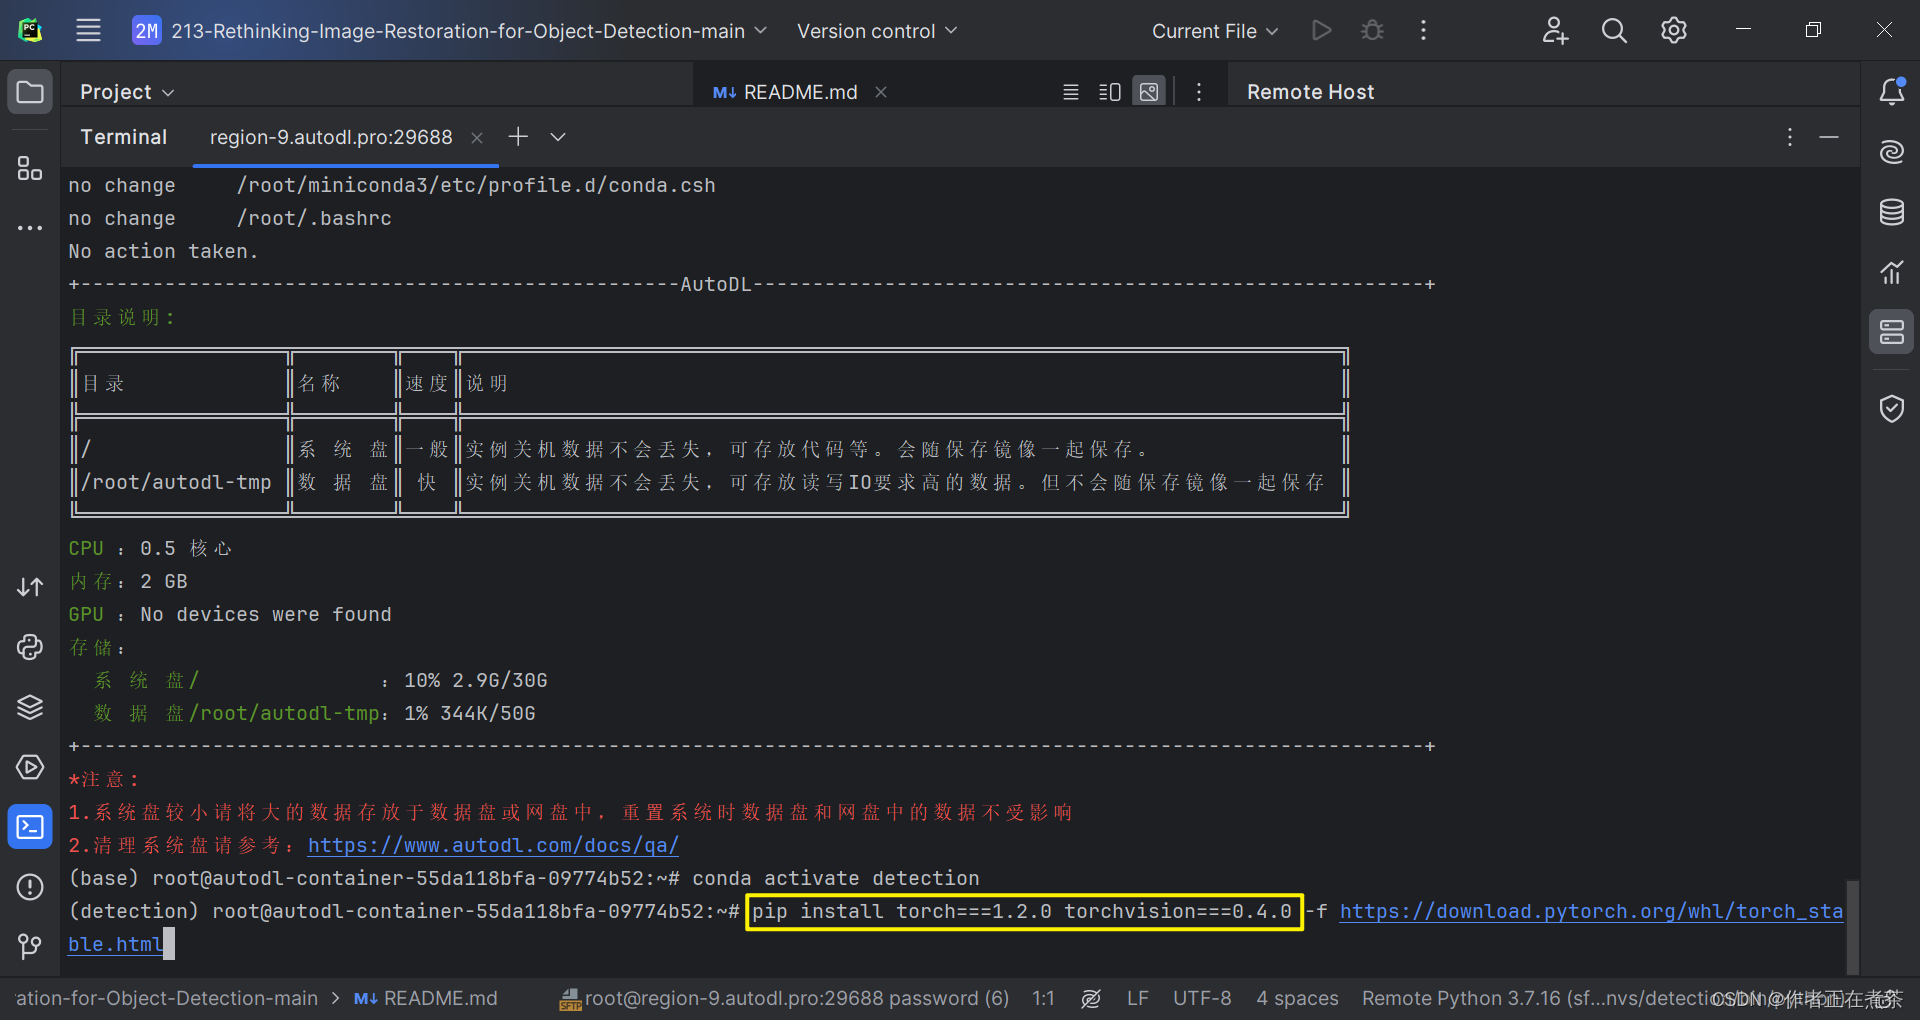
(2)安装过程出现 killed 问题
在这次安装 torch 与 torchvision 的过程中,我首次遇到进度条 killed 问题,具体细节如下图所示。
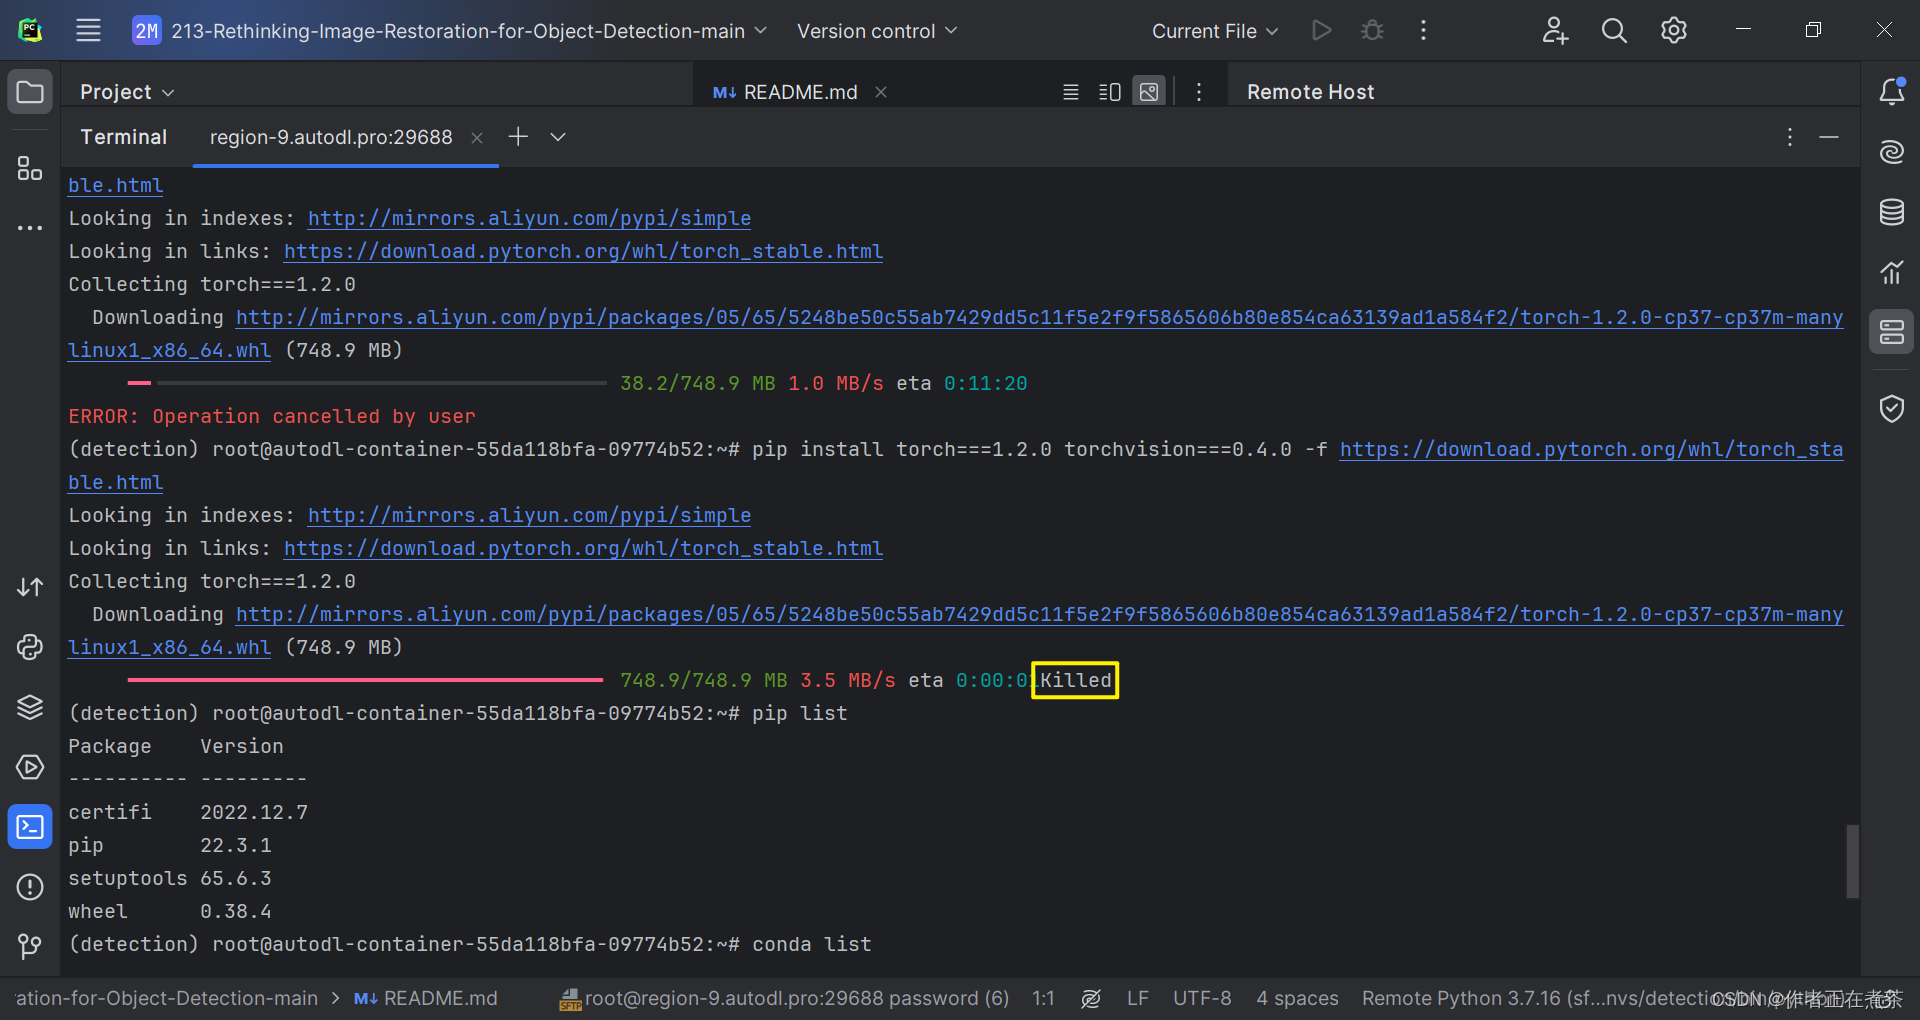
查阅了相关的博客后,我发现可以通过在原命令后面加上 --no-cache-dir 来解决该问题。
pip install torch===1.2.0 torchvision===0.4.0 -f https://download.pytorch.org/whl/torch_stable.html --no-cache-dir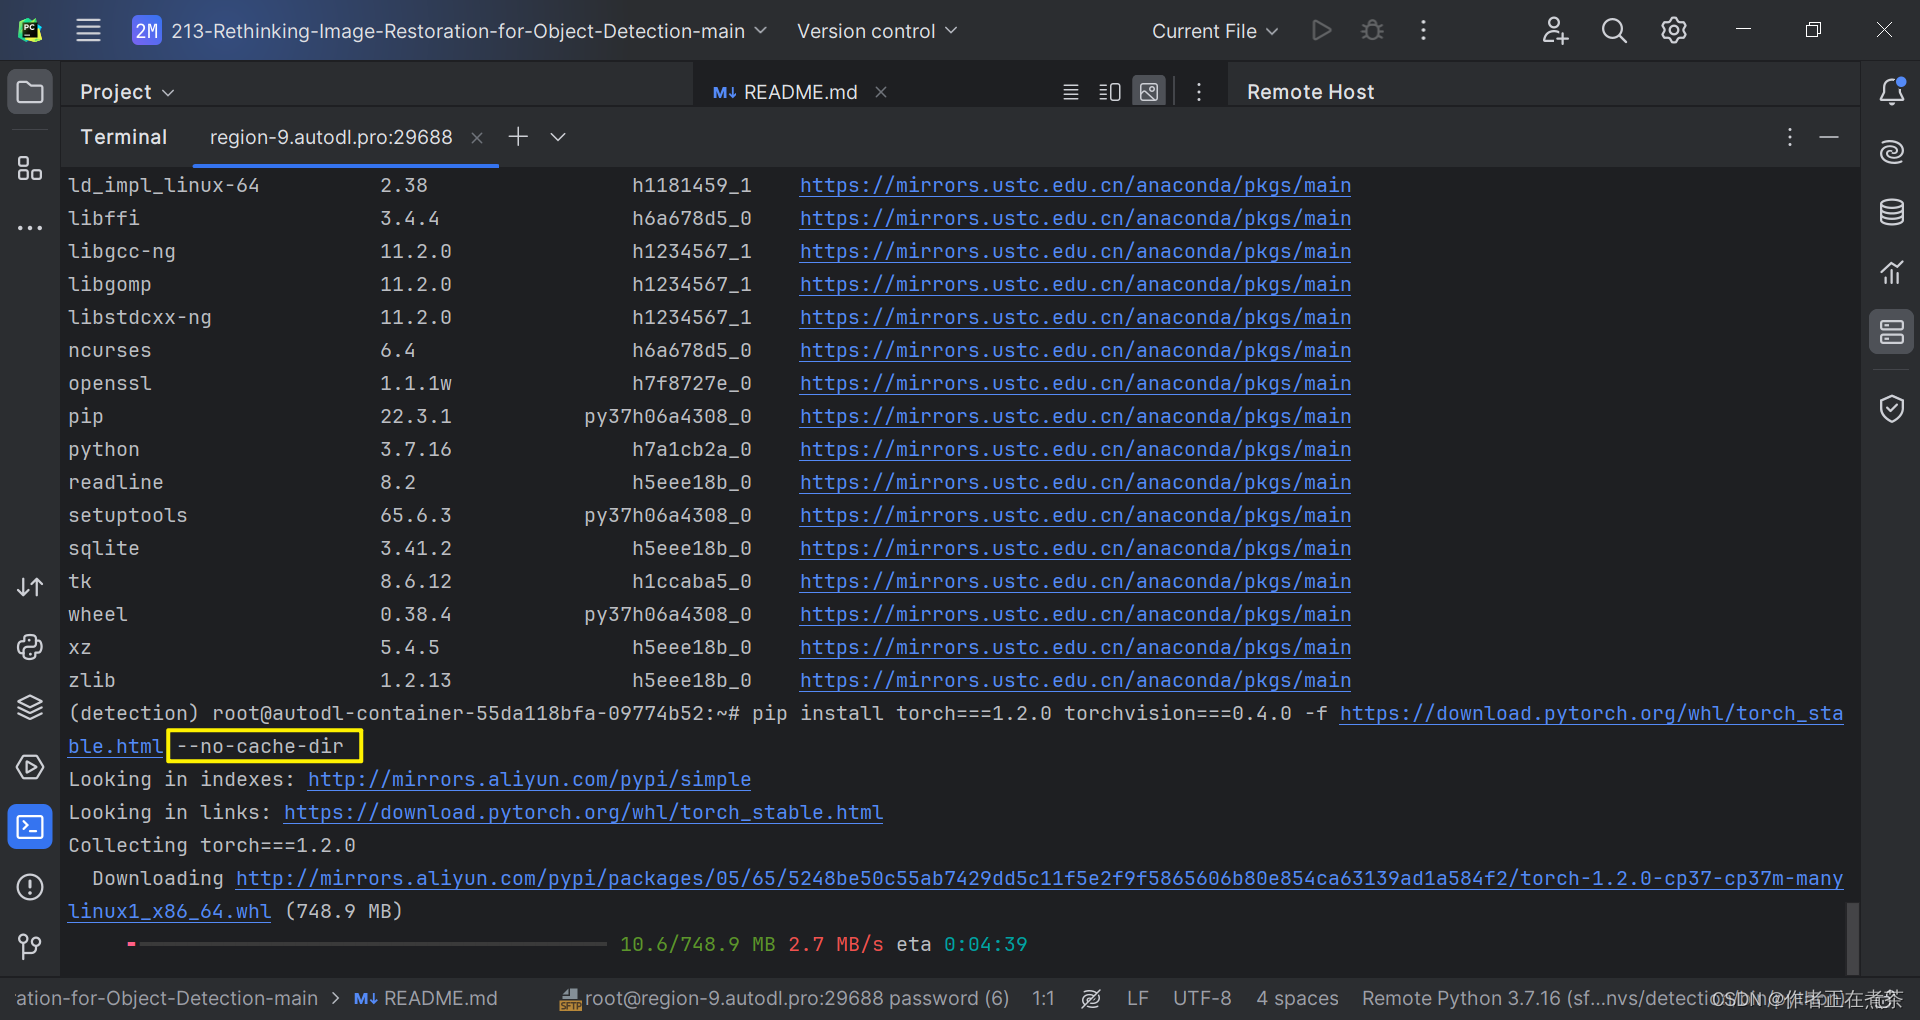
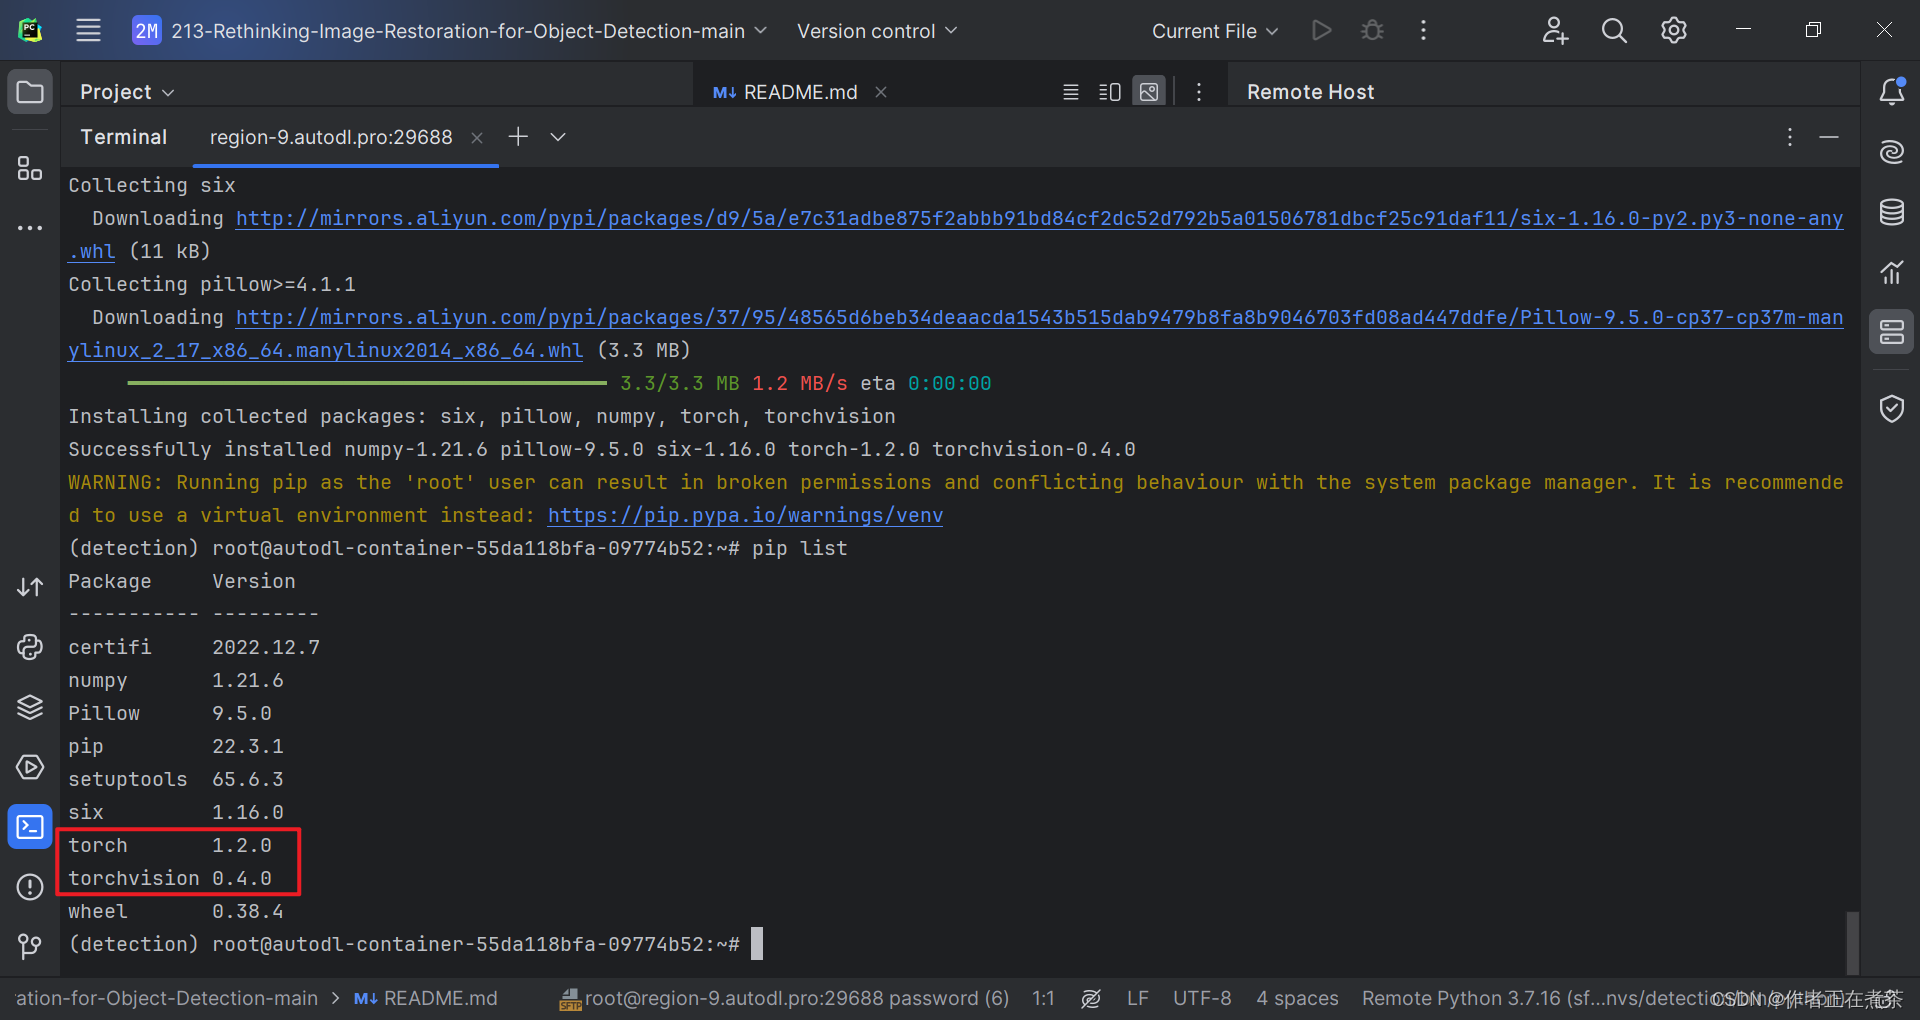
(3)检查是否安装对应版本
由于我们是用 pip 命令安装 torch 与 torchvision 的,所以我们可以用 pip list 命令查看 python 安装的库。
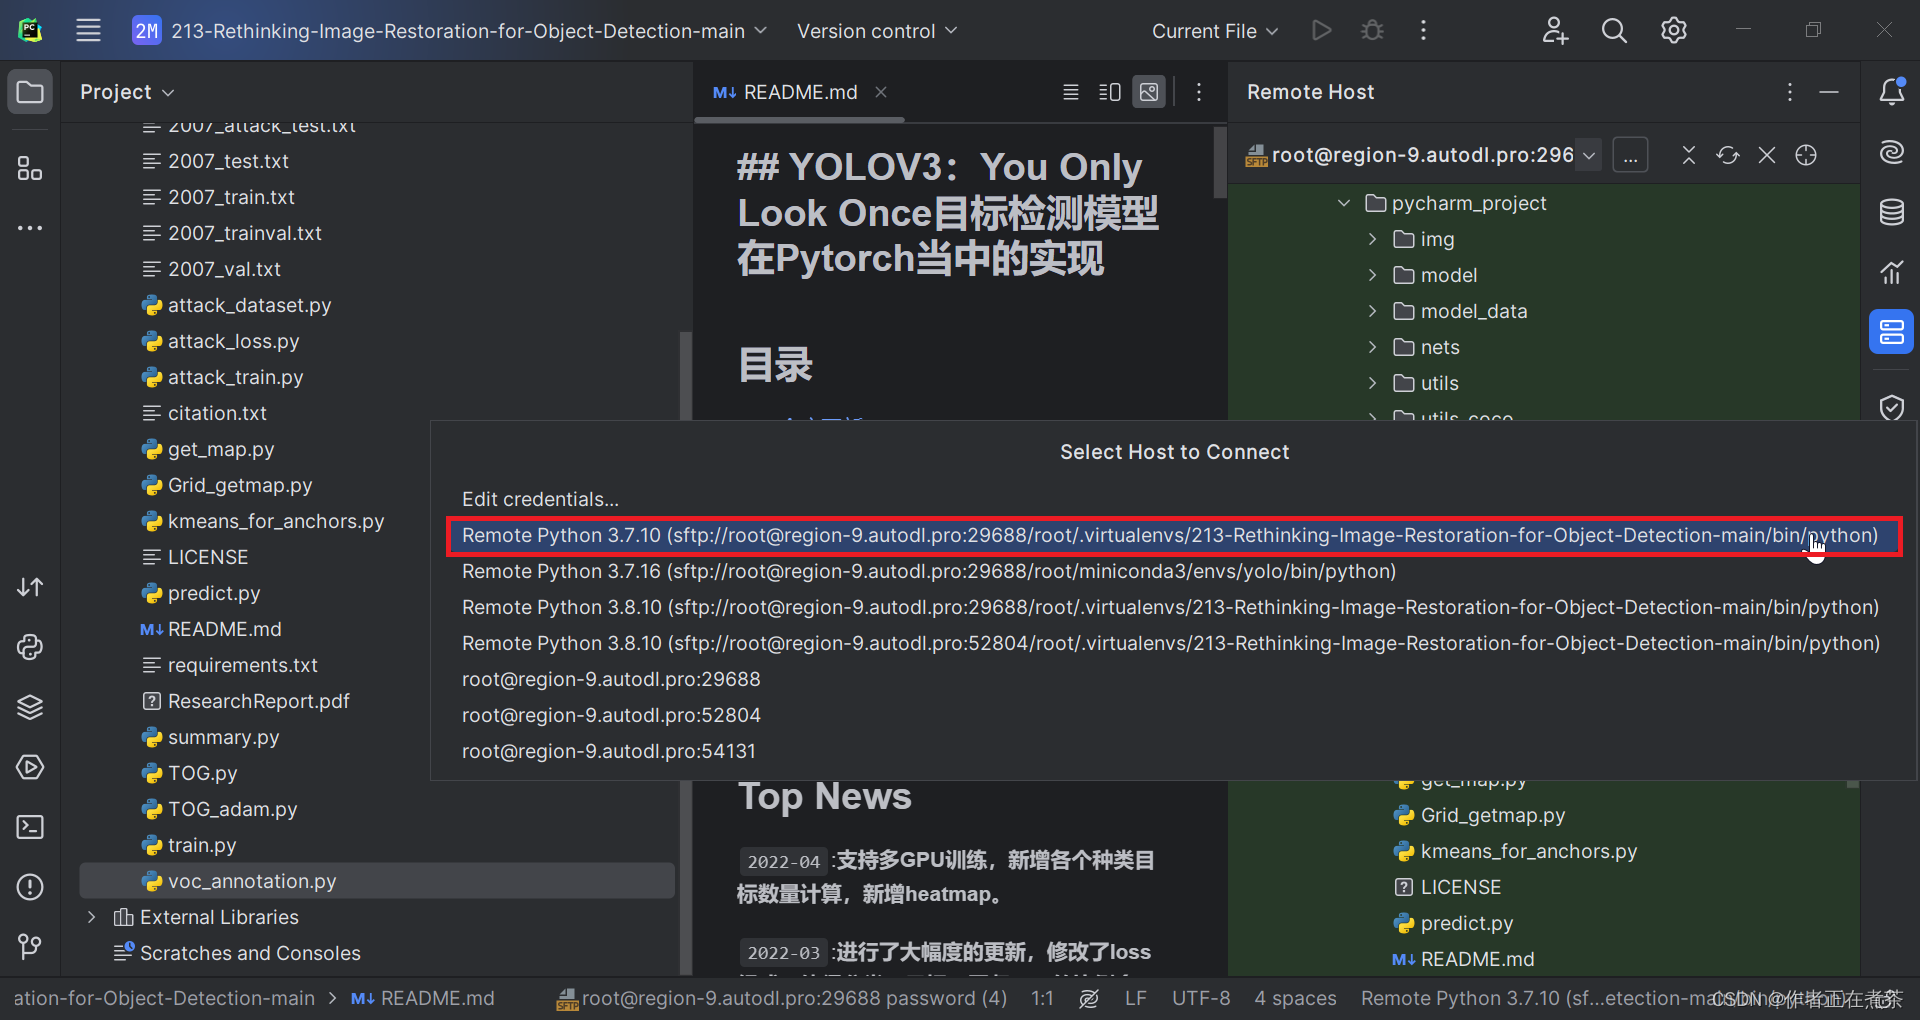
4、更改 Python 解释器
在根据 requirements.txt 安装依赖之前,要确保我们使用的 Python Interpreter 对应了我们新建的虚拟环境,具体操作如下图所示。
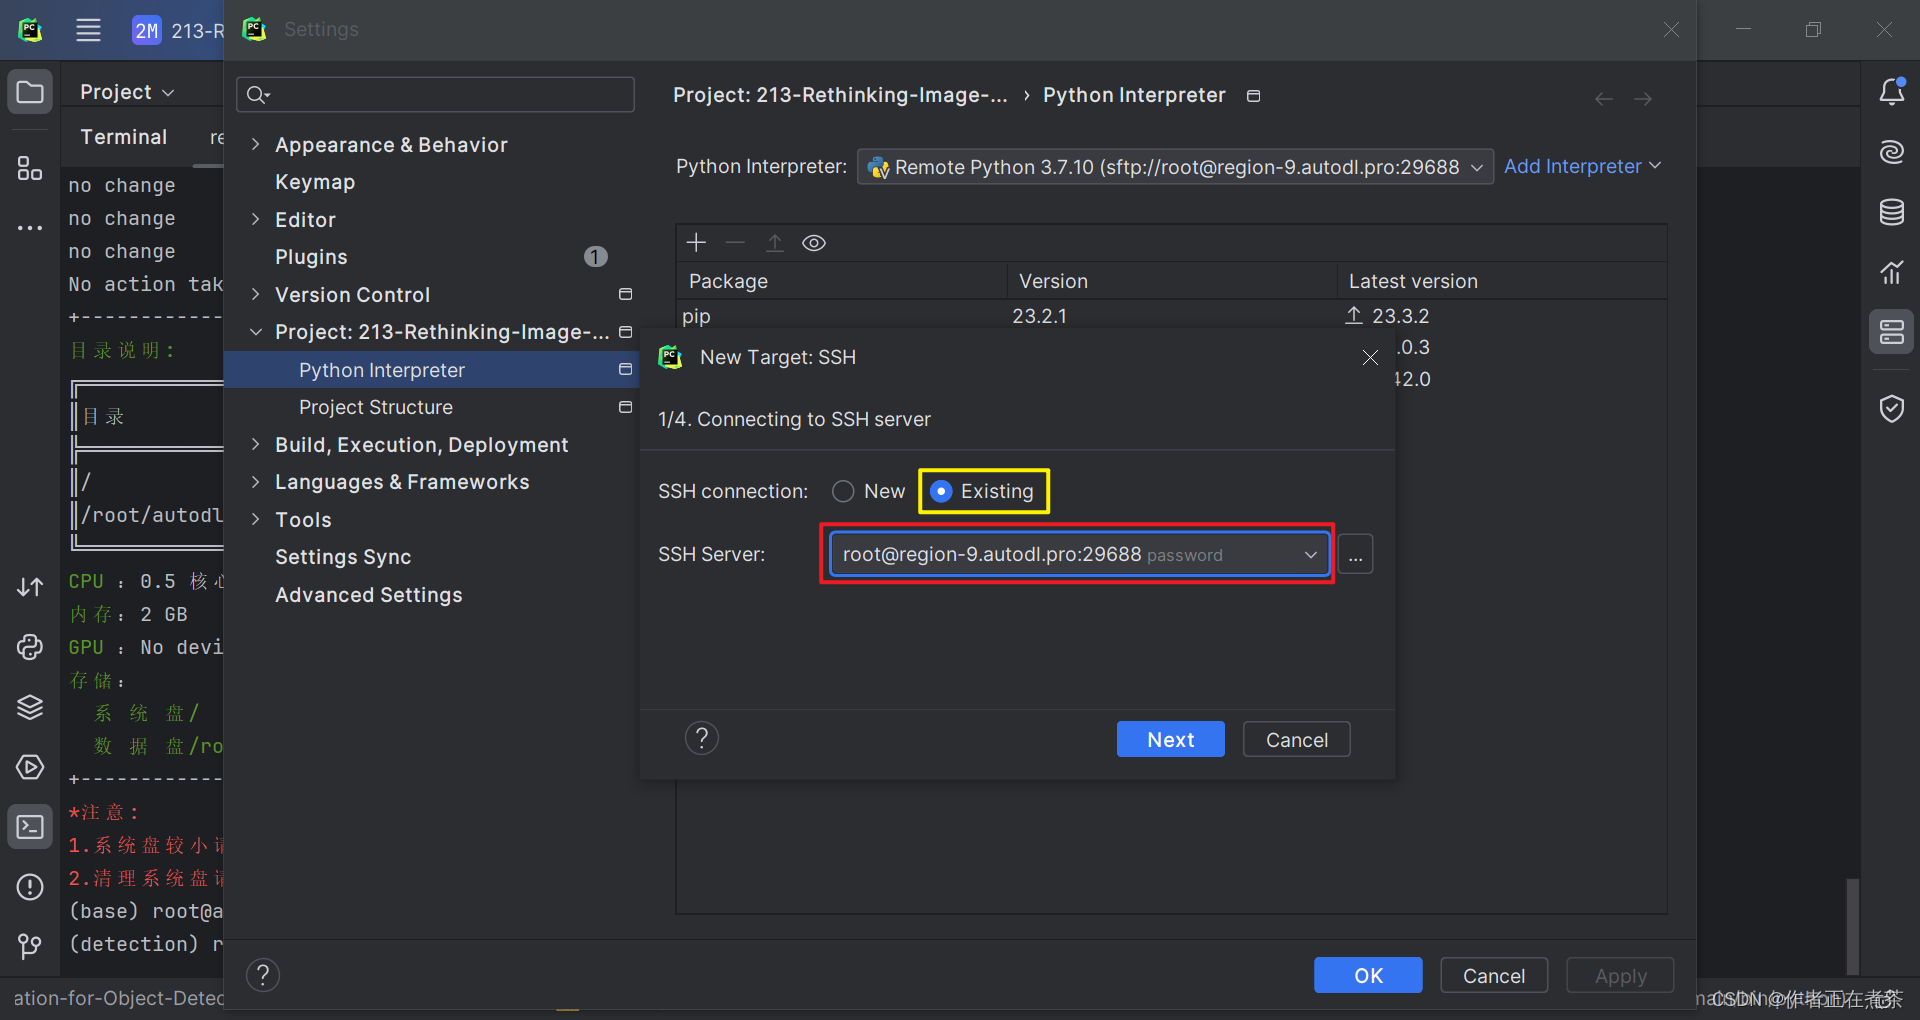
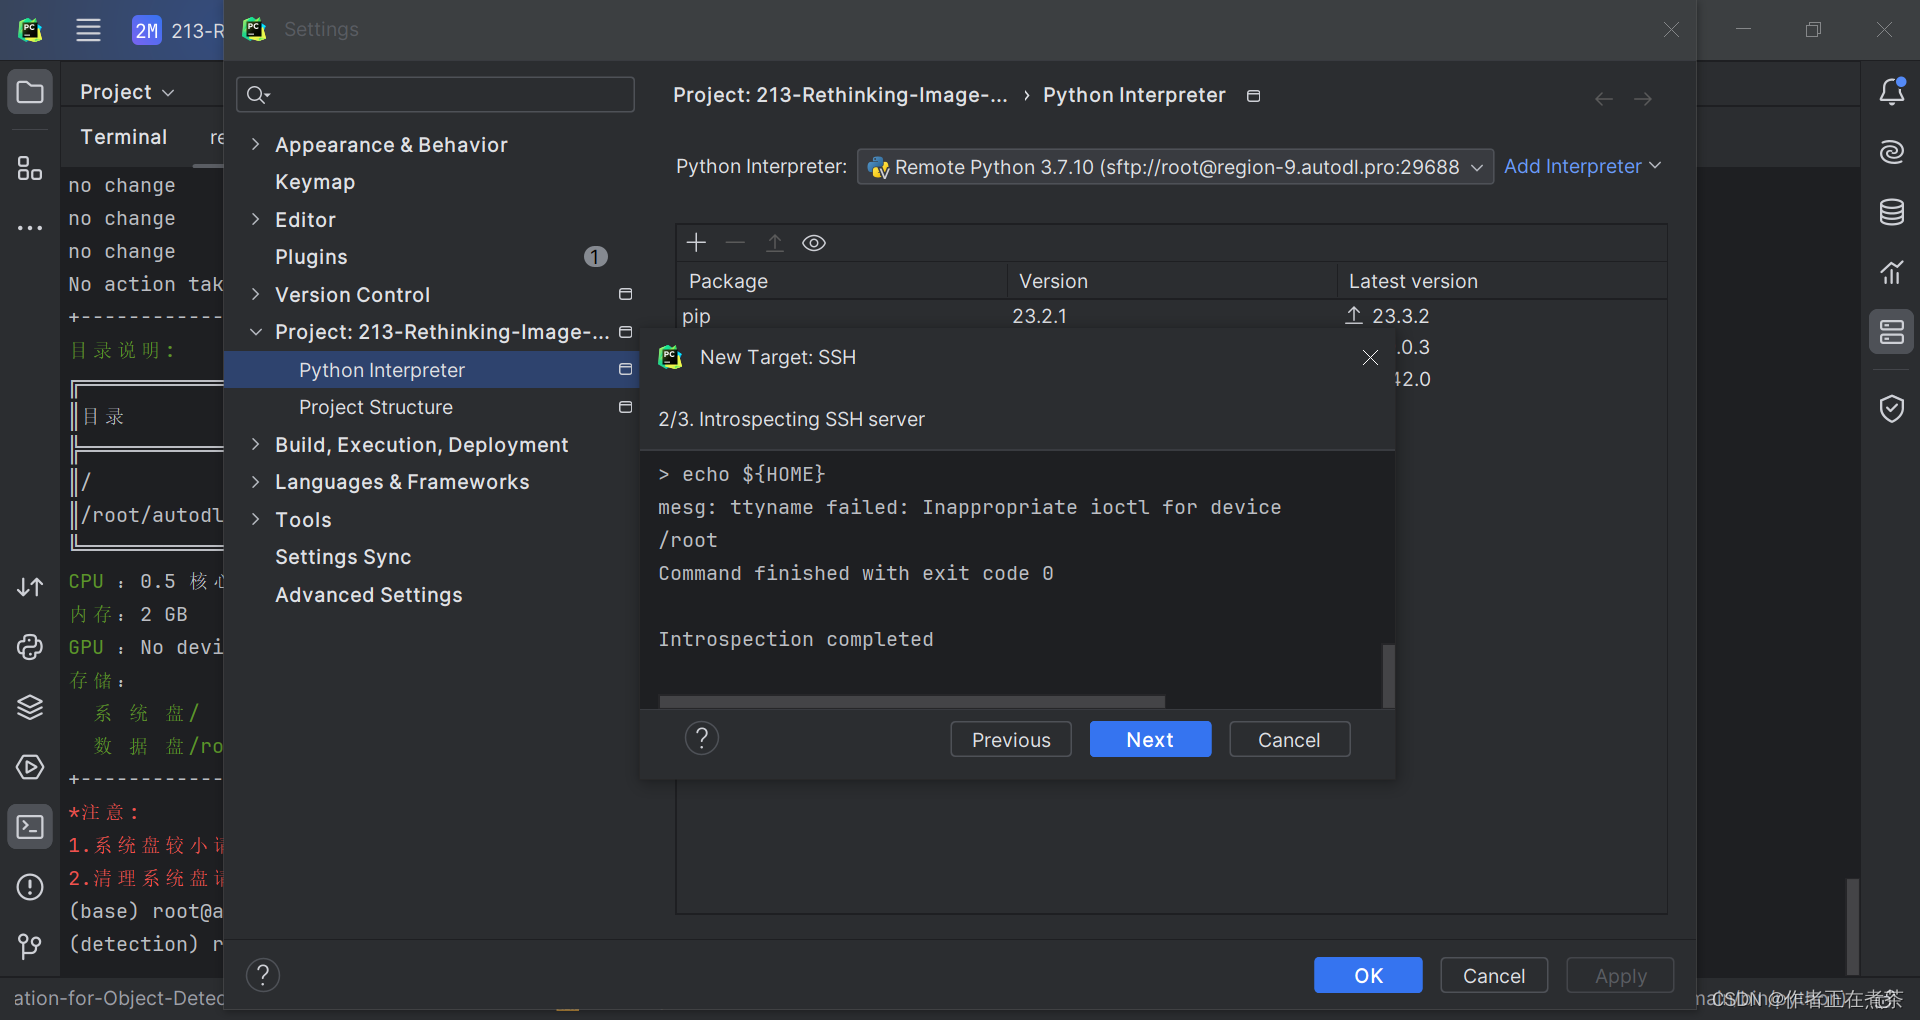
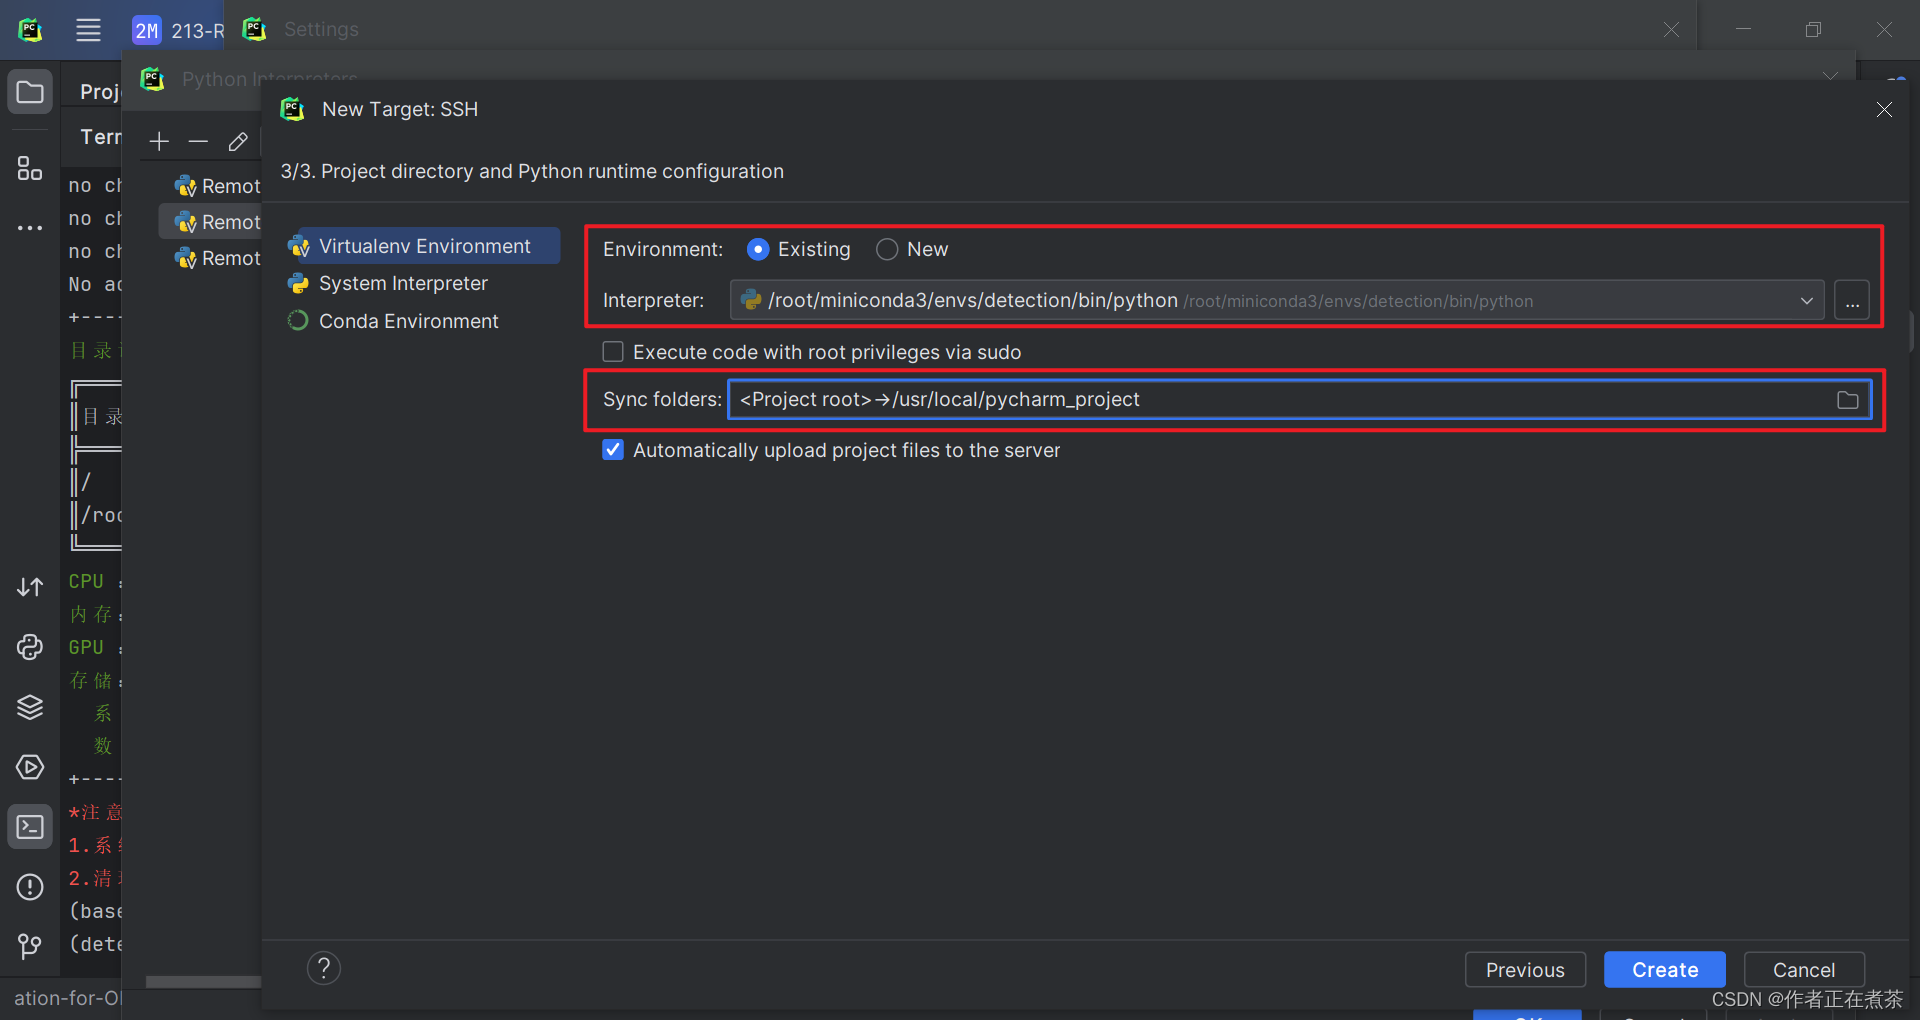
【说明】 Environment 勾选 Existing 表示环境已存在,Interpreter 选择对应的虚拟环境,Sync folders 选择项目在远程服务器上所处的路径。
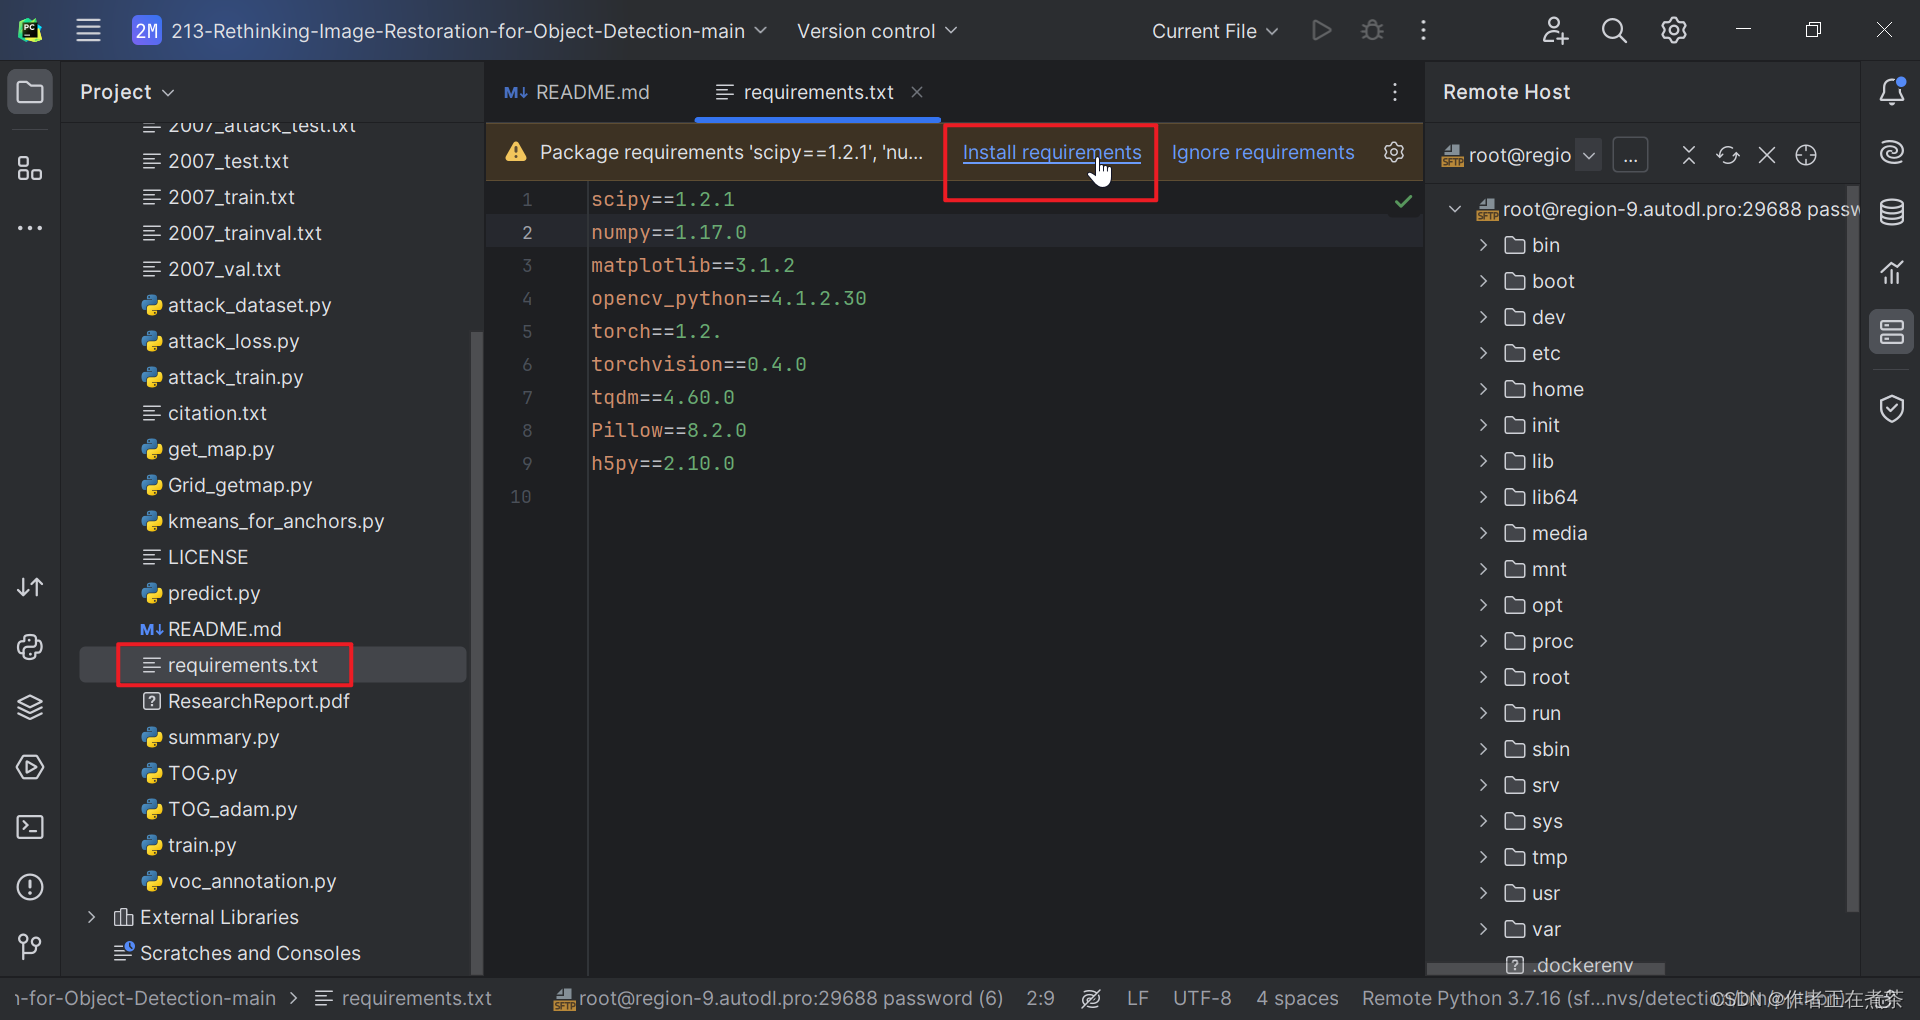
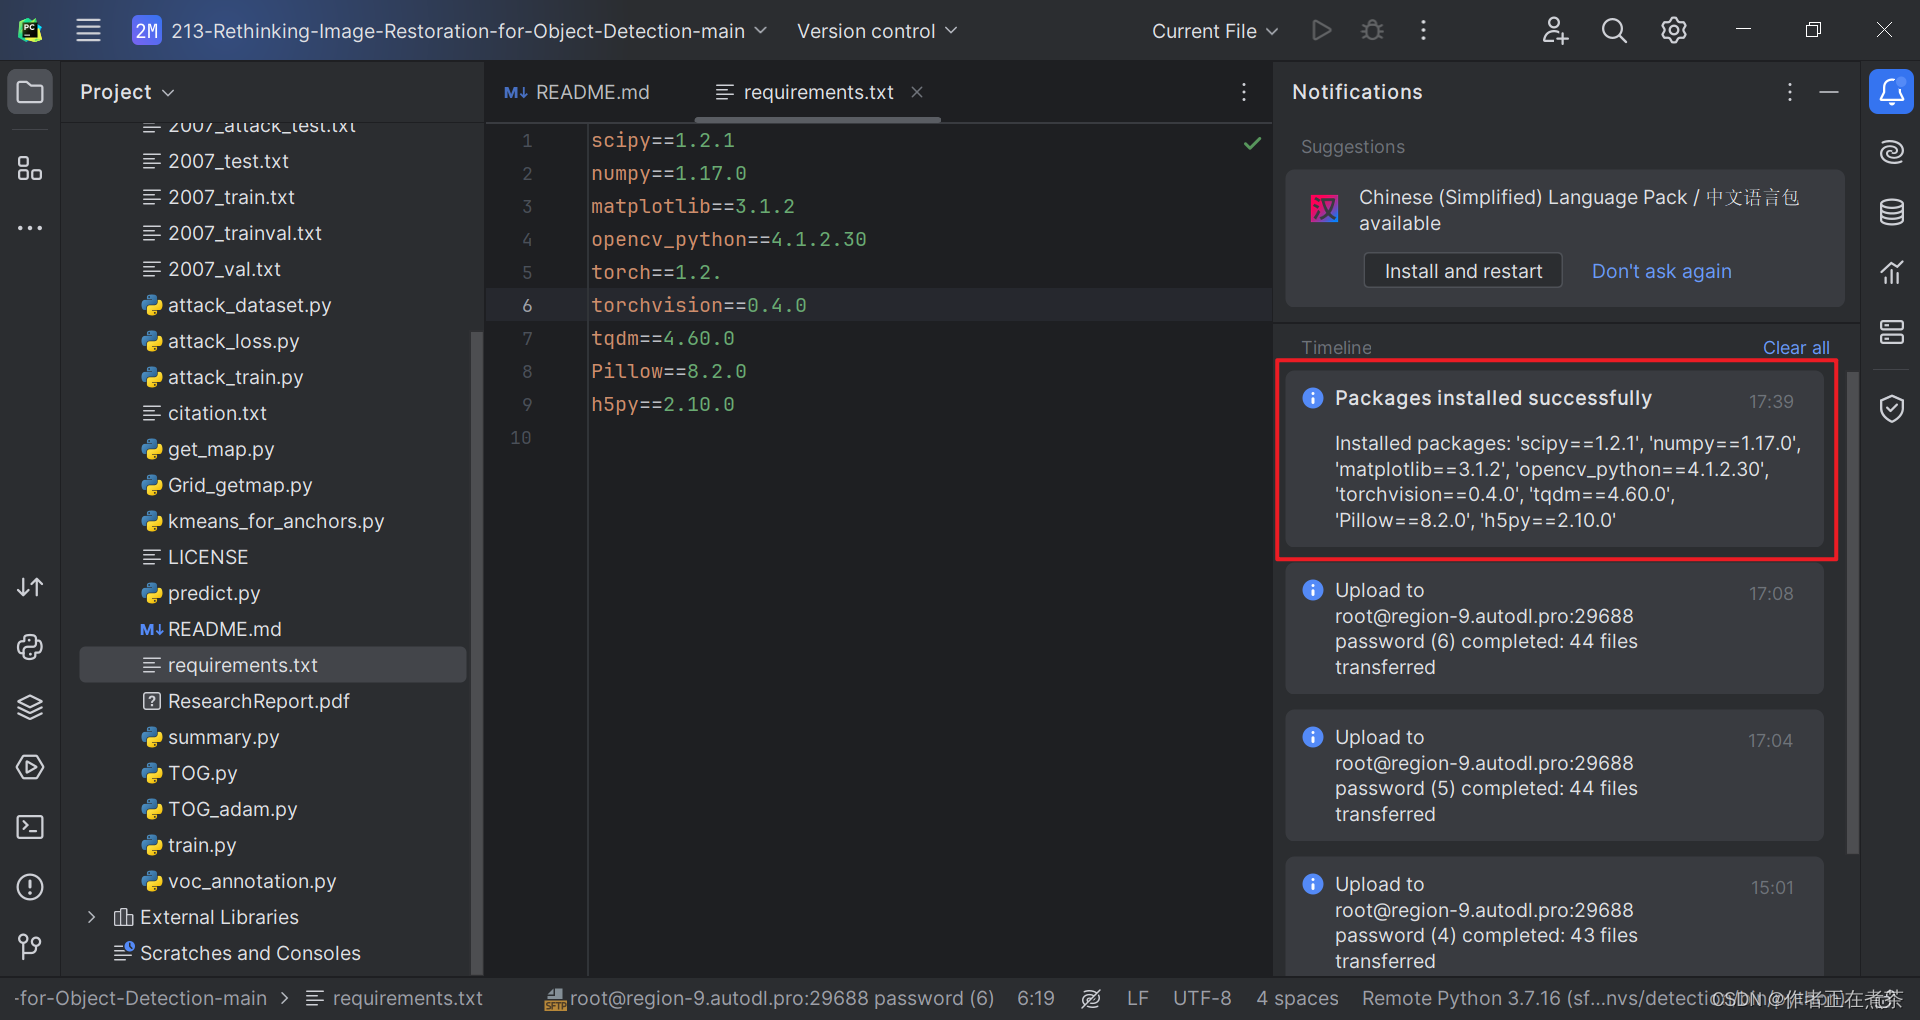
5、根据 requirements.txt 安装依赖
确保使用的 Python 解释器对应了正确的虚拟环境后,我们再根据提示点击 Install requirements 安装缺少的依赖。
四、运行 yolov3 时的问题与解决
1、ModuleNotFoundError: No module named 'tensorboard'
【错误】ModuleNotFoundError: No module named 'tensorboard'
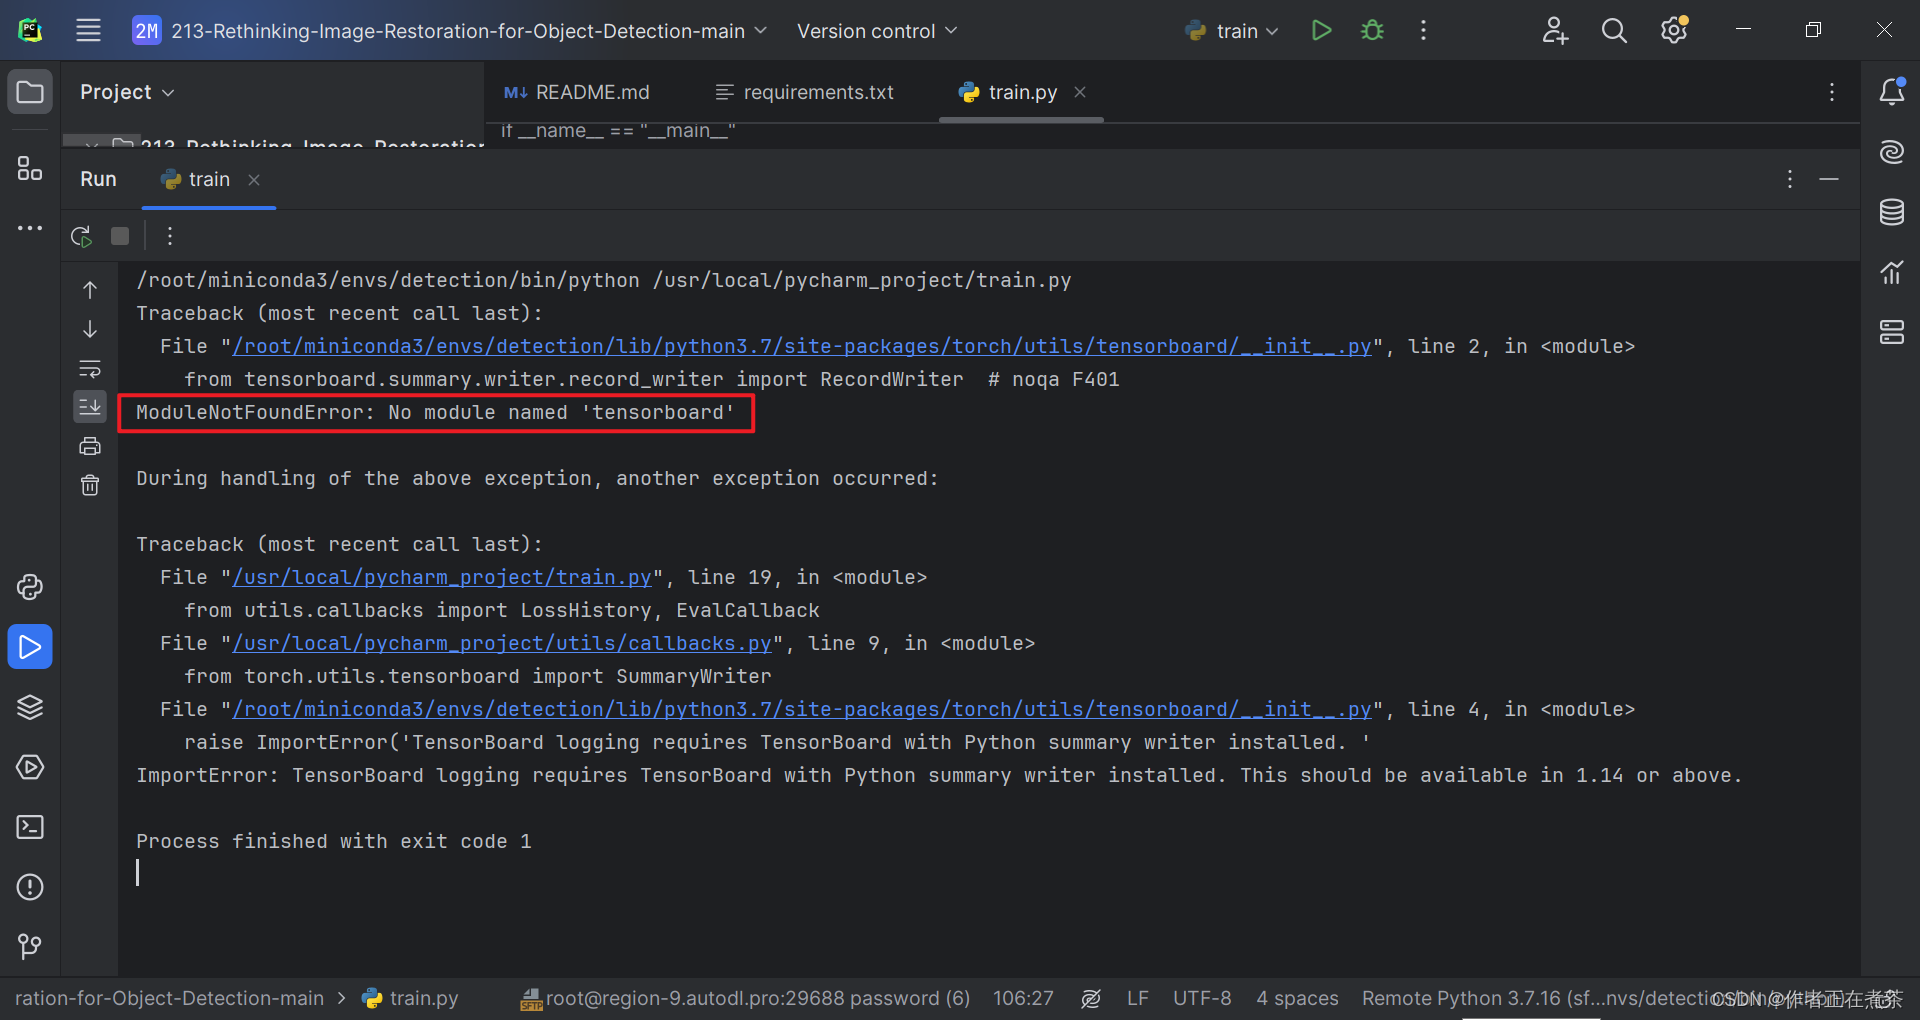
【解决方法】在 Terminal 终端执行 pip install tensorboard 命令,注意要在对应的虚拟环境中安装噢~
pip install tensorboard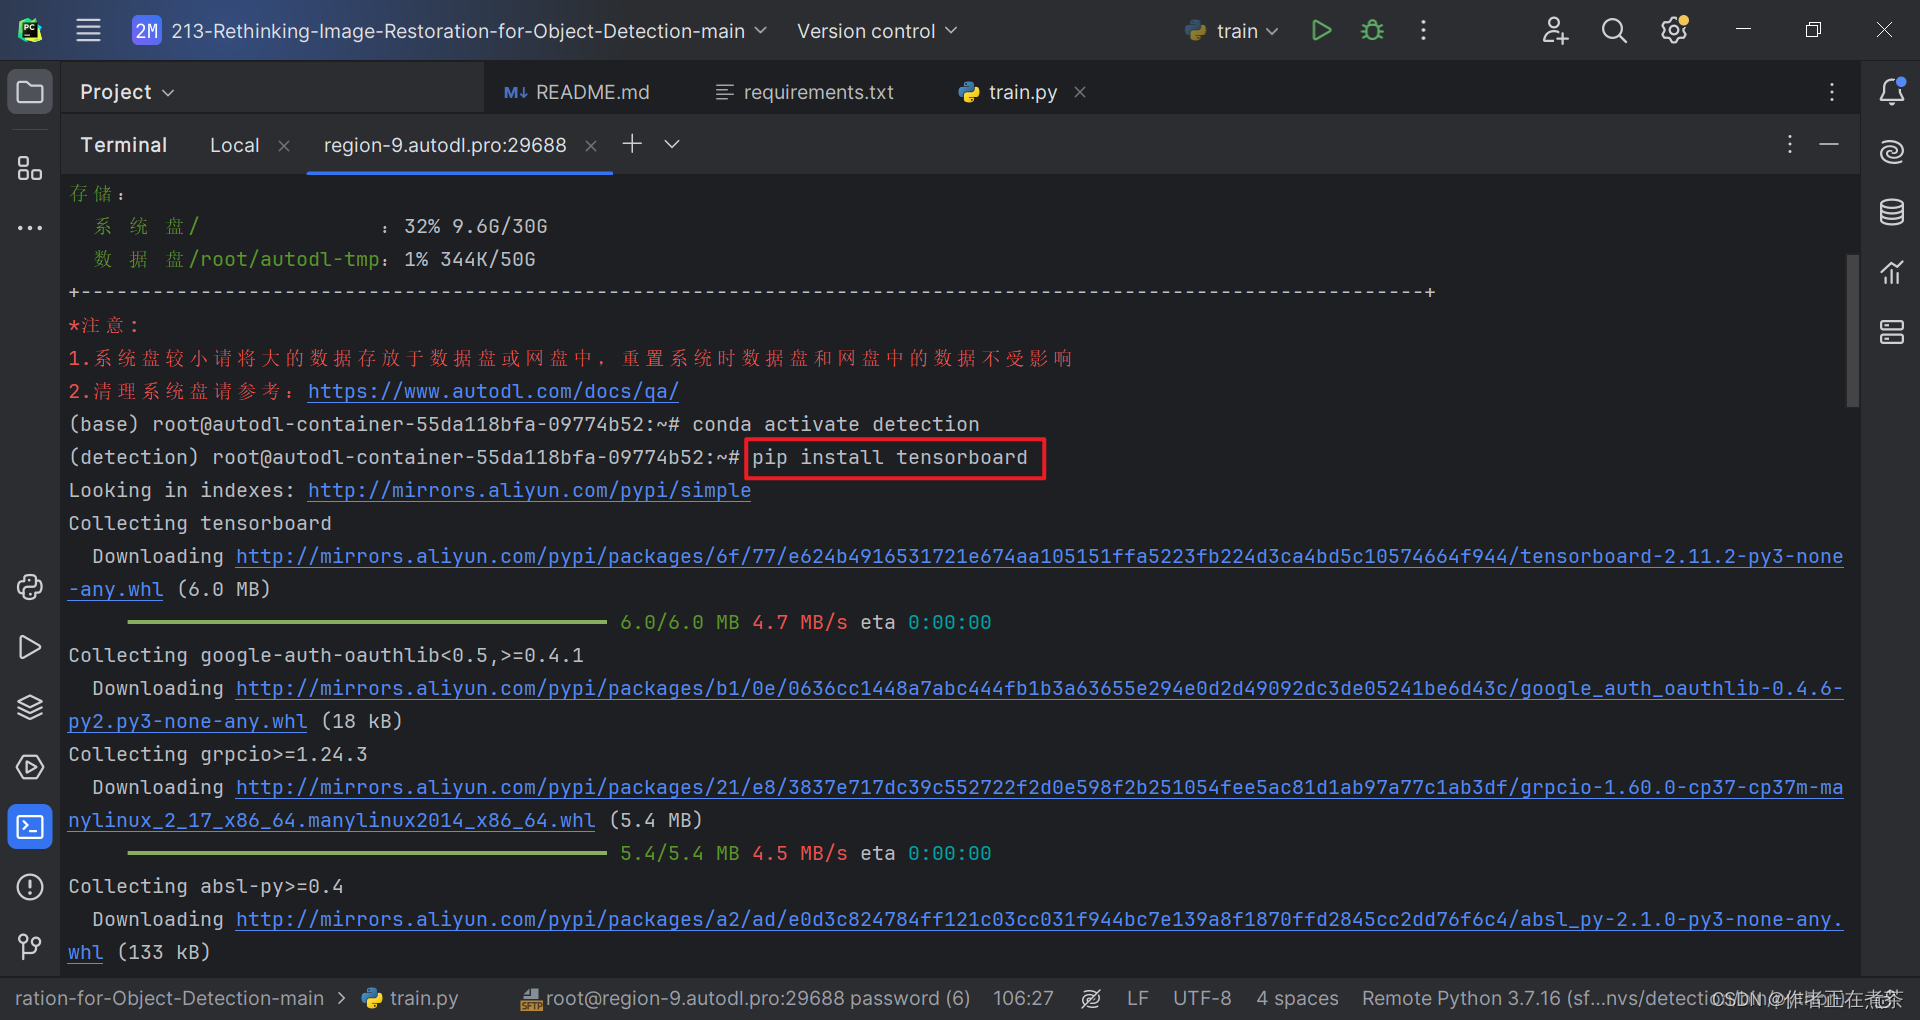
2、ModuleNotFoundError: No module named 'past'
【错误】ModuleNotFoundError: No module named 'past'
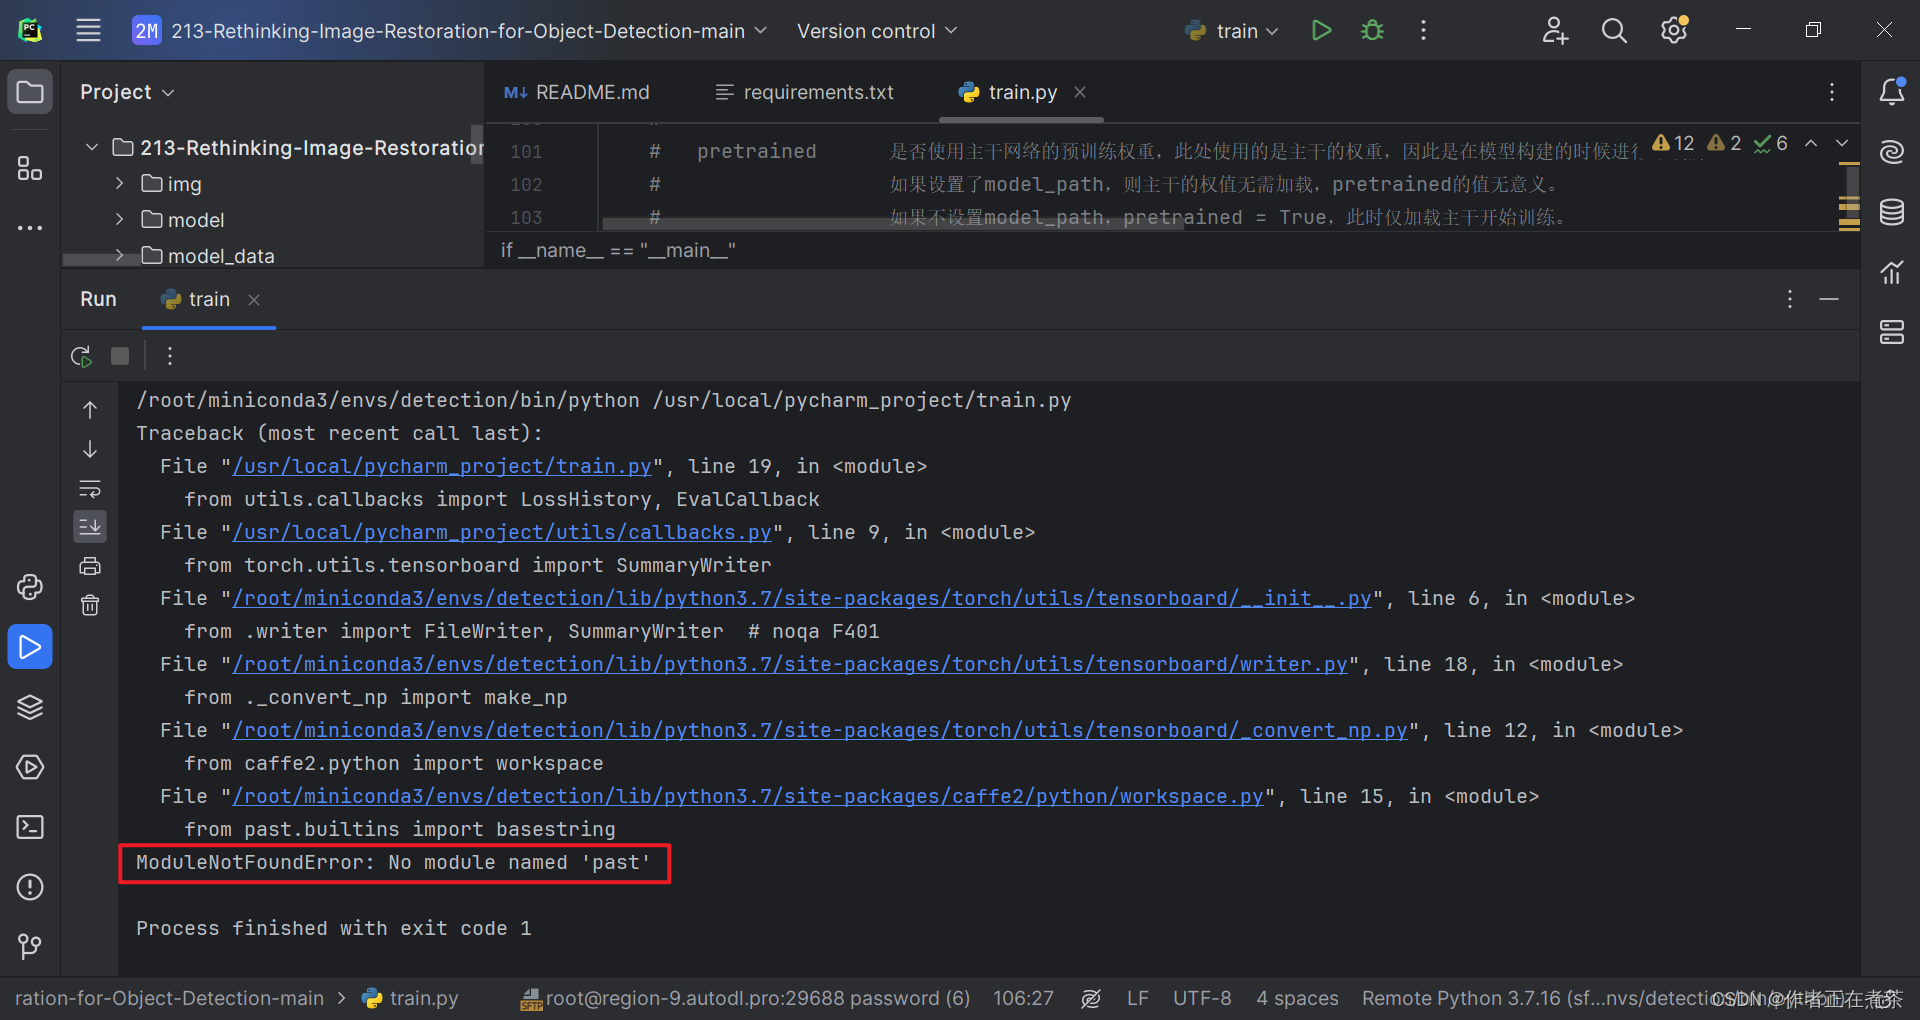
【解决方法】在 Terminal 终端执行 pip install future 命令,注意要在对应的虚拟环境中安装噢~
pip install future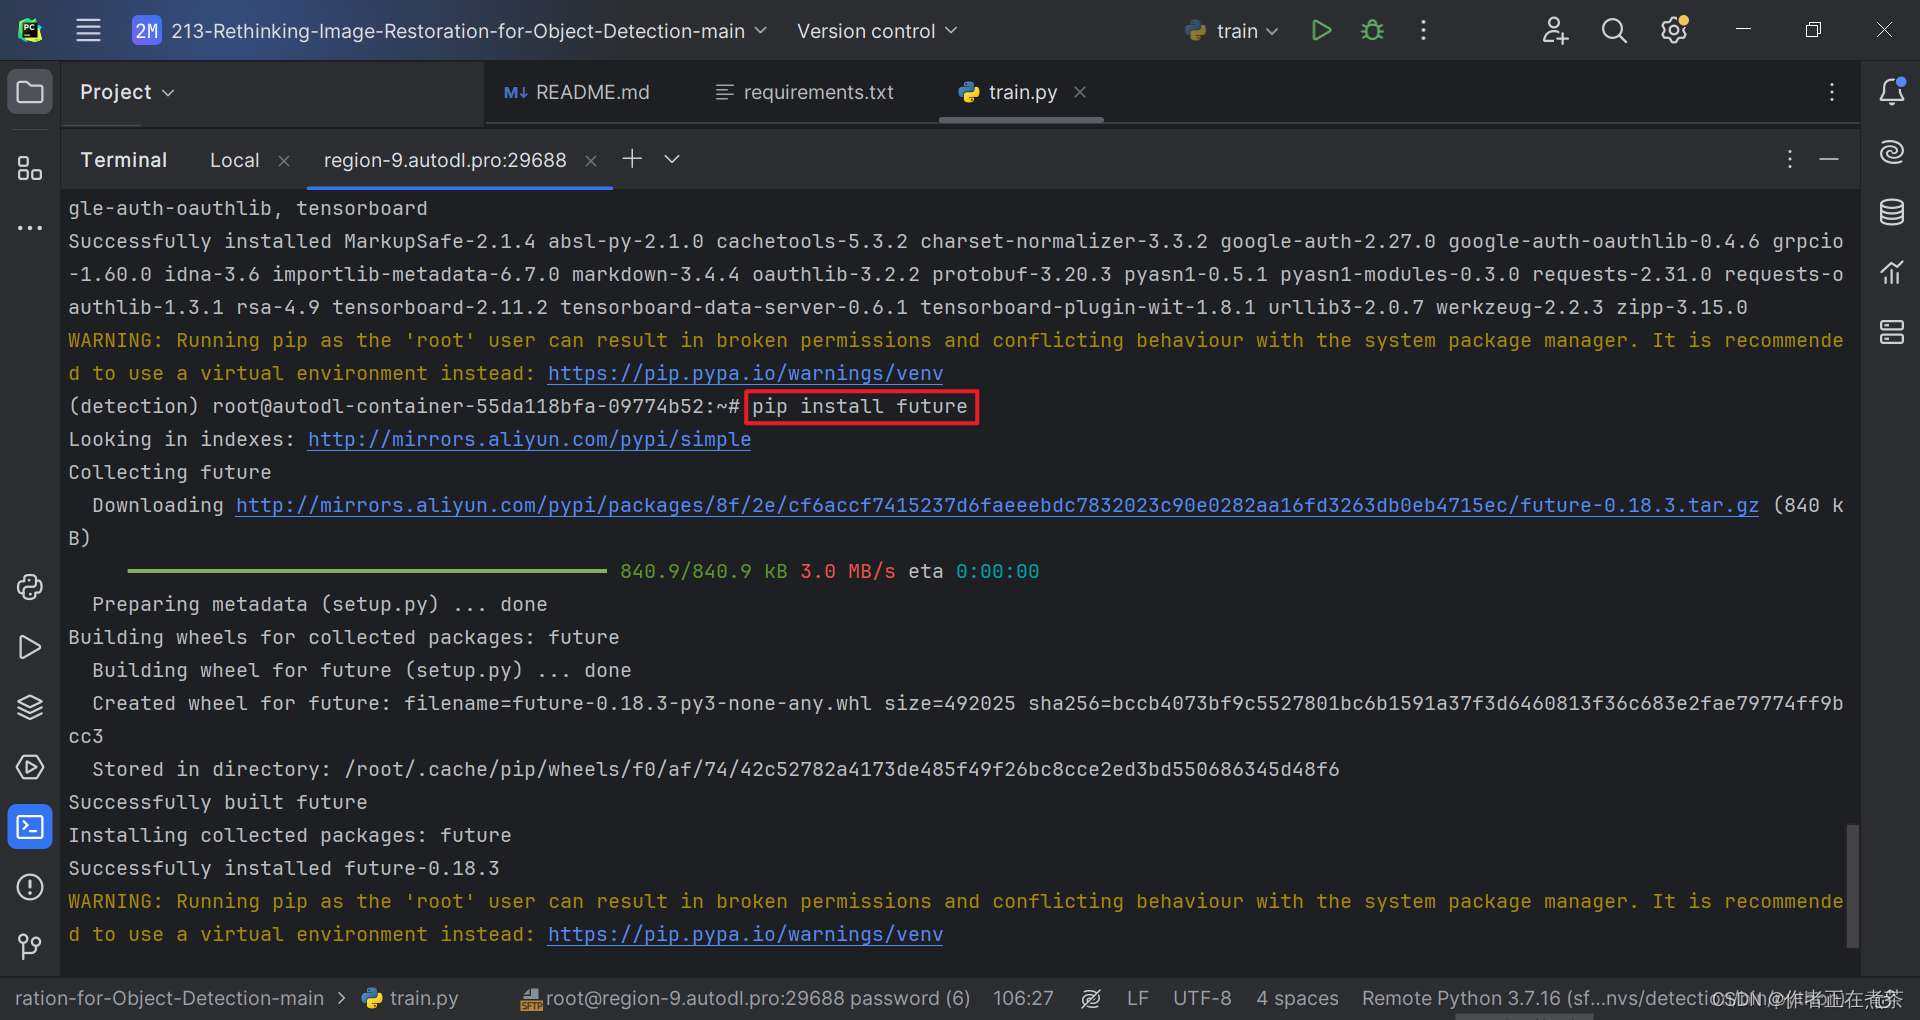
3、ValueError: Error initializing torch.distributed using env:// ...
【错误】ValueError: Error initializing torch.distributed using env:// rendezvous: environment variable RANK expected, but not set
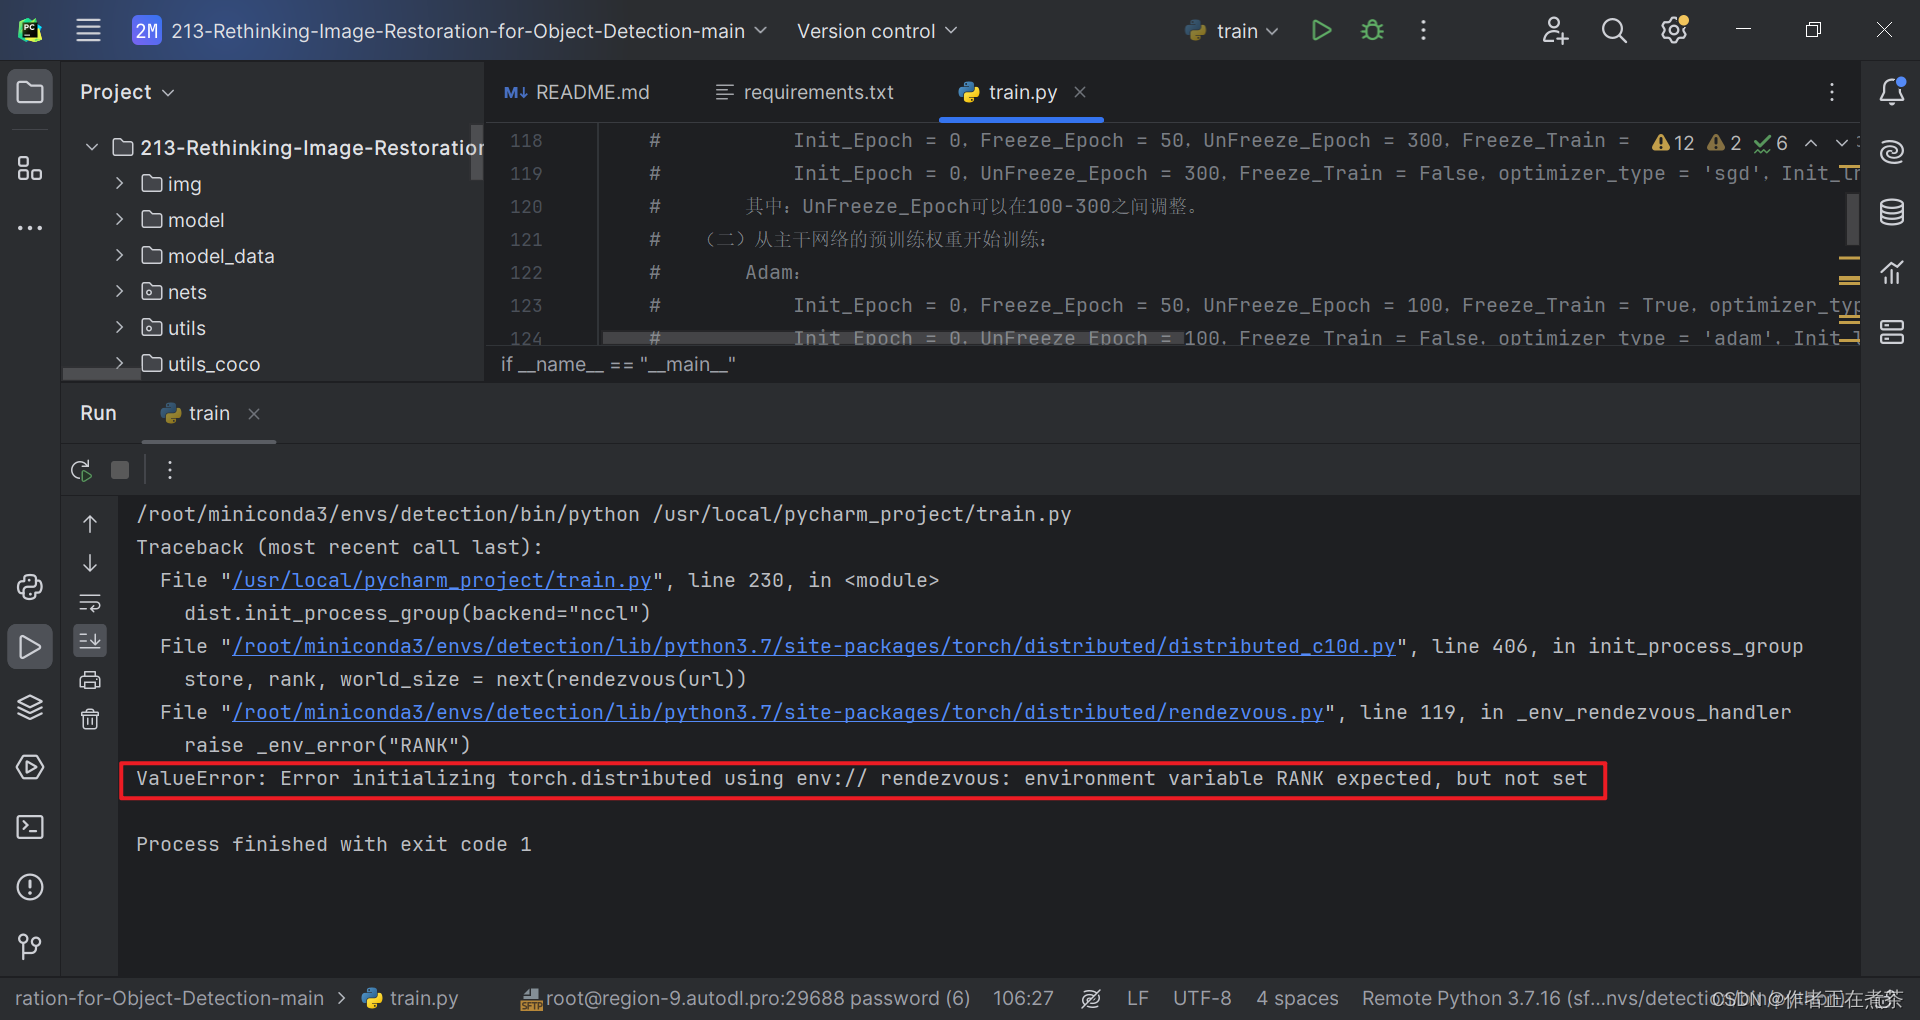
【解决方法】在代码的合适位置处增加:
import torch.distributed as dist
import osos.environ['MASTER_ADDR'] = 'localhost'
os.environ['MASTER_PORT'] = '5678'
dist.init_process_group(backend="nccl", init_method='env://', rank=0,world_size=int(os.environ['WORLD_SIZE']) if 'WORLD_SIZE' in os.environ else 1)
4、KeyError: 'LOCAL_RANK'
【错误】KeyError: 'LOCAL_RANK'
【解决方法】将 distributed 的值改为 False 。注意 distributed 用于指定是否使用单机多卡分布式运行。
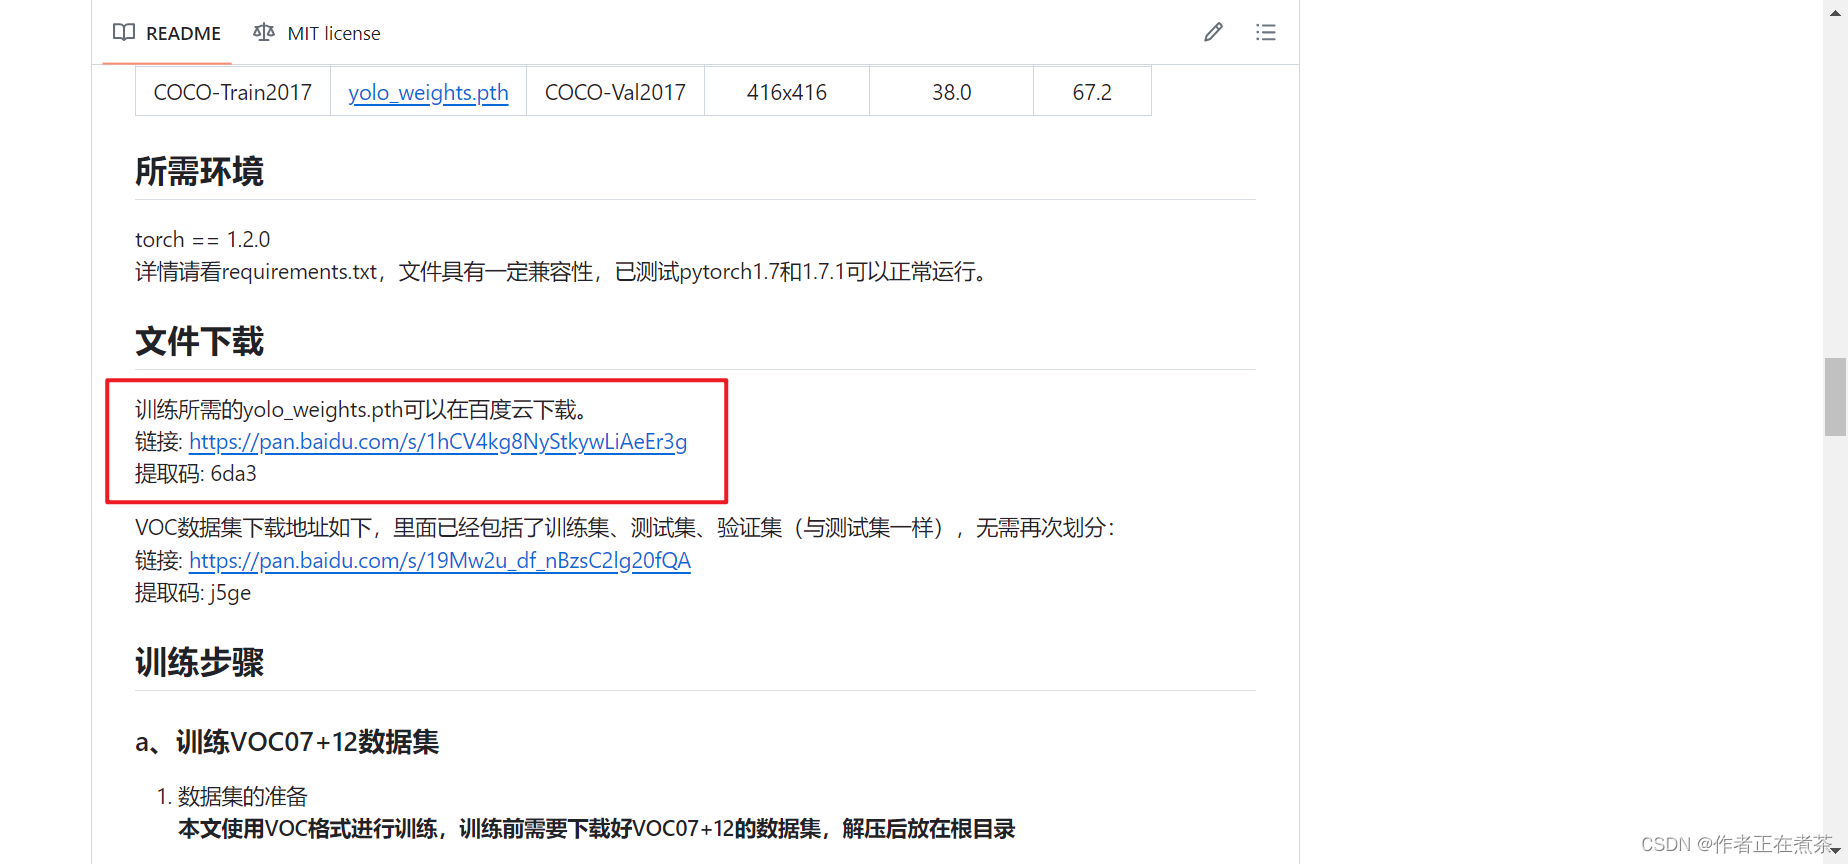
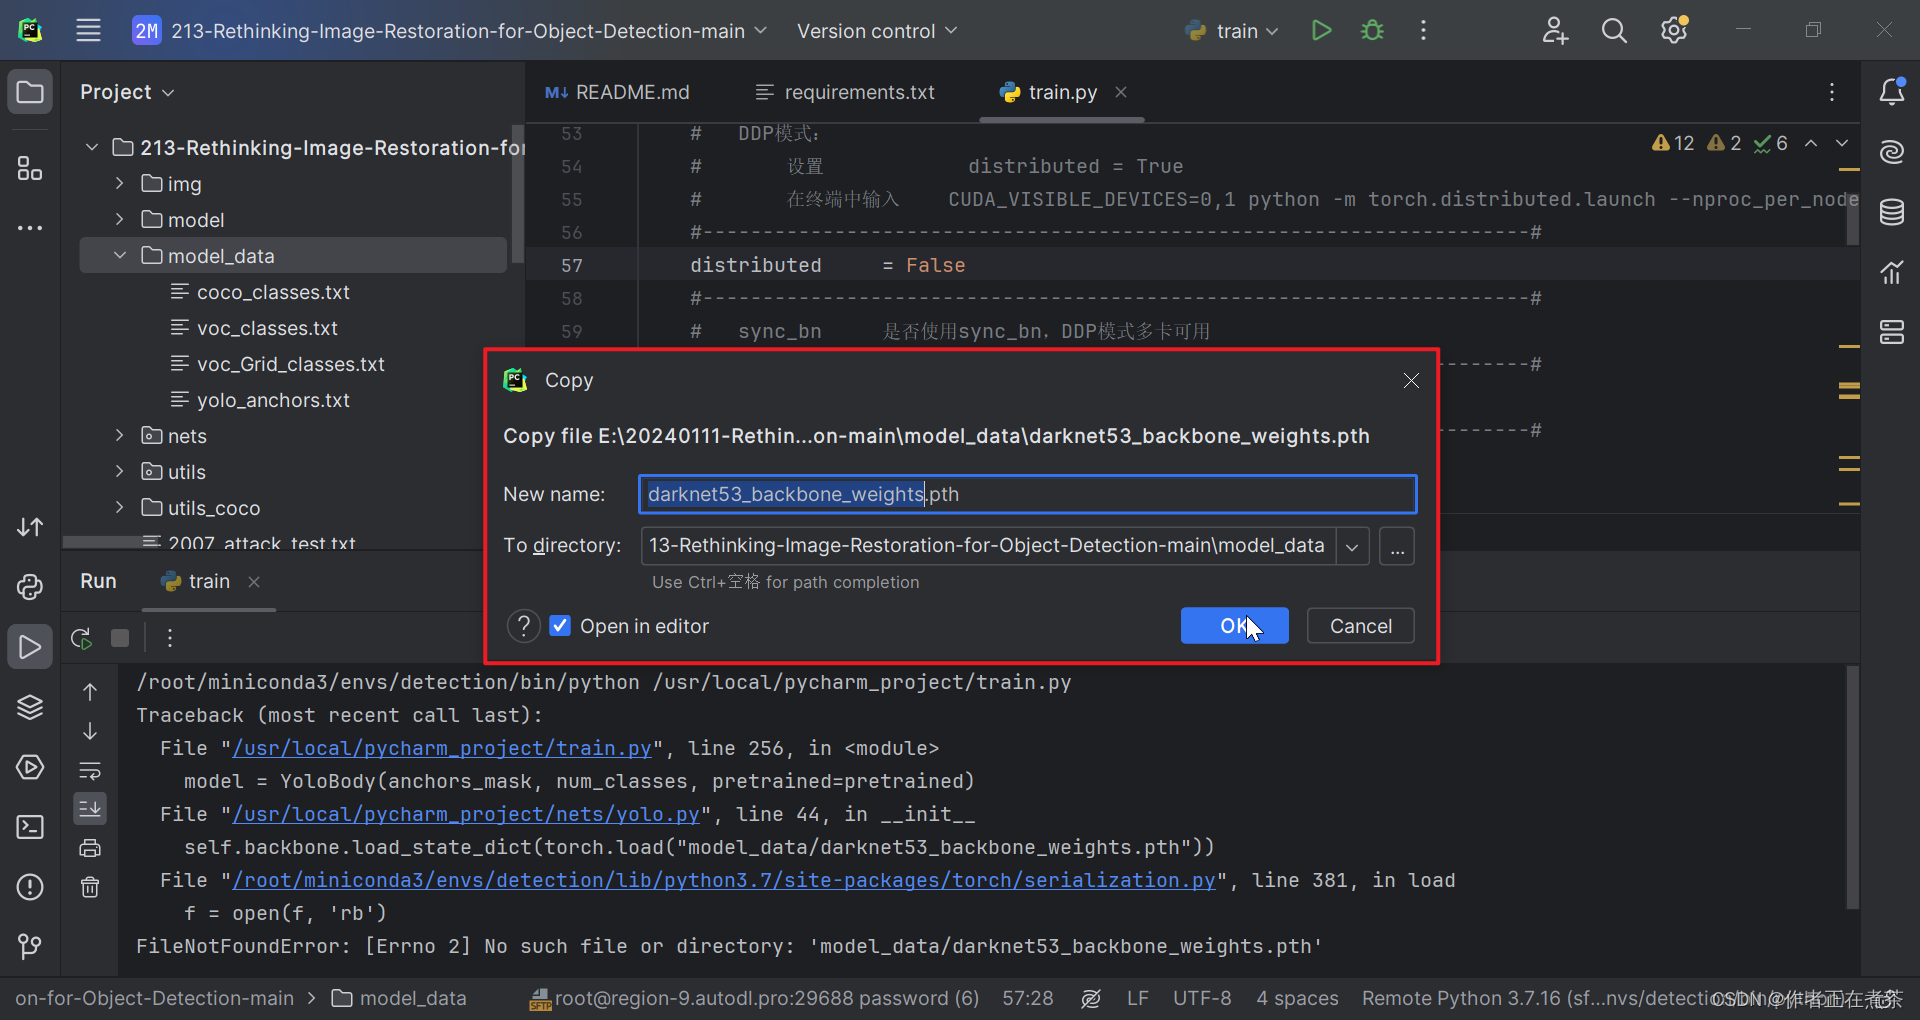
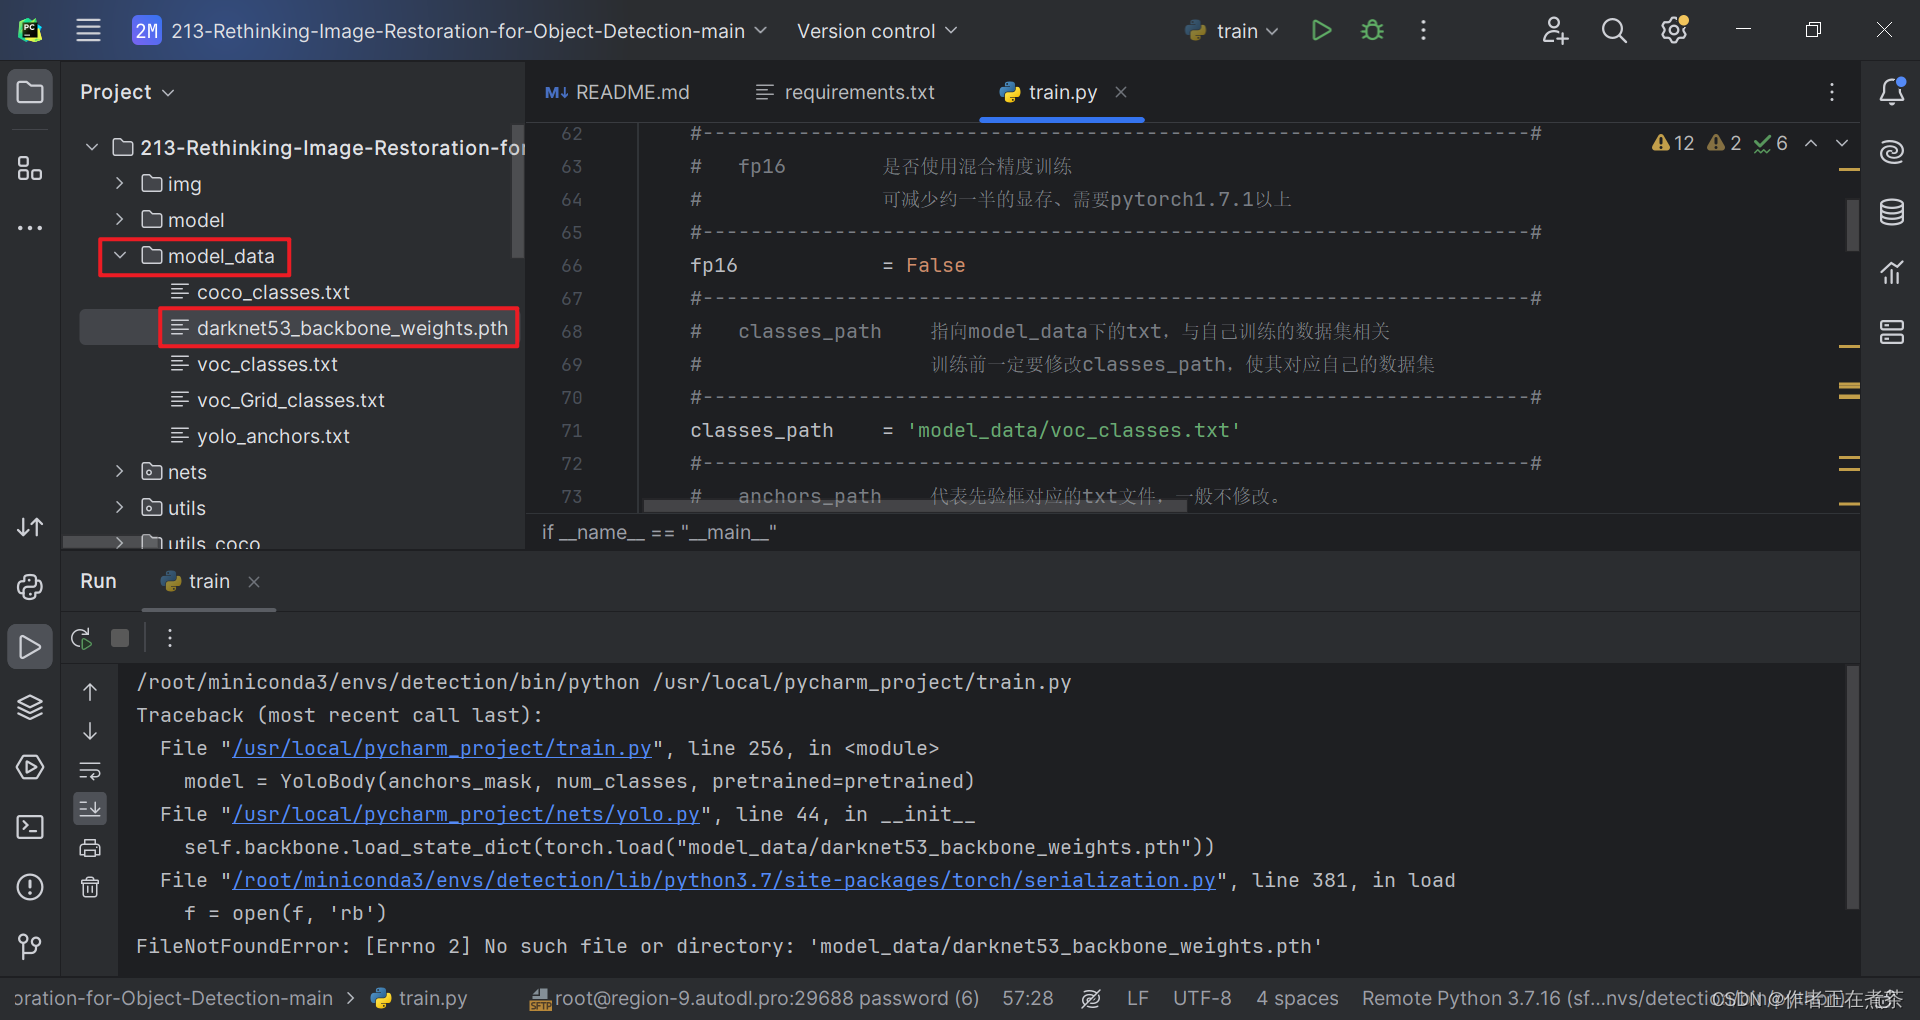
5、FileNotFoundError: [Errno 2] No such file or directory: ...
【错误】FileNotFoundError: [Errno 2] No such file or directory: 'model_data/darknet53_backbone_weights.pth'

【说明】项目提供的代码中缺少 darknet53_backbone_weights.pth 文件,可以在【这里】下载!
6、FileNotFoundError: [Errno 2] No such file or directory: ...
【错误】FileNotFoundError: [Errno 2] No such file or directory: '/data/yks/yolov3/VOCdevkit/VOC2007/JPEGImages/008931.jpg'
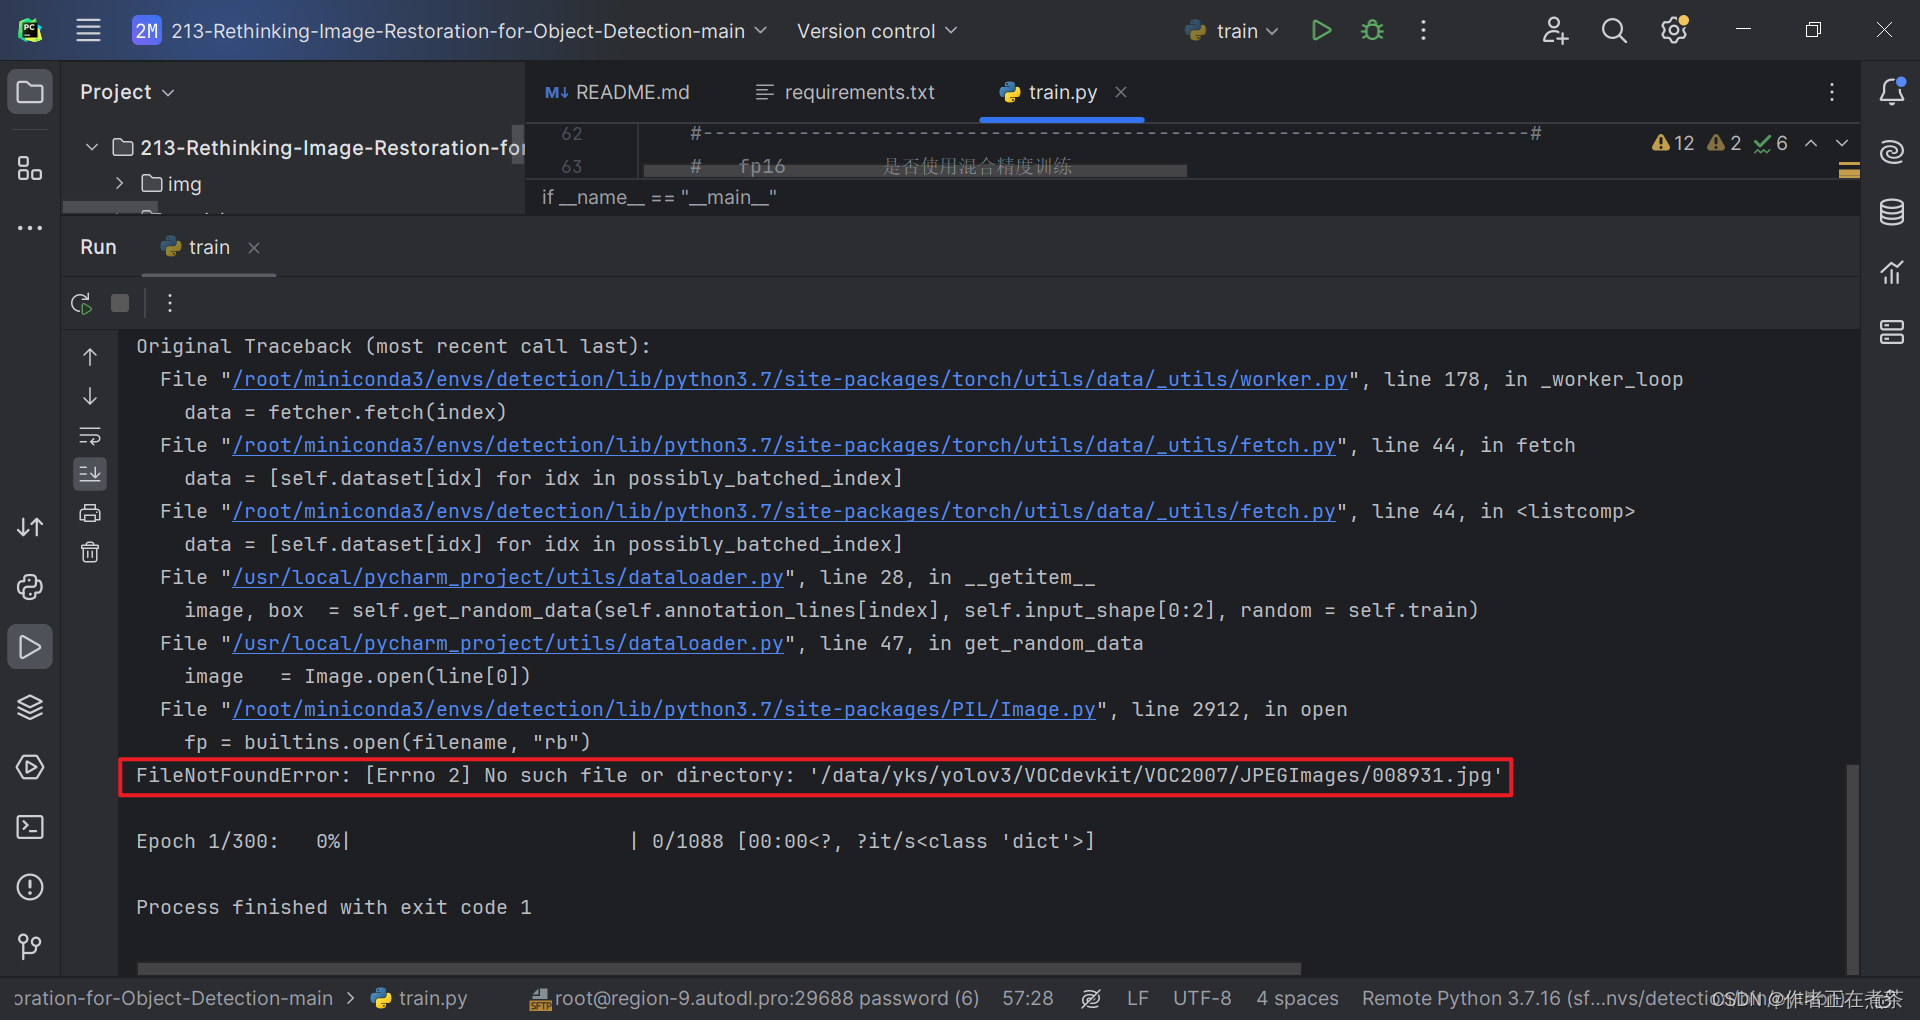
【说明】项目提供的代码中缺少 darknet53_backbone_weights.pth 文件,可以在【这里】下载!

五、在 PyCharm 运行 train.py 训练权重
现在!我们可以成功在 PyCharm 中运行 train.py 训练模型权重啦~
六、在 Tabby 运行 train.py 训练权重
由于运行 train.py 文件需要花费较长时间,而在 PyCharm 运行时无法关闭电脑,因此选择在 Tabby 远程服务器上训练权重。
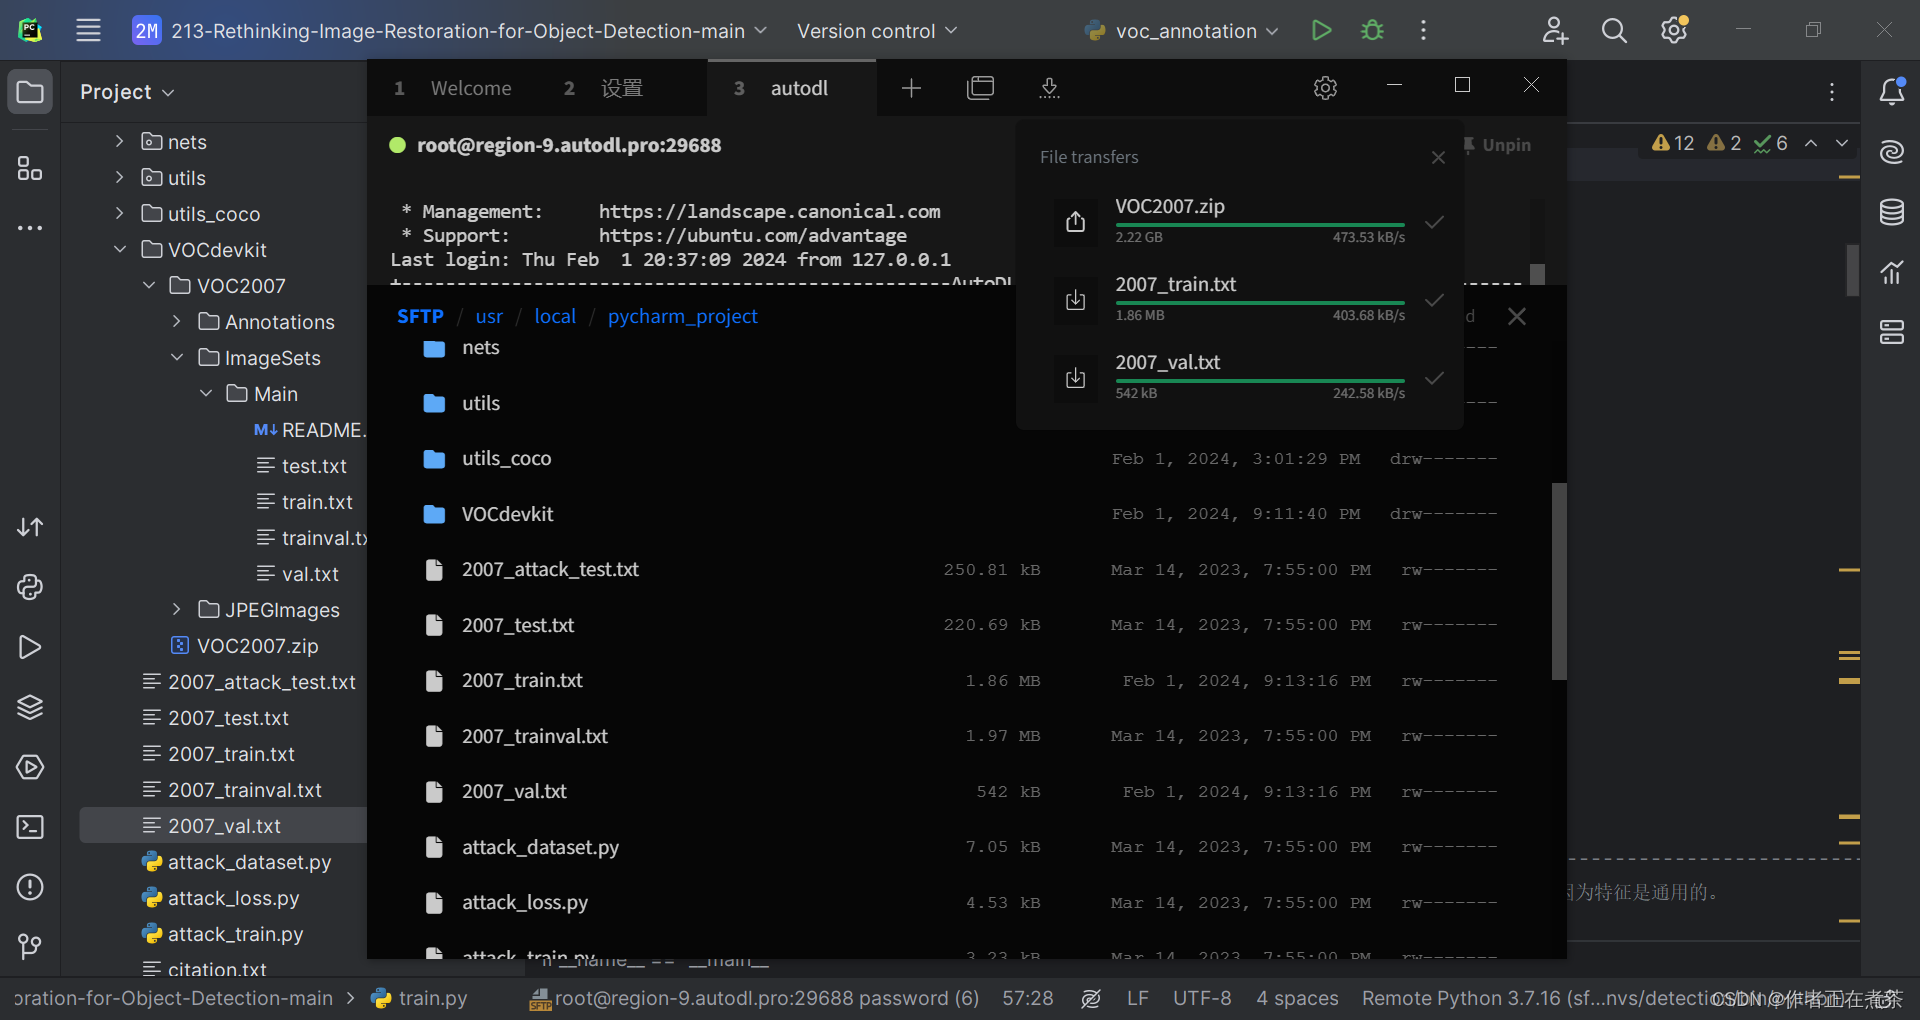
1、将项目文件更新至远程服务器
主要是将运行 voc_annotation 得到的 2007_train.txt 和 2007_val.txt 文件重新上传覆盖原有文件。
2、不挂断运行 train.py 训练权重
首先使用 conda activate 命令激活项目所用的虚拟环境,再使用 cd 命令进入项目的根目录,最后执行下面这个命令:
nohup python train.py > logs/object_detection300.log 2>&1 & 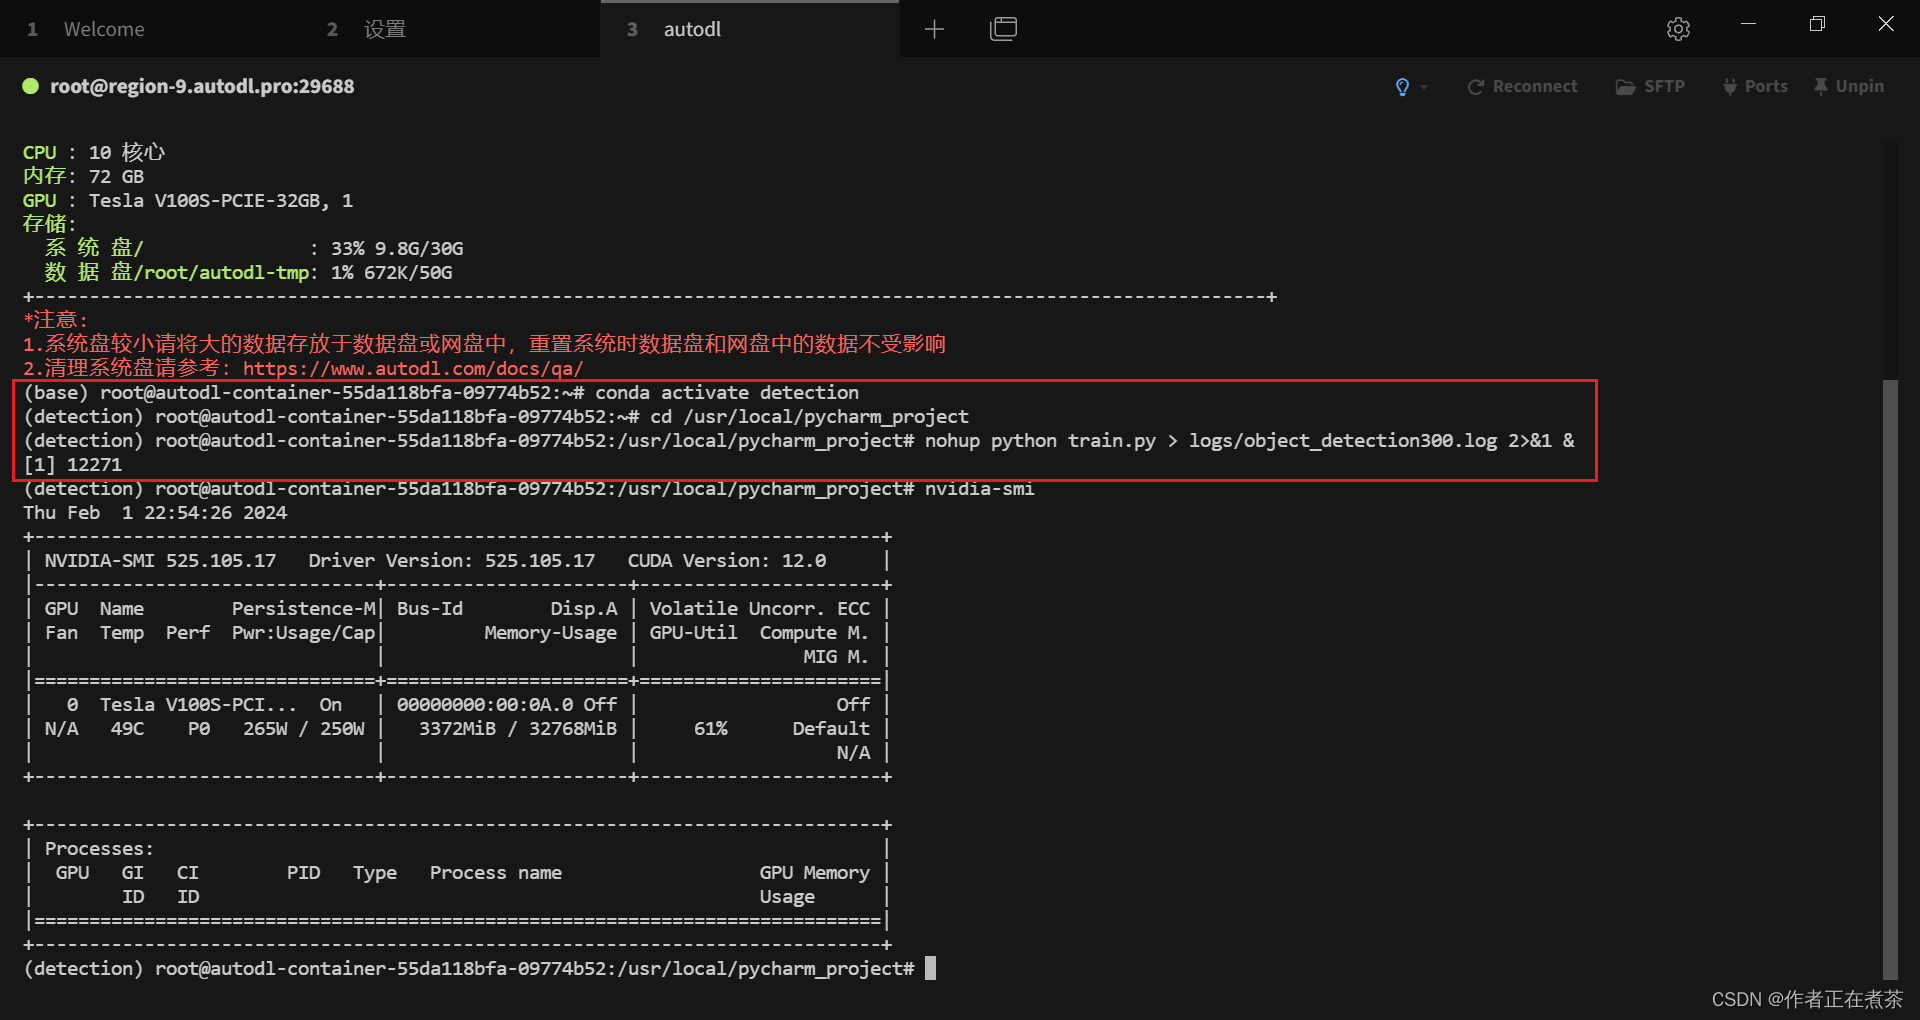
【说明】我们可以使用 nvidia-smi 来查看 GPU 的使用情况。
3、为何 NVIDIA-SMI 进程不显示
在使用 nvidia-smi 来查看 GPU 的使用情况时,我们发现 Process 中并没有 12271 进程,这也许是因为我们 GPU 使用率过低...
ps -ef|grep 12271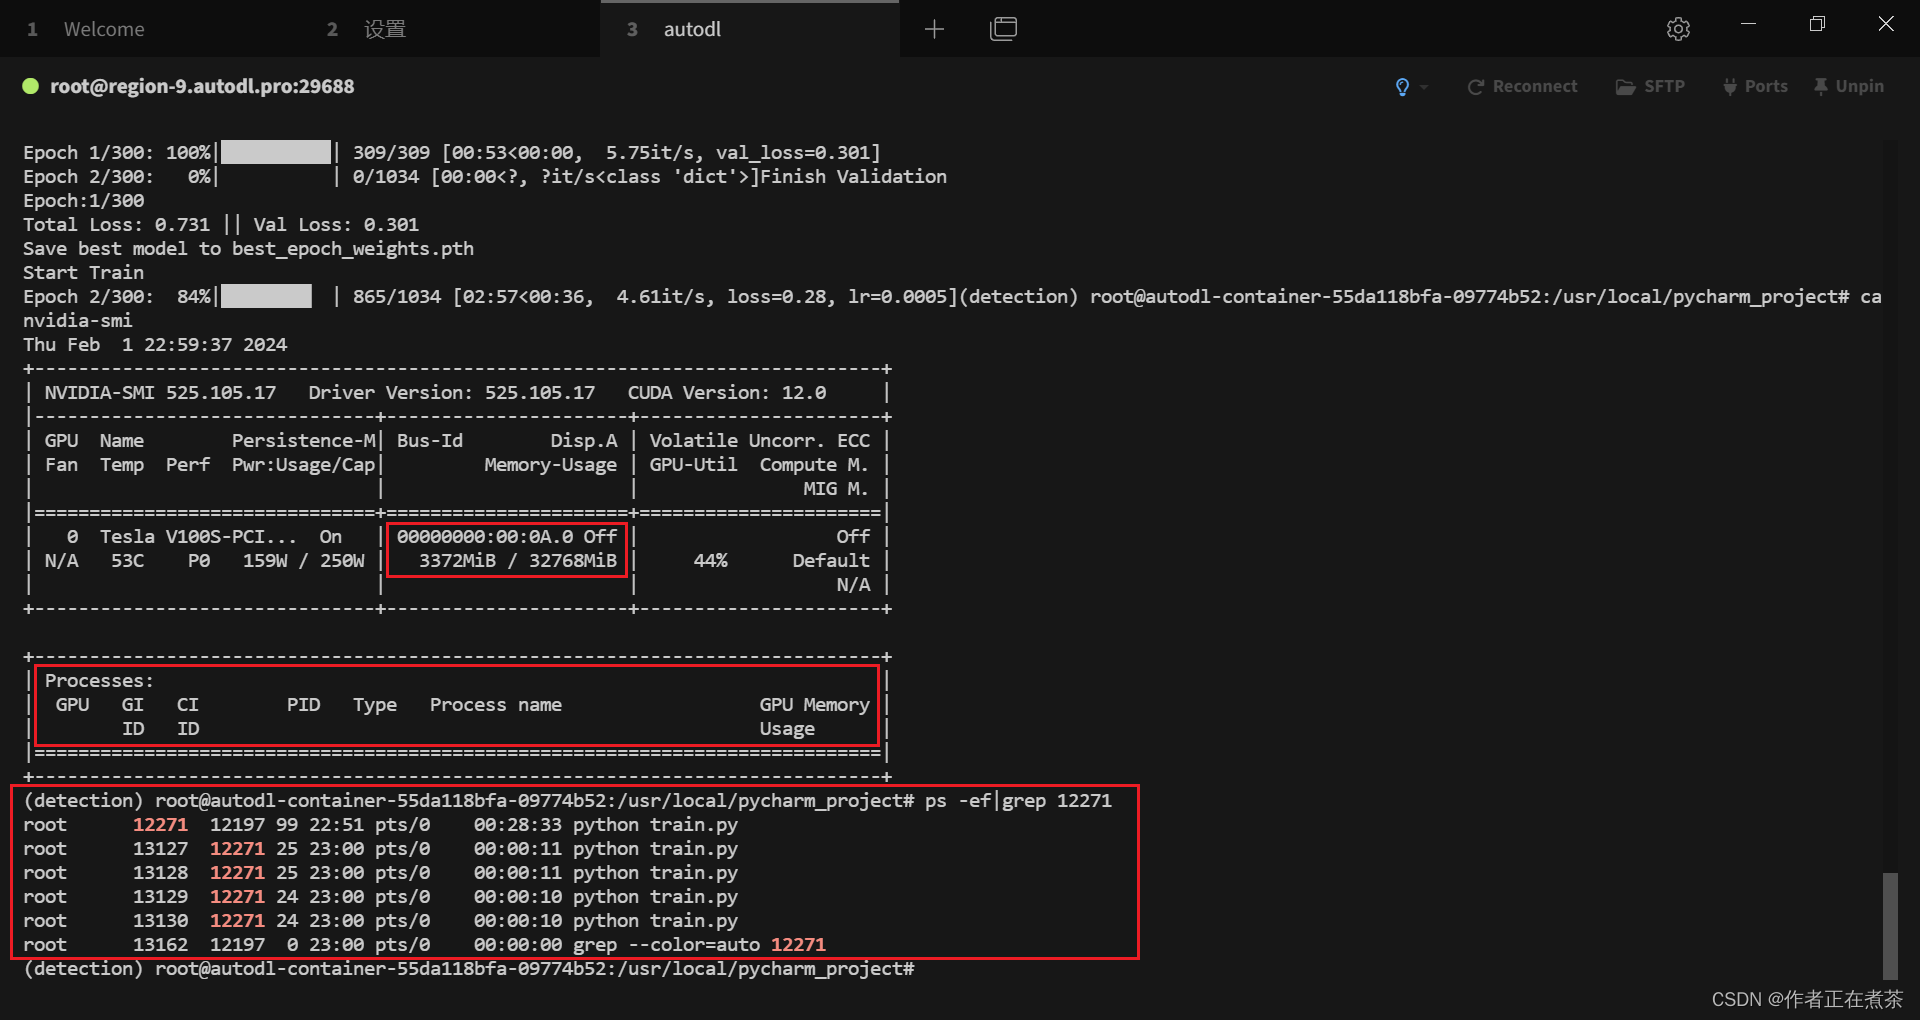
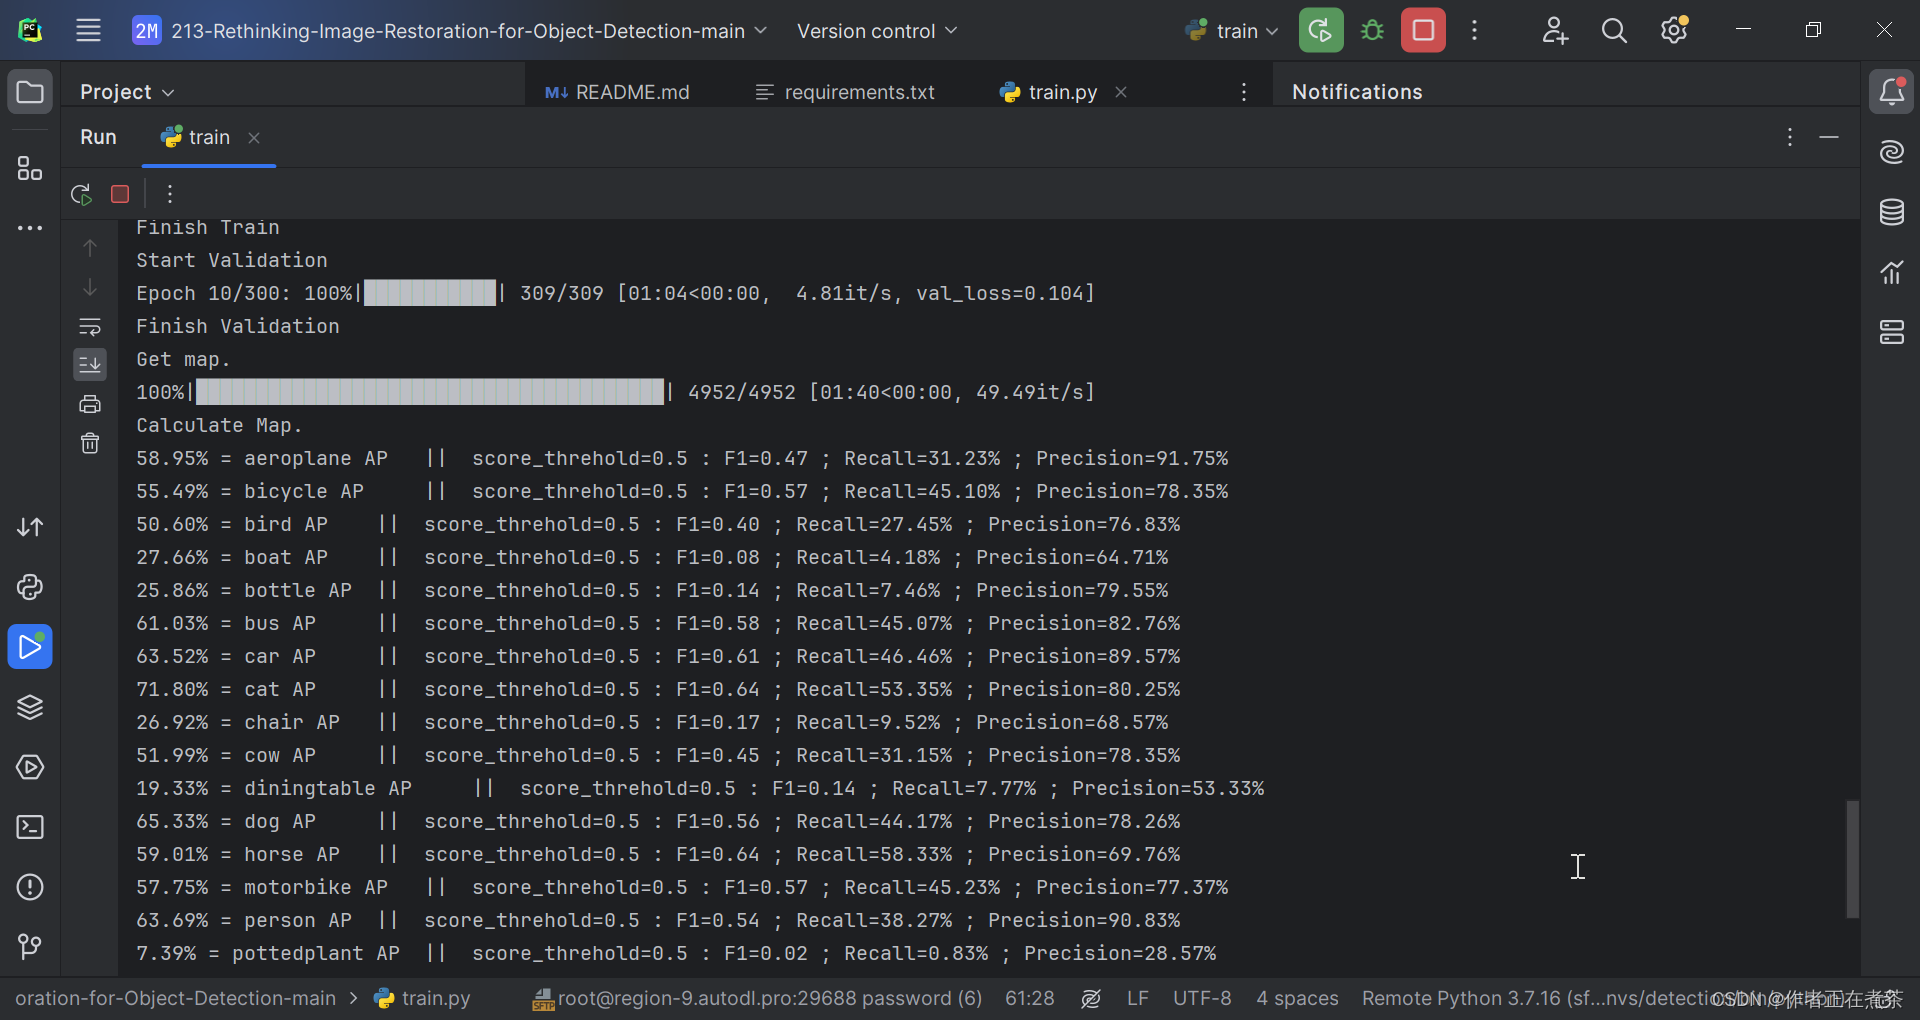
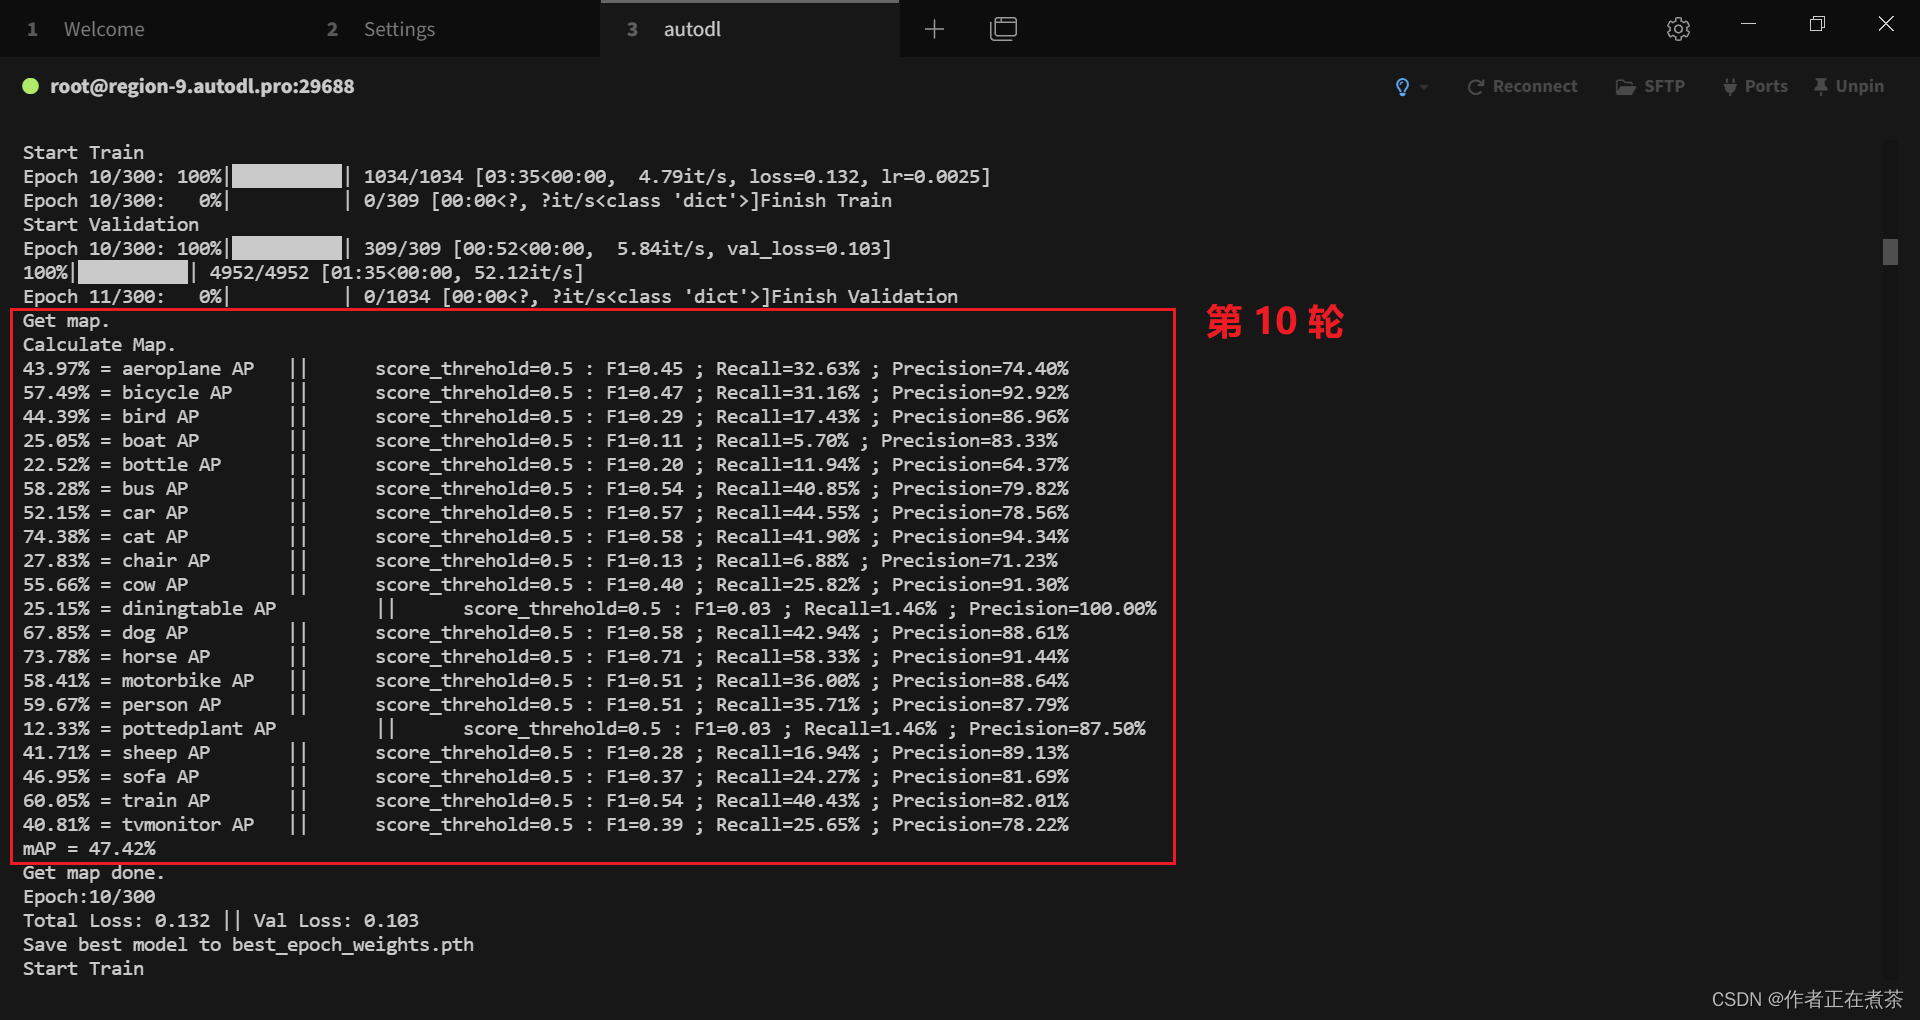
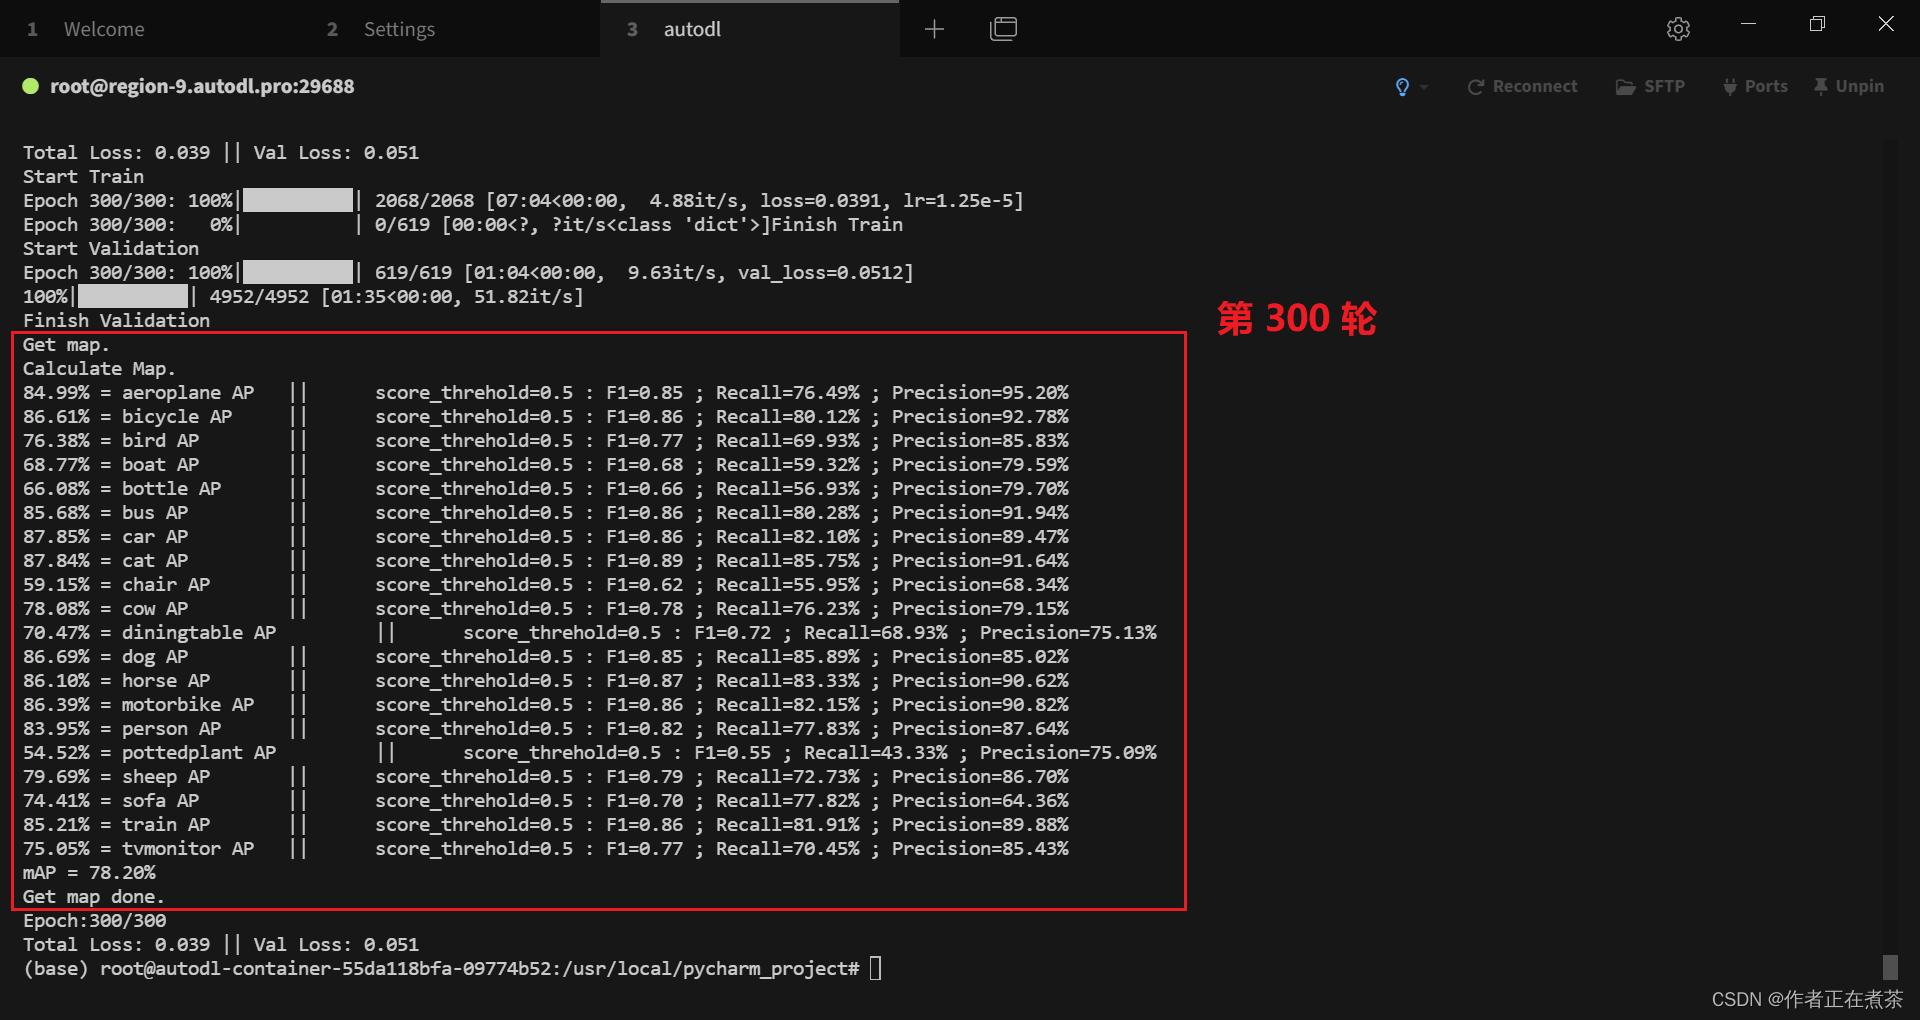
4、初步训练得到 300 轮模型权重
cat logs/object_detection300.log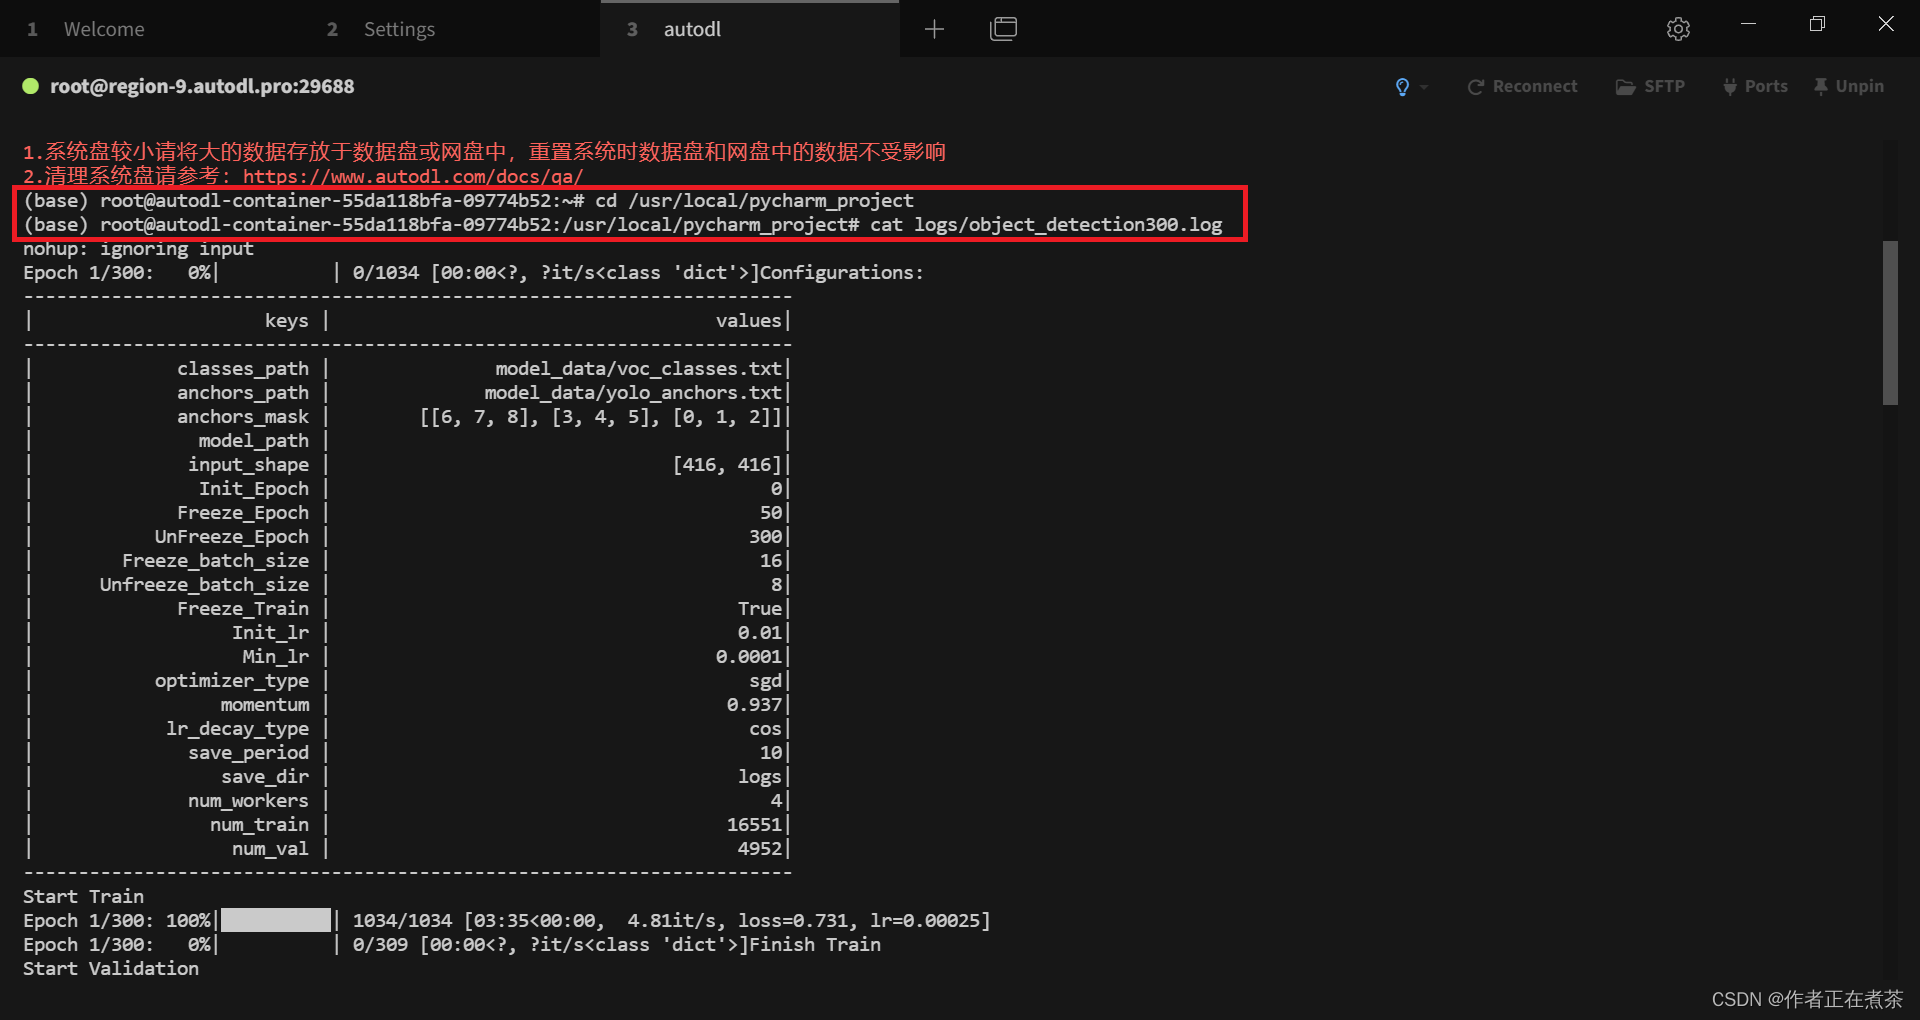
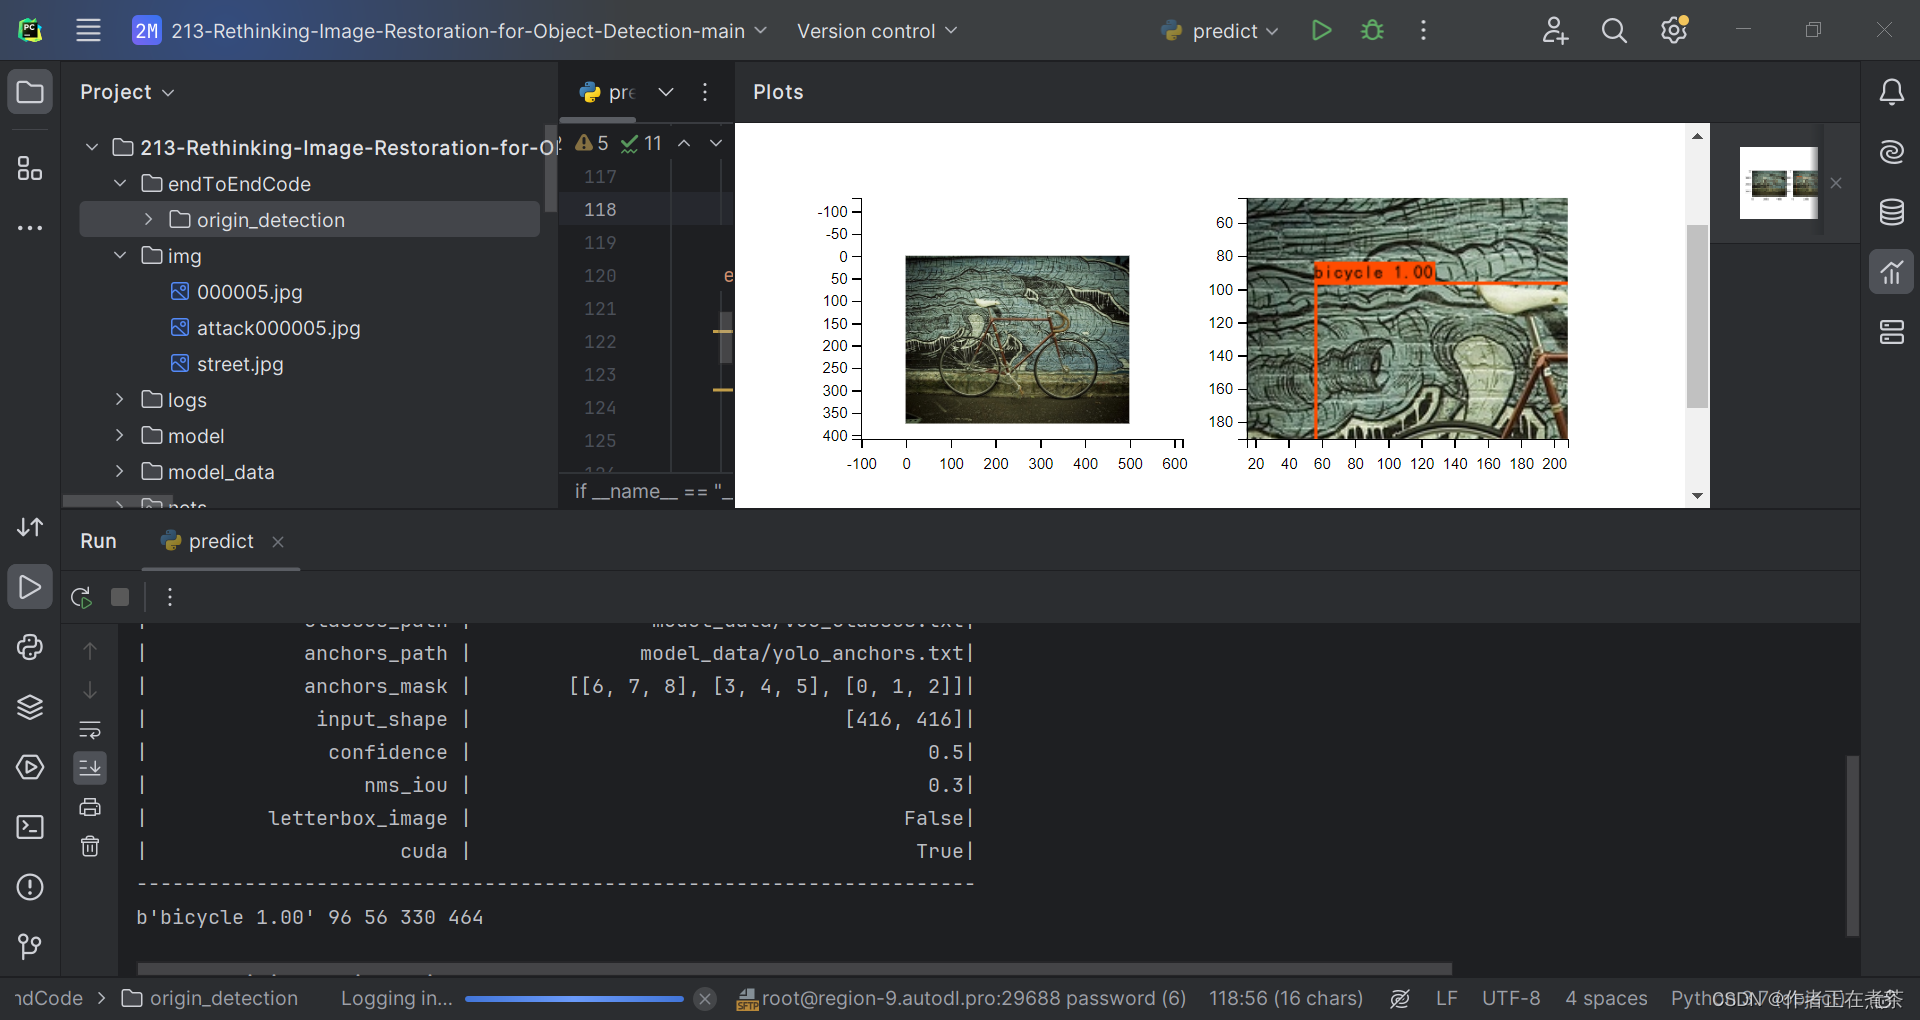
七、在 PyCharm 运行 predict.py 预测
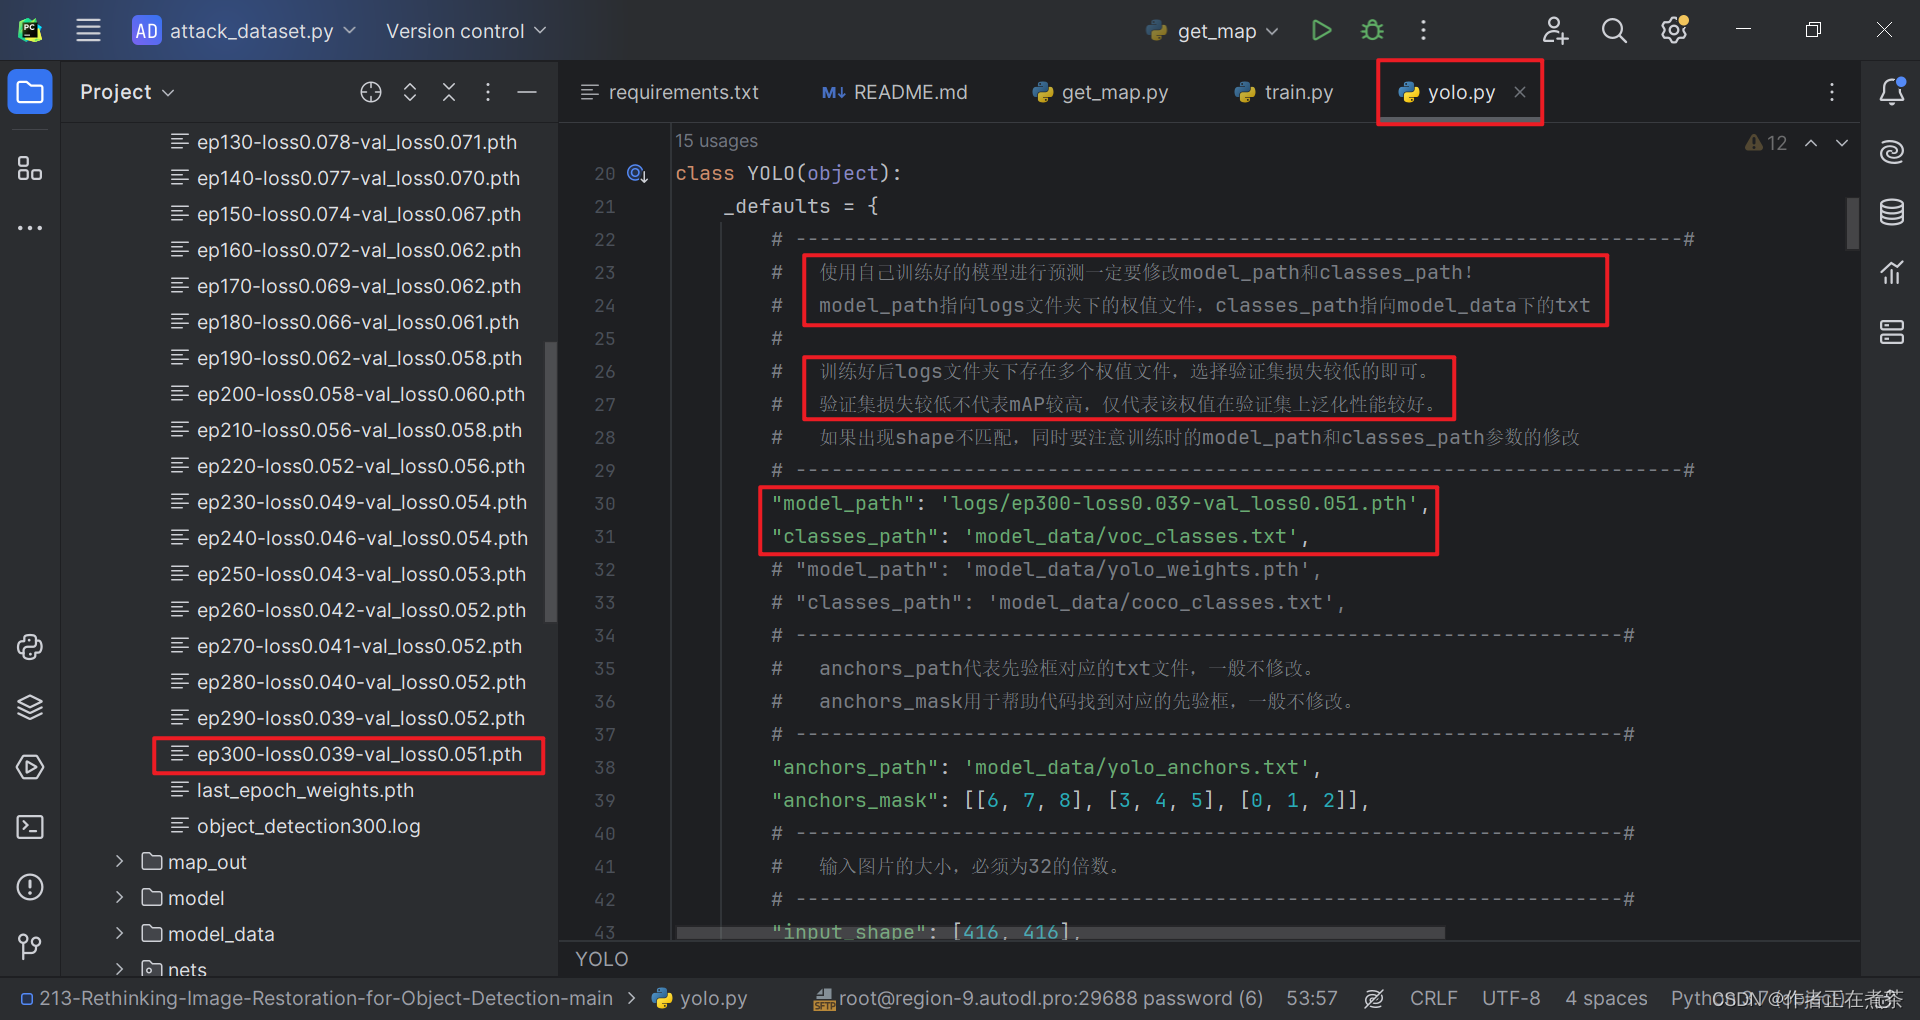
在运行 predict.py 文件前,需要按照下图修改 yolo.py 文件的 model_path 和 classes_path 路径,遇到其他问题可参考这篇博客:
【深度学习】Anaconda3 + PyCharm 的环境配置 5:手把手带你运行 predict.py 文件,史上最全的问题解决记录_np.array(results[0][:, 6], dtype = 'int32')-CSDN博客文章浏览阅读1.2k次,点赞40次,收藏17次。这篇文章主要记录了运行 predict.py 文件时遇到的错误以及相应的解决方案,错误包括 ModuleNotFoundError、ImportError、FileNotFoundError、OMP: Error #15 等。_np.array(results[0][:, 6], dtype = 'int32')https://blog.csdn.net/nanzhou520/article/details/135585204?spm=1001.2014.3001.5502【补充】项目提供的代码中缺少 yolo.py 文件,可以在【这里】下载!
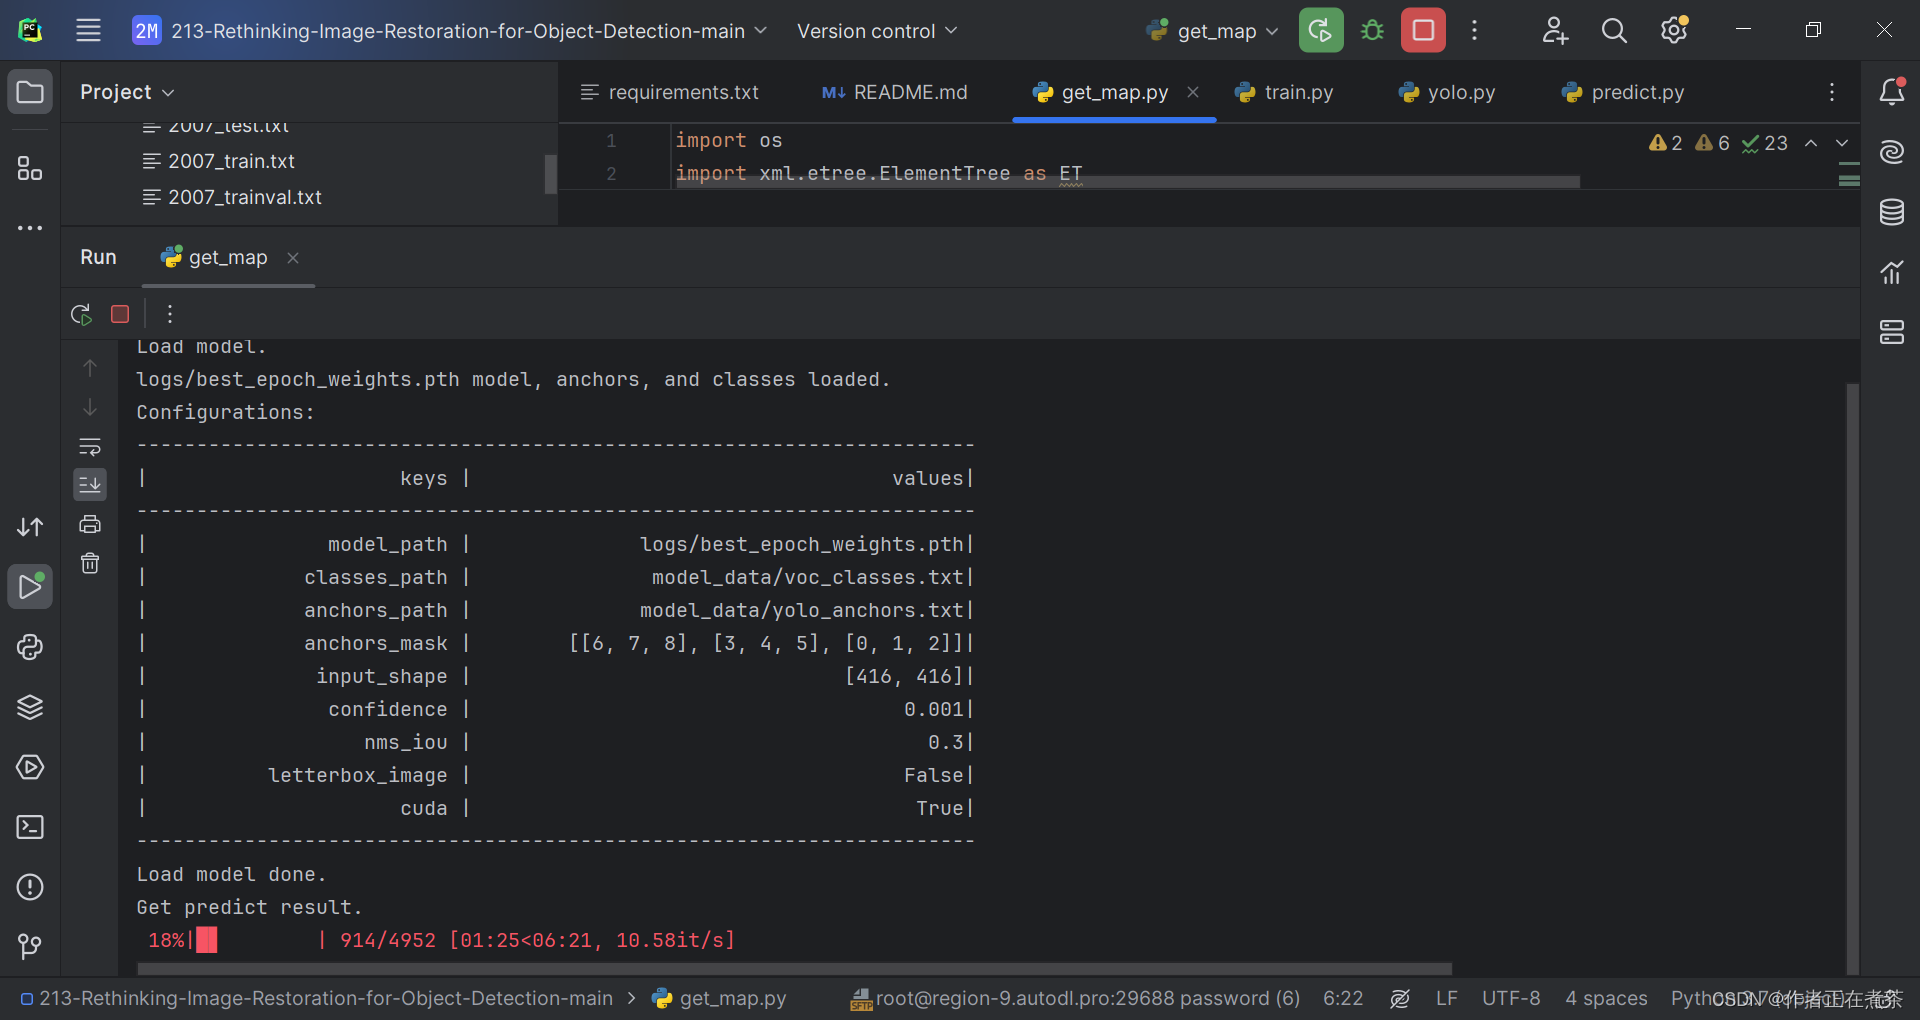
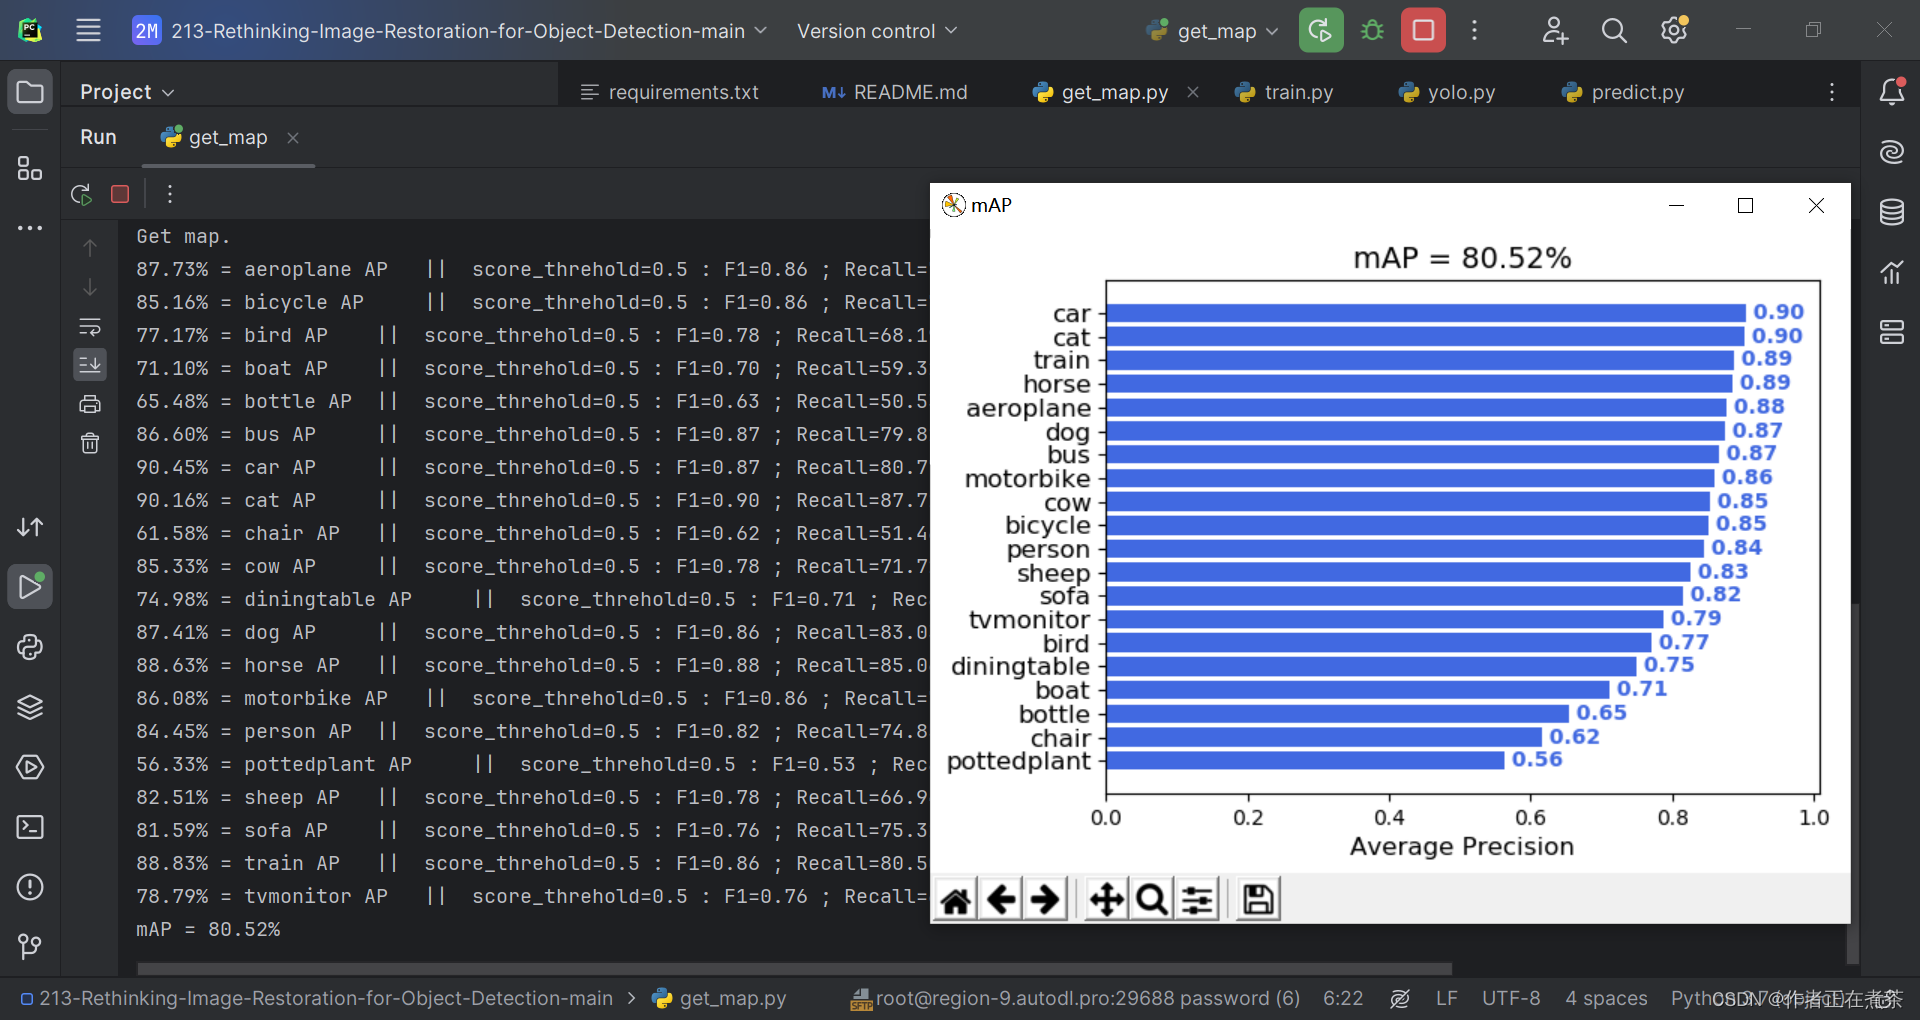
八、在 PyCharm 运行 get_map.py 评估
在执行 get_map.py 时还是比较顺利的 (๑•̀ㅂ•́)و✧
附录1:voc_annotation.py
import os
import random
import xml.etree.ElementTree as ETfrom utils.utils import get_classes#--------------------------------------------------------------------------------------------------------------------------------#
#   annotation_mode用于指定该文件运行时计算的内容
#   annotation_mode为0代表整个标签处理过程,包括获得VOCdevkit/VOC2007/ImageSets里面的txt以及训练用的2007_train.txt、2007_val.txt
#   annotation_mode为1代表获得VOCdevkit/VOC2007/ImageSets里面的txt
#   annotation_mode为2代表获得训练用的2007_train.txt、2007_val.txt
#--------------------------------------------------------------------------------------------------------------------------------#
annotation_mode     = 2
#-------------------------------------------------------------------#
#   必须要修改,用于生成2007_train.txt、2007_val.txt的目标信息
#   与训练和预测所用的classes_path一致即可
#   如果生成的2007_train.txt里面没有目标信息
#   那么就是因为classes没有设定正确
#   仅在annotation_mode为0和2的时候有效
#-------------------------------------------------------------------#
classes_path        = 'model_data/voc_classes.txt'
#--------------------------------------------------------------------------------------------------------------------------------#
#   trainval_percent用于指定(训练集+验证集)与测试集的比例,默认情况下 (训练集+验证集):测试集 = 9:1
#   train_percent用于指定(训练集+验证集)中训练集与验证集的比例,默认情况下 训练集:验证集 = 9:1
#   仅在annotation_mode为0和1的时候有效
#--------------------------------------------------------------------------------------------------------------------------------#
trainval_percent    = 0.9
train_percent       = 0.9
#-------------------------------------------------------#
#   指向VOC数据集所在的文件夹
#   默认指向根目录下的VOC数据集
#-------------------------------------------------------#
VOCdevkit_path  = 'VOCdevkit'VOCdevkit_sets  = [('2007', 'train'), ('2007', 'val')]
classes, _      = get_classes(classes_path)def convert_annotation(year, image_id, list_file):in_file = open(os.path.join(VOCdevkit_path, 'VOC%s/Annotations/%s.xml'%(year, image_id)), encoding='utf-8')tree=ET.parse(in_file)root = tree.getroot()for obj in root.iter('object'):difficult = 0 if obj.find('difficult')!=None:difficult = obj.find('difficult').textcls = obj.find('name').textif cls not in classes or int(difficult)==1:continuecls_id = classes.index(cls)xmlbox = obj.find('bndbox')b = (int(float(xmlbox.find('xmin').text)), int(float(xmlbox.find('ymin').text)), int(float(xmlbox.find('xmax').text)), int(float(xmlbox.find('ymax').text)))list_file.write(" " + ",".join([str(a) for a in b]) + ',' + str(cls_id))if __name__ == "__main__":random.seed(0)if annotation_mode == 0 or annotation_mode == 1:print("Generate txt in ImageSets.")xmlfilepath     = os.path.join(VOCdevkit_path, 'VOC2007/Annotations')saveBasePath    = os.path.join(VOCdevkit_path, 'VOC2007/ImageSets/Main')temp_xml        = os.listdir(xmlfilepath)total_xml       = []for xml in temp_xml:if xml.endswith(".xml"):total_xml.append(xml)num     = len(total_xml)  list    = range(num)  tv      = int(num*trainval_percent)  tr      = int(tv*train_percent)  trainval= random.sample(list,tv)  train   = random.sample(trainval,tr)  print("train and val size",tv)print("train size",tr)ftrainval   = open(os.path.join(saveBasePath,'trainval.txt'), 'w')  ftest       = open(os.path.join(saveBasePath,'test.txt'), 'w')  ftrain      = open(os.path.join(saveBasePath,'train.txt'), 'w')  fval        = open(os.path.join(saveBasePath,'val.txt'), 'w')  for i in list:  name=total_xml[i][:-4]+'\n'  if i in trainval:  ftrainval.write(name)  if i in train:  ftrain.write(name)  else:  fval.write(name)  else:  ftest.write(name)  ftrainval.close()  ftrain.close()  fval.close()  ftest.close()print("Generate txt in ImageSets done.")if annotation_mode == 0 or annotation_mode == 2:print("Generate 2007_train.txt and 2007_val.txt for train.")for year, image_set in VOCdevkit_sets:image_ids = open(os.path.join(VOCdevkit_path, 'VOC%s/ImageSets/Main/%s.txt'%(year, image_set)), encoding='utf-8').read().strip().split()list_file = open('%s_%s.txt'%(year, image_set), 'w', encoding='utf-8')for image_id in image_ids:list_file.write('%s/VOC%s/JPEGImages/%s.jpg'%(os.path.abspath(VOCdevkit_path), year, image_id))convert_annotation(year, image_id, list_file)list_file.write('\n')list_file.close()print("Generate 2007_train.txt and 2007_val.txt for train done.")
附录2:yolo.py
import colorsys
import os
import timeimport numpy as np
import torch
import torch.nn as nn
from PIL import ImageDraw, ImageFontfrom nets.yolo import YoloBody
from utils.utils import (cvtColor, get_anchors, get_classes, preprocess_input,resize_image, show_config)
from utils.utils_bbox import DecodeBox'''
训练自己的数据集必看注释!
'''class YOLO(object):_defaults = {# --------------------------------------------------------------------------##   使用自己训练好的模型进行预测一定要修改model_path和classes_path!#   model_path指向logs文件夹下的权值文件,classes_path指向model_data下的txt##   训练好后logs文件夹下存在多个权值文件,选择验证集损失较低的即可。#   验证集损失较低不代表mAP较高,仅代表该权值在验证集上泛化性能较好。#   如果出现shape不匹配,同时要注意训练时的model_path和classes_path参数的修改# --------------------------------------------------------------------------#"model_path": 'model_data/yolo_weights.pth',"classes_path": 'model_data/coco_classes.txt',# ---------------------------------------------------------------------##   anchors_path代表先验框对应的txt文件,一般不修改。#   anchors_mask用于帮助代码找到对应的先验框,一般不修改。# ---------------------------------------------------------------------#"anchors_path": 'model_data/yolo_anchors.txt',"anchors_mask": [[6, 7, 8], [3, 4, 5], [0, 1, 2]],# ---------------------------------------------------------------------##   输入图片的大小,必须为32的倍数。# ---------------------------------------------------------------------#"input_shape": [416, 416],# ---------------------------------------------------------------------##   只有得分大于置信度的预测框会被保留下来# ---------------------------------------------------------------------#"confidence": 0.5,# ---------------------------------------------------------------------##   非极大抑制所用到的nms_iou大小# ---------------------------------------------------------------------#"nms_iou": 0.3,# ---------------------------------------------------------------------##   该变量用于控制是否使用letterbox_image对输入图像进行不失真的resize,#   在多次测试后,发现关闭letterbox_image直接resize的效果更好# ---------------------------------------------------------------------#"letterbox_image": False,# -------------------------------##   是否使用Cuda#   没有GPU可以设置成False# -------------------------------#"cuda": True,}@classmethoddef get_defaults(cls, n):if n in cls._defaults:return cls._defaults[n]else:return "Unrecognized attribute name '" + n + "'"# ---------------------------------------------------##   初始化YOLO# ---------------------------------------------------#def __init__(self, **kwargs):self.__dict__.update(self._defaults)for name, value in kwargs.items():setattr(self, name, value)self._defaults[name] = value# ---------------------------------------------------##   获得种类和先验框的数量# ---------------------------------------------------#self.class_names, self.num_classes = get_classes(self.classes_path)self.anchors, self.num_anchors = get_anchors(self.anchors_path)self.bbox_util = DecodeBox(self.anchors, self.num_classes, (self.input_shape[0], self.input_shape[1]),self.anchors_mask)# ---------------------------------------------------##   画框设置不同的颜色# ---------------------------------------------------#hsv_tuples = [(x / self.num_classes, 1., 1.) for x in range(self.num_classes)]self.colors = list(map(lambda x: colorsys.hsv_to_rgb(*x), hsv_tuples))self.colors = list(map(lambda x: (int(x[0] * 255), int(x[1] * 255), int(x[2] * 255)), self.colors))self.generate()show_config(**self._defaults)# ---------------------------------------------------##   生成模型# ---------------------------------------------------#def generate(self, onnx=False):# ---------------------------------------------------##   建立yolov3模型,载入yolov3模型的权重# ---------------------------------------------------#self.net = YoloBody(self.anchors_mask, self.num_classes)device = torch.device('cuda' if torch.cuda.is_available() else 'cpu')self.net.load_state_dict(torch.load(self.model_path, map_location=device))self.net = self.net.eval()print('{} model, anchors, and classes loaded.'.format(self.model_path))if not onnx:if self.cuda:self.net = nn.DataParallel(self.net)self.net = self.net.cuda()# ---------------------------------------------------##   检测图片# ---------------------------------------------------#def detect_image(self, image, crop=False, count=False):image_shape = np.array(np.shape(image)[0:2])# ---------------------------------------------------------##   在这里将图像转换成RGB图像,防止灰度图在预测时报错。#   代码仅仅支持RGB图像的预测,所有其它类型的图像都会转化成RGB# ---------------------------------------------------------#image = cvtColor(image)# ---------------------------------------------------------##   给图像增加灰条,实现不失真的resize#   也可以直接resize进行识别# ---------------------------------------------------------#image_data = resize_image(image, (self.input_shape[1], self.input_shape[0]), self.letterbox_image)# ---------------------------------------------------------##   添加上batch_size维度# ---------------------------------------------------------#image_data = np.expand_dims(np.transpose(preprocess_input(np.array(image_data, dtype='float32')), (2, 0, 1)), 0)with torch.no_grad():images = torch.from_numpy(image_data)if self.cuda:images = images.cuda()# ---------------------------------------------------------##   将图像输入网络当中进行预测!# ---------------------------------------------------------#outputs = self.net(images)outputs = self.bbox_util.decode_box(outputs)# ---------------------------------------------------------##   将预测框进行堆叠,然后进行非极大抑制# ---------------------------------------------------------#results = self.bbox_util.non_max_suppression(torch.cat(outputs, 1), self.num_classes, self.input_shape,image_shape, self.letterbox_image, conf_thres=self.confidence,nms_thres=self.nms_iou)if results[0] is None:return imagetop_label = np.array(results[0][:, 6], dtype='int32')top_conf = results[0][:, 4] * results[0][:, 5]top_boxes = results[0][:, :4]# ---------------------------------------------------------##   设置字体与边框厚度# ---------------------------------------------------------#font = ImageFont.truetype(font='model_data/simhei.ttf',size=np.floor(3e-2 * image.size[1] + 0.5).astype('int32'))thickness = int(max((image.size[0] + image.size[1]) // np.mean(self.input_shape), 1))# ---------------------------------------------------------##   计数# ---------------------------------------------------------#if count:print("top_label:", top_label)classes_nums = np.zeros([self.num_classes])for i in range(self.num_classes):num = np.sum(top_label == i)if num > 0:print(self.class_names[i], " : ", num)classes_nums[i] = numprint("classes_nums:", classes_nums)# ---------------------------------------------------------##   是否进行目标的裁剪# ---------------------------------------------------------#if crop:for i, c in list(enumerate(top_label)):top, left, bottom, right = top_boxes[i]top = max(0, np.floor(top).astype('int32'))left = max(0, np.floor(left).astype('int32'))bottom = min(image.size[1], np.floor(bottom).astype('int32'))right = min(image.size[0], np.floor(right).astype('int32'))dir_save_path = "img_crop"if not os.path.exists(dir_save_path):os.makedirs(dir_save_path)crop_image = image.crop([left, top, right, bottom])crop_image.save(os.path.join(dir_save_path, "crop_" + str(i) + ".png"), quality=95, subsampling=0)print("save crop_" + str(i) + ".png to " + dir_save_path)# ---------------------------------------------------------##   图像绘制# ---------------------------------------------------------#for i, c in list(enumerate(top_label)):predicted_class = self.class_names[int(c)]box = top_boxes[i]score = top_conf[i]top, left, bottom, right = boxtop = max(0, np.floor(top).astype('int32'))left = max(0, np.floor(left).astype('int32'))bottom = min(image.size[1], np.floor(bottom).astype('int32'))right = min(image.size[0], np.floor(right).astype('int32'))label = '{} {:.2f}'.format(predicted_class, score)draw = ImageDraw.Draw(image)label_size = draw.textsize(label, font)label = label.encode('utf-8')print(label, top, left, bottom, right)if top - label_size[1] >= 0:text_origin = np.array([left, top - label_size[1]])else:text_origin = np.array([left, top + 1])for i in range(thickness):draw.rectangle([left + i, top + i, right - i, bottom - i], outline=self.colors[c])draw.rectangle([tuple(text_origin), tuple(text_origin + label_size)], fill=self.colors[c])draw.text(text_origin, str(label, 'UTF-8'), fill=(0, 0, 0), font=font)del drawreturn imagedef get_FPS(self, image, test_interval):image_shape = np.array(np.shape(image)[0:2])# ---------------------------------------------------------##   在这里将图像转换成RGB图像,防止灰度图在预测时报错。#   代码仅仅支持RGB图像的预测,所有其它类型的图像都会转化成RGB# ---------------------------------------------------------#image = cvtColor(image)# ---------------------------------------------------------##   给图像增加灰条,实现不失真的resize#   也可以直接resize进行识别# ---------------------------------------------------------#image_data = resize_image(image, (self.input_shape[1], self.input_shape[0]), self.letterbox_image)# ---------------------------------------------------------##   添加上batch_size维度# ---------------------------------------------------------#image_data = np.expand_dims(np.transpose(preprocess_input(np.array(image_data, dtype='float32')), (2, 0, 1)), 0)with torch.no_grad():images = torch.from_numpy(image_data)if self.cuda:images = images.cuda()# ---------------------------------------------------------##   将图像输入网络当中进行预测!# ---------------------------------------------------------#outputs = self.net(images)outputs = self.bbox_util.decode_box(outputs)# ---------------------------------------------------------##   将预测框进行堆叠,然后进行非极大抑制# ---------------------------------------------------------#results = self.bbox_util.non_max_suppression(torch.cat(outputs, 1), self.num_classes, self.input_shape,image_shape, self.letterbox_image, conf_thres=self.confidence,nms_thres=self.nms_iou)t1 = time.time()for _ in range(test_interval):with torch.no_grad():# ---------------------------------------------------------##   将图像输入网络当中进行预测!# ---------------------------------------------------------#outputs = self.net(images)outputs = self.bbox_util.decode_box(outputs)# ---------------------------------------------------------##   将预测框进行堆叠,然后进行非极大抑制# ---------------------------------------------------------#results = self.bbox_util.non_max_suppression(torch.cat(outputs, 1), self.num_classes, self.input_shape,image_shape, self.letterbox_image,conf_thres=self.confidence, nms_thres=self.nms_iou)t2 = time.time()tact_time = (t2 - t1) / test_intervalreturn tact_timedef detect_heatmap(self, image, heatmap_save_path):import cv2import matplotlib.pyplot as pltdef sigmoid(x):y = 1.0 / (1.0 + np.exp(-x))return y# ---------------------------------------------------------##   在这里将图像转换成RGB图像,防止灰度图在预测时报错。#   代码仅仅支持RGB图像的预测,所有其它类型的图像都会转化成RGB# ---------------------------------------------------------#image = cvtColor(image)# ---------------------------------------------------------##   给图像增加灰条,实现不失真的resize#   也可以直接resize进行识别# ---------------------------------------------------------#image_data = resize_image(image, (self.input_shape[1], self.input_shape[0]), self.letterbox_image)# ---------------------------------------------------------##   添加上batch_size维度# ---------------------------------------------------------#image_data = np.expand_dims(np.transpose(preprocess_input(np.array(image_data, dtype='float32')), (2, 0, 1)), 0)with torch.no_grad():images = torch.from_numpy(image_data)if self.cuda:images = images.cuda()# ---------------------------------------------------------##   将图像输入网络当中进行预测!# ---------------------------------------------------------#outputs = self.net(images)plt.imshow(image, alpha=1)plt.axis('off')mask = np.zeros((image.size[1], image.size[0]))for sub_output in outputs:sub_output = sub_output.cpu().numpy()b, c, h, w = np.shape(sub_output)sub_output = np.transpose(np.reshape(sub_output, [b, 3, -1, h, w]), [0, 3, 4, 1, 2])[0]score = np.max(sigmoid(sub_output[..., 4]), -1)score = cv2.resize(score, (image.size[0], image.size[1]))normed_score = (score * 255).astype('uint8')mask = np.maximum(mask, normed_score)plt.imshow(mask, alpha=0.5, interpolation='nearest', cmap="jet")plt.axis('off')plt.subplots_adjust(top=1, bottom=0, right=1, left=0, hspace=0, wspace=0)plt.margins(0, 0)plt.savefig(heatmap_save_path, dpi=200, bbox_inches='tight', pad_inches=-0.1)print("Save to the " + heatmap_save_path)plt.show()def convert_to_onnx(self, simplify, model_path):import onnxself.generate(onnx=True)im = torch.zeros(1, 3, *self.input_shape).to('cpu')  # image size(1, 3, 512, 512) BCHWinput_layer_names = ["images"]output_layer_names = ["output"]# Export the modelprint(f'Starting export with onnx {onnx.__version__}.')torch.onnx.export(self.net,im,f=model_path,verbose=False,opset_version=12,training=torch.onnx.TrainingMode.EVAL,do_constant_folding=True,input_names=input_layer_names,output_names=output_layer_names,dynamic_axes=None)# Checksmodel_onnx = onnx.load(model_path)  # load onnx modelonnx.checker.check_model(model_onnx)  # check onnx model# Simplify onnxif simplify:import onnxsimprint(f'Simplifying with onnx-simplifier {onnxsim.__version__}.')model_onnx, check = onnxsim.simplify(model_onnx,dynamic_input_shape=False,input_shapes=None)assert check, 'assert check failed'onnx.save(model_onnx, model_path)print('Onnx model save as {}'.format(model_path))def get_map_txt(self, image_id, image, class_names, map_out_path):f = open(os.path.join(map_out_path, "detection-results/" + image_id + ".txt"), "w")image_shape = np.array(np.shape(image)[0:2])# ---------------------------------------------------------##   在这里将图像转换成RGB图像,防止灰度图在预测时报错。#   代码仅仅支持RGB图像的预测,所有其它类型的图像都会转化成RGB# ---------------------------------------------------------#image = cvtColor(image)# ---------------------------------------------------------##   给图像增加灰条,实现不失真的resize#   也可以直接resize进行识别# ---------------------------------------------------------#image_data = resize_image(image, (self.input_shape[1], self.input_shape[0]), self.letterbox_image)# ---------------------------------------------------------##   添加上batch_size维度# ---------------------------------------------------------#image_data = np.expand_dims(np.transpose(preprocess_input(np.array(image_data, dtype='float32')), (2, 0, 1)), 0)with torch.no_grad():images = torch.from_numpy(image_data)if self.cuda:images = images.cuda()# ---------------------------------------------------------##   将图像输入网络当中进行预测!# ---------------------------------------------------------#outputs = self.net(images)outputs = self.bbox_util.decode_box(outputs)# ---------------------------------------------------------##   将预测框进行堆叠,然后进行非极大抑制# ---------------------------------------------------------#results = self.bbox_util.non_max_suppression(torch.cat(outputs, 1), self.num_classes, self.input_shape,image_shape, self.letterbox_image, conf_thres=self.confidence, nms_thres=self.nms_iou)if results[0] is None:returntop_label = np.array(results[0][:, 6], dtype='int32')top_conf = results[0][:, 4] * results[0][:, 5]top_boxes = results[0][:, :4]for i, c in list(enumerate(top_label)):predicted_class = self.class_names[int(c)]box = top_boxes[i]score = str(top_conf[i])top, left, bottom, right = boxif predicted_class not in class_names:continuef.write("%s %s %s %s %s %s\n" % (predicted_class, score[:6], str(int(left)), str(int(top)), str(int(right)), str(int(bottom))))f.close()return