Spring/Spring Boot整合ActiveMQ
- 一、Spring整合ActiveMQ
- 1.pom.xml
- 2.Queue - 队列
- 2.1 applicationContext.xml
- 2.2 生产者
- 2.3 消费者
- 3.Topic - 主题
- 3.1 applicationContext.xml
- 3.2 生产者
- 3.3 消费者
- 4.消费者 - 监听器
- 4.1 编写监听器类
- 4.2 配置监听器
- 4.3 生产者+消费者一体
- 二、Spring Boot整合ActiveMQ
- 1.Queue - 队列
- 1.1 生产者
- 1.1.1 创建Maven工程
- 1.1.2 pom.xml
- 1.1.3 application.yml
- 1.1.4 创建配置文件Bean
- 1.1.5 生产者
- 1.1.6 主启动类
- 1.1.7 测试单元类
- 1.1.8 案例-定时投递
- 1.2 消费者
- 1.2.1 创建Maven工程
- 1.2.2 pom.xml
- 1.2.3 application.yml
- 1.2.4 消费者-监听类
- 1.2.5 主启动类
- 2.Topic - 主题
- 2.1 生产者
- 2.1.1 创建Maven工程
- 2.1.2 pom.xml
- 2.1.3 application.yml
- 2.1.4 创建配置文件Bean
- 2.1.5 生产者
- 2.1.6 主启动类
- 2.2 消费者
- 2.2.1 创建Maven工程
- 2.2.2 pom.xml
- 2.2.3 application.yml
- 2.2.4 消费者
- 2.2.5 主启动类
一、Spring整合ActiveMQ
1.pom.xml
<?xml version="1.0" encoding="UTF-8"?>
<project xmlns="http://maven.apache.org/POM/4.0.0"xmlns:xsi="http://www.w3.org/2001/XMLSchema-instance"xsi:schemaLocation="http://maven.apache.org/POM/4.0.0 http://maven.apache.org/xsd/maven-4.0.0.xsd"><modelVersion>4.0.0</modelVersion><groupId>com.qingsi.activemq</groupId><artifactId>activemq_test</artifactId><version>1.0-SNAPSHOT</version><properties><maven.compiler.source>8</maven.compiler.source><maven.compiler.target>8</maven.compiler.target></properties><dependencies><dependency><!-- activemq所需要的jar包配置 --><groupId>org.apache.activemq</groupId><artifactId>activemq-all</artifactId><version>5.15.11</version></dependency><!-- 池化技术 --><dependency><groupId>org.apache.activemq</groupId><artifactId>activemq-pool</artifactId><version>5.15.10</version></dependency><dependency><groupId>com.fasterxml.jackson.core</groupId><artifactId>jackson-databind</artifactId><version>2.10.1</version></dependency><!-- https://mvnrepository.com/artifact/org.apache.xbean/xbean-spring --><dependency><groupId>org.apache.xbean</groupId><artifactId>xbean-spring</artifactId><version>4.15</version></dependency><!-- https://mvnrepository.com/artifact/org.springframework/spring-jms --><dependency><groupId>org.springframework</groupId><artifactId>spring-jms</artifactId><version>5.2.1.RELEASE</version></dependency><!-- https://mvnrepository.com/artifact/org.springframework/spring-aop --><dependency><groupId>org.springframework</groupId><artifactId>spring-aop</artifactId><version>5.2.1.RELEASE</version></dependency><!--  下面是junit/logback等基础配置  --><dependency><groupId>ch.qos.logback</groupId><artifactId>logback-classic</artifactId><version>1.2.3</version></dependency><dependency><groupId>org.projectlombok</groupId><artifactId>lombok</artifactId><version>1.16.18</version><scope>provided</scope></dependency><dependency><groupId>junit</groupId><artifactId>junit</artifactId><version>4.12</version></dependency></dependencies></project>
2.Queue - 队列
2.1 applicationContext.xml
- 路径:src/main/resources/applicationContext.xml
<?xml version="1.0" encoding="UTF-8"?>
<beans xmlns="http://www.springframework.org/schema/beans"xmlns:xsi="http://www.w3.org/2001/XMLSchema-instance"xmlns:context="http://www.springframework.org/schema/context"xsi:schemaLocation="http://www.springframework.org/schema/beans http://www.springframework.org/schema/beans/spring-beans.xsd http://www.springframework.org/schema/context https://www.springframework.org/schema/context/spring-context.xsd"><!--  开启包的自动扫描  --><context:component-scan base-package="com.qingsi.activemq"/><!--  配置生产者  --><bean id="connectionFactory" class="org.apache.activemq.pool.PooledConnectionFactory" destroy-method="stop"><property name="connectionFactory"><!--      正真可以生产Connection的ConnectionFactory,由对应的JMS服务商提供  --><bean class="org.apache.activemq.spring.ActiveMQConnectionFactory"><property name="brokerURL" value="tcp://192.168.86.128:61616"/></bean></property><property name="maxConnections" value="100"/></bean><!--  这个是队列目的地,点对点的Queue  --><bean id="destinationQueue" class="org.apache.activemq.command.ActiveMQQueue"><!--    通过构造注入Queue名    --><constructor-arg index="0" value="spring-active-queue"/></bean><!--  Spring提供的JMS工具类,他可以进行消息发送,接收等  --><bean id="jmsTemplate" class="org.springframework.jms.core.JmsTemplate"><!--    传入连接工厂    --><property name="connectionFactory" ref="connectionFactory"/><!--    传入目的地    --><property name="defaultDestination" ref="destinationQueue"/><!--    消息自动转换器    --><property name="messageConverter"><bean class="org.springframework.jms.support.converter.SimpleMessageConverter"/></property></bean>
</beans>
2.2 生产者
package com.qingsi.activemq.spring;import org.apache.xbean.spring.context.ClassPathXmlApplicationContext;
import org.springframework.beans.factory.annotation.Autowired;
import org.springframework.context.ApplicationContext;
import org.springframework.jms.core.JmsTemplate;
import org.springframework.jms.core.MessageCreator;
import org.springframework.stereotype.Service;import javax.jms.JMSException;
import javax.jms.Message;
import javax.jms.Session;
import javax.jms.TextMessage;@Service
public class SpringMQProduce {@Autowiredprivate JmsTemplate jmsTemplate;public static void main(String[] args) {// 获取配置文件对象ApplicationContext ctx = new ClassPathXmlApplicationContext("applicationContext.xml");// 获取SpringMQProduce对象,用于调用jmsTemplate// 下面等同于 new SpringMQProduce(),但是交给Spring管理,他只会new一次,后续都是用同一个实例对象SpringMQProduce produce = ctx.getBean(SpringMQProduce.class);// 由于 目标队列 在配置文件指定了,所以在发送的时候不需要再指定produce.jmsTemplate.send(new MessageCreator() {@Overridepublic Message createMessage(Session session) throws JMSException {TextMessage textMessage = session.createTextMessage("Spring和Active整合的消息");return textMessage;}});// 下面是lambda表达式写法,和上面效果一样// produce.jmsTemplate.send((session -> {//     TextMessage textMessage = session.createTextMessage("Spring和Active整合的消息");//     return textMessage;// }));System.out.println("消息发送完毕");}}
2.3 消费者
package com.qingsi.activemq.spring;import org.apache.xbean.spring.context.ClassPathXmlApplicationContext;
import org.springframework.beans.factory.annotation.Autowired;
import org.springframework.context.ApplicationContext;
import org.springframework.jms.core.JmsTemplate;
import org.springframework.stereotype.Service;@Service
public class SpringMQConsumer {@Autowiredprivate JmsTemplate jmsTemplate;public static void main(String[] args) {// 获取配置文件对象ApplicationContext ctx = new ClassPathXmlApplicationContext("applicationContext.xml");// 获取SpringMQConsumer对象,用于调用jmsTemplate// 下面等同于 new SpringMQConsumer(),但是交给Spring管理,他只会new一次,后续都是用同一个实例对象SpringMQConsumer consumer = ctx.getBean(SpringMQConsumer.class);String retValue = (String) consumer.jmsTemplate.receiveAndConvert();System.out.println("spring消费者收到的消息:" + retValue);}}
3.Topic - 主题
3.1 applicationContext.xml
- 路径:src/main/resources/applicationContext.xml
<?xml version="1.0" encoding="UTF-8"?>
<beans xmlns="http://www.springframework.org/schema/beans"xmlns:xsi="http://www.w3.org/2001/XMLSchema-instance"xmlns:context="http://www.springframework.org/schema/context"xsi:schemaLocation="http://www.springframework.org/schema/beans http://www.springframework.org/schema/beans/spring-beans.xsd http://www.springframework.org/schema/context https://www.springframework.org/schema/context/spring-context.xsd"><!--  开启包的自动扫描  --><context:component-scan base-package="com.qingsi.activemq"/><!--  配置生产者  --><bean id="connectionFactory" class="org.apache.activemq.pool.PooledConnectionFactory" destroy-method="stop"><property name="connectionFactory"><!--      正真可以生产Connection的ConnectionFactory,由对应的JMS服务商提供  --><bean class="org.apache.activemq.spring.ActiveMQConnectionFactory"><property name="brokerURL" value="tcp://192.168.86.128:61616"/></bean></property><property name="maxConnections" value="100"/></bean><!--  这个是队列目的地,  发布订阅的主题Topic--><bean id="destinationTopic" class="org.apache.activemq.command.ActiveMQTopic"><constructor-arg index="0" value="spring-active-topic"/></bean><!--  Spring提供的JMS工具类,他可以进行消息发送,接收等  --><bean id="jmsTemplate" class="org.springframework.jms.core.JmsTemplate"><!--    传入连接工厂    --><property name="connectionFactory" ref="connectionFactory"/><!--    传入目的地    --><property name="defaultDestination" ref="destinationTopic"/><!--    消息自动转换器    --><property name="messageConverter"><bean class="org.springframework.jms.support.converter.SimpleMessageConverter"/></property></bean>
</beans>
3.2 生产者
- 和队列的代码一样,只是在配置文件里面改了destination
3.3 消费者
- 和队列的代码一样,只是在配置文件里面改了destination
4.消费者 - 监听器
- 实现目标:在Spring里面实现消费者不启动,直接通过配置监听完成
- 类似于前面setMessageListenner实时间提供消息
注意:配置了监听器,那么启动生产者,就会自动消费,不需要再启动消费者了
4.1 编写监听器类
package com.qingsi.activemq.spring;import org.springframework.stereotype.Component;import javax.jms.JMSException;
import javax.jms.Message;
import javax.jms.MessageListener;
import javax.jms.TextMessage;@Component
public class MyMessageListener implements MessageListener {@Overridepublic void onMessage(Message message) {if (message instanceof TextMessage){TextMessage textMessage = (TextMessage) message;try {System.out.println("收到消息: " + textMessage.getText());} catch (JMSException e) {e.printStackTrace();}}}
}
4.2 配置监听器
- applicationContext.xml
<?xml version="1.0" encoding="UTF-8"?>
<beans xmlns="http://www.springframework.org/schema/beans"xmlns:xsi="http://www.w3.org/2001/XMLSchema-instance"xmlns:context="http://www.springframework.org/schema/context"xsi:schemaLocation="http://www.springframework.org/schema/beans http://www.springframework.org/schema/beans/spring-beans.xsd http://www.springframework.org/schema/context https://www.springframework.org/schema/context/spring-context.xsd"><!--  开启包的自动扫描  --><context:component-scan base-package="com.qingsi.activemq"/><!--  配置生产者  --><bean id="connectionFactory" class="org.apache.activemq.pool.PooledConnectionFactory" destroy-method="stop"><property name="connectionFactory"><!--      正真可以生产Connection的ConnectionFactory,由对应的JMS服务商提供  --><bean class="org.apache.activemq.spring.ActiveMQConnectionFactory"><property name="brokerURL" value="tcp://192.168.86.128:61616"/></bean></property><property name="maxConnections" value="100"/></bean><!--  这个是队列目的地,  发布订阅的主题Topic--><bean id="destinationTopic" class="org.apache.activemq.command.ActiveMQTopic"><constructor-arg index="0" value="spring-active-topic"/></bean><!--  Spring提供的JMS工具类,他可以进行消息发送,接收等  --><bean id="jmsTemplate" class="org.springframework.jms.core.JmsTemplate"><!--    传入连接工厂    --><property name="connectionFactory" ref="connectionFactory"/><!--    传入目的地    --><property name="defaultDestination" ref="destinationTopic"/><!--    消息自动转换器    --><property name="messageConverter"><bean class="org.springframework.jms.support.converter.SimpleMessageConverter"/></property></bean><!--  配置Jms消息监听器  --><bean id="defaultMessageListenerContainer" class="org.springframework.jms.listener.DefaultMessageListenerContainer"><!--  Jms连接的工厂     --><property name="connectionFactory" ref="connectionFactory"/><!--   设置默认的监听目的地     --><property name="destination" ref="destinationTopic"/><!--  指定自己实现了MessageListener的类     --><property name="messageListener" ref="myMessageListener"/></bean>
</beans>
4.3 生产者+消费者一体
package com.qingsi.activemq.spring;import org.apache.xbean.spring.context.ClassPathXmlApplicationContext;
import org.springframework.beans.factory.annotation.Autowired;
import org.springframework.context.ApplicationContext;
import org.springframework.jms.core.JmsTemplate;
import org.springframework.jms.core.MessageCreator;
import org.springframework.stereotype.Service;import javax.jms.JMSException;
import javax.jms.Message;
import javax.jms.Session;
import javax.jms.TextMessage;@Service
public class SpringMQProduce {@Autowiredprivate JmsTemplate jmsTemplate;public static void main(String[] args) {// 获取配置文件对象ApplicationContext ctx = new ClassPathXmlApplicationContext("applicationContext.xml");// 获取SpringMQProduce对象,用于调用jmsTemplate// 下面等同于 new SpringMQProduce(),但是交给Spring管理,他只会new一次,后续都是用同一个实例对象SpringMQProduce produce = ctx.getBean(SpringMQProduce.class);// 由于 目标队列 在配置文件指定了,所以在发送的时候不需要再指定produce.jmsTemplate.send((session -> {TextMessage textMessage = session.createTextMessage("Spring和Active整合的消息");return textMessage;}));System.out.println("消息发送完毕");}}
二、Spring Boot整合ActiveMQ
1.Queue - 队列
1.1 生产者
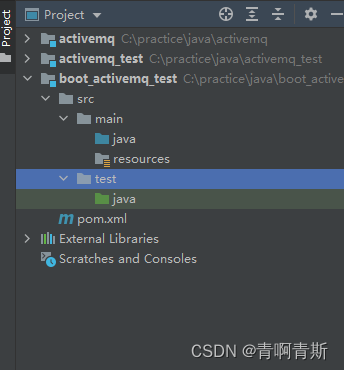
1.1.1 创建Maven工程
- 这里有案例,根据实际来创建:https://qingsi.blog.csdn.net/article/details/136130132
- 我创建了
- 工程名:boot_activemq_test
- 包名:com.qingsi.boot.activemq
1.1.2 pom.xml
<?xml version="1.0" encoding="UTF-8"?>
<project xmlns="http://maven.apache.org/POM/4.0.0"xmlns:xsi="http://www.w3.org/2001/XMLSchema-instance"xsi:schemaLocation="http://maven.apache.org/POM/4.0.0 http://maven.apache.org/xsd/maven-4.0.0.xsd"><modelVersion>4.0.0</modelVersion><groupId>com.qingsi.boot.activemq</groupId><artifactId>boot_activemq_test</artifactId><version>1.0-SNAPSHOT</version><properties><maven.compiler.source>8</maven.compiler.source><maven.compiler.target>8</maven.compiler.target></properties><dependencies><!-- https://mvnrepository.com/artifact/org.springframework.boot/spring-boot-starter --><dependency><groupId>org.springframework.boot</groupId><artifactId>spring-boot-starter</artifactId><version>2.2.1.RELEASE</version></dependency><dependency><groupId>org.springframework.boot</groupId><artifactId>spring-boot-starter-web</artifactId><version>2.2.1.RELEASE</version></dependency><dependency><groupId>org.springframework.boot</groupId><artifactId>spring-boot-starter-test</artifactId><version>2.2.1.RELEASE</version><scope>test</scope></dependency><!-- https://mvnrepository.com/artifact/org.springframework.boot/spring-boot-starter --><dependency><groupId>org.springframework.boot</groupId><artifactId>spring-boot-starter-activemq</artifactId><version>2.2.1.RELEASE</version></dependency></dependencies><build><plugins><plugin><groupId>org.springframework.boot</groupId><artifactId>spring-boot-maven-plugin</artifactId><version>2.2.1.RELEASE</version></plugin></plugins></build></project>
1.1.3 application.yml
- 路径:src/main/resources/application.yml
#Springboot启动端口
server:port: 8080#ActiveMQ配置
spring:activemq:broker-url: tcp://192.168.86.128:61616 #ActiveMQ服务器IPuser: admin #ActiveMQ连接用户名password: admin #ActiveMQ连接密码jms:#指定连接队列还是主题pub-sub-domain: false # false = Queue |  true = Topic#定义服务上的队列名
myqueue: springboot-activemq-queue
1.1.4 创建配置文件Bean
package com.qingsi.boot.activemq.config;import javax.jms.Queue;import org.apache.activemq.command.ActiveMQQueue;
import org.springframework.beans.factory.annotation.Value;
import org.springframework.context.annotation.Bean;
import org.springframework.jms.annotation.EnableJms;
import org.springframework.stereotype.Component;@Component
@EnableJms
public class ConfigBean {// 从配置文件读取 队列名称@Value("${myqueue}")private String myQueue;// 通过 队列名称 创建队列@Beanpublic Queue queue() {return new ActiveMQQueue(myQueue);}
}
1.1.5 生产者
package com.qingsi.boot.activemq.produce;import org.springframework.beans.factory.annotation.Autowired;
import org.springframework.jms.core.JmsMessagingTemplate;
import org.springframework.stereotype.Component;import javax.jms.Queue;
import java.util.UUID;@Component
public class QueueProduce {@Autowiredprivate JmsMessagingTemplate jmsMessagingTemplate;@Autowiredprivate Queue queue;public void produceMsg() {jmsMessagingTemplate.convertAndSend(queue, "-----" + UUID.randomUUID().toString().substring(0, 6));}
}
1.1.6 主启动类
package com.qingsi.boot.activemq;import org.springframework.boot.SpringApplication;
import org.springframework.boot.autoconfigure.SpringBootApplication;@SpringBootApplication
public class MainAppProduce {public static void main(String[] args) {SpringApplication.run(MainAppProduce.class, args);}
}
1.1.7 测试单元类
package com.qingsi.boot.activemq;import com.qingsi.boot.activemq.produce.QueueProduce;
import org.junit.Test;
import org.junit.runner.RunWith;
import org.springframework.boot.test.context.SpringBootTest;
import org.springframework.test.context.junit4.SpringJUnit4ClassRunner;
import org.springframework.test.context.web.WebAppConfiguration;import javax.annotation.Resource;@SpringBootTest(classes = MainAppProduce.class)
@RunWith(SpringJUnit4ClassRunner.class)
@WebAppConfiguration
public class TestActiveMQ {@Resourceprivate QueueProduce queueProduce;@Testpublic void testSend() {queueProduce.produceMsg();}
}
- 运行测试类

1.1.8 案例-定时投递
- 要求每隔3秒钟,往MQ推送消息
生产者
package com.qingsi.boot.activemq.produce;import org.springframework.beans.factory.annotation.Autowired;
import org.springframework.jms.core.JmsMessagingTemplate;
import org.springframework.scheduling.annotation.Scheduled;
import org.springframework.stereotype.Component;import javax.jms.Queue;
import java.util.UUID;@Component
public class QueueProduce {@Autowiredprivate JmsMessagingTemplate jmsMessagingTemplate;@Autowiredprivate Queue queue;public void produceMsg() {jmsMessagingTemplate.convertAndSend(queue, "-----" + UUID.randomUUID().toString().substring(0, 6));}// 间隔实际3秒定投@Scheduled(fixedDelay = 3000)public void produceMsgScheduled(){jmsMessagingTemplate.convertAndSend(queue, "-----" + UUID.randomUUID().toString().substring(0, 6));}
}
主启动类
- 开启Schedule
package com.qingsi.boot.activemq;import org.springframework.boot.SpringApplication;
import org.springframework.boot.autoconfigure.SpringBootApplication;
import org.springframework.scheduling.annotation.EnableScheduling;@SpringBootApplication
@EnableScheduling
public class MainAppProduce {public static void main(String[] args) {SpringApplication.run(MainAppProduce.class, args);}
}- 启动主启动类,就会定时发消息了
1.2 消费者
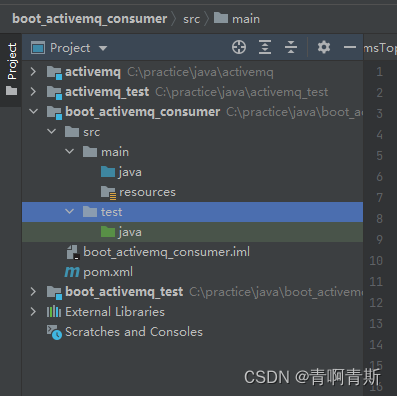
1.2.1 创建Maven工程
- 这里有案例,根据实际来创建:https://qingsi.blog.csdn.net/article/details/136130132
- 我创建了
- 工程名:boot_activemq_consumer
- 包名:com.qingsi.boot.activemq
1.2.2 pom.xml
<?xml version="1.0" encoding="UTF-8"?>
<project xmlns="http://maven.apache.org/POM/4.0.0"xmlns:xsi="http://www.w3.org/2001/XMLSchema-instance"xsi:schemaLocation="http://maven.apache.org/POM/4.0.0 http://maven.apache.org/xsd/maven-4.0.0.xsd"><modelVersion>4.0.0</modelVersion><groupId>com.qingsi.boot.activemq</groupId><artifactId>boot_activemq_consumer</artifactId><version>1.0-SNAPSHOT</version><properties><maven.compiler.source>8</maven.compiler.source><maven.compiler.target>8</maven.compiler.target></properties><dependencies><!-- https://mvnrepository.com/artifact/org.springframework.boot/spring-boot-starter --><dependency><groupId>org.springframework.boot</groupId><artifactId>spring-boot-starter</artifactId><version>2.2.1.RELEASE</version></dependency><dependency><groupId>org.springframework.boot</groupId><artifactId>spring-boot-starter-web</artifactId><version>2.2.1.RELEASE</version></dependency><dependency><groupId>org.springframework.boot</groupId><artifactId>spring-boot-starter-test</artifactId><version>2.2.1.RELEASE</version><scope>test</scope></dependency><!-- https://mvnrepository.com/artifact/org.springframework.boot/spring-boot-starter --><dependency><groupId>org.springframework.boot</groupId><artifactId>spring-boot-starter-activemq</artifactId><version>2.2.1.RELEASE</version></dependency></dependencies><build><plugins><plugin><groupId>org.springframework.boot</groupId><artifactId>spring-boot-maven-plugin</artifactId><version>2.2.1.RELEASE</version></plugin></plugins></build>
</project>
1.2.3 application.yml
#Springboot启动端口
server:port: 8888#ActiveMQ配置
spring:activemq:broker-url: tcp://192.168.86.128:61616 #ActiveMQ服务器IPuser: admin #ActiveMQ连接用户名password: admin #ActiveMQ连接密码jms:#指定连接队列还是主题pub-sub-domain: false # false = Queue |  true = Topic#定义服务上的队列名
myqueue: springboot-activemq-queue
1.2.4 消费者-监听类
package com.qingsi.activemq.consumer;import org.springframework.jms.annotation.JmsListener;
import org.springframework.stereotype.Component;import javax.jms.JMSException;
import javax.jms.TextMessage;@Component
public class QueueConsumer {// 开启监听@JmsListener(destination = "${myqueue}")public void receive(TextMessage textMessage) throws JMSException {System.out.println("消费者收到消息:" + textMessage.getText());}
}
1.2.5 主启动类
- 开启Jms监听
package com.qingsi.activemq;import org.springframework.boot.SpringApplication;
import org.springframework.boot.autoconfigure.SpringBootApplication;@SpringBootApplication
public class MainAppConsumer {public static void main(String[] args) {SpringApplication.run(MainAppConsumer.class, args);}
}
2.Topic - 主题
2.1 生产者
2.1.1 创建Maven工程
- 这里有案例,根据实际来创建:https://qingsi.blog.csdn.net/article/details/136130132
- 我创建了
- 工程名:boot_mq_topic_produce
- 包名:com.qingsi.boot.activemq.topic.produce
2.1.2 pom.xml
<?xml version="1.0" encoding="UTF-8"?>
<project xmlns="http://maven.apache.org/POM/4.0.0"xmlns:xsi="http://www.w3.org/2001/XMLSchema-instance"xsi:schemaLocation="http://maven.apache.org/POM/4.0.0 http://maven.apache.org/xsd/maven-4.0.0.xsd"><modelVersion>4.0.0</modelVersion><groupId>com.qingsi.boot.activemq.topic.produce</groupId><artifactId>boot_mq_topic_produce</artifactId><version>1.0-SNAPSHOT</version><properties><maven.compiler.source>8</maven.compiler.source><maven.compiler.target>8</maven.compiler.target></properties><dependencies><!-- https://mvnrepository.com/artifact/org.springframework.boot/spring-boot-starter --><dependency><groupId>org.springframework.boot</groupId><artifactId>spring-boot-starter</artifactId><version>2.2.1.RELEASE</version></dependency><dependency><groupId>org.springframework.boot</groupId><artifactId>spring-boot-starter-web</artifactId><version>2.2.1.RELEASE</version></dependency><dependency><groupId>org.springframework.boot</groupId><artifactId>spring-boot-starter-test</artifactId><version>2.2.1.RELEASE</version><scope>test</scope></dependency><!-- https://mvnrepository.com/artifact/org.springframework.boot/spring-boot-starter --><dependency><groupId>org.springframework.boot</groupId><artifactId>spring-boot-starter-activemq</artifactId><version>2.2.1.RELEASE</version></dependency></dependencies><build><plugins><plugin><groupId>org.springframework.boot</groupId><artifactId>spring-boot-maven-plugin</artifactId><version>2.2.1.RELEASE</version></plugin></plugins></build></project>
2.1.3 application.yml
#Springboot启动端口
server:port: 6666#ActiveMQ配置
spring:activemq:broker-url: tcp://192.168.86.128:61616 #ActiveMQ服务器IPuser: admin #ActiveMQ连接用户名password: admin #ActiveMQ连接密码jms:#指定连接队列还是主题pub-sub-domain: true # false = Queue |  true = Topic#定义服务上的队列名
myTopic: springboot-activemq-topic
2.1.4 创建配置文件Bean
package com.qingsi.boot.activemq.topic.config;import org.apache.activemq.command.ActiveMQTopic;
import org.springframework.beans.factory.annotation.Value;
import org.springframework.context.annotation.Bean;
import org.springframework.stereotype.Component;import javax.jms.Topic;@Component
public class ConfigBean {@Value("${myTopic}")private String topicName;@Beanpublic Topic topic(){return new ActiveMQTopic(topicName);}}
2.1.5 生产者
package com.qingsi.boot.activemq.topic.com.qingsi.boot.activemq.produce;import org.springframework.beans.factory.annotation.Autowired;
import org.springframework.jms.core.JmsMessagingTemplate;
import org.springframework.scheduling.annotation.Scheduled;
import org.springframework.stereotype.Component;import javax.jms.Topic;
import java.util.UUID;@Component
public class TopicProduce {@Autowiredprivate JmsMessagingTemplate jmsMessagingTemplate;@Autowiredprivate Topic topic;// 间隔实际3秒定投@Scheduled(fixedDelay = 3000)public void produceTopic() {jmsMessagingTemplate.convertAndSend(topic, "主题消息: " + UUID.randomUUID().toString().substring(0, 6));}}
2.1.6 主启动类
package com.qingsi.boot.activemq.topic;import org.springframework.boot.SpringApplication;
import org.springframework.boot.autoconfigure.SpringBootApplication;
import org.springframework.scheduling.annotation.EnableScheduling;@SpringBootApplication
@EnableScheduling
public class MainAppTopicProduce {public static void main(String[] args) {SpringApplication.run(MainAppTopicProduce.class, args);}}
2.2 消费者
2.2.1 创建Maven工程
- 这里有案例,根据实际来创建:https://qingsi.blog.csdn.net/article/details/136130132
- 我创建了
- 工程名:boot_mq_topic_consumer
- 包名:com.qingsi.boot.activemq.topic.consumer
2.2.2 pom.xml
<?xml version="1.0" encoding="UTF-8"?>
<project xmlns="http://maven.apache.org/POM/4.0.0"xmlns:xsi="http://www.w3.org/2001/XMLSchema-instance"xsi:schemaLocation="http://maven.apache.org/POM/4.0.0 http://maven.apache.org/xsd/maven-4.0.0.xsd"><modelVersion>4.0.0</modelVersion><groupId>com.qingsi.boot.activemq.topic.consumer</groupId><artifactId>boot_mq_topic_consumer</artifactId><version>1.0-SNAPSHOT</version><properties><maven.compiler.source>8</maven.compiler.source><maven.compiler.target>8</maven.compiler.target></properties><dependencies><!-- https://mvnrepository.com/artifact/org.springframework.boot/spring-boot-starter --><dependency><groupId>org.springframework.boot</groupId><artifactId>spring-boot-starter</artifactId><version>2.2.1.RELEASE</version></dependency><dependency><groupId>org.springframework.boot</groupId><artifactId>spring-boot-starter-web</artifactId><version>2.2.1.RELEASE</version></dependency><dependency><groupId>org.springframework.boot</groupId><artifactId>spring-boot-starter-test</artifactId><version>2.2.1.RELEASE</version><scope>test</scope></dependency><!-- https://mvnrepository.com/artifact/org.springframework.boot/spring-boot-starter --><dependency><groupId>org.springframework.boot</groupId><artifactId>spring-boot-starter-activemq</artifactId><version>2.2.1.RELEASE</version></dependency></dependencies><build><plugins><plugin><groupId>org.springframework.boot</groupId><artifactId>spring-boot-maven-plugin</artifactId><version>2.2.1.RELEASE</version></plugin></plugins></build></project>
2.2.3 application.yml
#Springboot启动端口
server:port: 5555#ActiveMQ配置
spring:activemq:broker-url: tcp://192.168.86.128:61616 #ActiveMQ服务器IPuser: admin #ActiveMQ连接用户名password: admin #ActiveMQ连接密码jms:#指定连接队列还是主题pub-sub-domain: true # false = Queue |  true = Topic#定义服务上的队列名
myTopic: springboot-activemq-topic
2.2.4 消费者
package com.qingsi.activemq.topic.consumer;import org.springframework.jms.annotation.JmsListener;
import org.springframework.stereotype.Component;import javax.jms.JMSException;
import javax.jms.TextMessage;@Component
public class TopicConsumer {// 开启监听@JmsListener(destination = "${myTopic}")public void receive(TextMessage textMessage) throws JMSException {System.out.println("消费者收到消息:" + textMessage.getText());}
}
2.2.5 主启动类
package com.qingsi.activemq.topic;import org.springframework.boot.SpringApplication;
import org.springframework.boot.autoconfigure.SpringBootApplication;@SpringBootApplication
public class MainAppTopicConsumer {public static void main(String[] args) {SpringApplication.run(MainAppTopicConsumer.class, args);}}


![[计算机网络]---Http协议](https://img-blog.csdnimg.cn/direct/85666f3e835e446e924fb9ce42ad64ed.png)
