文章目录
- 前言
- 一、安装准备
- 1. 安装条件
- 2. 安装jdk
- 3. 安装MySQL
- 二、安装dolphinscheduler
- 1. 下载并解压dolphinscheduler
- 2. 修改配置文件
- 2.1 修改 dolphinscheduler_env.sh 文件
- 2.2 修改 application.yaml 文件
- 3. 配置mysql数据源
- 3.1 修改MySQL安全策略
- 3.2 查看数据库
- 3.3 创建数据库
- 3.4 创建MySQL用户
- 3.5 配置MySQL驱动
- 4. 初始化数据库
- 5. 启动dolphinscheduler单机版
- 6. 登录 DolphinScheduler
- 三、dolphinscheduler单机版命令
- 1. 启停命令
- 1.1 启动dolphinscheduler单机版
- 1.2 停止dolphinscheduler单机版
- 1.3 重启dolphinscheduler单机版
- 总结
前言
本教程将介绍如何安装和配置 DolphinScheduler,一个分布式任务调度系统。您将学习如何准备安装环境,下载和解压 DolphinScheduler,修改配置文件,配置 MySQL 数据源,并进行数据库初始化。最后,您将学习如何启动 DolphinScheduler 单机版,并通过浏览器访问系统 UI。
一、安装准备
1. 安装条件
- jdk版本:1.8+
- MySQL版本:5.7+
- MySQL驱动版本:8.0.16+
2. 安装jdk
下载地址:https://www.oracle.com/java/technologies/downloads/#java8
下载后上传到/tmp目录下。
然后执行下面命令,用于创建目录、解压,并设置系统级环境变量。
mkdir -p /opt/module
tar -zxvf /tmp/jdk-8u401-linux-x64.tar.gz -C /opt/module/
echo >> /etc/profile
echo '#JAVA_HOME' >> /etc/profile
echo "export JAVA_HOME=/opt/module/jdk1.8.0_401" >> /etc/profile
echo 'export PATH=$PATH:$JAVA_HOME/bin' >> /etc/profile
source /etc/profile
3. 安装MySQL
在hadoop101安装MySQL。
- mysql5.7.44自动化安装教程
- mysql5.7.37自动化安装教程
二、安装dolphinscheduler
1. 下载并解压dolphinscheduler
wget --no-check-certificate https://archive.apache.org/dist/dolphinscheduler/3.1.4/apache-dolphinscheduler-3.1.4-bin.tar.gz -P /tmp
mkdir -p /opt/soft/dolphinscheduler
tar -zxvf /tmp/apache-dolphinscheduler-3.1.4-bin.tar.gz -C /opt/soft/dolphinscheduler
2. 修改配置文件
2.1 修改 dolphinscheduler_env.sh 文件
修改 /opt/soft/dolphinscheduler/apache-dolphinscheduler-3.1.4-bin/bin/env/dolphinscheduler_env.sh 文件。内容如下所示。
# 修改为自己的jdk安装目录
export JAVA_HOME=${JAVA_HOME:-/opt/module/jdk1.8.0_391}# 修改MySQL配置
export DATABASE=${DATABASE:-mysql}
export SPRING_PROFILES_ACTIVE=${DATABASE}
export SPRING_DATASOURCE_URL="jdbc:mysql://localhost:3306/dolphinscheduler?useUnicode=true&characterEncoding=UTF-8&useSSL=false"
export SPRING_DATASOURCE_USERNAME="dolphinscheduler"
export SPRING_DATASOURCE_PASSWORD="dolphinscheduler"# DolphinScheduler服务相关配置
export SPRING_CACHE_TYPE=${SPRING_CACHE_TYPE:-none}
export SPRING_JACKSON_TIME_ZONE=${SPRING_JACKSON_TIME_ZONE:-UTC}
export MASTER_FETCH_COMMAND_NUM=${MASTER_FETCH_COMMAND_NUM:-10}# 注册中心配置,修改为自己的zookeeper监听地址
export REGISTRY_TYPE=${REGISTRY_TYPE:-zookeeper}
export REGISTRY_ZOOKEEPER_CONNECT_STRING=${REGISTRY_ZOOKEEPER_CONNECT_STRING:-localhost:2181}# 这些环境变量根据自己的需要更改,没有保持默认即口
export HADOOP_HOME=${HADOOP_HOME:-/opt/soft/hadoop}
export HADOOP_CONF_DIR=${HADOOP_CONF_DIR:-/opt/soft/hadoop/etc/hadoop}
export SPARK_HOME1=${SPARK_HOME1:-/opt/soft/spark1}
export SPARK_HOME2=${SPARK_HOME2:-/opt/soft/spark2}
export PYTHON_HOME=${PYTHON_HOME:-/opt/soft/python}
export HIVE_HOME=${HIVE_HOME:-/opt/soft/hive}
export FLINK_HOME=${FLINK_HOME:-/opt/soft/flink}
export DATAX_HOME=${DATAX_HOME:-/opt/soft/datax}
export SEATUNNEL_HOME=${SEATUNNEL_HOME:-/opt/soft/seatunnel}
export CHUNJUN_HOME=${CHUNJUN_HOME:-/opt/soft/chunjun}export PATH=$HADOOP_HOME/bin:$SPARK_HOME1/bin:$SPARK_HOME2/bin:$PYTHON_HOME/bin:$JAVA_HOME/bin:$HIVE_HOME/bin:$FLINK_HOME/bin:$DATAX_HOME/bin:$SEATUNNEL_HOME/bin:$CHUNJUN_HOME/bin:$PATH
2.2 修改 application.yaml 文件
修改 /opt/soft/dolphinscheduler/apache-dolphinscheduler-3.1.4-bin/standalone-server/conf/application.yaml 文件。
修改了如下两处。

修改后的内容如下所示。
spring:jackson:time-zone: UTCdate-format: "yyyy-MM-dd HH:mm:ss"banner:charset: UTF-8cache:# default enable cache, you can disable by `type: none`type: nonecache-names:- tenant- user- processDefinition- processTaskRelation- taskDefinitioncaffeine:spec: maximumSize=100,expireAfterWrite=300s,recordStatssql:init:schema-locations: classpath:sql/dolphinscheduler_h2.sqldatasource:driver-class-name: com.mysql.cj.jdbc.Driverurl: jdbc:mysql://127.0.0.1:3306/dolphinscheduler?useUnicode=true&characterEncoding=UTF-8username: dolphinschedulerpassword: dolphinscheduler
#  datasource:
#    driver-class-name: org.h2.Driver
#    url: jdbc:h2:mem:dolphinscheduler;MODE=MySQL;DB_CLOSE_DELAY=-1;DATABASE_TO_LOWER=true
#    username: sa
#    password: ""quartz:job-store-type: jdbcjdbc:initialize-schema: neverproperties:org.quartz.threadPool:threadPriority: 5org.quartz.jobStore.isClustered: trueorg.quartz.jobStore.class: org.springframework.scheduling.quartz.LocalDataSourceJobStoreorg.quartz.scheduler.instanceId: AUTOorg.quartz.jobStore.tablePrefix: QRTZ_org.quartz.jobStore.acquireTriggersWithinLock: trueorg.quartz.scheduler.instanceName: DolphinSchedulerorg.quartz.threadPool.class: org.quartz.simpl.SimpleThreadPoolorg.quartz.jobStore.useProperties: falseorg.quartz.threadPool.makeThreadsDaemons: trueorg.quartz.threadPool.threadCount: 25org.quartz.jobStore.misfireThreshold: 60000org.quartz.scheduler.makeSchedulerThreadDaemon: trueorg.quartz.jobStore.driverDelegateClass: org.quartz.impl.jdbcjobstore.StdJDBCDelegateorg.quartz.jobStore.clusterCheckinInterval: 5000servlet:multipart:max-file-size: 1024MBmax-request-size: 1024MBmessages:basename: i18n/messagesjpa:hibernate:ddl-auto: nonemvc:pathmatch:matching-strategy: ANT_PATH_MATCHERregistry:type: zookeeperzookeeper:namespace: dolphinschedulerconnect-string: localhost:2181retry-policy:base-sleep-time: 60msmax-sleep: 300msmax-retries: 5session-timeout: 30sconnection-timeout: 9sblock-until-connected: 600msdigest: ~security:authentication:# Authentication types (supported types: PASSWORD,LDAP)type: PASSWORD# IF you set type `LDAP`, below config will be effectiveldap:# ldap server configurls: ldap://ldap.forumsys.com:389/base-dn: dc=example,dc=comusername: cn=read-only-admin,dc=example,dc=compassword: passworduser:# admin userId when you use LDAP loginadmin: read-only-adminidentity-attribute: uidemail-attribute: mail# action when ldap user is not exist (supported types: CREATE,DENY)not-exist-action: CREATE# Traffic control, if you turn on this config, the maximum number of request/s will be limited.
# global max request number per second
# default tenant-level max request number
traffic:control:global-switch: falsemax-global-qps-rate: 300tenant-switch: falsedefault-tenant-qps-rate: 10#customize-tenant-qps-rate:# eg.#tenant1: 11#tenant2: 20master:listen-port: 5678# master fetch command numfetch-command-num: 10# master prepare execute thread number to limit handle commands in parallelpre-exec-threads: 10# master execute thread number to limit process instances in parallelexec-threads: 10# master dispatch task number per batchdispatch-task-number: 3# master host selector to select a suitable worker, default value: LowerWeight. Optional values include random, round_robin, lower_weighthost-selector: lower_weight# master heartbeat intervalheartbeat-interval: 10s# Master heart beat task error threshold, if the continuous error count exceed this count, the master will close.heartbeat-error-threshold: 5# master commit task retry timestask-commit-retry-times: 5# master commit task intervaltask-commit-interval: 1sstate-wheel-interval: 5s# master max cpuload avg, only higher than the system cpu load average, master server can schedule. default value -1: the number of cpu cores * 2max-cpu-load-avg: -1# master reserved memory, only lower than system available memory, master server can schedule. default value 0.3, the unit is Greserved-memory: 0.3# failover intervalfailover-interval: 10m# kill yarn jon when failover taskInstance, default truekill-yarn-job-when-task-failover: trueworker-group-refresh-interval: 10sworker:# worker listener portlisten-port: 1234# worker execute thread number to limit task instances in parallelexec-threads: 10# worker heartbeat intervalheartbeat-interval: 10s# Worker heart beat task error threshold, if the continuous error count exceed this count, the worker will close.heartbeat-error-threshold: 5# worker host weight to dispatch tasks, default value 100host-weight: 100# tenant corresponds to the user of the system, which is used by the worker to submit the job. If system does not have this user, it will be automatically created after the parameter worker.tenant.auto.create is true.tenant-auto-create: true#Scenes to be used for distributed users.For example,users created by FreeIpa are stored in LDAP.This parameter only applies to Linux, When this parameter is true, worker.tenant.auto.create has no effect and will not automatically create tenants.tenant-distributed-user: false# worker max cpuload avg, only higher than the system cpu load average, worker server can be dispatched tasks. default value -1: the number of cpu cores * 2max-cpu-load-avg: -1# worker reserved memory, only lower than system available memory, worker server can be dispatched tasks. default value 0.3, the unit is Greserved-memory: 0.3# default worker groups separated by comma, like 'worker.groups=default,test'groups:- default# alert server listen hostalert-listen-host: localhostalert-listen-port: 50052task-execute-threads-full-policy: REJECTalert:port: 50052# Mark each alert of alert server if late after x milliseconds as failed.# Define value is (0 = infinite), and alert server would be waiting alert result.wait-timeout: 0python-gateway:# Weather enable python gateway server or not. The default value is true.enabled: true# Authentication token for connection from python api to python gateway server. Should be changed the default value# when you deploy in public network.auth-token: jwUDzpLsNKEFER4*a8gruBH_GsAurNxU7A@Xc# The address of Python gateway server start. Set its value to `0.0.0.0` if your Python API run in different# between Python gateway server. It could be be specific to other address like `127.0.0.1` or `localhost`gateway-server-address: 0.0.0.0# The port of Python gateway server start. Define which port you could connect to Python gateway server from# Python API side.gateway-server-port: 25333# The address of Python callback client.python-address: 127.0.0.1# The port of Python callback client.python-port: 25334# Close connection of socket server if no other request accept after x milliseconds. Define value is (0 = infinite),# and socket server would never close even though no requests acceptconnect-timeout: 0# Close each active connection of socket server if python program not active after x milliseconds. Define value is# (0 = infinite), and socket server would never close even though no requests acceptread-timeout: 0server:port: 12345servlet:session:timeout: 120mcontext-path: /dolphinscheduler/compression:enabled: truemime-types: text/html,text/xml,text/plain,text/css,text/javascript,application/javascript,application/json,application/xmljetty:max-http-form-post-size: 5000000management:endpoints:web:exposure:include: '*'endpoint:health:enabled: trueshow-details: alwayshealth:db:enabled: truedefaults:enabled: falsemetrics:tags:application: ${spring.application.name}audit:enabled: truemetrics:enabled: true# Override by profile
---
spring:config:activate:on-profile: postgresqlquartz:properties:org.quartz.jobStore.driverDelegateClass: org.quartz.impl.jdbcjobstore.PostgreSQLDelegatedatasource:driver-class-name: org.postgresql.Driverurl: jdbc:postgresql://127.0.0.1:5432/dolphinschedulerusername: rootpassword: root---
spring:config:activate:on-profile: mysqlsql:init:schema-locations: classpath:sql/dolphinscheduler_mysql.sqldatasource:driver-class-name: com.mysql.cj.jdbc.Driverurl: jdbc:mysql://127.0.0.1:3306/dolphinscheduler?useUnicode=true&characterEncoding=UTF-8username: dolphinschedulerpassword: dolphinscheduler
3. 配置mysql数据源
3.1 修改MySQL安全策略
修改安全策略为LOW,使其可以设置简单密码,根据自己的需要更改。
mysql -h localhost -P 3306 -uroot -proot -e "set global validate_password_length=4;"
mysql -h localhost -P 3306 -uroot -proot -e "set global validate_password_policy=LOW;"
3.2 查看数据库
查看dolphinscheduler数据库是否存在。
mysql -h localhost -P 3306 -uroot -proot -e "SHOW DATABASES;" | grep dolphinscheduler
若存在则删除。
mysql -h localhost -P 3306 -uroot -proot -e "DROP DATABASE dolphinscheduler;"
3.3 创建数据库
创建dolphinscheduler数据库
mysql -h localhost -P 3306 -uroot -proot -e "CREATE DATABASE dolphinscheduler DEFAULT CHARACTER SET utf8 DEFAULT COLLATE utf8_general_ci;"
3.4 创建MySQL用户
创建 dolphinscheduler 用户并授予操作 dolphinscheduler 数据库的权限。
此处创建dolphinscheduler用户并设置密码为dolphinscheduler。
mysql -h localhost -P 3306 -uroot -proot -e "CREATE USER 'dolphinscheduler'@'%' IDENTIFIED BY 'dolphinscheduler';"
授予操作 dolphinscheduler 数据库的权限并刷新权限。
mysql -h localhost -P 3306 -uroot -proot -e "GRANT ALL PRIVILEGES ON dolphinscheduler.* TO 'dolphinscheduler'@'%' IDENTIFIED BY 'dolphinscheduler';"
mysql -h localhost -P 3306 -uroot -proot -e "flush privileges;"
3.5 配置MySQL驱动
下载并配置MySQL驱动。
cd /opt/soft/dolphinscheduler
wget https://repo1.maven.org/maven2/mysql/mysql-connector-java/8.0.16/mysql-connector-java-8.0.16.jar -P /tmp
cp /tmp/mysql-connector-java-8.0.16.jar apache-dolphinscheduler-3.1.4-bin/worker-server/libs
cp /tmp/mysql-connector-java-8.0.16.jar apache-dolphinscheduler-3.1.4-bin/api-server/libs
cp /tmp/mysql-connector-java-8.0.16.jar apache-dolphinscheduler-3.1.4-bin/alert-server/libs
cp /tmp/mysql-connector-java-8.0.16.jar apache-dolphinscheduler-3.1.4-bin/master-server/libs
cp /tmp/mysql-connector-java-8.0.16.jar apache-dolphinscheduler-3.1.4-bin/tools/libs
cp /tmp/mysql-connector-java-8.0.16.jar apache-dolphinscheduler-3.1.4-bin/standalone-server/libs/standalone-server
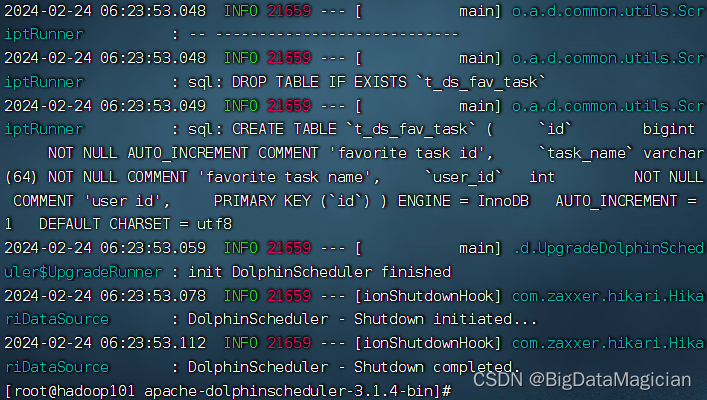
4. 初始化数据库
初始化dolphinscheduler数据库。
cd /opt/soft/dolphinscheduler/apache-dolphinscheduler-3.1.4-bin
bash tools/bin/upgrade-schema.sh
初始化成功如下图所示。
5. 启动dolphinscheduler单机版
cd /opt/soft/dolphinscheduler/apache-dolphinscheduler-3.1.4-bin
./bin/dolphinscheduler-daemon.sh start standalone-server
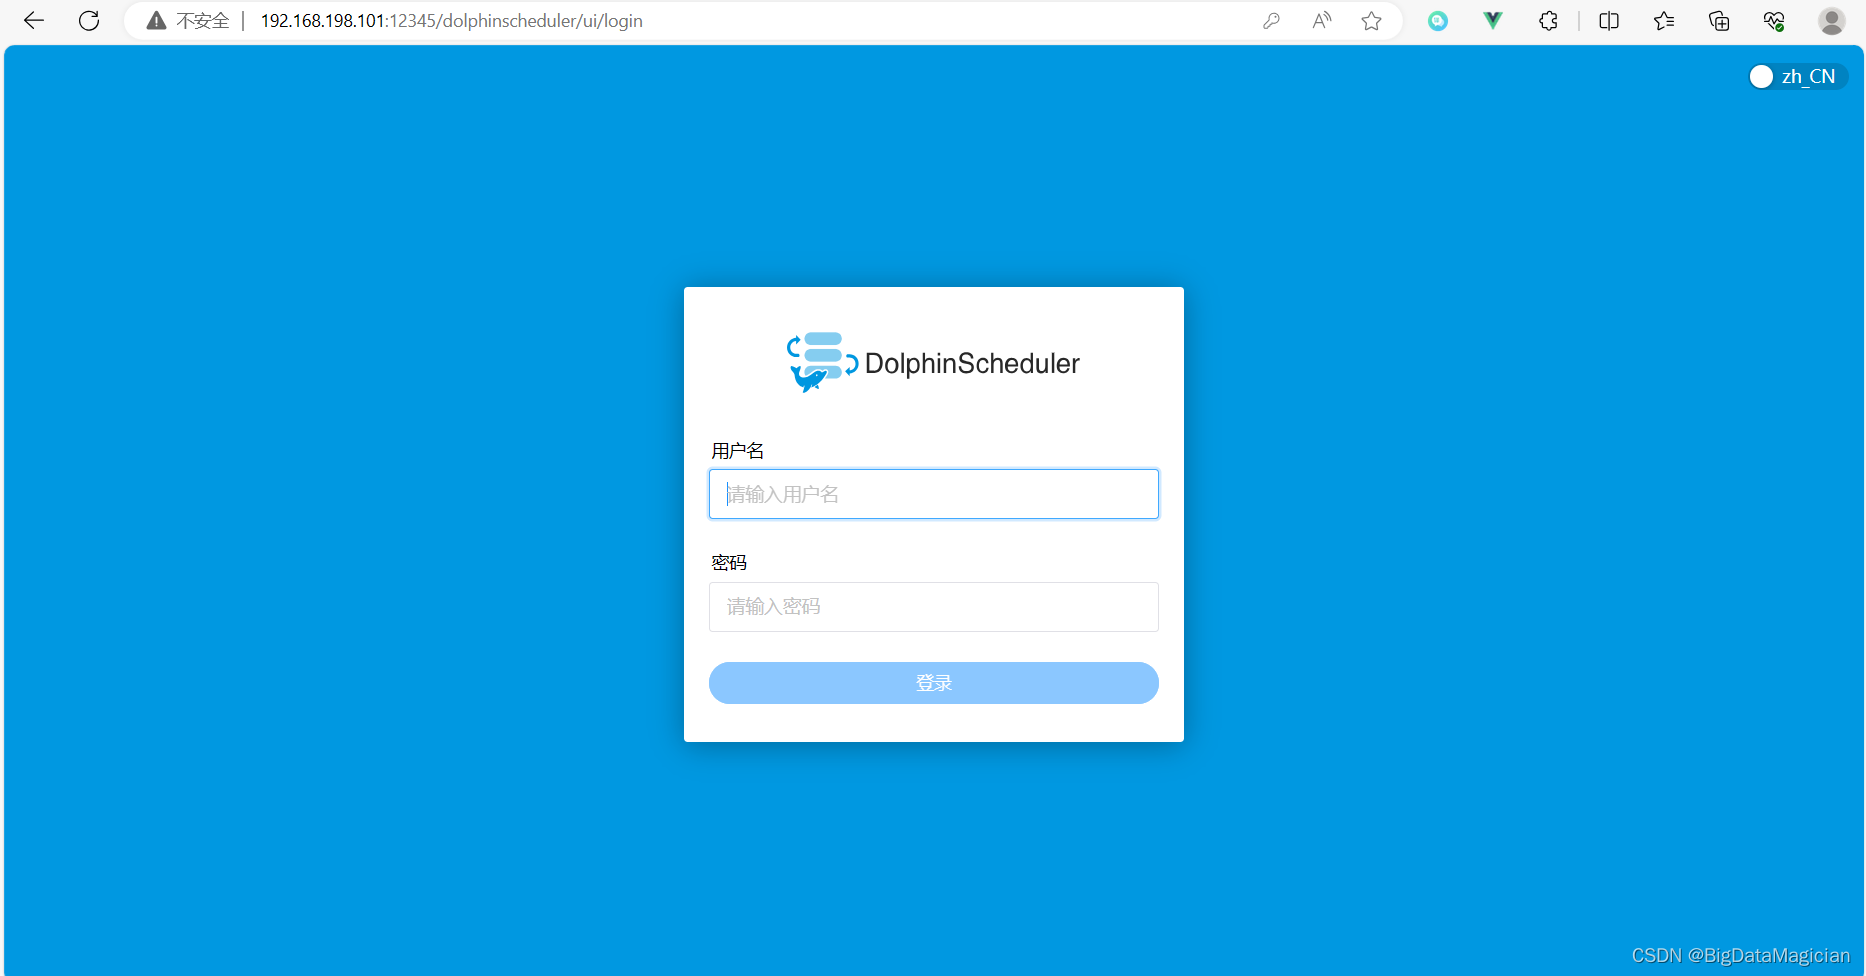
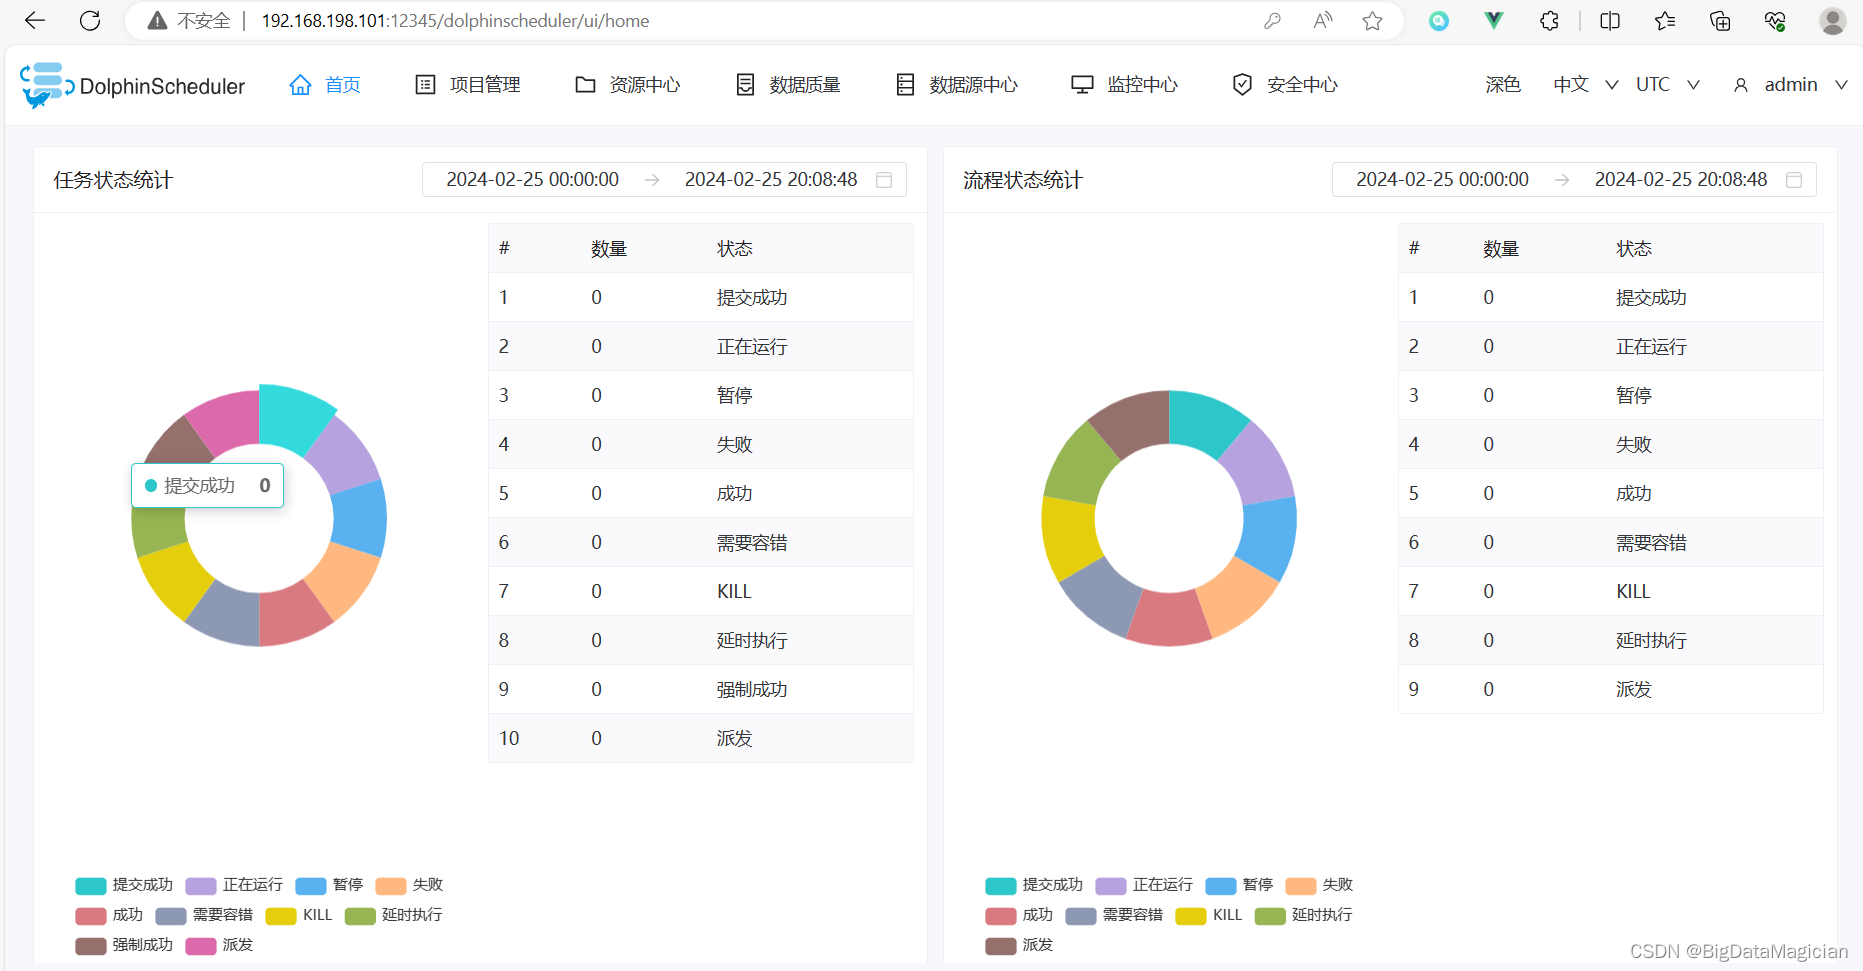
6. 登录 DolphinScheduler
浏览器访问地址 http://localhost:12345/dolphinscheduler/ui 即可登录系统UI。默认的用户名和密码是 admin/dolphinscheduler123
如下图所示。
三、dolphinscheduler单机版命令
1. 启停命令
1.1 启动dolphinscheduler单机版
cd /opt/soft/dolphinscheduler/apache-dolphinscheduler-3.1.4-bin
./bin/dolphinscheduler-daemon.sh start standalone-server
1.2 停止dolphinscheduler单机版
cd /opt/soft/dolphinscheduler/apache-dolphinscheduler-3.1.4-bin
./bin/dolphinscheduler-daemon.sh stop standalone-server
1.3 重启dolphinscheduler单机版
cd /opt/soft/dolphinscheduler/apache-dolphinscheduler-3.1.4-bin
./bin/dolphinscheduler-daemon.sh stop standalone-server
./bin/dolphinscheduler-daemon.sh start standalone-server
总结
通过本教程,您已经学会了安装和配置 DolphinScheduler 的基本步骤。了解了如何准备安装环境,下载和解压 DolphinScheduler,修改配置文件,配置 MySQL 数据源,并进行数据库初始化。此外,还学会了如何启动和停止 DolphinScheduler 单机版,并通过浏览器访问系统 UI。
希望本教程对您有所帮助!如有任何疑问或问题,请随时在评论区留言。感谢阅读!

![C++初阶 | [八] (下) vector 模拟实现](https://img-blog.csdnimg.cn/direct/5b3935e2a5e84044b8607b6dc904dacf.png)