摘要:最近,看了下慕课2周刷完n道面试题,记录下...
1. offsetHeight scrollHeight clientHeight 区别
计算规则:
offsetHeight offsetWidth : border + padding + content
clientHeight clientWidth: padding + content
scrollHeight scrollWidth: padding + 实际内容尺寸(当显示滚动条时,就大于content尺寸)
2. HTMLCollection 和 NodeList区别
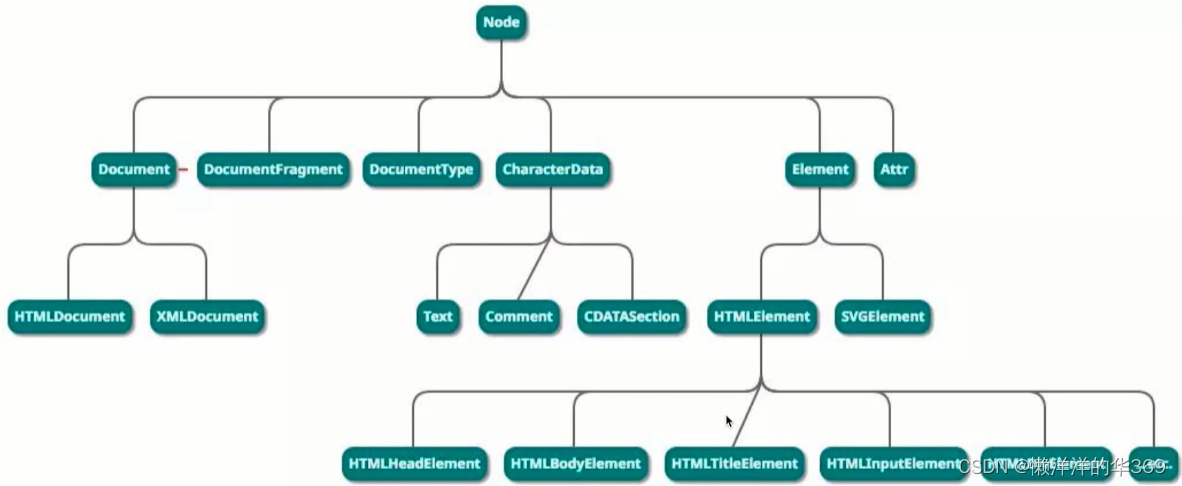
Node 和Element
DOM是一棵树,所有的节点都是Node
Node是Element的基类
Element是其他HTML元素的基类,如HTMLDivElement

HTMLCollection是Element的集合;NodeList是Node的集合
注:获取Node和Element的返回结果可能不一样
如果elem.childNode和elem.children不一样
前者包含Text和Comment等节点,后者不包含
扩展:HTMLCollection和NodeLIst都是类数组,将类数组转换为数组的几种方式
const arr1 = Array.from(list)
const arr2 = Array.prototype.slice.call(list)
const arr3 = [...list]
3. Vue computed和watch的区别
两者用途不同
computed用于计算产生新的数据;watch用于监听现有数据;
另外,computed有缓存,method没缓存
4. Vue组件通讯有几种方式,尽量全面
Vue组件间通讯分为不同场景的:
- 父子组件
- 上下级组件(跨多级)通讯
- 全局组件
几种组件通讯方式:
props和Event:
父组件通过 props 向子组件传递数据,子组件通过 events 向父组件发送消息;
<!--Home.vue-->
<template><HelloWorld msg="Welcome to your Vue.js App" @showMsg="showMsg"/>
</template>
<script>import HelloWorld from '@/component/HelloWorld.vue'export defult {name: 'Home',components: {HelloWorld,},methods: {showMsg(msg) {console.log(msg)}}}
</script><!--HelloWorld.vue-->
<template><h1 @click="clickHandler"> {{msg}} </h1>
</template>
<script>export default {name: 'HelloWorld',props: {msg: String},emits: ['showMsg'],  // Vue3新增属性methods: {clickHandler() {this.$emit('showMsg', 'hello world')}}}
</script>
自定义事件
Vue 实例可以通过 $on 方法监听自定义事件,通过 $emit 触发自定义事件,从而实现组件之间的通讯。自定定义事件常用于兄弟组件,跨多级通讯,灵活但容易用乱。
<!--ParentComponent.vue-->
<template><CustomEvent1/><CustomEvent2/>
</template>
<script>import CoustomEvent1 from '@/component/CoustomEvent1.vue'import CoustomEvent1 from '@/component/CoustomEvent2.vue'export defult {name: 'Home',components: {CustomEvent1,CustomEvent2},methods: {showMsg(msg) {console.log(msg)}}}
</script><!--CustomEvent1.vue 接收方-->
<template><p> recive coustom event</p>
</template>
<script>
import event from '../utils/event.js'  //引入event发布订阅的总线
export default {name: 'CustomEvent1',methods: {showMsg(msg) {console.log(msg)    }},mounted() {event.on('showMsg', this.showMsg)  // 监听},// vue 2.x beforeDestroy 需要销毁避免内存泄漏beforeUnmount() {event.off('showMsg', this.showMsg)  // 销毁;监听和销毁要写函数名字,处理同一个函数}
}
</script><!--CustomEvent2.vue 发送方-->
<template><p><button @click="trigger">trigger coustom event<button></p>
</template>
<script>
import event from '../utils/event.js'  //引入event发布订阅的总线
export default {name: 'CustomEvent2',methods: {trigger() {event.emit('showMsg', 'hello coustom event')}},
}
</script>//event.js
import ee from 'event-emitter'
// Vue2 : new Vue()就是 event
// Vue3 : 引入第三方库
const event = ee()export default event
$attrs
之前资料$attrs 和 $listeners比较多,但是后者在Vue3中已经移除;子组件可以通过 $attrs 获取父组件传递的非 prop 和emits特性。
<!--ParentComponent.vue-->
<template><AttrsDome/>
</template>
<script>import AttrsDome from '@/component/AttrsAndListeners/Level1.vue' //主需要引用Level1export defult {name: 'Home',components: {AttrsDome,},methods: {showMsg(msg) {console.log(msg)}}}
</script><!--Level1-->
<template><p>Level1</p><Level2  :a="a" :b="b" :c="c" @getA="getA" @getB="getB" @getC="getC"></Level2>
</template>
<script>
import Level2 from './Level2'
export default {name: 'Level1'components: {Level2},date() {return {a: 'aaa',b: 'bbb',c: 'ccc'}},methods: {getA(){return this.a},getB(){return this.b},getC(){return this.c}}
}
</script><!--Level2-->
<template><p>Level2</p><Level3  :x="x" :y="y" :z="z" @getX="getx" @getY="gety" @getZ="getz"></Level3>v-bind="$attrs"  //将attrs传入下一级Level3,
</template>
<script>
import Level3 from './Level3'
export default {name: 'Level2'components: {Level3},// 只接受Level1传入的a和getAprops: ['a'],   // Vue2中属性在$attrs,方法在$listener中emits: ['getA']date() {return {x: 'xxx',y: 'yyy',z: 'zzz'}},methods: {getX(){return this.x},getY(){return this.y},getZ(){return this.z}},created() {console.log('level2', Object.keys(this.$attrs))  // ['b', 'c','onGetB', 'onGetC']// 也就是说,Level1传入的属性,没有被包含在props和$emits,就会放在attrs中;是前两者的后补}
}
</script><!--Level3-->
<template><p>Level3</p>
</template>
<script>
export default {name: 'Level3',// 只接受Levelx传入的a和getXprops: ['x'],emits: ['getX']inheritAttrs: false,// 避免属性继承date() {return {}},mounted() {console.log('Level3 $attrs', Object.keys(this.$attrs))//['y','z','onGetY','onGetZ']// Level2中增加v-bind传入attrs后,上面输出为['y','z','onGetY','onGetZ','b', 'c','onGetB', 'onGetC']}
}
</script>
$parent和 $refs
Vue2中可以通过 $parent 和 children 直接访问父组件和子组件的实例,进行直接的组件通讯(父子组件通讯);Vue3中children建议用$refs来获取,可以使用 $refs 获取对子组件实例的引用,从而直接调用子组件的方法或访问子组件的数据。
上例子中Level3,可以通过$parent直接获取父节点,获取属性调用方法都可以;
<!--Level3-->
<template><p>Level3</p><!--添加子组件HelloWorld的ref属性,为读取是的名称--><HelloWorld msg="hello czh" ref="hello1"/>
</template>
<script>
import HelloWorld from '../HelloWorld'export default {name: 'Level3',components: {HelloWorld},// 只接受Levelx传入的a和getXprops: ['x'],emits: ['getX']inheritAttrs: false,// 避免属性继承date() {return {}},mounted() {console.log(this.$parent)  //父节点console.log(this.$parent.y)   //yyy   ,获取属性console.log(this.$parent.getX())   //xxx   ,调用方法console.log(this.refs.hello1.name)  // hello-world}
}
</script><!--HelloWorld.vue-->
<template><h1 @click="clickHandler"> {{msg}} </h1>
</template>
<script>export default {name: 'HelloWorld',props: {msg: String},emits: ['showMsg'],  // Vue3新增属性data() {    // 新增data中的name属性return {name: 'hello-world'}},methods: {clickHandler() {this.$emit('showMsg', 'hello world')}}}
</script>
需要注意$parent 和 $refs获取父组件和子组件,需要在mounted中获取,因为created中组件还未渲染完成。
provide/inject
provide/inject是多层级组件间通讯较完美的解决方案,父组件通过 provide 向子孙组件注入数据,子孙组件通过 inject 接收注入的数据(可以跨级接收注入的数据)。
<!--Level1-->
<template><p>Level1 :<input v-model=name></p><Level2></Level2>
</template>
<script>
import {computed} from 'vue'  // 传入data中响应式的数据需要使用computed包裹
import Level2 from './Level2'
export default {name: 'Level1'components: {Level2},date() {return {name: 'czh'}},// provide: {    // 传入数据为静态字符串//   info: 'aaa'// },provide () {   //传入data中响应式的数据return {info: computed(() => this.name)  // 使用computed包裹}}
}
</script><!--Level2-->
<template><p>Level2  {{info}}</p>   <!--使用注入的数据info--><Level3></Level3>
</template>
<script>
import Level3 from './Level3'
export default {name: 'Level2'components: {Level3},inject: ['info'],   // 接收注入的数据
}
</script><!--Level3-->
<template><p>Level3 {{info}}</p>   <!--使用注入的数据info-->
</template>
<script>
export default {name: 'Level3',inject: ['info'],   // 接收注入的数据
}
Vuex
使用 Vuex 来进行状态管理,实现组件之间共享状态和通信。
5. Vuex 中mutation和action的区别
mutation:原子操作,必须是同步代码;action: 可包含多个mutation,可包含异步代码;
具体来说:
mutation:
- mutation 是 Vuex 中用于修改状态的唯一途径;
- mutation 必须是同步函数,用于直接改变状态;
- 在组件中通过 commit 方法来触发 mutation;
- 由于 mutation 是同步执行的,因此可以更容易地追踪状态的变化和调试。
action:
- action 类似于 Mutation,但是可以包含任意异步操作;
- action 可以包含业务逻辑、异步请求等操作,并且最终提交 mutation 来修改状态;
- 在组件中通过 dispatch 方法来触发 action;
- action 可以处理复杂的逻辑,例如异步请求、多个 mutation 的组合等。
6. JS严格模式有什么特点
7. HTTP跨域时为何要发送option请求
未完待续……


