文章目录
- 一、路由
- 1、清空页面栈
- 2、路由跳转模式
- 3、跳转到应用内的指定页面
- 4、某个页面替换当前页面
- 5、返回上一页面或指定的页面
- 6、获取路由参数
- 7、开启页面返回询问对话框
- 8、导入路由模块
- 9、页面路径配置
- 10、完整示例
- 二、属性动画和显式动画
- 1、属性动画
- 2、显示动画
- 3、组件内转场动画
- 三、http数据请求
- 1、导入http模块
- 2、使用http模块发送请求,处理响应
- 3、完整代码示例
- 四、第三方库axios
- 1、下载和安装ohpm
- 2、下载安装axios
- 3、使用axios
- 4、完整代码案例
- 五、页面和自定义组件生命周期
- 1、组件生命周期
- 2、页面生命周期
一、路由
文件
src/main/resources/base/profile/main_pages.json中需配置页面路径,若存在可忽略,否则会跳转页面失败,具体配置查看该文路由第9条(页面路径配置)
1、清空页面栈
- 页面栈支持最大数值是32
- 使用
router.clear()可清空页面栈,释放内存 - 使用后仅保留当前页面作为栈顶页面。
2、路由跳转模式
- 多实例模式
Standard:默认情况下的跳转模式,目标页面会被添加到页面栈顶,无论栈中是否存在相同url的页面。 - 单实例模式
Single:如果目标页面的url已经存在于页面栈中,则该url页面移动到栈顶。
3、跳转到应用内的指定页面
router.pushUrl()- 目标页压入页面栈,可用
router.back()返回当前页
router.pushUrl({url: 'pages/routerpage2',params: {data1: 'message',data2: {data3: [123, 456, 789]}}
}, router.RouterMode.Standard, (err) => {if (err) {console.error(`pushUrl failed, code is ${err.code}, message is ${err.message}`);return;}console.info('pushUrl success');
});
4、某个页面替换当前页面
router.replaceUrl()- 目标页替换当前页,当前页被销毁并释放资源,无法返回当前页
router.replaceUrl({url: 'pages/detail',params: {data1: 'message'}
}, router.RouterMode.Standard, (err) => {if (err) {console.error(`replaceUrl failed, code is ${err.code}, message is ${err.message}`);return;}console.info('replaceUrl success');
});
5、返回上一页面或指定的页面
router.back()- 不传参数(页面路径)时返回上一页
router.back({url:'pages/detail'});
6、获取路由参数
- 获取发起跳转的页面往当前页传入的参数
router.getParams();
7、开启页面返回询问对话框
router.showAlertBeforeBackPage({message: 'Message Info'
});
8、导入路由模块
import router from '@ohos.router'
9、页面路径配置
- 页面位置:
src/main/resources/base/profile/main_pages.json - 格式如下:
{"src": ["pages/Index","pages/ImagePage",]
}
10、完整示例
- 当前页
import router from '@ohos.router'router.pushUrl(options)
// 通过router.pushUrl跳转至目标页携带params参数
import router from '@ohos.router'@Entry
@Component
struct Index {async routePage() {let options = {url: 'pages/second',params: {text: '这是第一页的值',data: {array: [12, 45, 78]}}}try {await router.pushUrl(options)} catch (err) {console.info(` fail callback, code: ${err.code}, msg: ${err.msg}`)}}build() {Flex({ direction: FlexDirection.Column, alignItems: ItemAlign.Center, justifyContent: FlexAlign.Center }) {Text('这是第一页').fontSize(50).fontWeight(FontWeight.Bold)Button() {Text('next page').fontSize(25).fontWeight(FontWeight.Bold)}.type(ButtonType.Capsule).margin({ top: 20 }).backgroundColor('#ccc').onClick(() => {this.routePage()})}.width('100%').height('100%')}
}
- 目标页
import router from '@ohos.router'router.getParams()
// 在second页面中接收传递过来的参数
import router from '@ohos.router'@Entry
@Component
struct Second {private content: string = "这是第二页"@State text: string = router.getParams()['text']@State data: object = router.getParams()['data']@State secondData: string = ''build() {Flex({ direction: FlexDirection.Column, alignItems: ItemAlign.Center, justifyContent: FlexAlign.Center }) {Text(`${this.content}`).fontSize(50).fontWeight(FontWeight.Bold)Text(this.text).fontSize(30).onClick(() => {this.secondData = (this.data['array'][1]).toString()}).margin({ top: 20 })Text(`第一页传来的数值:${this.secondData}`).fontSize(20).margin({ top: 20 }).backgroundColor('red')}.width('100%').height('100%')}
}
二、属性动画和显式动画
显式动画(animateTo)和属性动画(animation)是ArkUI提供的最基础和常用的动画功能。在布局属性(如尺寸属性、位置属性)发生变化时,可以通过属性动画或显式动画,按照动画参数过渡到新的布局参数状态。
1、属性动画
- 动画设置简单,属性变化时自动触发动画
- 需把
animation属性加在要做属性动画的组件的属性后面 - 有的属性变化不希望通过
animation产生属性动画,可以放在animation之后。 animation(value: AnimateParam)
Button("text").type(ButtonType.Normal).width(this.myWidth).height(this.myHeight)// animation只对其上面的type、width、height属性生效,时长为1000ms,曲线为Ease.animation({ duration: 1000, curve: Curve.Ease })// animation对下面的backgroundColor、margin属性不生效.backgroundColor(this.myColor).margin(20)
Button("area: click me").fontSize(12).onClick(() => {// 改变属性值,配置了属性动画的属性会进行动画过渡if (this.flag) {this.myWidth = 100;this.myHeight = 50;this.myColor = Color.Blue;} else {this.myWidth = 200;this.myHeight = 100;this.myColor = Color.Pink;}this.flag = !this.flag;})
2、显示动画
- 闭包内的变化均会触发动画,包括由数据变化引起的组件的增删、组件属性的变化等,可以做较为复杂的动画。
animateTo(value: AnimateParam, event: () => void): void- 第一个参数指定动画参数,第二个参数为动画的闭包函数。
- 只要某属性是在
animateTo的闭包函数中修改的,那么由其引起的所有变化都会按照animateTo的动画参数执行动画过渡到终点值
Column({ space: 10 }) {Button("1").width(100).height(50)Button("2").width(100).height(50)Button("3").width(100).height(50)}.margin(20).alignItems(this.itemAlign).borderWidth(2).width("90%").height(200)
Button("click").onClick(() => {// 动画时长为1000ms,曲线为EaseInOutanimateTo({ duration: 1000, curve: Curve.EaseInOut }, () => {this.alignIndex = (this.alignIndex + 1) % this.allAlign.length;// 在闭包函数中修改this.itemAlign参数,使Column容器内部孩子的布局方式变化,使用动画过渡到新位置this.itemAlign = this.allAlign[this.alignIndex];});
})
3、组件内转场动画
- 组件的插入、删除过程即为组件本身的转场过程
- 组件的插入、删除动画称为组件内转场动画。
transition(value: TransitionOptions)transition函数的入参为组件内转场的效果,可以定义平移、透明度、旋转、缩放这几种转场样式的单个或者组合的转场效果,必须和animateTo一起使用才能产生组件转场效果。- 组件的插入、删除使用同一个动画效果
Button().transition({ type: TransitionType.All, scale: { x: 0, y: 0 } })
- 组件的插入、删除使用不同的动画效果
Button().transition({ type: TransitionType.Insert, translate: { x: 200, y: -200 }, opacity: 0 }).transition({ type: TransitionType.Delete, rotate: { x: 0, y: 0, z: 1, angle: 360 } })
- 只定义组件的插入或删除其中一种动画效果。
Button().transition({ type: TransitionType.Delete, translate: { x: 200, y: -200 } })
- 完整示例代码如下
@Entry
@Component
struct IfElseTransition {@State flag: boolean = true;@State show: string = 'show';build() {Column() {Button(this.show).width(80).height(30).margin(30).onClick(() => {if (this.flag) {this.show = 'hide';} else {this.show = 'show';}animateTo({ duration: 1000 }, () => {// 动画闭包内控制Image组件的出现和消失this.flag = !this.flag;})})if (this.flag) {// Image的出现和消失配置为不同的过渡效果Image($r('app.media.mountain')).width(200).height(200).transition({ type: TransitionType.Insert, translate: { x: 200, y: -200 } }).transition({ type: TransitionType.Delete, opacity: 0, scale: { x: 0, y: 0 } })}}.height('100%').width('100%')}
}
三、http数据请求
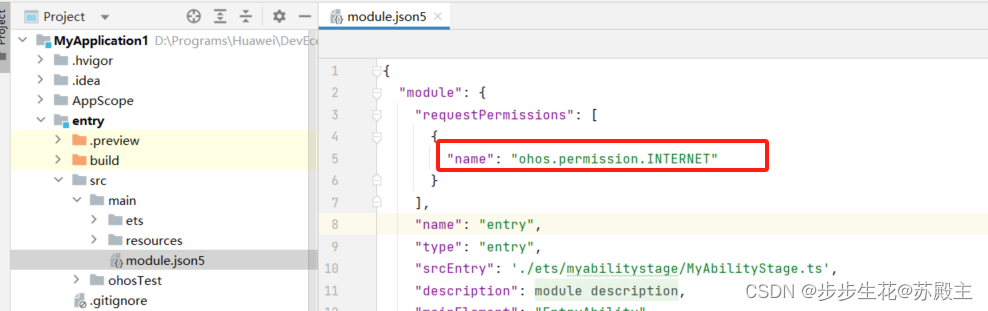
应用通过HTTP发起一个数据请求,支持常见的GET、POST、OPTIONS、HEAD、PUT、DELETE、TRACE、CONNECT方法。
使用该功能需要申请ohos.permission.INTERNET权限。
1、导入http模块
import http from '@ohos.net.http';
2、使用http模块发送请求,处理响应
- 创建一个http的请求对象,每一个
httpRequest对应一个HTTP请求任务,不可复用
let httpRequest = http.createHttp();
- 发起网络请求
httpRequest.request(// 填写HTTP请求的URL地址,可以带参数也可以不带参数。URL地址需要开发者自定义。请求的参数可以在extraData中指定"EXAMPLE_URL",{method: http.RequestMethod.POST, // 可选,默认为http.RequestMethod.GET// 开发者根据自身业务需要添加header字段header: {'Content-Type': 'application/json'},// 当使用POST请求时此字段用于传递内容extraData: {"data": "data to send",},expectDataType: http.HttpDataType.STRING, // 可选,指定返回数据的类型usingCache: true, // 可选,默认为truepriority: 1, // 可选,默认为1connectTimeout: 60000, // 可选,默认为60000msreadTimeout: 60000, // 可选,默认为60000msusingProtocol: http.HttpProtocol.HTTP1_1, // 可选,协议类型默认值由系统自动指定}, (err, data) => {if (!err) {// data.result为HTTP响应内容,可根据业务需要进行解析console.info('Result:' + JSON.stringify(data.result));console.info('code:' + JSON.stringify(data.responseCode));// data.header为HTTP响应头,可根据业务需要进行解析console.info('header:' + JSON.stringify(data.header));console.info('cookies:' + JSON.stringify(data.cookies)); // 8+} else {console.info('error:' + JSON.stringify(err));// 当该请求使用完毕时,调用destroy方法主动销毁httpRequest.destroy();}}
);
3、完整代码示例
viewmodel/ShopInfo.ts
export default class ShopInfo {id: numbername: stringimages: string[]area: stringaddress: stringavgPrice: numbercomments: numberscore: numberopenHours: string
}
model/ShopModel.ts- a、基于ohos的http模块实现异步查询商铺
return new Promise((resolve, reject) => { }) - b、基于ohos的http模块实现同步查询商铺
async...await...
import http from '@ohos.net.http';
import ShopInfo from '../viewmodel/ShopInfo';class ShopModel {baseURL: string = 'http://localhost:3000'pageNo: number = 1/*** 基于ohos的http模块实现异步查询商铺* @returns*/getShopListByHttp(): Promise<ShopInfo[]> {return new Promise((resolve, reject) => {// 1.创建http的请求对象let httpRequest = http.createHttp()// 2.发送请求httpRequest.request(`${this.baseURL}/shops?pageNo=${this.pageNo}&pageSize=3`,{method: http.RequestMethod.GET}).then(resp => {if (resp.responseCode === 200) {// 查询成功console.log('testTag', '查询商铺成功!', resp.result)resolve(JSON.parse(resp.result.toString()))} else {console.log('testTag', '查询商铺信息失败!error:', JSON.stringify(resp))reject('查询商铺失败')}}).catch(error => {console.log('testTag', '查询商铺信息失败!error:', JSON.stringify(error))reject('查询商铺失败')})})}/*** 基于ohos的http模块实现同步查询商铺* @returns*/async getShopListByHttpAsync(): Promise<ShopInfo[]> {// 1.创建http的请求对象let httpRequest = http.createHttp()// 2.发送请求let resp = await httpRequest.request(`${this.baseURL}/shops?pageNo=${this.pageNo}&pageSize=3`,{method: http.RequestMethod.GET})// 3.处理响应if (resp.responseCode === 200) {// 查询成功console.log('testTag', '查询商铺成功!', resp.result)return JSON.parse(resp.result.toString());}console.log('testTag', '查询商铺信息失败!error:', JSON.stringify(resp))}
}const shopModel = new ShopModel();export default shopModel as ShopModel;
ShopPage.etsaboutToAppear()页面生命周期:组件即将出现时回调该接口,具体时机为在创建自定义组件的新实例后,在执行其build()函数之前执行onReachEnd()列表触底事件
import { Header } from '../common/components/CommonComponents'
import ShopInfo from '../viewmodel/ShopInfo'
import ShopItem from '../views/ShopItem'
import ShopModel from '../model/ShopModel'@Entry
@Component
struct ShopPage {@State shops: ShopInfo[] = []isLoading: boolean = falseisMore: boolean = true// 页面生命周期,页面出现前aboutToAppear() {// 加载商品数据this.loadShopInfo()}build() {Column({ space: 10 }) {Header({ title: '商铺列表' })List({ space: 10 }) {ForEach(this.shops, shop => {ListItem() {ShopItem({ shop: shop })}})}.width('100%').layoutWeight(1).onReachEnd(() => {console.log('触底了!')if(!this.isLoading && this.isMore){this.isLoading = true// 翻页ShopModel.pageNo++this.loadShopInfo()}})}.width('100%').height('100%').padding(10).backgroundColor('#e1e2e3')}loadShopInfo(){// 加载数据ShopModel.getShopListByAxios().then(shops => {// 给图片加上服务器地址前缀shops.forEach(s => {s.images.forEach((src, i) => {s.images[i] = 'http://localhost:3000' + src})})this.shops = this.shops.concat(shops)this.isLoading = falseif(!shops || shops.length === 0){this.isMore = false}})}
}
四、第三方库axios
1、下载和安装ohpm
- 下载ohpm工具包,点击链接获取。
- 如果安装开发工具时已安装
ohpm, 此步骤可忽略。
-
解压文件,进入“
ohpm/bin”目录(之前就安装好的,找到该目录即可), -
打开命令行工具,执行如下指令初始化ohpm。
-
Windows环境下执行:
init.bat
- Linux/macOS环境下执行:
./init
- 将
ohpm配置到环境变量中 - Windows环境变量设置方法: 在
此电脑 > 属性 > 高级系统设置 > 高级 > 环境变量中,将ohpm命令行工具的bin目录配置到系统或者用户的PATH变量中。 - macOS环境变量设置方法: 打开终端工具,执行以下命令。
export OHPM_HOME=/home/xx/Downloads/ohpm  #本处路径请替换为ohpm的安装路径
export PATH=${OHPM_HOME}/bin:${PATH}
- 安装完成之后,执行如下命令:终端输出为版本号(如:0.6.10),则表示安装成功。
ohpm -v
2、下载安装axios
- OpenHarmony三方库中心仓:https://ohpm.openharmony.cn/#/cn/home
- 下载axios,根目录下执行如下命令
ohpm install @ohos/axios
- 如图所示,绿色表示项目名称,终端命令执行后,会出现红色箭头所指内容,则代表安装成功
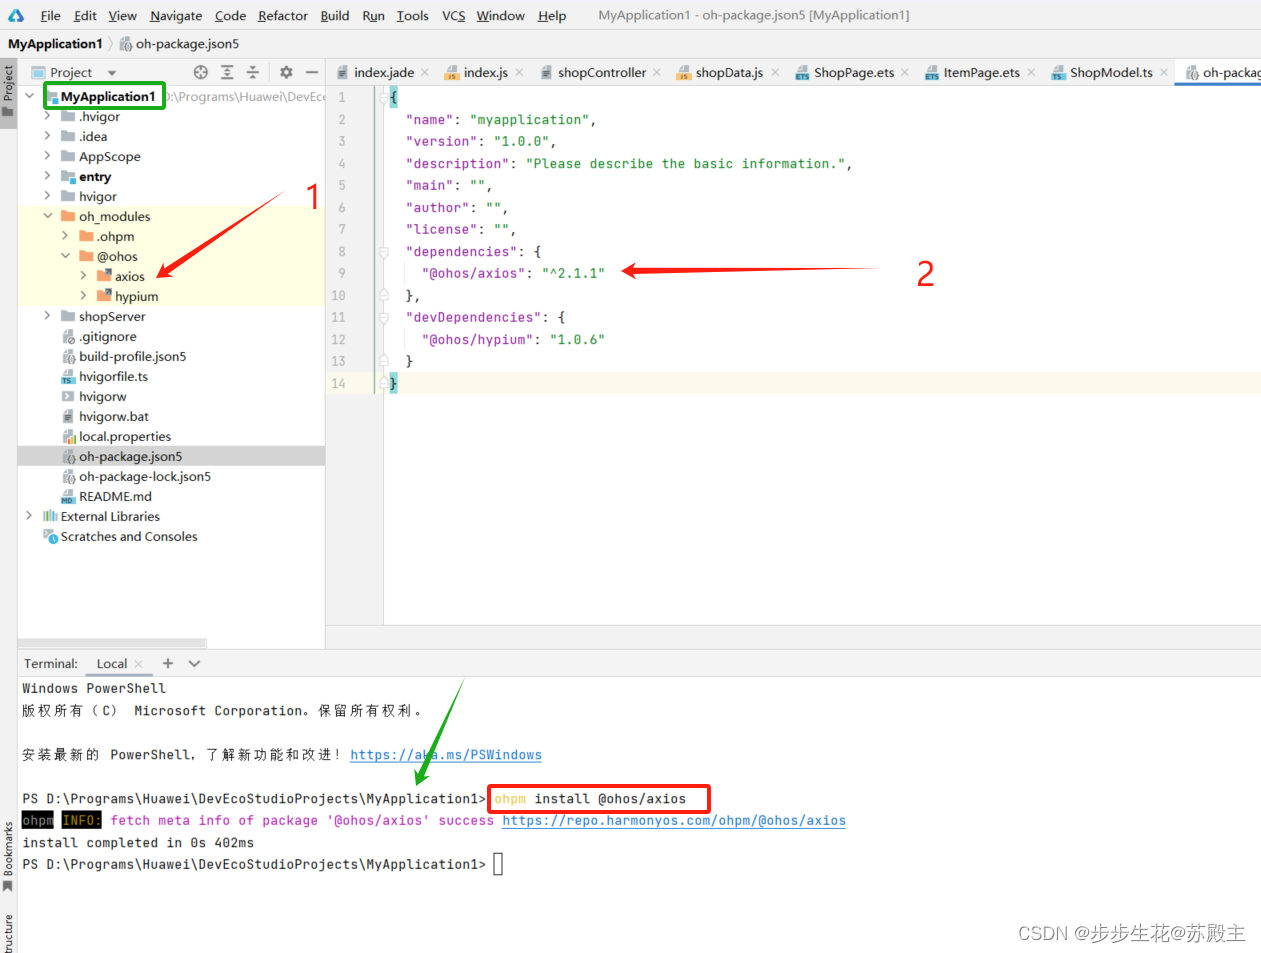
- 需要开放网络权限
ohos.permission.INTERNET
3、使用axios
- 导入axios
import axios from '@ohos/axios'
- 发送请求并处理响应
axios.get(`url`,{params: { /*用于get请求传参*/ }data:{ /*用于post请求传参*/ }}).then(resp => {if (resp.status === 200) {// 查询成功console.log('testTag', '查询商铺成功!', JSON.stringify(resp.data))resolve(resp.data)} else {console.log('testTag', '查询商铺信息失败!error:', JSON.stringify(resp))reject('查询商铺失败')}}).catch(error => {console.log('testTag', '查询商铺信息失败!error:', JSON.stringify(error))reject('查询商铺失败')})
4、完整代码案例
model/ShopModel.ts- a、基于
axios实现异步查询商铺return new Promise((resolve, reject) => { }) - b、基于
axios实现同步查询商铺async...await... - 其它使用同http数据请求
import ShopInfo from '../viewmodel/ShopInfo';
import axios from '@ohos/axios'class ShopModel {baseURL: string = 'http://localhost:3000'pageNo: number = 1/*** 基于axios实现异步查询商铺* @returns*/getShopListByAxios(): Promise<ShopInfo[]> {return new Promise((resolve, reject) => {axios.get(`${this.baseURL}/shops`,{params: { pageNo: this.pageNo, pageSize: 3 }}).then(resp => {if (resp.status === 200) {// 查询成功console.log('testTag', '查询商铺成功!', JSON.stringify(resp.data))resolve(resp.data)} else {console.log('testTag', '查询商铺信息失败!error:', JSON.stringify(resp))reject('查询商铺失败')}}).catch(error => {console.log('testTag', '查询商铺信息失败!error:', JSON.stringify(error))reject('查询商铺失败')})})}/*** 基于axios实现同步查询商铺* @returns*/async getShopListByAxiosAsync(): Promise<ShopInfo[]> {// 1.发送请求let resp = await axios.get(`${this.baseURL}/shops`,{params: { pageNo: this.pageNo, pageSize: 3 }})// 2.处理响应if (resp.status === 200) {// 查询成功console.log('testTag', '查询商铺成功!', JSON.stringify(resp.data))return resp.data;}// 查询失败console.log('testTag', '查询商铺信息失败!error:', JSON.stringify(resp))}}const shopModel = new ShopModel();export default shopModel as ShopModel;
五、页面和自定义组件生命周期
- 自定义组件:
@Component装饰的UI单元,可以组合多个系统组件实现UI的复用,可以调用组件的生命周期。 - 页面:即应用的UI页面。可以由一个或者多个自定义组件组成,
@Entry装饰的自定义组件为页面的入口组件,即页面的根节点,一个页面有且仅能有一个@Entry。只有被@Entry装饰的组件才可以调用页面的生命周期。
1、组件生命周期
- 一般用
@Component装饰的自定义组件的生命周期 aboutToAppear:组件即将出现时回调该接口,具体时机为在创建自定义组件的新实例后,在执行其build()函数之前执行。aboutToDisappear:在自定义组件析构销毁之前执行。不允许在aboutToDisappear函数中改变状态变量,特别是@Link变量的修改可能会导致应用程序行为不稳定。
@Component
struct Child {@State title: string = 'Hello World';// 组件生命周期aboutToDisappear() {console.info('[lifeCycle] Child aboutToDisappear')}// 组件生命周期aboutToAppear() {console.info('[lifeCycle] Child aboutToAppear')}build() {Text(this.title).fontSize(50).onClick(() => {this.title = 'Hello ArkUI';})}
}
2、页面生命周期
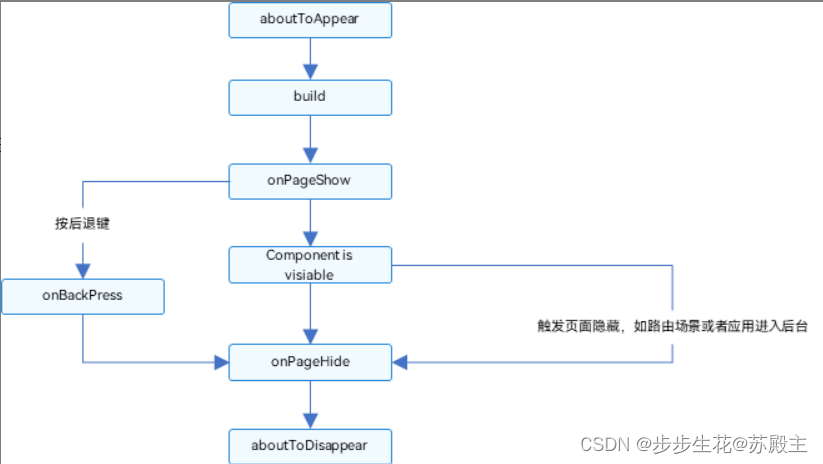
@Entry装饰的组件生命周期onPageShow:页面每次显示时触发一次,包括路由过程、应用进入前台等场景。onPageHide:页面每次隐藏时触发一次,包括路由过程、应用进入后台等场景。onBackPress:当用户点击返回按钮时触发。
import router from '@ohos.router';@Entry
@Component
struct MyComponent {@State showChild: boolean = true;// 只有被@Entry装饰的组件才可以调用页面的生命周期onPageShow() {console.info('Index onPageShow');}// 只有被@Entry装饰的组件才可以调用页面的生命周期onPageHide() {console.info('Index onPageHide');}// 只有被@Entry装饰的组件才可以调用页面的生命周期onBackPress() {console.info('Index onBackPress');}// 组件生命周期aboutToAppear() {console.info('MyComponent aboutToAppear');}// 组件生命周期aboutToDisappear() {console.info('MyComponent aboutToDisappear');}build() {Column() {// this.showChild为true,创建Child子组件,执行Child aboutToAppearif (this.showChild) {Child()}// this.showChild为false,删除Child子组件,执行Child aboutToDisappearButton('delete Child').onClick(() => {this.showChild = false;})// push到Page2页面,执行onPageHideButton('push to next page').onClick(() => {router.pushUrl({ url: 'pages/Page2' });})}}
}