1.IoC底层核心原理
1.核心接口

BeanFactory
提供bean的基本操作
bean获取
按名称获取
按类型获取
bean供应商
bean基本信息
是否存在
是否单例
类型获取
类型检测(类型是否匹配)
别名获取
HierarchicalBeanFactory
提供bean分层结构,提出父子容器概念
获取本地bean
AutowireCapableBeanFactory
提供bean自动装配功能
bean创建
自动装配
装配方式
前置动作
后置动作
ListableBeanFactory
容器中bean信息
bean存在性
bean的数量
bean的类型
bean相关信息获取
由类型获取bean的名称
由注解获取bean的名称
bean信息获取
bean的注解
bean的定义名称
2.组件扫描器
开发过程中,需要根据需求加载必要的bean,排除指定bean
3.设定组件扫描加载过滤器
名称:@ComponentScan
类型:类注解
位置:类定义上方
作用:设置spring配置加载类扫描规则
范例
@ComponentScan(value="com", //设置基础扫描路径excludeFilters = //设置过滤规则,当前为排除过滤@ComponentScan.Filter( //设置过滤器type= FilterType.ANNOTATION, //设置过滤方式为按照注解进行过滤classes=Repository.class) //设置具体的过滤项,过滤所有@Repository修饰的bean)
includeFilters:设置包含性过滤器
excludeFilters:设置排除性过滤器
type:设置过滤器类型
样例
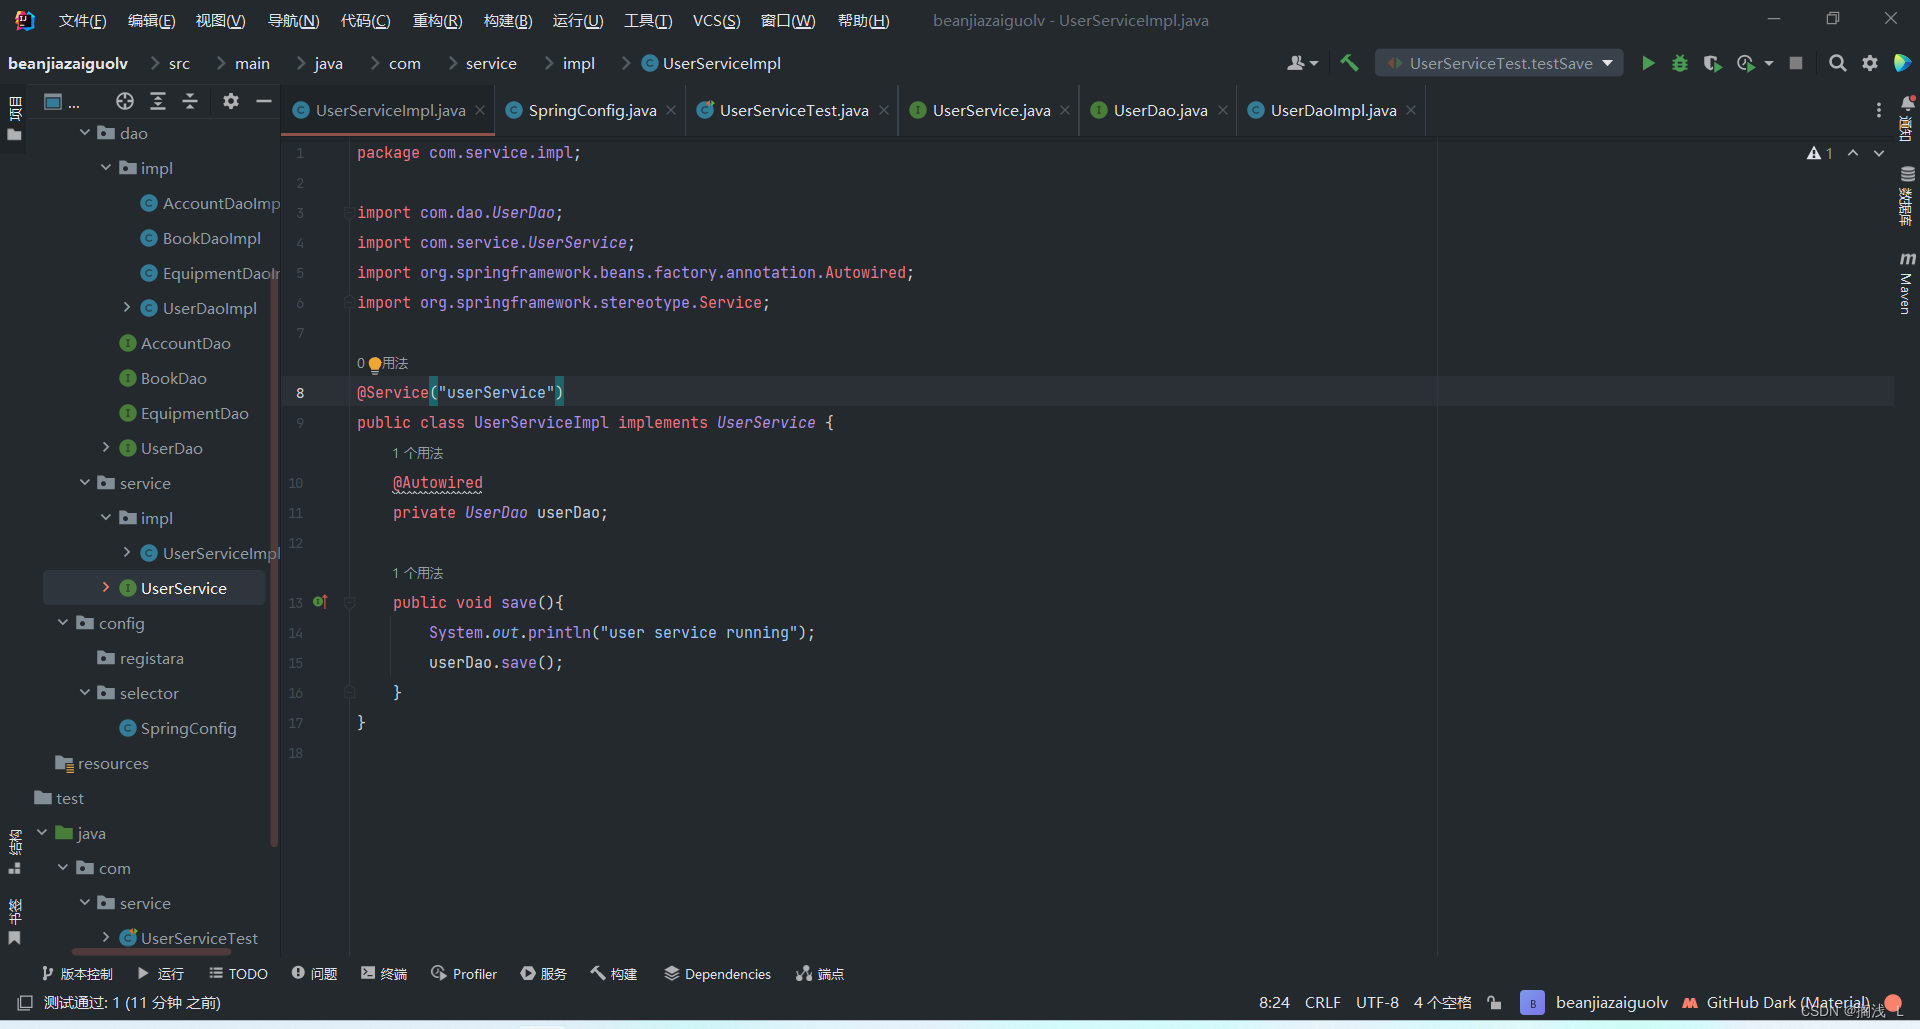
package com.service.impl;import com.dao.UserDao;
import com.service.UserService;
import org.springframework.beans.factory.annotation.Autowired;
import org.springframework.stereotype.Service;@Service("userService")
public class UserServiceImpl implements UserService {@Autowiredprivate UserDao userDao;public void save(){System.out.println("user service running");userDao.save();}
}
package config.selector;import org.springframework.context.annotation.ComponentScan;
import org.springframework.context.annotation.Configuration;
import org.springframework.context.annotation.FilterType;import javax.xml.ws.Service;@Configuration
@ComponentScan(value = "com",excludeFilters = @ComponentScan.Filter(type = FilterType.ANNOTATION,classes = Service.class)
)
public class SpringConfig {
}
package com.service;import config.selector.SpringConfig;
import org.junit.Test;
import org.junit.runner.RunWith;
import org.springframework.beans.factory.annotation.Autowired;
import org.springframework.test.context.ContextConfiguration;
import org.springframework.test.context.junit4.SpringJUnit4ClassRunner;@RunWith(SpringJUnit4ClassRunner.class)
@ContextConfiguration(classes = SpringConfig.class)
public class UserServiceTest {@Autowiredprivate UserService userService;@Testpublic void testSave(){userService.save();}
}
4.自定义组件过滤器
名称:TypeFilter
类型:接口
作用:自定义类型过滤器
public class MyTypeFilter implements TypeFilter {public boolean match(MetadataReader mr, MetadataReaderFactory mrf) throws IOException {ClassMetadata cm = metadataReader.getClassMetadata();tring className = cm.getClassName();if(className.equals("com.lichee.dao.impl.BookDaoImpl")){return false;}return false;}
}
样例
新建config.filter.MyTypeFilter类
package config.filter;import org.springframework.core.type.ClassMetadata;
import org.springframework.core.type.classreading.MetadataReader;
import org.springframework.core.type.classreading.MetadataReaderFactory;
import org.springframework.core.type.filter.TypeFilter;import java.io.IOException;public class MyTypeFilter implements TypeFilter {@Overridepublic boolean match(MetadataReader metadataReader, MetadataReaderFactory metadataReaderFactory) throws IOException {//加载的类满足要求,匹配成功ClassMetadata classMetadata = metadataReader.getClassMetadata();String className = classMetadata.getClassName();if(className.equals("com.service.impl.UserServiceImpl")){return true;}return false;}
}
package config.selector;import org.springframework.context.annotation.ComponentScan;
import org.springframework.context.annotation.Configuration;@Configuration
@ComponentScan("com")
/*@ComponentScan(value = "com",excludeFilters = @ComponentScan.Filter(type = FilterType.ANNOTATION,classes = Service.class)
)*/
public class SpringConfig {
}
5.自定义导入器
bean只有通过配置才可以进入spring容器,被spring加载并控制
配置bean的方式如下:
XML文件中使用标签配置
使用@Component及衍生注解配置
企业开发过程中,通常需要配置大量的bean,需要一种快速高效配置大量bean的方式
ImportSelector
名称: ImportSelector
类型:接口
作用:自定义bean导入器(可以导入多个东西)
范例
public class MyImportSelector implements ImportSelector {public String[] selectImports(AnnotationMetadata icm) {return new String[]{"com.dao.impl.AccountDaoImpl"};}
}
@Configuration
@ComponentScan("com")
@Import(MyImportSelector.class)
public class SpringConfig {
}
样例
package config.selector;import org.springframework.context.annotation.ImportSelector;
import org.springframework.core.type.AnnotationMetadata;import java.util.ResourceBundle;public class MyImportSelector implements ImportSelector {@Overridepublic String[] selectImports(AnnotationMetadata annotationMetadata) {
//        ResourceBundle bundle = ResourceBundle.getBundle("import");
//        String className = bundle.getString("className");ResourceBundle bundle = ResourceBundle.getBundle("import");String className = bundle.getString("className");return className.split(",");}
}
import.properties
#className=com.dao.impl.BookDaoImplclassName=com.dao.impl.BookDaoImpl,com.dao.impl.AccountDaoImpl#path=com.dao.impl.*package config;import config.selector.MyImportSelector;
import org.springframework.context.annotation.ComponentScan;
import org.springframework.context.annotation.Configuration;
import org.springframework.context.annotation.Import;@Configuration
@ComponentScan("com")
@Import(MyImportSelector.class)
/*@ComponentScan(value = "com",excludeFilters = @ComponentScan.Filter(type = FilterType.ANNOTATION,classes = Service.class)
)*/
public class SpringConfig {
}
6.自定义注册器
名称:ImportBeanDefinitionRegistrar
类型:接口
作用:自定义bean定义注册器
范例
public class MyImportBeanDefinitionRegistrar implements ImportBeanDefinitionRegistrar {public void registerBeanDefinitions(AnnotationMetadata icm, BeanDefinitionRegistry r) {ClassPathBeanDefinitionScanner scanner = new ClassPathBeanDefinitionScanner(r, false);TypeFilter tf = new TypeFilter() {public boolean match(MetadataReader mr, MetadataReaderFactory mrf) throws IOException {return true;}};scanner.addIncludeFilter(tf);//scanner.addExcludeFilter(tf);scanner.scan("com.lichee");}
}
7.bean初始化过程解析
BeanFactoryPostProcessor
作用:定义了在bean工厂对象创建后,bean对象创建前执行的动作,用于对工厂进行创建后业务处理
运行时机:当前操作用于对工厂进行处理,仅运行一次
BeanPostProcessor
作用:定义了所有bean初始化前后进行的统一动作,用于对bean进行创建前业务处理与创建后业务处理
运行时机:当前操作伴随着每个bean的创建过程,每次创建bean均运行该操作
InitializingBean
作用:定义了每个bean的初始化前进行的动作,属于非统一性动作,用于对bean进行创建前业务处理
运行时机:当前操作伴随着任意一个bean的创建过程,保障其个性化业务处理
注意:上述操作均需要被spring容器加载放可运行
繁琐的bean初始化过程处理
FactoryBean
对单一的bean的初始化过程进行封装,达到简化配置的目的
FactoryBean与BeanFactory区别
FactoryBean:封装单个bean的创建过程
BeanFactory:Spring容器顶层接口,定义了bean相关的获取操作
2.AOP
1.AOP概述
AOP(Aspect Oriented Programing)面向切面编程,一种编程范式,隶属于软工范畴,指导开发者如何组织程序结构
AOP弥补了OOP的不足,基于OOP基础之上进行横向开发
uOOP规定程序开发以类为主体模型,一切围绕对象进行,完成某个任务先构建模型
uAOP程序开发主要关注基于OOP开发中的共性功能,一切围绕共性功能进行,完成某个任务先构建可能遇到的所有共性功能(当所有功能都开发出来也就没有共性与非共性之分)
“AOP联盟”
AOP作用
伴随着AOP时代的降临,可以从各个行业的标准化、规范化开始入手,一步一步将所有共性功能逐一开发完毕,最终以功能组合来完成个别业务模块乃至整体业务系统的开发
目标:将软件开发由手工制作走向半自动化/全自动化阶段,实现“插拔式组件体系结构”搭建
AOP优势
提高代码的可重用性
业务代码编码更简洁
业务代码维护更高效
业务功能扩展更便捷
2.AOP入门案例
AOP相关概念
1.Joinpoint (连接点):连接点就像程序中的特定点,例如方法执行、异常抛出、字段更新等。我们可以在这些连接点上注入额外的代码。(就是方法)
2.Pointcut (切入点):切入点是我们选择在哪些连接点上添加额外代码的方式。我们可以使用一些规则或标准来选择特定的连接点。(就是挖掉共性功能的方法)
3.Advice (通知):通知是我们在特定连接点执行的额外代码。通知可以在连接点之前、之后或周围执行。在SpringAOP中,功能最终以方法的形式呈现(就是共性功能,最终以一个方法的形式呈现)
4.Aspect (切面):切面是一种模块化的方式来处理特定的横切关注点。切面由切入点和通知组成,通过将通知应用于特定的切入点来实现我们所需的功能。(就是共性功能与挖的位置的对应关系)
5.Target (目标对象):目标对象是我们要为其添加额外代码的对象。它是我们的业务逻辑对象,不包含与额外代码逻辑相关的内容。(就是挖掉功能的方法对应的类产生的对象,这种对象是无法直接完成最终工作的)
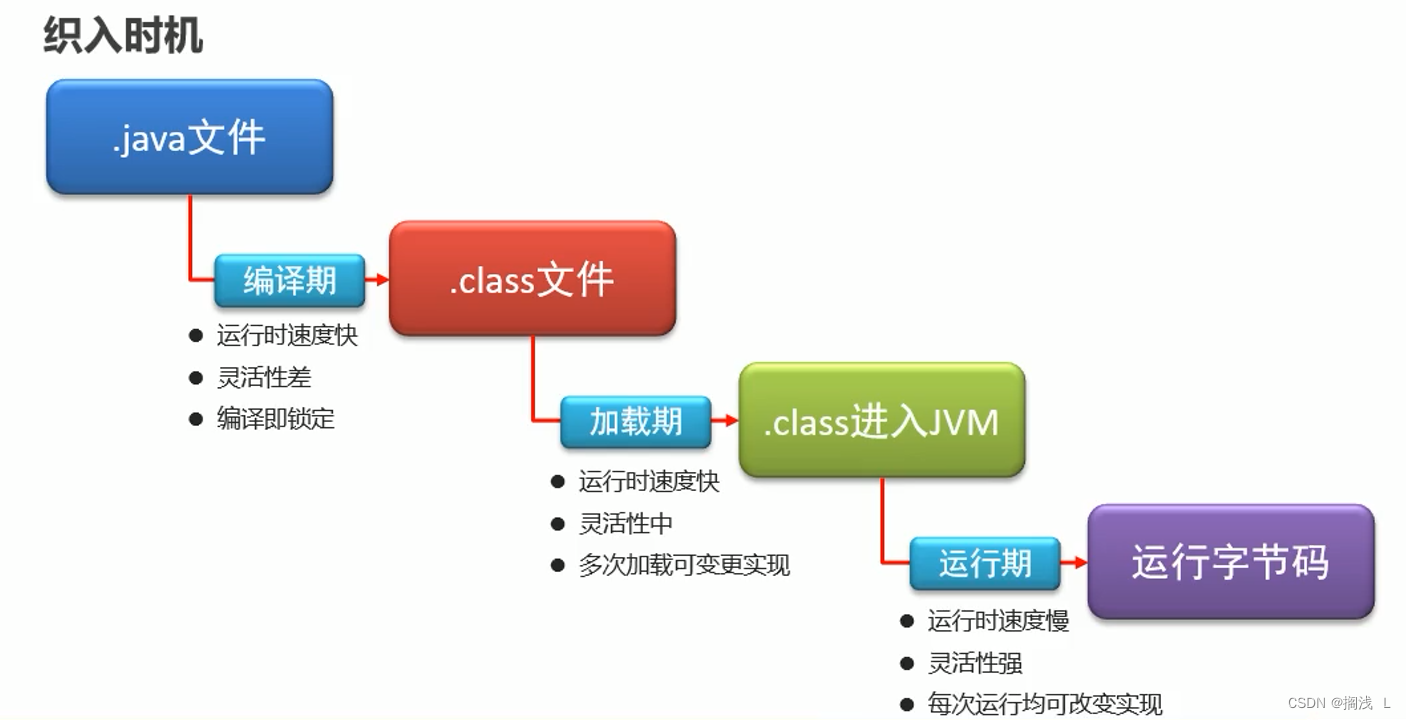
6.Weaving (织入):织入是将切面应用到目标对象的过程。我们可以在编译时、类加载时或运行时进行织入。在织入过程中,切面的逻辑被插入到目标对象的执行流程中。(就是将挖掉的功能回填的动态过程)
7.Proxy (代理):代理是一种在目标对象和客户端之间进行交互的方式。代理对象拦截对目标对象的调用,并在调用前后执行额外的逻辑。它使我们能够在目标对象上添加额外的行为,而不必改动目标对象本身。(目标对象无法直接完成工作,需要对其进行功能回填,通过创建原始对象的代理对象实现)
8.Introduction (引入/引介):引入允许我们向现有类添加新的方法或属性,而无需修改现有类的代码。这样,我们可以在不改动原有类的情况下,向其添加新的功能。(就是对原始对象无中生有的添加成员变量或成员方法)
AOP开发过程
开发阶段(开发者完成)
正常的制作程序
将非共性功能开发到对应的目标对象类中,并制作成切入点方法
将共性功能独立开发出来,制作成通知
在配置文件中,声明切入点
在配置文件中,声明切入点与通知间的关系(含通知类型),即切面
运行阶段(AOP完成)
Spring容器加载配置文件,监控所有配置的切入点方法的执行
当监控到切入点方法被运行,使用代理机制,动态创建目标对象的代理对象,根据通知类别,在代理对象的对应位置将通知对应的功能织入,完成完整的代码逻辑并运行
AOP开发方式
XML方式
XML+注解方式
注解方式
入门案例制作分析
1.导入相关坐标
2.确认要抽取的功能,并将其制作成方法保存到专用的类中,删除原始业务中对应的功能
3.将所有进行AOP操作的资源加载到IoC容器中
4.使用配置的方式描述被抽取功能的位置,并描述被抽取功能与对应位置的关系
5.运行程序
<dependencies><dependency><groupId>org.springframework</groupId><artifactId>spring-context</artifactId><version>5.1.9.RELEASE</version></dependency><dependency><groupId>org.aspectj</groupId><artifactId>aspectjweaver</artifactId><version>1.9.4</version></dependency></dependencies>package com.service;public interface USerService {public void save();
}
package com.service.impl;import com.service.USerService;public class UserServiceImpl implements USerService {public void save(){//0.将共性功能抽取出来//System.out.println("共性功能");System.out.println("user service running...");}
}
package com.aop;
//1.制作通知类,在类中定义一个方法用于完成共性功能
public class AOPAdvice {public void function(){System.out.println("共性功能");}
}
<?xml version="1.0" encoding="UTF-8"?>
<beans xmlns="http://www.springframework.org/schema/beans"xmlns:xsi="http://www.w3.org/2001/XMLSchema-instance"xmlns:p="http://www.springframework.org/schema/p"xmlns:context="http://www.springframework.org/schema/context"xmlns:aop="http://www.springframework.org/schema/aop"xsi:schemaLocation="http://www.springframework.org/schema/beanshttp://www.springframework.org/schema/beans/spring-beans.xsdhttp://www.springframework.org/schema/contexthttp://www.springframework.org/schema/context/spring-context.xsdhttp://www.springframework.org/schema/aophttp://www.springframework.org/schema/aop/spring-aop.xsd"><!--3.开启AOP命名空间--><bean id="userService" class="com.service.impl.UserServiceImpl"/><!--2.配置共性功能成为spring控制的资源--><bean id="myAdvice" class="com.aop.AOPAdvice"/><!--4.配置AOP--><aop:config><!--5.配置切入点--><aop:pointcut id="pt" expression="execution(* *..*(..))"/><!--6.配置切面(切入点与通知的关系)--><aop:aspect ref="myAdvice"><!--7.配置具体的切入点对应通知中哪个操作方法--><aop:before method="function" pointcut-ref="pt"/></aop:aspect></aop:config></beans>
import com.service.USerService;
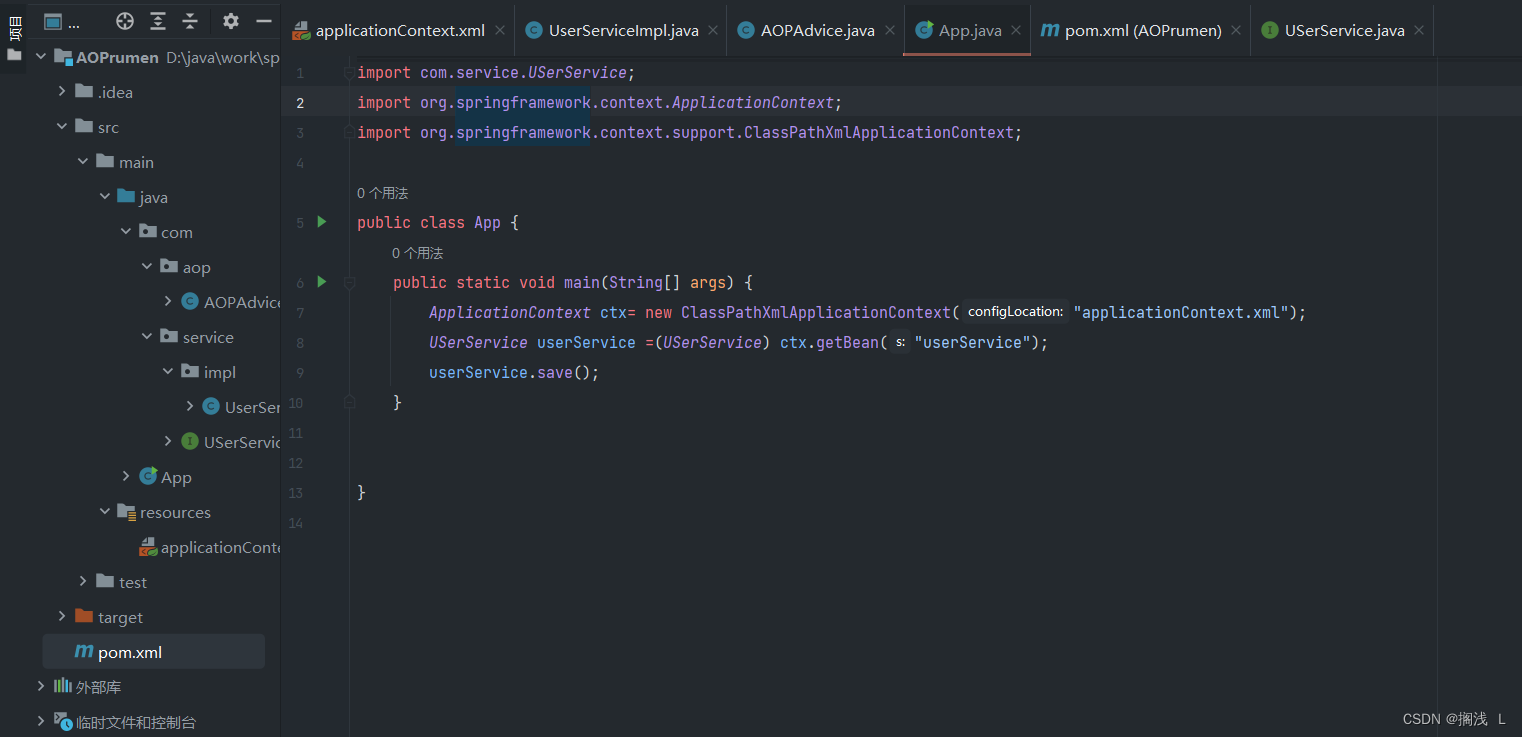
import org.springframework.context.ApplicationContext;
import org.springframework.context.support.ClassPathXmlApplicationContext;public class App {public static void main(String[] args) {ApplicationContext ctx= new ClassPathXmlApplicationContext("applicationContext.xml");USerService userService =(USerService) ctx.getBean("userService");userService.save();}}
3.AOP配置(XML)
AspectJ
Aspect(切面)用于描述切入点与通知间的关系,是AOP编程中的一个概念
AspectJ是基于java语言对Aspect的实现
AOP配置
1.aop:config
名称:aop:config
类型:标签
归属:beans标签
作用:设置AOP
格式
<beans><aop:config>……</aop:config><aop:config>……</aop:config>
</beans>
说明:一个beans标签中可以配置多个aop:config标签
2.aop:aspect
名称:aop:aspect
类型:标签
归属:aop:config标签
作用:设置具体的AOP通知对应的切入点
格式
<aop:config><aop:aspect ref="beanId">……</aop:aspect><aop:aspect ref="beanId">……</aop:aspect>
</aop:config>
说明:
一个aop:config标签中可以配置多个aop:aspect标签
基本属性:
ref :通知所在的bean的id
3.aop:pointcut
名称:aop:pointcut
类型:标签
归属:aop:config标签、aop:aspect标签
作用:设置切入点
格式
<aop:config><aop:pointcut id="pointcutId" expression="……"/><aop:aspect><aop:pointcut id="pointcutId" expression="……"/></aop:aspect>
</aop:config>
说明
一个aop:config标签中可以配置多个aop:pointcut标签,且该标签可以配置在aop:aspect标签内
基本属性
id :识别切入点的名称
expression :切入点表达式
4.切入点
切入点描述的是某个方法
切入点表达式是一个快速匹配方法描述的通配格式,类似于正则表达式
5.切入点表达式的组成
切入点描述的是某个方法
切入点表达式是一个快速匹配方法描述的通配格式,类似于正则表达式
关键字(访问修饰符 返回值 包名.类名.方法名(参数)异常名)关键字:描述表达式的匹配模式(参看关键字列表)
访问修饰符:方法的访问控制权限修饰符
类名:方法所在的类(此处可以配置接口名称)
异常:方法定义中指定抛出的异常
范例
execution(public User com.service.UserService.findById(int))
6.切入点表达式——关键字
execution :匹配执行指定方法
args :匹配带有指定参数类型的方法
within :……
this :……
target :……
@within :……
@target :……
@args :……
@annotation :……
bean :……
reference pointcut :……
7.切入点表达式——通配符
*:单个独立的任意符号,可以独立出现,也可以作为前缀或者后缀的匹配符出现
execution(public * com.*.UserService.find*(*))
匹配com包下的任意包中的UserService类或接口中所有find开头的带有一个参数的方法
… :多个连续的任意符号,可以独立出现,常用于简化包名与参数的书写
execution(public User com..UserService.findById(..))
匹配com包下的任意包中的UserService类或接口中所有名称为findById的方法
+:专用于匹配子类类型
execution(* *..*Service+.*(..))
8.切入点表达式——逻辑运算符
&& :连接两个切入点表达式,表示两个切入点表达式同时成立的匹配
|| :连接两个切入点表达式,表示两个切入点表达式成立任意一个的匹配
! :连接单个切入点表达式,表示该切入点表达式不成立的匹配
切入点表达式范例
execution(* *(..))
execution(* *..*(..))
execution(* *..*.*(..))
execution(public * *..*.*(..))
execution(public int *..*.*(..))
execution(public void *..*.*(..))
execution(public void com..*.*(..))
execution(public void com..service.*.*(..))
execution(public void com.service.*.*(..))
execution(public void com.service.User*.*(..))
execution(public void com.service.*Service.*(..))
execution(public void com.service.UserService.*(..))
execution(public User com.service.UserService.find*(..))
execution(public User com.service.UserService.*Id(..))
execution(public User com.service.UserService.findById(..))
execution(public User com.service.UserService.findById(int))
execution(public User com.service.UserService.findById(int,int))
execution(public User com.service.UserService.findById(int,*))
execution(public User com.service.UserService.findById(*,int))
execution(public User com.service.UserService.findById())
execution(List com.service.*Service+.findAll(..))
9.切入点的三种配置方式
<aop:config><!--配置公共切入点--><aop:pointcut id="pt1" expression="execution(* *(..))"/><aop:aspect ref="myAdvice"><!--配置局部切入点--><aop:pointcut id="pt2" expression="execution(* *(..))"/><!--引用公共切入点--><aop:before method="logAdvice" pointcut-ref="pt1"/><!--引用局部切入点--><aop:before method="logAdvice" pointcut-ref="pt2"/><!--直接配置切入点--><aop:before method="logAdvice" pointcut="execution(* *(..))"/></aop:aspect>
</aop:config>
9.切入点配置经验
企业开发命名规范严格遵循规范文档进行
先为方法配置局部切入点
再抽取类中公共切入点
最后抽取全局切入点
代码走查过程中检测切入点是否存在越界性包含
代码走查过程中检测切入点是否存在非包含性进驻
设定AOP执行检测程序,在单元测试中监控通知被执行次数与预计次数是否匹配
设定完毕的切入点如果发生调整务必进行回归测试
(以上规则适用于XML配置格式)
10.五种通知类型配置
前置通知:原始方法执行前执行,如果通知中抛出异常,阻止原始方法运行
应用:数据校验
后置通知:原始方法执行后执行,无论原始方法中是否出现异常,都将执行通知
应用:现场清理
返回后通知:原始方法正常执行完毕并返回结果后执行,如果原始方法中抛出异常,无法执行
应用:返回值相关数据处理
抛出异常后通知:原始方法抛出异常后执行,如果原始方法没有抛出异常,无法执行
应用:对原始方法中出现的异常信息进行处理
环绕通知:在原始方法执行前后均有对应执行执行,还可以阻止原始方法的执行
应用:十分强大,可以做任何事情
aop:before
名称:aop:before
类型:标签
归属:aop:aspect标签
作用:设置前置通知
格式
<aop:aspect ref="adviceId"><aop:before method="methodName" pointcut="……"/>
</aop:aspect>
基本属性
method :在通知类中设置当前通知类别对应的方法
pointcut :设置当前通知对应的切入点表达式,与pointcut-ref属性冲突
pointcut-ref :设置当前通知对应的切入点id,与pointcut属性冲突
aop:after
名称:aop:after
类型:标签
归属:aop:aspect标签
作用:设置后置通知
格式
<aop:aspect ref="adviceId"><aop:after method="methodName" pointcut="……"/>
</aop:aspect>
基本属性
method :在通知类中设置当前通知类别对应的方法
pointcut :设置当前通知对应的切入点表达式,与pointcut-ref属性冲突
pointcut-ref :设置当前通知对应的切入点id,与pointcut属性冲突
aop:after-returning
名称:aop:after-returning
类型:标签
归属:aop:aspect标签
作用:设置返回后通知
格式
<aop:aspect ref="adviceId"><aop:after-returning method="methodName" pointcut="……"/>
</aop:aspect>
基本属性
method :在通知类中设置当前通知类别对应的方法
pointcut :设置当前通知对应的切入点表达式,与pointcut-ref属性冲突
pointcut-ref :设置当前通知对应的切入点id,与pointcut属性冲突
aop:after-throwing
名称:aop:after-throwing
类型:标签
归属:aop:aspect标签
作用:设置抛出异常后通知
格式
<aop:aspect ref="adviceId"><aop:after-throwing method="methodName" pointcut="……"/>
</aop:aspect>
基本属性
method :在通知类中设置当前通知类别对应的方法
pointcut :设置当前通知对应的切入点表达式,与pointcut-ref属性冲突
pointcut-ref :设置当前通知对应的切入点id,与pointcut属性冲突
aop:around
名称:aop:around
类型:标签
归属:aop:aspect标签
作用:设置环绕通知
格式
<aop:aspect ref="adviceId"><aop:around method="methodName" pointcut="……"/>
</aop:aspect>
基本属性
method :在通知类中设置当前通知类别对应的方法
pointcut :设置当前通知对应的切入点表达式,与pointcut-ref属性冲突
pointcut-ref :设置当前通知对应的切入点id,与pointcut属性冲突
环绕通知方法相关说明:
方法须设定Object类型的返回值,否则会拦截原始方法的返回。如果原始方法返回值类型为void,通知方 也可以设定返回值类型为void,最终返回null
方法需在第一个参数位置设定ProceedingJoinPoint对象,通过该对象调用proceed()方法,实现对原始方法的调用。如省略该参数,原始方法将无法执行
使用proceed()方法调用原始方法时,因无法预知原始方法运行过程中是否会出现异常,强制抛出Throwable对象,封装原始方法中可能出现的异常信息
样例
<?xml version="1.0" encoding="UTF-8"?>
<beans xmlns="http://www.springframework.org/schema/beans"xmlns:xsi="http://www.w3.org/2001/XMLSchema-instance"xmlns:p="http://www.springframework.org/schema/p"xmlns:context="http://www.springframework.org/schema/context"xmlns:aop="http://www.springframework.org/schema/aop"xsi:schemaLocation="http://www.springframework.org/schema/beanshttp://www.springframework.org/schema/beans/spring-beans.xsdhttp://www.springframework.org/schema/contexthttp://www.springframework.org/schema/context/spring-context.xsdhttp://www.springframework.org/schema/aophttp://www.springframework.org/schema/aop/spring-aop.xsd"><!--3.开启AOP命名空间--><bean id="userService" class="com.service.impl.UserServiceImpl"/><!--2.配置共性功能成为spring控制的资源--><bean id="myAdvice" class="com.aop.AOPAdvice"/><!--4.配置AOP--><aop:config><!--5.配置切入点--><aop:pointcut id="pt" expression="execution(* *..*(..))"/><!--6.配置切面(切入点与通知的关系)--><aop:aspect ref="myAdvice"><!--7.配置具体的切入点对应通知中哪个操作方法--><!--<aop:before method="before" pointcut-ref="pt"/>--><!-- <aop:before method="after" pointcut-ref="pt"/>--><!--<aop:after-returning method="afterReturning" pointcut-ref="pt"/>--><!--<aop:after-throwing method="afterThrowing" pointcut-ref="pt"/>--><aop:around method="around" pointcut-ref="pt"/></aop:aspect></aop:config>
</beans>package com.service;public interface USerService {public void save();
}
package com.service.impl;import com.service.USerService;public class UserServiceImpl implements USerService {public void save(){System.out.println("user service running...");//int i=1/0;}}
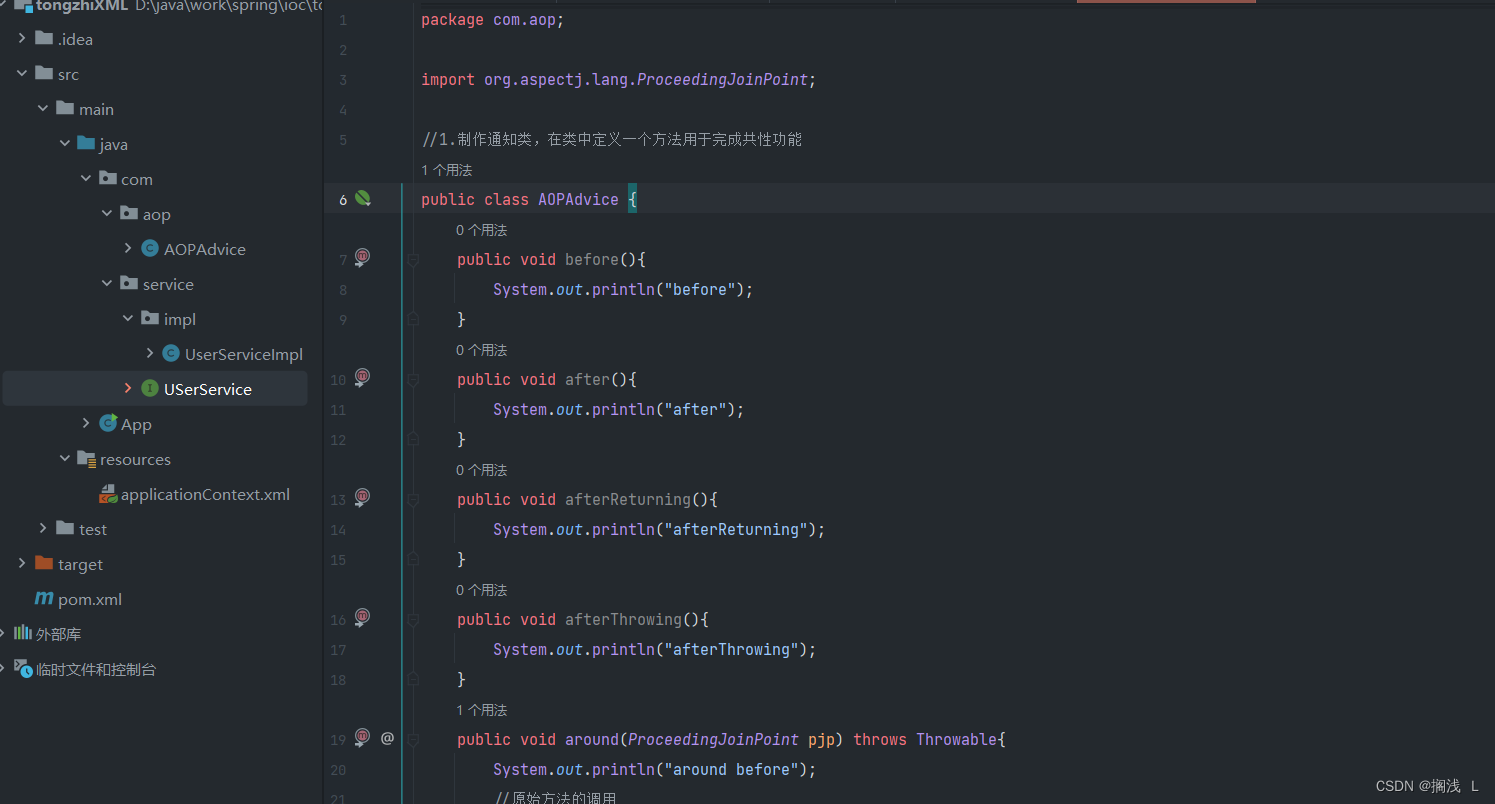
package com.aop;import org.aspectj.lang.ProceedingJoinPoint;//1.制作通知类,在类中定义一个方法用于完成共性功能
public class AOPAdvice {public void before(){System.out.println("before");}public void after(){System.out.println("after");}public void afterReturning(){System.out.println("afterReturning");}public void afterThrowing(){System.out.println("afterThrowing");}public void around(ProceedingJoinPoint pjp) throws Throwable{System.out.println("around before");//原始方法的调用pjp.proceed();System.out.println("around after");}
}
import com.service.USerService;
import org.springframework.context.ApplicationContext;
import org.springframework.context.support.ClassPathXmlApplicationContext;public class App {public static void main(String[] args) {ApplicationContext ctx= new ClassPathXmlApplicationContext("applicationContext.xml");USerService userService =(USerService) ctx.getBean("userService");userService.save();}}
11.通知顺序
当同一个切入点配置了多个通知时,通知会存在运行的先后顺序,该顺序以通知配置的顺序为准
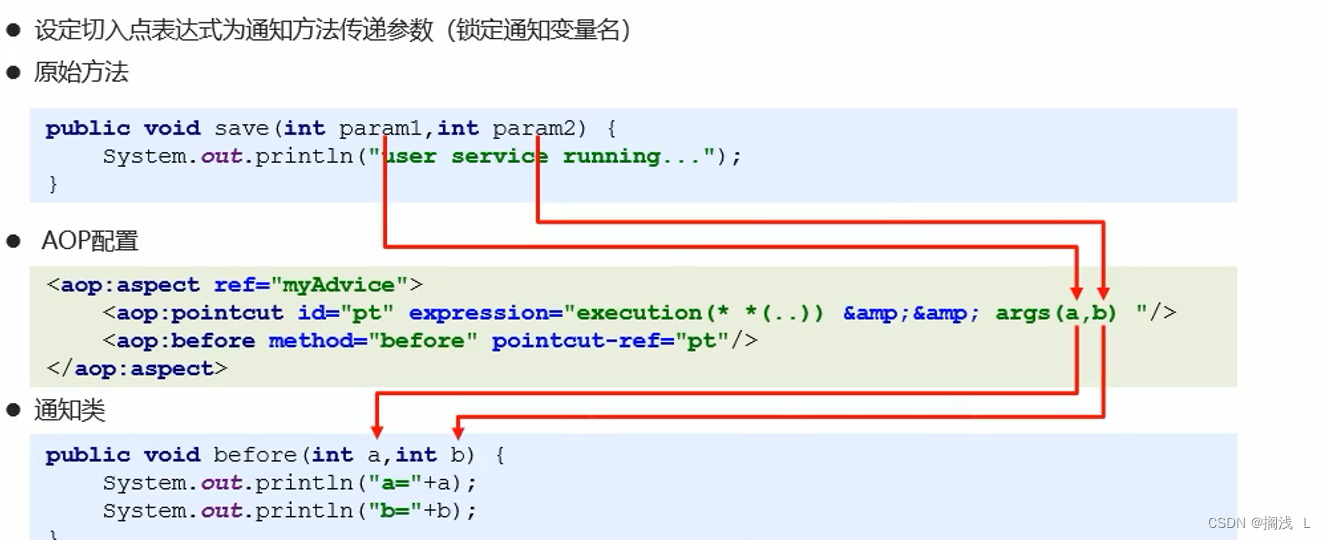
12.通知中获取参数
通知获取数据
参数
返回值
异常
通知获取参数数据
设定通知方法第一个参数为JoinPoint,通过该对象调用getArgs()方法,获取原始方法运行的参数数组
public void before(JoinPoint jp) throws Throwable {Object[] args = jp.getArgs();
}
所有的通知均可以获取参数
package com.service;public interface USerService {public void save(int i);
}
package com.service.impl;import com.service.USerService;public class UserServiceImpl implements USerService {@Overridepublic void save(int i) {System.out.println("user service running..."+i);//int i=1/0;}
}
import com.service.USerService;
import org.springframework.context.ApplicationContext;
import org.springframework.context.support.ClassPathXmlApplicationContext;public class App {public static void main(String[] args) {ApplicationContext ctx= new ClassPathXmlApplicationContext("applicationContext.xml");USerService userService =(USerService) ctx.getBean("userService");userService.save(666);}}
13.通知获取返回值参数
第一种
设定返回值变量名
原始方法
public int save() {System.out.println("user service running...");return 100;
}
AOP配置
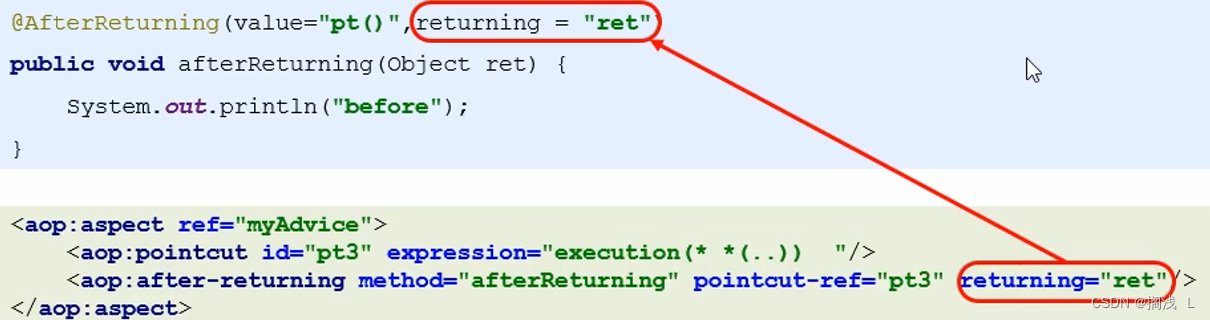
<aop:aspect ref="myAdvice"><aop:pointcut id="pt3" expression="execution(* *(..))  "/><aop:after-returning method="afterReturning" pointcut-ref="pt3" returning="ret"/>
</aop:aspect>
通知类
public void afterReturning(Object ret) {System.out.println(ret);
}
适用于返回后通知(after-returning)
第二种
在通知类的方法中调用原始方法获取返回值
原始方法
public int save() {System.out.println("user service running...");return 100;
}
AOP配置
<aop:aspect ref="myAdvice"><aop:pointcut id="pt2" expression="execution(* *(..))  "/><aop:around method="around" pointcut-ref="pt2" />
</aop:aspect>
通知类
public Object around(ProceedingJoinPoint pjp) throws Throwable {Object ret = pjp.proceed();return ret;
}
适用于环绕通知(around)
样例
package com.service.impl;import com.service.USerService;public class UserServiceImpl implements USerService {@Overridepublic void save(int i) {System.out.println("user service running..."+i);//int i=1/0;}@Overridepublic int update() {System.out.println("user service update running...");return 100;}
}
<aop:config><!--5.配置切入点--><aop:pointcut id="pt" expression="execution(* *..*(..))"/><!--6.配置切面(切入点与通知的关系)--><aop:aspect ref="myAdvice"><!--7.配置具体的切入点对应通知中哪个操作方法--><aop:after-returning method="afterReturning" pointcut-ref="pt" returning="ret"/><aop:around method="around" pointcut-ref="pt"/></aop:aspect></aop:config>package com.aop;import org.aspectj.lang.JoinPoint;
import org.aspectj.lang.ProceedingJoinPoint;//1.制作通知类,在类中定义一个方法用于完成共性功能
public class AOPAdvice {public void before(JoinPoint jp){Object[] args = jp.getArgs();System.out.println("before...");}public void before1(int x){System.out.println("before(int)..."+x);}public void after(JoinPoint jp){Object[] args = jp.getArgs();System.out.println("after..."+args[0]);}public void afterReturning(Object ret){System.out.println("afterReturning..."+ret);}public void afterThrowing(){System.out.println("afterThrowing...");}public Object around(ProceedingJoinPoint pjp) throws Throwable{System.out.println("around before...");//原始方法的调用Object ret = pjp.proceed();System.out.println("around after..."+ret);return ret;}
}
import com.service.USerService;
import org.springframework.context.ApplicationContext;
import org.springframework.context.support.ClassPathXmlApplicationContext;public class App {public static void main(String[] args) {ApplicationContext ctx= new ClassPathXmlApplicationContext("applicationContext.xml");USerService userService =(USerService) ctx.getBean("userService");//userService.save(666);int ref = userService.update();System.out.println("app..."+ref);}}
14.通知获取异常数据
在通知类的方法中调用原始方法捕获异常
第一种
原始方法
public void save() {System.out.println("user service running...");int i = 1/0;
}
AOP配置
<aop:aspect ref="myAdvice"><aop:pointcut id="pt4" expression="execution(* *(..))  "/><aop:around method="around" pointcut-ref="pt4" />
</aop:aspect>
通知类
public Object around(ProceedingJoinPoint pjp) throws Throwable {Object ret = pjp.proceed();	//对此处调用进行try……catch……捕获异常,或抛出异常return ret;
}
适用于环绕通知(around)
第二种
设定异常对象变量名
原始方法
public void save() {System.out.println("user service running...");int i = 1/0;
}
AOP配置
<aop:aspect ref="myAdvice"><aop:pointcut id="pt4" expression="execution(* *(..))  "/><aop:after-throwing method="afterThrowing" pointcut-ref="pt4" throwing="t"/>
</aop:aspect>
通知类
public void afterThrowing(Throwable t){System.out.println(t.getMessage());
}
适用于返回后通知(after-throwing)
4.AOP配置(注解)
1.注解配置AOP
2.注解开发AOP制作步骤
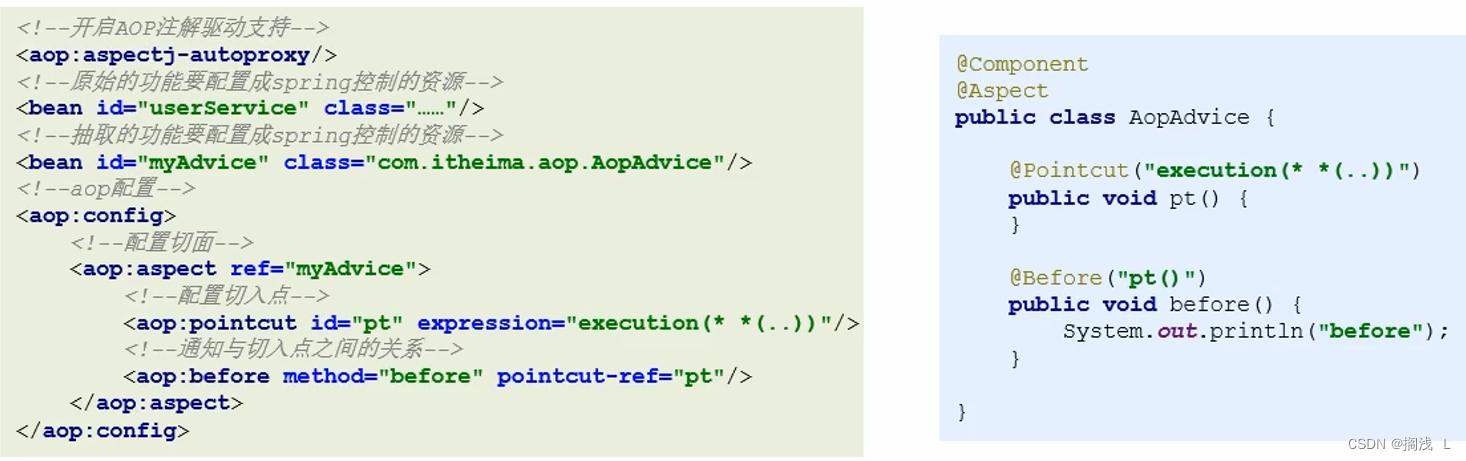
在XML格式基础上
导入坐标(伴随spring-context坐标导入已经依赖导入完成)
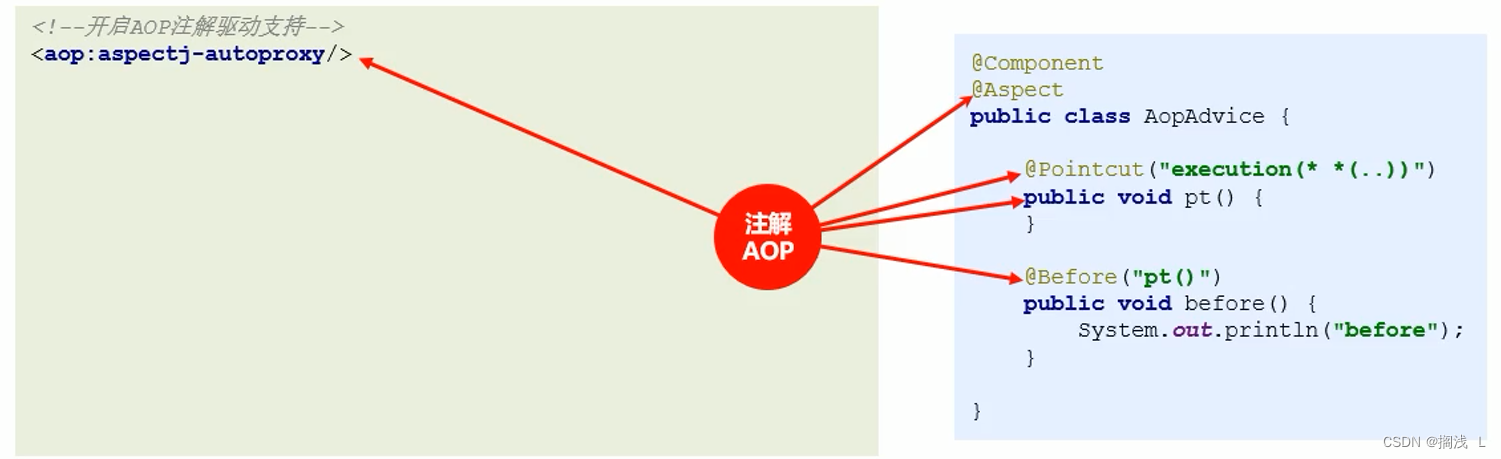
开启AOP注解支持
配置切面@Aspect
定义专用的切入点方法,并配置切入点@Pointcut
为通知方法配置通知类型及对应切入点@Before
3.注解开发AOP注意事项
1.切入点最终体现为一个方法,无参无返回值,无实际方法体内容,但不能是抽象方法
2.引用切入点时必须使用方法调用名称,方法后面的()不能省略
3.切面类中定义的切入点只能在当前类中使用,如果想引用其他类中定义的切入点使用“类名.方法名()”引用
4.可以在通知类型注解后添加参数,实现XML配置中的属性,例如after-returning后的returning属性
4.注解详解
@Aspect
名称:@Aspect
类型:注解
位置:类定义上方
作用:设置当前类为切面类
格式:
@Aspect
public class AopAdvice {
}
说明:一个beans标签中可以配置多个aop:config标签
@Pointcut
名称:@Pointcut
类型:注解
位置:方法定义上方
作用:使用当前方法名作为切入点引用名称
格式:
@Pointcut("execution(* *(..))")
public void pt() {
}
说明:被修饰的方法忽略其业务功能,格式设定为无参无返回值的方法,方法体内空实现(非抽象)
@Before
名称:@Before
类型:注解
位置:方法定义上方
作用:标注当前方法作为前置通知
格式:
@Before("pt()")
public void before(){
}
特殊参数:无
@After
名称:@After
类型:注解
位置:方法定义上方
作用:标注当前方法作为后置通知
格式:
@After("pt()")
public void after(){
}
特殊参数:无
@AfterReturning
名称:@AfterReturning
类型:注解
位置:方法定义上方
作用:标注当前方法作为返回后通知
格式:
@AfterReturning(value="pt()",returning = "ret")
public void afterReturning(Object ret) {
}
特殊参数:
returning :设定使用通知方法参数接收返回值的变量名
@AfterThrowing
名称:@AfterThrowing
类型:注解
位置:方法定义上方
作用:标注当前方法作为异常后通知
格式:
@AfterThrowing(value="pt()",throwing = "t")
public void afterThrowing(Throwable t){
}
特殊参数:
throwing :设定使用通知方法参数接收原始方法中抛出的异常对象名
@Around
名称:@Around
类型:注解
位置:方法定义上方
作用:标注当前方法作为环绕通知
格式:
@Around("pt()")
public Object around(ProceedingJoinPoint pjp) throws Throwable {Object ret = pjp.proceed();return ret;
}
特殊参数:无
样例
<?xml version="1.0" encoding="UTF-8"?>
<beans xmlns="http://www.springframework.org/schema/beans"xmlns:xsi="http://www.w3.org/2001/XMLSchema-instance"xmlns:p="http://www.springframework.org/schema/p"xmlns:context="http://www.springframework.org/schema/context"xmlns:aop="http://www.springframework.org/schema/aop"xsi:schemaLocation="http://www.springframework.org/schema/beanshttp://www.springframework.org/schema/beans/spring-beans.xsdhttp://www.springframework.org/schema/contexthttp://www.springframework.org/schema/context/spring-context.xsdhttp://www.springframework.org/schema/aophttp://www.springframework.org/schema/aop/spring-aop.xsd"><!--开启磁盘扫描--><context:component-scan base-package="com"/><!--开启aop注解支持--><aop:aspectj-autoproxy/><!-- <bean id="userService" class="com.service.impl.UserServiceImpl"/>--><!--<bean id="myAdvice" class="com.aop.AOPAdvice"/>--><!-- <aop:config><aop:pointcut id="pt" expression="execution(* *..*(..))"/><aop:aspect ref="myAdvice"><aop:before method="before" pointcut-ref="pt"/><aop:before method="after" pointcut-ref="pt"/><aop:after-returning method="afterReturning" pointcut-ref="pt"/><aop:after-throwing method="afterThrowing" pointcut-ref="pt"/><aop:around method="around" pointcut-ref="pt"/></aop:aspect></aop:config>--></beans>
package com.service;public interface USerService {public int save(int i, int m);
}
package com.service.impl;import com.service.USerService;
import org.springframework.stereotype.Service;@Service("userService")
public class UserServiceImpl implements USerService {public int save(int i,int m){System.out.println("user service running..."+i+","+m);return 100;}}
package com.aop;import org.aspectj.lang.ProceedingJoinPoint;
import org.aspectj.lang.annotation.*;
import org.springframework.stereotype.Component;@Component
@Aspect
public class AOPAdvice {@Pointcut("execution(* *..*(..))")public void pt(){}@Before("pt()")public void before(){System.out.println("前置before...");}@After("pt()")public void after(){System.out.println("后置after...");}@AfterReturning("pt()")public void afterReturning(){System.out.println("返回后afterReturning...");}@AfterThrowing("pt()")public void afterThrowing(){System.out.println("抛出异常后afterThrowing...");}@Around("pt()")public Object around(ProceedingJoinPoint pjp) throws Throwable{System.out.println("环绕前around before...");//原始方法的调用Object ret = pjp.proceed();System.out.println("环绕后around after...");return ret;}
}
import com.service.USerService;
import org.springframework.context.ApplicationContext;
import org.springframework.context.support.ClassPathXmlApplicationContext;public class App {public static void main(String[] args) {ApplicationContext ctx= new ClassPathXmlApplicationContext("applicationContext.xml");USerService userService =(USerService) ctx.getBean("userService");int ret = userService.save(666,888);System.out.println("应用程序调用执行结构..."+ret);}}
5.AOP注解开发通知执行顺序控制
AOP使用XML配置情况下,通知的执行顺序由配置顺序决定,在注解情况下由于不存在配置顺序的概念的概念,参照通知所配置的方法名字符串对应的编码值顺序,可以简单理解为字母排序
同一个通知类中,相同通知类型以方法名排序为准
不同通知类中,以类名排序为准
使用@Order注解通过变更bean的加载顺序改变通知的加载顺序
企业开发经验
通知方法名由3部分组成,分别是前缀、顺序编码、功能描述
前缀为固定字符串,例如baidu、tencent等,无实际意义
顺序编码为6位以内的整数,通常3位即可,不足位补0
功能描述为该方法对应的实际通知功能,例如exception、strLenCheck
制通知执行顺序使用顺序编码控制,使用时做一定空间预留
003使用,006使用,预留001、002、004、005、007、008
使用时从中段开始使用,方便后期做前置追加或后置追加
最终顺序以运行顺序为准,以测试结果为准,不以设定规则为准
6.AOP注解驱动
名称:@EnableAspectJAutoProxy
类型:注解
位置:Spring注解配置类定义上方
作用:设置当前类开启AOP注解驱动的支持,加载AOP注解
格式
@Configuration
@ComponentScan("com")
@EnableAspectJAutoProxy
public class SpringConfig {
}
样例
package com.config;import org.springframework.context.annotation.ComponentScan;
import org.springframework.context.annotation.Configuration;
import org.springframework.context.annotation.EnableAspectJAutoProxy;@Configuration
@ComponentScan("com")
@EnableAspectJAutoProxy
public class SpringConfig {
}
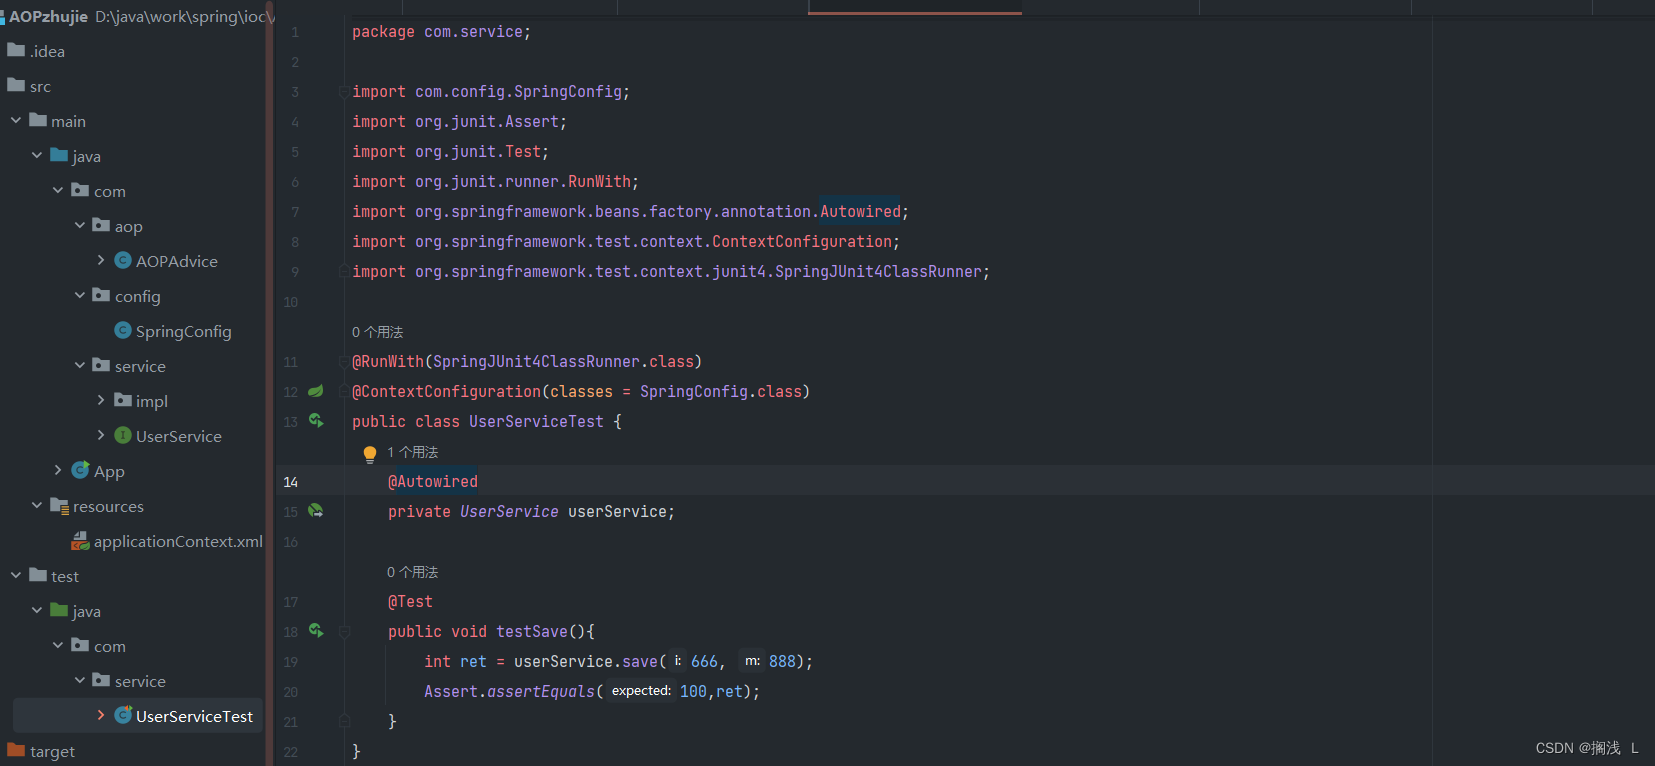
package com.service;import com.config.SpringConfig;
import org.junit.Assert;
import org.junit.Test;
import org.junit.runner.RunWith;
import org.springframework.beans.factory.annotation.Autowired;
import org.springframework.test.context.ContextConfiguration;
import org.springframework.test.context.junit4.SpringJUnit4ClassRunner;@RunWith(SpringJUnit4ClassRunner.class)
@ContextConfiguration(classes = SpringConfig.class)
public class UserServiceTest {@Autowiredprivate UserService userService;@Testpublic void testSave(){int ret = userService.save(666, 888);Assert.assertEquals(100,ret);}
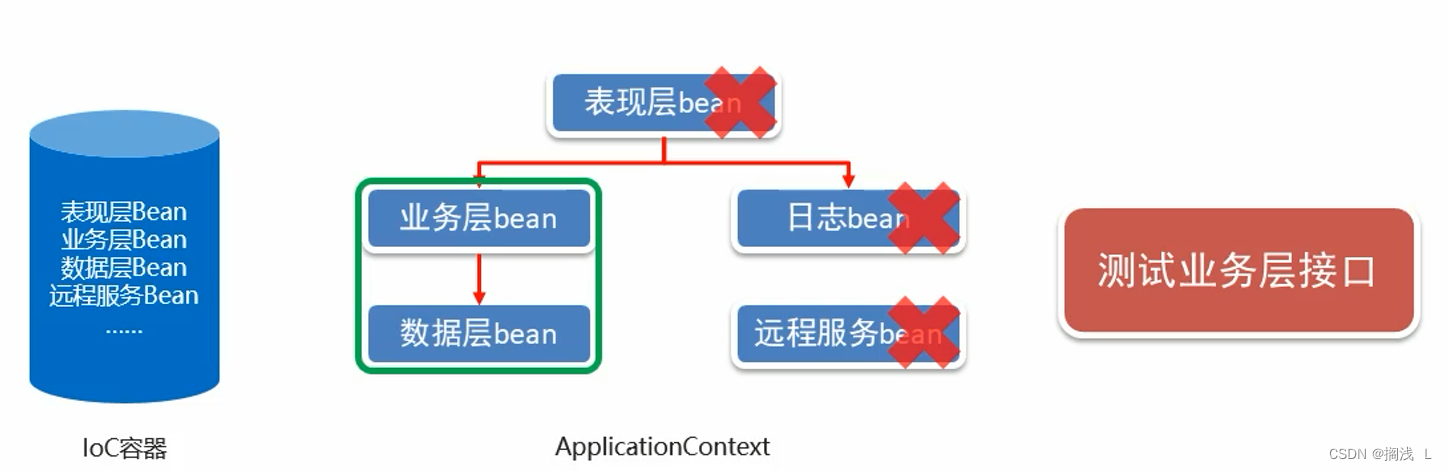
}5.案例:业务层接口性能监测
对项目进行业务层接口执行监控,测量业务层接口的执行效率
案例分析
测量接口执行效率:接口方法执行前后获取执行时间,求出执行时长
System.currentTimeMillis()
对项目进行监控:项目中所有接口方法,AOP思想,执行期动态织入代码
环绕通知
proceed()方法执行前后获取系统时间
案例制作步骤
定义切入点(务必要绑定到接口上,而不是接口实现类上)
制作AOP环绕通知,完成测量功能
注解配置AOP
开启注解驱动支持
代码实现
 <dependencies><dependency><groupId>junit</groupId><artifactId>junit</artifactId><version>4.13.2</version><scope>test</scope></dependency><dependency><groupId>org.springframework</groupId><artifactId>spring-test</artifactId><version>5.1.19.RELEASE</version></dependency><dependency><groupId>org.springframework</groupId><artifactId>spring-context</artifactId><version>5.1.9.RELEASE</version></dependency><dependency><groupId>org.springframework</groupId><artifactId>spring-jdbc</artifactId><version>5.3.22</version></dependency><dependency><groupId>com.alibaba</groupId><artifactId>druid</artifactId><version>1.2.16</version></dependency><dependency><groupId>org.mybatis</groupId><artifactId>mybatis</artifactId><version>3.5.13</version></dependency><dependency><groupId>mysql</groupId><artifactId>mysql-connector-java</artifactId><version>8.0.33</version></dependency><dependency><groupId>org.mybatis</groupId><artifactId>mybatis-spring</artifactId><version>2.0.7</version></dependency><dependency><groupId>org.aspectj</groupId><artifactId>aspectjweaver</artifactId><version>1.9.4</version></dependency>
</dependencies>
package com.domain;public class Account {private Integer id;private String name;private Double money;public Integer getId() {return id;}public void setId(Integer id) {this.id = id;}public String getName() {return name;}public void setName(String name) {this.name = name;}public Double getMoney() {return money;}public void setMoney(Double money) {this.money = money;}@Overridepublic String toString() {return "Account{" +"id=" + id +", name='" + name + '\'' +", money=" + money +'}';}
}package com.dao;import com.domain.Account;
import org.apache.ibatis.annotations.Delete;
import org.apache.ibatis.annotations.Insert;
import org.apache.ibatis.annotations.Select;
import org.apache.ibatis.annotations.Update;import java.util.List;public interface AccountDao {@Insert("INSERT INTO account(name, money) VALUES (#{name},#{money})")void save(Account account);@Delete("DELETE FROM account WHERE id = ${id}")void delete(Integer id);@Update("UPDATE account SET name = #{name},money = #{money} WHERE id = #{id}")void update(Account account);@Select("SELECT * FROM account")List<Account> findAll();@Select("SELECT * FROM account WHERE id = #{id}")Account findById(Integer id);
}package com.app;import org.aspectj.lang.ProceedingJoinPoint;
import org.aspectj.lang.Signature;
import org.aspectj.lang.annotation.Around;
import org.aspectj.lang.annotation.Aspect;
import org.aspectj.lang.annotation.Pointcut;
import org.springframework.stereotype.Component;@Component
@Aspect
public class RunTimeMonitorAdvice {//切入点,监控业务层接口@Pointcut("execution(* com.service.*Service.find*(..))")public void pt(){}@Around("pt()")public Object runtimeAround(ProceedingJoinPoint pjp) throws Throwable {Signature signature = pjp.getSignature();String className = signature.getDeclaringTypeName();String methodName = signature.getName();Object ret = null;long sum = 0L;for(int i = 0; i < 10000; i++){long startTime = System.currentTimeMillis();ret= pjp.proceed();long endTime = System.currentTimeMillis();sum += endTime-startTime;}System.out.println(className+":"+methodName+":(万次)run:"+sum+"ms");return ret;}
}package com.config;import org.springframework.context.annotation.*;@Configuration
@ComponentScan("com")
@PropertySource("classpath:jdbc.properties")
@Import({JDBCConfig.class, MybatisConfig.class})
@EnableAspectJAutoProxy
public class SpringConfig {
}package com.config;import com.alibaba.druid.pool.DruidDataSource;
import org.springframework.beans.factory.annotation.Value;
import org.springframework.context.annotation.Bean;import javax.sql.DataSource;public class JDBCConfig {@Value("${jdbc.driver}")private String driver;@Value("${jdbc.url}")private String url;@Value("${jdbc.username}")private String userName;@Value("${jdbc.password}")private String password;@Bean("dataSource")public DataSource getDataSource(){DruidDataSource ds = new DruidDataSource();ds.setDriverClassName(driver);ds.setUrl(url);ds.setUsername(userName);ds.setPassword(password);return ds;}
}
package com.config;import org.mybatis.spring.SqlSessionFactoryBean;
import org.mybatis.spring.mapper.MapperScannerConfigurer;
import org.springframework.beans.factory.annotation.Autowired;
import org.springframework.context.annotation.Bean;import javax.sql.DataSource;public class MybatisConfig {@Beanpublic SqlSessionFactoryBean getSqlSessionFactoryBean(@Autowired DataSource dataSource){SqlSessionFactoryBean ssfb = new SqlSessionFactoryBean();ssfb.setTypeAliasesPackage("com.domain");ssfb.setDataSource(dataSource);return ssfb;}@Beanpublic MapperScannerConfigurer getMapperScannerConfigurer(){MapperScannerConfigurer msc = new MapperScannerConfigurer();msc.setBasePackage("com.dao");return msc;}
}
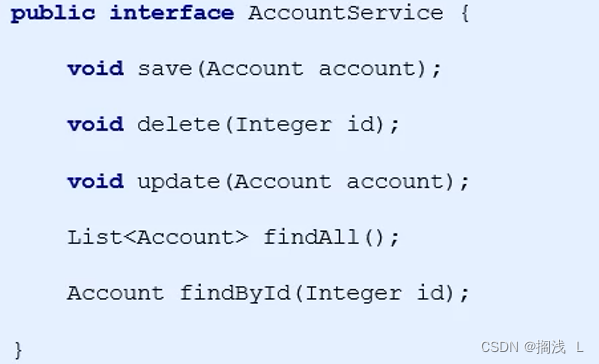
package com.service;import com.domain.Account;import java.util.List;public interface AccountService {void save(Account account);void delete(Integer id);void update(Account account);List<Account> findAll();Account findById(Integer id);
}
package com.service.impl;import com.dao.AccountDao;
import com.domain.Account;
import com.service.AccountService;
import org.springframework.beans.factory.annotation.Autowired;
import org.springframework.stereotype.Service;import java.util.List;@Service("accountService")
public class AccountServiceImpl implements AccountService {@Autowiredprivate AccountDao accountDao;public void save(Account account){accountDao.save(account);}public void delete(Integer id){accountDao.delete(id);}public void update(Account account){accountDao.update(account);}public List<Account> findAll(){return accountDao.findAll();}public Account findById(Integer id){return accountDao.findById(id);}
}jdbc.properties
jdbc.driver=com.mysql.cj.jdbc.Driver
jdbc.url=jdbc:mysql://localhost:3306/spring_db?serverTimezone=UTC&useUnicode=true&characterEncoding=UTF-8&useSSL=false
jdbc.username=root
jdbc.password=123456
package com.service;import com.config.SpringConfig;
import com.domain.Account;
import org.junit.Assert;
import org.junit.Test;
import org.junit.runner.RunWith;
import org.springframework.beans.factory.annotation.Autowired;
import org.springframework.test.context.ContextConfiguration;
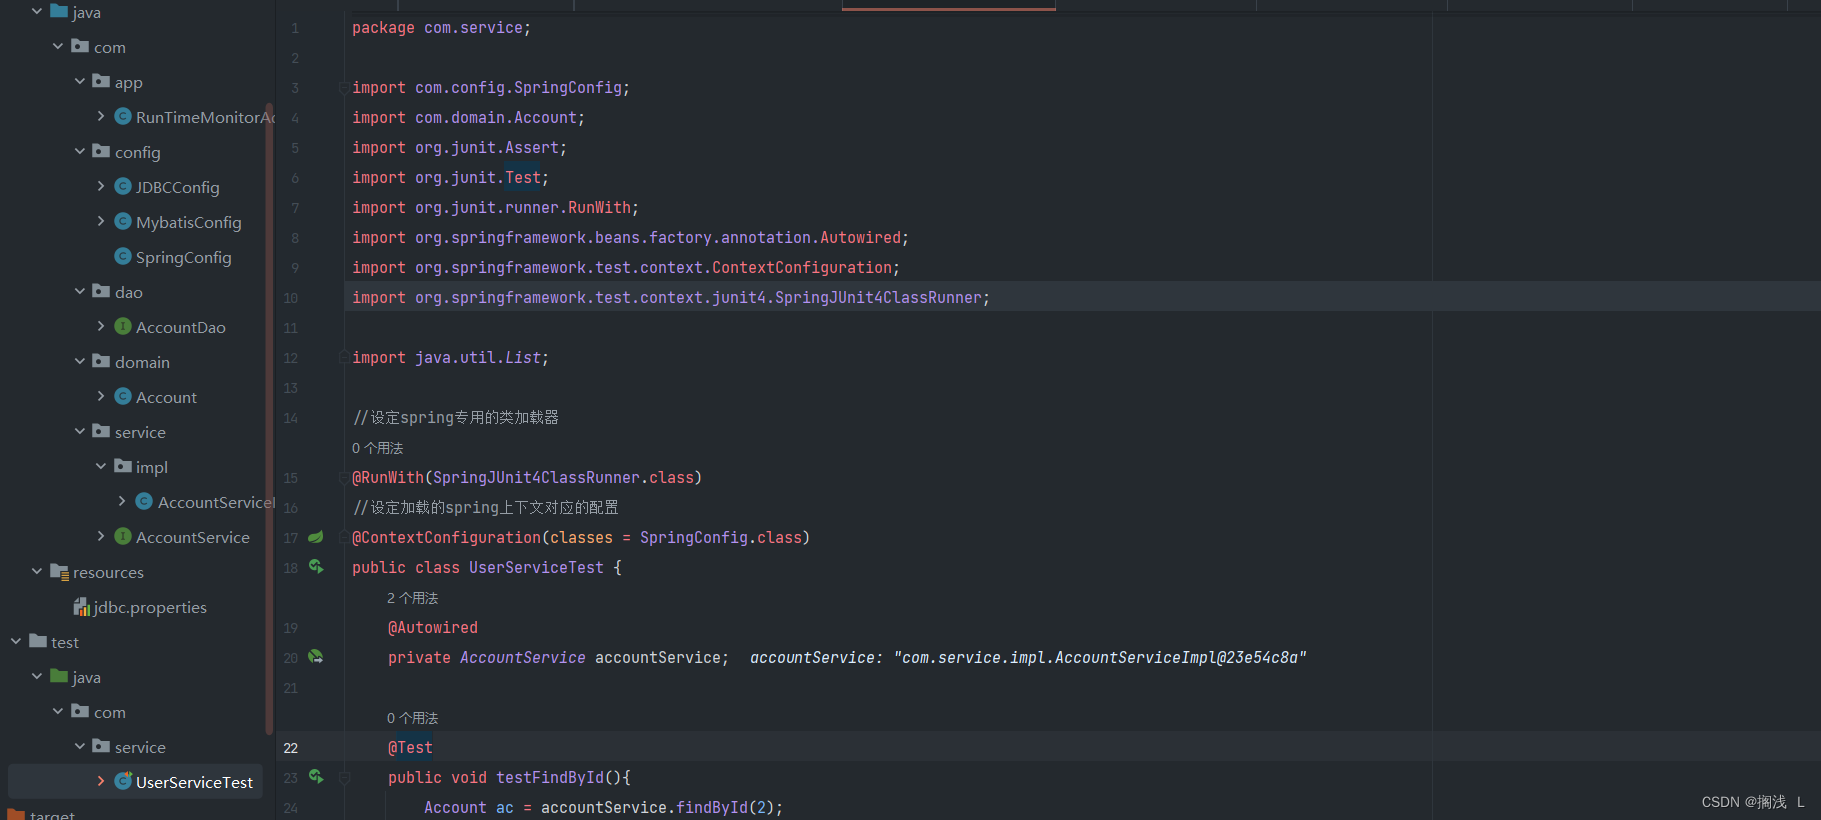
import org.springframework.test.context.junit4.SpringJUnit4ClassRunner;import java.util.List;//设定spring专用的类加载器
@RunWith(SpringJUnit4ClassRunner.class)
//设定加载的spring上下文对应的配置
@ContextConfiguration(classes = SpringConfig.class)
public class UserServiceTest {@Autowiredprivate AccountService accountService;@Testpublic void testFindById(){Account ac = accountService.findById(2);System.out.println(ac);}@Testpublic void testFindAll(){List<Account> list = accountService.findAll();Assert.assertEquals(2,list.size());}
}案例后续思考与设计
测量真实性
开发测量是隔离性反复执行某个操作,是理想情况,上线测量差异过大
上线测量服务器性能略低于单机开发测量
上线测量基于缓存的性能查询要优于数据库查询测量
上线测量接口的性能与最终对外提供的服务性能差异过大
当外部条件发生变化(硬件),需要进行回归测试,例如数据库迁移
测量结果展示
测量结果无需每一个都展示,需要设定检测阈值
阈值设定要根据业务进行区分,一个复杂的查询与简单的查询差异化很大
阈值设定需要做独立的配置文件或通过图形工具配置(工具级别的开发)
配合图形界面展示测量结果
3.AOP底层原理
1.静态代理
装饰者模式(Decorator Pattern):在不惊动原始设计的基础上,为其添加功能
样例
package com.service.impl;import com.service.UserService;public class UserServiceImpl implements UserService {@Overridepublic void save() {System.out.println("水泥墙");}
}
package base.dectorator;import com.service.UserService;public class UserServiceImplDecorator implements UserService {private UserService userService;public UserServiceImplDecorator(UserService userService){this.userService = userService;}@Overridepublic void save() {//增强功能System.out.println("刮大白");}
}
package base.dectorator;import com.service.UserService;
import com.service.impl.UserServiceImpl;public class App {public static void main(String[] args) {UserService userService = new UserServiceImpl();UserService userService1 = new UserServiceImplDecorator(userService);userService.save();}
}
在不动水泥墙的情况下贴上了刮大白
2.动态代理——JDK Proxy
JDKProxy动态代理是针对对象做代理,要求原始对象具有接口实现,并对接口方法进行增强
样例
package base.proxy;import com.service.UserService;import java.lang.reflect.InvocationHandler;
import java.lang.reflect.Method;
import java.lang.reflect.Proxy;public class UserServiceJDKProxy {public static UserService createUserServiceJDKProxy(final UserService userService){//获取被代理对象的类加载器ClassLoader cl = userService.getClass().getClassLoader();//获取被代理对象实现的接口Class[] classes = userService.getClass().getInterfaces();//对原始方法执行进行拦截并增强InvocationHandler ih = new InvocationHandler() {public Object invoke(Object proxy, Method method, Object[] args) throws Throwable {//前置增强内容Object ret = method.invoke(userService, args);//后置增强内容System.out.println("刮大白2");return ret;}};//使用原始被代理对象创建新的代理对象UserService service = (UserService) Proxy.newProxyInstance(cl,classes,ih);return service;}}
package base.proxy;import com.service.UserService;
import com.service.impl.UserServiceImpl;public class App {public static void main(String[] args) {UserService userService = new UserServiceImpl();UserService userService1 = UserServiceJDKProxy.createUserServiceJDKProxy(userService);userService1.save();}
}
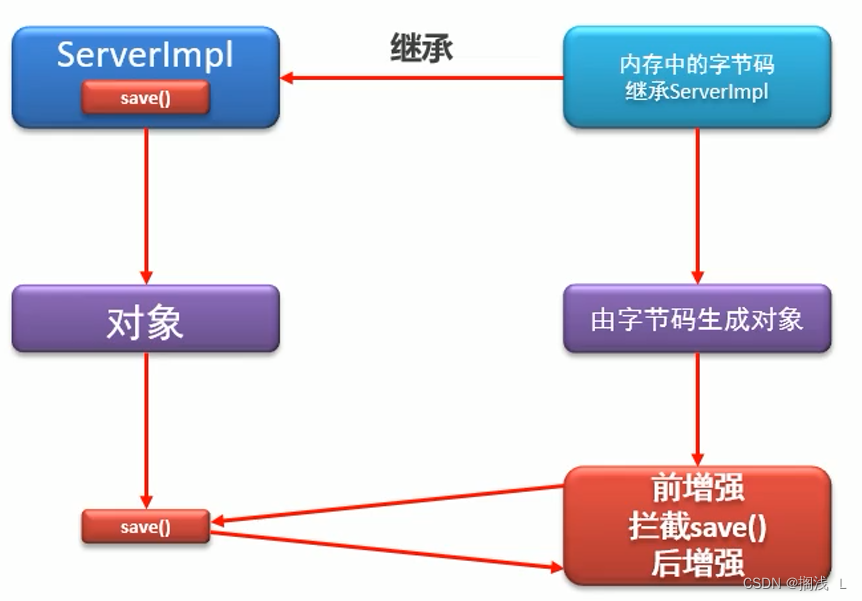
3.动态代理——CGLIB
CGLIB(Code Generation Library),Code生成类库
CGLIB动态代理不限定是否具有接口,可以对任意操作进行增强
CGLIB动态代理无需要原始被代理对象,动态创建出新的代理对象
CGLIB是一个强大的、高性能的代码生成库
其被广泛应用于AOP框架(Spring、dynaop)中,用以提供方法拦截操作
使用CGLIB动态代理有以下一些注意事项:
1.被代理的类和代理类之间必须有共享的可见构造函数,因为CGLIB代理类是通过继承被代理类的方式生成的。
2.对于final方法或private方法,CGLIB无法进行代理,因为它无法重写这些方法。
3.CGLIB生成的代理类通过继承被代理类,因此如果被代理类是final类,则无法生成代理类。
package base.cglib;import com.service.impl.UserServiceImpl;
import org.springframework.cglib.proxy.Callback;
import org.springframework.cglib.proxy.Enhancer;
import org.springframework.cglib.proxy.MethodInterceptor;
import org.springframework.cglib.proxy.MethodProxy;import java.lang.reflect.Method;public class UserServiceImplCglibProxy {public static UserServiceImpl createUserServiceCglibProxy(Class clazz){//创建Enhancer对象(可以理解为内存中动态创建了一个类的字节码)Enhancer enhancer = new Enhancer();//设置Enhancer对象的父类是指定类型UserServerImplenhancer.setSuperclass(clazz);Callback cb = new MethodInterceptor() {public Object intercept(Object o, Method m, Object[] a, MethodProxy mp) throws Throwable {Object ret = mp.invokeSuper(o, a);if(m.getName().equals("save")) {System.out.println("刮大白3");}return ret;}};//设置回调方法enhancer.setCallback(cb);//使用Enhancer对象创建对应的对象return (UserServiceImpl)enhancer.create();}
}
package base.cglib;import com.service.UserService;
import com.service.impl.UserServiceImpl;public class App {public static void main(String[] args) {UserService userService = UserServiceImplCglibProxy.createUserServiceCglibProxy(UserServiceImpl.class);userService.save();}}
4.织入时机