现在我们的最后一个特性是虚化模糊。注意,摄影师通常称之为景深,所以请确保在光线追踪的朋友中只使用虚化模糊这个术语。
真实相机具有虚化模糊是因为它们需要一个大孔(而不仅仅是针孔)来收集光线。一个大孔会导致所有物体失去焦点,但是如果我们在胶片/传感器前放置一块透镜,就会出现一定距离上所有物体都能够聚焦的情况。放置在该距离上的物体将呈现出清晰,而距离该距离越远的物体将呈现出线性模糊。您可以这样理解透镜:所有来自焦点距离上特定点的光线,当碰到透镜时将被折回到图像传感器上的一个点。
我们将摄像机中心与一切都处于完美聚焦状态的平面之间的距离称为焦距。请注意,焦距通常与焦距长度不同-焦距长度是摄像机中心与图像平面之间的距离。然而,在我们的模型中,这两个值将相等,因为我们将将像素网格放在焦平面上,距离摄像机中心焦距远。
在实体相机中,焦距由镜头与胶片/传感器之间的距离控制。这就是为什么当您改变对焦物体时,镜头会相对于相机移动的原因(您手机相机可能也会出现这种情况,但是传感器移动)。"光圈"是控制镜头有效大小的孔洞。对于真实相机,如果需要更多光线,可以使光圈更大,并且远离焦距的物体将产生更多的模糊效果。对于我们的虚拟相机,我们可以拥有完美的传感器并且从不需要更多光线,因此只在需要虚化模糊时使用光圈。
13.1 A Thin Lens Approximation
一台真实的相机配备有复杂的复合镜头。对于我们的代码,我们可以按顺序模拟传感器、透镜和光圈的工作方式。然后我们可以确定光线的传播路径,并在计算完成后翻转图像(图像在底片上是上下颠倒的)。而图形专家通常使用薄透镜近似:
Figure 21: Camera lens model
为了渲染相机外部的图像,我们不需要模拟相机内部的任何部分,这将增加不必要的复杂性。相反,我通常从一个无限薄的圆形“lens”(镜头)开始发射光线,将它们发送到焦平面上感兴趣的像素位置(focal_length away from the lens 距离镜头焦距的位置),在那个平面上,3D世界中的所有物体都是完全聚焦的。
实际上,我们通过将视口放置在这个平面上来实现这一点。将所有内容整合起来:
焦平面垂直于相机视角方向。
焦距是相机中心与焦平面之间的距离。
视口位于焦平面上,以相机视角方向向量为中心。
像素位置的网格位于视口内部(位于3D世界中)。
随机图像样本位置从当前像素位置周围的区域选择。
相机从镜头上的随机点通过当前图像样本位置发射光线。
Figure 22: Camera focus plane
13.2 Generating Sample Rays
没有虚化模糊时,所有场景光线都起源于相机中心(或lookfrom)。为了实现虚化模糊,我们构建一个以相机中心为中心的圆盘。半径越大,虚化模糊越明显。你可以将我们原始的相机看作具有半径为零的虚化圆盘(完全没有模糊),因此所有光线起源于圆盘中心(lookfrom)。
那么,虚化圆盘应该有多大?由于此圆盘的大小控制了我们获得的虚化模糊程度,这应该是相机类的一个参数。我们可以将圆盘的半径作为相机参数,但模糊程度将取决于投影距离。一个稍微简单一点的参数是指定以视口中心为顶点、以相机中心为底(虚化圆盘)的圆锥体的角度。这样,在变化焦距的情况下,可以获得更一致的结果。
由于我们将从虚化圆盘中选择随机点,因此需要一个函数来实现:random_in_unit_disk()。这个函数使用与random_in_unit_sphere()相同类型的方法,只是在二维平面上使用。
inline vec3 unit_vector(vec3 u) {
return v / v.length();
}inline vec3 random_in_unit_disk() {
while (true) {auto p = vec3(random_double(-1,1), random_double(-1,1), 0);if (p.length_squared() < 1)return p;}
}
Listing 79: [vec3.h] Generate random point inside unit disk
现在让我们更新相机,使光线起源于虚化圆盘:
class camera {public:
double aspect_ratio      = 1.0;  // Ratio of image width over height
int    image_width       = 100;  // Rendered image width in pixel count
int    samples_per_pixel = 10;   // Count of random samples for each pixel
int    max_depth         = 10;   // Maximum number of ray bounces into scene
double vfov     = 90;              // Vertical view angle (field of view)
point3 lookfrom = point3(0,0,-1);  // Point camera is looking from
point3 lookat   = point3(0,0,0);   // Point camera is looking at
vec3   vup      = vec3(0,1,0);     // Camera-relative "up" directiondouble defocus_angle = 0;  // Variation angle of rays through each pixel
double focus_dist = 10;// Distance from camera lookfrom point to plane of perfect focus...
private:int    image_height;    // Rendered image height
point3 center;          // Camera centerpoint3 pixel00_loc;     // Location of pixel 0, 0vec3   pixel_delta_u;   // Offset to pixel to the rightvec3   pixel_delta_v;   // Offset to pixel belowvec3   u, v, w;         // Camera frame basis vectorsvec3   defocus_disk_u;  // Defocus disk horizontal radiusvec3   defocus_disk_v;  // Defocus disk vertical radiusvoid initialize() {image_height = static_cast<int>(image_width / aspect_ratio);image_height = (image_height < 1) ? 1 : image_height;center = lookfrom;// Determine viewport dimensions.auto focal_length = (lookfrom - lookat).length();auto theta = degrees_to_radians(vfov);auto h = tan(theta/2);auto viewport_height = 2 * h * focus_dist;auto viewport_width = viewport_height * (static_cast<double>(image_width)/image_height);        // Calculate the u,v,w unit basis vectors for the camera coordinate frame.w = unit_vector(lookfrom - lookat);u = unit_vector(cross(vup, w));v = cross(w, u);        // Calculate the vectors across the horizontal and down the vertical viewport edges.vec3 viewport_u = viewport_width * u;    // Vector across viewport horizontal edgevec3 viewport_v = viewport_height * -v;  // Vector down viewport vertical edge// Calculate the horizontal and vertical delta vectors to the next pixel.pixel_delta_u = viewport_u / image_width;pixel_delta_v = viewport_v / image_height;// Calculate the location of the upper left pixel.auto viewport_upper_left = center - (focus_dist * w) - viewport_u/2 - viewport_v/2;pixel00_loc = viewport_upper_left + 0.5 * (pixel_delta_u + pixel_delta_v);// Calculate the camera defocus disk basis vectors.auto defocus_radius = focus_dist * tan(degrees_to_radians(defocus_angle / 2));defocus_disk_u = u * defocus_radius;defocus_disk_v = v * defocus_radius;
}ray get_ray(int i, int j) const {
// Get a randomly-sampled camera ray for the pixel at location i,j, originating from
// the camera defocus disk.auto pixel_center = pixel00_loc + (i * pixel_delta_u) + (j * pixel_delta_v);auto pixel_sample = pixel_center + pixel_sample_square();auto ray_origin = (defocus_angle <= 0) ? center : defocus_disk_sample();auto ray_direction = pixel_sample - ray_origin;return ray(ray_origin, ray_direction);
}...
point3 defocus_disk_sample() const {// Returns a random point in the camera defocus disk.auto p = random_in_unit_disk();return center + (p[0] * defocus_disk_u) + (p[1] * defocus_disk_v);
}color ray_color(const ray& r, int depth, const hittable& world) const {...
};
Listing 80: [camera.h] Camera with adjustable depth-of-field (dof)
使用大光圈:
int main() {
...
camera cam;
cam.aspect_ratio      = 16.0 / 9.0;
cam.image_width       = 400;
cam.samples_per_pixel = 100;
cam.max_depth         = 50;
cam.vfov     = 20;
cam.lookfrom = point3(-2,2,1);
cam.lookat   = point3(0,0,-1);
cam.vup      = vec3(0,1,0);cam.defocus_angle = 10.0;cam.focus_dist    = 3.4;
cam.render(world);
}
得到:
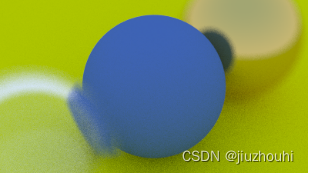
Image 22: Spheres with depth-of-field
