ROS
当先所有代码的git仓库 https://gitee.com/tianxiaohuahua/upper_computer_rviz
一、基础
1.创建工作空间 catkin_ws
创建src文件,放置功能包源码:
mkdir -p ~/catkin_ws/src
进入src文件夹:
cd ~/catkin_ws/src
初始化文件夹:
catkin_init_workspace
这样就在src文件中创建了一个 CMakeLists.txt 的文件,目的是告诉系统,这个是ROS的工作空间。
2.编译工作空间 catkin_make
所有编译工作都要在catkin_ws文件夹下编译:
cd ~/catkin_ws/
编译,编译完成后,会发现catkin_ws中多了两个文件 build 和 devel
catkin_make
3.设置环境变量
在第1篇中,我们介绍了设置环境变量,那个是将整个ros系统的环境变量设置到bash脚本中,现在我们需要把我们工作空间的环境变量设置到bash中。
echo "source ~/catkin_ws/devel/setup.bash" >> ~/.bashrc
让上面的配置在当前的终端生效:
source ~/.bashrc
我们用 vi 编辑器打开 ~/.bashrc 文件,就可以看到最后两行,第一行是我们第1篇添加的ros系统的环境变量,第2行是我们创建的catkin_ws工作空间的环境变量:

如果想要查看环境变量:
echo $ROS_PACKAGE_PATH
终端会输出:
/home/wdd/catkin_ws/src : /opt/ros/kinetic/share 第一个是我们刚才创建的catkin_ws的,第二个是ros系统的。
4.创建功能包
在src中创建:
cd ~/catkin_ws/src/
功能包格式:
catkin_create_pkg package_name depend1 depend2 depend2
package_name:功能表名称
depend1、2、3:依赖项
创建功能包:
catkin_create_pkg learning_communication std_msgs roscpp rospy
std_msgs:包含常见消息类型
roscpp:使用C++实现ROS各种功能
rospy:使用python实现ROS各种功能
5.编译功能包
cd ~/catkin_ws
catkin_make
显示如下说明编译成功:

6.添加编译C++源文件
ROS入门教程(三)—— 用C++或Python实现Hello world_ros操作系统下算法是用什么语言写的-CSDN博客
来到新建的learning_communication功能包
cd catkin_ws/src/learning_communication/src/
mkdir learning_communication_node.cpp
打开源文件添加如下内容:
#include "ros/ros.h" //set ros includeint main(int argc, char *argv[]) // main funtion
{//init ros includesros::init(argc,argv,"haha");//print hello worldROS_INFO("hello world!");return 0;
}
7.修改节点Cmake文件
打开 catkin_ws/src/learning_communication 下面的cmakeList.txt
8. 编译测试:
回到catkin_ws 工作目录下面进行编译:
catkin_make
9.运行程序
重新打开一个输入:【启动ros核心】
roscore
再重新打开另一个终端输入:【在工作空间中编译并执行】
source ./devel/setup.bash
rosrun helloworld hello
二、绘图
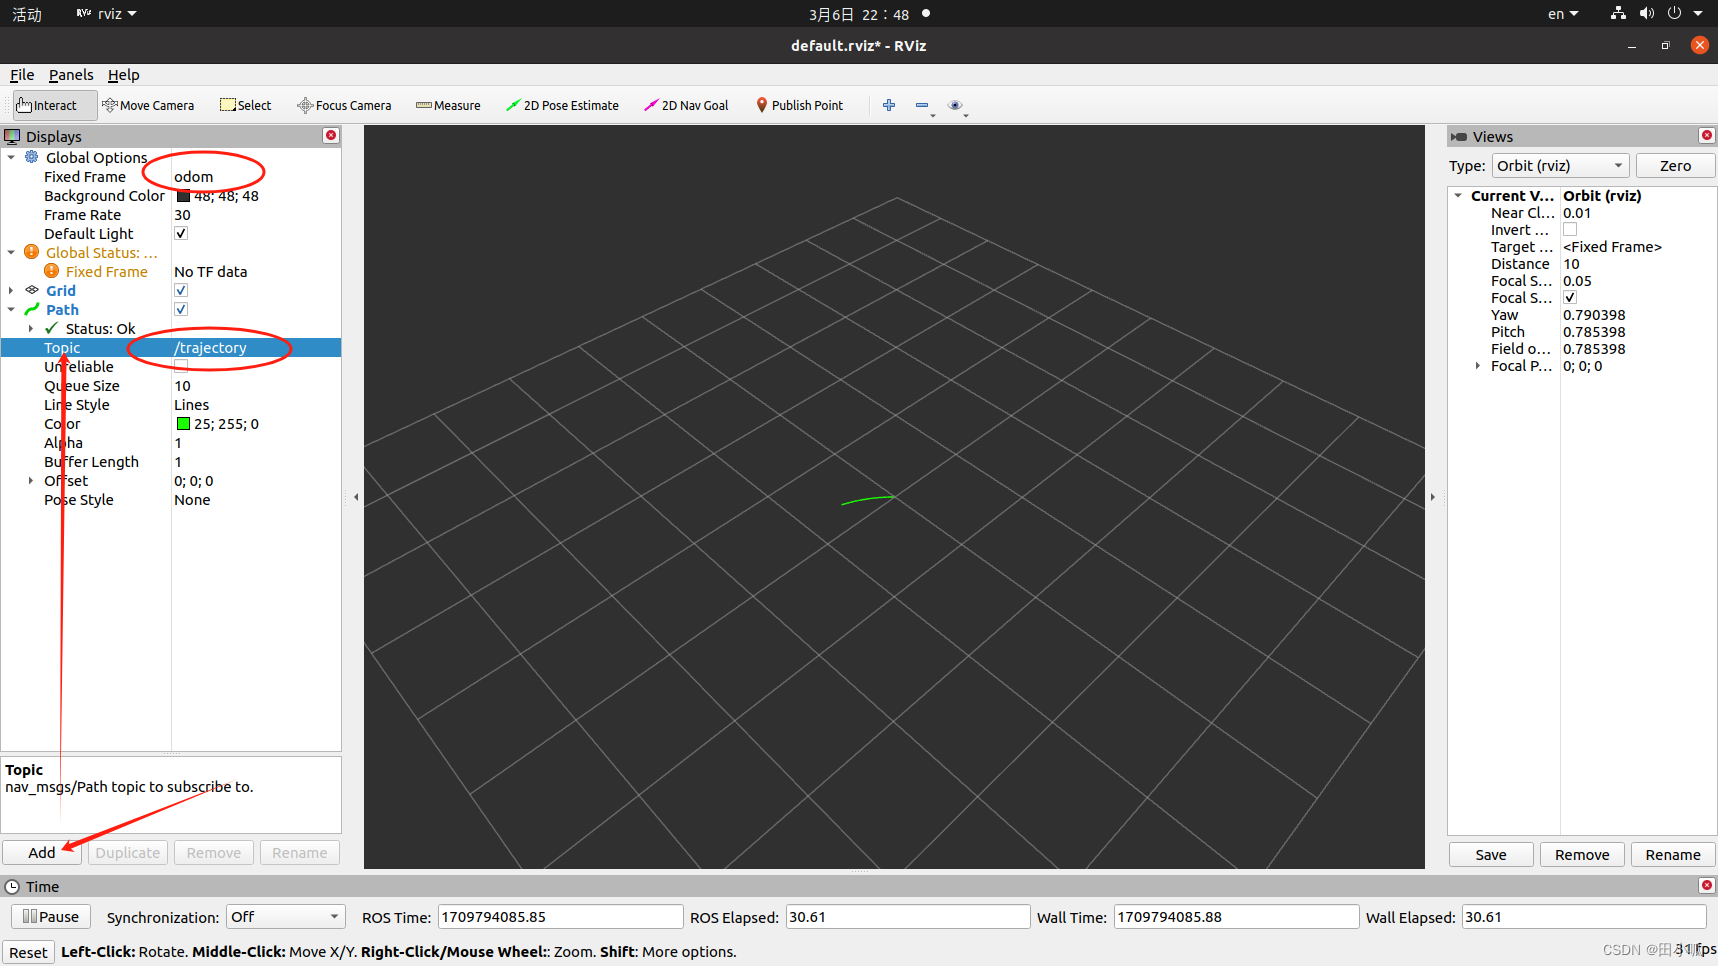
1、添加odom
ROS中rviz显示运动轨迹的常见方法_visualization_msgs::msg::marker 绘制轨迹-CSDN博客
新建功能包和源文件:
catkin_create_pkg learning_communication std_msgs roscpp rospy
cd catkin_ws/src/learning_communication/src/
mkdir learning_communication_node.cpp
添加源文件 learning_communication_node.cpp
#include <ros/ros.h>
#include <ros/console.h>
#include <nav_msgs/Path.h>
#include <std_msgs/String.h>
#include <geometry_msgs/Quaternion.h>
#include <geometry_msgs/PoseStamped.h>
#include <tf/transform_broadcaster.h>
#include <tf/tf.h>main (int argc, char **argv)
{ros::init (argc, argv, "showpath");ros::NodeHandle ph;ros::Publisher path_pub = ph.advertise<nav_msgs::Path>("trajectory",1, true);ros::Time current_time, last_time;current_time = ros::Time::now();last_time = ros::Time::now();nav_msgs::Path path;//nav_msgs::Path path;path.header.stamp=current_time;path.header.frame_id="odom";double x = 0.0;double y = 0.0;double th = 0.0;double vx = 0.1;double vy = -0.1;double vth = 0.1;ros::Rate loop_rate(1);while (ros::ok()){current_time = ros::Time::now();//compute odometry in a typical way given the velocities of the robotdouble dt = 0.1;double delta_x = (vx * cos(th) - vy * sin(th)) * dt;double delta_y = (vx * sin(th) + vy * cos(th)) * dt;double delta_th = vth * dt;x += delta_x;y += delta_y;th += delta_th;geometry_msgs::PoseStamped this_pose_stamped;this_pose_stamped.pose.position.x = x;this_pose_stamped.pose.position.y = y;geometry_msgs::Quaternion goal_quat = tf::createQuaternionMsgFromYaw(th);this_pose_stamped.pose.orientation.x = goal_quat.x;this_pose_stamped.pose.orientation.y = goal_quat.y;this_pose_stamped.pose.orientation.z = goal_quat.z;this_pose_stamped.pose.orientation.w = goal_quat.w;this_pose_stamped.header.stamp=current_time;this_pose_stamped.header.frame_id="odom";path.poses.push_back(this_pose_stamped);path_pub.publish(path);ros::spinOnce();               // check for incoming messageslast_time = current_time;loop_rate.sleep();}return 0;
}
修改Cmake进行编译:
cd catkin_ws/
catkin_make
运行:
source ./setup.base
rosrun learning_communication learning_communication_node
运行rviz
rviz
2、添加tf
ROS中的TF坐标变换工具及实现、Rviz查看(十四)C++、python_rviz查看某点的坐标-CSDN博客
新建一个功能包:
cd catkin_workSpease/src
catkin_create_pkg tf_test roscpp rospy std_msgs tf2 tf2_ros tf2_geometry_msgs geometry_msgs
catkin_init_workspace
新建源文件
touch tf_test_node.cpp
/* 静态坐标变换发布方:发布关于 laser 坐标系的位置信息 实现流程:1.包含头文件2.初始化 ROS 节点3.创建静态坐标转换广播器4.创建坐标系信息5.广播器发布坐标系信息6.spin()
*/// 1.包含头文件
#include "ros/ros.h"
#include "tf2_ros/static_transform_broadcaster.h"
#include "geometry_msgs/TransformStamped.h"
#include "tf2/LinearMath/Quaternion.h"int main(int argc, char *argv[])
{setlocale(LC_ALL,"");// 2.初始化 ROS 节点ros::init(argc,argv,"static_brocast");// 3.创建静态坐标转换广播器tf2_ros::StaticTransformBroadcaster broadcaster;// 4.创建坐标系信息geometry_msgs::TransformStamped ts;//----设置头信息ts.header.seq = 100;ts.header.stamp = ros::Time::now();ts.header.frame_id = "base_link";//----设置子级坐标系ts.child_frame_id = "laser";//----设置子级相对于父级的偏移量ts.transform.translation.x = 0.2;ts.transform.translation.y = 0.0;ts.transform.translation.z = 0.5;//----设置四元数:将 欧拉角数据转换成四元数tf2::Quaternion qtn;//创建四元数对象qtn.setRPY(0,0,0);//向该对象设置欧拉角,这个对象可以将欧拉角转换成四元数//注意此处是弧度值,比如说设置3.14就是绕着对应轴转了一圈ts.transform.rotation.x = qtn.getX();ts.transform.rotation.y = qtn.getY();ts.transform.rotation.z = qtn.getZ();ts.transform.rotation.w = qtn.getW();// 5.广播器发布坐标系信息broadcaster.sendTransform(ts);ros::spin();return 0;
}
修改Cmake
add_executable(${PROJECT_NAME}_node src/tf_test_node.cpp)target_link_libraries(${PROJECT_NAME}_node${catkin_LIBRARIES}
)
编译测试:
cd catkin_wprkspase
catkin_make
3、散点绘制直线
如何由一组散点绘制直线,曲线或轨迹并在Rviz中显示
如何由一组散点绘制直线,曲线或轨迹并在Rviz中显示_rviz画直线-CSDN博客
新建一个功能包:
cd catkin_workSpease/src
catkin_create_pkg tf_test roscpp rospy std_msgs tf2 tf2_ros tf2_geometry_msgs geometry_msgs
catkin_init_workspace
新建源文件
touch using_markers_node.cpp
#include <ros/ros.h>
#include <visualization_msgs/Marker.h>#include <cmath>int main( int argc, char** argv )
{ros::init(argc, argv, "points_and_lines");ros::NodeHandle n;ros::Publisher marker_pub = n.advertise<visualization_msgs::Marker>("visualization_marker", 10);ros::Rate r(30);float f = 0.0;while (ros::ok()){visualization_msgs::Marker points, line_strip, line_list;points.header.frame_id = line_strip.header.frame_id = line_list.header.frame_id = "my_frame";points.header.stamp = line_strip.header.stamp = line_list.header.stamp = ros::Time::now();points.ns = line_strip.ns = line_list.ns = "points_and_lines";points.action = line_strip.action = line_list.action = visualization_msgs::Marker::ADD;points.pose.orientation.w = line_strip.pose.orientation.w = line_list.pose.orientation.w = 1.0;points.id = 0;line_strip.id = 1;line_list.id = 2;points.type = visualization_msgs::Marker::POINTS;line_strip.type = visualization_msgs::Marker::LINE_STRIP;line_list.type = visualization_msgs::Marker::LINE_LIST;// POINTS markers use x and y scale for width/height respectivelypoints.scale.x = 0.2;points.scale.y = 0.2;// LINE_STRIP/LINE_LIST markers use only the x component of scale, for the line widthline_strip.scale.x = 0.1;line_list.scale.x = 0.1;// Points are greenpoints.color.g = 1.0f;points.color.a = 1.0;// Line strip is blueline_strip.color.b = 1.0;line_strip.color.a = 1.0;// Line list is redline_list.color.r = 1.0;line_list.color.a = 1.0;// Create the vertices for the points and linesfor (uint32_t i = 0; i < 100; ++i){float y = 5 * sin(f + i / 100.0f * 2 * M_PI);float z = 5 * cos(f + i / 100.0f * 2 * M_PI);geometry_msgs::Point p;p.x = (int32_t)i - 50;p.y = y;p.z = z;points.points.push_back(p);line_strip.points.push_back(p);// The line list needs two points for each lineline_list.points.push_back(p);p.z += 1.0;line_list.points.push_back(p);}marker_pub.publish(points);marker_pub.publish(line_strip);marker_pub.publish(line_list);r.sleep();f += 0.04;}
}
修改Cmake
add_executable(${PROJECT_NAME}_node src/using_markers_node.cpp)target_link_libraries(${PROJECT_NAME}_node${catkin_LIBRARIES}
)
编译测试:
cd catkin_wprkspase
catkin_make
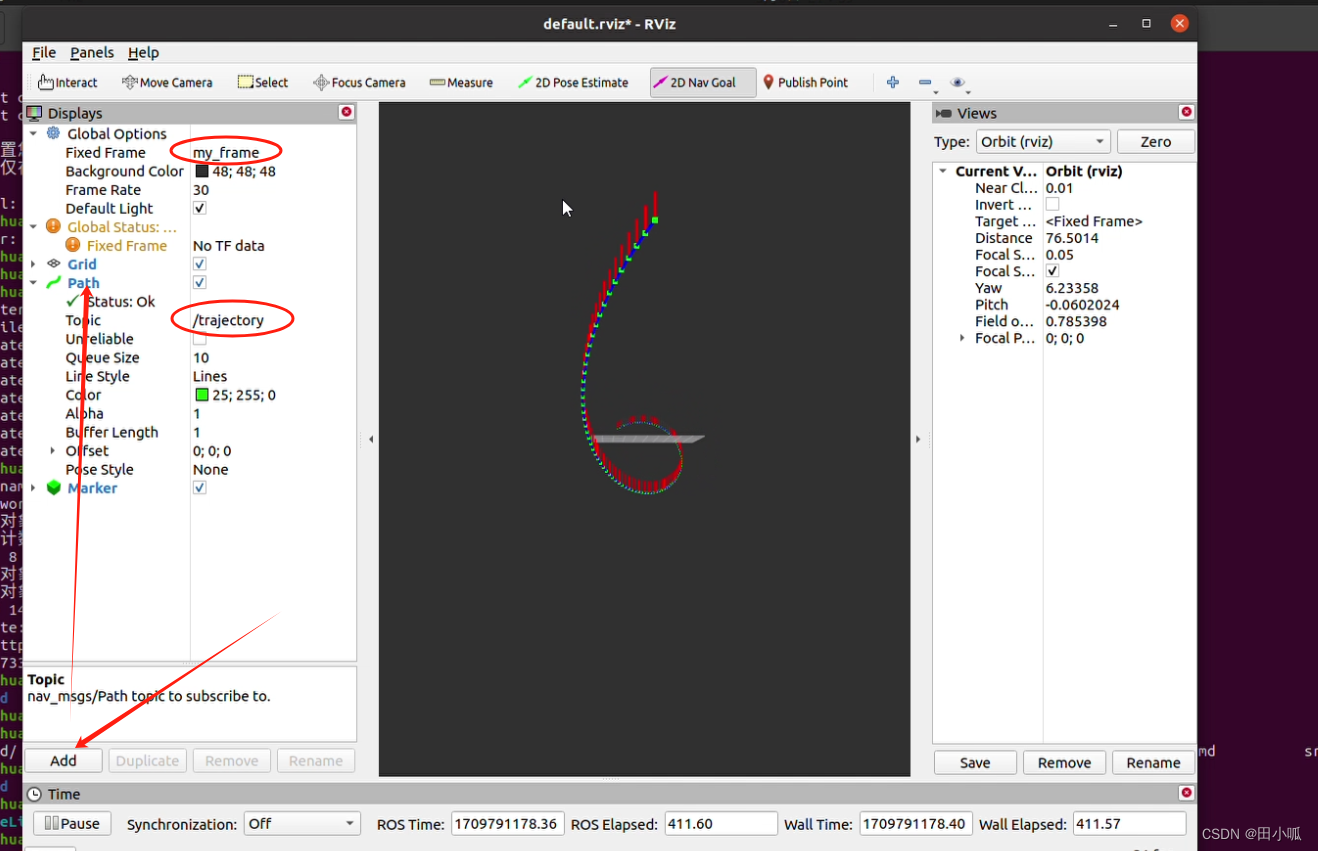
ROS2 操作
ROS2 入门应用 工作空间 - 古月居 (guyuehome.com)
在Ubuntu 20.04中安装ROS2最新版本Foxy Fitzroy_ubuntu 20.04 sudo apt install gazebo_ros_pkgs ros2-CSDN博客
source /opt/ros/foxy/setup.bash
以后每次打开终端都需要输入一次上面的语句,比较麻烦。我们以zsh为例,解决方法:
$ echo "source /opt/ros/foxy/setup.zsh" >> ~/.zshrc
$ source ~/.zshrc
这样,以后每次新打开终端,就不需要输入这条烦人的语句了source /opt/ros/foxy/setup.zsh, 终端会自动帮你加载这条语句,设置好ROS2的环境变量。
(2)安装argcomplete(可选)
sudo apt install python3-argcomplete
(3)安装RMW implementation
sudo apt update
sudo apt install ros-foxy-rmw-connext-cpp
