文章目录
- 前言
- 登录功能
- 前台
- 后台逻辑
- 退出登录
- 前台
- 使用jwt在后端进行鉴权
- 引入依赖
- 给后台接口加上统一的前缀/api,
- 开始Jwt配置
- 注册功能
- 前台
- 后台
前言
本文将整合简单的登录注册功能。
登录功能
前台
构造前台页面
<template><div><div style="width: 400px; height: 350px; margin: 150px auto; background-color:rgba(107,149,224,0.5); border-radius: 10px"><div style="width: 100%; height: 100px; font-size: 30px; line-height: 100px; text-align: center; color: #4a5ed0">欢迎登录</div><div style="margin-top: 25px; text-align: center; height: 320px;"><el-form :model="admin"><el-form-item><el-input v-model="admin.name" prefix-icon="el-icon-user" style="width: 80%" placeholder="请输入用户名"></el-input></el-form-item><el-form-item><el-input v-model="admin.password" prefix-icon="el-icon-lock" style="width: 80%" placeholder="请输入密码"></el-input></el-form-item><el-form-item><el-button style="width: 80%; margin-top: 10px" type="primary" @click="login()">登录</el-button></el-form-item></el-form></div></div></div>
</template><script>
import request from '@/utils/requests';
export default {name: "login",data() {return {admin:{}}},methods: {login() {request.post("/admin/login", this.admin).then(res => {if (res.code === '0') {this.$message({message: '登录成功',type: 'success'});this.$router.push("/");} else {this.$message({message: res.msg,type: 'error'});}})}}
}
</script>
前台发送请求
login() {request.post("/admin/login", this.admin).then(res => {if (res.code === '0') {this.$message({message: '登录成功',type: 'success'});this.$router.push("/");} else {this.$message({message: res.msg,type: 'error'});}})}
后台逻辑
Controller
@PostMapping("/login")public Result login(@RequestBody Admin admin){Admin loginUser=adminService.login(admin);return Result.success(loginUser);}
Service
public Admin login(Admin admin) {// 1. 进行一些非空判断if (admin.getName() == null || "".equals(admin.getName())) {throw new CustomException("用户名不能为空");}if (admin.getPassword() == null || "".equals(admin.getPassword())) {throw new CustomException("密码不能为空");}// 2. 从数据库里面根据这个用户名和密码去查询对应的管理员信息,Admin user = adminMapper.findByNameAndPassword(admin.getName(), admin.getPassword());if (user == null) {// 如果查出来没有,那说明输入的用户名或者密码有误,提示用户,不允许登录throw new CustomException("用户名或密码输入错误");}// 如果查出来了有,那说明确实有这个管理员,而且输入的用户名和密码都对;return user;}
Mapper
@Select("select * from admin where name = #{name} and password = #{password} limit 1")Admin findByNameAndPassword(@Param("name") String name, @Param("password") String password);
当然登录功能并不是这么简单,我们后面接下来将实现JWT的登录鉴权。
退出登录
前台
前台页面
     <el-dropdown style="float: right; height: 60px; line-height: 60px"><span class="el-dropdown-link" style="color: white; font-size: 16px">{{ user.name }}<i class="el-icon-arrow-down el-icon--right"></i></span><el-dropdown-menu slot="dropdown"><el-dropdown-item><div @click="logout">退出登录</div></el-dropdown-item></el-dropdown-menu>
</el-dropdown>
1.要实现退出登录,我们需要现将将登录的用户信息存储到前端的localStorage里。
localStorage.setItem("user", JSON.stringify(res.data));
2.登录成功后,从localStorage里获取当前的登录用户
data () {return {user: localStorage.getItem("user") ? JSON.parse(localStorage.getItem("user")) : {},}
},
3.退出登录后,清localStorage,跳到登录页
methods: {logout() {localStorage.removeItem("user");this.$router.push("/login");}
}
这样安全吗??
肯定不安全,用户可以跳过登录,直接在浏览器上输入后台的路由地址,即可直接进入系统,访问敏感数据
4.注册路由守卫
// 路由守卫
router.beforeEach((to ,from, next) => {if (to.path ==='/login') {next();}const user = localStorage.getItem("user");if (!user && to.path !== '/login') {return next("/login");}next();
})
这样就安全了吗??
还是不安全,因为前端的数据是不安全的,是可以认为篡改的!
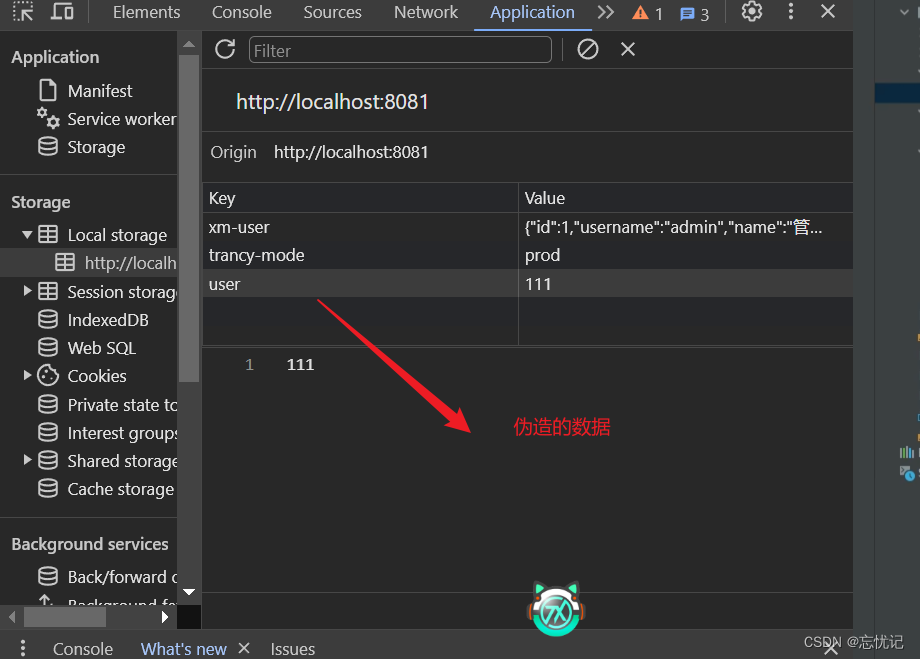
还是进入了后台页面
就是说,鉴权放在前端,是不安全的。我们的登录鉴权肯定是要放在服务端来完成。
使用jwt在后端进行鉴权
实现思路:
在用户登录后,后台给前台发送一个凭证(token),前台请求的时候需要带上这个凭证(token),才可以访问接口,如果没有凭证或者凭证跟后台创建的不一致,则说明该用户不合法。
引入依赖
<dependency><groupId>com.auth0</groupId><artifactId>java-jwt</artifactId><version>3.10.3</version>
</dependency>
<dependency><groupId>cn.hutool</groupId><artifactId>hutool-all</artifactId><version>5.3.7</version>
</dependency>
给后台接口加上统一的前缀/api,
因为我们统一拦截该前缀开头的接口,所以配置一个拦截器
package com.example.common;import org.springframework.context.annotation.Configuration;
import org.springframework.web.bind.annotation.RestController;
import org.springframework.web.servlet.config.annotation.PathMatchConfigurer;
import org.springframework.web.servlet.config.annotation.WebMvcConfigurer;@Configuration
public class WebConfig implements  WebMvcConfigurer {@Overridepublic void configurePathMatch(PathMatchConfigurer configurer) {// 指定controller统一的接口前缀。相当于在url拼了一个/api/xxxconfigurer.addPathPrefix("/api", clazz -> clazz.isAnnotationPresent(RestController.class));}
}
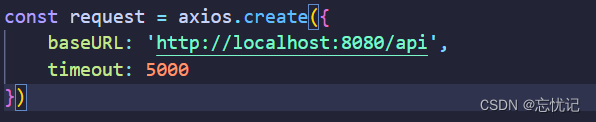
在前端request文件中也要加入api
开始Jwt配置
后台配置
JwtTokenUtils.java
1.定义jwt的规则
package com.example.common;import cn.hutool.core.date.DateUtil;
import cn.hutool.core.util.StrUtil;
import com.auth0.jwt.JWT;
import com.auth0.jwt.algorithms.Algorithm;
import com.example.entity.Admin;
import com.example.service.AdminService;
import org.slf4j.Logger;
import org.slf4j.LoggerFactory;
import org.springframework.stereotype.Component;
import org.springframework.web.context.request.RequestContextHolder;
import org.springframework.web.context.request.ServletRequestAttributes;import javax.annotation.PostConstruct;
import javax.annotation.Resource;
import javax.servlet.http.HttpServletRequest;
import java.util.Date;@Component
public class JwtTokenUtils {private static AdminService staticAdminService;private static final Logger log = LoggerFactory.getLogger(JwtTokenUtils.class);@Resourceprivate AdminService adminService;@PostConstructpublic void setUserService() {staticAdminService = adminService;}/*** 生成token*/public static String genToken(String userId, String password) {return JWT.create().withAudience(userId) // 将 user id 保存到 token 里面,作为载荷.withExpiresAt(DateUtil.offsetHour(new Date(), 2)) // 2小时后token过期.sign(Algorithm.HMAC256(password)); // 以 password 作为 token 的密钥}/*** 获取当前登录的用户信息*/public static Admin getCurrentUser() {String token = null;try {HttpServletRequest request = ((ServletRequestAttributes) RequestContextHolder.getRequestAttributes()).getRequest();token = request.getHeader("token");if (StrUtil.isBlank(token)) {token = request.getParameter("token");}if (StrUtil.isBlank(token)) {log.error("获取当前登录的token失败, token: {}", token);return null;}// 解析token,获取用户的idString adminId = JWT.decode(token).getAudience().get(0);return staticAdminService.findByById(Integer.valueOf(adminId));} catch (Exception e) {log.error("获取当前登录的管理员信息失败, token={}", token,  e);return null;}}}
2.用户在登录成功后,需要返回一个token给前台
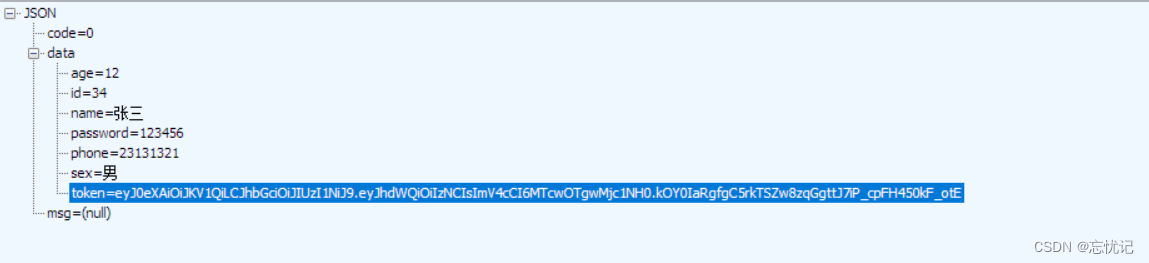
public Admin login(Admin admin) {// 1. 进行一些非空判断if (admin.getName() == null || "".equals(admin.getName())) {throw new CustomException("用户名不能为空");}if (admin.getPassword() == null || "".equals(admin.getPassword())) {throw new CustomException("密码不能为空");}// 2. 从数据库里面根据这个用户名和密码去查询对应的管理员信息,Admin user = adminMapper.findByNameAndPassword(admin.getName(), admin.getPassword());if (user == null) {// 如果查出来没有,那说明输入的用户名或者密码有误,提示用户,不允许登录throw new CustomException("用户名或密码输入错误");}// 如果查出来了有,那说明确实有这个管理员,而且输入的用户名和密码都对;// 生成jwt token给前端String token = JwtTokenUtils.genToken(user.getId().toString(), user.getPassword());user.setToken(token);return user;}
访问成功之后,查看有没有携带token
3.前台把token获取到,下次请求的时候,带到header里
const user = localStorage.getItem("user");
if (user) {config.headers['token'] = JSON.parse(user).token;
}
4.定义拦截器:JwtInterceptor.java
相当于无论发送什么请求的时候,我们都要检查请求是否合法
@Component
public class JwtInterceptor implements HandlerInterceptor {private static final Logger log = LoggerFactory.getLogger(JwtInterceptor.class);@Resourceprivate AdminService adminService;@Overridepublic boolean preHandle(HttpServletRequest request, HttpServletResponse response, Object handler) {// 1. 从http请求的header中获取tokenString token = request.getHeader("token");if (StrUtil.isBlank(token)) {// 如果没拿到,我再去参数里面拿一波试试  /api/admin?token=xxxxxtoken = request.getParameter("token");}// 2. 开始执行认证if (StrUtil.isBlank(token)) {throw new CustomException("无token,请重新登录");}// 获取 token 中的userIdString userId;Admin admin;try {userId = JWT.decode(token).getAudience().get(0);// 根据token中的userid查询数据库admin = adminService.findById(Integer.parseInt(userId));} catch (Exception e) {String errMsg = "token验证失败,请重新登录";log.error(errMsg + ", token=" + token, e);throw new CustomException(errMsg);}if (admin == null) {throw new CustomException("用户不存在,请重新登录");}try {// 用户密码加签验证 tokenJWTVerifier jwtVerifier = JWT.require(Algorithm.HMAC256(admin.getPassword())).build();jwtVerifier.verify(token); // 验证token} catch (JWTVerificationException e) {throw new CustomException("token验证失败,请重新登录");}return true;}
}
4.如何生效?在webConfig里添加拦截器规则:
@Resource
private JwtInterceptor jwtInterceptor;// 加自定义拦截器JwtInterceptor,设置拦截规则
@Override
public void addInterceptors(InterceptorRegistry registry) {registry.addInterceptor(jwtInterceptor).addPathPatterns("/api/**").excludePathPatterns("/api/admin/login").excludePathPatterns("/api/admin/register");
}
5.如果出现跨域问题
增加这样的一个类
@Configuration
public class CorsConfig {@Beanpublic CorsFilter corsFilter() {UrlBasedCorsConfigurationSource source = new UrlBasedCorsConfigurationSource();CorsConfiguration corsConfiguration = new CorsConfiguration();corsConfiguration.addAllowedOrigin("*"); // 1 设置访问源地址corsConfiguration.addAllowedHeader("*"); // 2 设置访问源请求头corsConfiguration.addAllowedMethod("*"); // 3 设置访问源请求方法source.registerCorsConfiguration("/**", corsConfiguration); // 4 对接口配置跨域设置return new CorsFilter(source);}
}
注册功能
前台
构造页面
<template><div><div style="width: 400px; height: 350px; margin: 150px auto; background-color:rgba(107,149,224,0.5); border-radius: 10px"><div style="width: 100%; height: 100px; font-size: 30px; line-height: 100px; text-align: center; color: #4a5ed0">欢迎注册</div><div style="margin-top: 25px; text-align: center; height: 320px;"><el-form :model="admin"><el-form-item><el-input v-model="admin.name" prefix-icon="el-icon-user" style="width: 80%" placeholder="请输入用户名"></el-input></el-form-item><el-form-item><el-input v-model="admin.password" prefix-icon="el-icon-lock" style="width: 80%" placeholder="请输入密码"></el-input></el-form-item><el-form-item><el-button style="width: 80%; margin-top: 10px" type="primary" @click="register()">登录</el-button></el-form-item></el-form></div></div></div>
</template><script>
import request from '@/utils/requests';
export default {name: "Register",data() {return {admin:{}}},methods: {register() {request.post("/admin/register", this.admin).then(res => {if (res.code === '0') {this.$message({message: '注册成功',type: 'success'});this.$router.push("/login");} else {this.$message({message: res.msg,type: 'error'});}})}}
}
</script>
前台页面请求
register() {request.post("/admin/register", this.admin).then(res => {if (res.code === '0') {this.$message({message: '注册成功',type: 'success'});this.$router.push("/login");} else {this.$message({message: res.msg,type: 'error'});}})}
后台
因为之前跟之前的增加接口重复了,我直接拿来用了
Controller
/*** 注册操作* @param admin* @return*/@PostMapping("/register")public Result register(@RequestBody Admin admin) {adminService.add(admin);return Result.success();}