RHCE——二、时间管理器与远程登陆服务
- 一、chrony服务器
- 1、简介
- 重要性
- Linux的两个时钟
- 设置日期时间
- timedatectl命令设置
- date命令设置
- NTP
- Chrony介绍
- 2、安装与配置
- 安装:
- Chrony配置文件分析
- 实验1
- 实验2
- 重启报错解决方法
- 二、远程登录服务
一、chrony服务器
1、简介
重要性
- 由于IT系统中,准确的计时非常重要,有很多种原因需要准确计时:
- 在网络传输中,数据包括和日志需要准确的时间戳
- 各种应用程序中,如订单信息,交易信息等 都需要准确的时间戳
Linux的两个时钟
硬件时钟RTC (Real Time Clock):即BIOS时钟,也就是我们主板中用电池供电的时钟,是将时间写入到BIOS中,系统断电后时间不会丢失,可以在开机时通过主板程序中进行设置
# 查看硬件时间
[root ~]# hwclock
2023-05-30 09:48:32.535594+08:00
- 系统时钟 (System Clock) :顾名思义也就是Linux系统内核时钟、软件时钟,是由Linux内核来提供的,系统时钟是基于内存,如果系统断电时间就会丢失
# 查看系统时间
[root ~]# date
2023年 05月 30日 星期二 09:50:50 CST[root ~]# date -s 10:00 # 修改为错误的时间
2023年 05月 30日 星期二 10:00:00 CST
[root ~]# date
2023年 05月 30日 星期二 10:00:01 CST
[root ~]# hwclock -s # 向硬件时间同步
[root ~]# date
2023年 05月 30日 星期二 09:51:50 CST
设置日期时间
timedatectl命令设置
# [root ~]# timedatectl # 显示当前的日期和时间Local time: 三 2023-11-15 13:00:26 CST # 本地时间Universal time: 三 2023-11-15 05:00:26 UTC # 世界时间RTC time: 三 2023-11-15 06:16:16 # 硬件时间Time zone: Asia/Shanghai (CST, +0800) # 时区
System clock synchronized: yes # 时间是否已同步NTP service: active # 时间同步服务已启动RTC in local TZ: no # no表示硬件时钟设置为协调世界时(UTC),yes表示硬件时钟设置为本地时间[root ~]# systemctl status chronyd # 查看时间同步服务状态(由于默认使用chrony服务同步时间,不再使用ntp服务)[root ~]# timedatectl set-ntp no # 关闭时间同步,以方便修改日期时间[root ~]# systemctl status chronyd[root ~]# timedatectl set-time "2023-12-12" # 设置新日期[root ~]# timedatectl set-time "12:12:12"[root ~]# timedatectlLocal time: 二 2023-12-12 12:12:22 CSTUniversal time: 二 2023-12-12 04:12:22 UTCRTC time: 二 2023-12-12 04:12:23Time zone: Asia/Shanghai (CST, +0800)
System clock synchronized: noNTP service: inactiveRTC in local TZ: no[root ~]# timedatectl list-timezones | grep Asia # 查看可用时区[root ~]# timedatectl set-timezone Asia/Shanghai # 设置时区
一般我们都习惯用date来看时间,很少用timedatectl,但此命令最重要的一点是能够观察到时间同步是否完成。
System clock synchronized: yes # 时间是否已同步
date命令设置
[root ~]# date # 显示[root ~]# date +"%Y-%m-%d %H:%M:%S" # 格式显示# 设置日期时间
[root ~]# date -s 2023-11-15
2023年 11月 15日 星期三 00:00:00 CST
[root ~]# date -s 14:33:33
2023年 11月 15日 星期三 14:33:33 CST
[root ~]# date
2023年 11月 15日 星期三 14:33:34 CST
注意:以便于以后的实验正常执行,可恢复快照后继续
NTP
- NTP:(Network Time Protocol,网络时间协议)是由RFC 1305定义的时间同步协议,用来在分布式时间服务器和客户端之间进行时间同步。
- NTP基于UDP报文进行传输,使用的UDP端口号为123
- NTP可以对网络内所有具有时钟的设备进行时钟同步,使网络内所有设备的时钟保持一致,从而使设备能够提供基于统一时间的多种应用,对于运行NTP的本地系统,既可以接受来自其他时钟源的同步,又可以作为时钟源同步其他的时钟,并且可以和其他设备互相同步。
- NTP的其精度在局域网内可达0.1ms,在互联网上绝大多数的地方其精度可以达到1-50ms
Chrony介绍
- chrony是一个开源的自由软件,它能帮助你保持系统时钟与时钟服务器(NTP)同步,因此让你的时间保持精确。
- chrony由两个程序组成,分别是chronyd(客户端)和chronyc(服务端)
- chronyd:是一个后台运行的守护进程,用于调整内核中运行的系统时钟和时钟服务器同步。它确定计算机增减时间的比率,并对此进行补偿。
- chronyc:提供了一个用户界面,用于监控性能并进行多样化的配置。它可以在chronyd实例控制的计算机上工作,也可以在一台不同的远程计算机上工作
- 注意:Chrony与NTP都是时间同步软件,两个软件不能够同时开启,会出现时间冲突,openeuler中默认使用chrony作为时间服务器,不在支持NTP软件包
[root ~]# systemctl status ntp # 查看ntp状态
2、安装与配置
安装:
# 默认已安装,若需要安装则可执行:[root ~]# yum install chrony -y[root ~]# systemctl start chronyd[root ~]# systemctl enable chronyd
# 默认已安装,若需要安装则可执行:[root@server ~]# yum install chrony -y[root@server ~]# systemctl start chronyd[root@server ~]# systemctl enable chronyd
Chrony配置文件分析
- 主配置文件:/etc/chrony.conf
xxxxxxxxxx [root ~]# vim /etc/chrony.conf
  1 # Use public servers from the pool.ntp.org project.2 # Please consider joining the pool (https://www.pool.ntp.org/join.html).3 pool pool.ntp.org iburst4 5 # Record the rate at which the system clock gains/losses time.6 driftfile /var/lib/chrony/drift7 8 # Allow the system clock to be stepped in the first three updates9 # if its offset is larger than 1 second.10 makestep 1.0 311 12 # Enable kernel synchronization of the real-time clock (RTC).13 rtcsync14 15 # Enable hardware timestamping on all interfaces that support it.16 #hwtimestamp *17 18 # Increase the minimum number of selectable sources required to adjust19 # the system clock.20 #minsources 221 22 # Allow NTP client access from local network.23 #allow 192.168.0.0/1624 25 # Serve time even if not synchronized to a time source.26 #local stratum 1027 28 # Require authentication (nts or key option) for all NTP sources.29 #authselectmode require30 31 # Specify file containing keys for NTP authentication.32 #keyfile /etc/chrony.keys33 34 # Save NTS keys and cookies.35 ntsdumpdir /var/lib/chrony36 37 # Insert/delete leap seconds by slewing instead of stepping.38 #leapsecmode slew39 40 # Get TAI-UTC offset and leap seconds from the system tz database.41 #leapsectz right/UTC42 43 # Specify directory for log files.44 logdir /var/log/chrony45 46 # Select which information is logged.47 #log measurements statistics tracking
~
其中第三行为最重要的配置命令,这条信息含义是设置这台机子向互联网上哪台机子申请的时间同步,换句话说此台机子的时间同步的域名是多少,命令如下
3 pool pool.ntp.org iburst3 server ntp。aliyun.com iburst #(二者都行)
次要重要的一条命令是
23 #allow 192.168.0.0/16
意思为白名单:我允许哪些主机来访问我的时间同步。
实验1
- 同步时间
- 第一步:先修改成错误时间
[root ~]# date -s 10:30
2023年 05月 30日 星期二 10:30:00 CST
- 第二步:编制chrony的配置文件
[root ~]# vim /etc/chrony.conf
# 定位第3行,删除后添加阿里的时间同步服务地址
server ntp.aliyun.com iburst# 注意:也可以先清空chrony.conf内容,将阿里开源提供的时间服务器推荐配置复制粘贴到该文件中
server ntp.aliyun.com iburst
stratumweight 0
driftfile /var/lib/chrony/drift
rtcsync
makestep 10 3
bindcmdaddress 127.0.0.1
bindcmdaddress ::1
keyfile /etc/chrony.keys
commandkey 1
generatecommandkey
logchange 0.5
logdir /var/log/chrony
- 第三步:重启服务
[root ~]# systemctl restart chronyd
- 第三步:时间同步
[root ~]# chronyc sources -v.-- Source mode '^' = server, '=' = peer, '#' = local clock./ .- Source state '*' = current best, '+' = combined, '-' = not combined,
| / 'x' = may be in error, '~' = too variable, '?' = unusable.
|| .- xxxx [ yyyy ] +/- zzzz
|| Reachability register (octal) -. | xxxx = adjusted offset,
|| Log2(Polling interval) --. | | yyyy = measured offset,
|| \ | | zzzz = estimated error.
|| | | \
MS Name/IP address Stratum Poll Reach LastRx Last sample
==========================================================================
^* 203.107.6.88 2 6 17 56 +493us[ -335us] +/- 34ms
注意看
^* 203.107.6.88
此处ip为阿里云ip,证明已经成功同步
第五步:查看时间是否同步
[root ~]# timedatectl statusLocal time: 二 2023-05-30 10:24:39 CSTUniversal time: 二 2023-05-30 02:24:39 UTCRTC time: 二 2023-05-30 02:24:40Time zone: Asia/Shanghai (CST, +0800)
System clock synchronized: yes # yes 表名已同步NTP service: activeRTC in local TZ: no[root ~]# date
2023年 05月 30日 星期二 10:26:14 CST
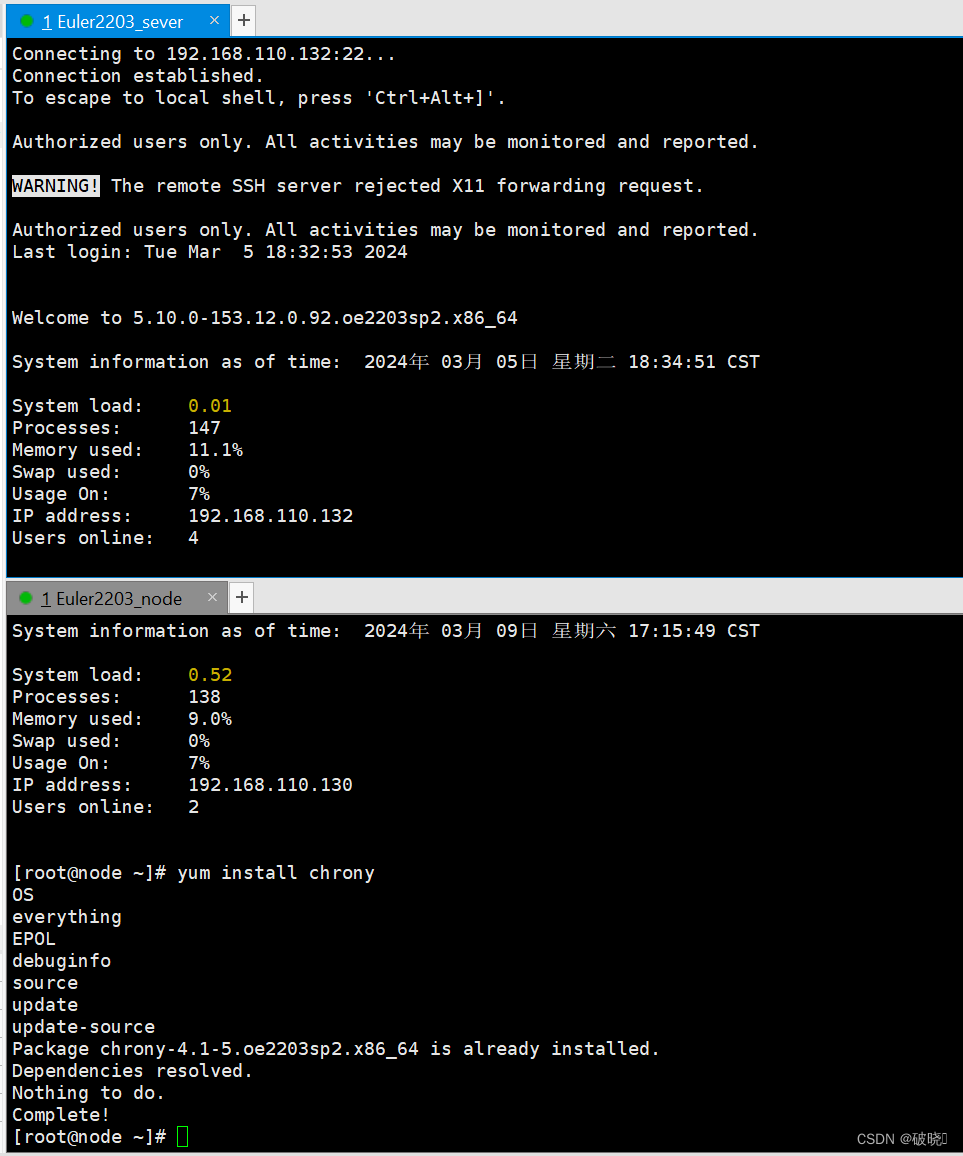
实验2
-
搭建本地时间同步服务器
-
架构
| 性质 | IP地址 | 同步对象 |
|---|---|---|
| 服务端server | 192.168.110.132 | ntp.aliyun.com |
| 客户端node1 | 192.168.110.130 | 192.168.110.132 |
-
要求
- 服务端server向阿里时间服务器进行时间同步
- 客户端node1向服务端server进行时间同步
-
第一步:定位服务端server
# 安装软件
[root ~]# yum install chrony -y # 默认已安装# 编辑配置文件,定位第3行,修改为阿里的时间服务地址
[root ~]# vim /etc/chrony.conf
server ntp.aliyun.com iburst# 重启服务
[root ~]# systemctl restart chronyd# 测试
[root ~]# chronyc sources -v[root ~]# timedatectl status# 设置允许客户端时间同步
[root ~]# vim /etc/chrony.conf 26 allow 192.168.110.130/24 # 定位第26行,设置谁可以访问本机进行同步
[root ~]# systemctl restart chronyd
注意修改完命令后记得重启服务!
[root ~]# systemctl restart chronyd
- 第二步:定位客户端node1
# 安装软件
[root ~]# yum install chrony -y # 编辑配置文件
[root ~]# vim /etc/chrony.conf # 修改第3行为server的地址
server 192.168.110.132 iburst# 重启服务
[root ~]# systemctl restart chronyd# 测试
[root ~]# chronyc sources -v.-- Source mode '^' = server, '=' = peer, '#' = local clock./ .- Source state '*' = current best, '+' = combined, '-' = not combined,
| / 'x' = may be in error, '~' = too variable, '?' = unusable.
|| .- xxxx [ yyyy ] +/- zzzz
|| Reachability register (octal) -. | xxxx = adjusted offset,
|| Log2(Polling interval) --. | | yyyy = measured offset,
|| \ | | zzzz = estimated error.
|| | | \
MS Name/IP address Stratum Poll Reach LastRx Last sample
=========================================================================
^* 192.168.110.132 3 6 17 39 +20us[ +252us] +/- 38ms[root ~]# timedatectl statusLocal time: 二 2023-05-30 11:08:37 CSTUniversal time: 二 2023-05-30 03:08:37 UTCRTC time: 二 2023-05-30 03:08:38Time zone: Asia/Shanghai (CST, +0800)
System clock synchronized: yesNTP service: activeRTC in local TZ: no
注意:客户端同步失败的原因
- 检查网络连通性,需要能ping通
- 检查服务端的allow参数
- 需要重启服务
重启报错解决方法
第一类:语法报错
比如我们在第三行故意输错单词
1 # Use public servers from the pool.ntp.org project.2 # Please consider joining the pool (https://www.pool.ntp.org/join.html).3 server 192.168.110.132 iburstaa然后退出后输入重启命令,会发现有个failed提示,我们将第二行See后的命令复制然后输入
[root ~]# systemctl restart chronyd
Job for chronyd.service failed because the control process exited with error code.
See "systemctl status chronyd.service" and "journalctl -xeu chronyd.service" for details.```dart
[root ~]# systemctl status chronyd.service
× chronyd.service - NTP client/serverLoaded: loaded (/usr/lib/systemd/system/chronyd.service; enabled; vendor preset: enabled)Active: failed (Result: exit-code) since Sat 2024-03-09 17:42:42 CST; 1min 25s agoDocs: man:chronyd(8)man:chrony.conf(5)Process: 1611 ExecStart=/usr/sbin/chronyd $OPTIONS (code=exited, status=1/FAILURE)3月 09 17:42:42 node systemd[1]: Starting NTP client/server...
3月 09 17:42:42 node chronyd[1611]: Could not parse server directive at line 3 in file /etc/chrony.conf
3月 09 17:42:42 node systemd[1]: chronyd.service: Control process exited, code=exited, status=1/FAILURE
3月 09 17:42:42 node systemd[1]: chronyd.service: Failed with result 'exit-code'.
3月 09 17:42:42 node systemd[1]: Failed to start NTP client/server.我们能在其中找到这行命令并发现是第三行的错误
3月 09 17:42:42 node chronyd[1611]: Could not parse server directive at line 3 in file /etc/chrony.conf这样我们就能迅速定位到目标行去修改命令
当然,我们也可以输入“journalctl -xeu chronyd.service”这条命令,这里的显示错误会更加的详细
See "systemctl status chronyd.service" and "journalctl -xeu chronyd.service" for details.
第二类:权限报错
这可能和防火墙的权限有关,需要具体情况具体分析。


![代码理解 pseudo_labeled = outputs.max(1)[1]](https://img-blog.csdnimg.cn/direct/b50f1163689a4f14a700f2e3d51f8f85.png)