ResNet50卷积神经网络输出数据形参分析-笔记
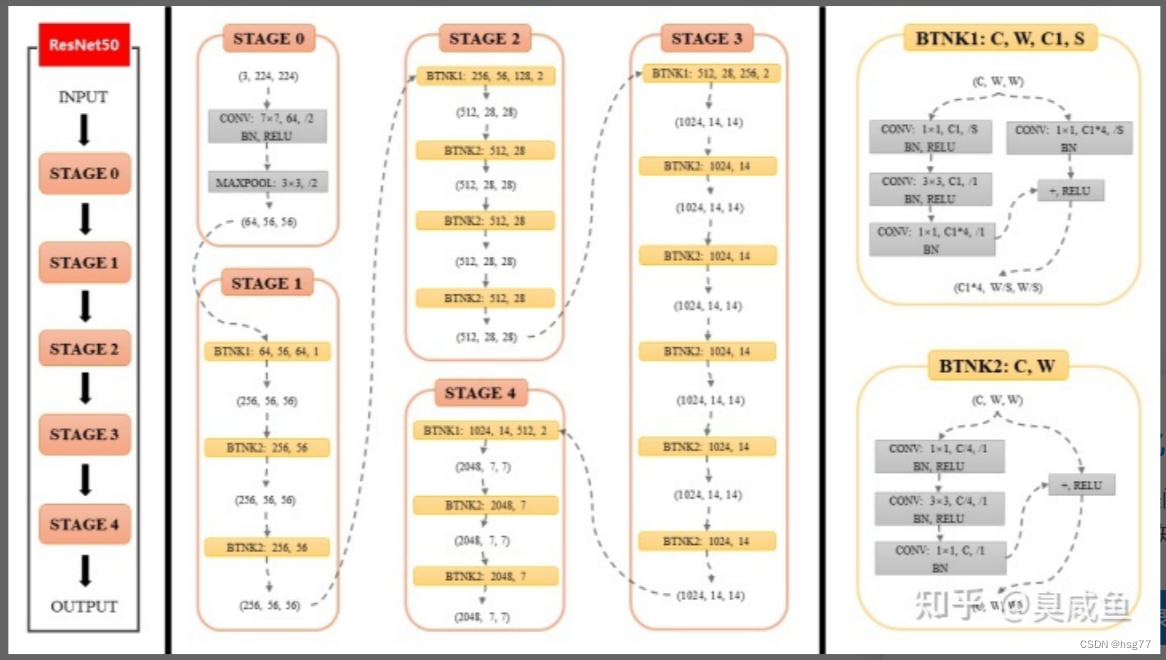
ResNet50包含多个模块,其中第2到第5个模块分别包含3、4、6、3个残差块
50=49个卷积(3+4+6+3)*3+1和一个全连接层
分析结果为:
输入数据形状:[10, 3, 224, 224]
最后输出结果:linear_0 [10, 1] [2048, 1] [1]
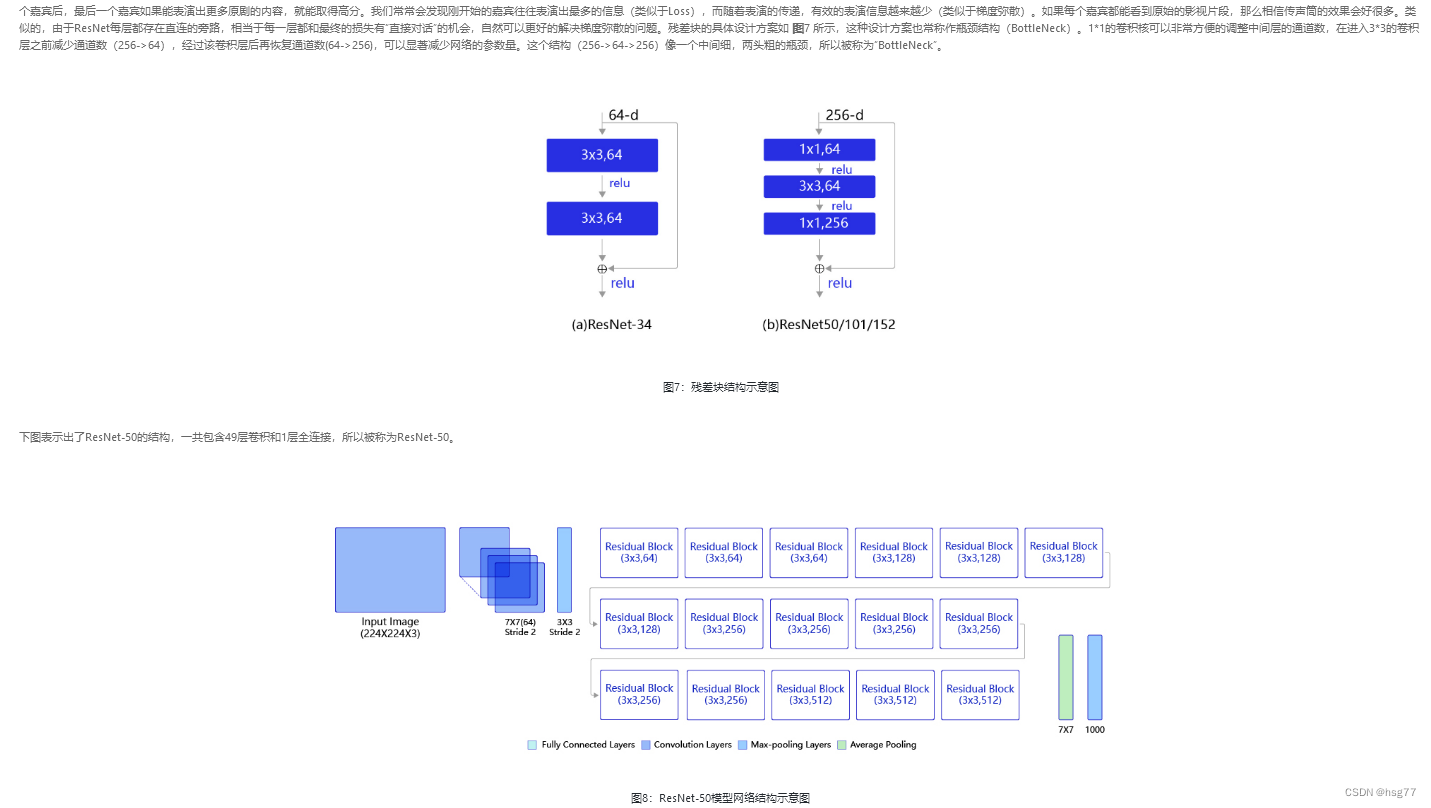
ResNet50包含多个模块,其中第2到第5个模块分别包含3、4、6、3个残差块
第1模块:7X7(64) 一个卷积
第2模块:3X3(64) 三个残差块=9个卷积
第3模块:3X3(128) 四个残差块=12个卷积
第4模块:3X3(256) 六个残差块=18个卷积
第5模块:3X3(512) 三个残差块=9个卷积
最后一个全连接层
分析详细过程如下所示:
PS E:\project\python> & D:/ProgramData/Anaconda3/python.exe e:/project/python/PM/ResNet_PM_test.py
layers= 50
W0804 20:41:04.044713 18388 gpu_resources.cc:61] Please NOTE: device: 0, GPU Compute Capability: 6.1, Driver API Version: 12.2, Runtime API Version: 10.2
W0804 20:41:04.053730 18388 gpu_resources.cc:91] device: 0, cuDNN Version: 7.6.
block= 0 depth[block]= 3    Cout=256
bottleneck[ 256 64 False
bottleneck[ 256 64 True
bottleneck[ 256 64 True
create bnb 3
block= 1 depth[block]= 4   Cout=512
bottleneck[ 512 128 False
bottleneck[ 512 128 True
bottleneck[ 512 128 True
bottleneck[ 512 128 True
create bnb 4
block= 2 depth[block]= 6   Cout=1024
bottleneck[ 1024 256 False
bottleneck[ 1024 256 True
bottleneck[ 1024 256 True
bottleneck[ 1024 256 True
bottleneck[ 1024 256 True
bottleneck[ 1024 256 True
create bnb 6
block= 3 depth[block]= 3   Cout=2048
bottleneck[ 2048 512 False
bottleneck[ 2048 512 True
bottleneck[ 2048 512 True
create bnb 3
[10, 3, 224, 224]
conv2d_0 [10, 64, 112, 112] [64, 3, 7, 7] [ 64 ]
D:\ProgramData\Anaconda3\lib\site-packages\paddle\nn\layer\norm.py:712: UserWarning: When training, we now always track global mean and variance.warnings.warn(
conv_bn_layer_0 [10, 64, 112, 112]
maxpool2d: [10, 64, 56, 56]
======start bottleneckBlock:
#第二个模块 Cout=256  包括三个残差块bottleneckBlock
-----print bottleneckBlock: 0
conv2d_1 [10, 64, 56, 56] [64, 64, 1, 1] [ 64 ]
conv2d_2 [10, 64, 56, 56] [64, 64, 3, 3] [ 64 ]
conv2d_3 [10, 256, 56, 56] [256, 64, 1, 1] [ 256 ]
conv2d_4 [10, 256, 56, 56] [256, 64, 1, 1] [ 256 ]
end block: [10, 256, 56, 56]
-----print bottleneckBlock: 1
conv2d_5 [10, 64, 56, 56] [64, 256, 1, 1] [ 64 ]
conv2d_6 [10, 64, 56, 56] [64, 64, 3, 3] [ 64 ]
conv2d_7 [10, 256, 56, 56] [256, 64, 1, 1] [ 256 ]
end block: [10, 256, 56, 56]
-----print bottleneckBlock: 2
conv2d_8 [10, 64, 56, 56] [64, 256, 1, 1] [ 64 ]
conv2d_9 [10, 64, 56, 56] [64, 64, 3, 3] [ 64 ]
conv2d_10 [10, 256, 56, 56] [256, 64, 1, 1] [ 256 ]
end block: [10, 256, 56, 56]
#第三个模块 Cout=512  包括四个残差块bottleneckBlock
-----print bottleneckBlock: 3
conv2d_11 [10, 128, 56, 56] [128, 256, 1, 1] [ 128 ]
conv2d_12 [10, 128, 28, 28] [128, 128, 3, 3] [ 128 ]
conv2d_13 [10, 512, 28, 28] [512, 128, 1, 1] [ 512 ]
conv2d_14 [10, 512, 28, 28] [512, 256, 1, 1] [ 512 ]
end block: [10, 512, 28, 28]
-----print bottleneckBlock: 4
conv2d_15 [10, 128, 28, 28] [128, 512, 1, 1] [ 128 ]
conv2d_16 [10, 128, 28, 28] [128, 128, 3, 3] [ 128 ]
conv2d_17 [10, 512, 28, 28] [512, 128, 1, 1] [ 512 ]
end block: [10, 512, 28, 28]
-----print bottleneckBlock: 5
conv2d_18 [10, 128, 28, 28] [128, 512, 1, 1] [ 128 ]
conv2d_19 [10, 128, 28, 28] [128, 128, 3, 3] [ 128 ]
conv2d_20 [10, 512, 28, 28] [512, 128, 1, 1] [ 512 ]
end block: [10, 512, 28, 28]
-----print bottleneckBlock: 6
conv2d_21 [10, 128, 28, 28] [128, 512, 1, 1] [ 128 ]
conv2d_22 [10, 128, 28, 28] [128, 128, 3, 3] [ 128 ]
conv2d_23 [10, 512, 28, 28] [512, 128, 1, 1] [ 512 ]
end block: [10, 512, 28, 28]
#第四个模块 Cout=1024  包括六个残差块bottleneckBlock
-----print bottleneckBlock: 7
conv2d_24 [10, 256, 28, 28] [256, 512, 1, 1] [ 256 ]
conv2d_25 [10, 256, 14, 14] [256, 256, 3, 3] [ 256 ]
conv2d_26 [10, 1024, 14, 14] [1024, 256, 1, 1] [ 1024 ]
conv2d_27 [10, 1024, 14, 14] [1024, 512, 1, 1] [ 1024 ]
end block: [10, 1024, 14, 14]
-----print bottleneckBlock: 8
conv2d_28 [10, 256, 14, 14] [256, 1024, 1, 1] [ 256 ]
conv2d_29 [10, 256, 14, 14] [256, 256, 3, 3] [ 256 ]
conv2d_30 [10, 1024, 14, 14] [1024, 256, 1, 1] [ 1024 ]
end block: [10, 1024, 14, 14]
-----print bottleneckBlock: 9
conv2d_31 [10, 256, 14, 14] [256, 1024, 1, 1] [ 256 ]
conv2d_32 [10, 256, 14, 14] [256, 256, 3, 3] [ 256 ]
conv2d_33 [10, 1024, 14, 14] [1024, 256, 1, 1] [ 1024 ]
end block: [10, 1024, 14, 14]
-----print bottleneckBlock: 10
conv2d_34 [10, 256, 14, 14] [256, 1024, 1, 1] [ 256 ]
conv2d_35 [10, 256, 14, 14] [256, 256, 3, 3] [ 256 ]
conv2d_36 [10, 1024, 14, 14] [1024, 256, 1, 1] [ 1024 ]
end block: [10, 1024, 14, 14]
-----print bottleneckBlock: 11
conv2d_37 [10, 256, 14, 14] [256, 1024, 1, 1] [ 256 ]
conv2d_38 [10, 256, 14, 14] [256, 256, 3, 3] [ 256 ]
conv2d_39 [10, 1024, 14, 14] [1024, 256, 1, 1] [ 1024 ]
end block: [10, 1024, 14, 14]
-----print bottleneckBlock: 12
conv2d_40 [10, 256, 14, 14] [256, 1024, 1, 1] [ 256 ]
conv2d_41 [10, 256, 14, 14] [256, 256, 3, 3] [ 256 ]
conv2d_42 [10, 1024, 14, 14] [1024, 256, 1, 1] [ 1024 ]
end block: [10, 1024, 14, 14]
#第五个模块 Cout=2048  包括三个残差块bottleneckBlock
-----print bottleneckBlock: 13
conv2d_43 [10, 512, 14, 14] [512, 1024, 1, 1] [ 512 ]
conv2d_44 [10, 512, 7, 7] [512, 512, 3, 3] [ 512 ]
conv2d_45 [10, 2048, 7, 7] [2048, 512, 1, 1] [ 2048 ]
conv2d_46 [10, 2048, 7, 7] [2048, 1024, 1, 1] [ 2048 ]
end block: [10, 2048, 7, 7]
-----print bottleneckBlock: 14
conv2d_47 [10, 512, 7, 7] [512, 2048, 1, 1] [ 512 ]
conv2d_48 [10, 512, 7, 7] [512, 512, 3, 3] [ 512 ]
conv2d_49 [10, 2048, 7, 7] [2048, 512, 1, 1] [ 2048 ]
end block: [10, 2048, 7, 7]
-----print bottleneckBlock: 15
conv2d_50 [10, 512, 7, 7] [512, 2048, 1, 1] [ 512 ]
conv2d_51 [10, 512, 7, 7] [512, 512, 3, 3] [ 512 ]
conv2d_52 [10, 2048, 7, 7] [2048, 512, 1, 1] [ 2048 ]
end block: [10, 2048, 7, 7]
======end bottleneckBlock:
adaptive_avg_pool2d_0 [10, 2048, 1, 1]
y.shape= [10, 2048]
linear_0 [10, 1] [2048, 1] [1]
PS E:\project\python>
分析测试代码如下所示:
# -*- coding:utf-8 -*-# ResNet模型代码
import numpy as np
import paddle
import paddle.nn as nn
import paddle.nn.functional as Fdef printItem(item,x):# item是CNN类中的一个子层# 查看经过子层之后的输出数据形状try:x = item(x)except:x = paddle.reshape(x, [x.shape[0], -1])x = item(x)  #print(len(item.parameters()))         if len(item.parameters())==1:       print(item.full_name(), x.shape,item.parameters()[0].shape,'[',item.parameters()[0].shape[0],']') #print(item)elif len(item.parameters())==2:# 查看卷积和全连接层的数据和参数的形状,# 其中item.parameters()[0]是权重参数w,item.parameters()[1]是偏置参数bprint(item.full_name(), x.shape, item.parameters()[0].shape, item.parameters()[1].shape)else:# 池化层没有参数print(item.full_name(), x.shape) return x;      # ResNet中使用了BatchNorm层,在卷积层的后面加上BatchNorm以提升数值稳定性
# 定义卷积批归一化块  (包括一个卷积)
class ConvBNLayer(paddle.nn.Layer):def __init__(self,num_channels,num_filters,filter_size,stride=1,groups=1,act=None):"""num_channels, 卷积层的输入通道数num_filters, 卷积层的输出通道数stride, 卷积层的步幅groups, 分组卷积的组数,默认groups=1不使用分组卷积"""super(ConvBNLayer, self).__init__()# 创建卷积层self._conv = nn.Conv2D(in_channels=num_channels,out_channels=num_filters,kernel_size=filter_size,stride=stride,padding=(filter_size - 1) // 2,groups=groups,bias_attr=False)# 创建BatchNorm层self._batch_norm = paddle.nn.BatchNorm2D(num_filters)self.act = actdef forward_old(self, inputs):y = self._conv(inputs)y = self._batch_norm(y)if self.act == 'leaky':y = F.leaky_relu(x=y, negative_slope=0.1)elif self.act == 'relu':y = F.relu(x=y)return ydef forward(self, inputs):y=printItem(self._conv,inputs)#print('[',num_filters,num_channels,filter_size,filter_size)y = self._batch_norm(y)if self.act == 'leaky':y = F.leaky_relu(x=y, negative_slope=0.1)elif self.act == 'relu':y = F.relu(x=y)return y# 定义残差块  (包括三个卷积)   16*3=48
# 每个残差块会对输入图片做三次卷积,然后跟输入图片进行短接
# 如果残差块中第三次卷积输出特征图的形状与输入不一致,则对输入图片做1x1卷积,将其输出形状调整成一致
class BottleneckBlock(paddle.nn.Layer):def __init__(self,num_channels,num_filters,stride,shortcut=True):super(BottleneckBlock, self).__init__()# 创建第一个卷积层 1x1self.conv0 = ConvBNLayer(num_channels=num_channels,num_filters=num_filters,filter_size=1,act='relu')# 创建第二个卷积层 3x3self.conv1 = ConvBNLayer(num_channels=num_filters,num_filters=num_filters,filter_size=3,stride=stride,act='relu')# 创建第三个卷积 1x1,但输出通道数乘以4self.conv2 = ConvBNLayer(num_channels=num_filters,num_filters=num_filters * 4,filter_size=1,act=None)# 如果conv2的输出跟此残差块的输入数据形状一致,则shortcut=True# 否则shortcut = False,添加1个1x1的卷积作用在输入数据上,使其形状变成跟conv2一致if not shortcut:self.short = ConvBNLayer(num_channels=num_channels,num_filters=num_filters * 4,filter_size=1,stride=stride)self.shortcut = shortcutself._num_channels_out = num_filters * 4def forward_old(self, inputs):y = self.conv0(inputs)conv1 = self.conv1(y)conv2 = self.conv2(conv1)# 如果shortcut=True,直接将inputs跟conv2的输出相加# 否则需要对inputs进行一次卷积,将形状调整成跟conv2输出一致if self.shortcut:short = inputselse:short = self.short(inputs)y = paddle.add(x=short, y=conv2)y = F.relu(y)return ydef forward(self, inputs): y = self.conv0(inputs)#print('>>>>ConvBMLayer0.shape=',y.shape,self.conv0)conv1 = self.conv1(y)#print('>>>>ConvBMLayer1.shape=',conv1.shape)conv2 = self.conv2(conv1)#print('>>>>ConvBMLayer2.shape=',conv2.shape)# 如果shortcut=True,直接将inputs跟conv2的输出相加# 否则需要对inputs进行一次卷积,将形状调整成跟conv2输出一致if self.shortcut:short = inputselse:short = self.short(inputs)y = paddle.add(x=short, y=conv2)y = F.relu(y)return y   # 定义ResNet模型
class ResNet(paddle.nn.Layer):def __init__(self, layers=50, class_dim=1):print('layers=',layers)"""layers, 网络层数,可以是50, 101或者152class_dim,分类标签的类别数"""super(ResNet, self).__init__()self.layers = layerssupported_layers = [50, 101, 152]assert layers in supported_layers, \"supported layers are {} but input layer is {}".format(supported_layers, layers)if layers == 50:#ResNet50包含多个模块,其中第2到第5个模块分别包含3、4、6、3个残差块depth = [3, 4, 6, 3]elif layers == 101:#ResNet101包含多个模块,其中第2到第5个模块分别包含3、4、23、3个残差块depth = [3, 4, 23, 3]elif layers == 152:#ResNet152包含多个模块,其中第2到第5个模块分别包含3、8、36、3个残差块depth = [3, 8, 36, 3]# 残差块中使用到的卷积的输出通道数num_filters = [64, 128, 256, 512]# ResNet的第一个模块,包含1个7x7卷积,后面跟着1个最大池化层self.conv = ConvBNLayer(num_channels=3,num_filters=64,filter_size=7,stride=2,act='relu')self.pool2d_max = nn.MaxPool2D(kernel_size=3,stride=2,padding=1)# ResNet的第二到第五个模块c2、c3、c4、c5self.bottleneck_block_list = []num_channels = 64for block in range(len(depth)):     #4(0,1,2,3)shortcut = Falseprint('block=',block,'depth[block]=',depth[block])k=0for i in range(depth[block]):   #depth = [3, 4, 6, 3]k+=1# c3、c4、c5将会在第一个残差块使用stride=2;其余所有残差块stride=1bottleneck_block = self.add_sublayer('bb_%d_%d' % (block, i),BottleneckBlock(num_channels=num_channels,num_filters=num_filters[block],stride=2 if i == 0 and block != 0 else 1, shortcut=shortcut))num_channels = bottleneck_block._num_channels_outself.bottleneck_block_list.append(bottleneck_block)print('bottleneck[',num_channels,num_filters[block],shortcut)shortcut = True;               print('create bnb',k)# 在c5的输出特征图上使用全局池化self.pool2d_avg = paddle.nn.AdaptiveAvgPool2D(output_size=1)# stdv用来作为全连接层随机初始化参数的方差import mathstdv = 1.0 / math.sqrt(2048 * 1.0)# 创建全连接层,输出大小为类别数目,经过残差网络的卷积和全局池化后,# 卷积特征的维度是[B,2048,1,1],故最后一层全连接的输入维度是2048self.out = nn.Linear(in_features=2048, out_features=class_dim,weight_attr=paddle.ParamAttr(initializer=paddle.nn.initializer.Uniform(-stdv, stdv)))def forward(self, inputs):y = self.conv(inputs)y = self.pool2d_max(y)for bottleneck_block in self.bottleneck_block_list:y = bottleneck_block(y)y = self.pool2d_avg(y)y = paddle.reshape(y, [y.shape[0], -1])y = self.out(y)return ydef printStruct(self,inputs):y=paddle.to_tensor(inputs)print(y.shape)y=printItem(self.conv,y)y = self.pool2d_max(y)print("maxpool2d:",y.shape)print('======start bottleneckBlock:')i=0        for bottleneck_block in self.bottleneck_block_list:            print('-----print bottleneckBlock:',i)y = bottleneck_block(y)print('end block:',y.shape)i+=1                       print('======end bottleneckBlock:')y=printItem(self.pool2d_avg,y)y = paddle.reshape(y, [y.shape[0], -1])print('y.shape=',y.shape)        y=printItem(self.out,y)return y# 创建模型
model = ResNet()
# 定义优化器
opt = paddle.optimizer.Momentum(learning_rate=0.001, momentum=0.9, parameters=model.parameters(), weight_decay=0.001)
# 启动训练过程
import PM
#PM.train_pm(model, opt)
## 输入数据形状是 [N, 3, H, W]
# 这里用np.random创建一个随机数组作为输入数据
x = np.random.randn(*[10,3,224,224])
x = x.astype('float32')
# 创建CNN类的实例,指定模型名称和分类的类别数目
#model = VGG(1)
#
model.printStruct(x)
#
训练源代码如下所示:
# -*- coding:utf-8 -*-# ResNet模型代码
import numpy as np
import paddle
import paddle.nn as nn
import paddle.nn.functional as F# ResNet中使用了BatchNorm层,在卷积层的后面加上BatchNorm以提升数值稳定性
# 定义卷积批归一化块  (包括一个卷积)
class ConvBNLayer(paddle.nn.Layer):def __init__(self,num_channels,num_filters,filter_size,stride=1,groups=1,act=None):"""num_channels, 卷积层的输入通道数num_filters, 卷积层的输出通道数stride, 卷积层的步幅groups, 分组卷积的组数,默认groups=1不使用分组卷积"""super(ConvBNLayer, self).__init__()# 创建卷积层self._conv = nn.Conv2D(in_channels=num_channels,out_channels=num_filters,kernel_size=filter_size,stride=stride,padding=(filter_size - 1) // 2,groups=groups,bias_attr=False)# 创建BatchNorm层self._batch_norm = paddle.nn.BatchNorm2D(num_filters)self.act = actdef forward(self, inputs):y = self._conv(inputs)y = self._batch_norm(y)if self.act == 'leaky':y = F.leaky_relu(x=y, negative_slope=0.1)elif self.act == 'relu':y = F.relu(x=y)return y# 定义残差块  (包括三个卷积)
# 每个残差块会对输入图片做三次卷积,然后跟输入图片进行短接
# 如果残差块中第三次卷积输出特征图的形状与输入不一致,则对输入图片做1x1卷积,将其输出形状调整成一致
class BottleneckBlock(paddle.nn.Layer):def __init__(self,num_channels,num_filters,stride,shortcut=True):super(BottleneckBlock, self).__init__()# 创建第一个卷积层 1x1self.conv0 = ConvBNLayer(num_channels=num_channels,num_filters=num_filters,filter_size=1,act='relu')# 创建第二个卷积层 3x3self.conv1 = ConvBNLayer(num_channels=num_filters,num_filters=num_filters,filter_size=3,stride=stride,act='relu')# 创建第三个卷积 1x1,但输出通道数乘以4self.conv2 = ConvBNLayer(num_channels=num_filters,num_filters=num_filters * 4,filter_size=1,act=None)# 如果conv2的输出跟此残差块的输入数据形状一致,则shortcut=True# 否则shortcut = False,添加1个1x1的卷积作用在输入数据上,使其形状变成跟conv2一致if not shortcut:self.short = ConvBNLayer(num_channels=num_channels,num_filters=num_filters * 4,filter_size=1,stride=stride)self.shortcut = shortcutself._num_channels_out = num_filters * 4def forward(self, inputs):y = self.conv0(inputs)conv1 = self.conv1(y)conv2 = self.conv2(conv1)# 如果shortcut=True,直接将inputs跟conv2的输出相加# 否则需要对inputs进行一次卷积,将形状调整成跟conv2输出一致if self.shortcut:short = inputselse:short = self.short(inputs)y = paddle.add(x=short, y=conv2)y = F.relu(y)return y# 定义ResNet模型
class ResNet(paddle.nn.Layer):def __init__(self, layers=50, class_dim=1):"""layers, 网络层数,可以是50, 101或者152class_dim,分类标签的类别数"""super(ResNet, self).__init__()self.layers = layerssupported_layers = [50, 101, 152]assert layers in supported_layers, \"supported layers are {} but input layer is {}".format(supported_layers, layers)if layers == 50:#ResNet50包含多个模块,其中第2到第5个模块分别包含3、4、6、3个残差块depth = [3, 4, 6, 3]elif layers == 101:#ResNet101包含多个模块,其中第2到第5个模块分别包含3、4、23、3个残差块depth = [3, 4, 23, 3]elif layers == 152:#ResNet152包含多个模块,其中第2到第5个模块分别包含3、8、36、3个残差块depth = [3, 8, 36, 3]# 残差块中使用到的卷积的输出通道数num_filters = [64, 128, 256, 512]# ResNet的第一个模块,包含1个7x7卷积,后面跟着1个最大池化层self.conv = ConvBNLayer(num_channels=3,num_filters=64,filter_size=7,stride=2,act='relu')self.pool2d_max = nn.MaxPool2D(kernel_size=3,stride=2,padding=1)# ResNet的第二到第五个模块c2、c3、c4、c5self.bottleneck_block_list = []num_channels = 64for block in range(len(depth)):shortcut = Falsefor i in range(depth[block]):# c3、c4、c5将会在第一个残差块使用stride=2;其余所有残差块stride=1bottleneck_block = self.add_sublayer('bb_%d_%d' % (block, i),BottleneckBlock(num_channels=num_channels,num_filters=num_filters[block],stride=2 if i == 0 and block != 0 else 1, shortcut=shortcut))num_channels = bottleneck_block._num_channels_outself.bottleneck_block_list.append(bottleneck_block)shortcut = True# 在c5的输出特征图上使用全局池化self.pool2d_avg = paddle.nn.AdaptiveAvgPool2D(output_size=1)# stdv用来作为全连接层随机初始化参数的方差import mathstdv = 1.0 / math.sqrt(2048 * 1.0)# 创建全连接层,输出大小为类别数目,经过残差网络的卷积和全局池化后,# 卷积特征的维度是[B,2048,1,1],故最后一层全连接的输入维度是2048self.out = nn.Linear(in_features=2048, out_features=class_dim,weight_attr=paddle.ParamAttr(initializer=paddle.nn.initializer.Uniform(-stdv, stdv)))def forward(self, inputs):y = self.conv(inputs)y = self.pool2d_max(y)for bottleneck_block in self.bottleneck_block_list:y = bottleneck_block(y)y = self.pool2d_avg(y)y = paddle.reshape(y, [y.shape[0], -1])y = self.out(y)return y
# 创建模型
model = ResNet()   #=ResNet(50)   =ResNet(101)   =ResNet(152)
# 定义优化器
opt = paddle.optimizer.Momentum(learning_rate=0.001, momentum=0.9, parameters=model.parameters(), weight_decay=0.001)
# 启动训练过程
import PM
PM.train_pm(model, opt)
#
训练结果:
D:\ProgramData\Anaconda3\lib\site-packages\paddle\nn\layer\norm.py:712: UserWarning: When training, we now always track global mean and variance.warnings.warn(
epoch: 0, batch_id: 0, loss is: 0.7711
epoch: 0, batch_id: 20, loss is: 0.6860
[validation] accuracy/loss: 0.7700/0.4910
epoch: 1, batch_id: 0, loss is: 0.7769
epoch: 1, batch_id: 20, loss is: 0.6261
[validation] accuracy/loss: 0.8475/0.3368
epoch: 2, batch_id: 0, loss is: 0.4543
epoch: 2, batch_id: 20, loss is: 0.3392
[validation] accuracy/loss: 0.8950/0.2690
epoch: 3, batch_id: 0, loss is: 1.1716
epoch: 3, batch_id: 20, loss is: 0.0736
[validation] accuracy/loss: 0.8975/0.2387
epoch: 4, batch_id: 0, loss is: 0.0909
epoch: 4, batch_id: 20, loss is: 0.1900
[validation] accuracy/loss: 0.9375/0.2098
PS E:\project\python>
