图片和PDF 加水印去水印
- 前要
- 1. 图片加水印
- 1.1 方法1
- 1.2 方法2
- 2. 图片去水印
- 3. pdf 加水印
- 4. pdf 去水印
前要
网上查了很多资料, 汇总了几个不错的代码, 顺便做个笔记
1. 图片加水印
1.1 方法1
简单方便, 后也好处理

# -*- coding:utf-8 -*-
import os
from PIL import Image
from PIL import ImageFont
from PIL import ImageDrawdef watermark_Image(img_path, output_path):img = Image.open(img_path)draw = ImageDraw.Draw(img)# 图片水印# # 打开水印图片# watermark = Image.open('1.png')# # 计算水印图片大小# wm_width, wm_height = watermark.size# # 计算原图大小# img_width, img_height = img.size# wm_width = int(wm_width * 1.5)# wm_height = int(wm_height * 1.5)# watermark = watermark.resize((wm_width, wm_height))# # 添加水印# img.paste(watermark, (5, 5), watermark)# 字体水印text = "CSDN"# 设置字体、字体大小等等font = ImageFont.truetype('arial.ttf', 33)# 添加水印draw.text((50, 50), text, font=font,  fill=(255, 255, 255))# 保存图片img.save(output_path)def run(in_path):out_path = './img_watermark'# 带水印图片路径if not os.path.exists(out_path):os.makedirs(out_path)file_ls = os.listdir(in_path)for file in file_ls:img_path = './{}/{}'.format(in_path, file)output_path = img_path.replace(in_path, out_path)try:watermark_Image(img_path, output_path)print(file, '完成!')except Exception as e:print(img_path, e)breakif __name__ == '__main__':run('./img_data')
1.2 方法2
太复杂, 而且后面清洗水印不好清除

import os
import sys
import argparse
from PIL import Image, ImageDraw, ImageFont, ImageEnhancedef read_origin_photo(photo_path, photo_angle=0):"""获取图像内容与尺寸photo_path:图片路径photo_angle: 图片旋转角度"""origin_photo = Image.open(photo_path)origin_photo = origin_photo.convert('RGBA')origin_photo = origin_photo.rotate(photo_angle, expand=True)h, w = origin_photo.sizereturn origin_photo, h, w# def get_color(text_color):
#     r = int(text_color[1:3], base=16)
#     g = int(text_color[3:5], base=16)
#     b = int(text_color[5:7], base=16)
#     return r, g, bdef make_text_picture(h, w, text, font_path, font_size=40, angle=-45, color=(0, 0, 0)):"""制作水印图片h: 原图高度w: 原图宽度font_path:字体文件路径font_size:字体大小angle:字体旋转角度color:字体颜色"""text_pic = Image.new('RGBA', (4 * h, 4 * w), (255, 255, 255, 255))fnt = ImageFont.truetype('arial.ttf', size=font_size)text_d = ImageDraw.Draw(text_pic)# a, b 分别控制水印的列间距和行间距,默认为字体的2倍列距,4倍行距a, b = 2, 4for x in range(10, text_pic.size[0] - 10, a * font_size * len(text)):for y in range(10, text_pic.size[1] - 10, b * font_size):text_d.multiline_text((x, y), text, fill=color, font=fnt)# 旋转水印text_pic = text_pic.rotate(angle)# 截取水印部分图片text_pic = text_pic.crop((h, w, 3 * h, 3 * w))# text_pic.show()return text_picdef combine(origin_photo, text_pic, alpha=0.2, out_name='out.jpg'):"""为图片添加水印并保存origin_photo: 原图内容text_pic: 要添加的水印图片alpha:水印的不透明度out_name: 输出图片的文件名"""# 合并水印图片和原图text_pic = text_pic.resize(origin_photo.size)out = Image.blend(origin_photo, text_pic, alpha)out = out.convert('RGB')# 增强图片对比度enhance = ImageEnhance.Contrast(out)out = enhance.enhance(1.0 / (1 - alpha))out_path = os.path.join('./img_no_watermark/', out_name)out.save(out_path)out.show()if __name__ == '__main__':# 获取cmd命令参数, 弊端:太复杂, 后面可以改成字典parser = argparse.ArgumentParser()parser.add_argument('-p', dest='path', default='./img_data/e7a88f27-dc2c-11ee-8e27-508140236042.jpg', help='图片路径,如:1.jpg或./images/1.jpg')parser.add_argument('-t', dest='text', default='Python', help="要添加的水印内容")parser.add_argument('--photo_angle', dest='photo_angle', default=0,help='原图片旋转角度,默认为0,不进行旋转')parser.add_argument('--new_image_name', dest='new_image_name', default=None,help='输出图片的名称, 默认为"原图片名_with_watermark.jpg", 图片保存在out_images目录下')# parser.add_argument('--font_path', dest='font_path', default=r"./fonts/STSONG.TTF",#                     help='要使用的字体路径,如 STSONG.TTF,windows可在C:\Windows\Fonts查找字体')parser.add_argument('--text_angle', dest='text_angle', default=-45,help='水印的旋转角度,0为水平,-90位从上向下垂直, 90为从下向上垂直,默认-45')parser.add_argument('--text_color', dest='text_color', default='#000000',help="水印颜色,默认#000000(黑色)")parser.add_argument('--text_size', dest='text_size',default=40, help='水印字体的大小, 默认40')parser.add_argument('--text_alpha', dest='text_alpha',default=0.2, help='水印的不透明度,建议0.2~0.3,默认0.2')args = parser.parse_args()# args 其实就是一个另类的自带你args.path = './img_data/8d9337c7-dcf9-11ee-b5dc-508140236042.jpg'photo_path = args.pathprint(photo_path)text = args.textif not photo_path or not text:print('必须指定图片路径和水印文字')sys.exit(-1)photo_angle = int(args.photo_angle)font_path = ''text_size = int(args.text_size)text_angle = int(args.text_angle)origin_photo, h, w = read_origin_photo(photo_path, photo_angle)text_pic = make_text_picture(h, w, text, font_path,font_size=text_size, angle=text_angle, color=args.text_color)new_image_name = args.new_image_namephoto_name = os.path.split(photo_path)[-1].split('.')[0]  # 获取图片名称if new_image_name is None:new_image_name = photo_name + '_with_watermark.jpg'combine(origin_photo, text_pic, alpha=float(args.text_alpha),out_name=new_image_name)
2. 图片去水印
找了好多去水印代码,只有这个效果不错,但是代码需要水印模板来确定水印位置, 当然如果水印少且位置固定可以不用(例如1.1), 2.2就不展示了, 基本没变化
原理就是通过模板找到相同形状图案位置,然后根据旁边像素点进行补充
水印模板

1.1 图片去水印效果
# coding=utf-8
import os
import cv2
import numpy as np# 膨胀算法 Kernel
_DILATE_KERNEL = np.array([[0, 0, 1, 0, 0],[0, 0, 1, 0, 0],[1, 1, 1, 1, 1],[0, 0, 1, 0, 0],[0, 0, 1, 0, 0]], dtype=np.uint8)class WatermarkRemover(object):""""去除图片中的水印(Remove Watermark)"""def __init__(self, verbose=True):self.verbose = verboseself.watermark_template_gray_img = Noneself.watermark_template_mask_img = Noneself.watermark_template_h = 0self.watermark_template_w = 0def load_watermark_template(self, watermark_template_filename):"""加载水印模板,以便后面批量处理去除水印:param watermark_template_filename::return:"""self.generate_template_gray_and_mask(watermark_template_filename)def dilate(self, img):"""对图片进行膨胀计算:param img::return:"""dilated = cv2.dilate(img, _DILATE_KERNEL)return dilateddef generate_template_gray_and_mask(self, watermark_template_filename):"""处理水印模板,生成对应的检索位图和掩码位图检索位图即处理后的灰度图,去除了非文字部分:param watermark_template_filename: 水印模板图片文件名称:return: x1, y1, x2, y2"""# 水印模板原图img = cv2.imread(watermark_template_filename)# 灰度图、掩码图gray = cv2.cvtColor(img, cv2.COLOR_BGR2GRAY)_, mask = cv2.threshold(gray, 0, 255, cv2.THRESH_TOZERO + cv2.THRESH_OTSU)_, mask = cv2.threshold(mask, 127, 255, cv2.THRESH_BINARY)mask = self.dilate(mask)  # 使得掩码膨胀一圈,以免留下边缘没有被修复#mask = self.dilate(mask)  # 使得掩码膨胀一圈,以免留下边缘没有被修复# 水印模板原图去除非文字部分img = cv2.bitwise_and(img, img, mask=mask)# 后面修图时需要用到三个通道mask = cv2.cvtColor(mask, cv2.COLOR_GRAY2BGR)self.watermark_template_gray_img = grayself.watermark_template_mask_img = maskself.watermark_template_h = img.shape[0]self.watermark_template_w = img.shape[1]# cv2.imwrite('watermark-template-gray.jpg', gray)# cv2.imwrite('watermark-template-mask.jpg', mask)return gray, maskdef find_watermark(self, filename):"""从原图中寻找水印位置:param filename::return: x1, y1, x2, y2"""# Load the images in gray scalegray_img = cv2.imread(filename, 0)return self.find_watermark_from_gray(gray_img, self.watermark_template_gray_img)def find_watermark_from_gray(self, gray_img, watermark_template_gray_img):"""从原图的灰度图中寻找水印位置:param gray_img: 原图的灰度图:param watermark_template_gray_img: 水印模板的灰度图:return: x1, y1, x2, y2"""# Load the images in gray scalemethod = cv2.TM_CCOEFF# Apply template Matchingres = cv2.matchTemplate(gray_img, watermark_template_gray_img, method)min_val, max_val, min_loc, max_loc = cv2.minMaxLoc(res)# If the method is TM_SQDIFF or TM_SQDIFF_NORMED, take minimumif method in [cv2.TM_SQDIFF, cv2.TM_SQDIFF_NORMED]:x, y = min_locelse:x, y = max_locreturn x, y, x + self.watermark_template_w, y + self.watermark_template_hdef remove_watermark_raw(self, img, watermark_template_gray_img, watermark_template_mask_img):"""去除图片中的水印:param img: 待去除水印图片位图:param watermark_template_gray_img: 水印模板的灰度图片位图,用于确定水印位置:param watermark_template_mask_img: 水印模板的掩码图片位图,用于修复原始图片:return: 去除水印后的图片位图"""# 寻找水印位置# img_gray = cv2.cvtColor(img, cv2.COLOR_BGR2GRAY)# x1, y1, x2, y2 = self.find_watermark_from_gray(img_gray, watermark_template_gray_img)# 水印位置固定x1, y1, x2, y2 = 50, 55, 170, 80# 制作原图的水印位置遮板mask = np.zeros(img.shape, np.uint8)watermark_template_mask_img = cv2.cvtColor(watermark_template_gray_img, cv2.COLOR_GRAY2BGR)# print(self.watermark_template_w, self.watermark_template_h)# 水印文章固定用这个mask[y1:y1 + self.watermark_template_h, x1:x1 + self.watermark_template_w] = watermark_template_mask_img# 不固定用这个# mask[y1:y2, x1:x2] = watermark_template_mask_imgmask = cv2.cvtColor(mask, cv2.COLOR_BGR2GRAY)# 用遮板进行图片修复,使用 TELEA 算法dst = cv2.inpaint(img, mask, 5, cv2.INPAINT_TELEA)# cv2.imwrite('dst.jpg', dst)return dstdef remove_watermark(self, filename, output_filename=None):"""去除图片中的水印:param filename: 待去除水印图片文件名称:param output_filename: 去除水印图片后的输出文件名称:return: 去除水印后的图片位图"""# 读取原图img = cv2.imread(filename)dst = self.remove_watermark_raw(img,self.watermark_template_gray_img,self.watermark_template_mask_img)if output_filename is not None:cv2.imwrite(output_filename, dst)return dstdef run(in_path):# 水印图片路径watermark_template_filename = './watermark.png'remover = WatermarkRemover()remover.load_watermark_template(watermark_template_filename)out_path = './img_no_watermark'if not os.path.exists(out_path):os.makedirs(out_path)file_ls = os.listdir(in_path)for file in file_ls:in_img_path = r'{}/{}'.format(in_path, file)out_img_path = r'{}/{}'.format(out_path, file)try:remover.remove_watermark(in_img_path, out_img_path)print('{} 完成!'.format(file))except Exception as e:print(e, in_img_path)if __name__ == '__main__':run('./img_watermark')
3. pdf 加水印
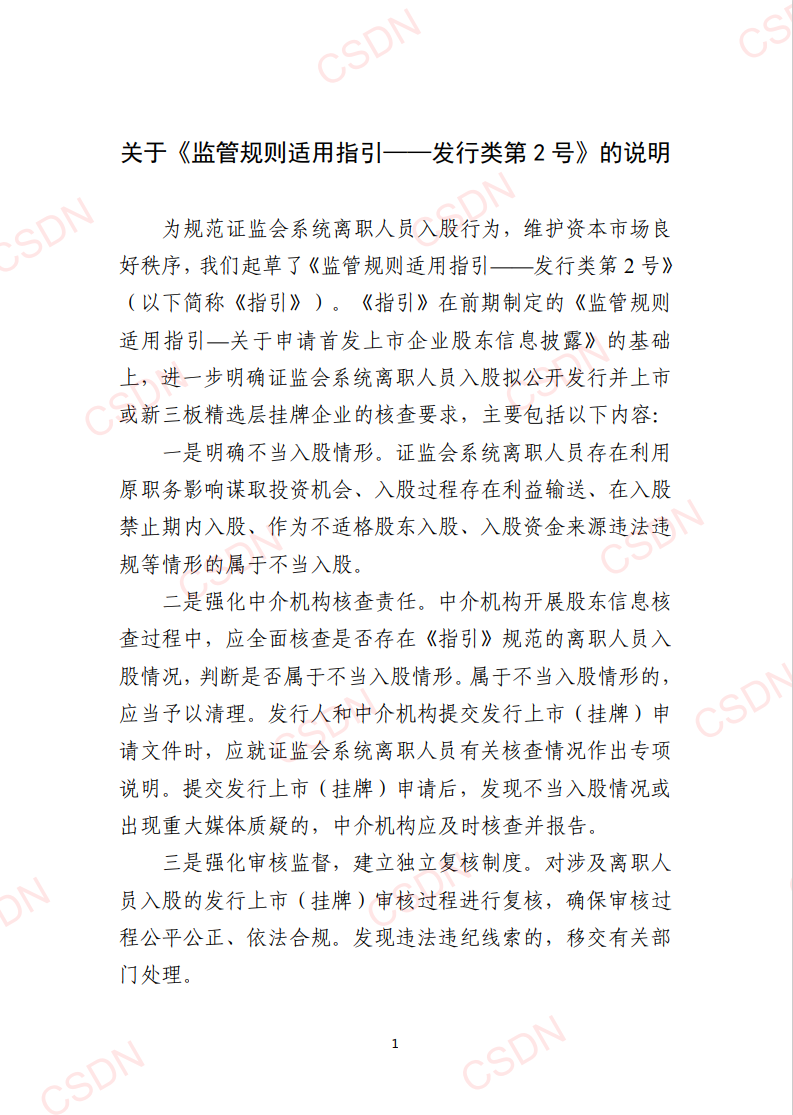
原理就是两个pdf合并到一块
代码会生成一个水印.pdf

执行代码效果
import os
from PyPDF2 import PdfReader, PdfWriter
from reportlab.lib.units import cm
from reportlab.pdfgen import canvasdef create_watermark(content):"""水印信息"""# 默认大小为21cm*29.7cmfile_name = "watermark.pdf"c = canvas.Canvas(file_name, pagesize=(30*cm, 30*cm))# 移动坐标原点(坐标系左下为(0,0))c.translate(10*cm, 5*cm)# 设置字体c.setFont("Helvetica", 30)# 指定描边的颜色c.setStrokeColorRGB(0, 1, 0)# 指定填充颜色c.setFillColorRGB(255, 0, 0)# 旋转45度,坐标系被旋转c.rotate(30)# 指定填充颜色c.setFillColorRGB(255, 0, 0, 0.1)# 设置透明度,1为不透明# c.setFillAlpha(0.1)# 画几个文本,注意坐标系旋转的影响for i in range(5):for j in range(10):a=10*(i-1)b=5*(j-2)c.drawString(a*cm, b*cm, content)c.setFillAlpha(0.1)# 关闭并保存pdf文件c.save()return file_namedef add_watermark(pdf_file_in, pdf_file_mark, pdf_file_out):"""把水印添加到pdf中"""pdf_output = PdfWriter()input_stream = open(pdf_file_in, 'rb')pdf_input = PdfReader(input_stream, strict=False)# 获取PDF文件的页数pageNum = len(pdf_input.pages)# 读入水印pdf文件pdf_watermark = PdfReader(open(pdf_file_mark, 'rb'), strict=False)# 给每一页打水印for i in range(pageNum):page = pdf_input._get_page(i)page.merge_page(pdf_watermark._get_page(0))page.compress_content_streams()  # 压缩内容pdf_output.add_page(page)pdf_output.write(open(pdf_file_out, 'wb'))def run(path):# 生成水印pdf_file_mark = create_watermark('CSDN')out_path = './pdf_watermark'if not os.path.exists(out_path):os.makedirs(out_path)file_ls = os.listdir(path)for file in file_ls:pdf_file_in = f'{path}/{file}'pdf_file_out = f'./{out_path}/{file}'try:add_watermark(pdf_file_in, pdf_file_mark, pdf_file_out)print(pdf_file_out, '完成!')except Exception as e:print(pdf_file_in, e)breakif __name__ == '__main__':run('./pdf_data')
4. pdf 去水印
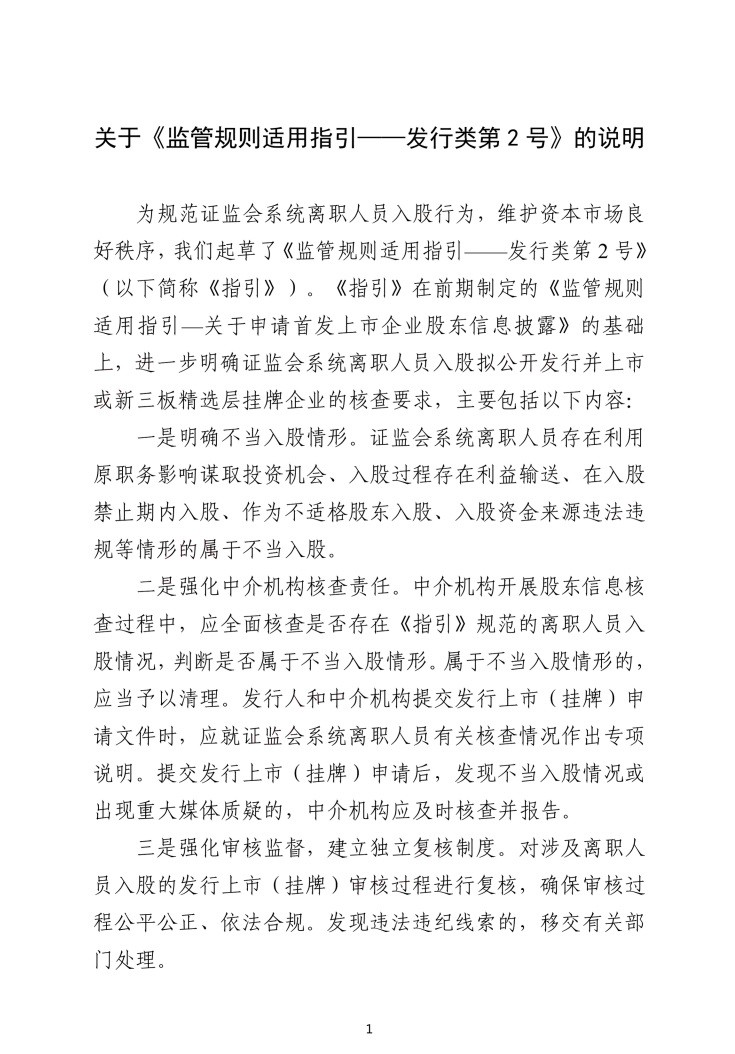
原理就是把pdf转成一张张图片, 因为水印一般都是浅色且透明,所以根据水印色差对图片整体色差进行调整, 从而去除水印
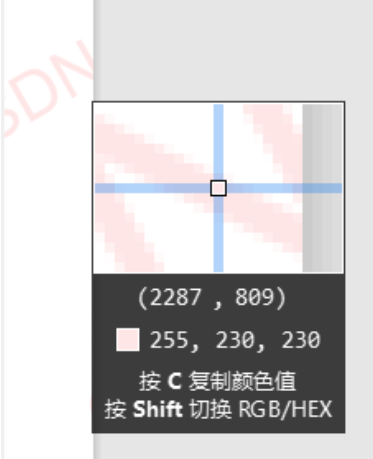
水印 RGB颜色 越高越透明, 所以需要注意别写太死, 留点空间, rgb 是 230 写成 210
例如:
效果图:
import os
import shutilimport cv2
import numpy as np
import fitz
from fpdf import FPDF
from PIL import Image
import tempfile# 定义A4纸张在300 DPI下的像素尺寸(宽度和高度)
A4_SIZE_PX_300DPI = (2480, 3508)# 图像去除水印函数
def remove_watermark(image_path):img = cv2.imread(image_path)#  水印RGB颜色, 不要写太准, 估个差值(例如230, 改成210), 而且这三个数需要一致lower_hsv = np.array([210, 210, 210])upper_hsv = np.array([255, 255, 255])mask = cv2.inRange(img, lower_hsv, upper_hsv)mask = cv2.GaussianBlur(mask, (1, 1), 0)img[mask == 255] = [255, 255, 255]cv2.imwrite(image_path, img)# 将PDF转换为图片,并保存到指定目录def pdf_to_images(pdf_path, output_folder):images = []doc = fitz.open(pdf_path)for page_num in range(doc.page_count):page = doc[page_num]# 设置分辨率为300 DPIpix = page.get_pixmap(matrix=fitz.Matrix(300 / 72, 300 / 72))image_path = os.path.join(output_folder, f"page_{page_num + 1}.png")pix.save(image_path)images.append(image_path)# 去除每张图片的水印remove_watermark(image_path)return imagesdef images_to_pdf(image_paths, output_path):pdf_writer = FPDF(unit='pt', format='A4')# 定义A4纸张在300 DPI下的尺寸(宽度和高度)A4_SIZE_MM = (210, 297)A4_SIZE_PX_300DPI = (A4_SIZE_MM[0] * 300 / 25.4, A4_SIZE_MM[1] * 300 / 25.4)for image_path in image_paths:with Image.open(image_path) as img:width, height = img.size# 计算图像是否需要缩放以适应A4纸张,并保持长宽比ratio = min(A4_SIZE_PX_300DPI[0] / width, A4_SIZE_PX_300DPI[1] / height)# 缩放图像以适应A4纸张,并保持长宽比img_resized = img.resize((int(width * ratio), int(height * ratio)), resample=Image.LANCZOS)# 创建临时文件并写入图片数据with tempfile.NamedTemporaryFile(suffix=".png", delete=False) as temp_file:img_resized.save(temp_file.name, format='PNG')# 添加一页,注意已经按300DPI处理了图片大小pdf_writer.add_page()# 使用临时文件路径添加图像到PDF,尺寸应基于已调整为300DPI分辨率的图片pdf_writer.image(temp_file.name, x=0, y=0, w=pdf_writer.w, h=pdf_writer.h)# 清理临时文件for image_path in image_paths:_, temp_filename = os.path.split(image_path)if os.path.exists(temp_filename):os.remove(temp_filename)pdf_writer.output(output_path)def run(path):out_path = './pdf_no_watermark'if not os.path.exists(out_path):os.makedirs(out_path)file_ls = os.listdir(path)for file in file_ls:pdf_file_in = f'{path}/{file}'pdf_file_out = f'{out_path}/{file}'output_folder = './output_images'os.makedirs(output_folder, exist_ok=True)  # 创建输出目录(如果不存在)try:image_paths = pdf_to_images(pdf_file_in, output_folder)images_to_pdf(image_paths, pdf_file_out)print(pdf_file_out)except Exception as e:print(pdf_file_in, e)shutil.rmtree(output_folder)if __name__ == '__main__':run('./pdf_watermark')
最后还是感谢很多大佬的分享, 我只是把他们的代码做了个汇总

