参考资料:
Xilinx/Vitis-AI-Tutorials (github.com)
Xilinx/Vitis-AI: Vitis AI is Xilinx’s development stack for AI inference on Xilinx hardware platforms
【03】ALINX Zynq UltraScale+ MPSoC XILINX FPGA视频教程Vitis AI开发
一. 简介
1.简介
边缘计算edge-ai;cloud-computing-edge-computing

edge端inference全栈部署方案


安装vitis-ai的准备
In addition, Vitis AI supports three host types(对于三种类型的机器,安装vitis-ai需做一定准备:
- CPU-only with no GPU acceleration:CPU hosts require no special preparation.
- CUDA-capable GPUs
- AMD ROCm™ GPUs:见Vitis-AI/docs/_sources/docs/install/install.rst.txt
<1>安装docker、Clone github Repository:
git clone https://github.com/Xilinx/Vitis-AI
cd Vitis-AI
注:You are now ready to start working with the Vitis AI Docker container. At this stage you will choose whether you wish to use the pre-built container, or build the container from scripts. docker环境的搭建可以选择Vitis-ai中的脚本搭建或者docker官方直接下载预构建的特定架构docker(见后),即:
docker pull xilinx/vitis-ai-<Framework>-<Arch>:latest| Desired Docker | <Framework> | <Arch> |
|---|---|---|
| PyTorch cpu-only | pytorch | cpu |
| TensorFlow 2 cpu-only | tensorflow2 | cpu |
| TensorFlow 1.15 cpu-only | tensorflow | cpu |
| PyTorch ROCm | pytorch | rocm |
| TensorFlow 2 ROCm | tensorflow2 | rocm |
或:
cd <Vitis-AI install path>/Vitis-AI
./docker_run.sh xilinx/vitis-ai-<pytorch|tensorflow2|tensorflow>-<cpu|rocm>:latest
适用机器类型:
- CPU-only
- CUDA-capable GPUs
- ROCm-capable GPUs
注:The cpu option does not provide GPU acceleration support which is strongly recommended for acceleration of the Vitis AI :ref:`Quantization process <quantization-process>`. The pre-built cpu container should only be used when a GPU is not available on the host machine.
(原文详细介绍了在NVIDIA器件上支持CUDA GPU的vitis-ai搭建)
注:vitis-ai补丁安装:Vitis-AI/docs/_sources/docs/install/patch_instructions.rst.txt
<2>安装交叉编译环境
By default, the cross compiler will be installed in ~/petalinux_sdk_2023.1. The ~/petalinux_sdk_2023.1 path is recommended for the installation. Regardless of the path you choose for the installation, make sure the path has read-write permissions. In this quickstart, it is installed in ~/petalinux_sdk_2023.1
在bash中执行:
[Host] $ cd Vitis-AI/board_setup/vek280
[Host] $ sudo chmod u+r+x host_cross_compiler_setup.sh
[Host] $ ./host_cross_compiler_setup.sh
注:为下载相关资源,执行前的软件安装源为清华源,也可参考:Vitis-AI/docs/_sources/docs/install/China_Ubuntu_servers.

When the installation is complete, follow the prompts and execute the following command:
source ~/petalinux_sdk_2023.1/environment-setup-cortexa72-cortexa53-xilinx-linux
The DPU implements an efficient tensor-level instruction set designed to support and accelerate various popular convolutional neural networks, such as VGG, ResNet, GoogLeNet, YOLO, SSD, and MobileNet, among others.
The DPU supports on AMD Zynq™ UltraScale+™ MPSoCs, the Kria™ KV260, Versal™ and Alveo cards. It scales to meet the requirements of many diverse applications in terms of throughput, latency, scalability, and power.


Zynq ™ UltraScale+ ™ MPSoC: DPUCZDX8G(workflow-system-integration.rst.txt at master
The DPUCZDX8G IP has been optimized for Zynq UltraScale+ MPSoC. You can integrate this IP as a block in the programmable logic (PL) of the selected Zynq UltraScale+ MPSoCs with direct connections to the processing system (PS). The DPU is user-configurable and exposes several parameters which can be specified to optimize PL resources or customize enabled features.
下载地址:
| Product Guide | Platforms | Vitis AI Release | Reference Design | IP-only Download |
|---|---|---|---|---|
| DPUCV2DX8G PG425 | VEK280/V70/Vx2802 | 3.5 | Download | Get IP |
| DPUCV2DX8G PG425 | VE2302(see note) | 3.5 | Early Access | Early Access |
| DPUCZDX8G PG338 | MPSoC & Kria K26 | 3.0 | Download | Get IP |
| DPUCVDX8G PG389 | VCK190 | 3.0 | Download | Get IP |
For MPSoC and Versal AI Core (non AIE-ML devices) please refer to the /dpu subdirectory in the Vitis AI 3.0 Github repository.
部署过程:Vitis-AI-Tutorials/Tutorials/Vitis-AI-Vivado-TRD at 2.0 · Xilinx/Vitis-AI-Tutorials (github.com)


2.实例




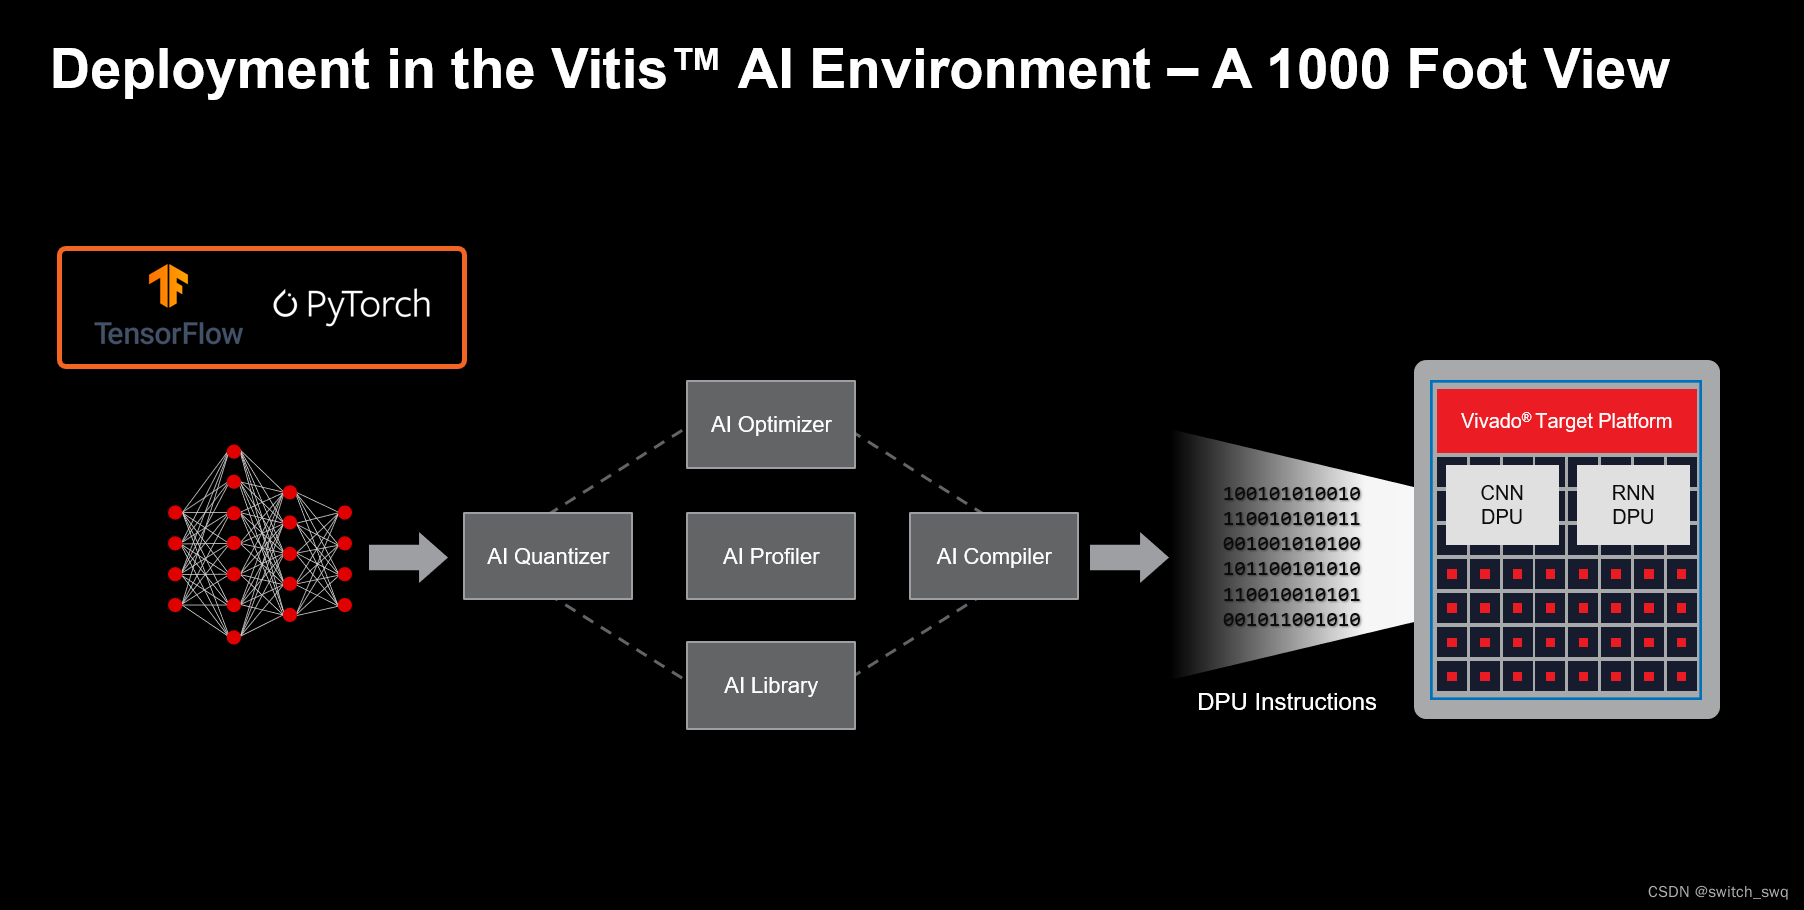
3.vitis-ai的解决方案
The Vitis AI solution is packaged and delivered as follows:
- AMD open download: pre-built target images integrating the DPU
- Vitis AI docker containers: model development tools
- Vitis AI github repository: model deployment libraries, setup scripts, examples and reference designs
4.vitis-ai工具链
Model Development
Vitis AI Model Zoo
The :ref:`Vitis AI Model Zoo <workflow-model-zoo>` includes optimized deep learning models to speed up the deployment of deep learning inference on adaptable AMD platforms. These models cover different applications, including ADAS/AD, video surveillance, robotics, and data center. You can get started with these pre-trained models to enjoy the benefits of deep learning acceleration.
Vitis AI Model Inspector
The :ref:`Vitis AI Model Inspector <model-inspector>` is used to perform initial sanity checks to confirm that the operators and sequence of operators in the graph is compatible with Vitis AI. Novel neural network architectures, operators, and activation types are constantly being developed and optimized for prediction accuracy and performance. Vitis AI provides mechanisms to leverage operators that are not natively supported by your specific DPU target.
Vitis AI Optimizer
The :ref:`Vitis AI Optimizer <model-optimization>` exploits the notion of sparsity to reduce the overall computational complexity for inference by 5x to 50x with minimal accuracy degradation. Many deep neural network topologies employ significant levels of redundancy. This is particularly true when the network backbone is optimized for prediction accuracy with training datasets supporting many classes. In many cases, this redundancy can be reduced by “pruning” some of the operations out of the graph.
Vitis AI Quantizer
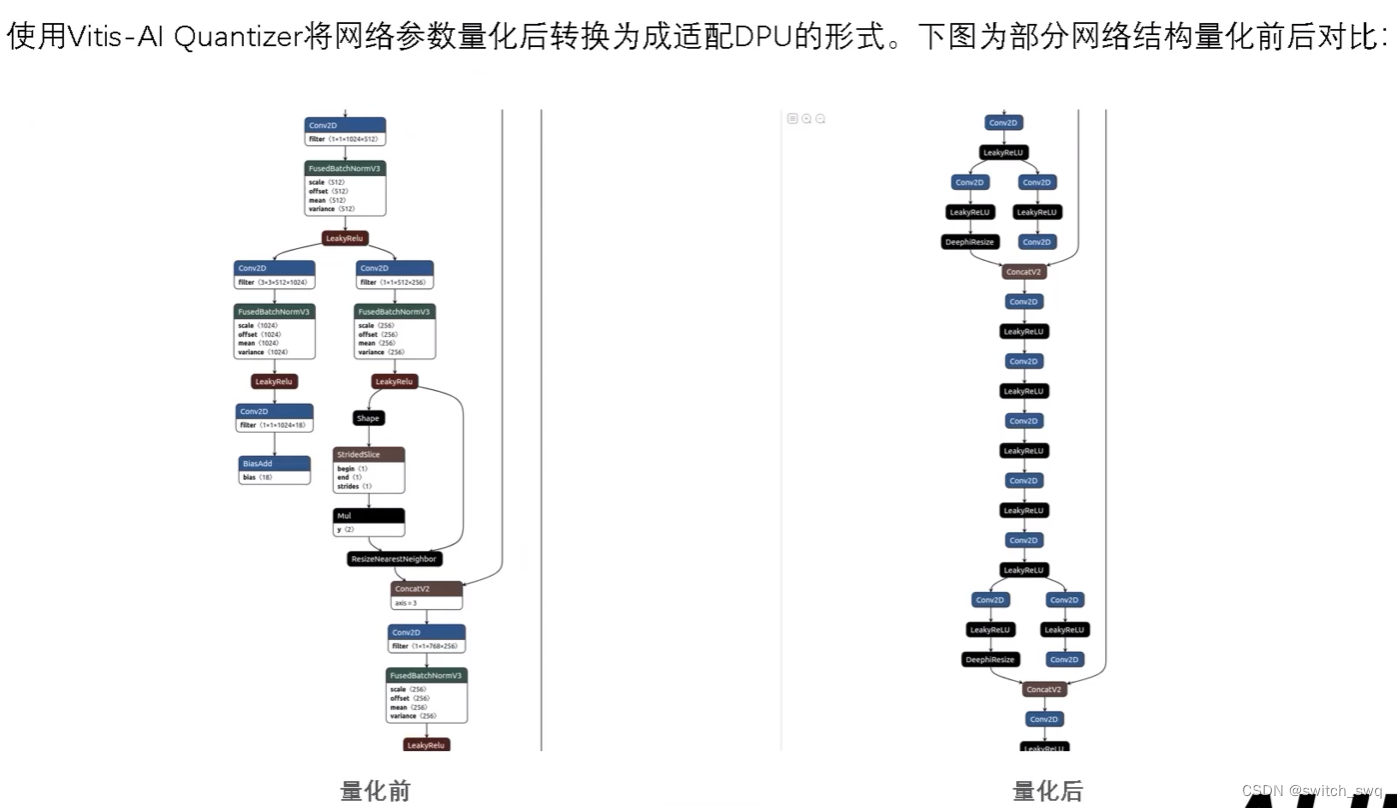
The :ref:`Vitis AI Quantizer <model-quantization>`, integrated as a component of either TensorFlow or PyTorch, converts 32-bit floating-point weights and activations to fixed-point integers like INT8 to reduce the computing complexity without losing prediction accuracy. The fixed-point network model requires less memory bandwidth and provides faster speed and higher power efficiency than the floating-point model.
Vitis AI Compiler
The :ref:`Vitis AI Compiler <model-compilation>` maps the AI quantized model to a highly-efficient instruction set and dataflow model. The compiler performs multiple optimizations; for example, batch normalization operations are fused with convolution when the convolution operator precedes the normalization operator. As the DPU supports multiple dimensions of parallelism, efficient instruction scheduling is key to exploiting the inherent parallelism and potential for data reuse in the graph. The Vitis AI Compiler addresses such optimizations.
Model Deployment
Vitis AI Runtime
The :ref:`Vitis AI Runtime <vitis-ai-runtime>` (VART) is a set of low-level API functions that support the integration of the DPU into software applications. VART is built on top of the Xilinx Runtime (XRT) amd provides a unified high-level runtime for both Data Center and Embedded targets. Key features of the Vitis AI Runtime API include:
Asynchronous submission of jobs to the DPU.
Asynchronous collection of jobs from the DPU.
C++ and Python API implementations.
Support for multi-threading and multi-process execution.
Vitis AI Library
The :ref:`Vitis AI Library <vitis-ai-library>` is a set of high-level libraries and APIs built on top of the Vitis AI Runtime (VART). The higher-level APIs included in the Vitis AI Library give developers a head-start on model deployment. While it is possible for developers to directly leverage the Vitis AI Runtime APIs to deploy a model on AMD platforms, it is often more beneficial to start with a ready-made example that incorporates the various elements of a typical application, including:
Simplified CPU-based pre and post-processing implementations.
Vitis AI Runtime integration at an application level.
Vitis AI Profiler
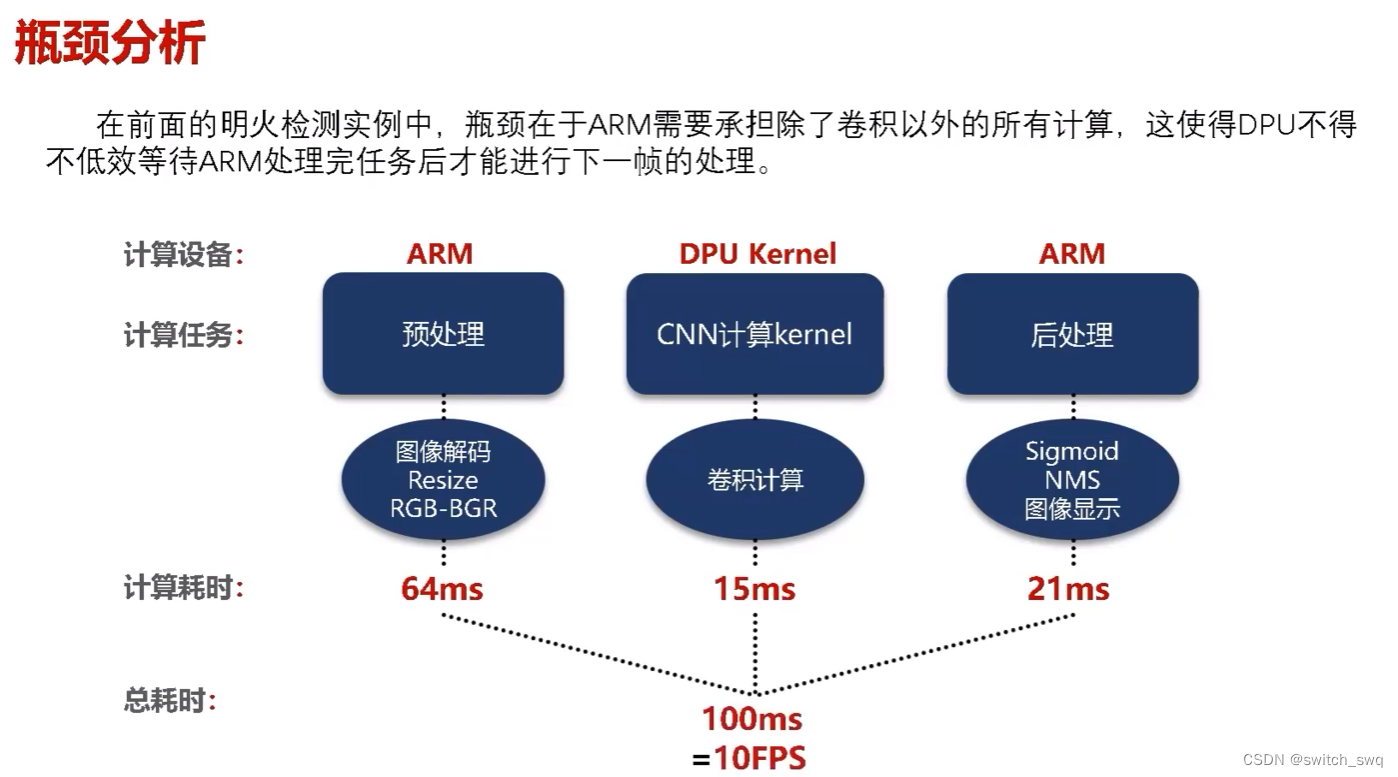
The :ref:`Vitis AI Profiler <vitis-ai-profiler>` profiles and visualizes AI applications to find bottlenecks and allocates computing resources among different devices. It is easy to use and requires no code changes. It can trace function calls and run time, and also collect hardware information, including CPU, DPU, and memory utilization.
模型开发:示例模型、检查器(语法、适用性)、优化器(稀疏连接)、量化器(位宽)、编译器(DPU指令)
模型部署:VART(DPU API)、Library(优化预处理、后处理)、分析器(各环节运行时间)
二.Docker环境搭建
在第一部分“安装的准备”已经介绍了搭建的两种方法。


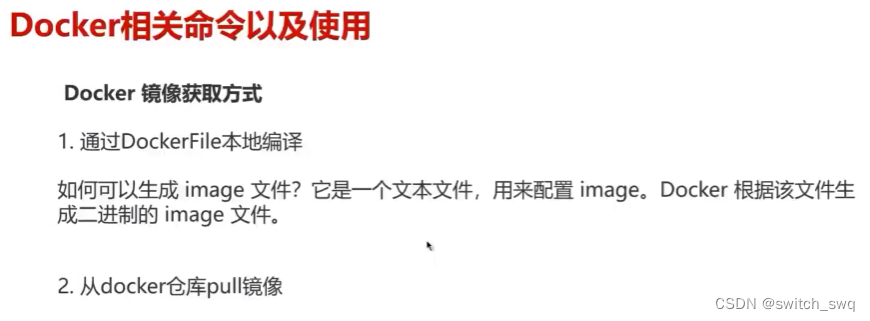
sudo apt-get remove docker-engine docker-ce docker.iosudo apt-get install curlcurl -fsSL https://download.docker.com/linux/ubuntu/gpg | sudo apt-key add -sudo apt-get update && sudo apt install docker-ce docker-ce-cll containerd.iosystemctl status dockersudo docker run hello-worldsudo usermod -aG docker $USERnewgrp dockerdocker run hello-worlddocker infodocker imagesdocker ps -a
若安装docker-ce失败:
docker-ce | 镜像站使用帮助 | 清华大学开源软件镜像站 | Tsinghua Open Source Mirror
下载vitis-ai的docker:
xilinx/vitis-ai-cpu - Docker Image | Docker Hub
xilinx/vitis-ai - Docker Image | Docker Hub
docker pull xilinx/vitis-ai使用git命令下载vitis-ai
git clone https://github.com/Xilinx/Vitis-AI启动docker环境:vitis-ai目录下运行脚本


可以看到其工作目录为workspace,上机目录直接为系统根目录:

而且这个docker预装了conda,进入 tensorflow 的conda并打印其组件:

其他docker命令:Docker最新超详细版教程通俗易懂(基础版) - 知乎 (zhihu.com)
三.实例
1.下载示例模型
在model_zoo文件夹内可以浏览各种支持的模型,这里我们选择tf_yolov3_3.5,打开model_info.md文件:
# YOLOv3### Contents
1. [Use Case and Application](#Use-Case-and-Application)
2. [Specification](#Specification)
3. [Paper and Architecture](#Paper-and-Architecture)
4. [Dataset Preparation](#Dataset-Preparation)
5. [Use Guide](#Use-Guide)
6. [License](#License)
7. [Note](#Note)### Use Case and Application- Classic Object Detection- Trained on VOC dataset### Specification| Metric             | Value                                   |
| :----------------- | :-------------------------------------- |
| Framework          | TensorFlow2                             |
| Prune Ratio        | 0%                                      |
| FLOPs              | 65.63G                                  |
| Input Dims (H W C) | 416,416,3                               |
| FP32 Accuracy      | 0.7846 mAP                              |
| INT8 Accuracy      | 0.7729 mAP                              |
| Train Dataset      | voc07+12_trainval	                   |
| Test Dataset       | voc07_test                              |
| Supported Platform | GPU, VEK280, V70                        |### Paper and Architecture 1. Network Architecture: YOLOv32. Paper Link: https://arxiv.org/abs/1804.02767### Dataset Preparation1. Dataset descriptionThe model is trained on VOC2007_trainval + VOC2012_trainval and tested on VOC2007_test.2. Download and prepare the datasetOur script `prepare_data.sh` downloads and prepares the dataset automatically. But if you have downloaded the VOC2007 test set before, you could place them in the `data` directory manually and choose to skip downloading the dataset when the script asking for a choice. Run the script: ```shellbash code/test/dataset_tools/prepare_data.sh```
Dataset diretory structure```shell# VOCdevkit is unpacked from the downloaded data# voc2007_test is generated by our code for data preparation+ data+ VOCdevkit+ VOC2007+ ImageSets+ JPEGImages+ Annotations+ voc2007_test+ images+ 000001.jpg+ 000002.jpg+ ...+ test.txt+ gt_detection.txt```### Use Guide1. EvaluationConfigure the model path and data path in [code/test/run_eval.sh](code/test/run_eval.sh)```shellbash code/test/run_eval.sh```### LicenseApache License 2.0For details, please refer to **[Vitis-AI License](https://github.com/Xilinx/Vitis-AI/blob/master/LICENSE)**### Note1. Data preprocess```data channel order: RGB(0~255)input = input / 255resize: keep aspect ratio of the raw image and resize it to make the length of the longer side equal to 416padding: pad along the short side with 0.5 to generate the input image with size = 416 x 416```
2. Node information```input node: 'input_1:0'output nodes: 'conv2d_59/BiasAdd:0', 'conv2d_67/BiasAdd:0', 'conv2d_75/BiasAdd:0'```### Quantize1. Quantize tool installationPlease refer to [vai_q_tensorflow](../../../src/vai_quantizer/vai_q_tensorflow1.x)2. Quantize workspaceYou could use code/quantize/ folder.
详细阅读该文件介绍,接下来下载所需文件:
在model_zoo文件夹,运行downloader.py,下载tf_yolov3_3.5


下载后对文件进行解压:

通常model-zoo提供的模型文件结构如下:
tensorflow:
├── code                            # Contains test code that can execute the model on the target and showcase model performance.
│
│
├── readme.md                       # Documents the environment requirements, data pre-processing requirements, and model information.
│                                     Developers should refer to this to understand how to test the model with scripts.
│
├── data                            # The dataset target directory that can be used for model verification and training.
│                                     When test or training scripts run successfully, the dataset will be placed in this directory.
│
├── quantized
│   └── quantize_eval_model.pb      # Quantized model for evaluation.
│
└── float└── frozen.pb                   # The floating-point frozen model is used as the input to the quantizer.The naming of the protobuf file may differ from the model naming used in the model list.
pytorch:
├── code                            # Contains test and training code.
│
│
├── readme.md                       # Contains the environment requirements, data pre-processing requirements and model information.
│                                     Developers should refer to this to understand how to test and train the model with scripts.
│
├── data                            # The dataset target directory that is used for model verification and training.
│                                     When test or training scripts run successfully, the dataset will be placed in this directory.
│
├── qat                             # Contains the QAT (Quantization Aware Training) results.
│                                     For some models, the accuracy of QAT is higher than with Post Training Quantization (PTQ) methods.
│                                     Some models, but not all, provide QAT reference results, and only these models have a QAT folder.
│
├── quantized
│   ├── _int.pth                    # Quantized model.
│   ├── quant_info.json             # Quantization steps of tensors got. Please keep it for evaluation of quantized model.
│   ├── _int.py                     # Converted vai_q_pytorch format model.
│   └── _int.xmodel                 # Deployed model. The name of different models may be different.
│                                     For some models that support QAT you could find better quantization results in 'qat' folder.
│
│
└── float└── _int.pth                    # Trained float-point model. The pth name of different models may be different.Path and model name in test scripts could be modified according to actual situation.
打开下载好的tf_yolov3_3.5文件夹,其中按照之前的model_info文件所叙述的内容,进行“Download and prepare the dataset”(不是必须运行):
bash code/test/dataset_tools/prepare_data.sh下载好的文件结构也在md文件中,在docker中执行评估(不是必须运行)(docker外需配置环境cv2、numpy):
bash code/test/run_eval.sh评估结果:

安装snap和snapcraft后安装模型查看工具netron:
sudo apt-get install snap
sudo apt-get install snapcraft
sudo snap install netron
然后就可以查看float文件夹下的pb文件网络的结构:


1. Data preprocess```data channel order: RGB(0~255)input = input / 255resize: keep aspect ratio of the raw image and resize it to make the length of the longer side equal to 416padding: pad along the short side with 0.5 to generate the input image with size = 416 x 416```
2. Node information```input node: 'input_1:0'output nodes: 'conv2d_59/BiasAdd:0', 'conv2d_67/BiasAdd:0', 'conv2d_75/BiasAdd:0'```
可以看到在第59、67、75个conv2d节点后进行了输出:

2.模型量化
在上述md文件最后给出了量化指引:
### Quantize1. Quantize tool installationPlease refer to [vai_q_tensorflow](../../../src/vai_quantizer/vai_q_tensorflow1.x)2. Quantize workspaceYou could use code/quantize/ folder.量化参考vitis-ai文件夹下src...和code/quantize/里的内容
在code/quantize/中的config.ini是配置文件,包括量化后模型名、存放位置为/quantized及各种参数;
打开quantize.sh脚本,关注以下内容:
source ./config.inivai_q_tensorflow quantize \--input_frozen_graph $FLOAT_MODEL \--input_nodes $Q_INPUT_NODE \--input_shapes ?,$INPUT_HEIGHT,$INPUT_WIDTH,3 \--output_nodes $Q_OUTPUT_NODE \--input_fn $CALIB_INPUT_FN \--method $METHOD \--gpu $GPUS \--calib_iter $CALIB_ITER \--output_dir $QUANTIZE_DIR \可以看到在量化过程中其调用config.ini中的各种参数,然后通过src/vai_quantizer/vai_q_tensorflow1.x工具进行量化,转到对应位置,在readme文件中可以看到详细信息:
Vitis-AI/src/vai_quantizer/vai_q_tensorflow1.x at master · Xilinx/Vitis-AI (github.com)

#目的:
The process of inference is computation intensive and requires a high memory bandwidth to satisfy the low-latency and high-throughput requirement of edge applications.#介绍(vitis-ai工具只包含量化工具,修建工具在optimizer中):
Quantization and channel pruning techniques are employed to address these issues while achieving high performance and high energy efficiency with little degradation in accuracy. Quantization makes it possible to use integer computing units and to represent weights and activations by lower bits, while pruning reduces the overall required operations. In the Vitis AI quantizer, only the quantization tool is included. The pruning tool is packaged in the Vitis AI optimizer. Contact the support team for the Vitis AI development kit if you require the pruning tool.
将32位浮点数转化为8位整数:

量化的步骤:
## Running vai_q_tensorflow
### Preparing the Float Model and Related Input Files
|1|frozen_graph.pb|Floating-point frozen inference graph. Ensure that the graph is the inference graph rather than the training graph.|
|2|calibration dataset|A subset of the training dataset containing 100 to 1000 images.|
|3|input_fn|An input function to convert the calibration dataset to the input data of the frozen_graph during quantize calibration. Usually performs data pre-processing and augmentation.|
#### **Generating the Frozen Inference Graph**
Training a model with TensorFlow 1.x creates a folder containing a GraphDef file (usually ending with *a.pb* or *.pbtxt* extension) and a set of checkpoint files. What you need for mobile or embedded deployment is a single GraphDef file that has been “frozen,” or had its variables converted into inline constants, so everything is in one file. To handle the conversion, TensorFlow provides *freeze_graph.py*, which is automatically installed with the vai_q_tensorflow quantizer.
#### **Preparing the Calibration Dataset and Input Function**
The calibration set is usually a subset of the training/validation dataset or actual application images (at least 100 images for performance). The input function is a Python importable function to load the calibration dataset and perform data preprocessing. The vai_q_tensorflow quantizer can accept an input_fn to do the preprocessing, which is not saved in the graph. If the preprocessing subgraph is saved into the frozen graph, the input_fn only needs to read the images from dataset and return a feed_dict.
### Quantizing the Model Using vai_q_tensorflow
### Generating the Quantized Model
- *quantize_eval_model.pb* is used to evaluate the CPU/GPUs, and can be used to simulate the results on hardware.
|1|deploy_model.pb|Quantized model for the Vitis AI compiler (extended TensorFlow format) for targeting DPUCZDX8G implementations.|
|2|quantize_eval_model.pb|Quantized model for evaluation (also, the Vitis AI compiler input for most DPU architectures, like DPUCAHX8H, and DPUCADF8H).|
### (Optional) Fast Finetune
Fast finetune adjusts the weights layer by layer with calibration dataset and may get better accuracy for some models. It will take much longer time than normal PTQ (still shorter than QAT as calibration dataset is much smaller than train dataset) and is disabled by default to save time, and can be turned on to try to improve the performance if you see accuracy issues.
### (Optional) Exporting the Quantized Model to ONNX
The quantized model is tensorflow protobuf format by default. If you want to get a ONNX format model, just add *output_format* to the *vai_q_tensorflow* command.
### (Optional) Evaluating the Quantized Model
If you have scripts to evaluate floating point models, like the models in [Vitis AI Model Zoo](https://github.com/Xilinx/Vitis-AI/tree/master/model_zoo), apply the following two changes to evaluate the quantized model:...
### (Optional) Dumping the Simulation Results## vai_q_tensorflow Quantization Aware Training
Quantization aware training (QAT, also called *quantize finetuning* in [Quantization Overview](#quantization-overview)) is similar to float model training/finetuning, but in QAT, the vai_q_tensorflow APIs are used to rewrite the float graph to convert it to a quantized graph before the training starts. The typical workflow is as follows:...
### Generated Files
### QAT APIs for TensorFlow 1.x## Converting to Float16 or BFloat16
The vai_q_tensorflow supports data type conversions for float models, including Float16, BFloat16, Float, and Double. To achieve this, you can add *convert_datatype* to the vai_q_tensorflow command. ## vai_q_tensorflow Supported Operations and APIs
在准备阶段包括:推理图的固化(freeze_graph.py已安装在vai_q_tensorflow内)、准备验证数据集和输入函数...

关于vai_q_tensorflow命令的详细使用见readme中的vai_q_tensorflow Usage,例:
#show help:
$vai_q_tensorflow --help#quantize:
$vai_q_tensorflow quantize --input_frozen_graph frozen_graph.pb \
--input_nodes inputs \
--output_nodes predictions \
--input_shapes ?,224,224,3 \
--input_fn my_input_fn.calib_input#dump quantized model:
$vai_q_tensorflow dump --input_frozen_graph quantize_results/quantize_eval_model.pb \
--input_fn my_input_fn.dump_input
将 /float/文件夹下的fb文件重命名为float.fb,在docker环境中转到/quantize文件夹下运行量化脚本(下载包含运行后文件,非必要):
bash quantize.sh运行结果如下:

量化后的模型文件位于/quantize的pb文件,继续运行/quantize下的evaluate_quantize_model.sh文件(非必要)对量化后的模型进行评估,结果如下:

3.模型编译
四.mpsoc快速开始
见:Vitis-AI/docs/_sources/docs/quickstart/mpsoc.rst.txt at v3.5 · Xilinx/Vitis-AI (github.com)
(适合xilinx官方开发板zcu102、zcu104、kv260)
五.官方资料
vivado_integration:

vitis_integration:

vek280_setup:

