CSS语言介绍
- 前言
- 正文
- 1、CSS 快速了解
- 2、CSS 应用方式
- 2.1 在标签上应用
- 2.2 在head标签中写style标签
- 2.3 写到文件中
- 3、问题探讨:用Flask框架开发不方便
- 4、选择器
- 4.1 ID选择器
- 4.2 类选择器
- 4.3 标签选择器
- 4.4 属性选择器
- 4.5 后代选择器
- 4.6 注意事项
- 5、样式
- 5.1 高度和宽度
- 5.2 块级和行内标签
- 5.2.1 行内标签对 height 和 width 属性生效
- 5.2.2 块级与行内标签的转换
- 5.3 字体和颜色
- 5.4 浮动
- 5.5 内边距
- 5.6 外边距
- 5.7 内容居中
- 5.7.1 文本居中
- 5.7.2 区域居中
- 5.8 鼠标悬停hover (伪类)
- 5.9 跟随after (伪类)
- 5.10 位置position
- 5.10.1 fixed
- 5.10.2 relative
- 5.10.3 absolute
- 5.11 边框border & 背景色background-color
- 6、案例:小米商城
- 6.1 页面顶部边距修改
- 6.2 页面顶部内容居中
- 6.3 小米商城顶部基础实现
- 6.4 小米商城二级菜单
- 6.5 小米商城推荐区域
- 6.6 小米商城返回顶部 position-fixed 案例
- 6.7 小米商城 position-relative & absolute 案例
前言
通过本篇文章,可以快速了解 CSS 、CSS的应用方式、选择器、样式等,并通过小米商城的案例进行展示,对于学习 Django 框架的后端开发者,可以快速了解前端相关的知识。
正文
1、CSS 快速了解
CSS,专门用来"美化"标签的语言;
本篇文章的主要目的:了解CSS基础,能够写简单的页面 & 看懂CSS样式 & 修改CSS样式
<img src="..." style="height: 100px">
2、CSS 应用方式
2.1 在标签上应用
<img src="..." style="height: 100px">
2.2 在head标签中写style标签
<!DOCTYPE html>
<html lang="en">
<head><meta charset="UTF-8"><title>Title</title><style>.c1{color:red;}</style>
</head>
<body><h1 class="c1">用户登录</h1><form method="post" action="/login">用户名:<input type="text" name="username">密码:<input type="text" name="password"><input type="submit" value="提交"></form>
</body>
</html>

2.3 写到文件中
- css文件
.c1{color:red;
}
.c1{color:green;
}
css 文件要放在项目目录下的 static 目录下
- html文件
<!DOCTYPE html>
<html lang="en">
<head><meta charset="UTF-8"><title>Title</title><link rel="stylesheet" href="/static/commons.css">
</head>
<body>
<h1 class="c1">用户注册</h1>
<div><form method="get" action="/do/reg">用户名:<input type="text" name="user">密码:<input type="password" name="pwd"><input type="submit" value="submit提交"></form>
</div>
<h1>用户注册POST请求</h1>
<div><form method="post" action="/do/reg">用户名:<input type="text" name="user">密码:<input type="password" name="pwd"><input type="submit" value="submit提交"></form>
</div>
</body>
</html>

3、问题探讨:用Flask框架开发不方便
截止目前的学习,都是用 Flask 框架进行开发,会需要以下问题:
- 每次都要重启
- 规定有些文件必须放在特定的文件夹内
- 新创建页面,要创建一个新的函数和HTML文件
有没有一种方法,可以快速的编写前端代码并查看效果,最后将页面集成到 Flask 中来?
PyCharm 提供了一种非常便捷开发前端页面的工具:
-
创建新项目
-
在项目目录下创建HTML文件
-
在HTML文件中写标签语言
-
点击右侧的浏览器按键

4、选择器
4.1 ID选择器
<!DOCTYPE html>
<html lang="en">
<head><meta charset="UTF-8"><title>Title</title><style>#c2{color:gold;}</style>
</head>
<body><div id="c2">广东</div>
</body>
</html>

4.2 类选择器
<!DOCTYPE html>
<html lang="en">
<head><meta charset="UTF-8"><title>Title</title><style>.c1{color:red;}</style>
</head>
<body><div class="c1">中国</div>
</body>
</html>

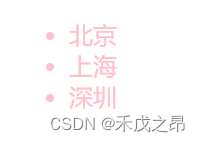
4.3 标签选择器
<!DOCTYPE html>
<html lang="en">
<head><meta charset="UTF-8"><title>Title</title><style>li{color:pink;}</style>
</head>
<body><ul><li>北京</li><li>上海</li><li>深圳</li></ul>
</body>
</html>
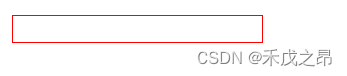
4.4 属性选择器
<!DOCTYPE html>
<html lang="en">
<head><meta charset="UTF-8"><title>Title</title><style>input[type="text"]{border:1px solid red;}</style>
</head>
<body><input type="text">
</body>
</html>
属性选择器还有一种方式:
<!DOCTYPE html>
<html lang="en">
<head><meta charset="UTF-8"><title>Title</title><style>.v1[xx="456"]{color:gold;}</style>
</head>
<body><div class="v1" xx="123">qwe</div><div class="v1" xx="456">rty</div><div class="v1" xx="789">uio</div>
</body>
</html>
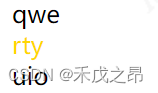
这种方式用到的比较少
4.5 后代选择器
<!DOCTYPE html>
<html lang="en">
<head><meta charset="UTF-8"><title>Title</title><style>.yy li{color:pink;}</style>
</head>
<body><ul><li>北京</li><li>上海</li><li>深圳</li></ul><div class="yy"><ul><li>美国</li><li>英国</li><li>法国</li></ul></div>
</body>
</html>
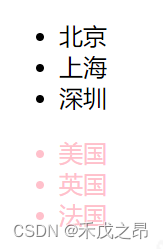
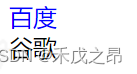
如果只想让第一层的标签生效,可以添加>号
<!DOCTYPE html>
<html lang="en">
<head><meta charset="UTF-8"><title>Title</title><style>}.yy > a{color:blue;}</style>
</head>
<body><div class="yy"><a>百度</a><div><a>谷歌</a></div></div>
</body>
</html>
关于以上5种选择器:
用到比较多的:类选择器、标签选择器、后代选择器
用到比较少的:属性选择器、ID选择器
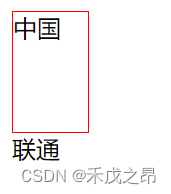
4.6 注意事项
多个样式覆盖的问题:多个选择器时,如果有相同属性,下面的会把上面的覆盖掉
如果不想让上面的被覆盖掉怎么办?
在对应的属性后面添加 !important
<!DOCTYPE html>
<html lang="en">
<head><meta charset="UTF-8"><title>Title</title><style>.c1{color:red !important;border:1px solid red;}.c2{font-size:28px;color:green;}</style>
</head>
<body><div class="c1 c2">中国联通</div>
</body>
</html>
5、样式
5.1 高度和宽度
<!DOCTYPE html>
<html lang="en">
<head><meta charset="UTF-8"><title>Title</title><style>.c1{height:80px;width:50px;}</style>
</head>
<body><div class="c1">中国</div><div>联通</div>
</body>
</html>
注意事项:
- 宽度,支持百分比,
width:50%; - 对于行内标签:默认无效
- 对于块级标签:默认有效
5.2 块级和行内标签
5.2.1 行内标签对 height 和 width 属性生效
- 块级标签
- 行内标签
- css样式:标签 ->
display:inline-block
<!DOCTYPE html>
<html lang="en">
<head><meta charset="UTF-8"><title>Title</title><style>.c1{display:inline-block;height:100px;width:300px;border:1px solid red;}</style>
</head>
<body><span class="c1">中国</span><span class="c1">中国</span><span class="c1">中国</span><span class="c1">中国</span>
</body>
</html>

可以看到让行内标签也具有了块级标签的属性
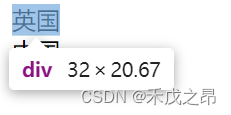
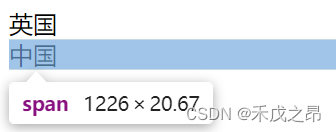
5.2.2 块级与行内标签的转换
<!DOCTYPE html>
<html lang="en">
<head><meta charset="UTF-8"><title>Title</title>
</head>
<body><div style="display:inline;">英国</div><span style="display:block;">中国</span>
</body>
</html>
5.3 字体和颜色
- 颜色 :
color - 大小 :
font-size - 粗细 :
font-weight - 样式 :
font-family - 文字对齐方式 :
text-align、line-height - 边框 :
border
<!DOCTYPE html>
<html lang="en">
<head><meta charset="UTF-8"><title>Title</title><style>.c1{color: #00FFFF;                   /* 字体颜色 */font-size: 20px;                  /* 字体大小 */font-weight: 600;                 /* 字体粗细 */font-family: Microsoft Yahei;     /* 字体样式 */text-align: center;               /* 水平方向居中 */line-height: 50px;                /* 垂直方向居中 */border: 10px solid GOLD;          /* 边框 */}</style>
</head>
<body><div class="c1">中国联通</div><div>中国移动</div>
</body>
</html>

5.4 浮动
先创建以下的 html:
<!DOCTYPE html>
<html lang="en">
<head><meta charset="UTF-8"><title>Title</title>
</head>
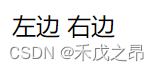
<body><div><span>左边</span><span>右边</span></div>
</body>
</html>
对"右边",增加浮动样式,浮动到右侧
<!DOCTYPE html>
<html lang="en">
<head><meta charset="UTF-8"><title>Title</title>
</head>
<body><div><span>左边</span><span style="float:right">右边</span></div>
</body>
</html>

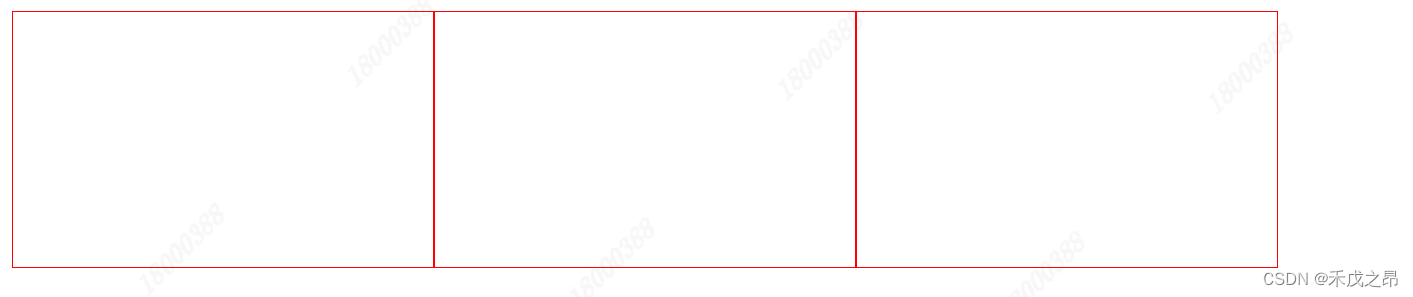
<div> 默认是块级标签,如果让其浮动起来,那么这个块级标签奖不会再占用一整行,而是自己有多大就占用多大
如下所示:
<!DOCTYPE html>
<html lang="en">
<head><meta charset="UTF-8"><title>Title</title><style>.item {float: left;width: 280px;height: 170px;border: 1px solid red;}</style>
</head>
<body>
<div><div class="item"></div><div class="item"></div><div class="item"></div>
</div>
</body>
</html>

如果让标签浮动起来,就会脱离文档流;
例如在下面的代码中,我们将背景颜色设置为了蓝色,但是因为脱离了文档流,在页面上是看不到蓝色的
<!DOCTYPE html>
<html lang="en">
<head><meta charset="UTF-8"><title>Title</title><style>.item {float: left;width: 280px;height: 170px;border: 1px solid red;}</style>
</head>
<body>
<div><div class="item"></div><div class="item"></div><div class="item"></div><div style="clear: both;"></div>
</div>
</body>
</html>
解决办法: 在同级子标签的最下面添加 style="clear: both;"
<!DOCTYPE html>
<html lang="en">
<head><meta charset="UTF-8"><title>Title</title><style>.item {float: left;width: 280px;height: 170px;border: 1px solid red;}</style>
</head>
<body>
<div style="background-color:blue"><div class="item"></div><div class="item"></div><div class="item"></div><div style="clear: both;"></div>
</div>
</body>
</html>

5.5 内边距
内边距:标签的内部设置一点距离
<!DOCTYPE html>
<html lang="en">
<head><meta charset="UTF-8"><title>Title</title><style>.outer {border: 1px solid red;height: 200px;width: 200px;padding-top: 20px;padding-left: 20px;padding-right: 20px;padding-bottom: 20px;}</style>
</head>
<body><div class="outer"><div>听妈妈的话</div><div>小朋友?你是否有很多问号?</div></div>
</body>
</html>
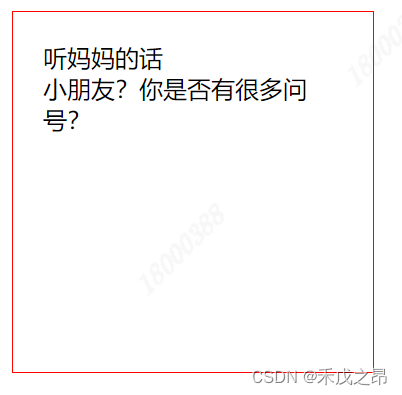
上面的四个上下左右的 padding 可以简写为 padding: 20px 20px 20px 20px,顺序为上右下左(顺时针方向)
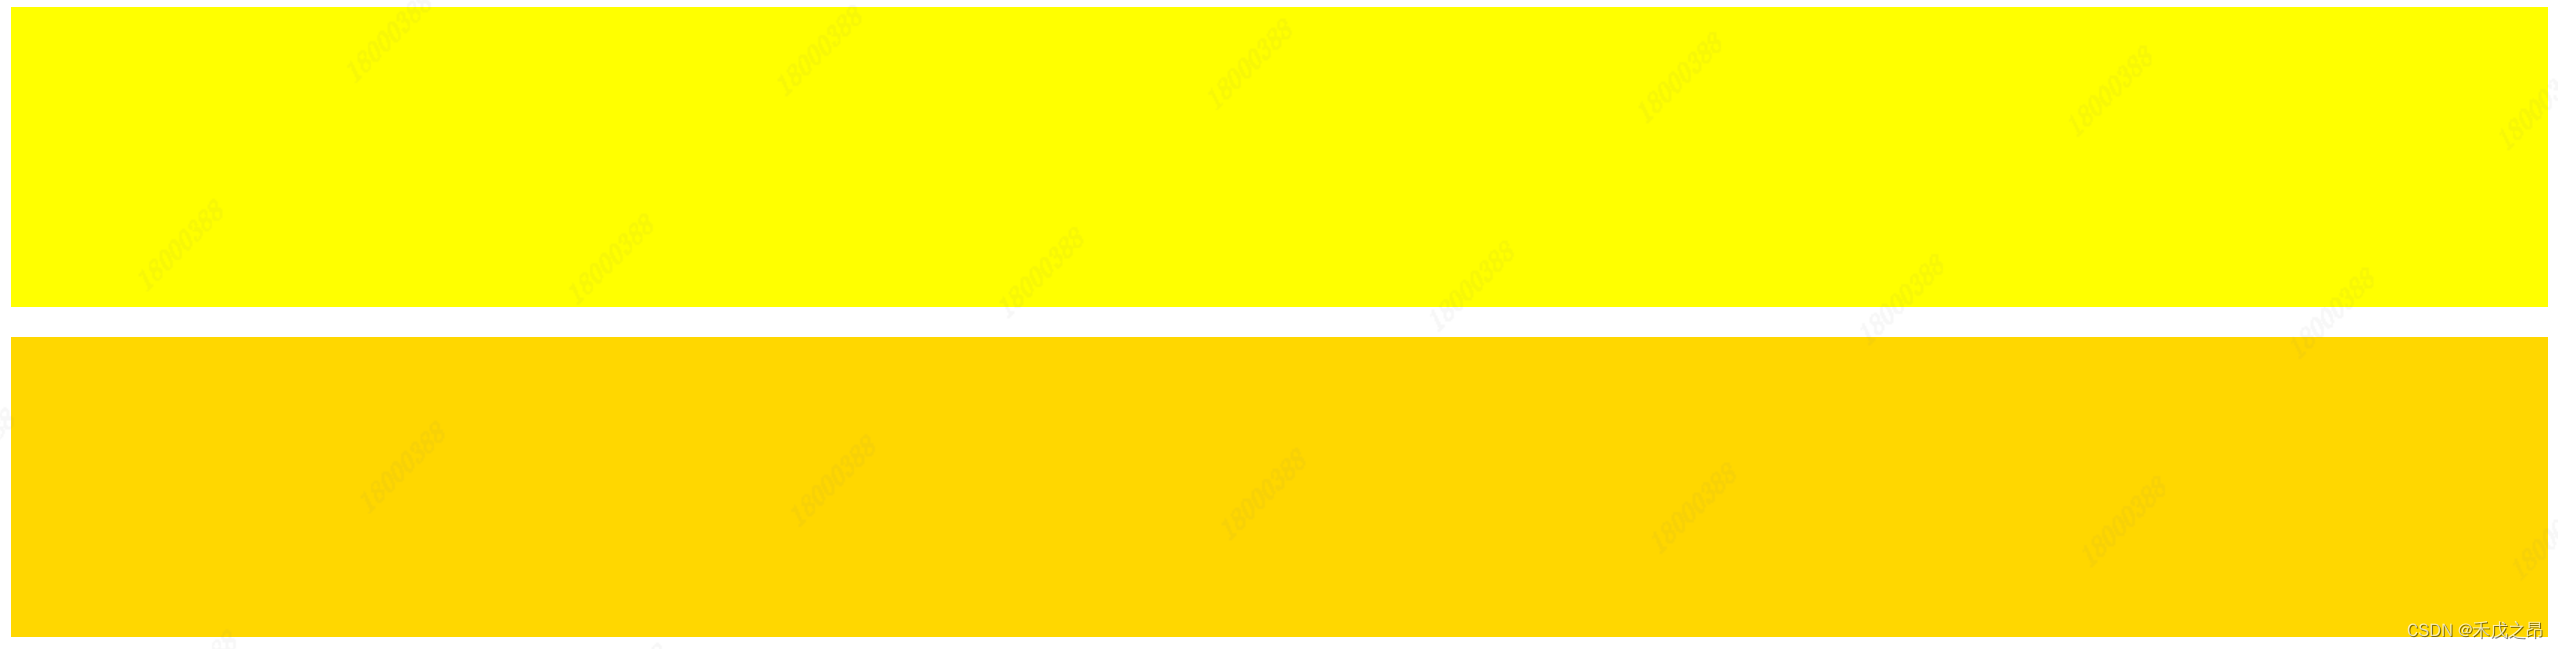
5.6 外边距
<!DOCTYPE html>
<html lang="en">
<head><meta charset="UTF-8"><title>Title</title>
</head>
<body><div style="height: 200px; background-color: yellow;"></div><div style="height: 200px; background-color:gold;"></div>
</body>
</html>

增加外边距之后:
<!DOCTYPE html>
<html lang="en">
<head><meta charset="UTF-8"><title>Title</title>
</head>
<body><div style="height: 200px; background-color: yellow;"></div><div style="height: 200px; background-color:gold; margin-top: 20px;"></div>
</body>
</html>
5.7 内容居中
5.7.1 文本居中
<div style="width=200px; text-align:center">文本居中</div>
5.7.2 区域居中
区域居中,自己要有宽度 width+margin-left:auto;margin-right:auto;
<!DOCTYPE html>
<html lang="en">
<head><style>.container{width:1226px;margin:0 auto;}</style>
</head>
<body><div class="container"></div>
</body>
</html>
5.8 鼠标悬停hover (伪类)
<!DOCTYPE html>
<html lang="en">
<head><meta charset="UTF-8"><title>Document</title><style>.c1 {color:brown;}.c1:hover {color: green;font-size: 20px;}.c2 {width: 100px;height: 50px;border: 3px solid red;}.c2:hover {border: 3px solid green;}.download {display: none;}.app:hover .download {display: block;}</style>
</head>
<body><div class="c1">悬停变成绿色</div><div class="c2">悬停边框变成绿色</div><div class="app"><div>悬停触发显示二维码</div><div class="download"><img src="https://cdn.cnbj1.fds.api.mi-img.com/mi-mall/78c30d4f259ed43ab20e810a522a6249.png" alt=""></div></div>
</body>
</html>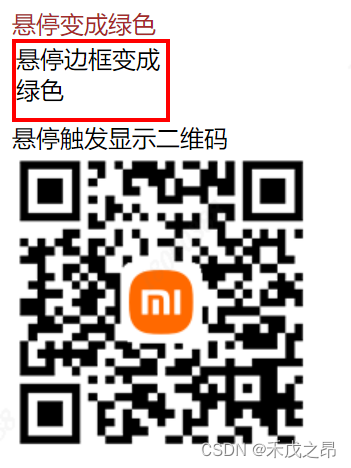
5.9 跟随after (伪类)
<!DOCTYPE html>
<html lang="en">
<head><meta charset="UTF-8"><title>Document</title><style>.c1:after {content: "跟上了after"}</style>
</head>
<body><div class="c1">demo1</div><div class="c1">demo2</div>
</body>
</html>
在清除浮动时可以用到 after:
<!DOCTYPE html>
<html lang="en">
<head><meta charset="UTF-8"><title>Document</title><style>.clearfix:after {content: "";display: block;clear: both;}.item {float: left;}</style>
</head>
<body><div class="clearfix"><div class="item">div1</div><div class="item">div2</div><div class="item">div3</div></div>
</body>
</html>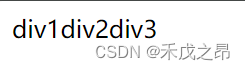
注意:这种使用方法很重要
5.10 位置position
5.10.1 fixed
fixed :固定在窗口的某个位置,返回顶部案例详见 6.6小米商城返回顶部 position-fixed 案例
在这里简单介绍下对话框实现,通过 fixed 可以将对话框固定在页面的中间位置:
<!DOCTYPE html><html lang="en"><head><meta charset="UTF-8"><title>Document</title><style>body {margin: 0;}.dialog {position: fixed;height: 300px;width: 500px;background-color: white;left: 0;right: 0;margin: 0 auto;top: 200px;z-index: 1000; /* 防止对话框被mask遮住 */}.mask {background-color: black;position: fixed;left: 0;right: 0;top: 0;bottom: 0;opacity: 0.7;z-index: 999; /* 防止对话框被mask遮住 */}</style></head><body><div style="height: 1000px;"></div><!-- 如果css中不加 z-index 设置优先级的话 --><!-- 那么下面的 dialog 如果在 mask 的上面,对话框就显示不出来了 --><!-- 设置优先级可以解决此问题 --><div class="dialog"></div><div class="mask"></div></body></html>
5.10.2 relative
5.10.3 absolute
relative 和 absolute 一般联合起来使用,一个区域设为 absolute,一个区域设为 relative ,relative 区域可以在 absolute 内任意位置出现,如下:
<!DOCTYPE html>
<html lang="en">
<head><meta charset="UTF-8"><title>Title</title><style>.c1{height:300px;width:500px;border:1px solid red;margin:100px;position:relative;}.c2{height:59px;width:59px;background-color:green;position:absolute;right:0;top:0;}</style>
</head>
<body><div class="c1"><div class="c2"></div></div>
</body>
</html>
<!DOCTYPE html>
<html lang="en">
<head><meta charset="UTF-8"><title>Title</title><style>.c1{height:300px;width:500px;border:1px solid red;margin:100px;position:relative;}.c2{height:59px;width:59px;background-color:green;position:absolute;right:0;bottom:0;}</style>
</head>
<body><div class="c1"><div class="c2"></div></div>
</body>
</html>
也会结合小米商城的案例进行展示,详情见6.7小米商城 position-relative & absolute 案例
5.11 边框border & 背景色background-color
其实在以上案例中已经使用了很多,不做过多介绍了
<!DOCTYPE html>
<html lang="en">
<head><meta charset="UTF-8"><title>Document</title><style>.left {float: left;}.c1 {height: 200px;width: 300px;border: 3px dotted red;margin: 50px;}.c2 {height: 200px;width: 300px;border: 3px solid red;border-left: 3px solid green;margin: 50px;}.c3 {height: 200px;width: 300px;margin: 50px;background-color: bisque;border-left: 2px solid transparent;  /* 透明色 */}.c3:hover {border-left: 2px solid rgb(35, 211, 19);}</style>
</head>
<body><div class="c1 left">我是虚线~</div><div class="c2 left">我是实线~左边框是绿色,上下右边框是红色</div><div class="c3 left">我是透明色,鼠标碰到我边框会变色哦~</div><div style="clear: both;"></div>
</body>
</html>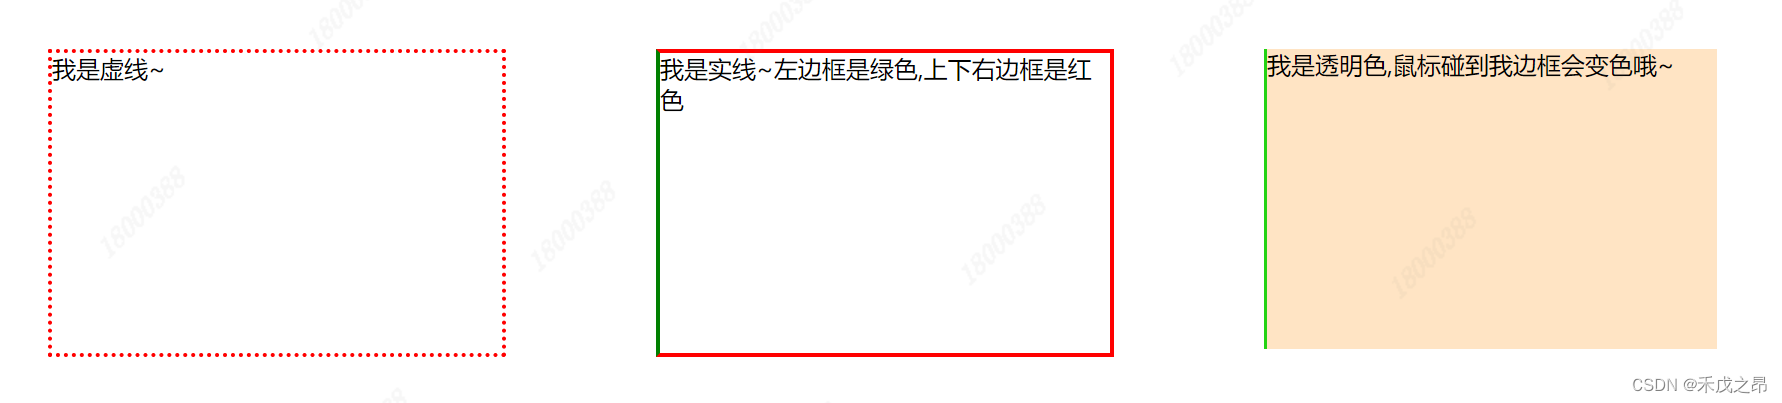
6、案例:小米商城
6.1 页面顶部边距修改
<!DOCTYPE html>
<html lang="en">
<head><meta charset="UTF-8"><title>Title</title><style>.header{height:38px;background-color:black;}.header .menu{float:left;color:white;}.header .account{float:right;color:white;}</style>
</head>
<body><div class="header"><div class="menu">左边</div><div class="account">右边</div><div style="clear:both"></div></div>
</body>
</html>

运行后可以看到在两端有留白
这是因为 <body> 标签默认是有边距的
可以通过修改 <body> 的 margin 属性进行修改:
<!DOCTYPE html>
<html lang="en">
<head><meta charset="UTF-8"><title>Title</title><style>body{margin:0;}.header{height:38px;background-color:black;}.header .menu{float:left;color:white;}.header .account{float:right;color:white;}</style>
</head>
<body><div class="header"><div class="menu">左边</div><div class="account">右边</div><div style="clear:both"></div></div>
</body>
</html>

6.2 页面顶部内容居中
通过设置 margin:0 auto; 边距为0,左右边距相等,居中;
注意:在使用 margin 属性设置居中时,要对 width 属性进行设置
<!DOCTYPE html>
<html lang="en">
<head><meta charset="UTF-8"><title>Title</title><style>body{margin:0;}.header{background-color:black;}.container{width:1226px;margin:0 auto;}.header .menu{float:left;color:white;}.header .account{float:right;color:white;}</style>
</head>
<body><div class="header"><div class="container"><div class="menu">左边</div><div class="account">右边</div><div style="clear:both"></div></div></div>
</body>
</html>

6.3 小米商城顶部基础实现
<!DOCTYPE html>
<html lang="en">
<head><meta charset="UTF-8"><title>Title</title><style>body{margin:0;}.header{background-color:#333;}.container{width:1226px;margin:0 auto;}.header .menu{float:left;color:white;}.header .account {float:right;color:white;}.header a {color: #b0b0b0;line-height: 40px;display: inline-block;font-size: 12px;margin-right:5px;}</style>
</head>
<body>
<div class="header"><div class="container"><div class="menu"><a>小米官网</a><a>小米商城</a><a>小米澎湃OS</a><a>IoT</a><a>云服务</a><a>天星数科</a><a>有品</a><a>小爱开放平台</a><a>资质证照</a><a>协议规则</a><a>下载app</a><a>Select Location</a></div><div class="account"><a>登录</a><a>注册</a><a>消息通知</a></div><div style="clear: both;"></div></div>
</div>
</body>
</html>

注意1:父级标签没有高度,会被子级标签支撑起来
注意2:如果存在浮动,一定加div style="clear: both;"></div>
6.4 小米商城二级菜单
<!DOCTYPE html>
<html lang="en">
<head><meta charset="UTF-8"><title>小米商城</title><style>body {margin: 0;}.header {background-color: #333;}.container {width: 1226px;margin: 0 auto;}.header a {color: #b0b0b0;line-height: 40px;display: inline-block;font-size: 12px;}.header .menu {float: left;color: white;}.header a {text-decoration: none;}.header a:hover {color: white;}.header .account {float: right;color: white;}.sub-header {height: 100px;}.sub-header .hw {width: 234px;height: 100px;}.sub-header .logo {float: left;}/* a标签是行内标签,默认不支持设置高度与边距 因此设置padding是不起作用的,因此可以加上 inline-block */.sub-header .logo a {padding-top: 22px;padding-bottom: 22px;display: inline-block;}/* 设置logo的图片像素大小 */.sub-header .logo img {height: 56px;width: 56px;}.sub-header .menu {width: 400px;float:left;line-height: 100px;     /* 与行高度保持一致 */}.sub-header .menu a {text-decoration: none;  /* 去掉 a 标签的下划线 */color: #333;font-size: 16px;padding: 0 10px;        /* 设置字体的左右外边距 */display: inline-block;}/* 鼠标放到字体时,使字体变红 */.sub-header .menu a:hover {color: #ff6700;}.sub-header .search {float: right;}</style></head>
<body><div class="header"><div class="container"><div class="menu"><a>小米官网</a><a>小米商城</a><a>小米澎湃OS</a><a>IoT</a><a>云服务</a><a>天星数科</a><a>有品</a><a>小爱开放平台</a><a>资质证照</a><a>协议规则</a><a>下载app</a><a>Select Location</a></div><div class="account"><a href="https://www.mi.com">登录</a><a href="https://www.mi.com">注册</a><a href="https://www.mi.com">消息通知</a></div>'<div style="clear: both;"></div></div></div><div class="sub-header"><div class="container"><div class="hw logo"><a href="https://www.mi.com"><img src="https://s02.mifile.cn/assets/static/image/logo-mi2.png" alt="小米官网"></a></div><div class="hw menu"><a href="https://www.mi.com">Xiaomi手机</a><a href="https://www.mi.com">Redmi手机</a><a href="https://www.mi.com">电视</a><a href="https://www.mi.com">笔记本</a><a href="https://www.mi.com">平板</a></div><div class="hw search"></div><div style="clear: both;"></div></div></div>
</body>
</html>
6.5 小米商城推荐区域
<!DOCTYPE html>
<html lang="en">
<head><meta charset="UTF-8"><title>小米商城</title><style>/* 去掉body的边距 */body {margin: 0;}img {width: 100%;height: 100%;}.left {float: left;}.margin_left {margin-left: 14.5px;}.header {background-color: #333;}/* 让中间内容居中 */.container {width: 1226px;margin: 0 auto;     /* 上下为0, 左右为auto */}/* header class 下的标签 a 自动应用这个样式 */.header a {color: #b0b0b0;line-height: 40px;display: inline-block;font-size: 12px;}.header .menu {float: left;color: white;}.header a {text-decoration: none;}.header a:hover {color: white;}.header .account {float: right;color: white;}.sub-header {height: 100px;}.sub-header .hw {width: 234px;height: 100px;}.sub-header .logo {float: left;}/* a标签是行内标签,默认不支持设置高度与边距 因此设置padding是不起作用的,因此可以加上 inline-block */.sub-header .logo a {padding-top: 22px;padding-bottom: 22px;display: inline-block;}/* 设置logo的图片像素大小 */.sub-header .logo img {height: 56px;width: 56px;}.sub-header .menu {width: 400px;float:left;line-height: 100px;     /* 与行高度保持一致 */}.sub-header .menu a {text-decoration: none;  /* 去掉 a 标签的下划线 */color: #333;font-size: 16px;padding: 0 10px;        /* 设置字体的左右外边距 */display: inline-block;}/* 鼠标放到字体时,使字体变红 */.sub-header .menu a:hover {color: #ff6700;}.sub-header .search {float: right;}.slider {height: 460px;}.news{margin-top: 14px;}.news .channel {width: 228px;height: 164px;background-color: #5f5750;padding: 3px;}.news .channel .item {width: 76px;height: 82px;float: left;text-align: center;}.news .channel .item img {width: 24px;height: 24px;display: block;         /* 让图片自已占一整行 */margin: 0 auto;         /* 让图片垂直居中 */margin-bottom: 4px;     /* 设置图片与下方字体的间距 */}.news .channel .item a {display: inline-block;font-size: 12px;        /* 设置字体大小 */text-decoration: none;  /* a标签去掉下划线 */padding-top: 18px;color: #fff;          /* 设置字体为白色 */opacity: 0.7;           /* 设置透明度 */}.news .channel .item a:hover {opacity: 1;           /* 设置透明度 */}.news .list-item {width: 316px;height: 170px;}</style></head>
<body><div class="header"><div class="container"><div class="menu"><a>小米官网</a><a>小米商城</a><a>小米澎湃OS</a><a>IoT</a><a>云服务</a><a>天星数科</a><a>有品</a><a>小爱开放平台</a><a>资质证照</a><a>协议规则</a><a>下载app</a><a>Select Location</a></div><div class="account"><a href="https://www.mi.com">登录</a><a href="https://www.mi.com">注册</a><a href="https://www.mi.com">消息通知</a></div>'<div style="clear: both;"></div></div></div><div class="sub-header"><div class="container"><div class="hw logo"><a href="https://www.mi.com"><img src="https://cdn.cnbj1.fds.api.mi-img.com/mi-mall/105b894ba62dc05069ba04efb1ea612b.jpg" alt="小米官网"></a></div><div class="hw menu"><a href="https://www.mi.com">Xiaomi手机</a><a href="https://www.mi.com">Redmi手机</a><a href="https://www.mi.com">电视</a><a href="https://www.mi.com">笔记本</a><a href="https://www.mi.com">平板</a></div><div class="hw search"></div><div style="clear: both;"></div></div></div><div class="slider"><div class="container"><div><img src="https://cdn.cnbj1.fds.api.mi-img.com/mi-mall/454c1da2c5b64a3f2c07c5a4c01aa9c4.jpg" alt="推荐商品"></div></div></div><div class="news"><div class="container"><div class="channel left"><div class="item"><a href="https://www.mi.com"><img src="https://cdn.cnbj1.fds.api.mi-img.com/mi-mall/82abdba456e8caaea5848a0cddce03db.png?w=48&h=48" alt=""><div>保障服务</div></a></div><div class="item"><a href="https://www.mi.com"><img src="https://cdn.cnbj1.fds.api.mi-img.com/mi-mall/806f2dfb2d27978e33fe3815d3851fa3.png?w=48&h=48" alt=""><div>企业团购</div></a></div><div class="item"><a href="https://www.mi.com"><img src="https://cdn.cnbj1.fds.api.mi-img.com/mi-mall/eded6fa3b897a058163e2485532c4f10.png?w=48&h=48" alt=""><div>F码通道</div></a></div><div class="item"><a href="https://www.mi.com"><img src="https://cdn.cnbj1.fds.api.mi-img.com/mi-mall/43a3195efa6a3cc7662efed8e7abe8bf.png?w=48&h=48" alt=""><div>米粉卡</div></a></div><div class="item"><a href="https://www.mi.com"><img src="https://cdn.cnbj1.fds.api.mi-img.com/mi-mall/f4846bca6010a0deb9f85464409862af.png?w=48&h=48" alt=""><div>以旧换新</div></a></div><div class="item"><a href="https://www.mi.com"><img src="https://cdn.cnbj1.fds.api.mi-img.com/mi-mall/9a76d7636b08e0988efb4fc384ae497b.png?w=48&h=48" alt=""><div>话费充值</div></a></div><div style="clear: both;"></div></div><div class="list-item left margin_left"><img src="https://cdn.cnbj1.fds.api.mi-img.com/mi-mall/d0c515086acb3c3a3e976ad20901aac5.jpg?w=632&h=340" alt=""></div><div class="list-item left margin_left"><img src="https://cdn.cnbj1.fds.api.mi-img.com/mi-mall/254c711cc71facf156ac955b8719dffa.jpg?w=632&h=340" alt=""></div><div class="list-item left margin_left"><img src="https://cdn.cnbj1.fds.api.mi-img.com/mi-mall/2b120c0dddc056dcb36e847269fb92cd.jpg?w=632&h=340" alt=""></div><div style="clear: both;"></div></div></div>
</body>
</html>
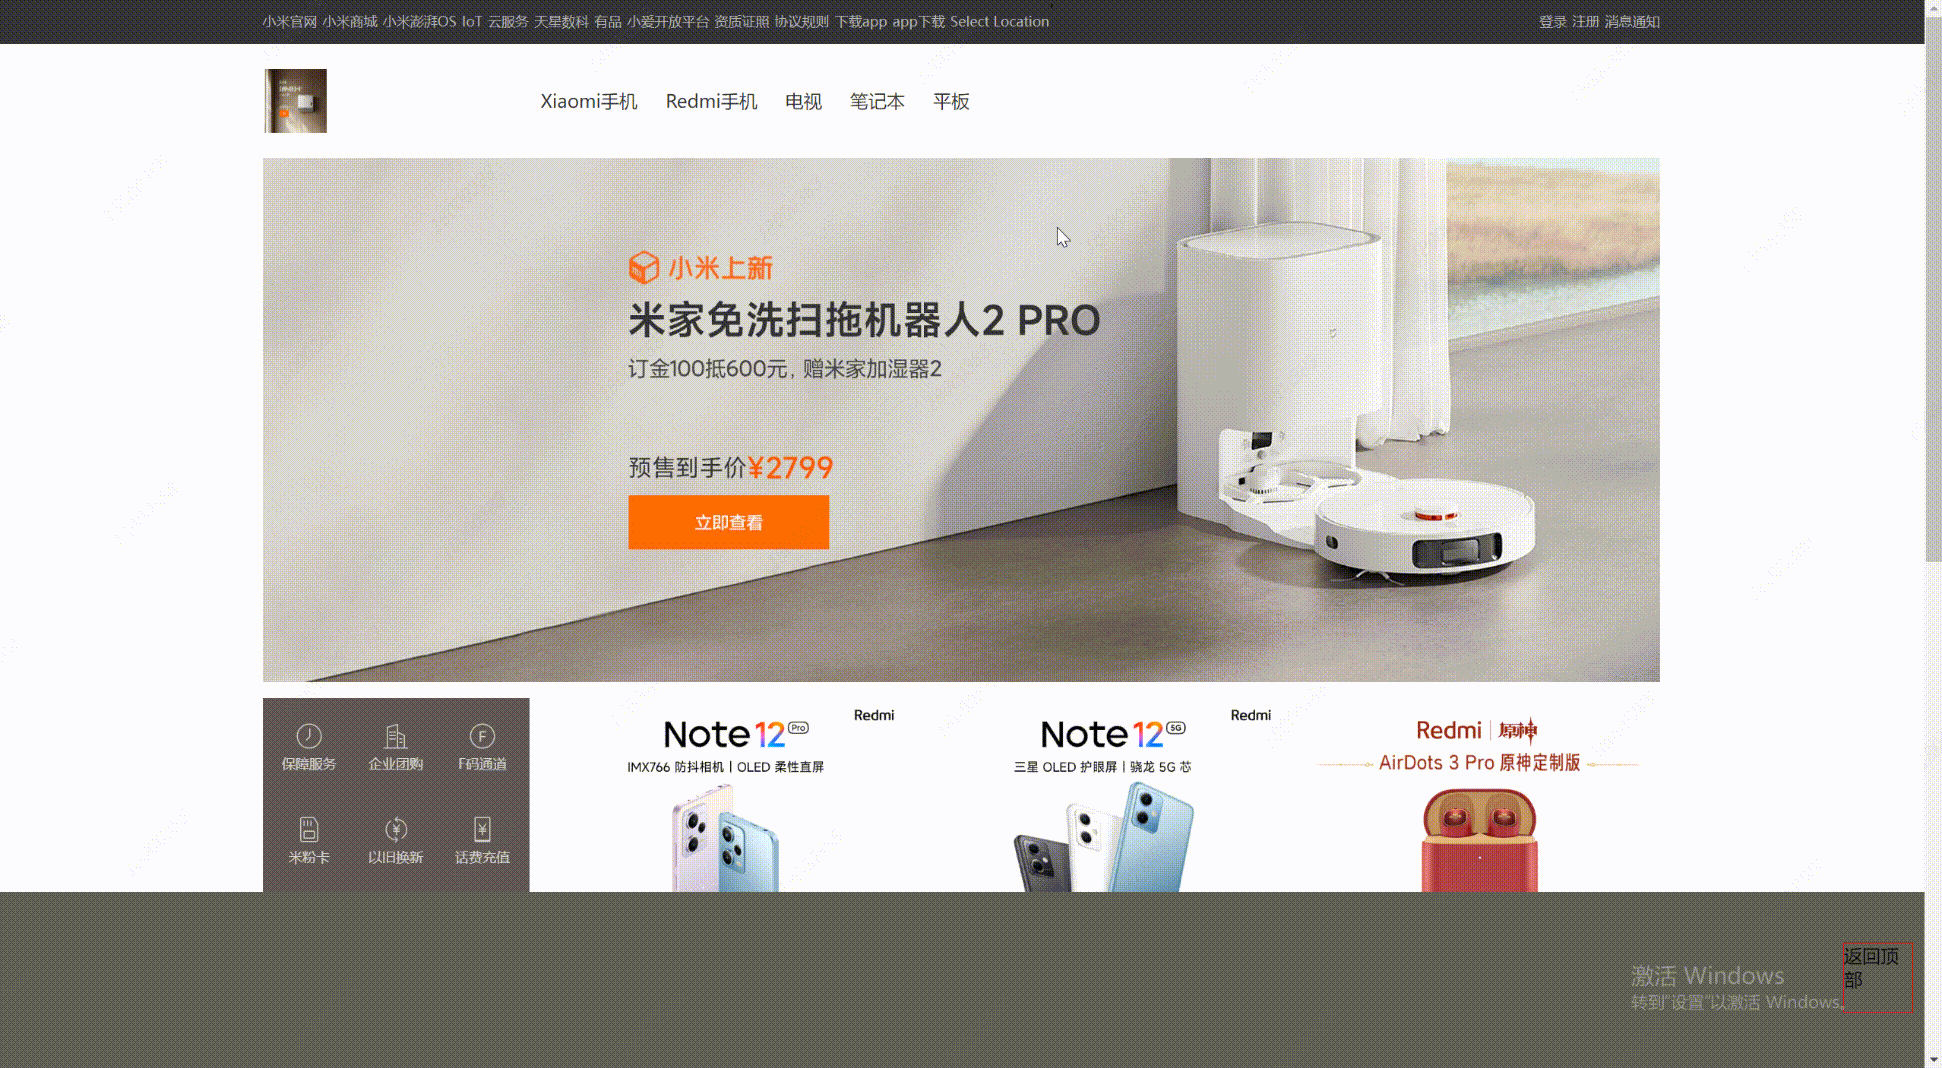
6.6 小米商城返回顶部 position-fixed 案例
在这结合小米商城的案例 介绍 position 中 fixed 的常用方法,一般做 返回顶部 或者 对话框固定在页面中间 功能的使用:
<!DOCTYPE html>
<html lang="en">
<head><meta charset="UTF-8"><title>小米商城</title><style>/* 去掉body的边距 */body {margin: 0;}img {width: 100%;height: 100%;}.left {float: left;}.margin_left {margin-left: 14.5px;}.header {background-color: #333;}/* 让中间内容居中 */.container {width: 1226px;margin: 0 auto;     /* 上下为0, 左右为auto */}/* header class 下的标签 a 自动应用这个样式 */.header a {color: #b0b0b0;line-height: 40px;display: inline-block;font-size: 12px;}.header .menu {float: left;color: white;}.header a {text-decoration: none;}.header a:hover {color: white;}.header .account {float: right;color: white;}.sub-header {height: 100px;}.sub-header .hw {width: 234px;height: 100px;}.sub-header .logo {float: left;}/* a标签是行内标签,默认不支持设置高度与边距 因此设置padding是不起作用的,因此可以加上 inline-block */.sub-header .logo a {padding-top: 22px;padding-bottom: 22px;display: inline-block;}/* 设置logo的图片像素大小 */.sub-header .logo img {height: 56px;width: 56px;}.sub-header .menu {width: 400px;float:left;line-height: 100px;     /* 与行高度保持一致 */}.sub-header .menu a {text-decoration: none;  /* 去掉 a 标签的下划线 */color: #333;font-size: 16px;padding: 0 10px;        /* 设置字体的左右外边距 */display: inline-block;}/* 鼠标放到字体时,使字体变红 */.sub-header .menu a:hover {color: #ff6700;}.sub-header .search {float: right;}.slider {height: 460px;}.news{margin-top: 14px;}.news .channel {width: 228px;height: 164px;background-color: #5f5750;padding: 3px;}.news .channel .item {width: 76px;height: 82px;float: left;text-align: center;}.news .channel .item img {width: 24px;height: 24px;display: block;         /* 让图片自已占一整行 */margin: 0 auto;         /* 让图片垂直居中 */margin-bottom: 4px;     /* 设置图片与下方字体的间距 */}.news .channel .item a {display: inline-block;font-size: 12px;        /* 设置字体大小 */text-decoration: none;  /* a标签去掉下划线 */padding-top: 18px;color: #fff;          /* 设置字体为白色 */opacity: 0.7;           /* 设置透明度 */}.news .channel .item a:hover {opacity: 1;           /* 设置透明度 */}.news .list-item {width: 316px;height: 170px;}.back{position:fixed;width:60px;height:60px;border:1px solid red;right:10px;bottom:50px;}</style></head>
<body><div class="header"><div class="container"><div class="menu"><a>小米官网</a><a>小米商城</a><a>小米澎湃OS</a><a>IoT</a><a>云服务</a><a>天星数科</a><a>有品</a><a>小爱开放平台</a><a>资质证照</a><a>协议规则</a><a>下载app</a><a>Select Location</a></div><div class="account"><a href="https://www.mi.com">登录</a><a href="https://www.mi.com">注册</a><a href="https://www.mi.com">消息通知</a></div>'<div style="clear: both;"></div></div></div><div class="sub-header"><div class="container"><div class="hw logo"><a href="https://www.mi.com"><img src="https://cdn.cnbj1.fds.api.mi-img.com/mi-mall/105b894ba62dc05069ba04efb1ea612b.jpg" alt="小米官网"></a></div><div class="hw menu"><a href="https://www.mi.com">Xiaomi手机</a><a href="https://www.mi.com">Redmi手机</a><a href="https://www.mi.com">电视</a><a href="https://www.mi.com">笔记本</a><a href="https://www.mi.com">平板</a></div><div class="hw search"></div><div style="clear: both;"></div></div></div><div class="slider"><div class="container"><div><img src="https://cdn.cnbj1.fds.api.mi-img.com/mi-mall/454c1da2c5b64a3f2c07c5a4c01aa9c4.jpg" alt="推荐商品"></div></div></div><div class="news"><div class="container"><div class="channel left"><div class="item"><a href="https://www.mi.com"><img src="https://cdn.cnbj1.fds.api.mi-img.com/mi-mall/82abdba456e8caaea5848a0cddce03db.png?w=48&h=48" alt=""><div>保障服务</div></a></div><div class="item"><a href="https://www.mi.com"><img src="https://cdn.cnbj1.fds.api.mi-img.com/mi-mall/806f2dfb2d27978e33fe3815d3851fa3.png?w=48&h=48" alt=""><div>企业团购</div></a></div><div class="item"><a href="https://www.mi.com"><img src="https://cdn.cnbj1.fds.api.mi-img.com/mi-mall/eded6fa3b897a058163e2485532c4f10.png?w=48&h=48" alt=""><div>F码通道</div></a></div><div class="item"><a href="https://www.mi.com"><img src="https://cdn.cnbj1.fds.api.mi-img.com/mi-mall/43a3195efa6a3cc7662efed8e7abe8bf.png?w=48&h=48" alt=""><div>米粉卡</div></a></div><div class="item"><a href="https://www.mi.com"><img src="https://cdn.cnbj1.fds.api.mi-img.com/mi-mall/f4846bca6010a0deb9f85464409862af.png?w=48&h=48" alt=""><div>以旧换新</div></a></div><div class="item"><a href="https://www.mi.com"><img src="https://cdn.cnbj1.fds.api.mi-img.com/mi-mall/9a76d7636b08e0988efb4fc384ae497b.png?w=48&h=48" alt=""><div>话费充值</div></a></div><div style="clear: both;"></div></div><div class="list-item left margin_left"><img src="https://cdn.cnbj1.fds.api.mi-img.com/mi-mall/d0c515086acb3c3a3e976ad20901aac5.jpg?w=632&h=340" alt=""></div><div class="list-item left margin_left"><img src="https://cdn.cnbj1.fds.api.mi-img.com/mi-mall/254c711cc71facf156ac955b8719dffa.jpg?w=632&h=340" alt=""></div><div class="list-item left margin_left"><img src="https://cdn.cnbj1.fds.api.mi-img.com/mi-mall/2b120c0dddc056dcb36e847269fb92cd.jpg?w=632&h=340" alt=""></div><div style="clear: both;"></div></div></div><div style="height:1000px;background-color:#5f5f50"></div><div class="back">返回顶部</div>
</body>
</html>
6.7 小米商城 position-relative & absolute 案例
在<head>中添加如下代码段:
.app{position: relative;}.app .download {position: absolute;display: none;height: 100px;width: 100px;}.app:hover .download {display: block;}
在<body> 的 <menu> 中添加如下代码段:
<a>小爱开放平台</a><a href="https://www.mi.com" class="app">app下载<div class="download"><img src="https://cdn.cnbj1.fds.api.mi-img.com/mi-mall/78c30d4f259ed43ab20e810a522a6249.png" alt=""></div></a>