一、模型介绍
- Baichuan 2 是百川智能推出的新一代开源大语言模型,采用 2.6 万亿 Tokens 的高质量语料训练。
- Baichuan 2 在多个权威的中文、英文和多语言的通用、领域 benchmark 上取得同尺寸最佳的效果。
它基于 Transformer 结构,在大约1.2万亿 tokens 上训练的70亿参数模型,支持中英双语,上下文窗口长度为4096。
项目地址:https://github.com/baichuan-inc/baichuan-7B
预训练模型:https://huggingface.co/baichuan-inc/baichuan-7B
modelscope:https://modelscope.cn/models/ba
硬件要求:NPU:8 x Ascend NPUs
二、环境搭建
1、ModelLink项目介绍:
ModelLink旨在为华为 昇腾芯片 上的大语言模型提供端到端的解决方案, 包含模型,算法,以及下游任务。目前支持baichuan,bloom,llam等系列模型。
1.1、下载ModelLink项目
git clone https://gitee.com/ascend/ModelLink.git
cd ModelLink
mkdir logs
mkdir model_from_hf
mkdir dataset
mkdir ckpt
2、安装依赖
依赖包下载的版本可以参考华为官网手册:https://www.hiascend.com/document/detail/zh/canncommercial/70RC1/envdeployment/instg/instg_0084.html
# python3.8
conda create -n test python=3.8
conda activate test# 安装 torch 和 torch_npu
pip install torch-2.1.0-cp38-cp38m-linux_aarch64.whl
pip install torch_npu-2.1.0.XXX-cp38-cp38m-linux_aarch64.whl
pip install apex-0.1_ascend*-cp38-cp38m-linux_aarch64.whl# 修改 ascend-toolkit 路径
source /usr/local/Ascend/ascend-toolkit/set_env.sh# 安装加速库
git clone https://gitee.com/ascend/AscendSpeed.git
cd AscendSpeed
pip install -r requirements.txt
pip3 install -e .
cd ..# 安装其余依赖库
pip install -r requirements.txt
3、准备预训练权重
从 huggingface 下载预训练权重:
mkdir ./model_from_hf/Baichuan-7B/
cd ./model_from_hf/Baichuan-7B/
wget https://huggingface.co/baichuan-inc/Baichuan-7B/resolve/main/config.json
wget https://huggingface.co/baichuan-inc/Baichuan-7B/resolve/main/configuration_baichuan.py
wget https://huggingface.co/baichuan-inc/Baichuan-7B/resolve/main/generation_config.json
wget https://huggingface.co/baichuan-inc/Baichuan-7B/resolve/main/handler.py
wget https://huggingface.co/baichuan-inc/Baichuan-7B/resolve/main/modeling_baichuan.py
wget https://huggingface.co/baichuan-inc/Baichuan-7B/resolve/main/pytorch_model.bin
wget https://huggingface.co/baichuan-inc/Baichuan-7B/resolve/main/special_tokens_map.json
wget https://huggingface.co/baichuan-inc/Baichuan-7B/resolve/main/tokenization_baichuan.py
wget https://huggingface.co/baichuan-inc/Baichuan-7B/resolve/main/tokenizer.model
wget https://huggingface.co/baichuan-inc/Baichuan-7B/resolve/main/tokenizer_config.json
cd ../../
4、数据转换
将模型权重文件从 HuggingFace权重 格式转化为 Megatron 权重 (该场景一般用于使能开源的HuggingFace模型在Megatron上进行训练)
# 修改 ascend-toolkit 路径
source /usr/local/Ascend/ascend-toolkit/set_env.shpython tools/checkpoint/convert_ckpt.py  --model-type GPT  --loader llama2_hf  --saver megatron  --target-tensor-parallel-size 4  --target-pipeline-parallel-size 1  --load-dir /data/models/baichuan2_7B_torch  --save-dir ./model_weights/Baichuan-7B-v0.1-tp8-pp1/  --tokenizer-model /data/models/baichuan2_7B_torch/tokenizer.model  --w-pack True
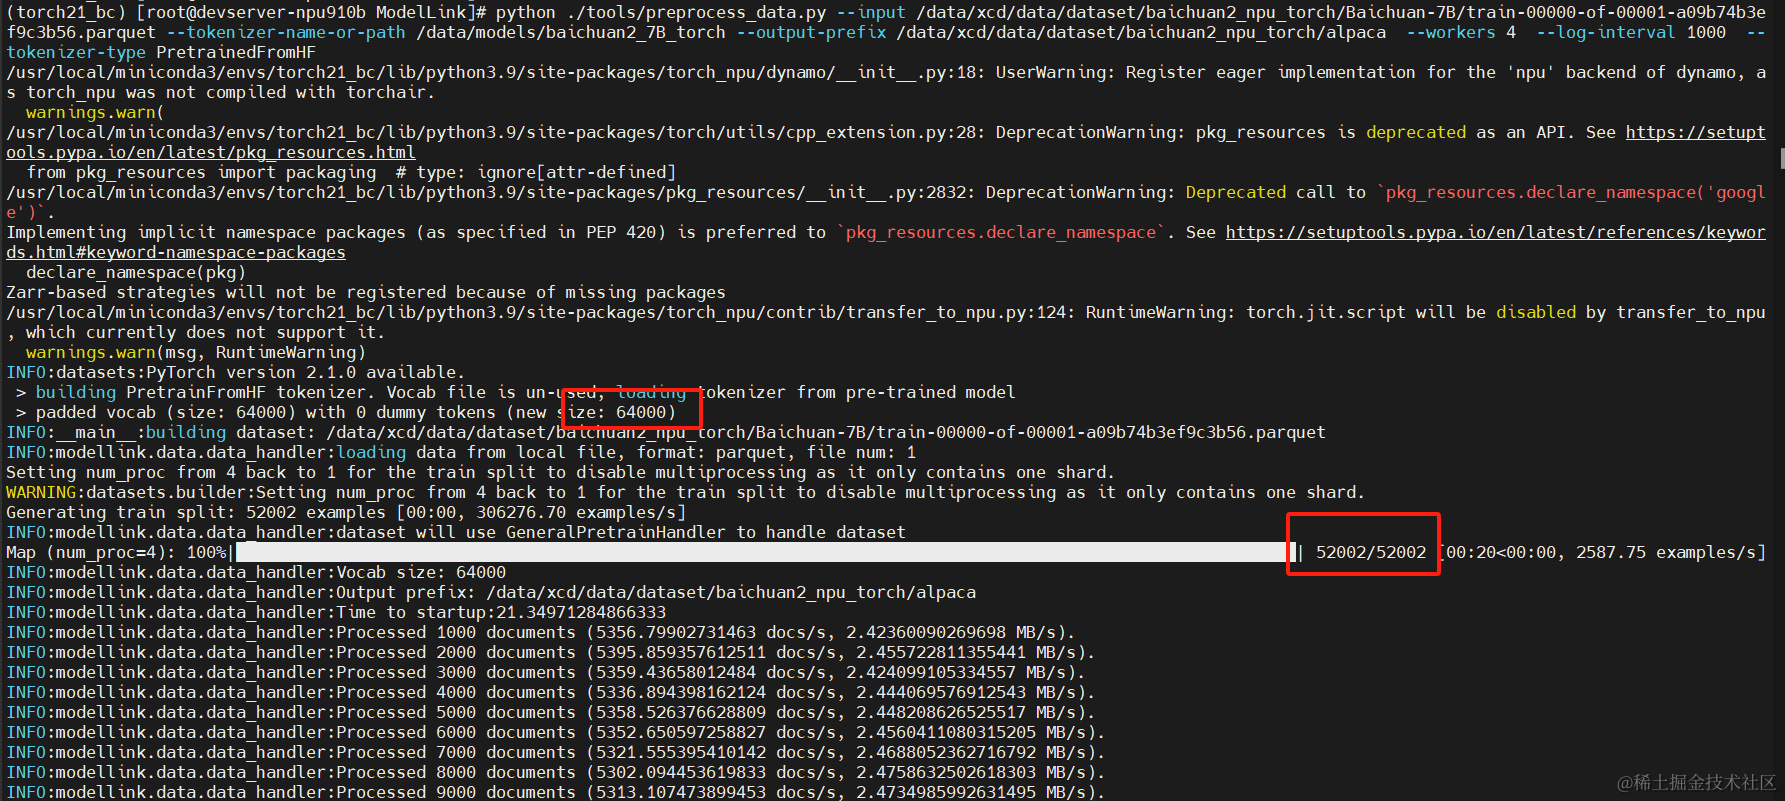
可以看到,共52k条预训练数据, 字典大小为64k,因为我们只用到4个npu卡,所以在-target-tensor-parallel-size指定为4
5、准备数据集
从 这里 下载 BaiChuan-7B 的数据集:
# 下载数据集
cd ./dataset
wget https://huggingface.co/datasets/tatsu-lab/alpaca/resolve/main/data/train-00000-of-00001-a09b74b3ef9c3b56.parquet
cd ..# 处理数据
mkdir ./dataset/Baichuan-7B/
python ./tools/preprocess_data.py --input /data/xcd/data/dataset/baichuan2_npu_torch/Baichuan-7B/train-00000-of-00001-a09b74b3ef9c3b56.parquet --tokenizer-name-or-path /data/models/baichuan2_7B_torch --output-prefix /data/xcd/data/dataset/baichuan2_npu_torch/alpaca  --workers 4  --log-interval 1000  --tokenizer-type PretrainedFromHF
二、预训练模型
1、配置 Baichuan-7B 预训练脚本: examples/baichuan/pretrain_baichuan_ptd_7B.sh
# 修改 ascend-toolkit 路径
# 如果需要指定特定的GPU进行预训练,可以增加这句,表示只在0-3 四个Device上面进行训练
ASCEND_RT_VISIBLE_DEVICES=0,1,2,3CKPT_SAVE_DIR="./ckpt/"
DATA_PATH="/data/xcd/data/dataset/baichuan2_npu_torch/alpaca_text_document"
TOKENIZER_MODEL="/data/models/baichuan2_7B_torch/tokenizer.model"
CKPT_LOAD_DIR="./model_weights/Baichuan-7B-v0.1-tp8-pp1/"# 内存较小可以指定batch_size小一些GPT_ARGS="--tensor-model-parallel-size $TP \--pipeline-model-parallel-size $PP \--sequence-parallel \--num-layers 32 \--hidden-size 4096 \--ffn-hidden-size 11008 \--num-attention-heads 32 \--tokenizer-type Llama2Tokenizer \--tokenizer-model $TOKENIZER_MODEL \--load $CKPT_LOAD_DIR \--seq-length 4096 \--max-position-embeddings 4096 \--micro-batch-size 2 \--global-batch-size 16 \--make-vocab-size-divisible-by 64 \--lr 1e-5 \--train-iters 1000 \--lr-decay-style cosine \--untie-embeddings-and-output-weights \--disable-bias-linear \--attention-dropout 0.0 \--init-method-std 0.01 \--hidden-dropout 0.0 \--position-embedding-type rope \--normalization RMSNorm \--use-fused-rmsnorm \--use-flash-attn \--swiglu \--no-masked-softmax-fusion \--attention-softmax-in-fp32 \--min-lr 1e-6 \--weight-decay 1e-2 \--lr-warmup-fraction 0.1 \--clip-grad 1.0 \--adam-beta1 0.9 \--initial-loss-scale 1024.0 \--adam-beta2 0.95 \--no-gradient-accumulation-fusion \--no-load-optim \--no-load-rng \--fp16
"
2、启动 Baichuan-7B 预训练脚本: examples/baichuan/pretrain_baichuan_ptd_7B.sh
bash examples/baichuan/pretrain_baichuan_ptd_7B.sh
3、运行耗时及资源占用
3.1、内存占用
运行时,内存占用情况如下:

3.2、可以看到显存占用比较高,AIcore占用率并不高

3.3、耗时,我这里设置是100个train_iter, 共耗时25分钟左右
三、推理模型
1、配置脚本
首先需要配置baichuan-7B的推理脚本: examples/baichuan/generate_baichuan_7b_ptd.sh
ASCEND_RT_VISIBLE_DEVICES=0,1,2,3# please fill these path configurations
CHECKPOINT="./model_weights/Baichuan-7B-v0.1-tp8-pp1/"
TOKENIZER_PATH="/data/models/baichuan2_7B_torch/"# Change for multinode config
MASTER_ADDR=localhost
MASTER_PORT=6001
NNODES=1
NODE_RANK=0
NPUS_PER_NODE=4
WORLD_SIZE=$(($NPUS_PER_NODE*$NNODES))DISTRIBUTED_ARGS="--nproc_per_node $NPUS_PER_NODE --nnodes $NNODES --node_rank $NODE_RANK --master_addr $MASTER_ADDR --master_port $MASTER_PORT"python -m torch.distributed.launch $DISTRIBUTED_ARGS inference.py \--tensor-model-parallel-size 4  \--pipeline-model-parallel-size 1  \--num-layers 32 \--hidden-size 4096  \--ffn-hidden-size 11008 \--seq-length 1024 \--max-new-tokens 256 \--micro-batch-size 1 \--global-batch-size 16 \--num-attention-heads 32  \--max-position-embeddings 2048 \--position-embedding-type rope \--swiglu \--load $CHECKPOINT \--tokenizer-type PretrainedFromHF  \--tokenizer-name-or-path $TOKENIZER_PATH \--tokenizer-not-use-fast \--fp16 \--normalization RMSNorm \--untie-embeddings-and-output-weights \--disable-bias-linear \--attention-softmax-in-fp32 \--no-load-optim \--no-load-rng \--no-masked-softmax-fusion \--no-gradient-accumulation-fusion \--exit-on-missing-checkpoint \--make-vocab-size-divisible-by 64 \| tee logs/generate_baichuan_7b.log
2、执行脚本
接启动generate_baichuan_7b_ptd.sh
bash examples/baichuan/generate_baichuan_7b_ptd.sh
3、验证结果
推理的示例如下:


