之前一直使用ggseg呈现结果,最近想试一试其他绘图工具。ENIGMA-toolbox有所了解,绘图功能看起来门槛不高,所以就试着用它呈现一些结果。Matlab版本的ENIGMA-toolbox直接使用就是SurfStat的功能绘图,Python版本的绘图功能应该是根据SurfStat的绘图思路进行改写的。
下载和安装
参照官网不再赘述。需要注意的是该工具包依赖的numpy和pandas版本较老,若不想降级numpy和pandas的话,可以到工具包安装位置,使用VScode将工具包中以下内容进行修改。
numpy已经没有.float和.int的属性了,因此np.float 应该改成float, np.int改成int
pandas新版本不再使用error_bad_lines作为输入,因此需要将error_bad_lines=False改为on_bad_lines='skip'
当然另外一种办法就是conda建立虚拟环境,按要求安装依赖也是可行的。
2. 准备Desikan结果-->载入python-->根据标签匹配顺序-->绘图
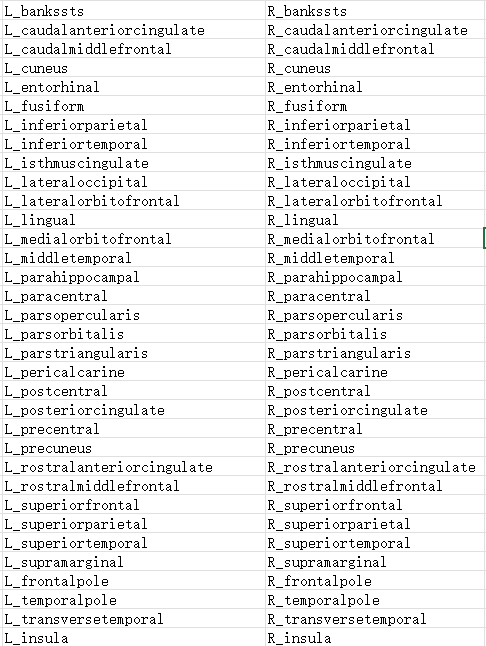
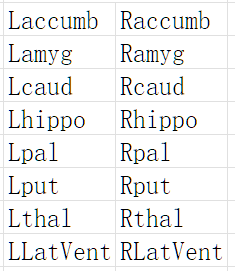
绘制统计结果,只需要将其按照工具包所需的格式准备即可,具体而言就是脑区的顺序需要和ENIGMA-Toolbox保持一致。这个工具并不像ggseg一样是根据脑区的标签进行数据匹配的,因此使用该工具时需要确保标签和数据的顺序与工具包默认的顺序一致 x 3!
Desikan 68个区域(第一列结束后紧接第二列)
皮层下区域(第一列结束后紧接第二列)
快速找到这些区域顺序的方式就是载入ENIGMA-Toolbox自带的一个结果文件
from enigmatoolbox.datasets import load_summary_stats
sum_stats = load_summary_stats('22q')
CT_vector = sum_stats['CortThick_case_vs_controls']['Structure']
SV_vector = sum_stats['SubVol_case_vs_controls']['Structure']
把它做成一个dataFrame用于匹配顺序
CT_order_df = pd.DataFrame(CT_vector.tolist(), columns=['Dependent Variable'])
SV_order_df = pd.DataFrame(SV_vector.tolist(), columns=['Dependent Variable'])
使用Merge的方式将载入的数据集,根据标签的顺序进行匹配。当然这不是必须的,如果将结果载入之前已经确保顺序没问题,就可以直接用数据作图。
CT_df_reordered = pd.merge(CT_order_df, CT_df, on='Dependent Variable', how='left')
SV_df_reordered = pd.merge(SV_order_df, SV_df, on='Dependent Variable', how='left')
获取需要呈现的统计值(这里是Cohen's d),然后使用parcel_to_surface函数将各个区域的数据映射到surface的vertex上面,就可以绘图了。
from enigmatoolbox.utils.parcellation import parcel_to_surface
from enigmatoolbox.plotting import plot_cortical, plot_subcortical
CT_d = CT_df_reordered['Cohen\'s d']
CT_d_fsa5 = parcel_to_surface(CT_d, 'aparc_fsa5')
# Project the results on the surface brain
plot_cortical(array_name=CT_d_fsa5,surface_name="fsa5",size=(1200, 600),cmap='RdBu_r',color_bar=False,color_range=(-1.8, 1.8),screenshot=True,filename=os.path.join(plot_path,'CT_d_all.png'),background=(1, 1, 1),transparent_bg=False,scale= (3,3))
对于皮层下区域,由于区域比较少,不需要单独做parcel_to_surface,直接绘图即可。
SV_d = SV_df_reordered['Cohen\'s d']
plot_subcortical(array_name=SV_d, size=(1200, 600),cmap='RdBu_r', color_bar=False, color_range=(-1, 1),screenshot=True,filename=os.path.join(plot_path,'SV_d_all.png'),background=(1, 1, 1),transparent_bg=False,scale= (1,1))
parcellated<->vertexwise的转换比想象中的简单,surface_to_parcel或者parcel_to_surface函数使用了一个vertex到ROI的映射表进行相互转换。
这是该工具包提供的映射表,有desikan, glasser360, schaefer100, 200,300,400, economo_koskinas,都是可以用该方式绘制和保存的,没有的模板也可以自己制作映射表绘制。
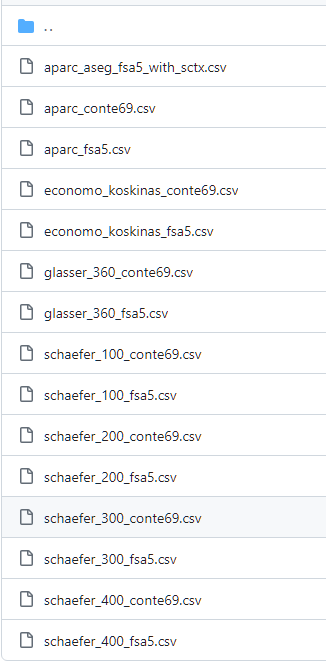
另外可以试用matlab的这个函数查看annot文件相关信息,判断映射表中区域的信息是否准确。
read_annotation('fsa5_lh_aparc.annot')3. 保存
无论是plot_cortical还是plot_subcortical都默认使用了VTK生成图形,它们可以缩放和旋转,要保存图片需要将画图函数中的screenshot设置为True,并设置filename为保存文件的位置和名称。此外,由于后续有拼图的需要,建议将colorbar关闭,拼图完成后手动添加一个colorbar。
4. 拼图
Python拼图的工具好像不多(?!),此外plot_cortical和plot_subcortical函数都是基于VTK作图,保存是截图的方式,并不返回plt内容,大部分的拼图工具可能也不好使。所以建立一个简单工作流完成拼图:
读取图片
subplot展示图片
裁剪(删除全白色的行和列)
裁剪时如果想留白某一位置,可以将该位置加入非白元素。
保存
将上述步骤封装为函数方便多次调用。
def merge_images(images_dict, output_file, trim_edges=False):"""Merges a list of images into a single figure and saves it, based on provided image information.Parameters:- images_dict: List of dictionaries, each containing 'file_path' and 'title' for each image.- output_file: Path where the merged image should be saved.- trim_edges: Whether to trim white edges from the merged image before saving.# Example usage:images_dict = [{'file_path': os.path.join(plot_path, 'CT_d_all.png'), 'title': 'Cortical'},{'file_path': os.path.join(plot_path, 'SV_d_all.png'), 'title': 'Subcortical'}]output_file = os.path.join(plot_path, 'CT_SV_d_all.png')merge_images(images_dict, output_file, trim_edges=True)"""n_images = len(images_dict)fig, axs = plt.subplots(n_images, 1, figsize=(12, 7 * n_images))for i, img_info in enumerate(images_dict):img = mpimg.imread(img_info['file_path'])axs[i].imshow(img)axs[i].axis('off')title_text = img_info.get('title', '')axs[i].set_title(title_text, y=0.7, fontdict={'family': 'sans-serif', 'fontsize': 18},)# Adding a subtle marker (barely visible)axs[i].text(0.5, 0.65, '|', fontsize=12, color=(0.995, 0.995, 0.995), ha='center', transform=axs[i].transAxes)axs[i].text(0.5, 0.75, '|', fontsize=22, color=(0.995, 0.995, 0.995), ha='center', transform=axs[i].transAxes)plt.tight_layout()plt.savefig(output_file, bbox_inches='tight',dpi=300)if trim_edges:# Load the saved image, trim edges, and save againmerged_img = mpimg.imread(output_file)trimmed_img = trim_white_edges(merged_img)plt.imsave(output_file, np.ascontiguousarray(trimmed_img),dpi=300)def trim_white_edges(img_array):"""Trim white edges from an image with pixel values normalized to the 0 to 1 range.Parameters:- img_array: Image array with pixel values in the range [0, 1].Returns:- Cropped image array with white edges removed."""# Detect pixels that are not completely white (assuming white is [1, 1, 1])mask = np.any(img_array < 1, axis=-1)# Find the rows and columns that contain non-white pixelsrows = np.any(mask, axis=1)cols = np.any(mask, axis=0)# Crop the image to these rows and columnscropped_img = img_array[rows][:, cols]return cropped_img调用函数即可拼图
images_dict = [{'file_path': os.path.join(plot_path, 'CT_d_all.png'), 'title': 'Cortical'},{'file_path': os.path.join(plot_path, 'SV_d_all.png'), 'title': 'Subcortical'}
]
output_file = os.path.join(plot_path, 'CT_SV_d_all.png')
merge_images(images_dict, output_file, trim_edges=True)
图中在subplot标题下加入了非白元素(肉眼难以识别),从而增加title和图片的距离;另外可以看到由于subplot标题的存在,左右半球之间的空白区域并未被移除,正好使得布局看起来更美观。美中不足的是皮层下区域看起来略大,所以在手动加colorbar的时候可以调一下大小。
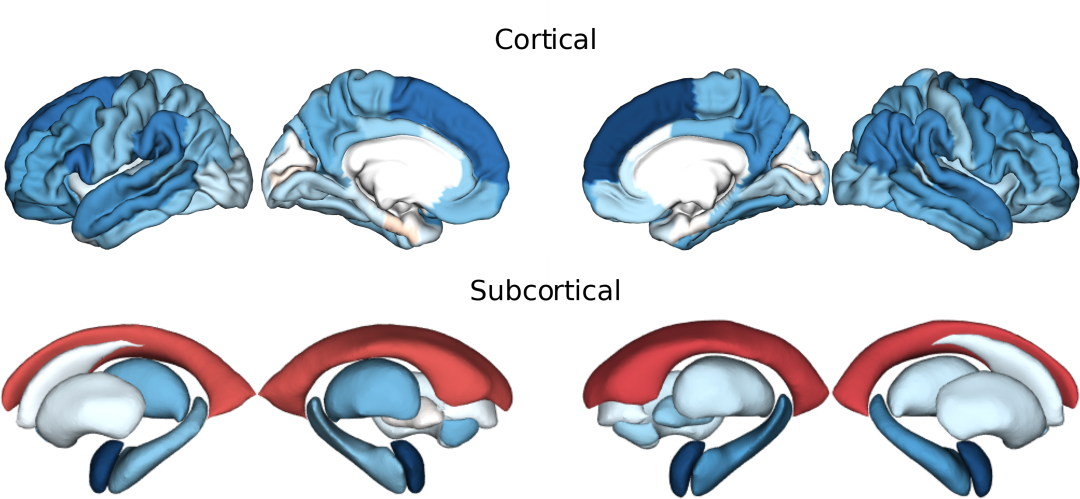
该函数可以一次拼接多个png图片,比如以下病例-对照结果:
images_dict = [{'file_path': os.path.join(plot_path, 'CT_d_{}.png'.format(condition_name)), 'title': condition_name} for condition_name, _ in conditions]
output_file = os.path.join(plot_path, 'all_CT_d_maps.png')
merge_images(images_dict, output_file, trim_edges=True)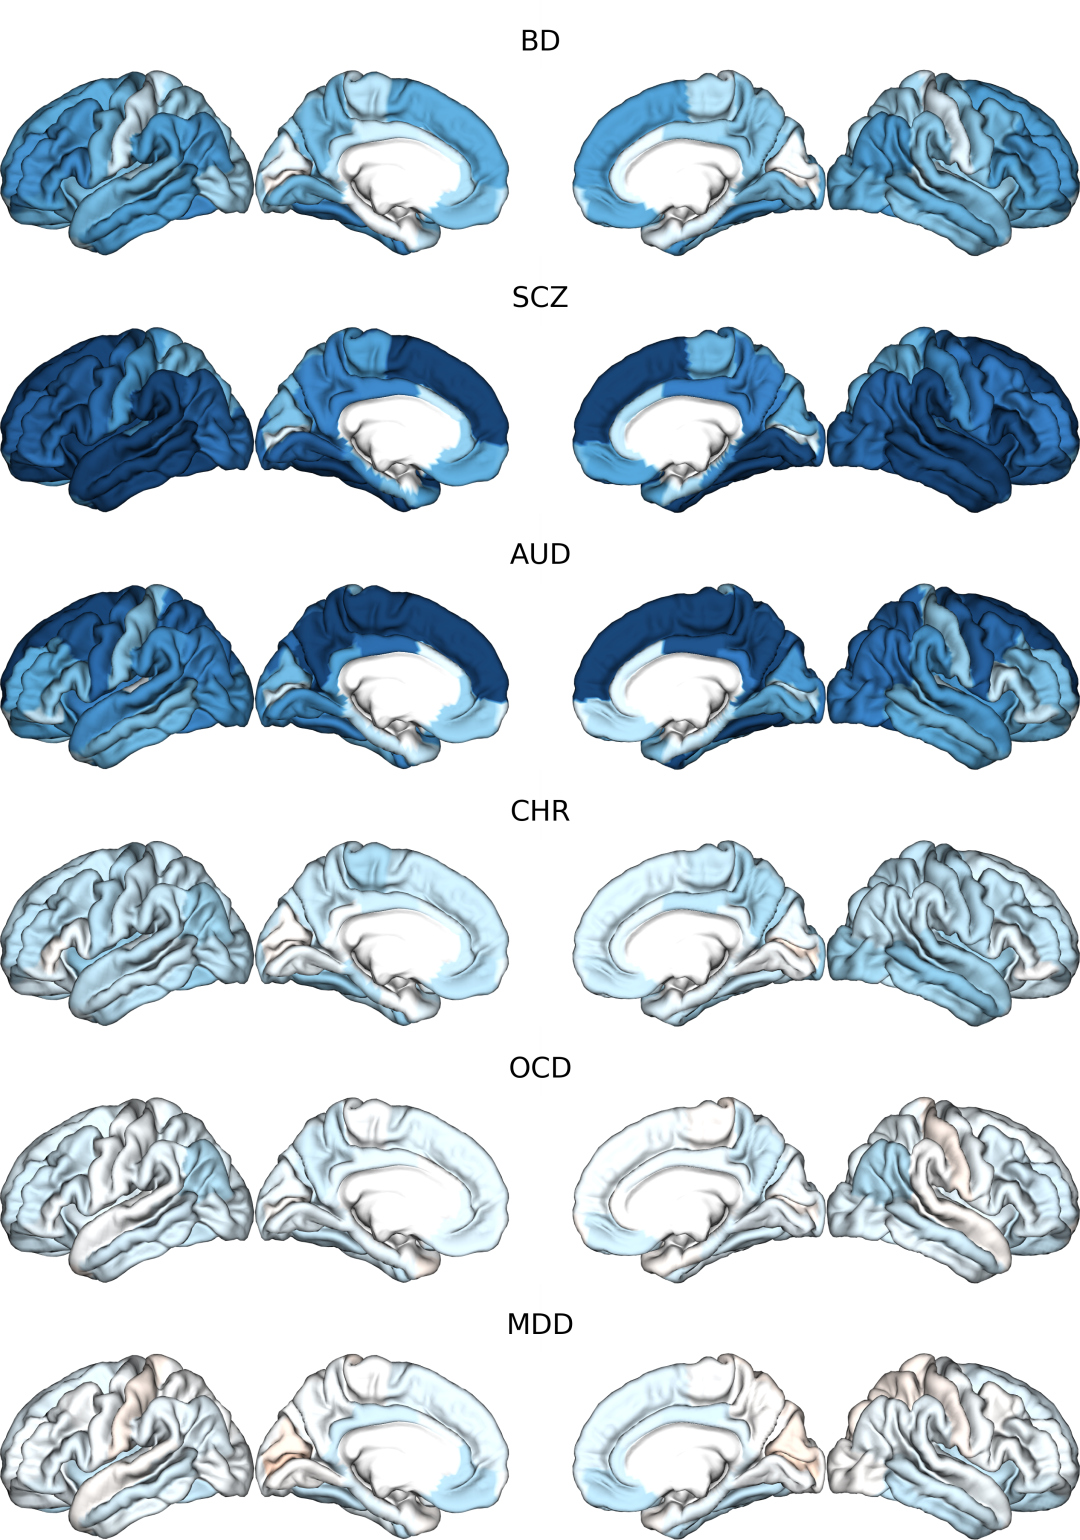
往期推荐
ENIGMA-Toolbox
R|ggsegExtra绘制Desterieux统计结果


