本章主要介绍Qt中的常用界面设计组件,因为更多的是涉及如何使用,因此会强调使用,也就是更多针对实例,而对于一些细节问题,需要参考《Qt5.9 c++开发指南》进行学习。
文章目录
- 1. 字符串与普通转换、进制转换
- 1.1 可视化UI设计
- 1.2 widget.h
- 1.3 widget.cpp
- 2. QString 的常用功能
- 2.1 可视化UI设计
- 2.2 widget.h
- 2.3 widget.cpp
1. 字符串与普通转换、进制转换
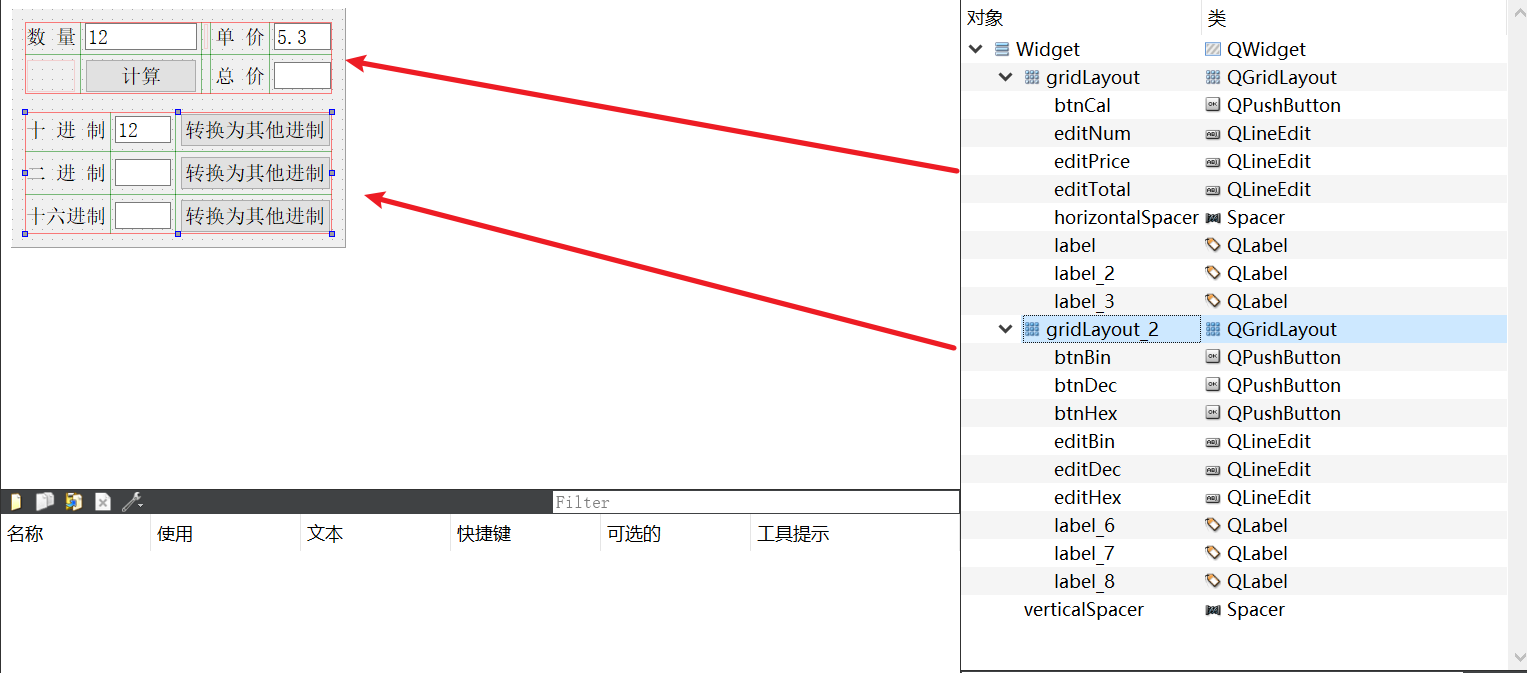
图4-1是实例samp4_1 设计时的窗体,是基于QWidget 创建的可视化窗体。界面设计使用了布局管理,窗体上组件的布局是:上方的几个组件是一个 GridLayout,下方的9 个组件也是一个GridLayout,两个 GridLayout 和中间一个 VerticalSpacer又组成一个 VerticalLayout。
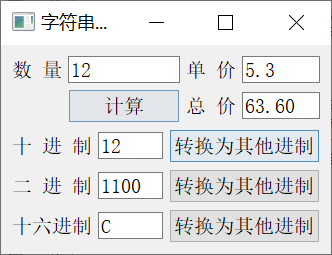
在布局设计时,要巧妙运用 VerticalSpacer 和 HorizontalSpacer,还要会设置组件的MaximumSize 和MinimumSize 属性,以取得期望的布局效果。例如,在图 4-1 中,两个 GridLayout 之间放了一个垂直方向的分隔,当窗体变大时,两个 GridLayout 的高度并不会发生变化;而如果不放置这个垂直分隔,两个 GridLayout的高度都会发生变化,GridLayout 内部组件的垂直距离会发生变化。
1.1 可视化UI设计
1.2 widget.h
#ifndef WIDGET_H
#define WIDGET_H#include <QWidget>namespace Ui {
class Widget;
}class Widget : public QWidget
{Q_OBJECTpublic:explicit Widget(QWidget *parent = 0);~Widget();private slots:void on_btnCal_clicked();  //计算 按键单击响应void on_btnDec_clicked();   //十进制转换为其他进制void on_btnBin_clicked();   //二进制转换为其他进制void on_btnHex_clicked();   //十六进制转换为其他进制private:Ui::Widget *ui;
};#endif // WIDGET_H
1.3 widget.cpp
#include "widget.h"
#include "ui_widget.h"
#include    <QString>Widget::Widget(QWidget *parent) :QWidget(parent),ui(new Ui::Widget)
{ui->setupUi(this);
}Widget::~Widget()
{delete ui;
}void Widget::on_btnCal_clicked()
{ //计算 按键单击响应int num=ui->editNum->text().toInt(); //读取字符串为整数float price=ui->editPrice->text().toFloat();//读取字符串为浮点数float total=num*price;//相乘计算QString str;
//    str=str.setNum(total,'f',2); //浮点数2位小数str=str.sprintf("%.2f",total); //格式化输出浮点数ui->editTotal->setText(str);//在文本框里显示
}void Widget::on_btnDec_clicked()
{ //读取十进制数,转换为其他进制int val=ui->editDec->text().toInt();//读取十进制数QString str=QString::number(val,16);// 显示为16进制 的字符串str=str.toUpper(); //转换为全大写字母ui->editHex->setText(str);//显示16进制字符串str=QString::number(val,2);// 显示2进制的字符串ui->editBin->setText(str);//显示二进制字符串
}void Widget::on_btnBin_clicked()
{ //读取二进制数,转换为其他进制的数bool ok;int val=ui->editBin->text().toInt(&ok,2);//以二进制数读入QString str=QString::number(val,10);//数字显示为10进制字符串ui->editDec->setText(str);//显示10进制数字符串str=QString::number(val,16);//显示为十六进制字符串str=str.toUpper(); //全大写字母ui->editHex->setText(str);//显示十六进制字符串
}void Widget::on_btnHex_clicked()
{//读取16进制数,转换为其他进制的数bool ok;int val=ui->editHex->text().toInt(&ok,16);//以十六进制数读入QString str=QString::number(val,10);// 显示为10进制字符串ui->editDec->setText(str);//显示为10进制字符串str=QString::number(val,2);// 显示二进制字符串ui->editBin->setText(str);//显示二进制字符串
}
2. QString 的常用功能
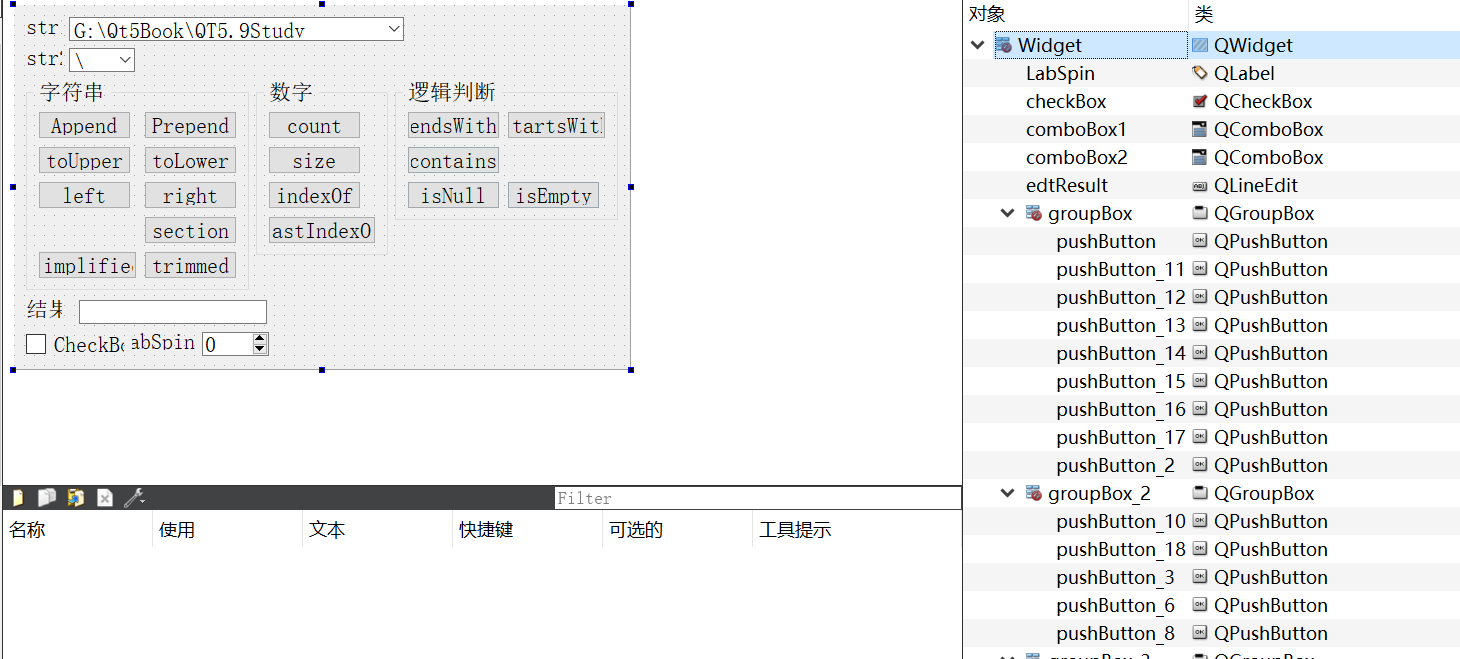
QString 是 Qt 编程中常用的类,除了用作数字量的输入输出之外,QString 还有很多其他功能,熟悉这些常见的功能,有助于灵活地实现字符串处理功能。
QString 存储字符串采用的是 Unicode 码,每一个字符是一个 16 位的 QChar,而不是8 位的char,所以 QString 处理中文字符没有问题,而且一个汉字算作是一个字符。
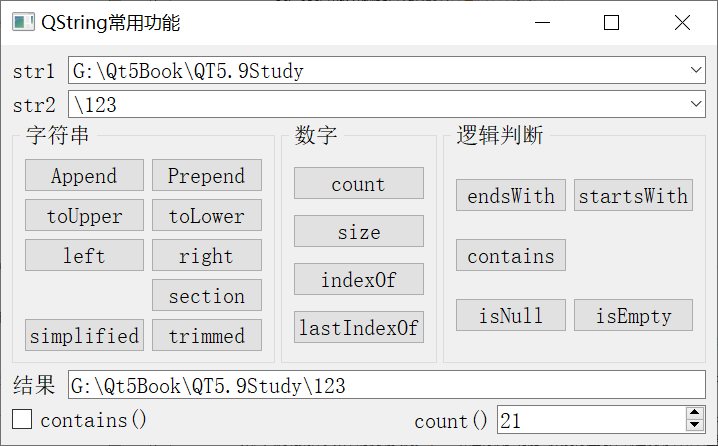
图4-2 是对 QString 常用函数的测试实例 samp4_2 的运行界面。下面在说明函数功能时,对于同名不同参数的函数,只说明某种参数下的使用实例。QString 还有很多功能函数没有在此介绍,在使用中如果遇到,可查询 Qt 的帮助文件。
2.1 可视化UI设计
2.2 widget.h
#ifndef WIDGET_H
#define WIDGET_H#include <QWidget>namespace Ui {
class Widget;
}class Widget : public QWidget
{Q_OBJECTpublic:explicit Widget(QWidget *parent = 0);~Widget();private slots:void on_pushButton_clicked();void on_pushButton_2_clicked();void on_pushButton_3_clicked();void on_pushButton_4_clicked();void on_pushButton_5_clicked();void on_pushButton_6_clicked();void on_pushButton_7_clicked();void on_pushButton_8_clicked();void on_pushButton_9_clicked();void on_pushButton_10_clicked();void on_pushButton_11_clicked();void on_pushButton_12_clicked();void on_pushButton_13_clicked();void on_pushButton_14_clicked();void on_pushButton_15_clicked();void on_pushButton_16_clicked();void on_pushButton_17_clicked();void on_pushButton_18_clicked();private:Ui::Widget *ui;
};#endif // WIDGET_H
2.3 widget.cpp
#include "widget.h"
#include "ui_widget.h"Widget::Widget(QWidget *parent) :QWidget(parent),ui(new Ui::Widget)
{ui->setupUi(this);
}Widget::~Widget()
{delete ui;
}void Widget::on_pushButton_clicked()
{//append()函数QString str1,str2;str1=ui->comboBox1->currentText();str2=ui->comboBox2->currentText();str1.append(str2);ui->edtResult->setText(str1);
}void Widget::on_pushButton_2_clicked()
{//prepend()函数QString str1,str2;str1=ui->comboBox1->currentText();str2=ui->comboBox2->currentText();str1.prepend(str2);ui->edtResult->setText(str1);
}void Widget::on_pushButton_3_clicked()
{//contains()函数QString str1,str2;str1=ui->comboBox1->currentText();str2=ui->comboBox2->currentText();bool chk;chk=str1.contains(str2);ui->checkBox->setChecked(chk);ui->checkBox->setText("contains()");ui->checkBox->sizeHint();
}void Widget::on_pushButton_4_clicked()
{//count()函数QString str1=ui->comboBox1->currentText();int i=str1.count();
//    int i=str1.length();ui->spinBox->setValue(i);ui->LabSpin->setText("count()");
}void Widget::on_pushButton_5_clicked()
{//size()函数QString str1;str1=ui->comboBox1->currentText();int i=str1.size();ui->spinBox->setValue(i);ui->LabSpin->setText("size()");}void Widget::on_pushButton_6_clicked()
{//endsWith()函数QString str1,str2;str1=ui->comboBox1->currentText();str2=ui->comboBox2->currentText();bool chk;chk=str1.endsWith(str2);ui->checkBox->setChecked(chk);ui->checkBox->setText("endsWith()");ui->checkBox->sizeHint();
}void Widget::on_pushButton_7_clicked()
{//indexOf()函数QString str1,str2;str1=ui->comboBox1->currentText();str2=ui->comboBox2->currentText();int i;i=str1.indexOf(str2);ui->spinBox->setValue(i);ui->LabSpin->setText("indexOf()");
}void Widget::on_pushButton_8_clicked()
{//isEmpty()函数QString str1;str1=ui->comboBox1->currentText();bool chk;chk=str1.isEmpty();ui->checkBox->setChecked(chk);ui->checkBox->setText("isEmpty()");ui->checkBox->sizeHint();
}void Widget::on_pushButton_9_clicked()
{//lastIndexOf()函数QString str1,str2;str1=ui->comboBox1->currentText();str2=ui->comboBox2->currentText();int i;i=str1.lastIndexOf(str2);ui->spinBox->setValue(i);ui->LabSpin->setText("lastIndexOf()");
}void Widget::on_pushButton_10_clicked()
{//startsWith()函数QString str1,str2;str1=ui->comboBox1->currentText();str2=ui->comboBox2->currentText();bool chk;chk=str1.startsWith(str2);ui->checkBox->setChecked(chk);ui->checkBox->setText("startsWith()");ui->checkBox->sizeHint();
}void Widget::on_pushButton_11_clicked()
{//toUpper()函数QString str1,str2;str1=ui->comboBox1->currentText();str2=str1.toUpper();ui->edtResult->setText(str2);
}void Widget::on_pushButton_12_clicked()
{//toLower()函数QString str1,str2;str1=ui->comboBox1->currentText();str2=str1.toLower();ui->edtResult->setText(str2);
}void Widget::on_pushButton_13_clicked()
{//trimmed()函数QString str1;str1=ui->comboBox1->currentText();str1=str1.trimmed();ui->edtResult->setText(str1);}void Widget::on_pushButton_14_clicked()
{//section()函数int i;QString str1,str2,str3;str1=ui->comboBox1->currentText();i=ui->spinBox->value();
//    str2=str1.section('\\',2,2);str3=ui->comboBox2->currentText();if (QString::compare(str3,"\\",Qt::CaseInsensitive)==0)str2=str1.section('\\',i,i+1); //elsestr2=str1.section(str3,i,i+1); //ui->edtResult->setText(str2);
}void Widget::on_pushButton_15_clicked()
{//left()函数QString str1,str2;str1=ui->comboBox1->currentText();int v=ui->spinBox->value();str2=str1.left(v);ui->edtResult->setText(str2);
}void Widget::on_pushButton_16_clicked()
{//right()函数QString str1,str2;str1=ui->comboBox1->currentText();int cnt=str1.size();int v=ui->spinBox->value();str2=str1.right(cnt-v-1);ui->edtResult->setText(str2);
}void Widget::on_pushButton_17_clicked()
{//simplified()函数QString str1;str1=ui->comboBox1->currentText();str1=str1.simplified();ui->edtResult->setText(str1);
}void Widget::on_pushButton_18_clicked()
{//isNull()函数QString str1;str1=ui->comboBox1->currentText();bool chk;chk=str1.isNull();ui->checkBox->setChecked(chk);ui->checkBox->setText("isNull()");ui->checkBox->sizeHint();
}

![[mongo]应用场景及选型](https://github.com/tutengdihuang/image/assets/31843331/0ac362e8-7916-4764-8c3d-c256fef60bcd)

