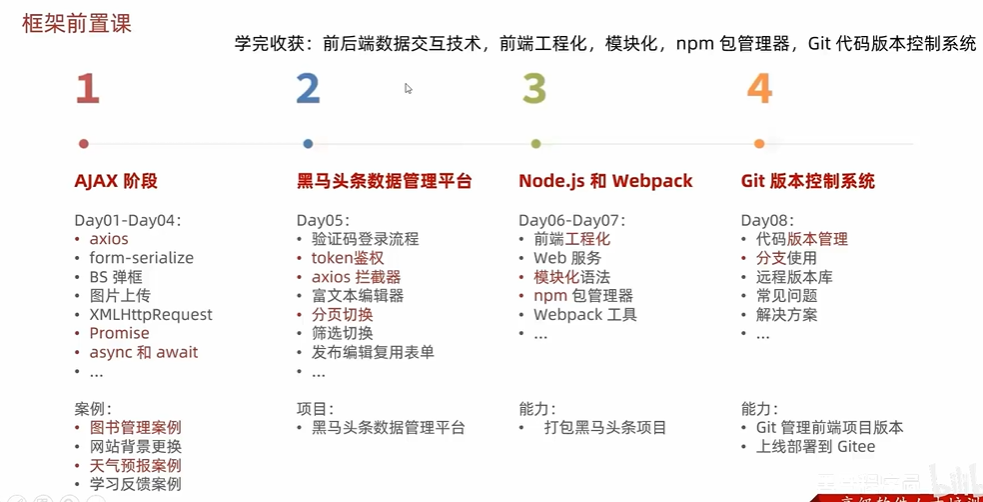
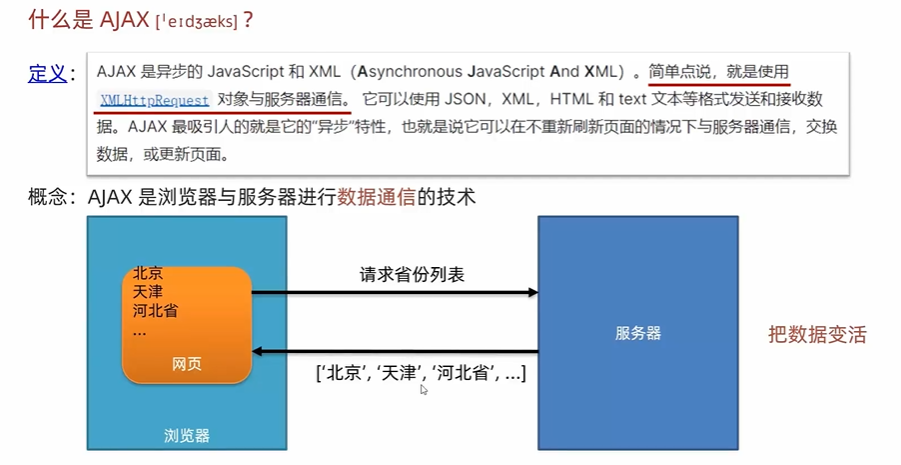
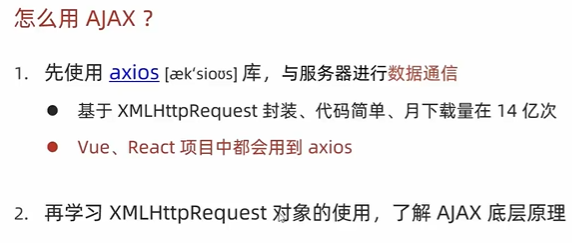
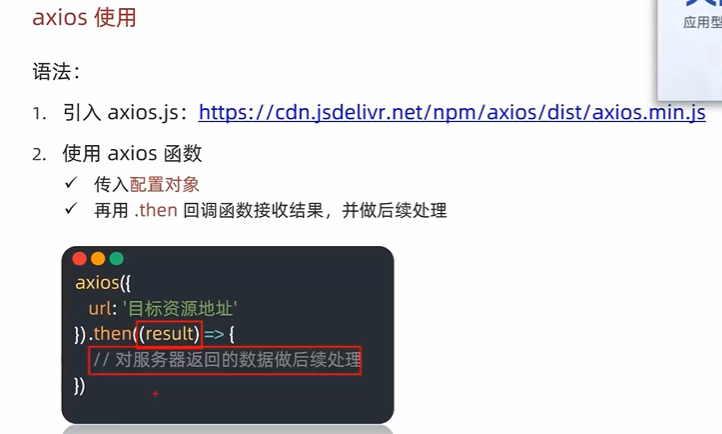
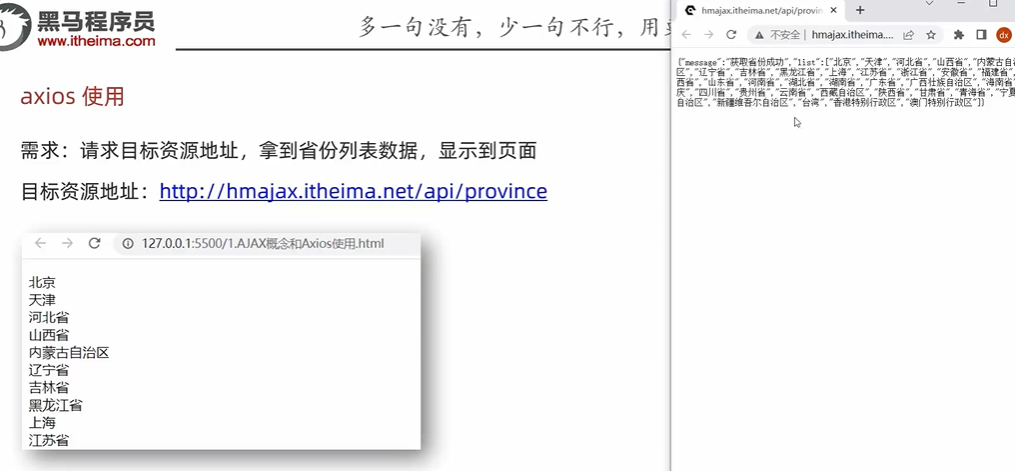
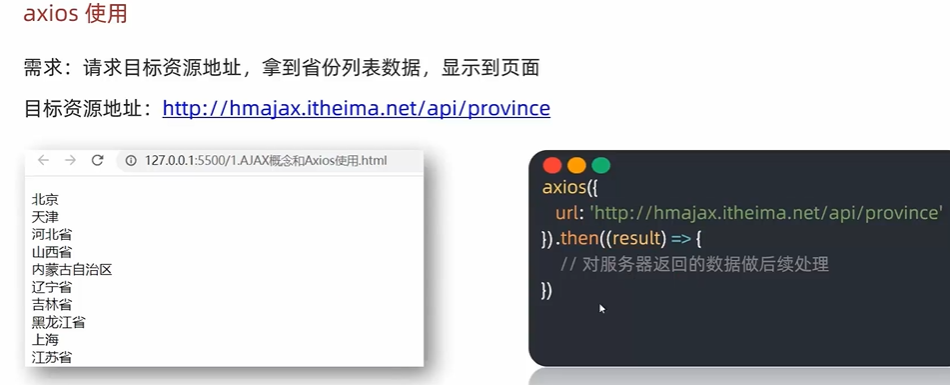
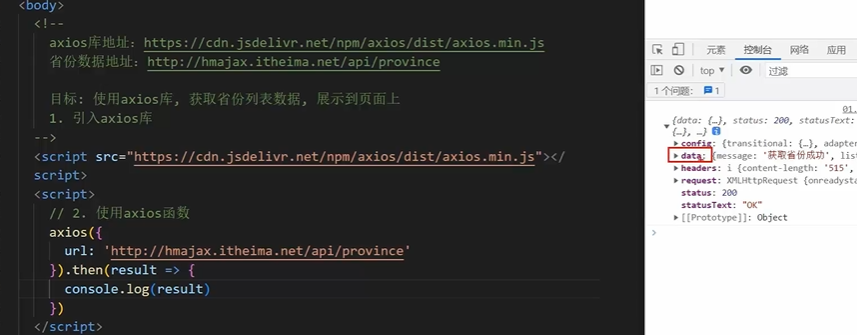
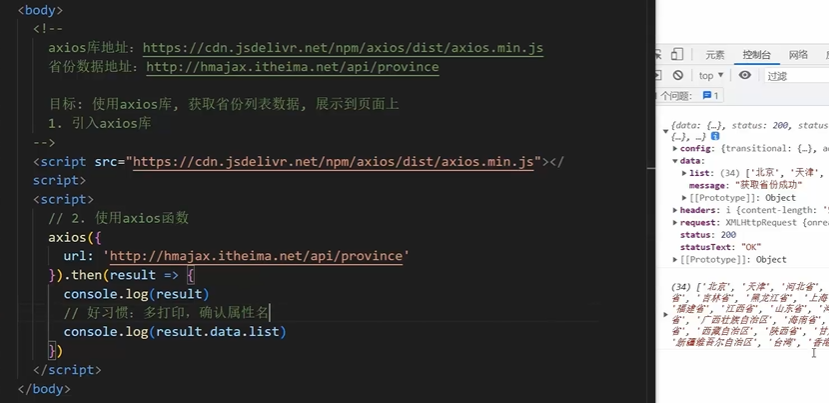
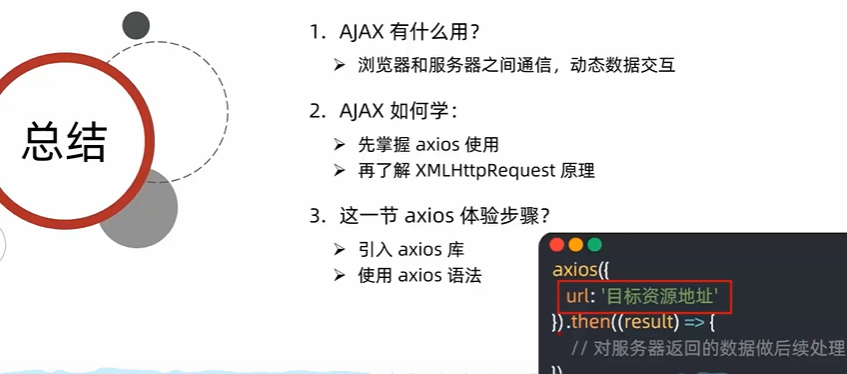
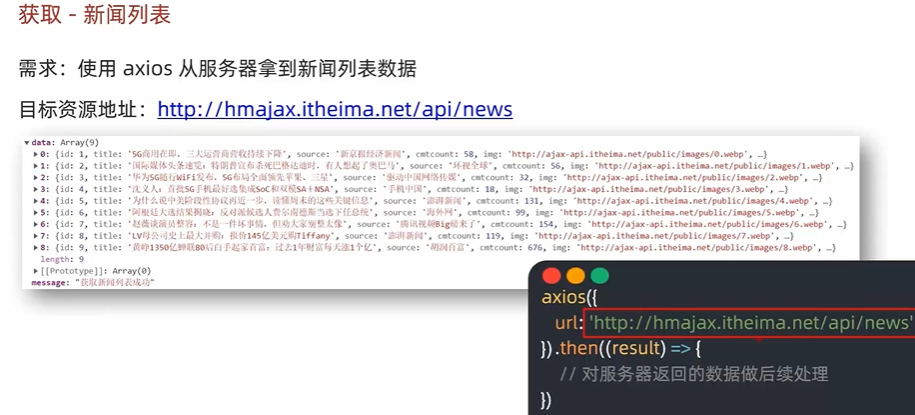
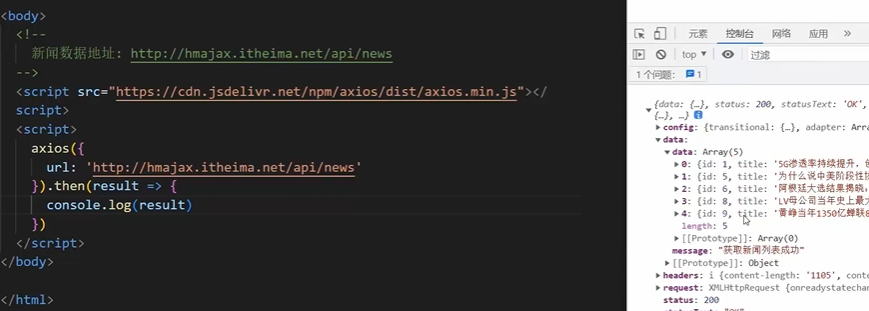
1.1-AJAX入门与axios使用
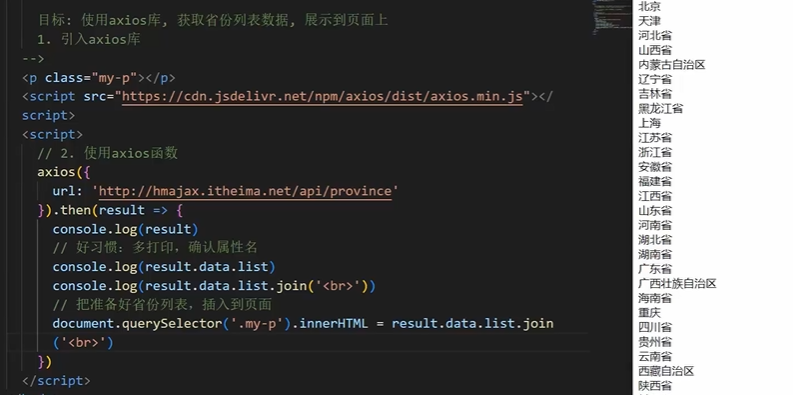
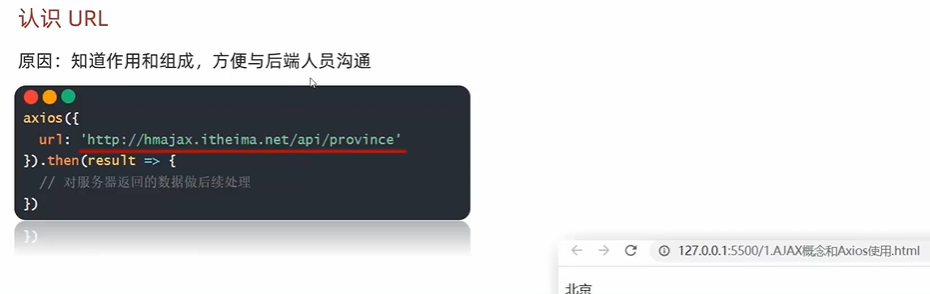
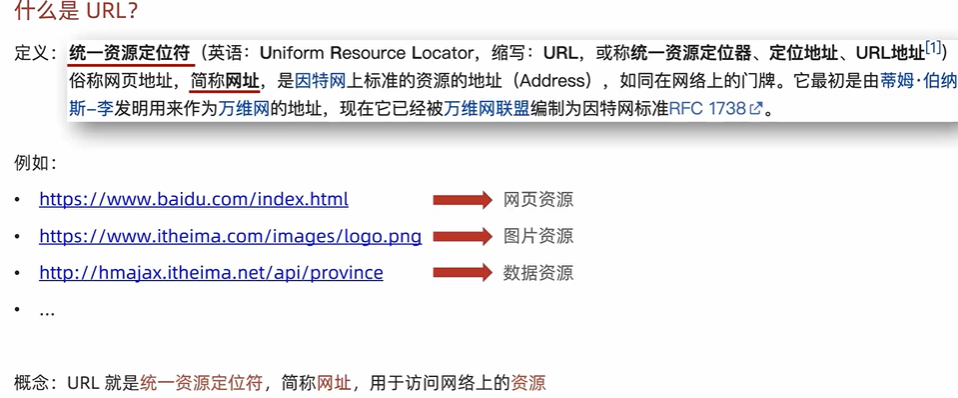
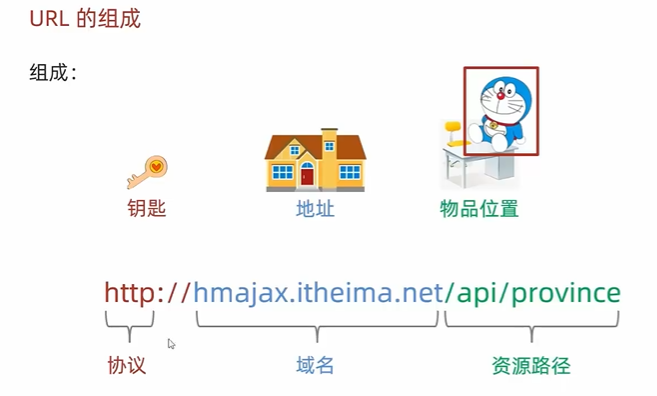
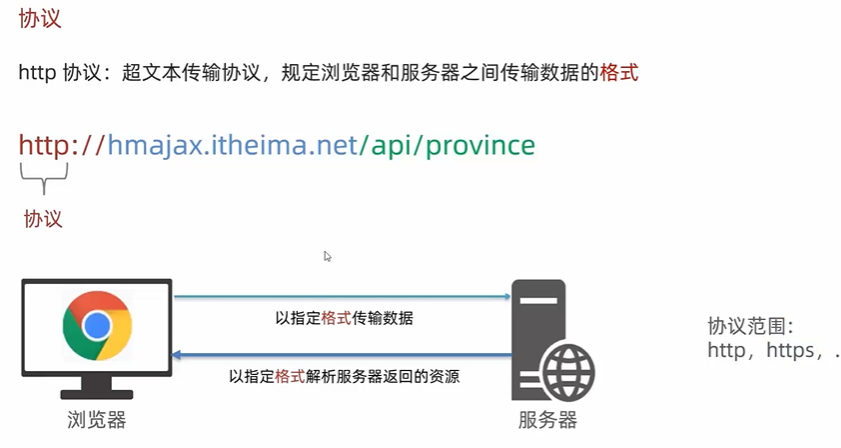
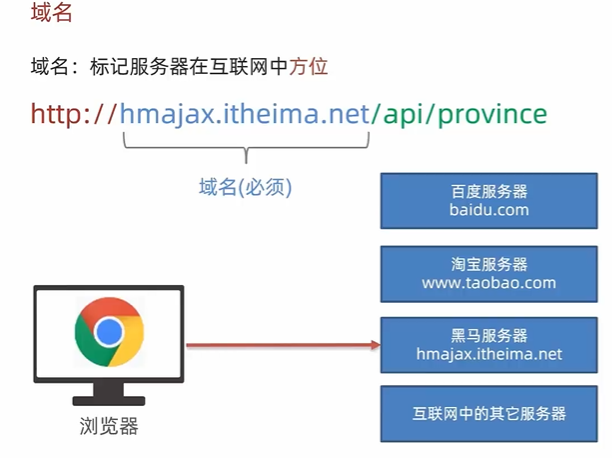
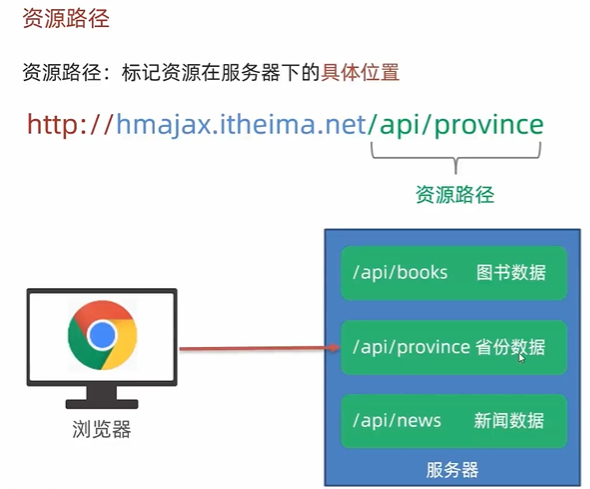
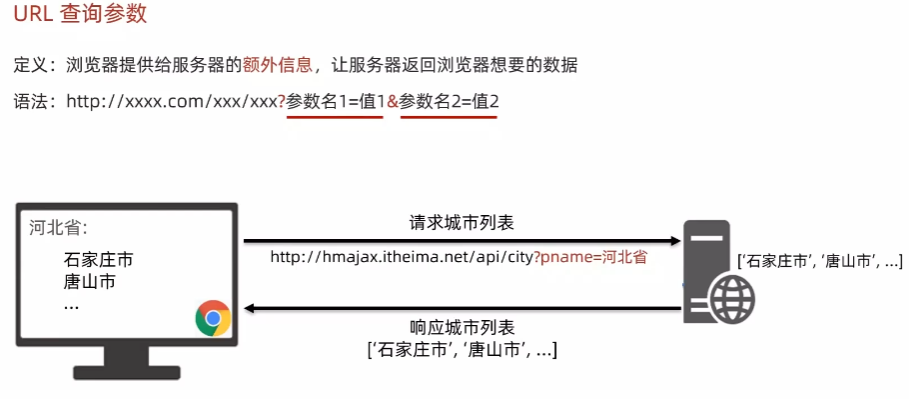
1.2-认识URL

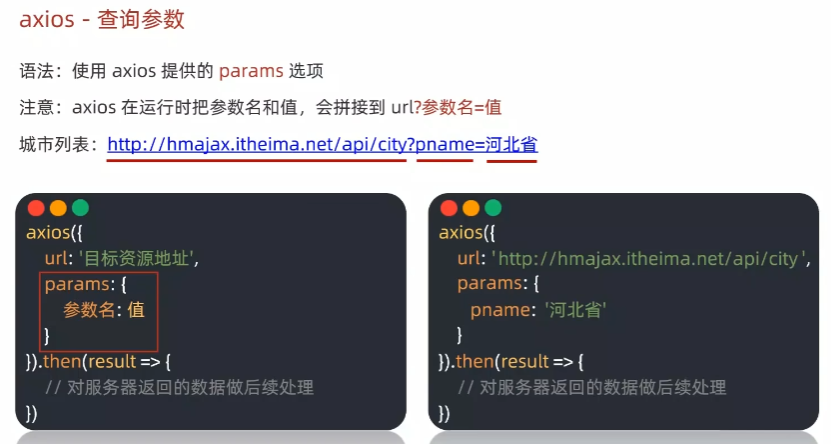
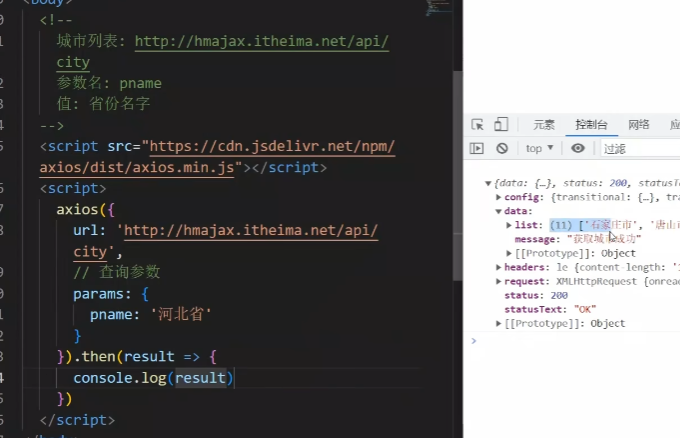
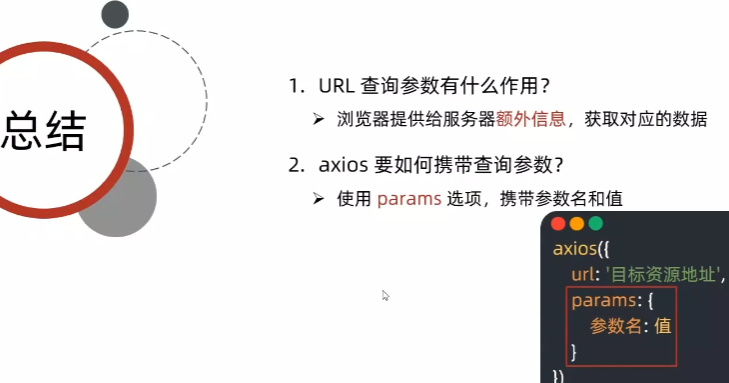
1.3-查询参数

1.4-案例_地区查询
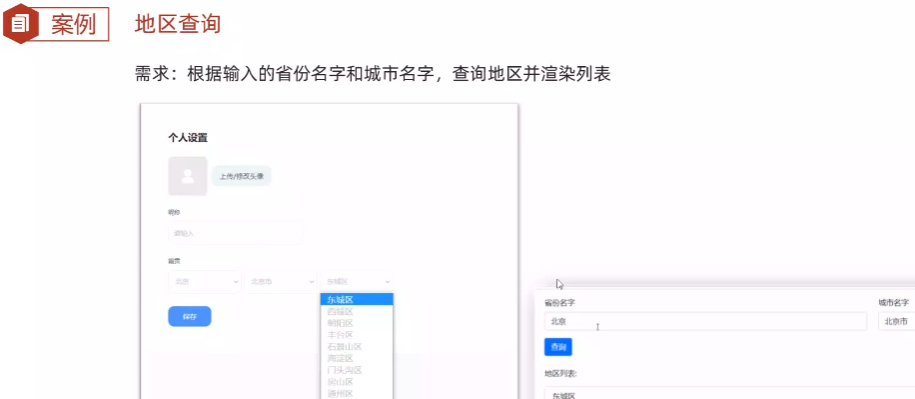
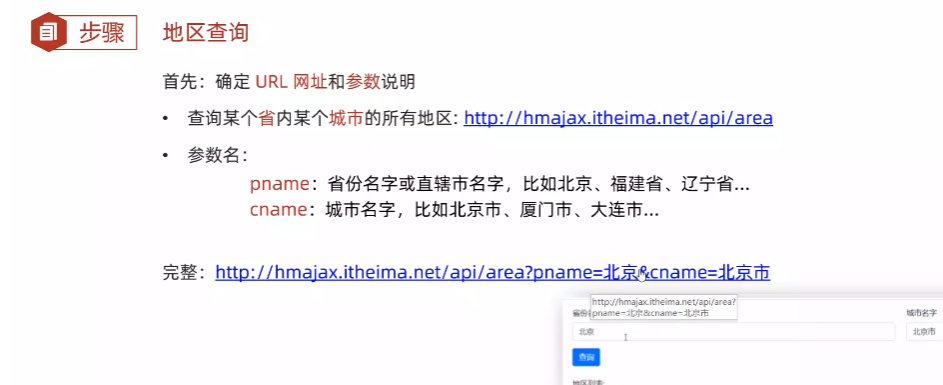
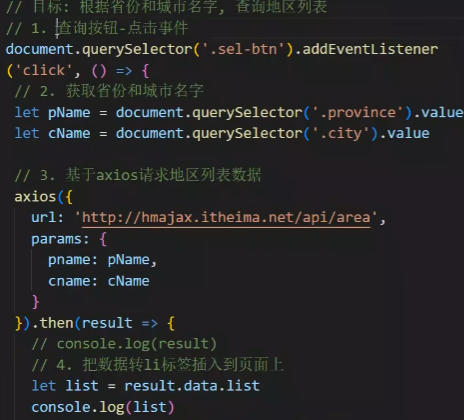
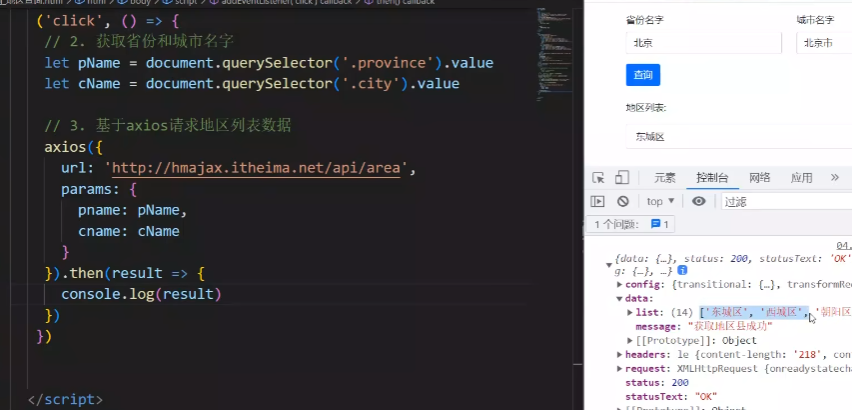
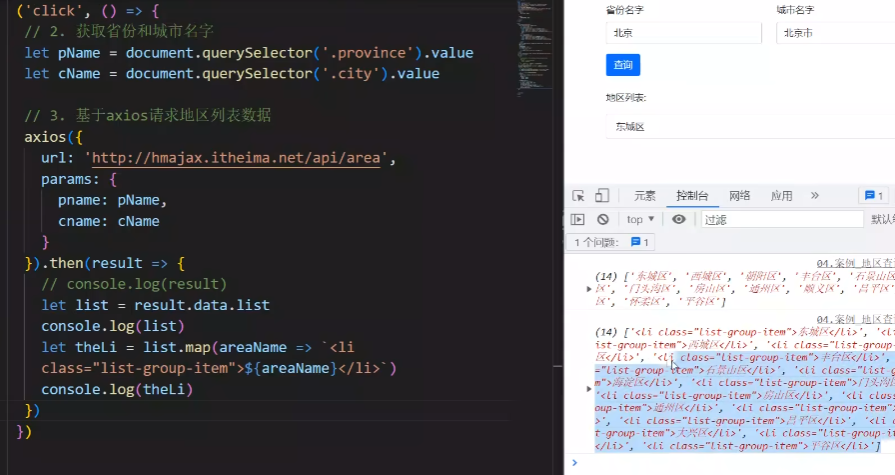
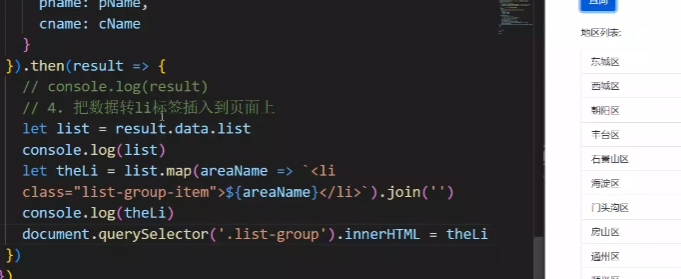
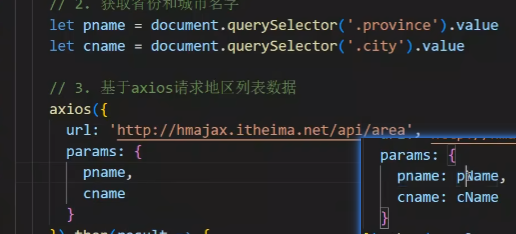
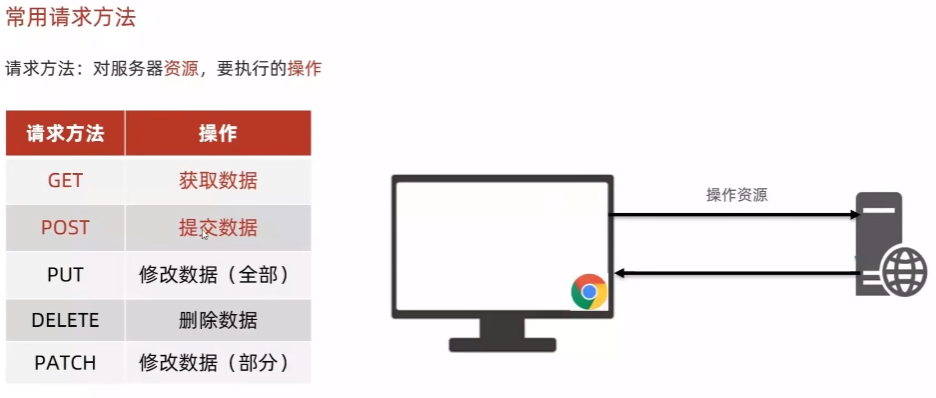
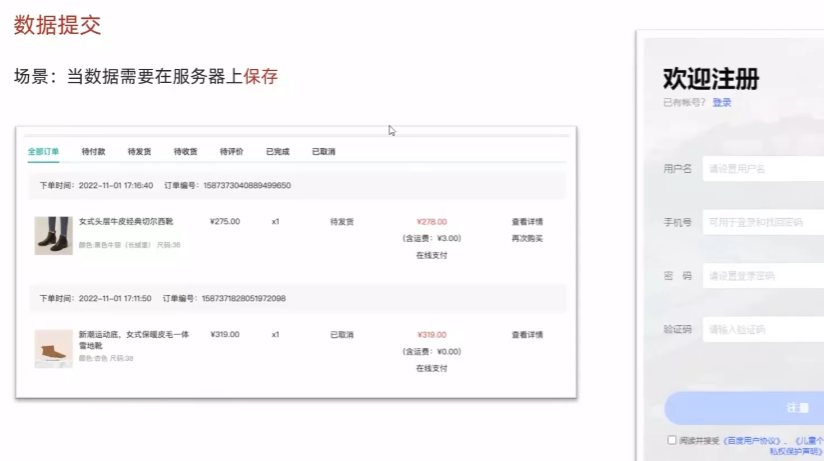
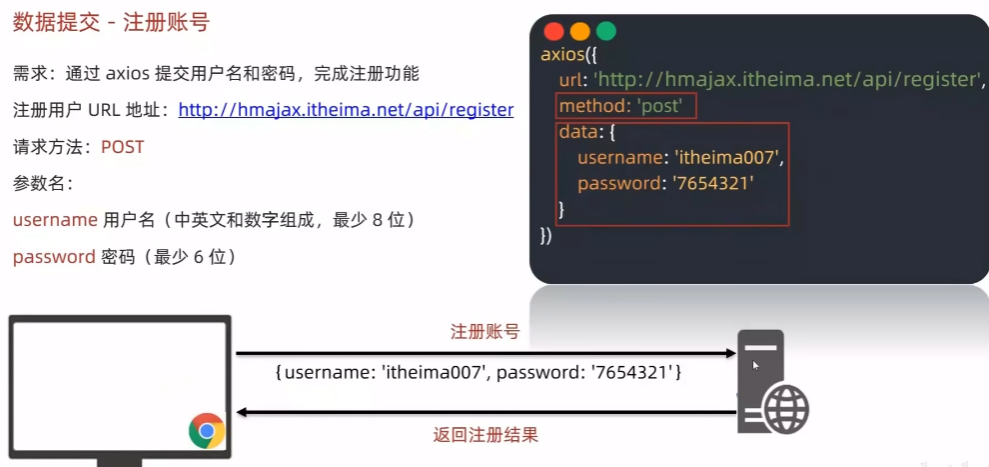
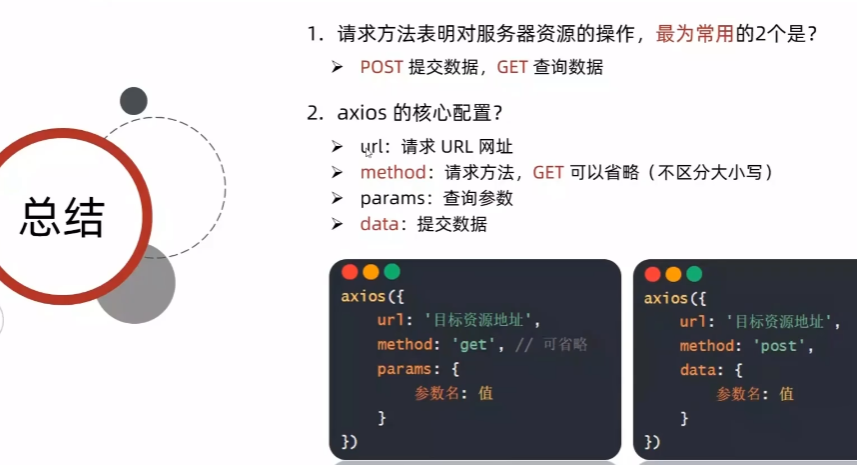
<script src="https://cdn.jsdelivr.net/npm/axios/dist/axios.min.js"></script><script>/*获取地区列表: http://hmajax.itheima.net/api/area查询参数:pname: 省份或直辖市名字cname: 城市名字*/// 目标: 根据省份和城市名字, 查询地区列表// 1. 查询按钮-点击事件document.querySelector('.sel-btn').addEventListener('click', () => {// 2. 获取省份和城市名字let pname = document.querySelector('.province').valuelet cname = document.querySelector('.city').value// 3. 基于axios请求地区列表数据axios({url: 'http://hmajax.itheima.net/api/area',params: {pname,cname}}).then(result => {// console.log(result)// 4. 把数据转li标签插入到页面上let list = result.data.listconsole.log(list)let theLi = list.map(areaName => `<li class="list-group-item">${areaName}</li>`).join('')console.log(theLi)document.querySelector('.list-group').innerHTML = theLi})})</script>1.5-常用请求方法和数据提交
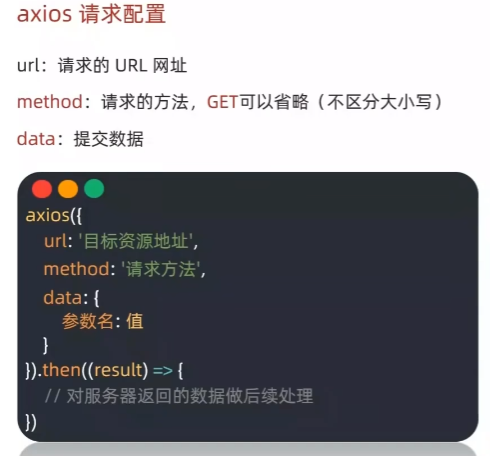
1.6-axios错误处理
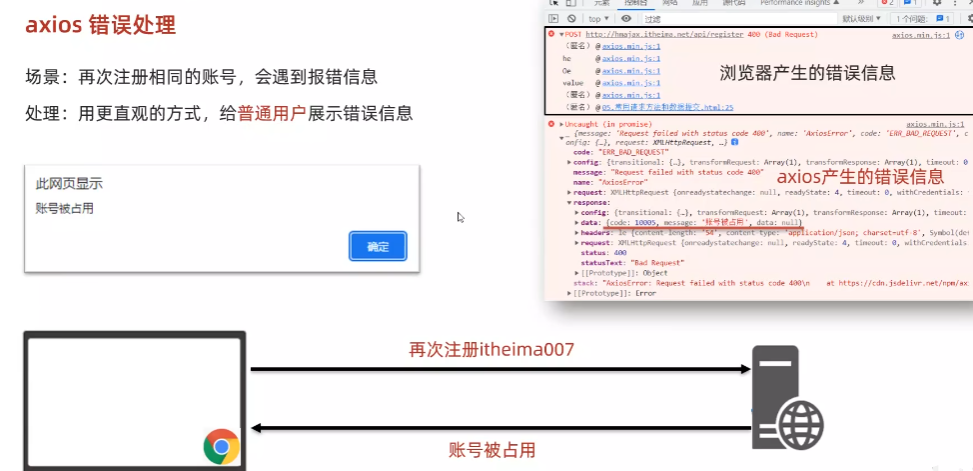
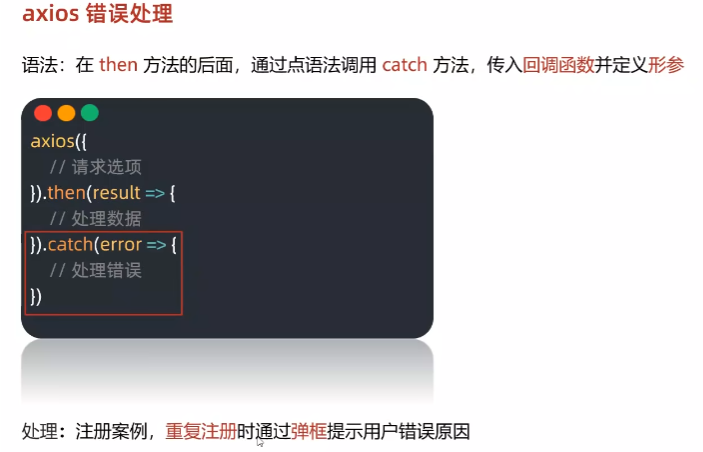
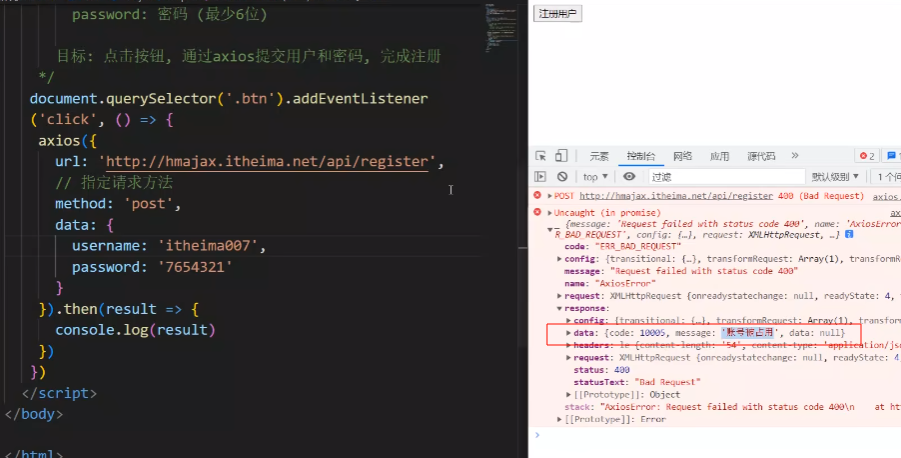

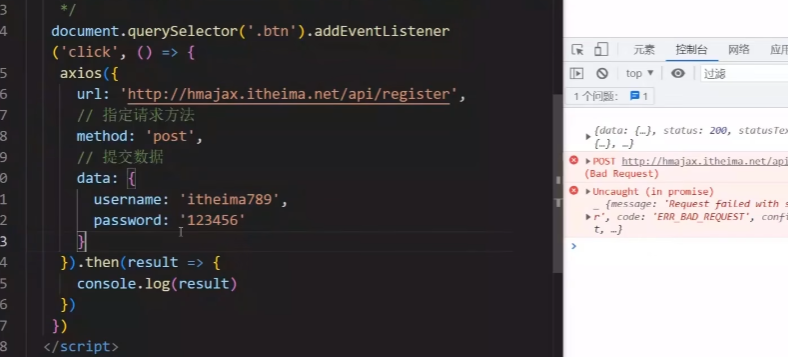
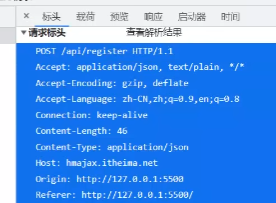
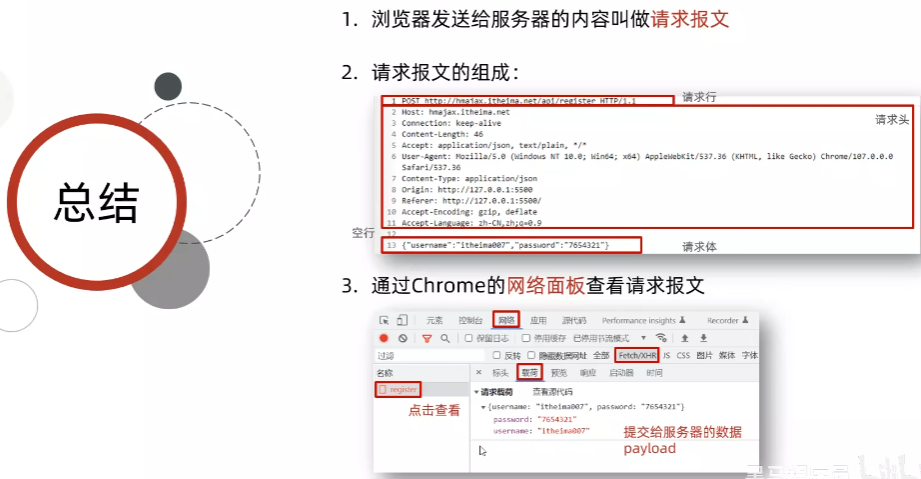
<button class="btn">注册用户</button><script src="https://cdn.jsdelivr.net/npm/axios/dist/axios.min.js"></script><script>/*注册用户: http://hmajax.itheima.net/api/register请求方法: POST参数名:username: 用户名 (中英文和数字组成, 最少8位)password: 密码 (最少6位)目标: 点击按钮, 通过axios提交用户和密码, 完成注册需求: 使用axios错误处理语法, 拿到报错信息, 弹框反馈给用户*/document.querySelector('.btn').addEventListener('click', () => {axios({url: 'http://hmajax.itheima.net/api/register',method: 'post',data: {username: 'itheima007',password: '7654321'}}).then(result => {// 成功console.log(result)}).catch(error => {// 失败// 处理错误信息console.log(error)console.log(error.response.data.message)alert(error.response.data.message)})})</script>1.7-HTTP协议请求报文
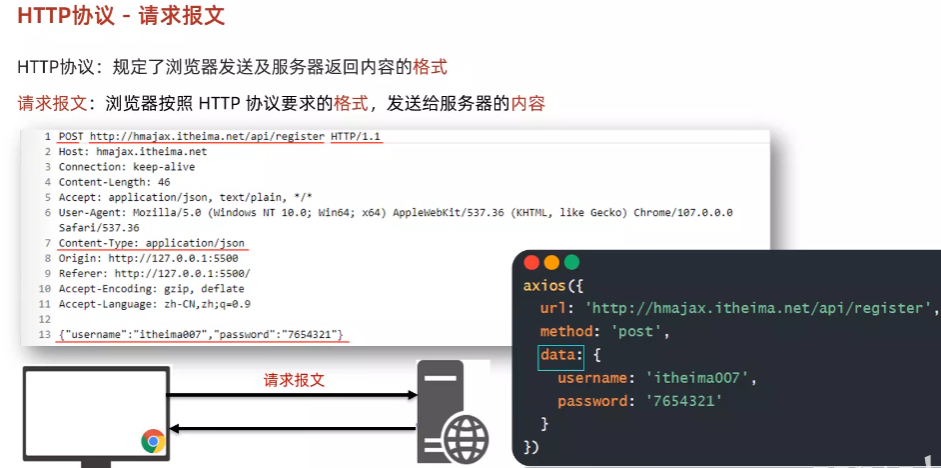
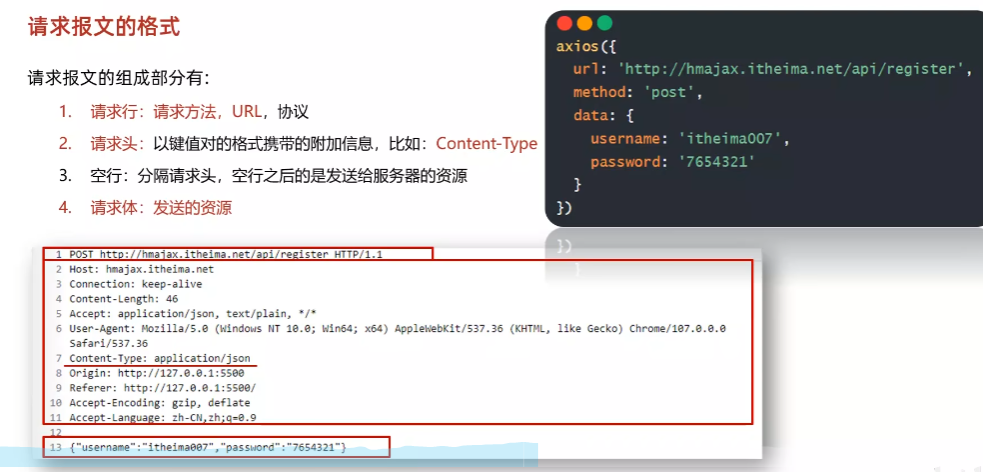


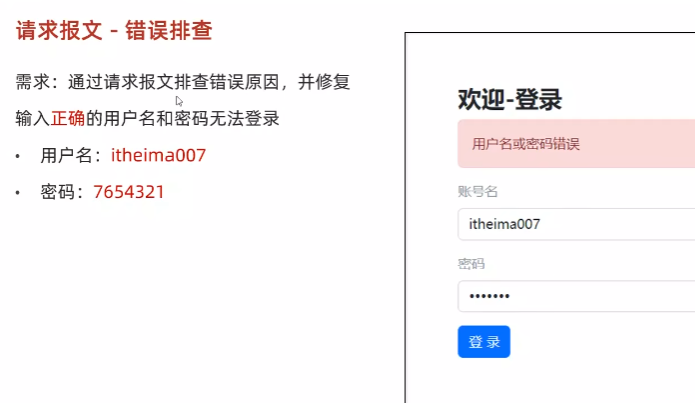
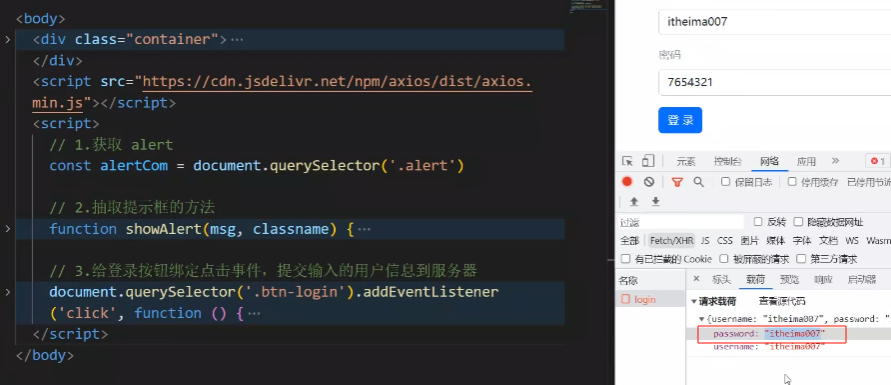
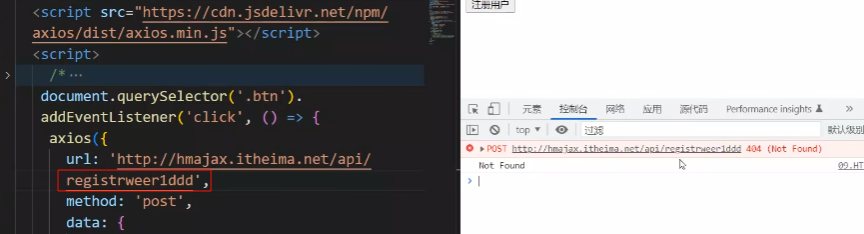
1.8-请求报文-错误排查
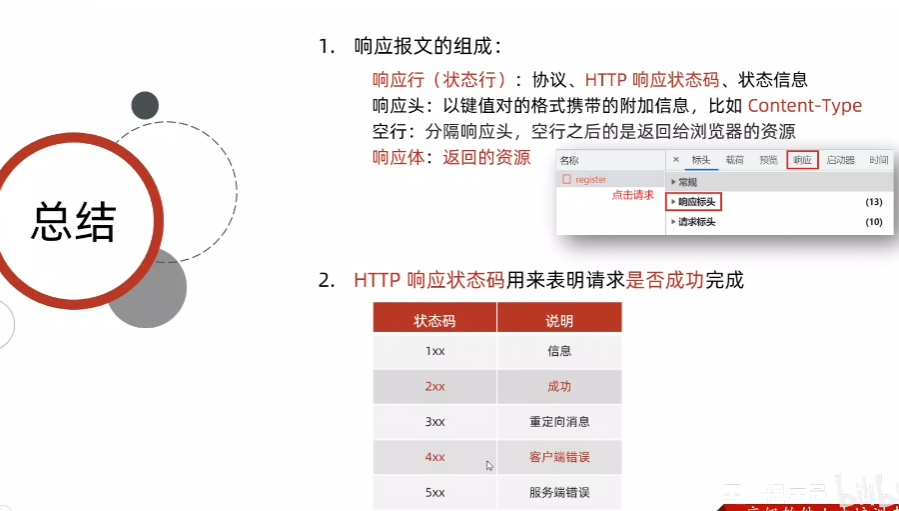
1.9-HTTP协议响应报文
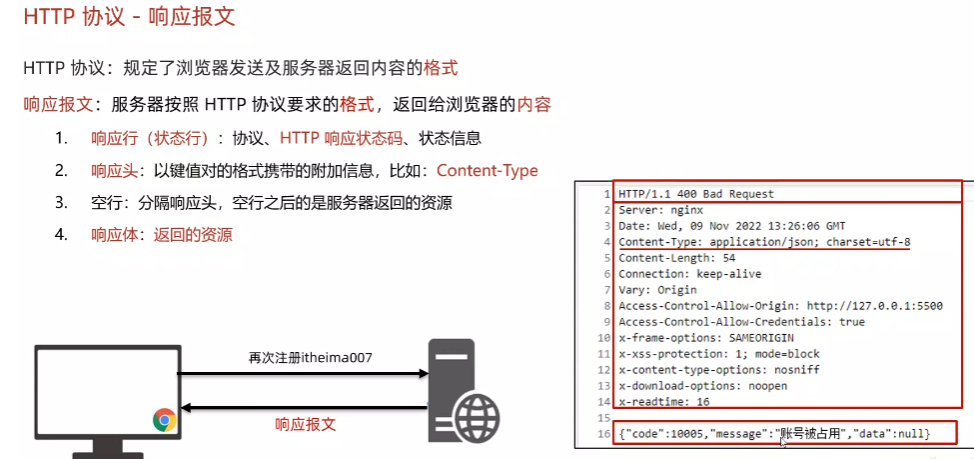
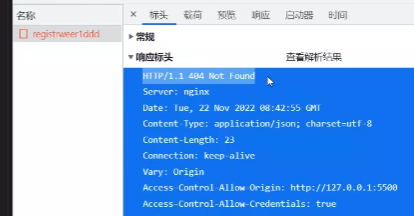
![]()
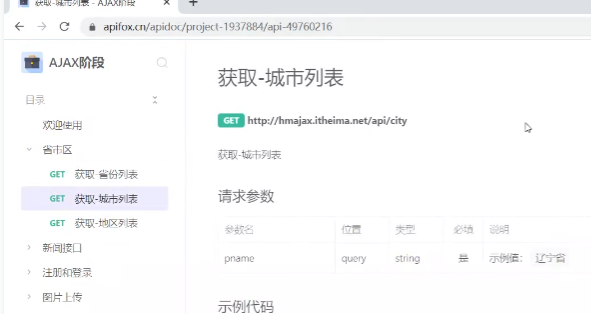
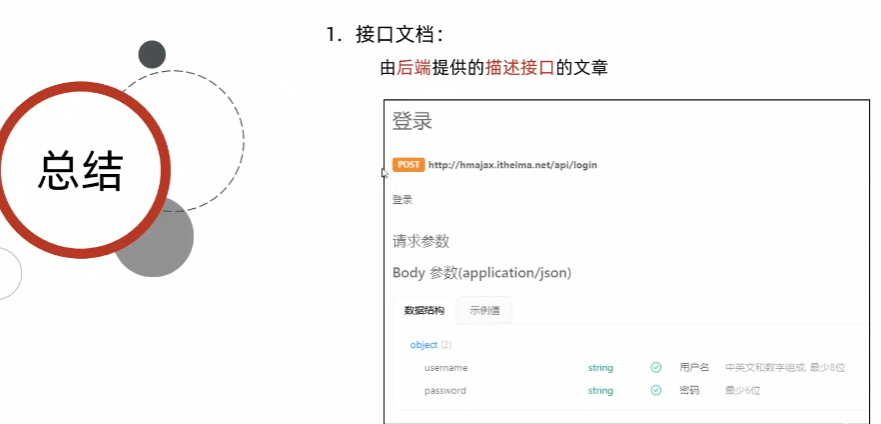
1.10-接口文档
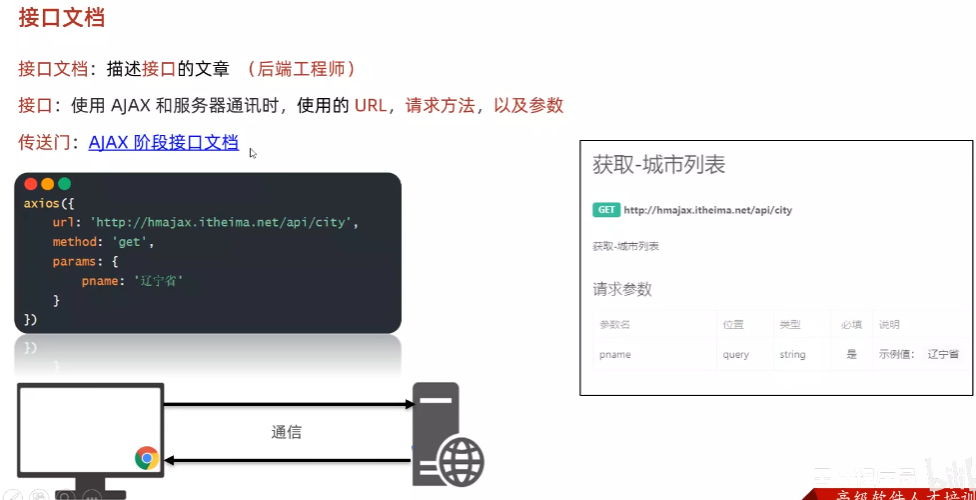
接口用例 | Apifox 帮助文档
<body><button class="btn">用户登录</button><script src="https://cdn.jsdelivr.net/npm/axios/dist/axios.min.js"></script><script>// 用户注册// axios({//   url: 'http://hmajax.itheima.net/api/register',//   method: 'post',//   data: {//     username: 'itheima007',//     password: '7654321'//   }// })document.querySelector('.btn').addEventListener('click', () => {// 用户登录axios({url: 'http://hmajax.itheima.net/api/login',method: 'post',data: {username: 'itheima007',password: '7654321'}})})</script>
</body>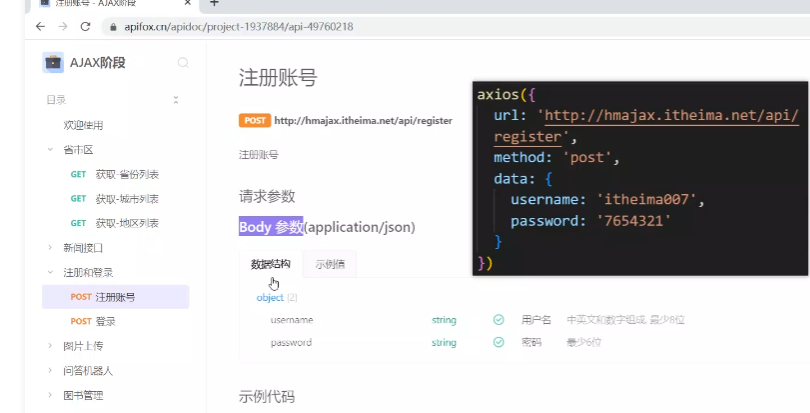
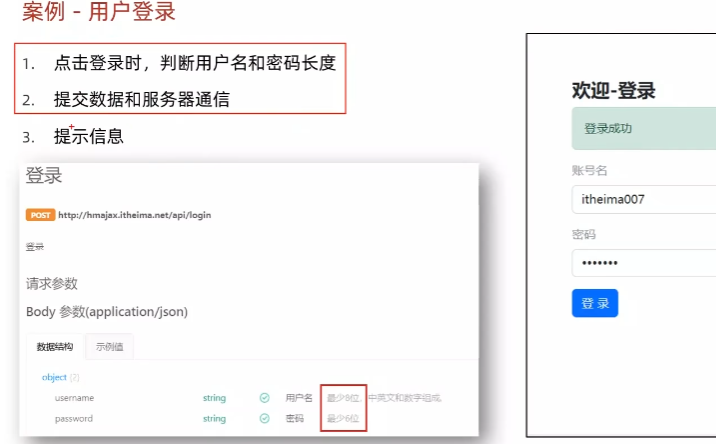
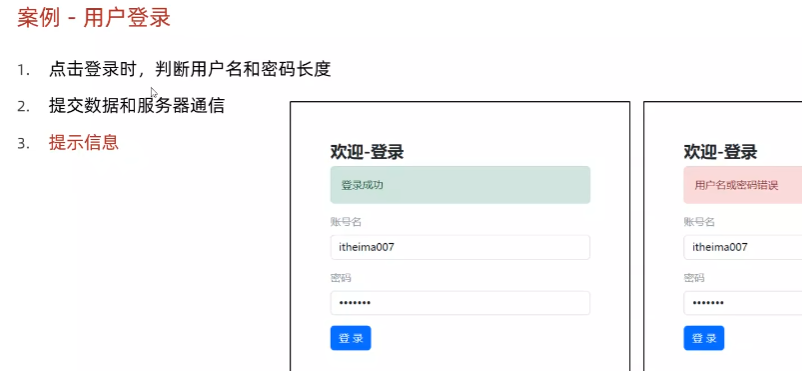
1.11-案例_登录
<!DOCTYPE html>
<html lang="en"><head><meta charset="UTF-8"><meta http-equiv="X-UA-Compatible" content="IE=edge"><meta name="viewport" content="width=device-width, initial-scale=1.0"><title>案例_登录</title><!-- 引入bootstrap.css --><link rel="stylesheet" href="https://cdn.jsdelivr.net/npm/bootstrap@5.2.2/dist/css/bootstrap.min.css"><!-- 公共 --><style>html,body {background-color: #EDF0F5;width: 100%;height: 100%;display: flex;justify-content: center;align-items: center;}.container {width: 520px;height: 540px;background-color: #fff;padding: 60px;box-sizing: border-box;}.container h3 {font-weight: 900;}</style><!-- 表单容器和内容 --><style>.form_wrap {color: #8B929D !important;}.form-text {color: #8B929D !important;}</style><!-- 提示框样式 --><style>.alert {transition: .5s;opacity: 0;}.alert.show {opacity: 1;}</style>
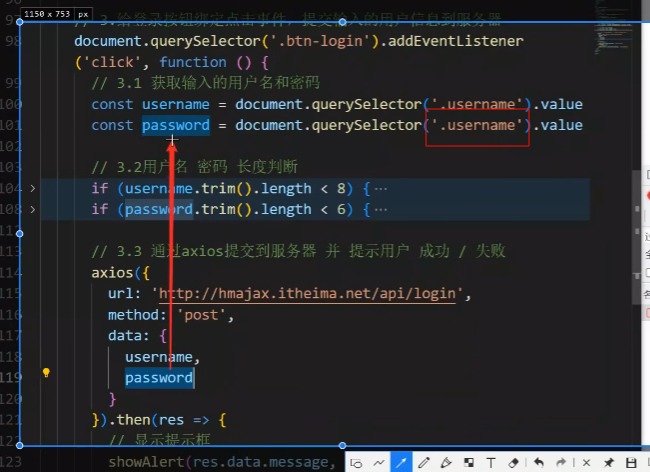
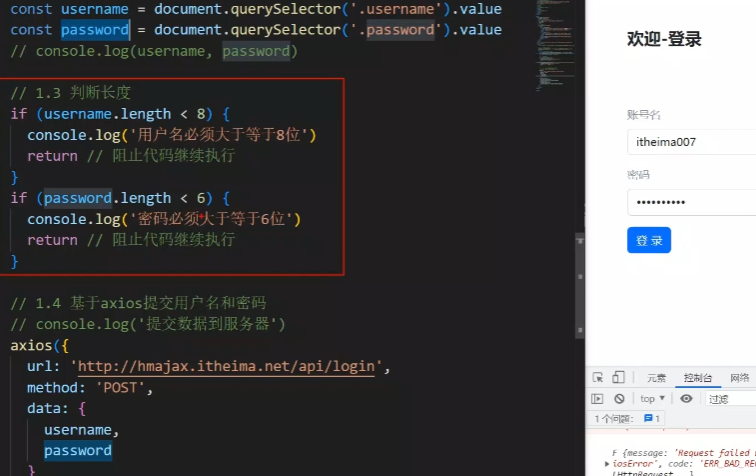
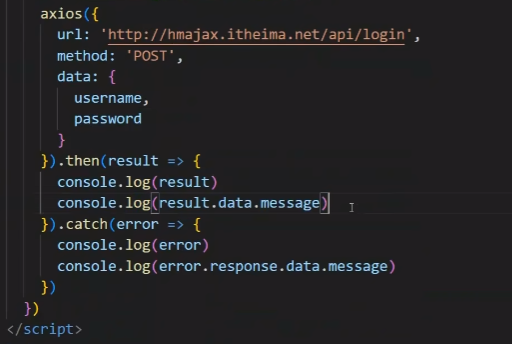
</head><body><div class="container"><h3>欢迎-登录</h3><!-- 登录结果-提示框 --><div class="alert alert-success" role="alert">提示消息</div><!-- 表单 --><div class="form_wrap"><form><div class="mb-3"><label for="username" class="form-label">账号名</label><input type="text" class="form-control username"></div><div class="mb-3"><label for="password" class="form-label">密码</label><input type="password" class="form-control password"></div><button type="button" class="btn btn-primary btn-login"> 登 录 </button></form></div></div><script src="https://cdn.jsdelivr.net/npm/axios/dist/axios.min.js"></script><script>// 目标1:点击登录时,用户名和密码长度判断,并提交数据和服务器通信// 1.1 登录-点击事件document.querySelector('.btn-login').addEventListener('click', () => {// 1.2 获取用户名和密码const username = document.querySelector('.username').valueconst password = document.querySelector('.password').value// console.log(username, password)// 1.3 判断长度if (username.length < 8) {console.log('用户名必须大于等于8位')return // 阻止代码继续执行}if (password.length < 6) {console.log('密码必须大于等于6位')return // 阻止代码继续执行}// 1.4 基于axios提交用户名和密码// console.log('提交数据到服务器')axios({url: 'http://hmajax.itheima.net/api/login',method: 'POST',data: {username,password}}).then(result => {console.log(result)console.log(result.data.message)}).catch(error => {console.log(error)console.log(error.response.data.message)})})</script>
</body></html>1.12-案例登录提示消息
<!DOCTYPE html>
<html lang="en"><head><meta charset="UTF-8"><meta http-equiv="X-UA-Compatible" content="IE=edge"><meta name="viewport" content="width=device-width, initial-scale=1.0"><title>案例_登录_提示消息</title><!-- 引入bootstrap.css --><link rel="stylesheet" href="https://cdn.jsdelivr.net/npm/bootstrap@5.2.2/dist/css/bootstrap.min.css"><!-- 公共 --><style>html,body {background-color: #EDF0F5;width: 100%;height: 100%;display: flex;justify-content: center;align-items: center;}.container {width: 520px;height: 540px;background-color: #fff;padding: 60px;box-sizing: border-box;}.container h3 {font-weight: 900;}</style><!-- 表单容器和内容 --><style>.form_wrap {color: #8B929D !important;}.form-text {color: #8B929D !important;}</style><!-- 提示框样式 --><style>.alert {transition: .5s;opacity: 0;}.alert.show {opacity: 1;}</style>
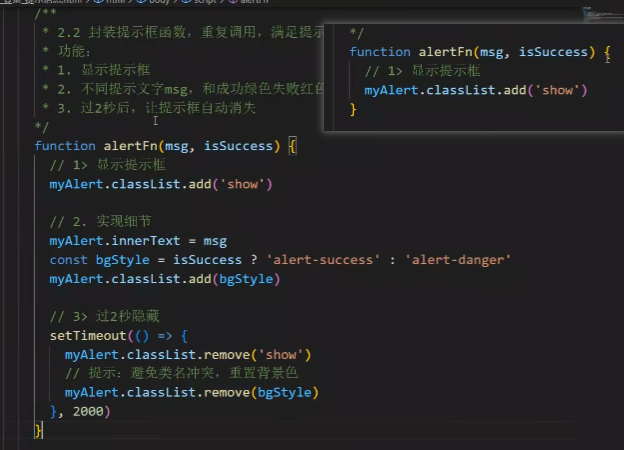
</head><body><div class="container"><h3>欢迎-登录</h3><!-- 登录结果-提示框 --><div class="alert alert-success" role="alert">提示消息</div><!-- 表单 --><div class="form_wrap"><form><div class="mb-3"><label for="username" class="form-label">账号名</label><input type="text" class="form-control username"></div><div class="mb-3"><label for="password" class="form-label">密码</label><input type="password" class="form-control password"></div><button type="button" class="btn btn-primary btn-login"> 登 录 </button></form></div></div><script src="https://cdn.jsdelivr.net/npm/axios/dist/axios.min.js"></script><script>// 目标1:点击登录时,用户名和密码长度判断,并提交数据和服务器通信// 目标2:使用提示框,反馈提示消息// 2.1 获取提示框const myAlert = document.querySelector('.alert')/*** 2.2 封装提示框函数,重复调用,满足提示需求* 功能:* 1. 显示提示框* 2. 不同提示文字msg,和成功绿色失败红色isSuccess(true成功,false失败)* 3. 过2秒后,让提示框自动消失*/function alertFn(msg, isSuccess) {// 1> 显示提示框myAlert.classList.add('show')// 2> 实现细节myAlert.innerText = msgconst bgStyle = isSuccess ? 'alert-success' : 'alert-danger'myAlert.classList.add(bgStyle)// 3> 过2秒隐藏setTimeout(() => {myAlert.classList.remove('show')// 提示:避免类名冲突,重置背景色myAlert.classList.remove(bgStyle)}, 2000)}// 1.1 登录-点击事件document.querySelector('.btn-login').addEventListener('click', () => {// 1.2 获取用户名和密码const username = document.querySelector('.username').valueconst password = document.querySelector('.password').value// console.log(username, password)// 1.3 判断长度if (username.length < 8) {alertFn('用户名必须大于等于8位', false)console.log('用户名必须大于等于8位')return // 阻止代码继续执行}if (password.length < 6) {alertFn('密码必须大于等于6位', false)console.log('密码必须大于等于6位')return // 阻止代码继续执行}// 1.4 基于axios提交用户名和密码// console.log('提交数据到服务器')axios({url: 'http://hmajax.itheima.net/api/login',method: 'POST',data: {username,password}}).then(result => {alertFn(result.data.message, true)console.log(result)console.log(result.data.message)}).catch(error => {alertFn(error.response.data.message, false)console.log(error)console.log(error.response.data.message)})})</script>
</body></html>1.13-form-serialize使用
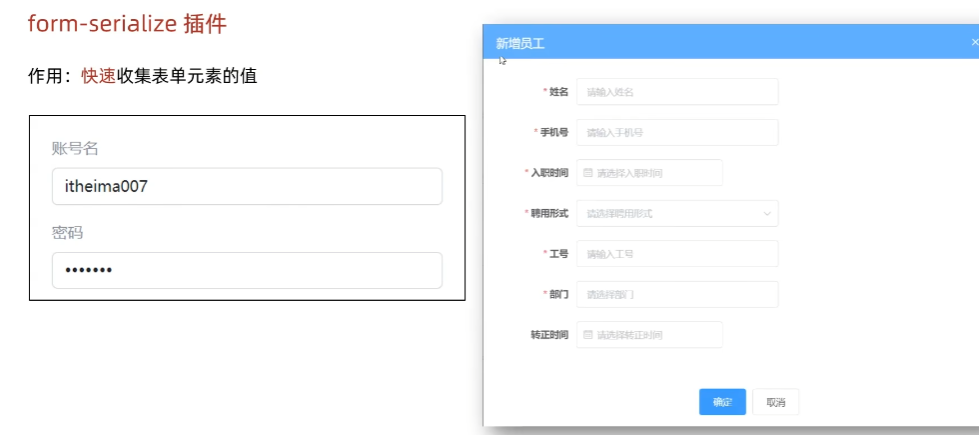
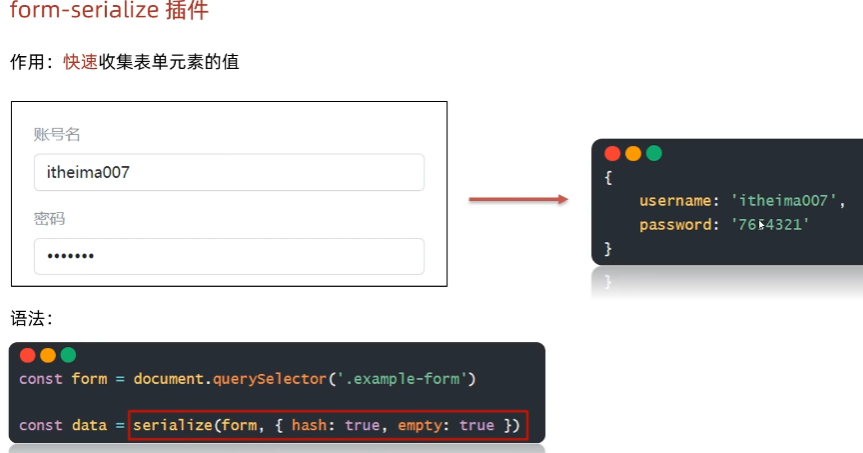
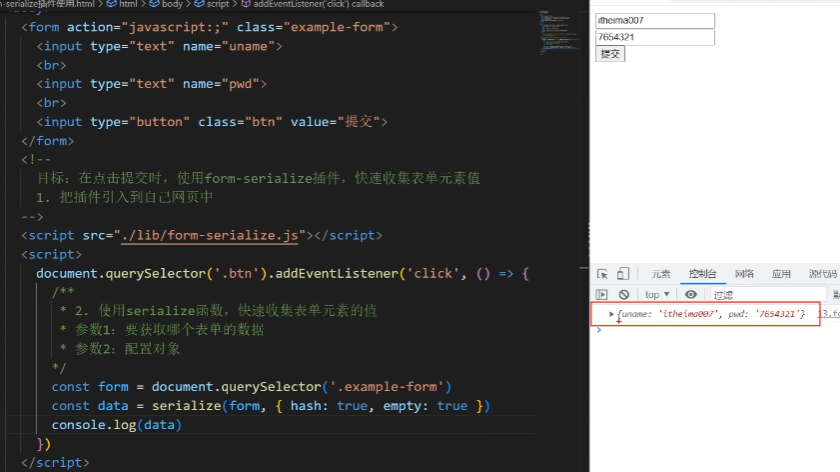
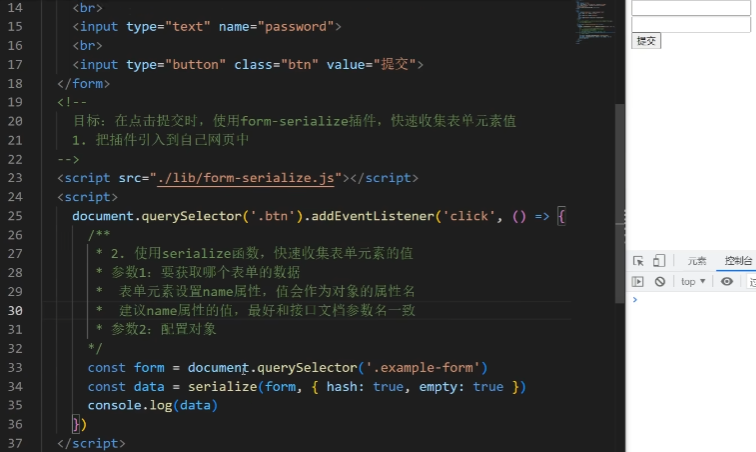
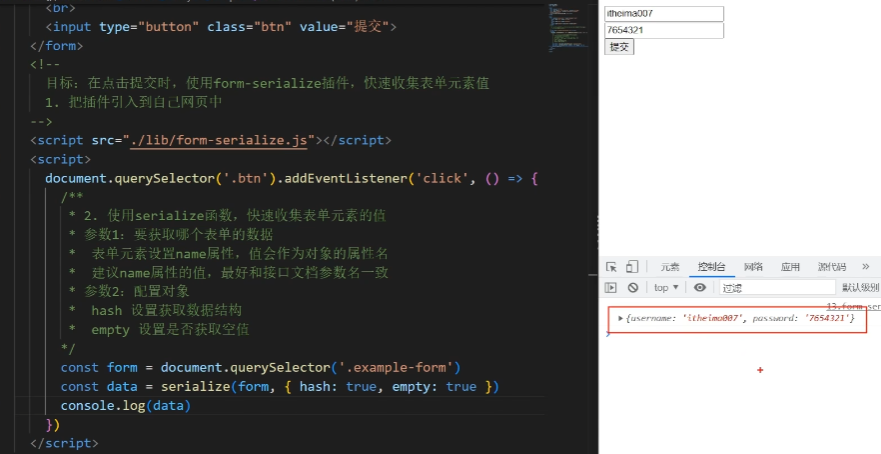
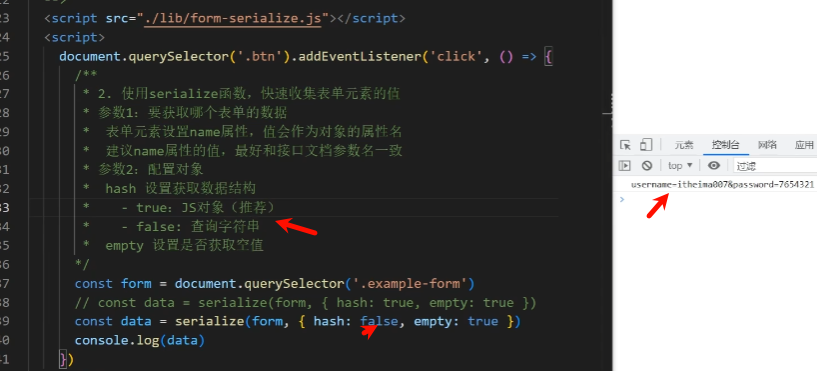
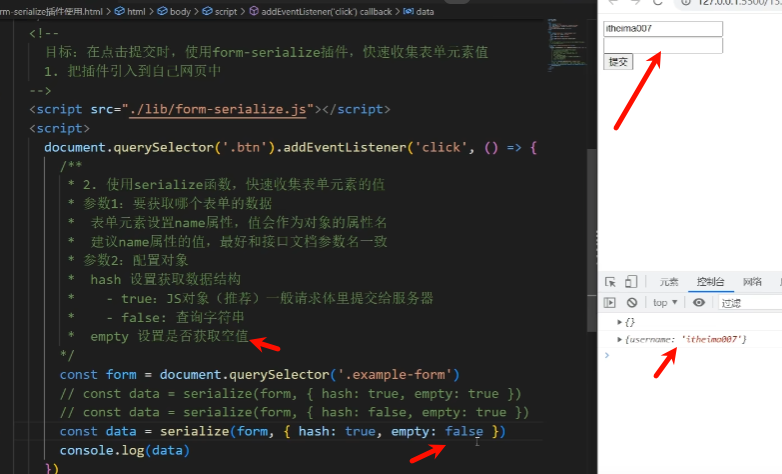

<body><form action="javascript:;" class="example-form"><input type="text" name="username"><br><input type="text" name="password"><br><input type="button" class="btn" value="提交"></form><!-- 目标:在点击提交时,使用form-serialize插件,快速收集表单元素值1. 把插件引入到自己网页中--><script src="./lib/form-serialize.js"></script><script>document.querySelector('.btn').addEventListener('click', () => {/*** 2. 使用serialize函数,快速收集表单元素的值* 参数1:要获取哪个表单的数据* 表单元素设置name属性,值会作为对象的属性名* 建议name属性的值,最好和接口文档参数名一致* 参数2:配置对象* hash 设置获取数据结构* - true:JS对象(推荐)一般请求体里提交给服务器* - false: 查询字符串* empty 设置是否获取空值* - true: 获取空值(推荐)数据结构和标签结构一致* - false:不获取空值*/const form = document.querySelector('.example-form')const data = serialize(form, { hash: true, empty: true })// const data = serialize(form, { hash: false, empty: true })// const data = serialize(form, { hash: true, empty: false })console.log(data)})</script>
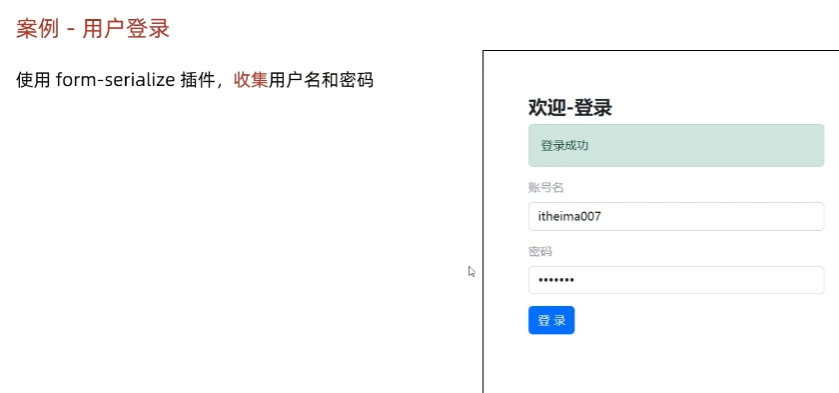
</body>1.14-案例_登录_整合form-serialize

<!DOCTYPE html>
<html lang="en"><head><meta charset="UTF-8"><meta http-equiv="X-UA-Compatible" content="IE=edge"><meta name="viewport" content="width=device-width, initial-scale=1.0"><title>案例_登录_插件使用</title><!-- 引入bootstrap.css --><link rel="stylesheet" href="https://cdn.jsdelivr.net/npm/bootstrap@5.2.2/dist/css/bootstrap.min.css"><!-- 公共 --><style>html,body {background-color: #EDF0F5;width: 100%;height: 100%;display: flex;justify-content: center;align-items: center;}.container {width: 520px;height: 540px;background-color: #fff;padding: 60px;box-sizing: border-box;}.container h3 {font-weight: 900;}</style><!-- 表单容器和内容 --><style>.form_wrap {color: #8B929D !important;}.form-text {color: #8B929D !important;}</style><!-- 提示框样式 --><style>.alert {transition: .5s;opacity: 0;}.alert.show {opacity: 1;}</style>
</head><body><div class="container"><h3>欢迎-登录</h3><!-- 登录结果-提示框 --><div class="alert alert-success" role="alert">提示消息</div><!-- 表单 --><div class="form_wrap"><form class="login-form"><div class="mb-3"><label for="username" class="form-label">账号名</label><input type="text" class="form-control username" name="username"></div><div class="mb-3"><label for="password" class="form-label">密码</label><input type="password" class="form-control password" name="password"></div><button type="button" class="btn btn-primary btn-login"> 登 录 </button></form></div></div><script src="https://cdn.jsdelivr.net/npm/axios/dist/axios.min.js"></script><!-- 3.1 引入插件 --><script src="./lib/form-serialize.js"></script><script>// 目标1:点击登录时,用户名和密码长度判断,并提交数据和服务器通信// 目标2:使用提示框,反馈提示消息// 目标3:使用form-serialize插件,收集用户名和密码// 2.1 获取提示框const myAlert = document.querySelector('.alert')/**2.2 封装提示框函数,重复调用,满足提示需求* 功能:* 1. 显示提示框* 2. 不同提示文字msg,和成功绿色失败红色isSuccess(true成功,false失败)* 3. 过2秒后,让提示框自动消失*/function alertFn(msg, isSuccess) {// 1> 显示提示框myAlert.classList.add('show')// 2> 实现细节myAlert.innerText = msgconst bgStyle = isSuccess ? 'alert-success' : 'alert-danger'myAlert.classList.add(bgStyle)// 3> 过2秒隐藏setTimeout(() => {myAlert.classList.remove('show')// 提示:避免类名冲突,重置背景色myAlert.classList.remove(bgStyle)}, 2000)}// 1.1 登录-点击事件document.querySelector('.btn-login').addEventListener('click', () => {// 3.2 使用serialize函数,收集登录表单里用户名和密码const form = document.querySelector('.login-form')const data = serialize(form, { hash: true, empty: true })console.log(data)// {username: 'itheima007', password: '7654321'}const { username, password } = data// 1.2 获取用户名和密码// const username = document.querySelector('.username').value// const password = document.querySelector('.password').valueconsole.log(username, password)// 1.3 判断长度if (username.length < 8) {alertFn('用户名必须大于等于8位', false)console.log('用户名必须大于等于8位')return // 阻止代码继续执行}if (password.length < 6) {alertFn('密码必须大于等于6位', false)console.log('密码必须大于等于6位')return // 阻止代码继续执行}// 1.4 基于axios提交用户名和密码// console.log('提交数据到服务器')axios({url: 'http://hmajax.itheima.net/api/login',method: 'POST',data: {username,password}}).then(result => {alertFn(result.data.message, true)console.log(result)console.log(result.data.message)}).catch(error => {alertFn(error.response.data.message, false)console.log(error)console.log(error.response.data.message)})})</script>
</body></html>