链表和顺序表的区别
顺序表的底层存储空间是连续的,链表的底层存储空间是不连续的,链表的每个节点需要额外的指针来指向下一个节点,占用更多的存储空间。
顺序表的随机访问性能好,时间复杂度为O(1),链表的随机访问性能差,时间复杂度为O(n)。
顺序表的插入和删除操作需要移动大量的元素,时间复杂度为O(n),链表的插入和删除操作只需要修改指针,时间复杂度为O(1)。
顺序表适合于查找为主的静态操作,链表适合于插入和删除为主的动态操作。
总的来说顺序表的底层是数组,而链表的底层是指针也就是地址,数组在内存中是连续存放的,所以顺序表的随机访问性要比链表好,而链表是以地址的方式存放在内存中,有可能一个空间与另一个空间的地址离的非常远,以指针的形式进行访问,所以随机访问性比较差,我们可以把顺序表和链表类比成动车和火车一节动车组是由8节车厢组成,车厢与车厢之间不能编组,他们8节就是一个整体就像数组一样,而火车就不同了,火车车厢之间可以灵活编组,就像链表的各个节点一样。
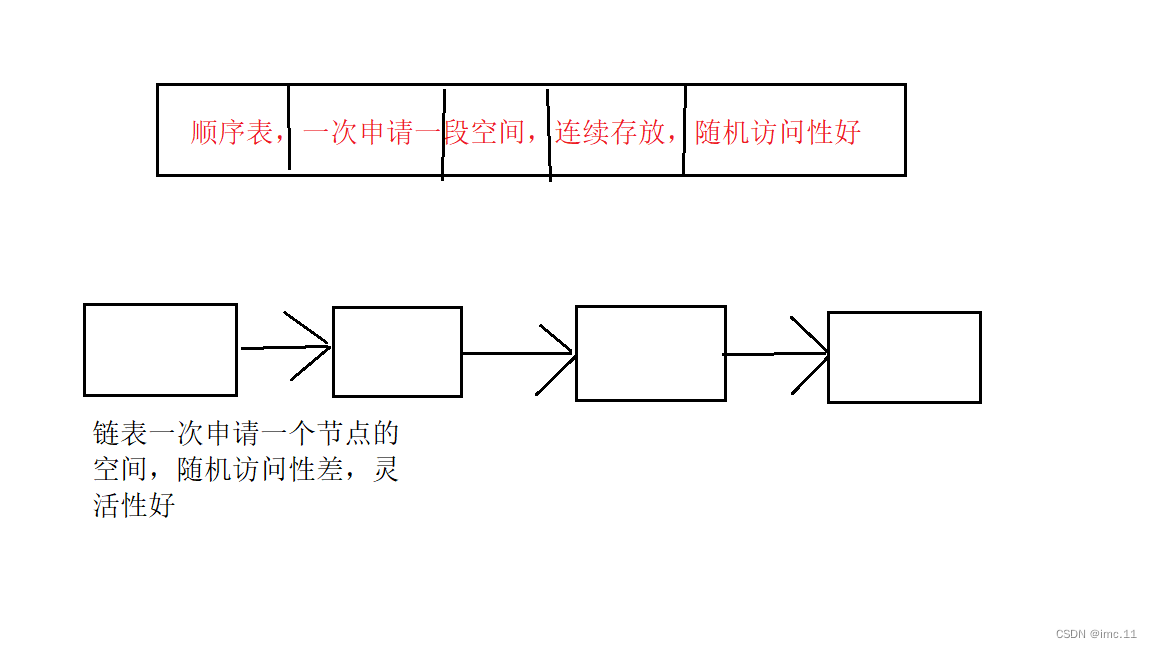
链表存储的优缺点
**优点:**空间利用率高,需要一个空间就分配一个空间,数据与数据之间以指针的形式联系,增添空间方便,只需要前一个结点和增加的节点,以及后一个节点,地址与地址之间形成联系手拉手,而不像顺序表那样需要前后移动来增加删除数据
**缺点:**存储密度小,每个节点的指针存放区域要额外申请空间,随机访问性差
链表的实现
下面是代码,会分部讲解
# include<stdio.h>
# include<stdlib.h>
# include<assert.h>
typedef int SLdatatype;
struct SListnode
{SLdatatype data;struct SListnode* next;
};
typedef struct SListnode SLnode;SLnode* create_memspace(SLdatatype x);//申请空间void pushback(SLnode** phead, SLdatatype x);//尾插void SLprint(SLnode* phead);//打印void del_pushback(SLnode** phead);//尾删void head_del(SLnode** phead);//头删void pushhead(SLnode** phead, SLdatatype x);//头插void pushpos(SLnode* pos, SLdatatype x);//指定位置之后插入void appoint_push(SLnode** phead, SLdatatype x, SLnode* pos);//在指定位置之前插入SLnode* find_data(SLnode* phead, SLdatatype x);//查找节点void del_pos_appoint(SLnode** phead, SLnode* pos);//删除节点void del_appoint_after(SLnode* pos);//删出之后的节点//销毁链表
void del_slist(SLnode** phead);
void SLprint(SLnode* phead)//打印链表{SLnode* printlist = phead;while (printlist != NULL){printf("%d->", printlist->data);printlist = printlist->next;}printf("NULL\n");
}
//申请空间
SLnode* create_memspace(SLdatatype x)
{SLnode* newspace = (SLnode*)malloc(sizeof(SLnode));if (newspace == NULL){perror("malloc");exit(1);}newspace->data = x;newspace->next = NULL;return newspace;
}//头插
void pushhead(SLnode** phead, SLdatatype x)
{assert(phead);SLnode* newspace = create_memspace(x);newspace->next = *phead;*phead = newspace;
}
//尾插
void pushback(SLnode** phead, SLdatatype x)
{assert(phead);SLnode* newspace = create_memspace(x);SLnode* pfind_tail = *phead;if (*phead == NULL){*phead = newspace;}else{while (pfind_tail->next != NULL){pfind_tail = pfind_tail->next;}pfind_tail->next = newspace;}
}
//尾删
void del_pushback(SLnode** phead)
{assert(phead);if ((*phead)->next == NULL){free(*phead);}else{SLnode* pfind_tail = *phead;//尾巴节点SLnode* pfind_previous = *phead;//基于尾巴节点的上一个节点while (pfind_tail->next != NULL){pfind_previous = pfind_tail;pfind_tail = pfind_tail->next;}pfind_previous->next = NULL;free(pfind_tail);pfind_tail = NULL;}
}
//头删
void head_del(SLnode** phead)
{assert(phead && *phead);SLnode* new_next = (*phead)->next;free(*phead);*phead = new_next;
}
//在指定位置之前插入
void appoint_push(SLnode** phead, SLdatatype x, SLnode* pos)
{assert(*phead && phead);SLnode* newspace = create_memspace(x);SLnode* find_appoint = *phead;if (*phead == pos){pushhead(phead, x);}else{while (find_appoint->next != pos){find_appoint = find_appoint->next;}newspace->next = pos;find_appoint->next = newspace;}
}
//查找
SLnode* find_data(SLnode* phead, SLdatatype x)
{SLnode* find_pdata = phead;while (find_pdata->next != NULL){if (find_pdata->data == x){return find_pdata;}find_pdata = find_pdata->next;}return NULL;
}
//在指定位置后插入
void pushpos(SLnode* pos, SLdatatype x)
{assert(pos);SLnode* newspace = create_memspace(x);newspace->next = pos->next;pos->next = newspace;
}
//删除指定节点
void del_pos_appoint(SLnode** phead, SLnode* pos)
{assert(phead && *phead && pos);SLnode* pfind_previous = *phead;if (pos == *phead){head_del(phead);}else{while (pfind_previous->next != pos){pfind_previous = pfind_previous->next;}pfind_previous->next = pos->next;free(pos);pos = NULL;}
}
//删除指定位置后一个
void del_appoint_after(SLnode* pos)
{assert(pos && pos->next);SLnode* temp_del = pos->next;pos->next = temp_del->next;free(temp_del);temp_del = NULL;
}
//销毁链表
void del_slist(SLnode** phead)
{assert(phead && *phead);SLnode* appoint_pervious = *phead;while (appoint_pervious->next != NULL){SLnode* next = appoint_pervious->next;free(appoint_pervious);appoint_pervious = next;}*phead = NULL;
}
测试代码
void test(){SLnode* plist = NULL;pushback(&plist, 1);pushback(&plist, 2);pushback(&plist, 3);SLprint(plist);del_pushback(&plist);SLprint(plist);head_del(&plist);SLprint(plist);pushhead(&plist, 5);SLprint(plist);pushhead(&plist, 3);pushhead(&plist, 2);	SLprint(plist);SLnode* find = find_data(plist, 2);pushpos(find, 5);pushpos(find, 9);SLprint(plist);appoint_push(&plist,34,find);SLprint(plist);del_pos_appoint(&plist, find);SLprint(plist);SLnode* find2 = find_data(plist, 5);SLprint(plist);del_appoint_after(find2);SLprint(plist);del_slist(&plist);
}int main()
{test();return 0;
}
代码讲解
链表的结构体声明
typedef int SLdatatype;
struct SListnode
{SLdatatype data;struct SListnode* next;
};
typedef struct SListnode SLnode;
这里我们创建了一个链表结构体,他的数据类型是int我们用来类型定义把他定义成 SLdatatype这样做的目的是为了以后方便修改链表中存放的数据,struct SListnode*next
这个就是存放下一个链表节点的指针。
typedef struct SListnode SLnode;
这里我们把链表重命名为SLnode这样是为了方便书写代码。
申请内存空间
SLnode* create_memspace(SLdatatype x)
{SLnode* newspace = (SLnode*)malloc(sizeof(SLnode));if (newspace == NULL){perror("malloc");exit(1);}newspace->data = x;newspace->next = NULL;return newspace;
}
这里我们用了一个malloc函数来申请内存空间为什么吧用realloc,那是由于这里我们不需要对空间进行扩容,不像顺序表那样,这里就申请一个定长空间就可以了返回类型是一个结构体指针SLnode*
然后下面进行了一个if判断看看空间有没有申请成功,再来看看下面的代码
newspace->data = x;newspace->next = NULL;
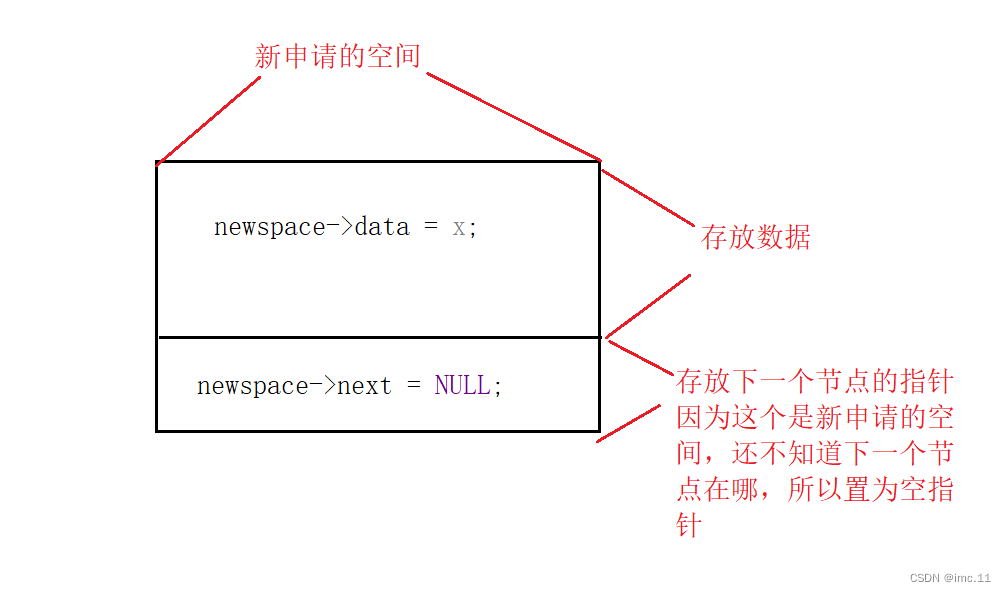
这里通过指针的形式来访问结构体,给新申请的空间把值存放进去。
头插入
void pushhead(SLnode** phead, SLdatatype x)
{assert(phead);SLnode* newspace = create_memspace(x);newspace->next = *phead;*phead = newspace;
}
这里我们传了一个参数是一个二级指针,为什么要传二级指针,那是因为我们头部插入会改变原始指针指向的位置,所以要传一个二级指针,不能传一个一级指针,如果传了一个一级指针,对一级指针解引用就得到第一个节点只能修改该指针所指向的值,而不能修改指针本身,就不能完成修改指针原始指向的位置了
然后我们assert断言了一下判断传过来的指针不能为空。
在下面就是申请内存空间了
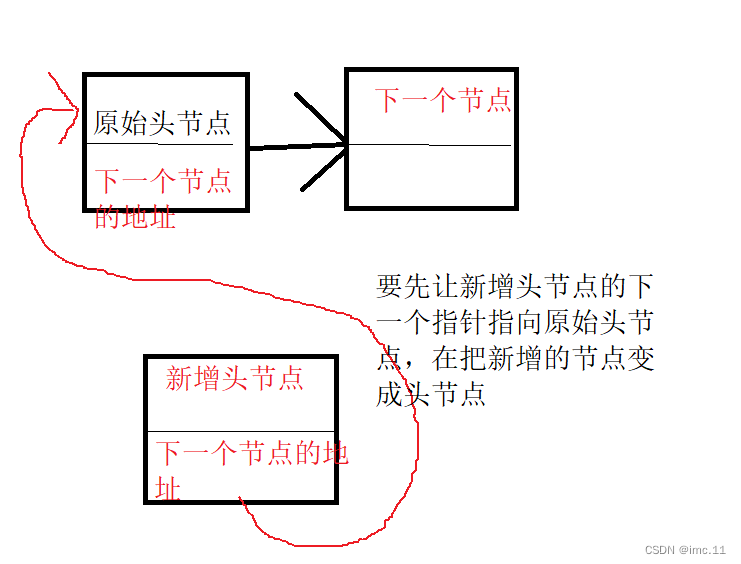
关于下面两行节点之间的链接看下面这张图
newspace->next = *phead;*phead = newspace;
尾插入
void pushback(SLnode** phead, SLdatatype x)
{assert(phead);SLnode* newspace = create_memspace(x);SLnode* pfind_tail = *phead;if (*phead == NULL){*phead = newspace;}else{while (pfind_tail->next != NULL){pfind_tail = pfind_tail->next;}pfind_tail->next = newspace;}
}
同样这里的参数是一个二级指针,因为这里的尾插入可以也会修改原始指针指向的位置,如果在链表的开始没有任何数据存储的情况下执行尾插入,就和执行头插入一样需要修改原始指针的指向。assert断言和申请空间我们就跳过讲解,来看看这段代码
SLnode* pfind_tail = *phead;
尾插需要通过寻找链表的尾部所以我们把第一个头节点的指针赋值给了我们需要寻找链表尾部的指针SLnode* pfind_tail
if (*phead == NULL)
{*phead = newspace;
}
这里就是判断第一个头节点是不是空,如果是就直接把新增加的空间赋值给头节点。
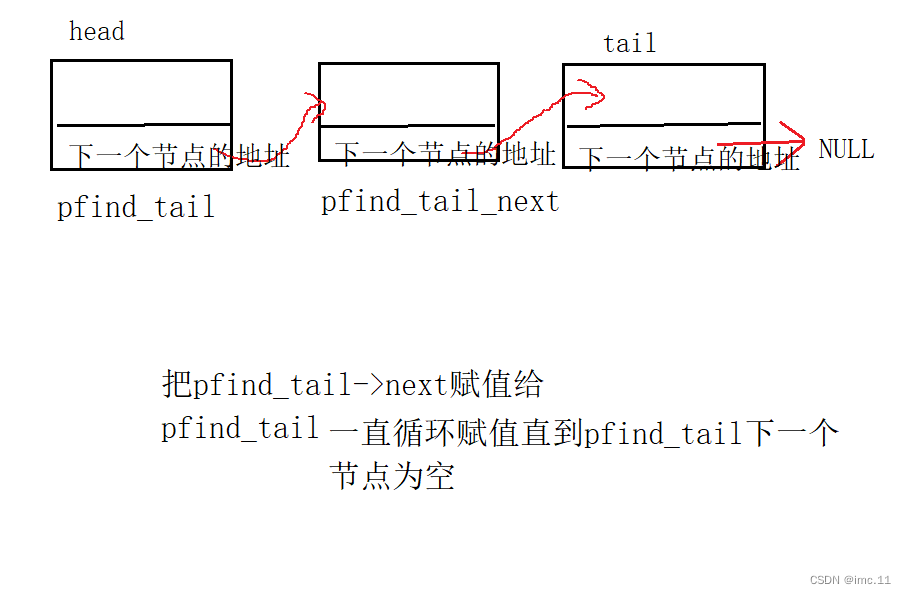
如果不是就进入下面else通过while进行找尾。
else
{while (pfind_tail->next != NULL){pfind_tail = pfind_tail->next;}pfind_tail->next = newspace;
}
头删除
void head_del(SLnode** phead)
{assert(phead && *phead);SLnode* new_next = (*phead)->next;free(*phead);*phead = new_next;
}
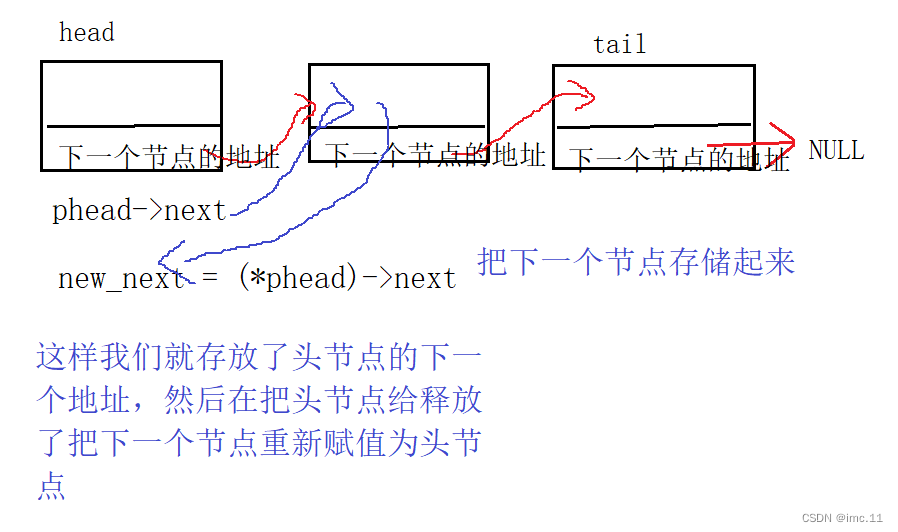
这里我们同样传了个二级指针过来,这里头删也要改变原始指针指向的位置assert(phead && *phead);这里断言了两个一个是phead另一个是 phead这样是为了防止链表不能为空,还有指向链表的头节点也不能为空。这样删除才有意义,我们这里创建了一个临时变量SLnode new_next来存放(phead)->next的值,最后在把原始phead给释放了,再把new_next赋值给phead,这样就完成了头删除。
尾删除
void del_pushback(SLnode** phead)
{assert(phead && *phead);if ((*phead)->next == NULL){free(*phead);}else{SLnode* pfind_tail = *phead;//尾节点SLnode* pfind_previous = *phead;//基于尾节点的上一个节点while (pfind_tail->next != NULL){pfind_previous = pfind_tail;pfind_tail = pfind_tail->next;}free(pfind_tail);pfind_previous->next = NULL;pfind_tail = NULL;}
}
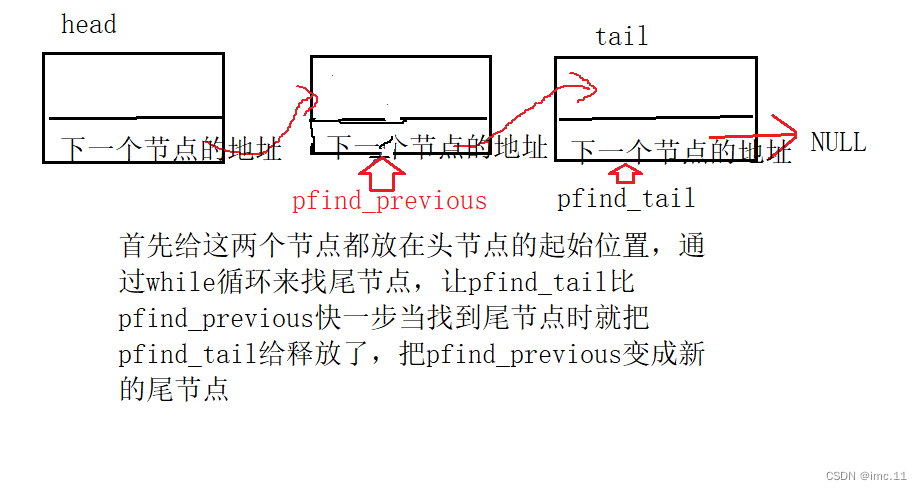
这里的assert断言和上面一样的解释,然后下面一个if判断,判断头节点的下一个节点是不是空指针,如果是就代表链表只有一个节点直接释放掉就可以了,如果不是我们就需要创建两个指针变量一个是当前节点,另一个是基于当前节点的上一个节点这样是为了在尾删的时候重新创建链表的新的尾节点,也就是尾节点的上一个节点。
查找节点
SLnode* find_data(SLnode* phead, SLdatatype x)
{SLnode* find_pdata = phead;while (find_pdata->next != NULL){if (find_pdata->data == x){return find_pdata;}find_pdata = find_pdata->next;}return NULL;
}
查找节点,这里我们创建了一个find_data的结构体指针,把头节点赋值给了他,这样我们就不用动头节点指向的位置,这样安全一些,然后按照节点里面存放的数据进行查找,用了while循环在链表节点里面遍历如果找到了就返回当前节点的指针,如果未找到就返回NULL空指针
在指定位置前插入数据
void appoint_push(SLnode** phead, SLdatatype x, SLnode* pos)
{assert(*phead && phead);SLnode* newspace = create_memspace(x);SLnode* find_appoint = *phead;if (*phead == pos){pushhead(phead, x);}else{while (find_appoint->next != pos){find_appoint = find_appoint->next;}newspace->next = pos;find_appoint->next = newspace;}
}
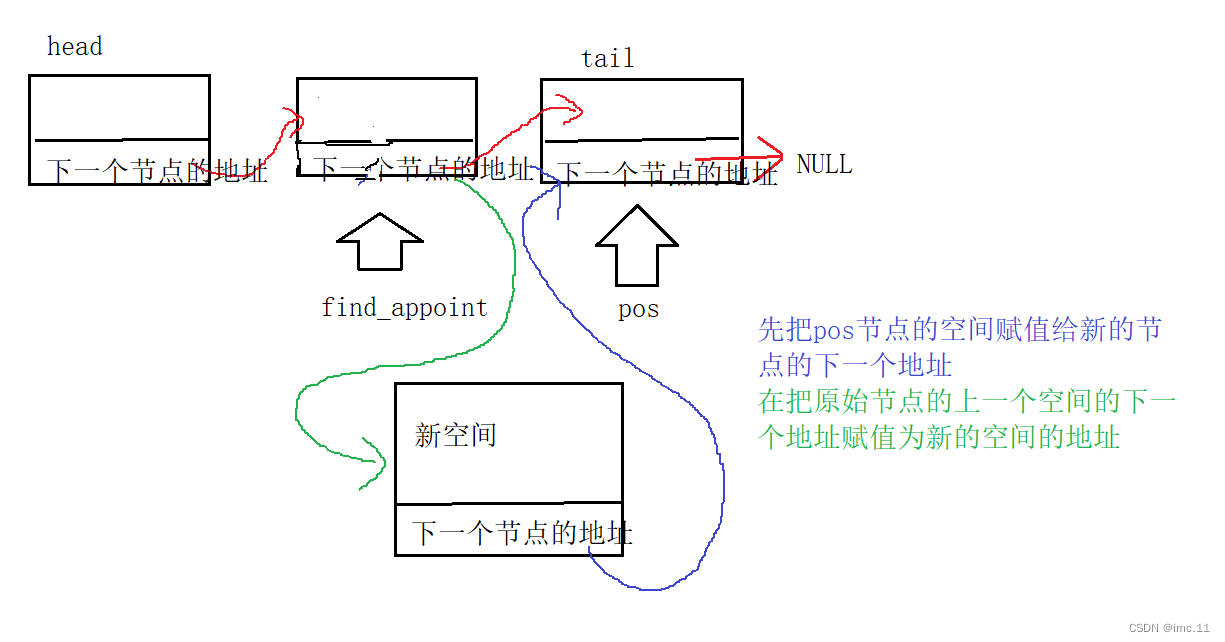
这里就要结和查找节点一起来讲了,先通过查找节点函数来找到该节点,然后在在此节点之前插入数据,这里我们用了个if判断语句来判断是不是头插,如果要在此节点之前插入的节点是phead的话就执行头插,如果不是就从头开始找,直到找到那个节点为止
指定位置后插入
void pushpos(SLnode* pos, SLdatatype x)
{assert(pos);SLnode* newspace = create_memspace(x);newspace->next = pos->next;pos->next = newspace;
}
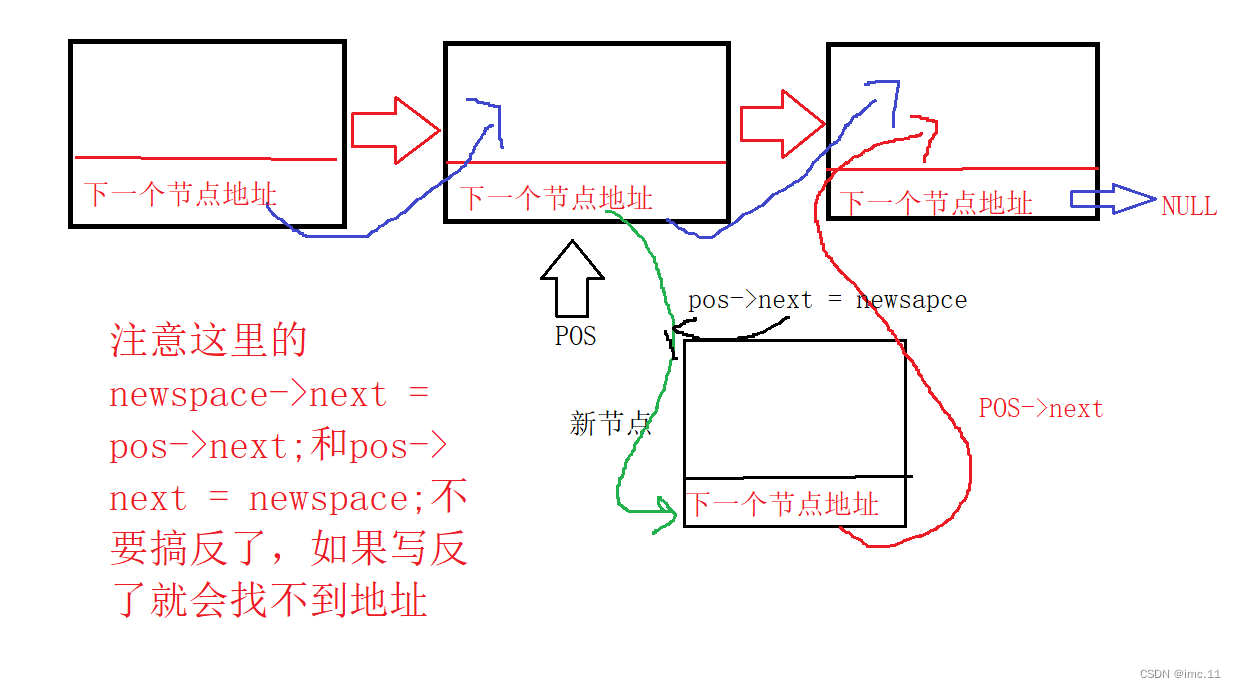
在指定位置后插入就比较简单了,这里我们就不需要传头节点,这里我们假定pos是存在的,因为在调用pos节点的时候会执行查找节点,如果查找的节点为空,那么这里就只需要断言一下pos节点就行了。
删除指定节点
void del_pos_appoint(SLnode** phead, SLnode* pos)
{assert(phead && *phead && pos);SLnode* pfind_previous = *phead;if (pos == *phead){head_del(phead);}else{while (pfind_previous->next != pos){pfind_previous = pfind_previous->next;}pfind_previous->next = pos->next;free(pos);pos = NULL;}
}
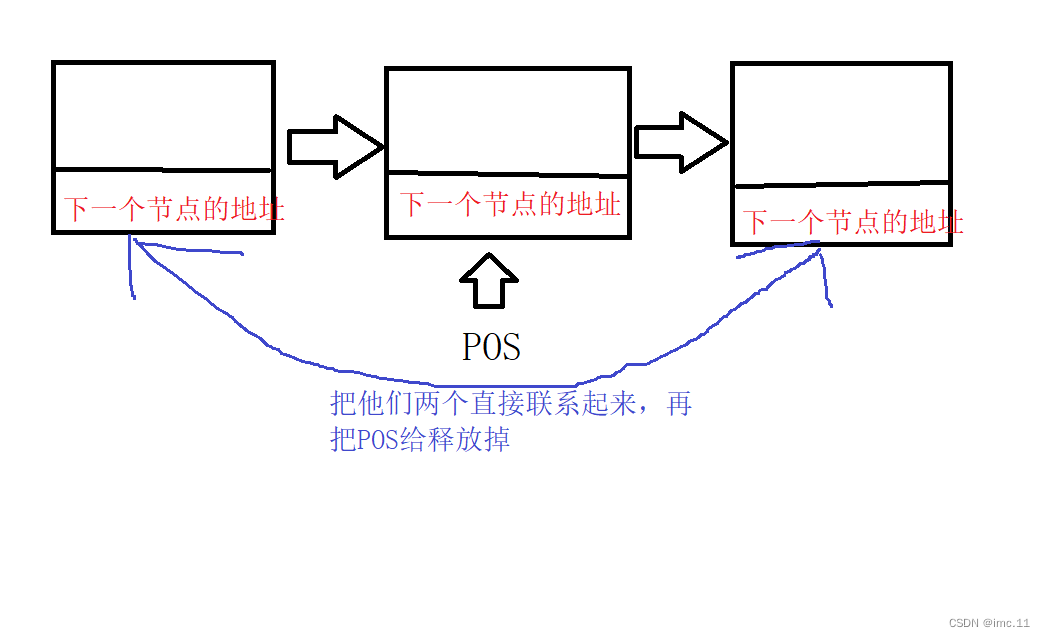
这里的删除和上面的代码类似只不过多了一个断言pos,if判断语句里面还是一样的如果POS是头节点的话就执行头删如果不是就找POS节点,找到了就把pos的上一个节点和pos的下一个节点联系起来,然后在把POS节点给释放掉。
删除指定位置的后一个
void del_appoint_after(SLnode* pos)
{assert(pos && pos->next);SLnode* temp_del = pos->next;pos->next = temp_del->next;free(temp_del);temp_del = NULL;
}
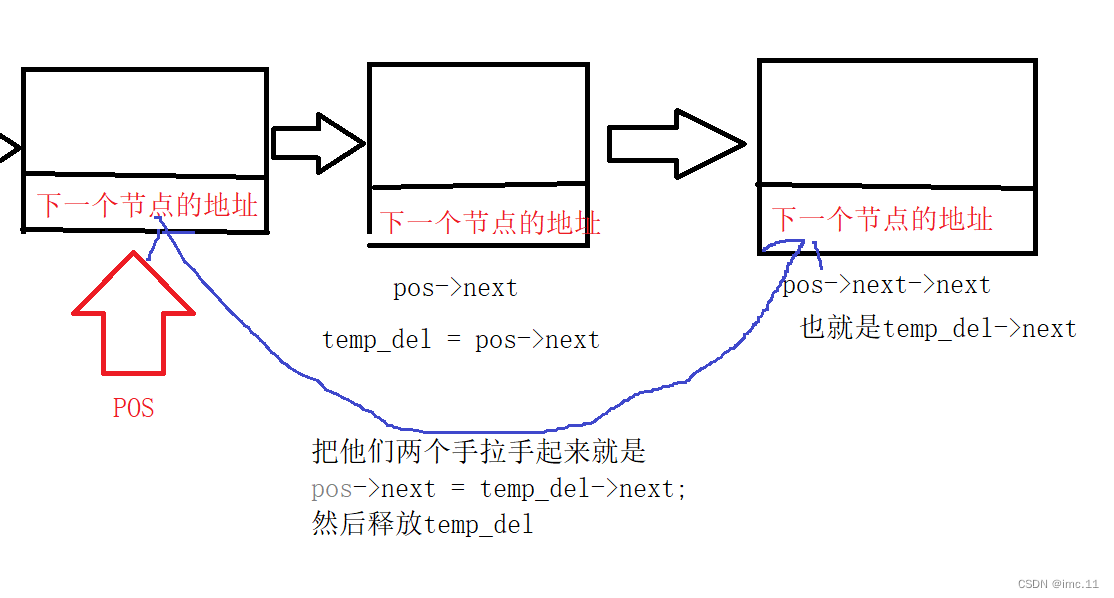
这里和指定位置后插入一样简单,这里我们的参数只有POS,我们需要断言POS和POS->next,然后要创建一个临时指针变量,用来存放pos的下一个节点temp_del->next相当于pos->next->next也就是pos节点后面的后面一个节点,就是要删除的节点的后一个节点。
最后把把pos->下一个节点赋值给了temp_del->next,这样就可以删除掉pos的下一个节点了,让pos与要删除的下一个节点手拉手起来了。
销毁链表
void del_slist(SLnode** phead)
{assert(phead && *phead);SLnode* pcur = *phead;while (appoint_pervious->next != NULL){SLnode* next = pcur->next;free(appoint_pervious);pcur = next;}*phead = NULL;
}
最后就是销毁链表了,把链表所占用的空间还给操作系统,循环销毁直到下一个节点为空。注意销毁的时候要存放下一个节点的指针,不然会找不到。
以上就是C语言链表的详解了,如果有错误欢迎指正
