一、引言
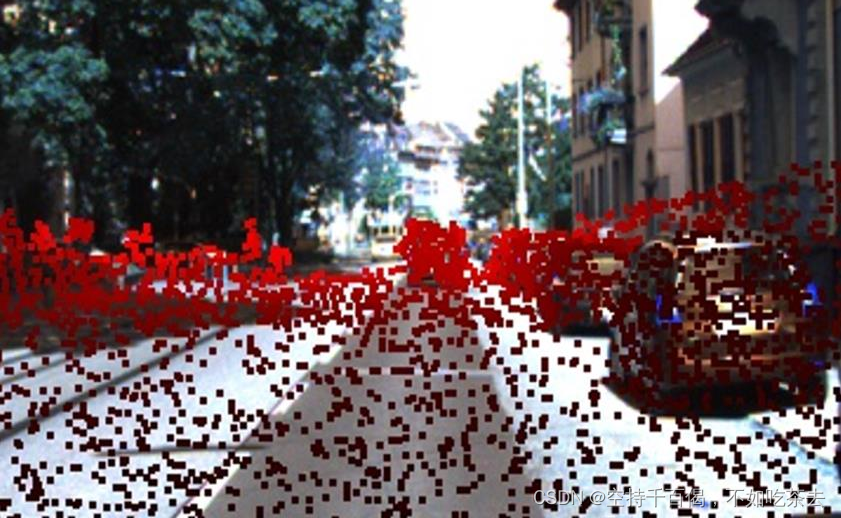
受Focals Conv的启发,该论文中通过将点云投影到图片中清晰展现出点云学习后的情况:

本次实现的是体素向图像投影并显示,实现出来的效果如下:
二、 实现细节
1、体素投影到图像坐标系
这里我们参考的是VirConv的投影函数:
def index2uv(batch_dict, indices, batch_size, calib, stride, x_trans_train, trans_param):"""convert the 3D voxel indices to image pixel indices.将3D的voxel索引转换成图像像素"""# 变换维度的索引inv_idx = torch.Tensor([2, 1, 0]).long().cuda()batch_index = indices[:, 0]new_uv = indices.new(size=(indices.shape[0], 3))depth = indices.new(size=(indices.shape[0], 1)).float()for b_i in range(batch_size):# 找到对应的batchcur_in = indices[indices[:, 0] == b_i]# 转换成voxel3d特征cur_pts = index2points(cur_in, stride=stride)if trans_param is not None:# 反增强transed = x_trans_train.backward_with_param({'points': cur_pts[:, 1:4],'transform_param': trans_param[b_i]})cur_pts = transed['points'] # .cpu().numpy()else:cur_pts = cur_pts[:, 1:4] # .cpu().numpy() 除了batch以外都取出来# 投影到相机坐标系pts_rect = calib[b_i].lidar_to_rect_cuda(cur_pts[:, 0:3])# 投影到图像坐标系pts_img, pts_rect_depth = calib[b_i].rect_to_img_cuda(pts_rect)# 转换成整型pts_img = pts_img.int()# pts_img = torch.from_numpy(pts_img).to(new_uv.device)# 找到对应的batch,把他的像素坐标取出来new_uv[indices[:, 0] == b_i, 1:3] = pts_img# pts_rect_depth = torch.from_numpy(pts_rect_depth).to(new_uv.device).float()# 深度信息depth[indices[:, 0] == b_i, 0] = pts_rect_depth[:]# batch对应new_uv[:, 0] = indices[:, 0]# 控制一下像素坐标# new_uv[:, 1] = torch.clamp(new_uv[:, 1], min=0, max=1400 - 1) // stride# new_uv[:, 2] = torch.clamp(new_uv[:, 2], min=0, max=600 - 1) // stridereturn new_uv, depth以上代码具体可参考VirConv源码,这里不赘述。
调用:
# 读取体素坐标
pointxyz = sparse_t.indices
# 传入参数:从左向右依次是batch_dict总字典,pointxyz体素坐标,batchsize大小,calib标定矩阵,stride步长,TED独有的全局变换,trans_param增强参数
pc_xy, depth_pc = index2uv(batch_dict, pointxyz, batch_size, calib, 1, x_trans_train,trans_param)
以上是我目前能找的最有效,最简单的体素投影方法。
2、读取图像并根据深度来画体素
# 根据batch id 依次取出数据
for batch_id in range(batch_size):# image的路径,这里我是放到batch_dict提前存好,所以这里可以直接改为路径img_path = str(batch_dict['image_path'][batch_id]).split('/')[-1]# 像素大小×255pcimg_batch = pcimg[batch_id] * 255# 根目录root_path = '/home/xd/xyy/VirConv-master/voxel_vision/vision_pcimg/' + img_path + '/'# 输出路径output_path = root_path + name + '_' + str(batch_id) + '.jpg'# 创建路径if not os.path.exists(root_path):os.makedirs(root_path)# 根据batch_id读取出当前batch下的体素坐标pc_xyz_indices = pc_xyz[pc_xyz[:, 0] == batch_id][:, 1:]for idx, pc in enumerate(pc_xyz_indices):# 根据深度确定颜色深度color = int((pc[2] / depth_max) * 255)# rectangle函数的主要作用是给指定的区域加上长宽分别为2的矩形边框if isinstance(pcimg_batch, torch.Tensor):pcimg_batch = pcimg_batch.cpu().numpy()if pc[0] < W and pc[1] < H:# 画体素cv2.rectangle(pcimg_batch, (int(pc[0] - 1), int(pc[1] - 1)), (int(pc[0] + 1), int(pc[1] + 1)),(0, 0, color), -1)cv2.imwrite(output_path, pcimg_batch)
3、完整代码
def vision_pc_img(sparse_t, pcimg, name, batch_dict, batch_size, calib, x_trans_train, trans_param, H=376, W=1241):pointxyz = sparse_t.indicespc_xy, depth_pc = index2uv(batch_dict, pointxyz, batch_size, calib, 1, x_trans_train,trans_param)# 保存pc_xy# for batch_id in range(batch_size):# img_path = str(batch_dict['image_path'][batch_id]).split('/')[-1]# name_2d = img_path + '/' + name# save_2d(pc_xy[pc_xy[:,0]==batch_id], name_2d)# vision(sparse_t)pc_xyz = torch.cat((pc_xy, depth_pc), dim=1)depth_max, _ = torch.max(depth_pc.squeeze(1), dim=0)for batch_id in range(batch_size):img_path = str(batch_dict['image_path'][batch_id]).split('/')[-1]pcimg_batch = pcimg[batch_id] * 255root_path = '/home/xd/xyy/VirConv-master/voxel_vision/vision_pcimg/' + img_path + '/'output_path = root_path + name + '_' + str(batch_id) + '.jpg'if not os.path.exists(root_path):os.makedirs(root_path)pc_xyz_indices = pc_xyz[pc_xyz[:, 0] == batch_id][:, 1:]for idx, pc in enumerate(pc_xyz_indices):color = int((pc[2] / depth_max) * 255)# rectangle函数的主要作用是给指定的区域加上长宽分别为2的矩形边框if isinstance(pcimg_batch, torch.Tensor):pcimg_batch = pcimg_batch.cpu().numpy()if pc[0] < W and pc[1] < H:cv2.rectangle(pcimg_batch, (int(pc[0] - 1), int(pc[1] - 1)), (int(pc[0] + 1), int(pc[1] + 1)),(0, 0, color), -1)cv2.imwrite(output_path, pcimg_batch)