springboot+mybatis实现简单的增、删、查、改![]() https://blog.csdn.net/heyl163_/article/details/132197201上一篇文章,已经详细地介绍了怎么通过springboot项目整合mybatis实现简单的数据库表的增删改查功能,是最简单的springboot项目的结构。所以有很多问题,包括简单sql语句需要重复编写、数据校验、异常处理、操作类方法没有返回响应等等。这篇文章我们通过使用springmvc的全局异常处理机制以及引入mybatis-plus和validation来解决这几个问题。
https://blog.csdn.net/heyl163_/article/details/132197201上一篇文章,已经详细地介绍了怎么通过springboot项目整合mybatis实现简单的数据库表的增删改查功能,是最简单的springboot项目的结构。所以有很多问题,包括简单sql语句需要重复编写、数据校验、异常处理、操作类方法没有返回响应等等。这篇文章我们通过使用springmvc的全局异常处理机制以及引入mybatis-plus和validation来解决这几个问题。
基于上一篇文章的项目,新建一个分支springboot1.0,保存最新的代码。
一、简单sql语句重复编写问题
通过引入mybatis-plus来解决重复编写简单sql语句的问题。
在pom.xml中引入mybatis-plus的依赖
<properties><mybatis-plus.version>3.5.1</mybatis-plus.version>
</properties><!--mybatis-plus-->
<dependency><groupId>com.baomidou</groupId><artifactId>mybatis-plus-boot-starter</artifactId><version>${mybatis-plus.version}</version>
</dependency>
然后SongMapper继承BaseMapper接口,然后就能调用BaseMapper里预先定义的crud方法了。
package com.example.springboot.mapper;import com.baomidou.mybatisplus.core.mapper.BaseMapper;
import com.example.springboot.entity.Song;
import org.springframework.stereotype.Repository;/*** @author heyunlin* @version 1.0*/
@Repository
public interface SongMapper extends BaseMapper<Song> {}
BaseMapper的参数类型为对应实体类的类型;
因为BaseMapper里有几个方法selectById()、deleteById()、updateById()需要用到表的主键,因此,在实体类上需要通过注解@TableId来标注哪个字段是表的主键;
如果数据库表名和实体类的类名不一致,需要通过@TableName注解指明对应的数据库表;
如果数据库表名的字段名和实体类的属性名不一致,需要通过@TableField注解指明对应的数据库表的字段;
package com.example.springboot.entity;import com.baomidou.mybatisplus.annotation.IdType;
import com.baomidou.mybatisplus.annotation.TableField;
import com.baomidou.mybatisplus.annotation.TableId;
import com.baomidou.mybatisplus.annotation.TableName;
import com.fasterxml.jackson.annotation.JsonFormat;
import lombok.Data;import java.io.Serializable;
import java.time.LocalDateTime;/*** 歌曲* @author heyunlin* @version 1.0*/
@Data
@TableName("song")
public class Song implements Serializable {private static final long serialVersionUID = 18L;@TableId(type = IdType.INPUT)private String id;/*** 歌曲名*/@TableField("name")private String name;/*** 歌手*/@TableField("singer")private String singer;/*** 描述信息*/@TableField("note")private String note;/*** 最后一次修改时间*/@TableField("last_update_time")@JsonFormat(pattern = "yyyy-MM-dd HH:mm:ss", timezone = "GMT+8")private LocalDateTime lastUpdateTime;
}
然后,删除SongMapper.java中编写的方法和对应SongMapper.xml中的statement
<?xml version="1.0" encoding="UTF-8" ?>
<!DOCTYPE mapper PUBLIC "-//mybatis.org//DTD Mapper 3.0//EN" "http://mybatis.org/dtd/mybatis-3-mapper.dtd"><mapper namespace="com.example.springboot.mapper.SongMapper"></mapper>
删除之后惊奇地发现service中调用mapperde的方法并没有报错,因为这些方法已经预定义在BaseMapper中了。
mybatis-plus使用简单,归根于BaseMapper中预先帮我们实现的方法,接下来详细介绍这些方法的作用。
package com.baomidou.mybatisplus.core.mapper;import com.baomidou.mybatisplus.core.conditions.Wrapper;
import com.baomidou.mybatisplus.core.metadata.IPage;
import com.baomidou.mybatisplus.core.toolkit.CollectionUtils;
import com.baomidou.mybatisplus.core.toolkit.ExceptionUtils;
import java.io.Serializable;
import java.util.Collection;
import java.util.List;
import java.util.Map;
import org.apache.ibatis.annotations.Param;public interface BaseMapper<T> extends Mapper<T> {// 添加,如果字段值为null,则不会设置到insert语句中int insert(T entity);// 通过id删除,id字段的类型需要实现Serializable接口int deleteById(Serializable id);int deleteById(T entity);// 条件删除,把条件放到Map中,map的key是数据库表的字段名,map的value是字段的值int deleteByMap(@Param("cm") Map<String, Object> columnMap);// 条件删除,通过条件构造器来设置条件int delete(@Param("ew") Wrapper<T> queryWrapper);// 通过ID批量删除,相当于delete from xxx where id in idListint deleteBatchIds(@Param("coll") Collection<?> idList);// 通过id修改,如果字段值为null,则不会设置到update语句中int updateById(@Param("et") T entity);// 条件修改,通过条件构造器来设置条件,entity中的数据为Wrapper的set()方法设置的字段值int update(@Param("et") T entity, @Param("ew") Wrapper<T> updateWrapper);// 通过id查询,id字段的类型需要实现Serializable接口T selectById(Serializable id);// 通过ID批量查询,相当于select * from xxx where id in idListList<T> selectBatchIds(@Param("coll") Collection<? extends Serializable> idList);// 条件查询,通过条件构造器来设置查询条件List<T> selectByMap(@Param("cm") Map<String, Object> columnMap);// 条件查询,通过条件构造器来设置查询条件// 如果确定查询最多只有一行结果,可以使用该方法,否则将报错default T selectOne(@Param("ew") Wrapper<T> queryWrapper) {List<T> ts = this.selectList(queryWrapper);if (CollectionUtils.isNotEmpty(ts)) {if (ts.size() != 1) {throw ExceptionUtils.mpe("One record is expected, but the query result is multiple records", new Object[0]);} else {return ts.get(0);}} else {return null;}}// existes语句default boolean exists(Wrapper<T> queryWrapper) {Long count = this.selectCount(queryWrapper);return null != count && count > 0L;}// 条件查询记录数,通过条件构造器来设置查询条件Long selectCount(@Param("ew") Wrapper<T> queryWrapper);// 条件查询,通过条件构造器来设置查询条件// 当查询结果有多条时,不能使用selectOne,需要使用该方法List<T> selectList(@Param("ew") Wrapper<T> queryWrapper);List<Map<String, Object>> selectMaps(@Param("ew") Wrapper<T> queryWrapper);List<Object> selectObjs(@Param("ew") Wrapper<T> queryWrapper);// 分页查询<P extends IPage<T>> P selectPage(P page, @Param("ew") Wrapper<T> queryWrapper);<P extends IPage<Map<String, Object>>> P selectMapsPage(P page, @Param("ew") Wrapper<T> queryWrapper);
}
二、数据校验问题
1、ID不能为空的问题
delete()和detail()方法理论上需要ID不为空,否则查询结果必然是空,为了避免无效的查询,应该设置id不能为空,通过@RequestParam(requied = true)来限制id不能为空
SongController.java对应修改
@RequestMapping(value = "/delete/{id}", method = RequestMethod.GET)
public void delete(@RequestParam(required = true) @PathVariable("id") String id) {songService.delete(id);
}
@RequestMapping(value = "/detail/{id}", method = RequestMethod.GET) public Song detail(@RequestParam(required = true) @PathVariable("id") String id) {return songService.detail(id); }
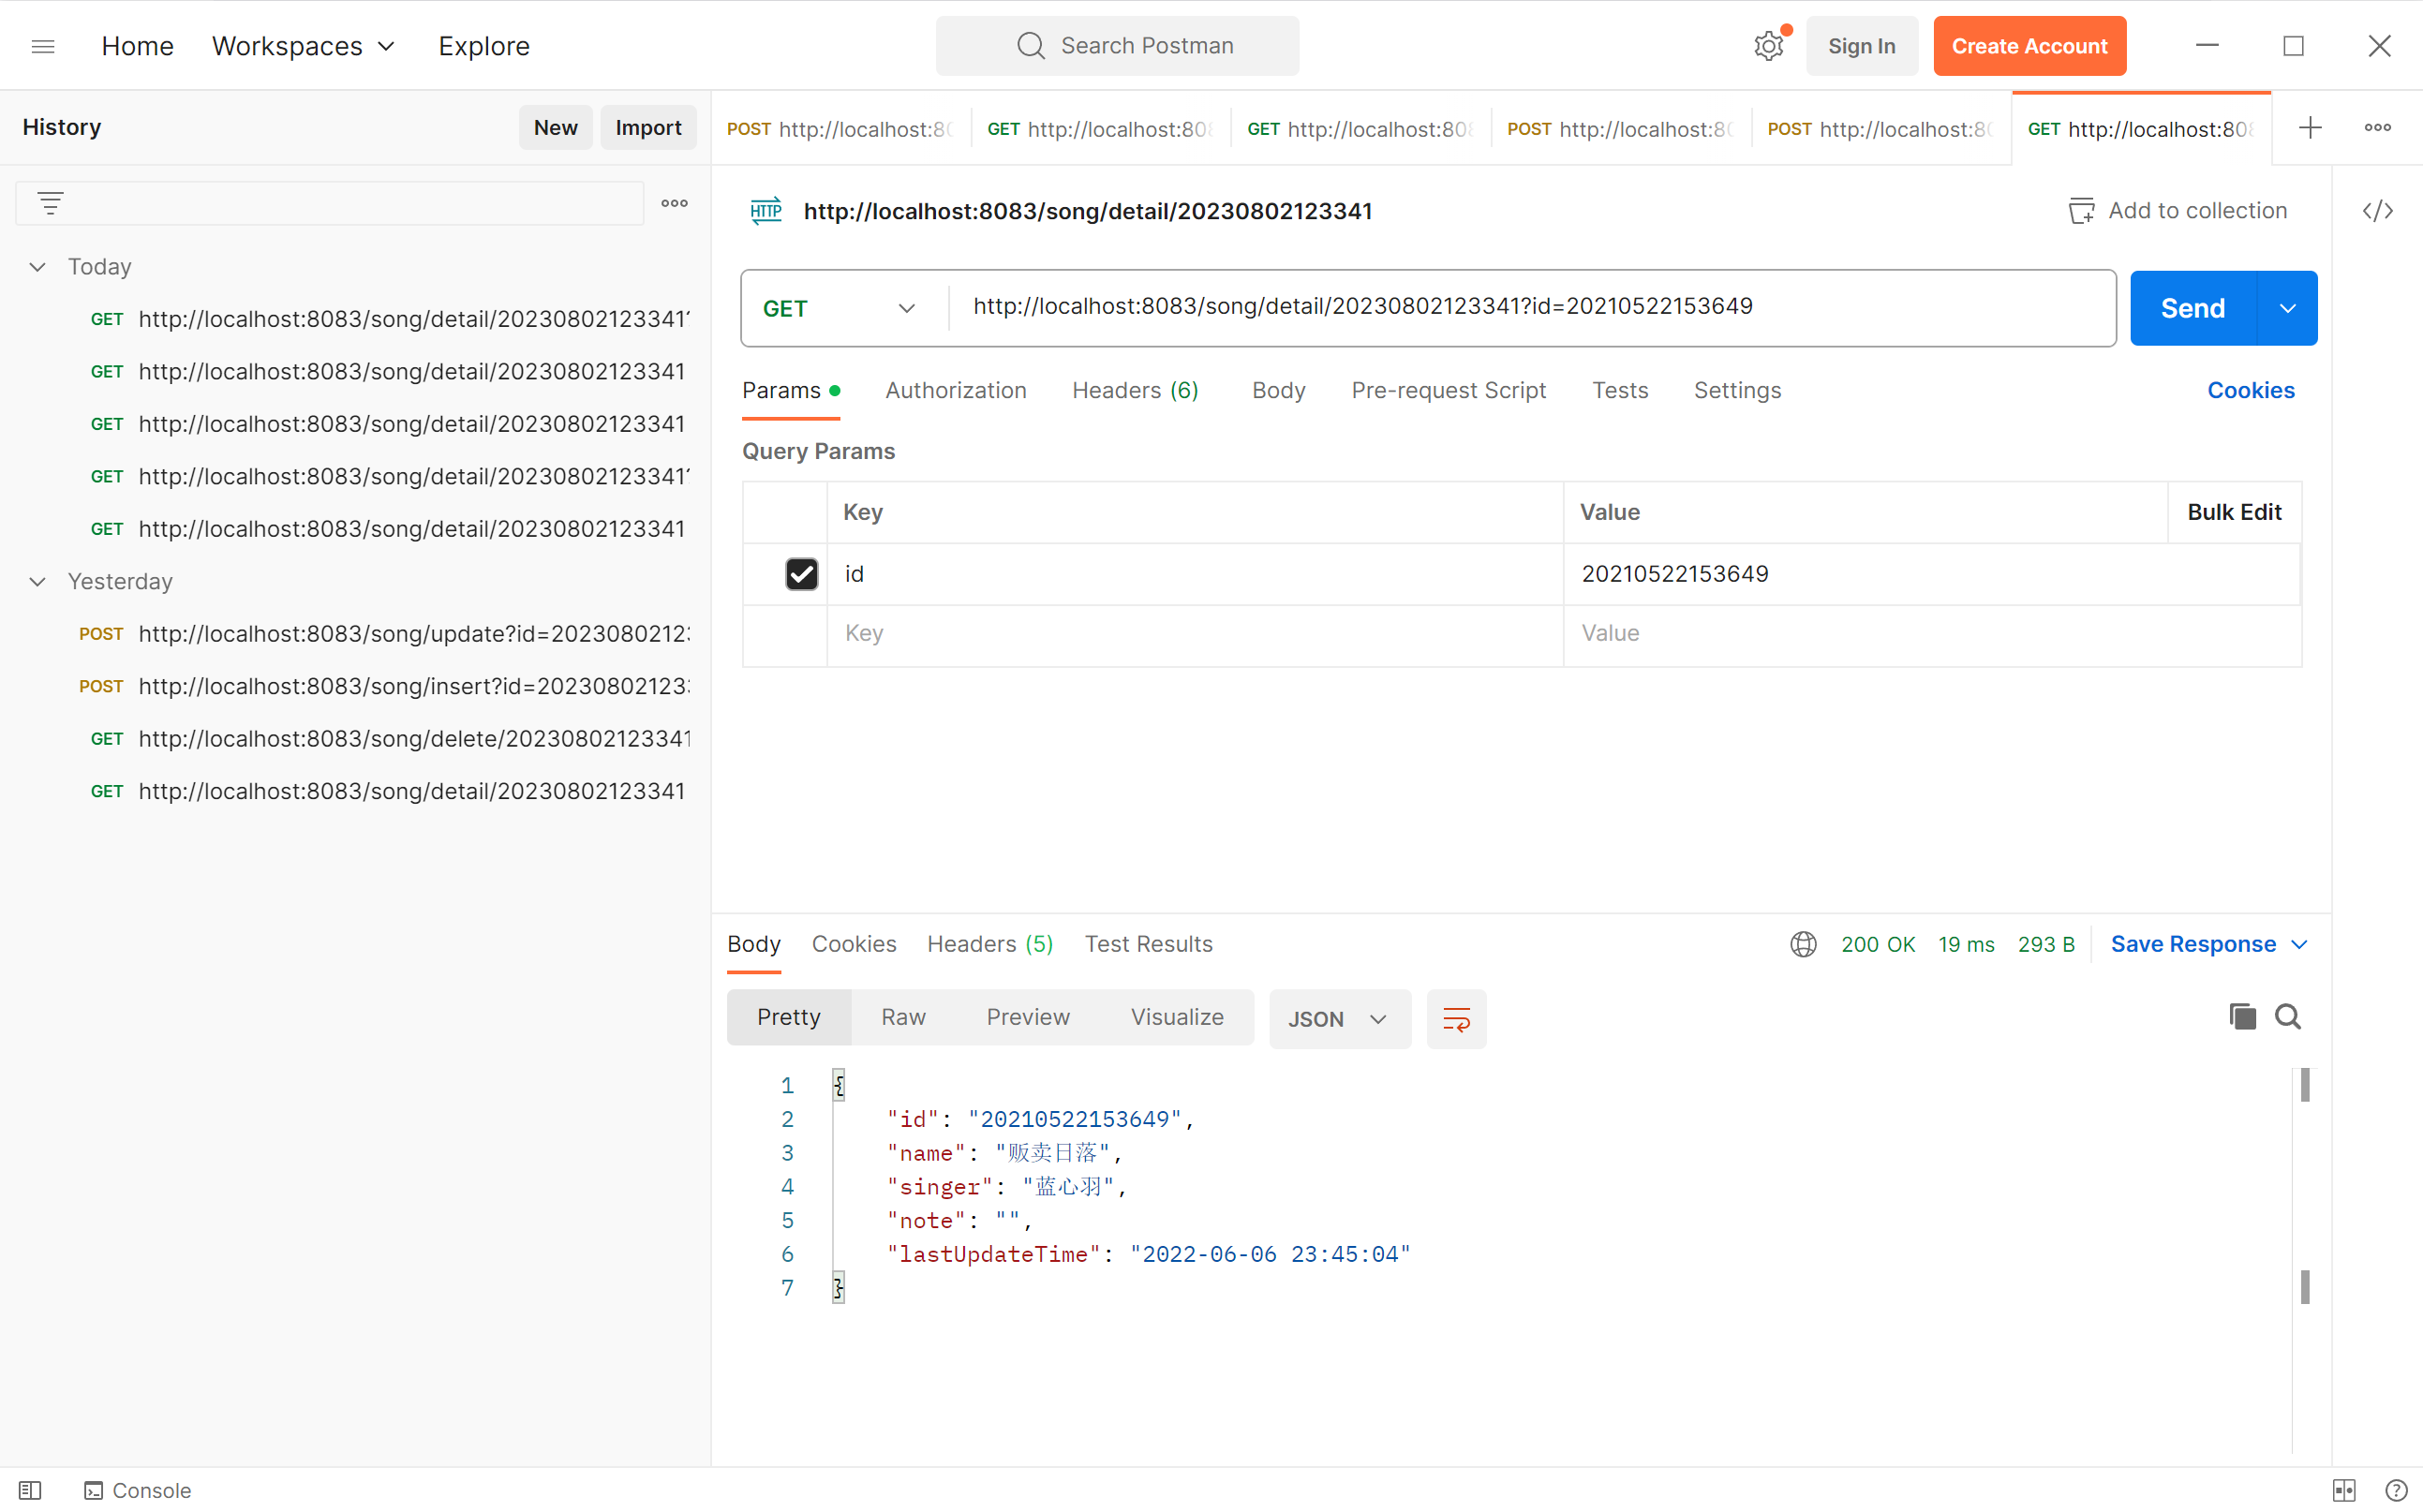
如下图,当通过postman测试接口时,不传id会报错
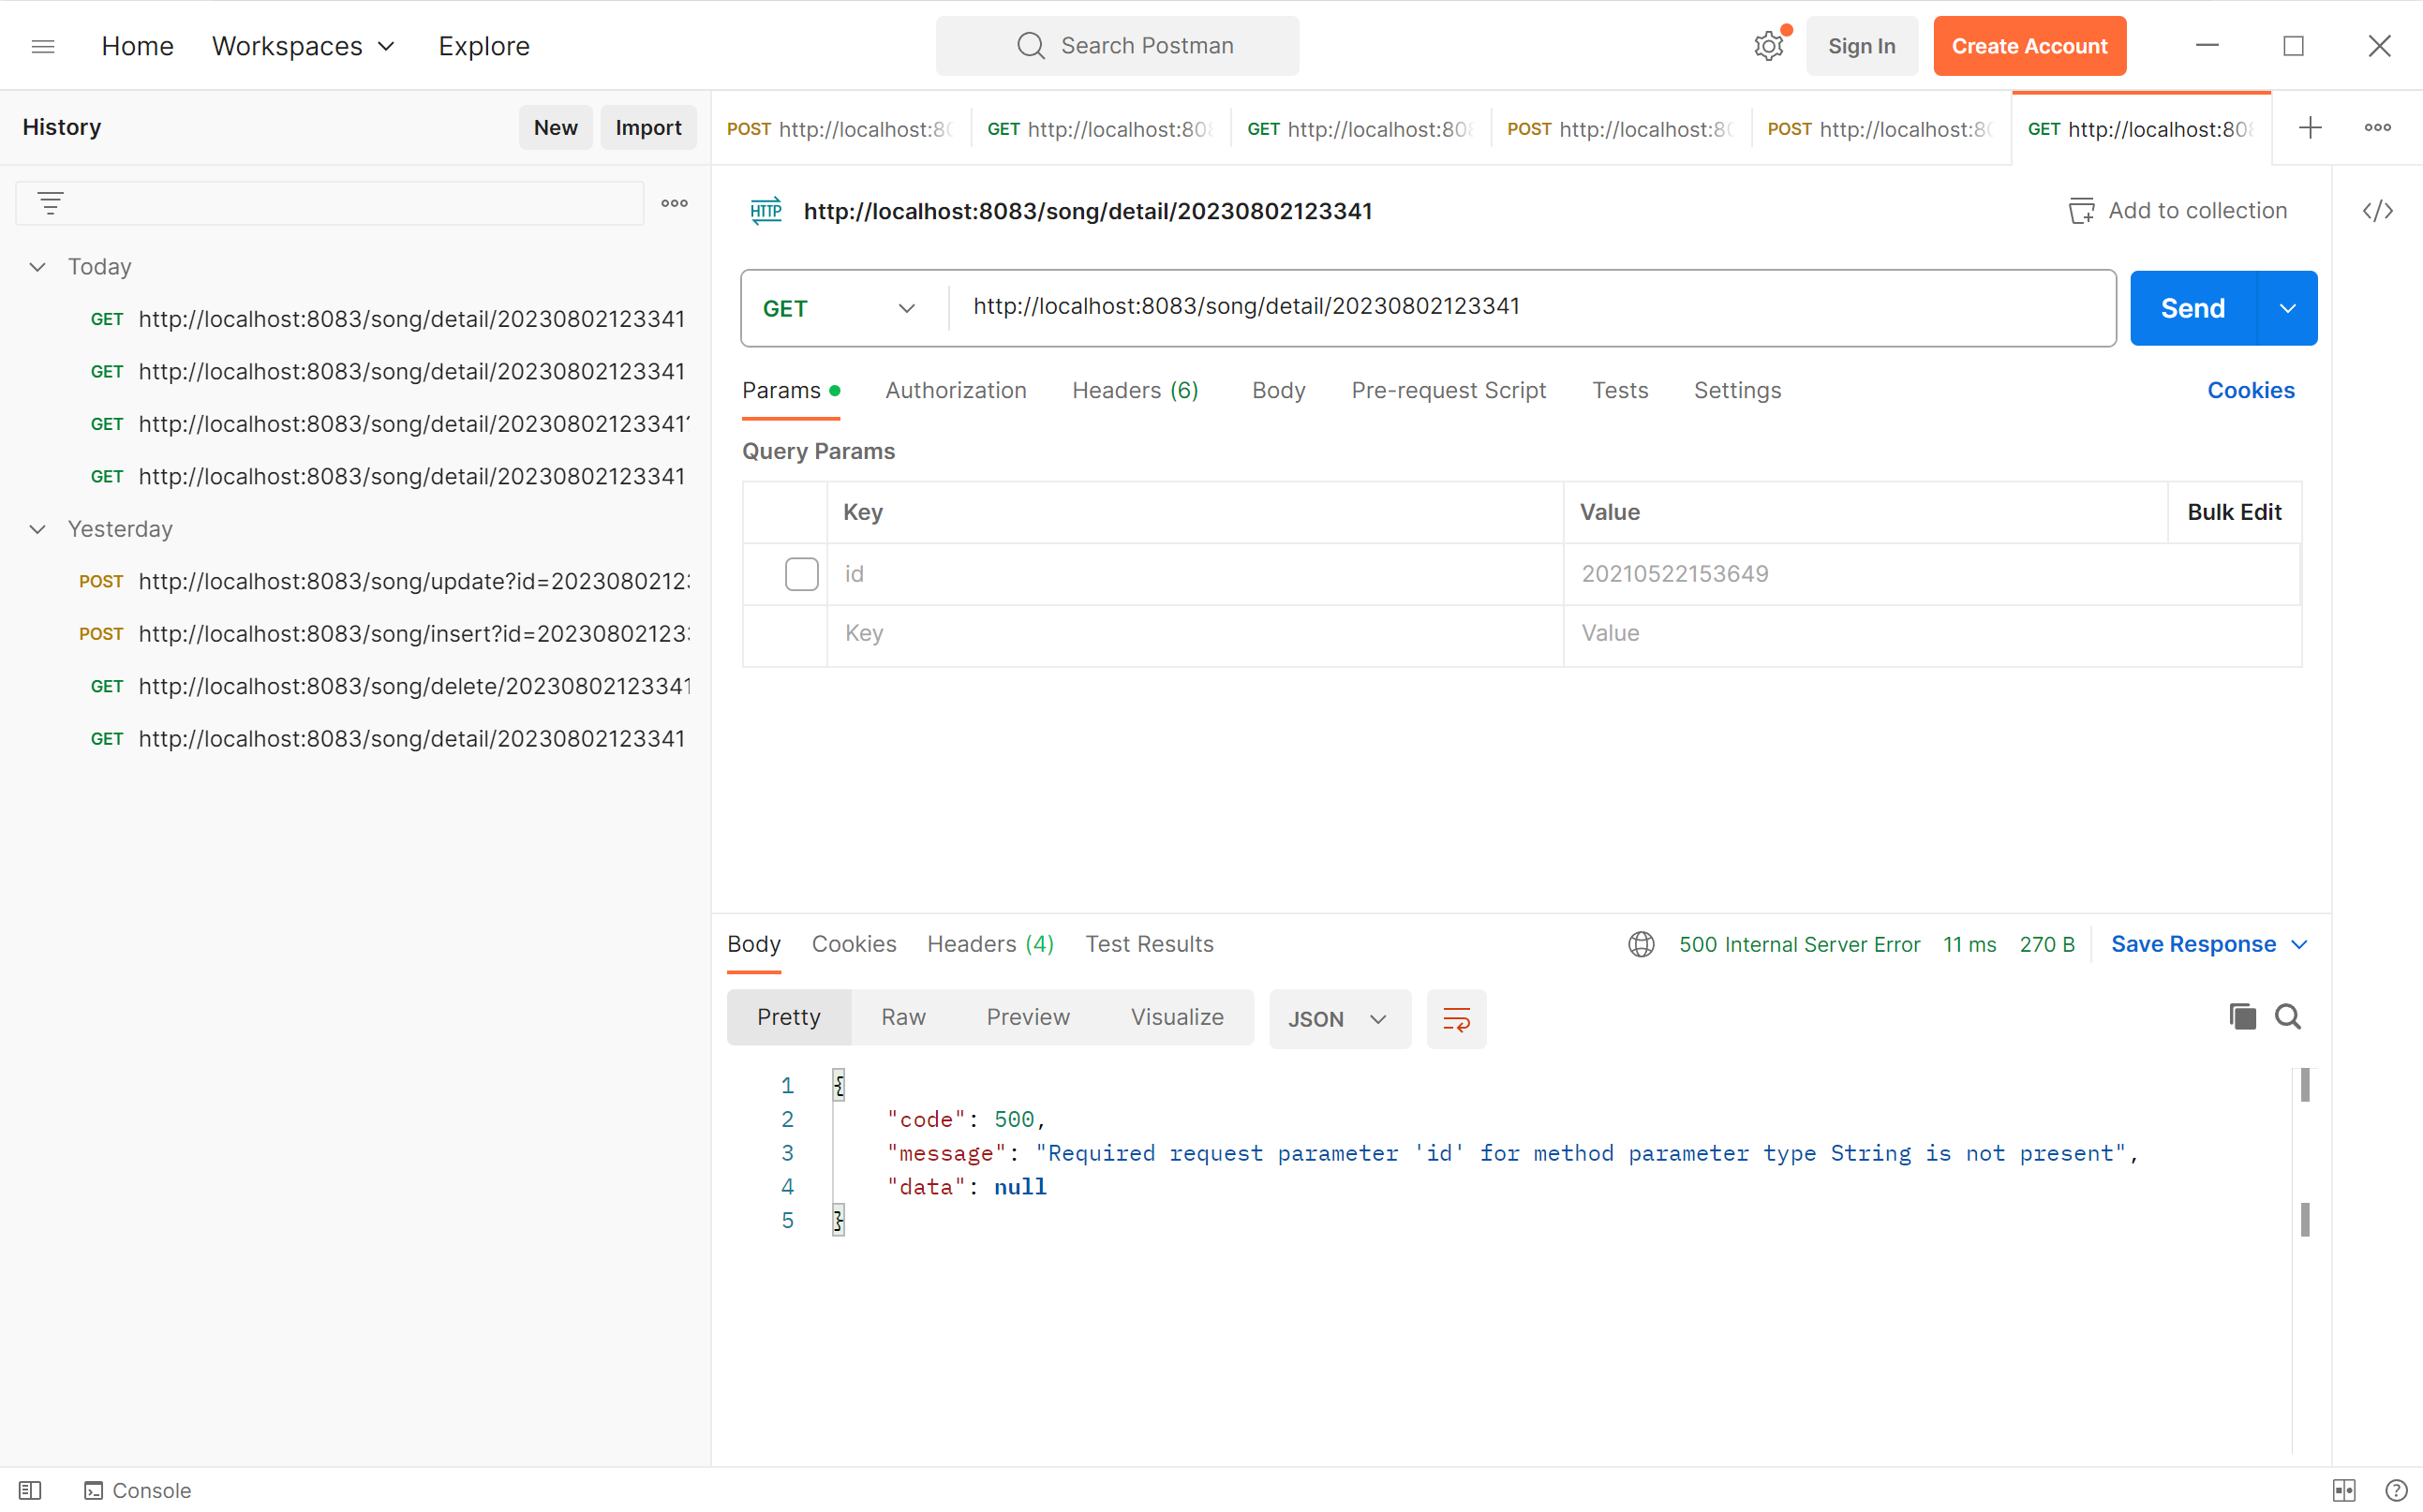
传正确的ID时,成功返回了查询结果。
2、添加校验
通过validation数据校验框架完成数据校验。
在pom.xml中引入validation的依赖
<!--validation-->
<dependency><groupId>org.springframework.boot</groupId><artifactId>spring-boot-starter-validation</artifactId>
</dependency>
然后创建一个对应前端传来的数据的dto对象,比如添加对应一个dto对象,用户只需要输入name、singer和note三个字段的值,而且name、singer这两个字段是必填的,也就是需要验证非空(ID是通过当前时间生成的)。

添加时的dto对象
package com.example.springboot.dto;import lombok.Data;/*** @author heyunlin* @version 1.0*/
@Data
public class SongInsertDTO {/*** 歌曲名*/private String name;/*** 歌手*/private String singer;/*** 描述信息*/private String note;
}
接着,在字段上使用validation定义的注解对字段值进行校验,校验失败会抛出BindException异常,然后对异常进行处理即可,详情请参考文章:
validation数据校验框架![]() https://blog.csdn.net/heyl163_/article/details/132112153
https://blog.csdn.net/heyl163_/article/details/132112153
SongInsertDTO.java
package com.example.springboot.dto;import lombok.Data;import javax.validation.constraints.NotEmpty;
import javax.validation.constraints.NotNull;/*** @author heyunlin* @version 1.0*/
@Data
public class SongInsertDTO {/*** 歌曲名*/@NotNull(message = "歌曲名不能为空")@NotEmpty(message = "歌曲名不能为空")private String name;/*** 歌手*/@NotNull(message = "歌手不能为空")@NotEmpty(message = "歌手不能为空")private String singer;
}
然后控制器SongController上的insert()方法的参数类型改为SongInsertDTO,然后在参数上添加@Valid或@Validated注解
@RequestMapping(value = "/insert", method = RequestMthod.POST)
public void insert(@Validated SongInsertDTO insertDTO) {
songService.insert(insertDTO);
}
相应的,service也要修改
SongService
void insert(SongInsertDTO insertDTO);
SongServiceImpl
@Override
public void insert(SongInsertDTO insertDTO) {Song song = new Song();song.setId(StringUtils.uuid());song.setName(insertDTO.getName());song.setSinger(insertDTO.getSinger());if (StringUtils.isNotEmpty(insertDTO.getNote())) {song.setNote(insertDTO.getNote());}songMapper.insert(song);
}
3、修改校验
修改时需要ID、name、singer不为空,则创建一个SongUpdateDTO类即可,然后按照相同的步骤在类的属性上和控制器方法的参数上添加对应的注解即可。
package com.example.springboot.dto;import lombok.Data;import javax.validation.constraints.NotEmpty;
import javax.validation.constraints.NotNull;/*** @author heyunlin* @version 1.0*/
@Data
public class SongUpdateDTO {/*** 歌曲编号/ID*/@NotNull(message = "歌曲编号不能为空")@NotEmpty(message = "歌曲编号不能为空")private String id;/*** 歌曲名*/@NotNull(message = "歌曲名不能为空")@NotEmpty(message = "歌曲名不能为空")private String name;/*** 歌手*/@NotNull(message = "歌手不能为空")@NotEmpty(message = "歌手不能为空")private String singer;/*** 描述信息*/private String note;
}
控制器SongController上的update()方法的参数类型改为SongUpdateDTO,然后在参数上添加@Valid或@Validated注解
@RequestMapping(value = "/update", method = RequestMethod.POST)
public void update(@Valid SongUpdateDTO updateDTO) {songService.update(updateDTO);
}
相应的,service也要修改
SongService
void update(SongUpdateDTO updateDTO);
SongServiceImpl
@Override
public void update(SongUpdateDTO updateDTO) {Song song = new Song();song.setId(StringUtils.uuid());song.setName(updateDTO.getName());song.setSinger(updateDTO.getSinger());if (StringUtils.isNotEmpty(updateDTO.getNote())) {song.setNote(updateDTO.getNote());}song.setLastUpdateTime(LocalDateTime.now());songMapper.updateById(song);
}
三、操作类方法没有响应数据问题
无论操作成功还是失败,都应该向客户端返回操作的结果。
1、创建响应对象
新建一个响应对象实体类,包含状态码、数据和响应的消息(提示)。
package com.example.springboot.restful;import lombok.Data;@Data
public class JsonResult<T> {/*** 响应状态码*/private Integer code;/*** 响应提示信息*/private String message;/*** 响应数据*/private T data;public static JsonResult<Void> success() {return success(null);}public static JsonResult<Void> success(String message) {return success(message, null);}public static <T> JsonResult<T> success(String message, T data) {JsonResult<T> jsonResult = new JsonResult<>();jsonResult.setCode(ResponseCode.OK.getValue());jsonResult.setMessage(message);jsonResult.setData(data);return jsonResult;}public static JsonResult<Void> error(String message) {JsonResult<Void> jsonResult = new JsonResult<>();jsonResult.setCode(ResponseCode.ERROR.getValue());jsonResult.setMessage(message);return jsonResult;}public static JsonResult<Void> error(ResponseCode responseCode, Throwable e) {return error(responseCode, e.getMessage() != null ? e.getMessage() : "系统发生异常,请联系管理员!");}public static JsonResult<Void> error(ResponseCode responseCode, String message) {JsonResult<Void> jsonResult = new JsonResult<>();jsonResult.setCode(responseCode.getValue());jsonResult.setMessage(message);return jsonResult;}}
2、定义响应状态码
package com.example.springboot.restful;/*** 响应状态码* @author heyunlin* @version 1.0*/
public enum ResponseCode {/*** 请求成功*/OK(200),/*** 失败的请求*/BAD_REQUEST(400),/*** 未授权*/UNAUTHORIZED(401),/*** 禁止访问*/FORBIDDEN(403),/*** 找不到*/NOT_FOUND(404),/*** 不可访问*/NOT_ACCEPTABLE(406),/*** 冲突*/CONFLICT(409),/*** 服务器发生异常*/ERROR(500);private final Integer value;ResponseCode(Integer value) {this.value = value;}public Integer getValue() {return value;}}
3、增删改方法添加返回值
insert()、update()、delete()三个方法的返回值类型修改为JsonResult<Void>,JsonResult<T>的参数类型T表示返回的数据的类型,在这里不需要返回数据,只需要返回给用户看的提示信息。
SongController.java
package com.example.springboot.controller;import com.example.springboot.dto.SongInsertDTO;
import com.example.springboot.dto.SongUpdateDTO;
import com.example.springboot.entity.Song;
import com.example.springboot.restful.JsonResult;
import com.example.springboot.service.SongService;
import org.springframework.beans.factory.annotation.Autowired;
import org.springframework.validation.annotation.Validated;
import org.springframework.web.bind.annotation.*;import javax.validation.Valid;/*** @author heyunlin* @version 1.0*/
@RestController
@RequestMapping(path = "/song", produces="application/json;charset=utf-8")
public class SongController {private final SongService songService;@Autowiredpublic SongController(SongService songService) {this.songService = songService;}@RequestMapping(value = "/insert", method = RequestMethod.POST)public JsonResult<Void> insert(@Validated SongInsertDTO insertDTO) {songService.insert(insertDTO);return JsonResult.success("添加成功");}@RequestMapping(value = "/delete/{id}", method = RequestMethod.GET)public JsonResult<Void> delete(@RequestParam(required = true) @PathVariable("id") String id) {songService.delete(id);return JsonResult.success("删除成功");}@RequestMapping(value = "/update", method = RequestMethod.POST)public JsonResult<Void> update(@Valid SongUpdateDTO updateDTO) {songService.update(updateDTO);return JsonResult.success("修改成功");}@RequestMapping(value = "/detail/{id}", method = RequestMethod.GET)public Song detail(@RequestParam(required = true) @PathVariable("id") String id) {return songService.detail(id);}}
这样的话,用户操作添加、删除、修改歌曲时,能得到响应,成功或者失败,以及失败的原因。
4、深入分析操作影响行数
当然了,这里只要没报错就默认操作成功了,如果要求完美,可以获取BaseMapper的增删改方法的返回值,这个返回值是int类型,表示本次操作受影响的行数:插入行数、删除行数、修改行数,根据这个行数返回对应的提示给用户即可。
对应SongServiceImpl的修改
package com.example.springboot.service.impl;import com.example.springboot.dto.SongInsertDTO;
import com.example.springboot.dto.SongUpdateDTO;
import com.example.springboot.entity.Song;
import com.example.springboot.exception.GlobalException;
import com.example.springboot.mapper.SongMapper;
import com.example.springboot.restful.ResponseCode;
import com.example.springboot.service.SongService;
import com.example.springboot.util.StringUtils;
import org.springframework.beans.factory.annotation.Autowired;
import org.springframework.stereotype.Service;import java.time.LocalDateTime;/*** @author heyunlin* @version 1.0*/
@Service
public class SongServiceImpl implements SongService {private final SongMapper songMapper;@Autowiredpublic SongServiceImpl(SongMapper songMapper) {this.songMapper = songMapper;}@Overridepublic void insert(SongInsertDTO insertDTO) {Song song = new Song();song.setId(StringUtils.uuid());song.setName(insertDTO.getName());song.setSinger(insertDTO.getSinger());if (StringUtils.isNotEmpty(insertDTO.getNote())) {song.setNote(insertDTO.getNote());}int rows = songMapper.insert(song);if (rows < 1) {throw new GlobalException(ResponseCode.BAD_REQUEST, "添加时发生了异常,预计影响" + rows + "条记录,已经对本次操作影响的数据进行恢复");}}@Overridepublic void delete(String id) {int rows = songMapper.deleteById(id);if (rows == 0) {throw new GlobalException(ResponseCode.BAD_REQUEST, "删除失败,本次操作删除了" + rows + "条记录。");} else if (rows > 1) {throw new GlobalException(ResponseCode.BAD_REQUEST, "删除失败,操作过程中发生了不可预知的错误。");}}@Overridepublic void update(SongUpdateDTO updateDTO) {Song song = new Song();song.setId(StringUtils.uuid());song.setName(updateDTO.getName());song.setSinger(updateDTO.getSinger());if (StringUtils.isNotEmpty(updateDTO.getNote())) {song.setNote(updateDTO.getNote());}song.setLastUpdateTime(LocalDateTime.now());int rows = songMapper.updateById(song);if (rows == 0) {throw new GlobalException(ResponseCode.BAD_REQUEST, "修改失败,本次操作删除了" + rows + "条记录。");} else if (rows > 1) {throw new GlobalException(ResponseCode.BAD_REQUEST, "修改失败,操作过程中发生了不可预知的错误。");}}@Overridepublic Song detail(String id) {return songMapper.selectById(id);}}
四、异常处理问题
程序的健壮性作为3大重要指标,可见非常重要,当程序发生异常时,应该被很好的处理,而不是让用户看到500的页面,或者长时间无响应。
这篇文章通过springmvc统一异常处理机制来解决这个问题,不需要在每个方法上使用try...catch...finally来手动处理异常。
首先,创建一个自定义异常,继承RuntimeException,这时候可能你就会好奇:为什么是继承RuntimeException呢?能不能继承其他Exception,答案是可以。
但是这里需要了解检查异常和非检查异常的区别:
非检查异常:RuntimeException及其子类异常,不需要手动处理,也就是不需要通过try...catch捕获或者通过throws关键字在方法上面申明抛出异常。
检查异常:除了RuntimeException及其子类型异常以外的异常都是检查异常,必须手动处理,通过try...catch捕获或者通过throws关键字在方法上面申明抛出异常。如果不处理,编译就会报错。
所以,我们使用非检查异常的好处显而易见,当我们在代码里主动使用throw关键字抛出RuntimeException异常时不需要去处理就可以通过编译。
我们创建一个exception子包来存放异常相关的类,在该类下创建一个全局异常类GlobalException
package com.example.springboot.exception;import com.example.springboot.restful.ResponseCode;
import lombok.Data;
import lombok.EqualsAndHashCode;/*** 自定义异常* @author heyunlin* @version 1.0*/
@Data
@EqualsAndHashCode(callSuper = true)
public class GlobalException extends RuntimeException {private ResponseCode responseCode;public GlobalException(ResponseCode responseCode, String message) {super(message);setResponseCode(responseCode);}}
然后在当前的exception包下面创建一个handler,然后在handler包下创建一个统一异常处理类
package com.example.springboot.exception.handler;import com.example.springboot.exception.GlobalException;
import com.example.springboot.restful.JsonResult;
import com.example.springboot.restful.ResponseCode;
import org.springframework.http.HttpStatus;
import org.springframework.validation.BindException;
import org.springframework.validation.BindingResult;
import org.springframework.validation.FieldError;
import org.springframework.web.bind.annotation.ExceptionHandler;
import org.springframework.web.bind.annotation.ResponseStatus;
import org.springframework.web.bind.annotation.RestControllerAdvice;import javax.servlet.http.HttpServletResponse;
import java.util.Objects;/*** 全局异常处理类* @author heyunlin* @version 1.0*/
@RestControllerAdvice
public class GlobalExceptionHandler {/*** 处理GlobalException* @param e GlobalException* @return JsonResult<Void>*/@ExceptionHandler(GlobalException.class)public JsonResult<Void> handlerGlobalException(HttpServletResponse response, GlobalException e) {e.printStackTrace();response.setStatus(e.getResponseCode().getValue());return JsonResult.error(e.getResponseCode(), e);}/*** 处理BindException* @param e BindException* @return JsonResult<Void>*/@ExceptionHandler(BindException.class)@ResponseStatus(HttpStatus.BAD_REQUEST)public JsonResult<Void> handlerBindException(BindException e) {e.printStackTrace();BindingResult bindingResult = e.getBindingResult();FieldError fieldError = bindingResult.getFieldError();String defaultMessage = Objects.requireNonNull(fieldError).getDefaultMessage();return JsonResult.error(ResponseCode.BAD_REQUEST, defaultMessage);}/*** 处理Exception* @param e Exception* @return JsonResult<Void>*/@ExceptionHandler(Exception.class)@ResponseStatus(HttpStatus.INTERNAL_SERVER_ERROR)public JsonResult<Void> handlerException(Exception e) {e.printStackTrace();return JsonResult.error(ResponseCode.ERROR, e);}}
这样的话,当发生对应的异常时,会执行对应的方法,比如数据校验失败时发生了BindException,会执行以下方法
/**
* 处理BindException
* @param e BindException
* @return JsonResult<Void>
*/
@ExceptionHandler(BindException.class)
@ResponseStatus(HttpStatus.BAD_REQUEST)
public JsonResult<Void> handlerBindException(BindException e) {
e.printStackTrace();
BindingResult bindingResult = e.getBindingResult();
FieldError fieldError = bindingResult.getFieldError();
String defaultMessage = Objects.requireNonNull(fieldError).getDefaultMessage();
return JsonResult.error(ResponseCode.BAD_REQUEST, defaultMessage);
}
通过上面几个步骤,项目的结构已经相对完善了。
好了,这篇文章就分享到这里了,看完不要忘了点赞+收藏哦~
源码已经上传至git,按需获取:
springboot整合mybatis实现crud项目改进![]() https://gitee.com/he-yunlin/springboot/tree/springboot1.0/
https://gitee.com/he-yunlin/springboot/tree/springboot1.0/

