【 声明:版权所有,欢迎转载,请勿用于商业用途。 联系信箱:feixiaoxing @163.com】
前面我们学习了如何在树莓派4b上面开发qt,也学习了如何用/etc/rc.local启动控制台程序,那今天我们继续学习一下如何利用树莓派4b开启第一个界面程序。这里的界面程序就是用qt开发的程序,假设这个程序是一个计算器,我们看下应该如何启动。
1、准备计算器程序的代码
这部分代码出自另外一个课程,大家可以直接copy代码即可,文件名是mycalc.cpp,
// header file start here
#include <QApplication>
#include <QWidget>
#include <QGridLayout>
#include <QPushButton>
#include <QLineEdit>// function declaration
static double calculate(QString str);// main function start here
int main(int argc, char *argv[]) {QApplication app(argc, argv);QWidget window;window.setWindowTitle("Calculator");window.setFixedWidth(600);window.setFixedHeight(400);// create the layoutQGridLayout *layout = new QGridLayout(&window);// create the displayQLineEdit *display = new QLineEdit();display->setAlignment(Qt::AlignRight);display->setReadOnly(true);display->setFixedHeight(50);// add the display to the layoutlayout->addWidget(display, 0, 0, 1, 4);// create the buttonsconst QStringList buttonsText = {"7", "8", "9", "-","4", "5", "6", "*","1", "2", "3", "/","0", ".", "+", "="};// add the buttons to the layoutfor (int i = 0; i < 16; ++i) {QPushButton *button = new QPushButton(buttonsText[i]);button->setFixedHeight(40);layout->addWidget(button, 1 + i / 4, i % 4);// set up signal-slot connections, and setup anonymous functionif (buttonsText[i] == "=") {QObject::connect(button, &QPushButton::clicked, [&] {// evaluate the expression and set the result to the displayQString expression = display->text();display->setText(QString::number(calculate(expression)));});}else {QObject::connect(button, &QPushButton::clicked, [=] {// append the clicked button's text to the displaydisplay->setText(display->text() + button->text());});}}// show your window herewindow.show();return app.exec();
}// transfer the string to the calculated result
//https://blog.csdn.net/be_quiet_endeavor/article/details/78847565
//
static double calculate(QString str)
{if (str.indexOf("+") != -1){int i = str.indexOf("+");return calculate(str.left(i)) + calculate(str.right(str.length() - 1 - i));}if (str.indexOf("-") != -1){QStringList list = str.split('-');double value = calculate(list[0]);if (str.at(0) == "-")value = -value;for (int i = 1; i < list.count(); ++i){value -= calculate(list[i]);}return value;}if (str.indexOf("*") != -1){int i = str.indexOf("*");return calculate(str.left(i))*calculate(str.right(str.length() - 1 - i));}if (str.indexOf("/") != -1){QStringList list = str.split('/');double value = calculate(list[0]);for (int i = 1; i < list.count(); ++i){value /= calculate(list[i]);}return value;}return str.toDouble();
}
2、直接用g++命令进行编译
这里没有用cmake进行编译,而是直接用g++进行编译,
g++ -std=c++11 -o mycalc mycalc.cpp -I/usr/include/aarch64-linux-gnu/qt5 -I/usr/include/aarch64-linux-gnu/qt5/QtWidgets -lQt5Core -lQt5Widgets -lQt5Gui -lQt5DBus -lQt5XcbQpa -lpthread3、开始准备desktop文件
因为准备的内容比较多,所以我们可以直接准备一个脚本,
cd /home/feixiaoxing/.config
mkdir autostart
cd autostart
vi autostart.desktop
这里desktop填写的内容也比较简单,
[Desktop Entry]
Type=Application
Name=mycalc
Exec=/home/feixiaoxing/Desktop/qt/mycalc
最重要的部分就是这里的Exec文件,指向刚才编译的可执行程序。
4、重启树莓派4b,开始测试
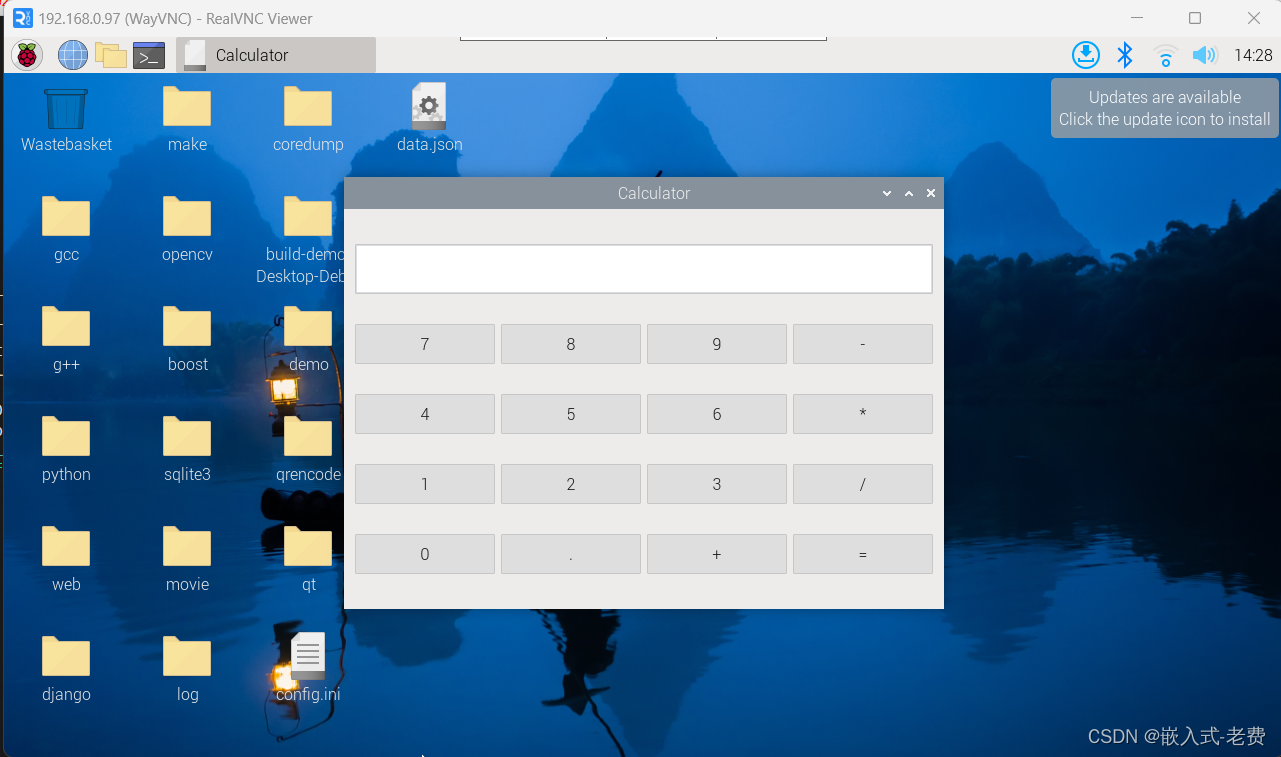
所有这一切都准备好了之后,就可以重启树莓派4b了。因为我们这里没有屏幕,所以连接的方式就是通过real vnc viewer进行查看。过一段时间之后,如果不出意外,就可以看到这样的画面,这代表qt界面程序已经启动好了。





![Amazon云计算AWS之[5]关系数据库服务RDS](https://img-blog.csdnimg.cn/direct/c7e33d19d32141df9eeb3f9714c4bd2e.png)
