Colab/PyTorch - 001 PyTorch Basics
- 1. 源由
- 2. PyTorch库概览
- 3. 处理过程
- 2.1 数据加载与处理
- 2.2 构建神经网络
- 2.3 模型推断
- 2.4 兼容性
- 3. 张量介绍
- 3.1 构建张量
- 3.2 访问张量元素
- 3.3 张量元素类型
- 3.4 张量转换(NumPy Array)
- 3.5 张量运算
- 3.6 CPU v/s GPU 张量
- 4. 参考资料
1. 源由
认知一件事,或者一个物,了解事物的最初源于对这个事物的理解。因此,我们还是非常循着逻辑循序渐进的方式,首先来认识事物的基本属性、特性。
这里将来看下PyTorch的一些基础知识、流程、定义。
2. PyTorch库概览
我们知道PyTorch是基于Python的科学计算包,让我们看一看PyTorch计算包在处理深度机器学习的基本流程。下面的图描述了一个典型的工作流程以及与每个步骤相关的重要模块。
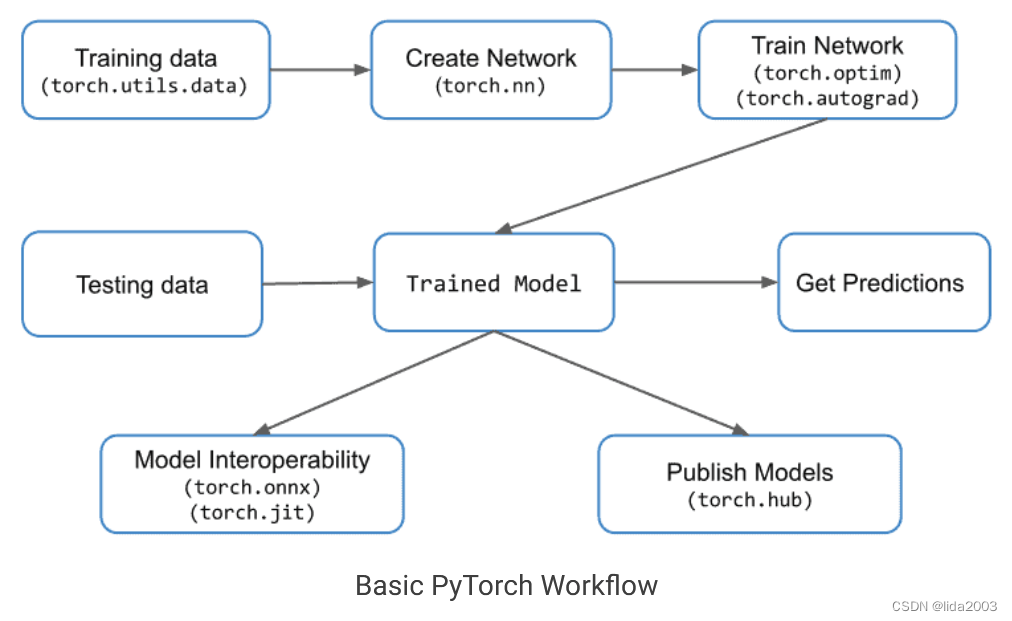
注:重要PyTorch模块包括:torch.nn、torch.optim、torch.utils和torch.autograd。
3. 处理过程
2.1 数据加载与处理
在任何深度学习项目中,第一步都是处理数据的加载和处理。PyTorch通过torch.utils.data提供了相应的工具。
该模块中的两个重要类是Dataset和DataLoader。
- Dataset建立在张量数据类型之上,主要用于自定义数据集。
- DataLoader用于大型数据集并且希望在后台加载数据以便在训练循环中准备好并等待时使用。
注:如果可以访问多台机器或GPU,还可以使用torch.nn.DataParallel和torch.distributed。
2.2 构建神经网络
torch.nn模块用于创建神经网络。它提供了所有常见的神经网络层,如全连接层、卷积层、激活函数和损失函数等。
一旦网络架构被创建并且数据准备好被馈送到网络中,需要不断来更新权重和偏差,以便网络开始学习。这些实用工具在torch.optim模块中提供。类似地,在反向传播过程中需要的自动微分,我们使用torch.autograd模块。
2.3 模型推断
模型训练完成后,它可以用于对测试用例甚至新数据集进行输出预测。这个过程称为模型推断。
2.4 兼容性
提供了TorchScript,可以用于在不依赖Python运行时的情况下运行模型。这可以被视为一个虚拟机,其中的指令主要针对张量。
还可以格式转换,使用PyTorch训练的模型转换为ONNX等格式,这样可以在其他深度学习框架(如MXNet、CNTK、Caffe2)中使用这些模型。也可以将ONNX模型转换为TensorFlow。
3. 张量介绍
张量简单来说就是对矩阵的一种称呼。如果熟悉NumPy数组,理解和使用PyTorch张量将会非常容易。标量值由一个零维张量表示。类似地,列/行矩阵使用一维张量表示,以此类推。下面给出了一些不同维度的张量示例,供理解:
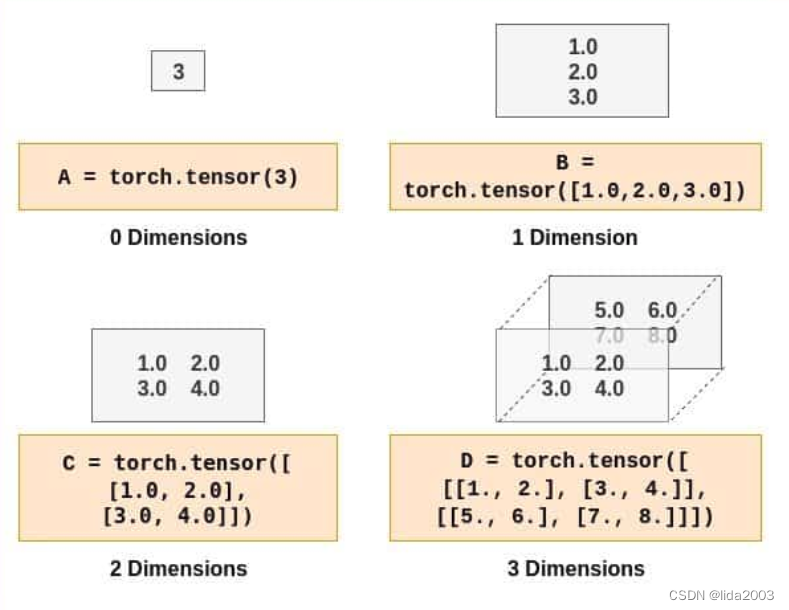
测试代码:PyTorch_for_Beginners
3.1 构建张量
import torch# Create a Tensor with just ones in a column
a = torch.ones(5)# Print the tensor we created
print(a)# tensor([1., 1., 1., 1., 1.])# Create a Tensor with just zeros in a column
b = torch.zeros(5)
print(b)# tensor([0., 0., 0., 0., 0.])c = torch.tensor([1.0, 2.0, 3.0, 4.0, 5.0])
print(c)# tensor([1., 2., 3., 4., 5.])d = torch.zeros(3,2)
print(d)# tensor([[0., 0.],
#        [0., 0.],
#        [0., 0.]])e = torch.ones(3,2)
print(e)# tensor([[1., 1.],
#        [1., 1.],
#        [1., 1.]])f = torch.tensor([[1.0, 2.0],[3.0, 4.0]])
print(f)# tensor([[1., 2.],
#        [3., 4.]])# 3D Tensor
g = torch.tensor([[[1., 2.], [3., 4.]], [[5., 6.], [7., 8.]]])
print(g)# tensor([[[1., 2.],
#         [3., 4.]],
#
#        [[5., 6.],
#         [7., 8.]]])print(f.shape)
# torch.Size([2, 2])print(e.shape)
# torch.Size([3, 2])print(g.shape)
# torch.Size([2, 2, 2])
3.2 访问张量元素
- 1D
# Get element at index 2
print(c[2])# tensor(3.)
- 2D/3D
# All indices starting from 0# Get element at row 1, column 0
print(f[1,0])
# We can also use the following
print(f[1][0])# tensor(3.)# Similarly for 3D Tensor
print(g[1,0,0])
print(g[1][0][0])# tensor(5.)
- 访问部分张量
# All elements
print(f[:])# All elements from index 1 to 2 (inclusive)
print(c[1:3])# All elements till index 4 (exclusive)
print(c[:4])# First row
print(f[0,:])# Second column
print(f[:,1])
3.3 张量元素类型
int_tensor = torch.tensor([[1,2,3],[4,5,6]])
print(int_tensor.dtype)# torch.int64# What if we changed any one element to floating point number?
int_tensor = torch.tensor([[1,2,3],[4.,5,6]])
print(int_tensor.dtype)# torch.float32print(int_tensor)# tensor([[1., 2., 3.],
#        [4., 5., 6.]])# This can be overridden as follows
int_tensor = torch.tensor([[1,2,3],[4.,5,6]], dtype=torch.int32)
print(int_tensor.dtype)# torch.int32
print(int_tensor)# tensor([[1, 2, 3],
#        [4, 5, 6]], dtype=torch.int32)
3.4 张量转换(NumPy Array)
# Import NumPy
import numpy as np# Tensor to Array
f_numpy = f.numpy()
print(f_numpy)# array([[1., 2.],
#       [3., 4.]], dtype=float32)# Array to Tensor
h = np.array([[8,7,6,5],[4,3,2,1]])
h_tensor = torch.from_numpy(h)
print(h_tensor)# tensor([[8, 7, 6, 5],
#        [4, 3, 2, 1]])
3.5 张量运算
# Create tensor
tensor1 = torch.tensor([[1,2,3],[4,5,6]])
tensor2 = torch.tensor([[-1,2,-3],[4,-5,6]])# Addition
print(tensor1+tensor2)
# We can also use
print(torch.add(tensor1,tensor2))# tensor([[ 0,  4,  0],
#        [ 8,  0, 12]])# Subtraction
print(tensor1-tensor2)
# We can also use
print(torch.sub(tensor1,tensor2))# tensor([[ 2,  0,  6],
#        [ 0, 10,  0]])# Multiplication
# Tensor with Scalar
print(tensor1 * 2)
# tensor([[ 2,  4,  6],
#        [ 8, 10, 12]])# Tensor with another tensor
# Elementwise Multiplication
print(tensor1 * tensor2)
# tensor([[ -1,   4,  -9],
#        [ 16, -25,  36]])# Matrix multiplication
tensor3 = torch.tensor([[1,2],[3,4],[5,6]])
print(torch.mm(tensor1,tensor3))
# tensor([[22, 28],
#        [49, 64]])# Division
# Tensor with scalar
print(tensor1/2)
# tensor([[0, 1, 1],
#        [2, 2, 3]])# Tensor with another tensor
# Elementwise division
print(tensor1/tensor2)
# tensor([[-1,  1, -1],
#        [ 1, -1,  1]])
3.6 CPU v/s GPU 张量
PyTorch针对CPU和GPU有不同的Tensor实现。可以将每个张量转换为GPU,以执行大规模并行、快速的计算。所有对张量执行的操作都将使用PyTorch提供的专用于GPU的例程进行。
# Create a tensor for CPU
# This will occupy CPU RAM
tensor_cpu = torch.tensor([[1.0, 2.0], [3.0, 4.0], [5.0, 6.0]], device='cpu')# Create a tensor for GPU
# This will occupy GPU RAM
tensor_gpu = torch.tensor([[1.0, 2.0], [3.0, 4.0], [5.0, 6.0]], device='cuda')
CPU v/s GPU张量转换
# Move GPU tensor to CPU
tensor_gpu_cpu = tensor_gpu.to(device='cpu')# Move CPU tensor to GPU
tensor_cpu_gpu = tensor_cpu.to(device='cuda')
测试代码:001 PyTorch for Beginners
4. 参考资料
【1】Colab/PyTorch - Getting Started with PyTorch


![[笔试强训day07]](https://img-blog.csdnimg.cn/direct/811a4927632243a48c0b96ebb45bad1e.png)
