本文将使用安富莱的STM32H743XIH板子驱动SDRAM
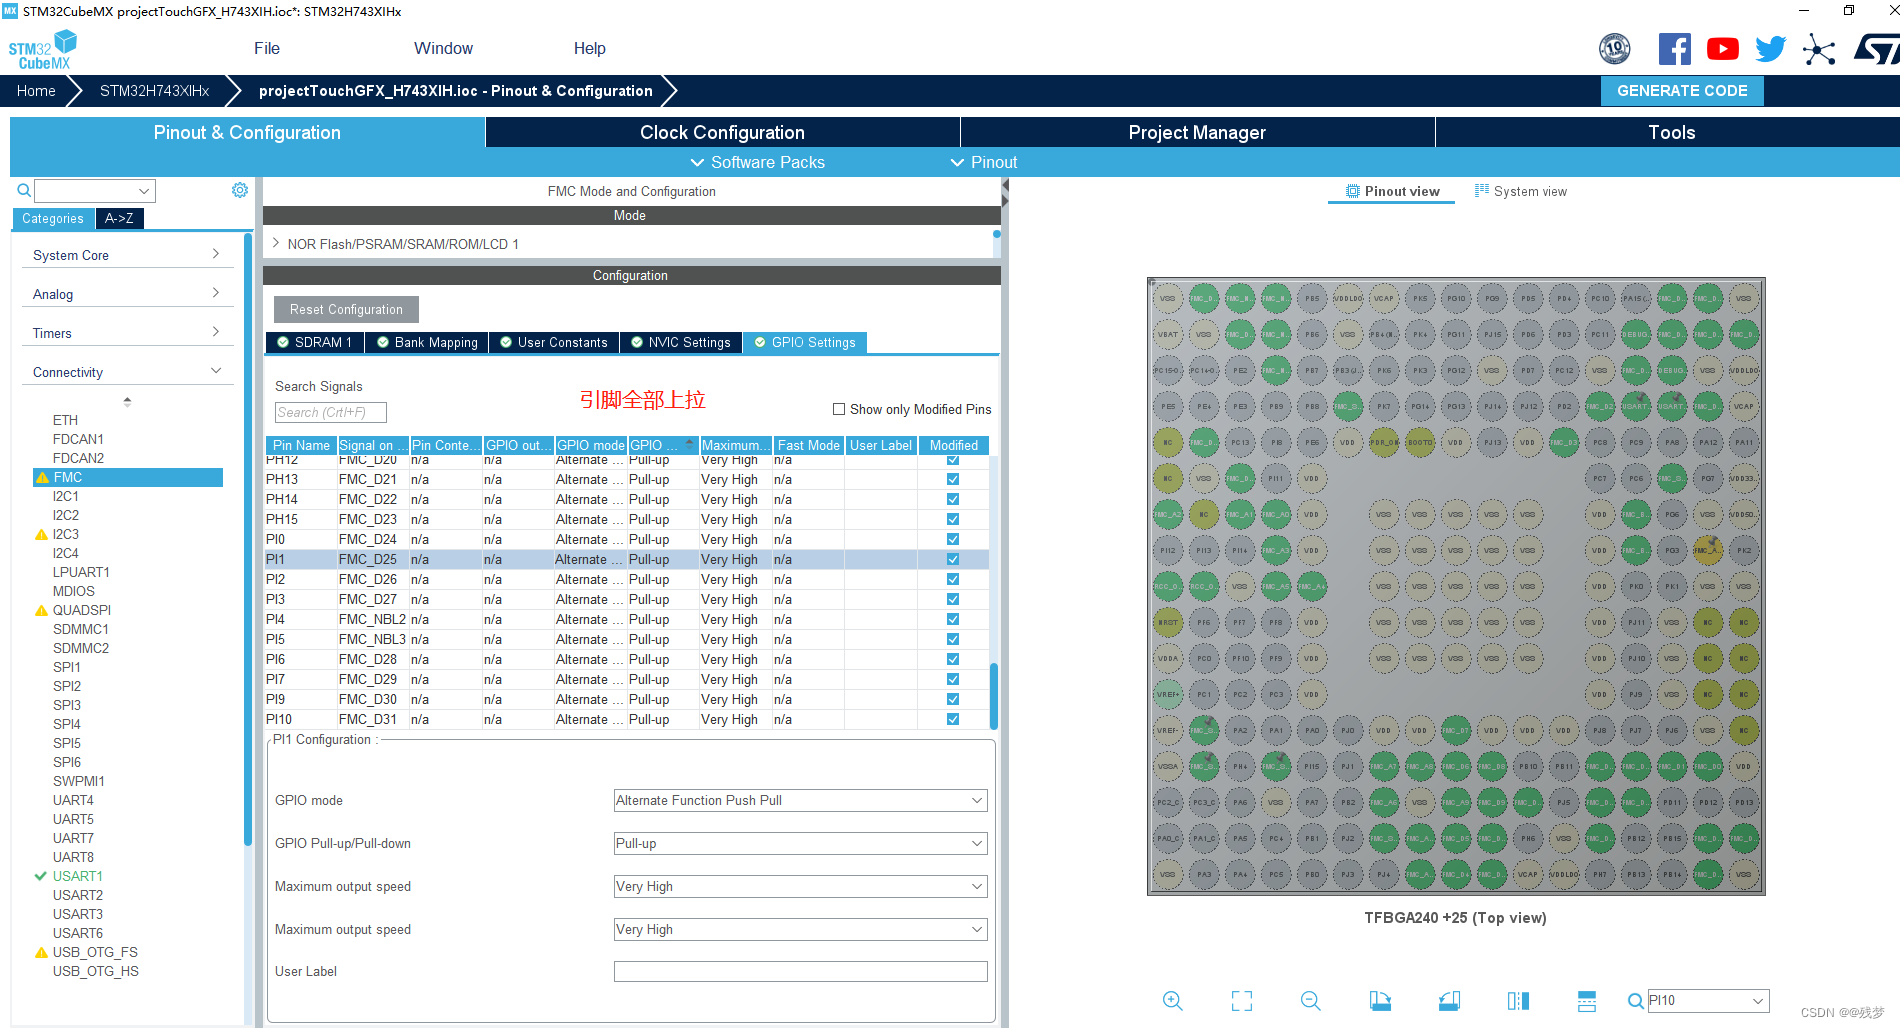
引脚连接情况

一、CubeMx配置工程

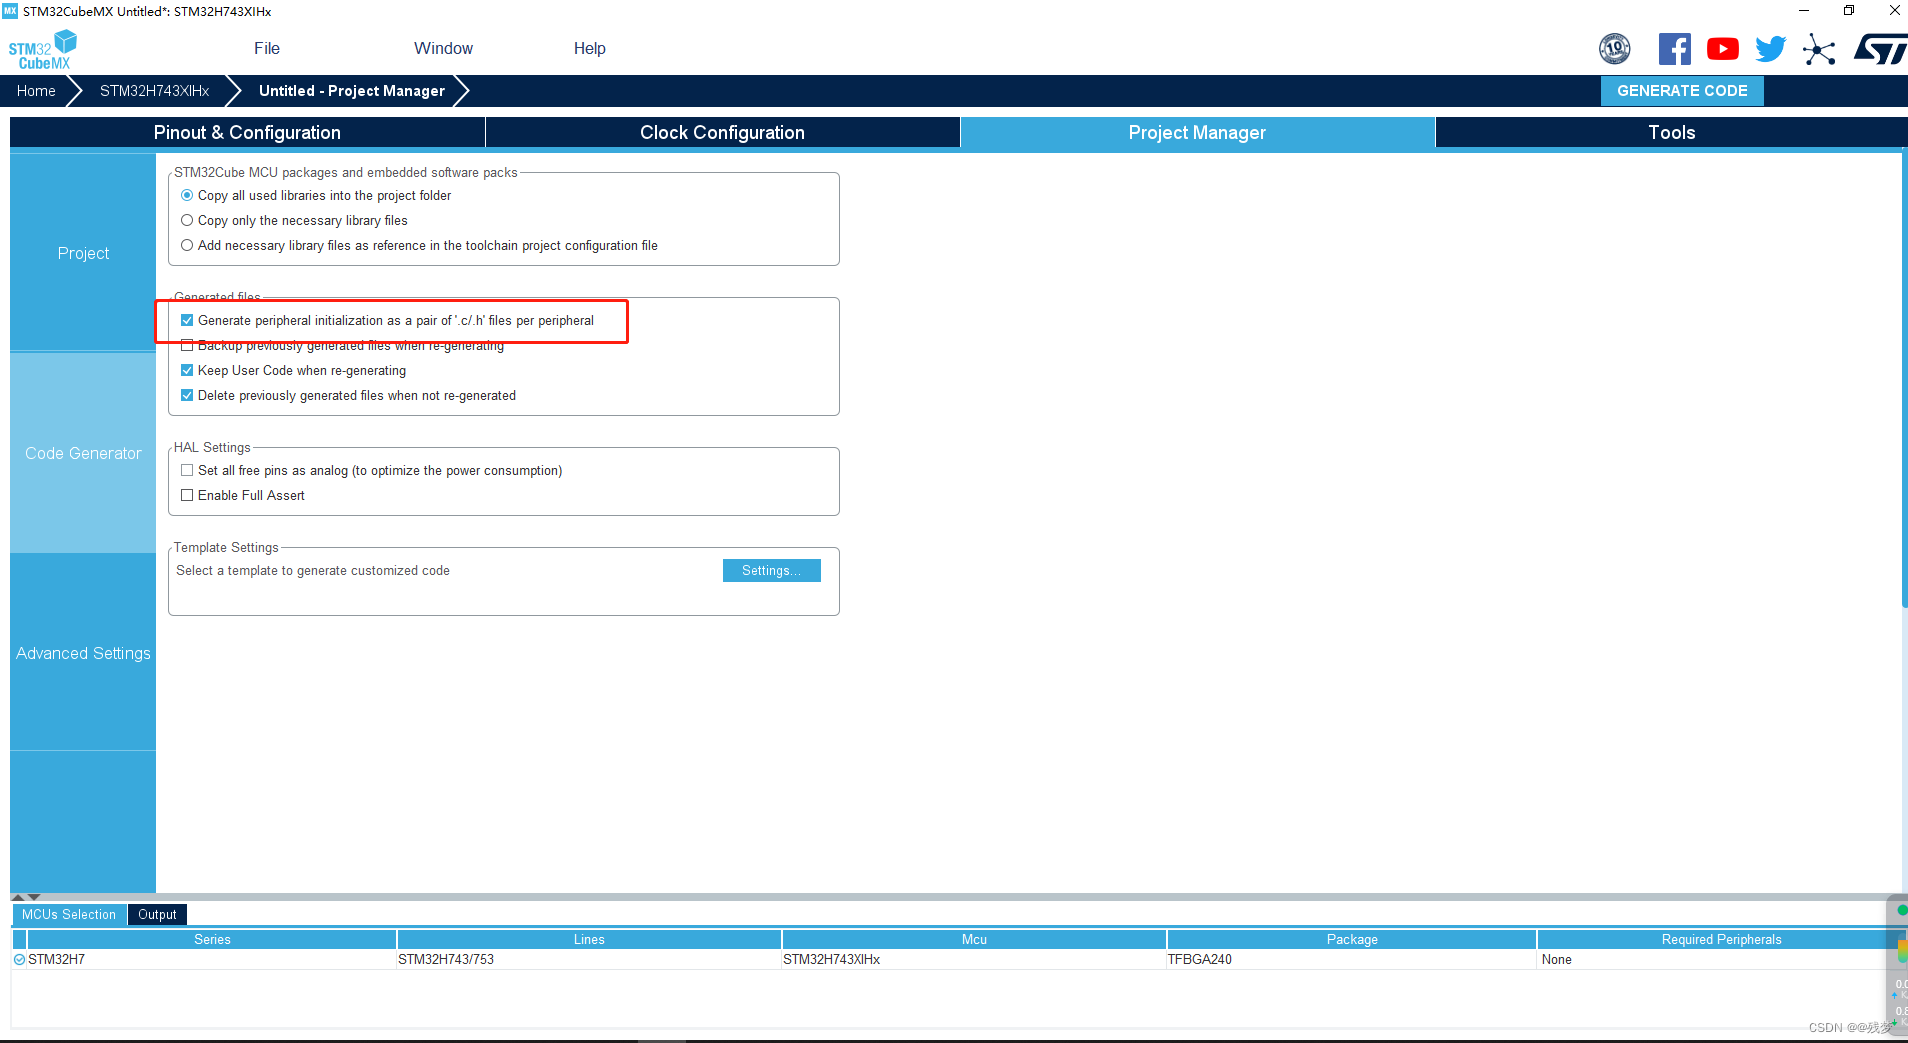
1、开启调试口

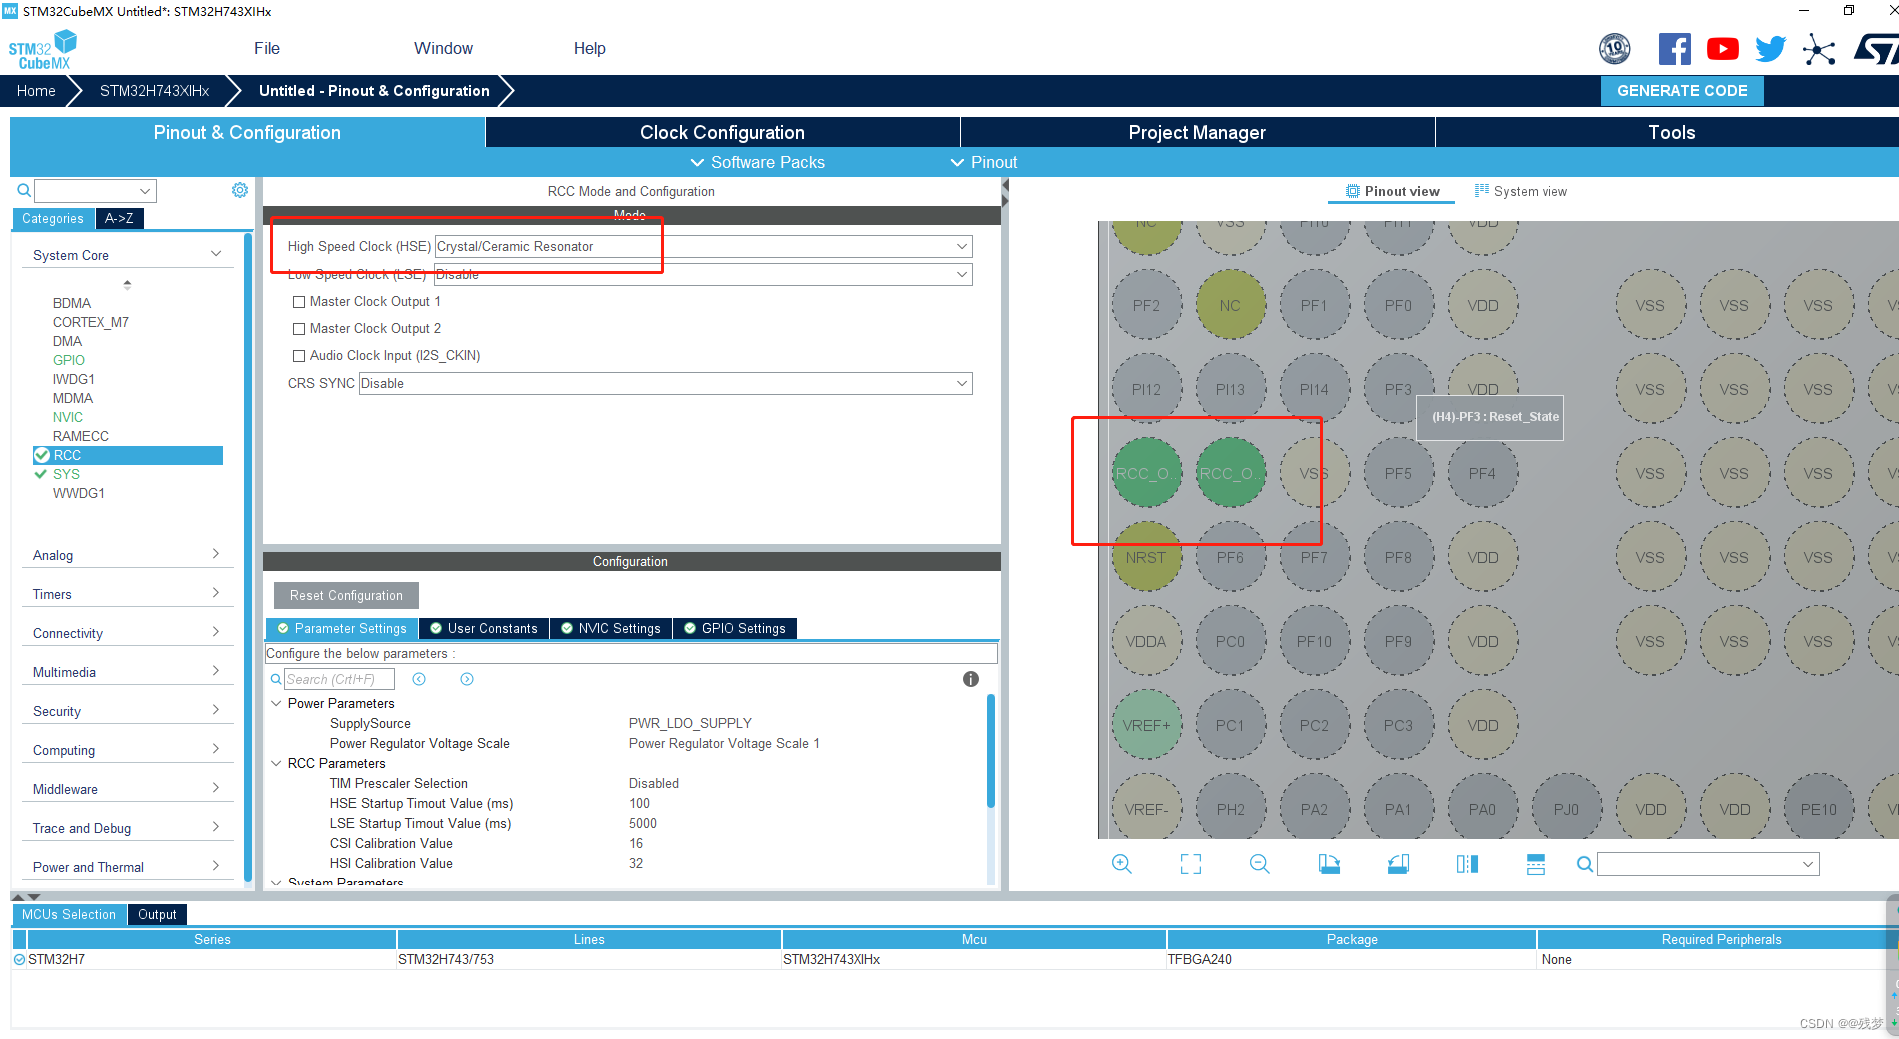
2、开启外部高速时钟
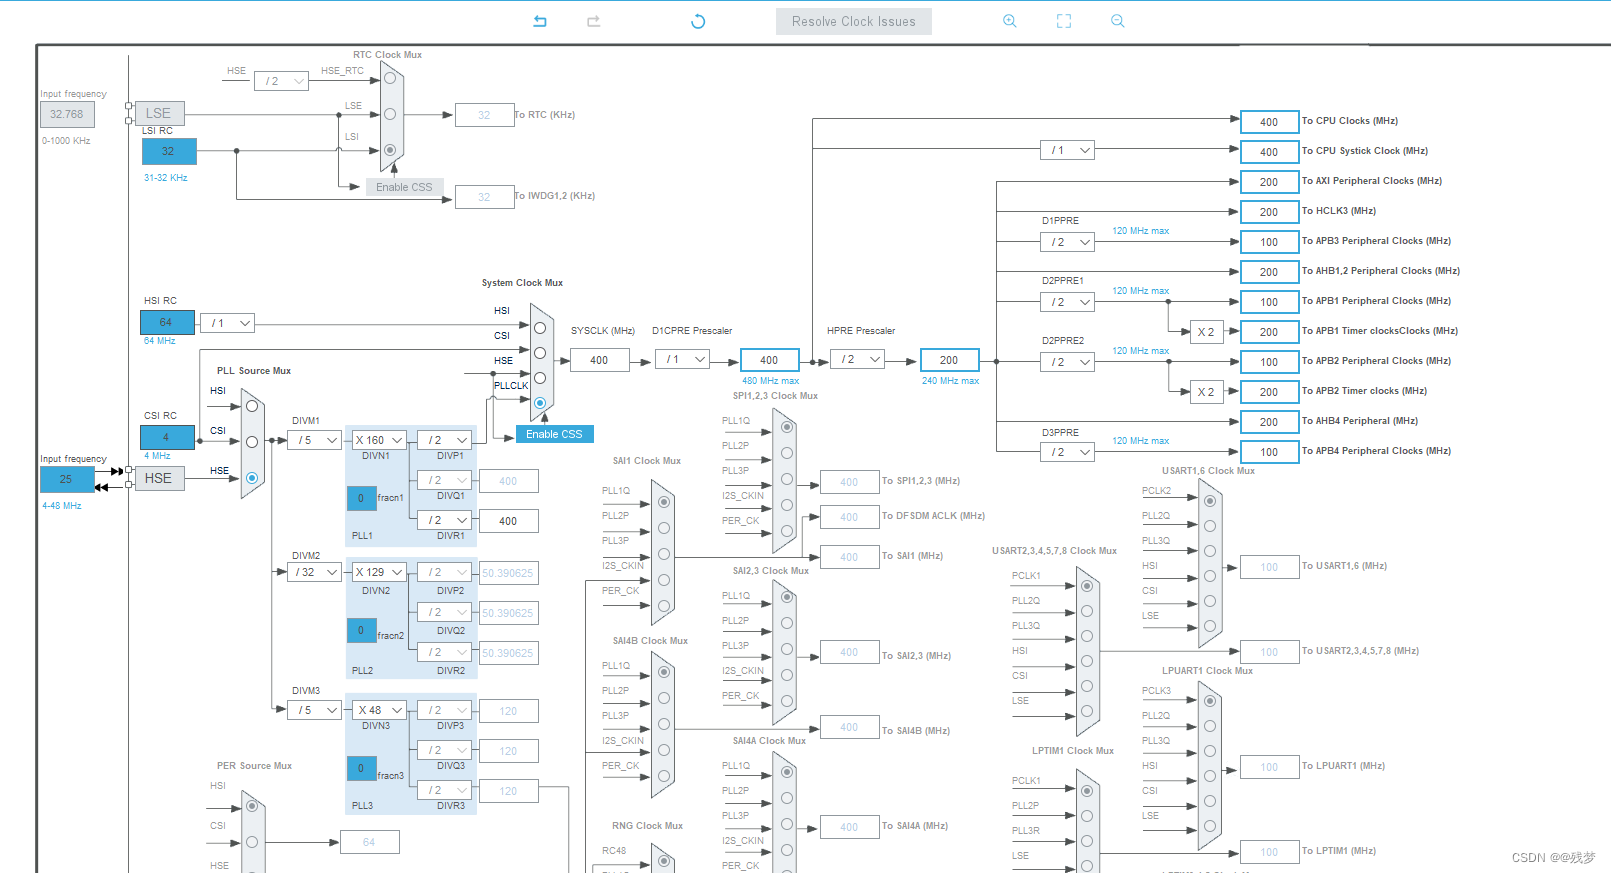
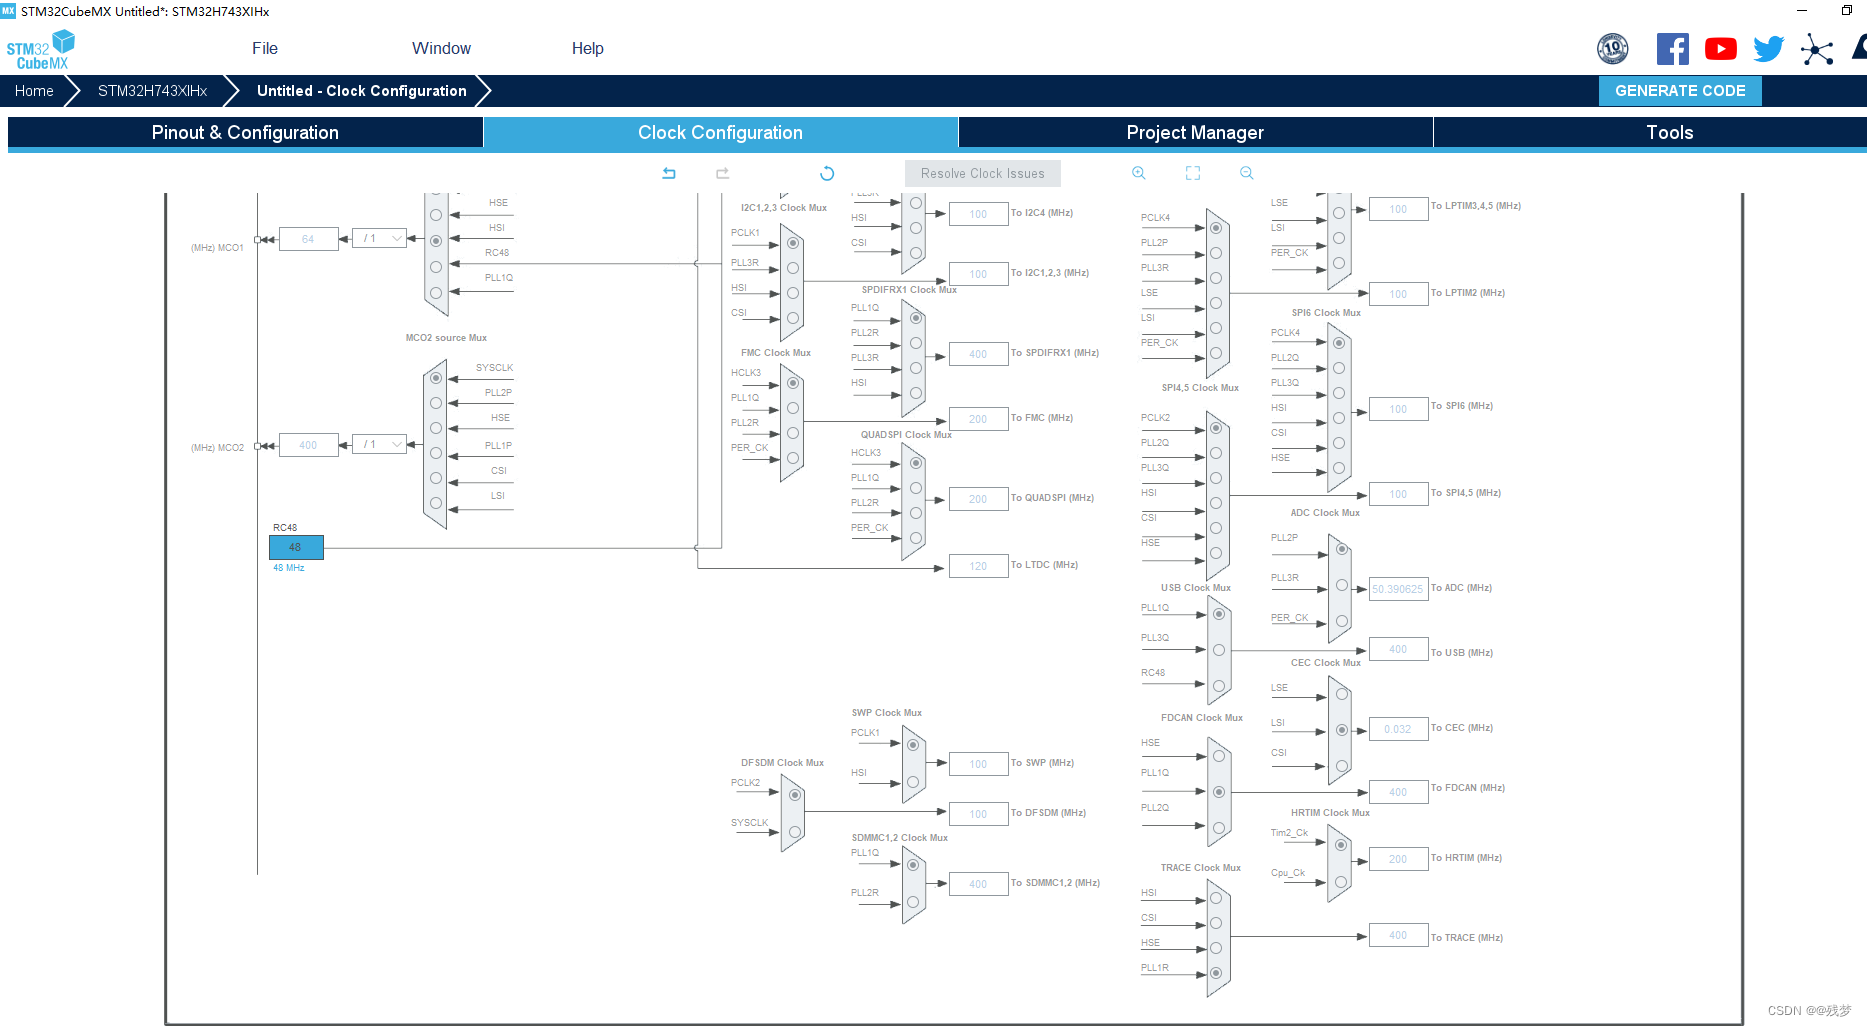
配置时钟树
3、开启串口1

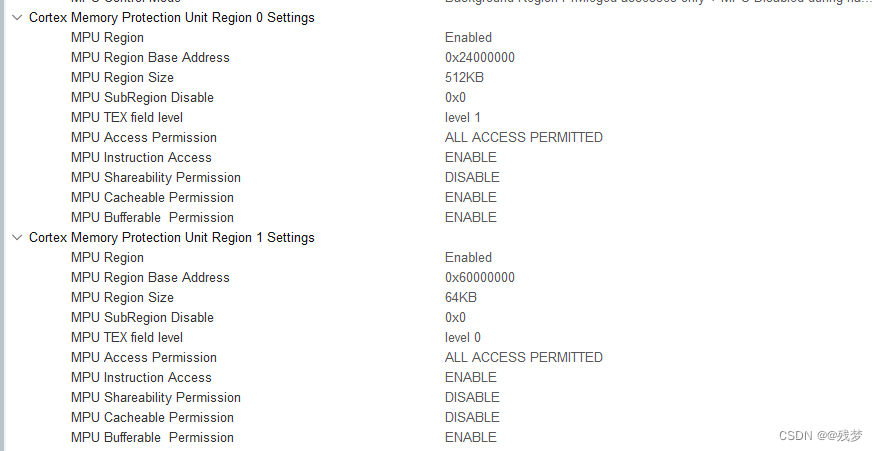
4、配置MPU
按照安富莱的例程配置:
/*
*********************************************************************************************************
*	函 数 名: MPU_Config
*	功能说明: 配置MPU
*	形    参: 无
*	返 回 值: 无
*********************************************************************************************************
*/
static void MPU_Config( void )
{MPU_Region_InitTypeDef MPU_InitStruct;/* 禁止 MPU */HAL_MPU_Disable();/* 配置AXI SRAM的MPU属性为Write back, Read allocate,Write allocate */MPU_InitStruct.Enable           = MPU_REGION_ENABLE;MPU_InitStruct.BaseAddress      = 0x24000000;MPU_InitStruct.Size             = MPU_REGION_SIZE_512KB;MPU_InitStruct.AccessPermission = MPU_REGION_FULL_ACCESS;MPU_InitStruct.IsBufferable     = MPU_ACCESS_BUFFERABLE;MPU_InitStruct.IsCacheable      = MPU_ACCESS_CACHEABLE;MPU_InitStruct.IsShareable      = MPU_ACCESS_NOT_SHAREABLE;MPU_InitStruct.Number           = MPU_REGION_NUMBER0;MPU_InitStruct.TypeExtField     = MPU_TEX_LEVEL1;MPU_InitStruct.SubRegionDisable = 0x00;MPU_InitStruct.DisableExec      = MPU_INSTRUCTION_ACCESS_ENABLE;HAL_MPU_ConfigRegion(&MPU_InitStruct);/* 配置FMC扩展IO的MPU属性为Device或者Strongly Ordered */MPU_InitStruct.Enable           = MPU_REGION_ENABLE;MPU_InitStruct.BaseAddress      = 0x60000000;MPU_InitStruct.Size             = ARM_MPU_REGION_SIZE_64KB;	MPU_InitStruct.AccessPermission = MPU_REGION_FULL_ACCESS;MPU_InitStruct.IsBufferable     = MPU_ACCESS_BUFFERABLE;MPU_InitStruct.IsCacheable      = MPU_ACCESS_NOT_CACHEABLE;	/* 不能用MPU_ACCESS_CACHEABLE;会出现2次CS、WE信号 */MPU_InitStruct.IsShareable      = MPU_ACCESS_NOT_SHAREABLE;MPU_InitStruct.Number           = MPU_REGION_NUMBER1;MPU_InitStruct.TypeExtField     = MPU_TEX_LEVEL0;MPU_InitStruct.SubRegionDisable = 0x00;MPU_InitStruct.DisableExec      = MPU_INSTRUCTION_ACCESS_ENABLE;HAL_MPU_ConfigRegion(&MPU_InitStruct);/* 配置SDRAM的MPU属性为Write back, Read allocate,Write allocate */MPU_InitStruct.Enable           = MPU_REGION_ENABLE;MPU_InitStruct.BaseAddress      = 0xC0000000;MPU_InitStruct.Size             = MPU_REGION_SIZE_32MB;MPU_InitStruct.AccessPermission = MPU_REGION_FULL_ACCESS;MPU_InitStruct.IsBufferable     = MPU_ACCESS_BUFFERABLE;MPU_InitStruct.IsCacheable      = MPU_ACCESS_CACHEABLE;MPU_InitStruct.IsShareable      = MPU_ACCESS_NOT_SHAREABLE;MPU_InitStruct.Number           = MPU_REGION_NUMBER2;MPU_InitStruct.TypeExtField     = MPU_TEX_LEVEL1;MPU_InitStruct.SubRegionDisable = 0x00;MPU_InitStruct.DisableExec      = MPU_INSTRUCTION_ACCESS_ENABLE;HAL_MPU_ConfigRegion(&MPU_InitStruct);/*使能 MPU */HAL_MPU_Enable(MPU_PRIVILEGED_DEFAULT);
}/*
*********************************************************************************************************
*	函 数 名: CPU_CACHE_Enable
*	功能说明: 使能L1 Cache
*	形    参: 无
*	返 回 值: 无
*********************************************************************************************************
*/
static void CPU_CACHE_Enable(void)
{/* 使能 I-Cache */SCB_EnableICache();/* 使能 D-Cache */SCB_EnableDCache();
}


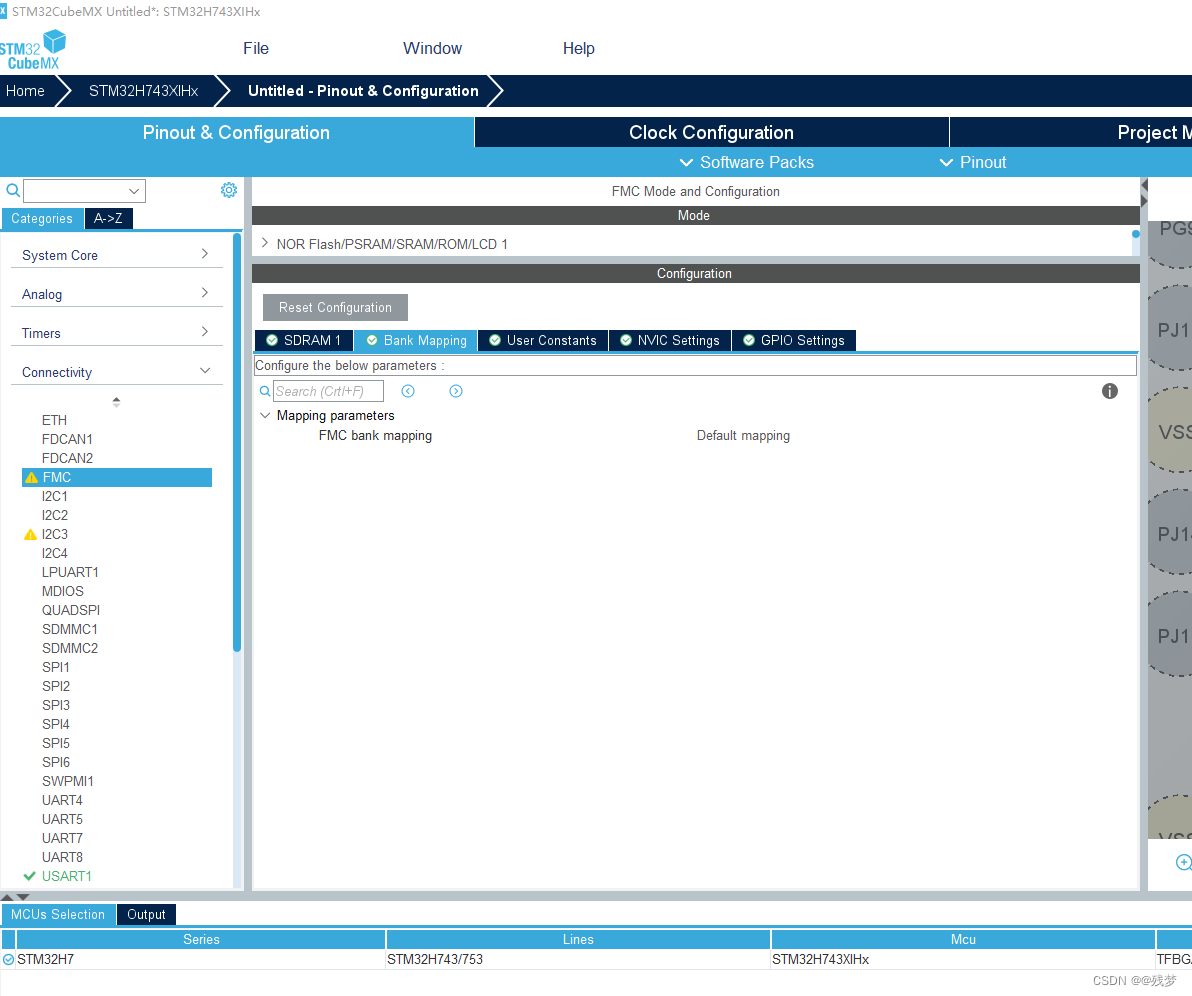
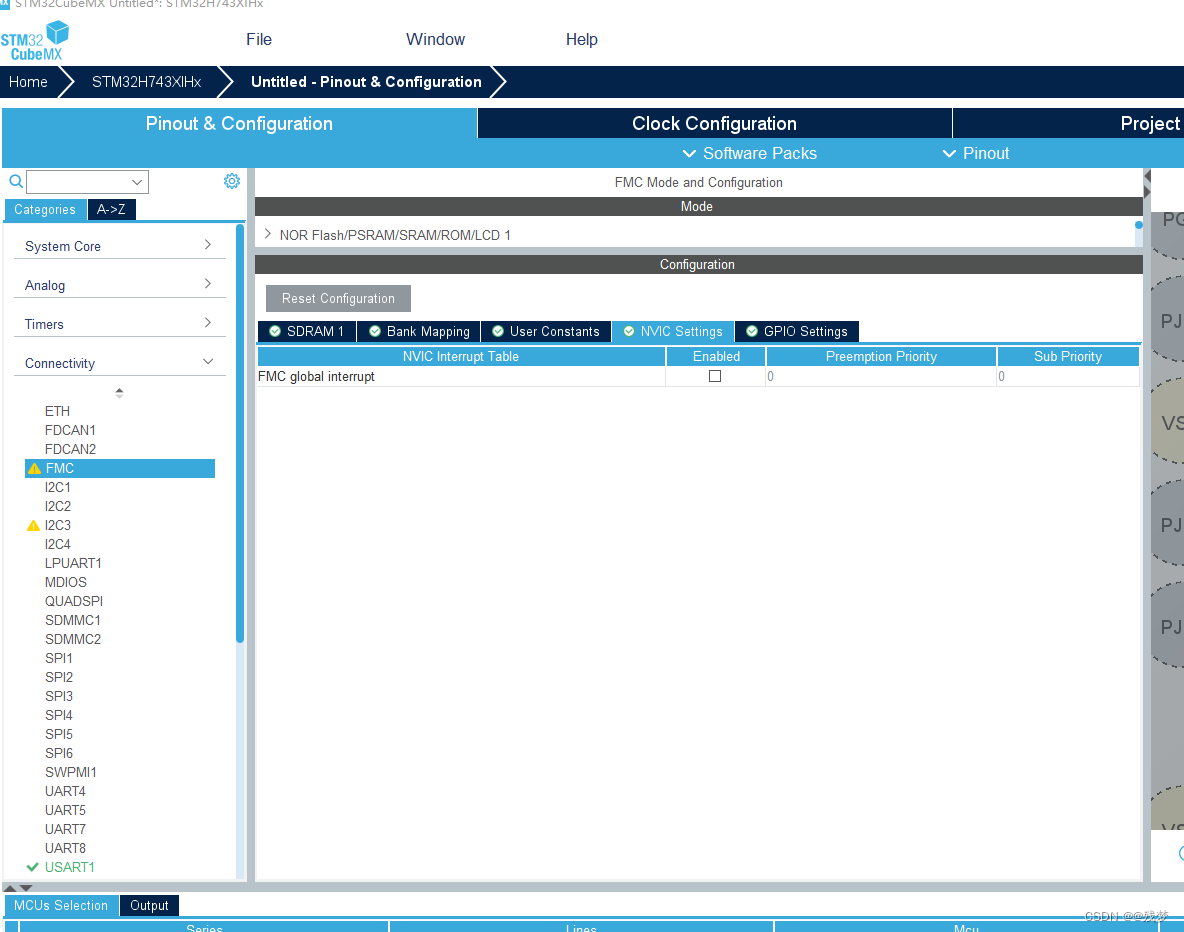
5、配置FMC


调整引脚和硬件接线图一致
注意FMC时钟
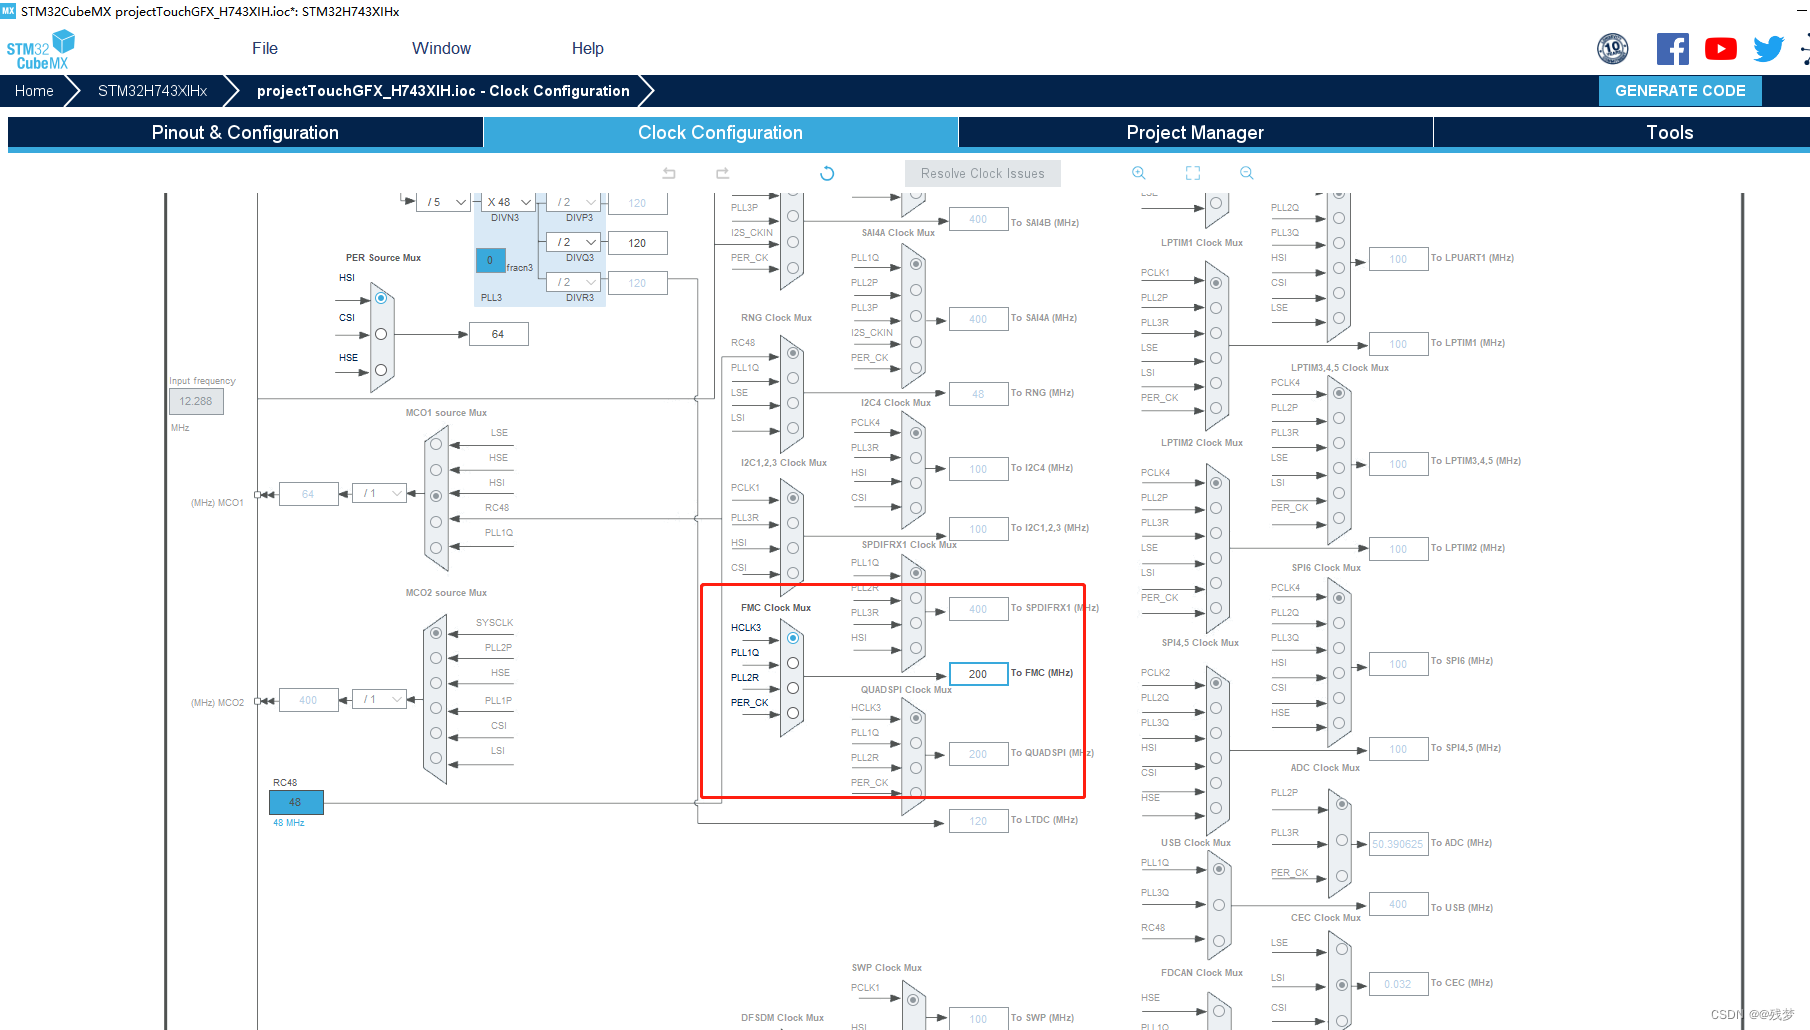
生成代码工程…
二、编写代码
1、添加文件至工程
common_driver.c|common_driver.h
bsp.c|bsp.h
sdram_driver.c|sdram_driver.h
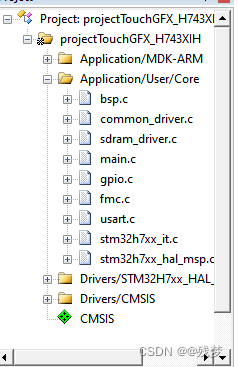
common_driver.h
#ifndef _common_driver_H_
#define _common_driver_H_
#ifdef __Cplusplus
#extern "C" {
#endif//本文件使用宏的方式开启附加功能
#define dcommonEnable_STM32 //使能stm32功能
#define dcommonEnable_PID //使能PID功能#include "stdint.h"
#include "stdlib.h"
#include "stdio.h"
#include "string.h"
#include "math.h"#define dBOOL(x) (x?eStatus_Valid:eStatus_Invalid)//逻辑值:真-1,假-0typedef  uint8_t    u8;
typedef  uint16_t   u16;
typedef  uint32_t   u32;
typedef  int8_t    s8;
typedef  int16_t   s16;
typedef  int32_t   s32;typedef struct
{unsigned char byte1;unsigned char byte2;unsigned char byte3;unsigned char byte4;
}Byte4_MemoryParameterStructDef;typedef struct
{unsigned char byte1;unsigned char byte2;
}Byte2_MemoryParameterStructDef;typedef union
{short int Value;Byte2_MemoryParameterStructDef Memory;
}Convert_ShortIntParameter_UnionDef;typedef union
{unsigned short int Value;Byte2_MemoryParameterStructDef Memory;
}Convert_UnsignedShortIntParameter_UnionDef;typedef union
{unsigned long int Value;Byte4_MemoryParameterStructDef Memory;
}Convert_UnsignedLongIntParameter_UnionDef;typedef union
{float Value;Byte4_MemoryParameterStructDef Memory;
}Convert_FloatParameter_UnionDef;typedef struct
{uint8_t hour;uint8_t minute;uint8_t second;uint8_t millisecond;
}Time24Format_StructDef;typedef enum
{eStatus_Invalid = 0,eStatus_Valid = 1
}status_EnumDef;void LinearFitCoefficient(double *pA,double *pB,double x[],double y[],unsigned short int dataSize);
unsigned long int DichotomyFindPos(float target,float *pdata,unsigned long int len);//STM32支持区
#ifdef dcommonEnable_STM32
#include "main.h"
#pragma diag_suppress 177 //忽略编译时函数定义但是没有引用的警告#define dSET_PIN(GPIOx,Pin)         GPIOx->BSRR = Pin  //引脚置1
#define dRESET_PIN(GPIOx,Pin)       GPIOx->BSRR =  ((uint32_t)Pin << 16u) //引脚置0
#define dPIN_WRITE(GPIOx,Pin,x)     GPIOx->BSRR = ((uint32_t)Pin << ((x)?0u:16u))
#define dPIN_READ(GPIOx,Pin)        (GPIOx->IDR & Pin)?1:0 //获取引脚状态
#define dxPIN_MODE_IN(gpio,pin)     {gpio->MODER &= ~(3<<(pin*2));gpio->MODER |= 0<<(pin*2);}//配置引脚为输入模式
#define dxPIN_MODE_OUT(gpio,pin)    {gpio->MODER &= ~(3<<(pin*2));gpio->MODER |= 1<<(pin*2);}//配置引脚为输出模式
#define dPIN_TURN(GPIOx,Pin)        HAL_GPIO_TogglePin(GPIOx,Pin)#endif//PID功能支持区
#ifdef dcommonEnable_PID
typedef struct
{float target;//目标值float actual;//当前输出值float err;//本次偏差值float err_last;//上一次偏差值float err_next;//上上次的偏差值float integral;//累计误差float Kp;float Ki;float Kd;
}PID_ParameterStructDef;//PID参数结构体float PID_realize_increment(PID_ParameterStructDef *pid,float actual_val,unsigned long int Min,unsigned long int Max);
float PID_realize_location(PID_ParameterStructDef *pid,float actual_val,unsigned long int Min,unsigned long int Max);#endif#ifdef __Cplusplus
}
#endif
#endif
common_driver.c
/**********************************************************************
*file:开发常用函数|宏文件
*author:残梦
*versions:V1.2
*date:2023.08.10
*note:
**********************************************************************/
#include "common_driver.h"/*开始1、基础功能******************************************************/
/****************************************************
@function:计算数据的拟合系数
@param:*pA,*pB--系数x[],y[]--数据源dataSize--数据个数
@return:void
@note:拟合曲线y=Ax+B
****************************************************/
void LinearFitCoefficient(double *pA,double *pB,double x[],double y[],unsigned short int dataSize)
{unsigned short int i= 0;double AverX = 0.0f,AverY = 0.0f,a1 = 0.0f,a2 = 0.0f;if(dataSize == 0){*pA = *pB = 0.0;return;}else if(dataSize == 1){*pA = 0.0;*pB = y[0];return;}while(i < dataSize)	{AverX += x[i];AverY += y[i];i++;}AverX /= (double)(dataSize);AverY /= (double)(dataSize);a1 = a2 = 0.0f;for(i=0;i<dataSize;i++){a1 += (x[i] - AverX)*(y[i] - AverY);a2 += (x[i] - AverX)*(x[i] - AverX);}*pA = a1/a2;*pB = AverY - (*pA)*AverX;
}/****************************************
@function:二分法查找target在数组pdata中的最相邻位置
@param:target--目标数据,pdata--源数据,len--源数据长度
@return:[0,len-1]
@note:
****************************************/
unsigned long int DichotomyFindPos(float target,float *pdata,unsigned long int len)
{unsigned long int pos = 0,posl = 0,posr = 0;unsigned char flag = 0;//for(unsigned long int z = 0;z < len;z++){printf("[%d]=%f\n",z,*(pdata+z));}if(len <= 2){return 0;}//判定数据是否在区间外flag = (*(pdata + len -1) > *pdata)?1:0;if(flag == 1)//递增数据{if(target < *pdata)return 0;else if(target > *(pdata + len -1))return (len -1);}else{if(target > *pdata)return 0;else if(target < *(pdata + len -1))return (len -1);}unsigned long int num = 0;//区间内的数据posl = 0;posr = len -1;while((posl != (posr-1)) && (posl != posr)){pos = (posr + posl)/2;if(flag == 1){if(target < (*(pdata + pos))){posr = pos;}else{posl = pos;}}else{if(target > (*(pdata + pos))){posr = pos;}else{posl = pos;}}num++;//printf("%d [%d,%d]=[%f,%f]\n",num,posl,posr,*(pdata + posl),*(pdata + posr));}//printf("[pos,tar]=[%d,%f] num=%d\n",posl,target,num);return posl;
}/*结束****************************************************************//*开始1、STM32支持区***************************************************/
#ifdef dcommonEnable_STM32
#include "usart.h"/******************************
@function:printf打印使用
@param:
@return:
@remark:
******************************/
int fputc(int ch,FILE *f)
{unsigned char temp[1] = {ch};HAL_UART_Transmit(&huart1,temp,1,2);return(ch);
}
#endif
/*结束****************************************************************//*开始1、PID功能支持区*************************************************/
#ifdef dcommonEnable_PID
/****************************************
@function:增量式PID算法
@param:	pid--PID_ParameterStructDefactual_val--当前采集值Min--输出限幅最小值Max--输出限幅最大值
@return:
@note:
****************************************/
float PID_realize_increment(PID_ParameterStructDef *pid,float actual_val,unsigned long int Min,unsigned long int Max)
{/*计算目标值与实际值的误差*/pid->err=pid->target-actual_val;/*PID算法实现*/pid->actual += pid->Kp*(pid->err - pid->err_next)+ pid->Ki*pid->err+ pid->Kd*(pid->err - 2 * pid->err_next + pid->err_last);/*传递误差*/pid->err_last = pid->err_next;pid->err_next = pid->err;pid->actual = (pid->actual < Min)?Min:pid->actual;pid->actual = (pid->actual > Max)?Max:pid->actual;/*返回当前实际值*/return pid->actual;
}/****************************************
@function:位置式PID算法
@param:	pid--PID_ParameterStructDefactual_val--当前采集值Min--输出限幅最小值Max--输出限幅最大值
@return:
@note:
****************************************/
float PID_realize_location(PID_ParameterStructDef *pid,float actual_val,unsigned long int Min,unsigned long int Max)
{/*计算目标值与实际值的误差*/pid->err=pid->target-actual_val;/*误差累积*/pid->integral+=pid->err;/*PID算法实现*/pid->actual=pid->Kp*pid->err + pid->Ki*pid->integral + pid->Kd * (pid->err - pid->err_last);/*误差传递*/pid->err_last=pid->err;pid->actual = (pid->actual < Min)?Min:pid->actual;pid->actual = (pid->actual > Max)?Max:pid->actual;return pid->actual;
}#endif
bsp.h
#ifndef _bsp_H_
#define _bsp_H_
#ifdef __Cplusplus
#extern "C" {
#endif
#include "stdint.h"int32_t bsp_init(void);#ifdef __Cplusplus
}
#endif
#endif
bsp.c
/**********************************************************************
*file:板级支持包文件
*author:残梦
*versions:V1.0
*date:2023.08.10
*note:
**********************************************************************/
#include "bsp.h"
#include "common_driver.h"/****************************************
@function:板硬件初始化
@param:void
@return:小于0--失败,0--成功
@note:
****************************************/
int32_t bsp_init(void)
{return 0;
}
sdram_driver.h
#ifndef _sdram_driver_H_
#define _sdram_driver_H_
#ifdef __Cplusplus
#extern "C" {
#endif
#include "main.h"#define EXT_SDRAM_ADDR  	((uint32_t)0xC0000000)
#define EXT_SDRAM_SIZE		(32 * 1024 * 1024)/* LCD显存,第1页, 分配2M字节 */
#define SDRAM_LCD_BUF1 		EXT_SDRAM_ADDR/* LCD显存,第2页, 分配2M字节 */
#define SDRAM_LCD_BUF2		(EXT_SDRAM_ADDR + SDRAM_LCD_SIZE)#define SDRAM_LCD_SIZE		(2 * 1024 * 1024)		/* 每层2M */
#define SDRAM_LCD_LAYER		2						/* 2层 *//* 剩下的12M字节,提供给应用程序使用 */
#define SDRAM_APP_BUF		(EXT_SDRAM_ADDR + SDRAM_LCD_SIZE * SDRAM_LCD_LAYER)
#define SDRAM_APP_SIZE		(EXT_SDRAM_SIZE - SDRAM_LCD_SIZE * SDRAM_LCD_LAYER)void SDRAM_Initialization_Sequence(SDRAM_HandleTypeDef *hsdram);
uint32_t bsp_TestExtSDRAM1(void);#ifdef __Cplusplus
}
#endif
#endif
sdram_driver.c
/**********************************************************************
*file:外部SDRAM驱动文件:SDRAM型号IS42S32800G-6BLI, 32位带宽, 容量32MB, 6ns速度(166MHz)
*author:残梦
*versions:V1.0
*date:2023.06.02
*note:-- 安富莱STM32-V7发板 SDRAM GPIO 定义+-------------------+--------------------+--------------------+--------------------++                       SDRAM pins assignment                                      ++-------------------+--------------------+--------------------+--------------------+| PD0  <-> FMC_D2   | PE0  <-> FMC_NBL0  | PF0  <-> FMC_A0    | PG0 <-> FMC_A10    || PD1  <-> FMC_D3   | PE1  <-> FMC_NBL1  | PF1  <-> FMC_A1    | PG1 <-> FMC_A11    || PD8  <-> FMC_D13  | PE7  <-> FMC_D4    | PF2  <-> FMC_A2    | PG4 <-> FMC_A14    || PD9  <-> FMC_D14  | PE8  <-> FMC_D5    | PF3  <-> FMC_A3    | PG5 <-> FMC_A15    || PD10 <-> FMC_D15  | PE9  <-> FMC_D6    | PF4  <-> FMC_A4    | PG8 <-> FC_SDCLK   || PD14 <-> FMC_D0   | PE10 <-> FMC_D7    | PF5  <-> FMC_A5    | PG15 <-> FMC_NCAS  || PD15 <-> FMC_D1   | PE11 <-> FMC_D8    | PF11 <-> FC_NRAS   |--------------------++-------------------| PE12 <-> FMC_D9    | PF12 <-> FMC_A6    | PG2  --- FMC_A12 (预留64M字节容量,和摇杆上键复用)| PE13 <-> FMC_D10   | PF13 <-> FMC_A7    || PE14 <-> FMC_D11   | PF14 <-> FMC_A8    || PE15 <-> FMC_D12   | PF15 <-> FMC_A9    |+-------------------+--------------------+--------------------+| PH2 <-> FMC_SDCKE0| PI4 <-> FMC_NBL2   || PH3 <-> FMC_SDNE0 | PI5 <-> FMC_NBL3   || PH5 <-> FMC_SDNW  |--------------------++-------------------++-------------------+------------------++   32-bits Mode: D31-D16              ++-------------------+------------------+| PH8 <-> FMC_D16   | PI0 <-> FMC_D24  || PH9 <-> FMC_D17   | PI1 <-> FMC_D25  || PH10 <-> FMC_D18  | PI2 <-> FMC_D26  || PH11 <-> FMC_D19  | PI3 <-> FMC_D27  || PH12 <-> FMC_D20  | PI6 <-> FMC_D28  || PH13 <-> FMC_D21  | PI7 <-> FMC_D29  || PH14 <-> FMC_D22  | PI9 <-> FMC_D30  || PH15 <-> FMC_D23  | PI10 <-> FMC_D31 |+------------------+-------------------++-------------------++  Pins remapping   ++-------------------+| PC0 <-> FMC_SDNWE || PC2 <-> FMC_SDNE0 || PC3 <-> FMC_SDCKE0|+-------------------+hsdram1.Instance = FMC_SDRAM_DEVICE;hsdram1.Init.SDBank = FMC_SDRAM_BANK1;hsdram1.Init.ColumnBitsNumber = FMC_SDRAM_COLUMN_BITS_NUM_9;hsdram1.Init.RowBitsNumber = FMC_SDRAM_ROW_BITS_NUM_12;hsdram1.Init.MemoryDataWidth = FMC_SDRAM_MEM_BUS_WIDTH_32;hsdram1.Init.InternalBankNumber = FMC_SDRAM_INTERN_BANKS_NUM_4;hsdram1.Init.CASLatency = FMC_SDRAM_CAS_LATENCY_3;//CAS Latency可以设置Latency1,2和3,实际测试Latency3稳定hsdram1.Init.WriteProtection = FMC_SDRAM_WRITE_PROTECTION_DISABLE;//禁止写保护hsdram1.Init.SDClockPeriod = FMC_SDRAM_CLOCK_PERIOD_2;//FMC时钟200MHz,2分频后给SDRAM,即100MHzhsdram1.Init.ReadBurst = FMC_SDRAM_RBURST_ENABLE;//使能读突发hsdram1.Init.ReadPipeDelay = FMC_SDRAM_RPIPE_DELAY_0;//此位定CAS延时后延后多少个SDRAM时钟周期读取数据,实际测此位可以设置无需延迟FMC使用的HCLK3时钟,200MHz,用于SDRAM的话,至少2分频,也就是100MHz,即1个SDRAM时钟周期是10ns下面参数单位均为10ns。Timing.LoadToActiveDelay    = 2; 20ns, TMRD定义加载模式寄存器的命令与激活命令或刷新命令之间的延迟Timing.ExitSelfRefreshDelay = 7; 70ns, TXSR定义从发出自刷新命令到发出激活命令之间的延迟Timing.SelfRefreshTime      = 4; 50ns, TRAS定义最短的自刷新周期Timing.RowCycleDelay        = 7; 70ns, TRC定义刷新命令和激活命令之间的延迟Timing.WriteRecoveryTime    = 2; 20ns, TWR定义在写命令和预充电命令之间的延迟Timing.RPDelay              = 2; 20ns, TRP定义预充电命令与其它命令之间的延迟Timing.RCDDelay             = 2; 20ns, TRCD定义激活命令与读/写命令之间的延迟
*********************************************************************/
#include "sdram_driver.h"#define SDRAM_TIMEOUT                    ((uint32_t)0xFFFF)
#define REFRESH_COUNT                    ((uint32_t)1543)    /* SDRAM自刷新计数 */  /* SDRAM的参数配置 */
#define SDRAM_MODEREG_BURST_LENGTH_1             ((uint16_t)0x0000)
#define SDRAM_MODEREG_BURST_LENGTH_2             ((uint16_t)0x0001)
#define SDRAM_MODEREG_BURST_LENGTH_4             ((uint16_t)0x0002)
#define SDRAM_MODEREG_BURST_LENGTH_8             ((uint16_t)0x0004)
#define SDRAM_MODEREG_BURST_TYPE_SEQUENTIAL      ((uint16_t)0x0000)
#define SDRAM_MODEREG_BURST_TYPE_INTERLEAVED     ((uint16_t)0x0008)
#define SDRAM_MODEREG_CAS_LATENCY_2              ((uint16_t)0x0020)
#define SDRAM_MODEREG_CAS_LATENCY_3              ((uint16_t)0x0030)
#define SDRAM_MODEREG_OPERATING_MODE_STANDARD    ((uint16_t)0x0000)
#define SDRAM_MODEREG_WRITEBURST_MODE_PROGRAMMED ((uint16_t)0x0000)
#define SDRAM_MODEREG_WRITEBURST_MODE_SINGLE     ((uint16_t)0x0200)/****************************************************
@function:SDRAM初始化序列
@param:hsdram: SDRAM句柄
@return:void
@note:完成SDRAM序列初始化
****************************************************/
void SDRAM_Initialization_Sequence(SDRAM_HandleTypeDef *hsdram)
{FMC_SDRAM_CommandTypeDef Command;__IO uint32_t tmpmrd =0;/*##-1- 时钟使能命令 ##################################################*/Command.CommandMode = FMC_SDRAM_CMD_CLK_ENABLE;Command.CommandTarget = FMC_SDRAM_CMD_TARGET_BANK1;;Command.AutoRefreshNumber = 1;Command.ModeRegisterDefinition = 0;/* 发送命令 */HAL_SDRAM_SendCommand(hsdram, &Command, SDRAM_TIMEOUT);/*##-2- 插入延迟,至少100us ##################################################*/HAL_Delay(1);/*##-3- 整个SDRAM预充电命令,PALL(precharge all) #############################*/Command.CommandMode = FMC_SDRAM_CMD_PALL;Command.CommandTarget = FMC_SDRAM_CMD_TARGET_BANK1;Command.AutoRefreshNumber = 1;Command.ModeRegisterDefinition = 0;/* 发送命令 */HAL_SDRAM_SendCommand(hsdram, &Command, SDRAM_TIMEOUT);/*##-4- 自动刷新命令 #######################################################*/Command.CommandMode = FMC_SDRAM_CMD_AUTOREFRESH_MODE;Command.CommandTarget = FMC_SDRAM_CMD_TARGET_BANK1;Command.AutoRefreshNumber = 8;Command.ModeRegisterDefinition = 0;/* 发送命令 */HAL_SDRAM_SendCommand(hsdram, &Command, SDRAM_TIMEOUT);/*##-5- 配置SDRAM模式寄存器 ###############################################*/tmpmrd = (uint32_t)SDRAM_MODEREG_BURST_LENGTH_1          |SDRAM_MODEREG_BURST_TYPE_SEQUENTIAL   |SDRAM_MODEREG_CAS_LATENCY_3           |SDRAM_MODEREG_OPERATING_MODE_STANDARD |SDRAM_MODEREG_WRITEBURST_MODE_SINGLE;Command.CommandMode = FMC_SDRAM_CMD_LOAD_MODE;Command.CommandTarget = FMC_SDRAM_CMD_TARGET_BANK1;Command.AutoRefreshNumber = 1;Command.ModeRegisterDefinition = tmpmrd;/* 发送命令 */HAL_SDRAM_SendCommand(hsdram, &Command, SDRAM_TIMEOUT);/*##-6- 设置自刷新率 ####################################################*//*SDRAM refresh period / Number of rows)*SDRAM时钟速度 – 20= 64ms / 4096 *100MHz - 20= 1542.5 取值1543*/HAL_SDRAM_ProgramRefreshRate(hsdram, REFRESH_COUNT);
}/*
*********************************************************************************************************
*	函 数 名: bsp_TestExtSDRAM
*	功能说明: 扫描测试外部SDRAM的全部单元。
*	形    参: 无
*	返 回 值: 0 表示测试通过; 大于0表示错误单元的个数。
*********************************************************************************************************
*/
uint32_t bsp_TestExtSDRAM1(void)
{uint32_t i;uint32_t *pSRAM;uint8_t *pBytes;uint32_t err;const uint8_t ByteBuf[4] = {0x55, 0xA5, 0x5A, 0xAA};/* 写SRAM */pSRAM = (uint32_t *)EXT_SDRAM_ADDR;for (i = 0; i < EXT_SDRAM_SIZE / 4; i++){*pSRAM++ = i;}/* 读SRAM */err = 0;pSRAM = (uint32_t *)EXT_SDRAM_ADDR;for (i = 0; i < EXT_SDRAM_SIZE / 4; i++){if (*pSRAM++ != i){err++;}}if (err >  0){return  (4 * err);}/* 对SRAM 的数据求反并写入 */pSRAM = (uint32_t *)EXT_SDRAM_ADDR;for (i = 0; i < EXT_SDRAM_SIZE / 4; i++){*pSRAM = ~*pSRAM;pSRAM++;}/* 再次比较SDRAM的数据 */err = 0;pSRAM = (uint32_t *)EXT_SDRAM_ADDR;for (i = 0; i < EXT_SDRAM_SIZE / 4; i++){if (*pSRAM++ != (~i)){err++;}}if (err >  0){return (4 * err);}/* 测试按字节方式访问, 目的是验证 FSMC_NBL0 、 FSMC_NBL1 口线 */pBytes = (uint8_t *)EXT_SDRAM_ADDR;for (i = 0; i < sizeof(ByteBuf); i++){*pBytes++ = ByteBuf[i];}/* 比较SDRAM的数据 */err = 0;pBytes = (uint8_t *)EXT_SDRAM_ADDR;for (i = 0; i < sizeof(ByteBuf); i++){if (*pBytes++ != ByteBuf[i]){err++;}}if (err >  0){return err;}return 0;
}
2、fmc.c初始化后添加SDRAM初始序列
添加头文件
/* USER CODE BEGIN 0 */
#include "sdram_driver.h"
/* USER CODE END 0 */
void MX_FMC_Init(void)函数中添加
/* USER CODE BEGIN FMC_Init 2 */SDRAM_Initialization_Sequence(&hsdram1);//添加SDRAM初始序列/* USER CODE END FMC_Init 2 */
3、main.c文件对sdram读写测试
main.c文件
/* USER CODE BEGIN Header */
/********************************************************************************* @file : main.c* @brief : Main program body******************************************************************************* @attention** <h2><center>© Copyright (c) 2023 STMicroelectronics.* All rights reserved.</center></h2>** This software component is licensed by ST under BSD 3-Clause license,* the "License"; You may not use this file except in compliance with the* License. You may obtain a copy of the License at:* opensource.org/licenses/BSD-3-Clause********************************************************************************/
/* USER CODE END Header */
/* Includes ------------------------------------------------------------------*/
#include "main.h"
#include "usart.h"
#include "gpio.h"
#include "fmc.h"/* Private includes ----------------------------------------------------------*/
/* USER CODE BEGIN Includes */
#include "bsp.h"
#include "common_driver.h"
#include "sdram_driver.h"
/* USER CODE END Includes *//* Private typedef -----------------------------------------------------------*/
/* USER CODE BEGIN PTD *//* USER CODE END PTD *//* Private define ------------------------------------------------------------*/
/* USER CODE BEGIN PD */
/* USER CODE END PD *//* Private macro -------------------------------------------------------------*/
/* USER CODE BEGIN PM *//* USER CODE END PM *//* Private variables ---------------------------------------------------------*//* USER CODE BEGIN PV *//* USER CODE END PV *//* Private function prototypes -----------------------------------------------*/
void SystemClock_Config(void);
static void MPU_Config(void);
/* USER CODE BEGIN PFP *//* USER CODE END PFP *//* Private user code ---------------------------------------------------------*/
/* USER CODE BEGIN 0 *//* USER CODE END 0 *//*** @brief The application entry point.* @retval int*/
int main(void)
{/* USER CODE BEGIN 1 *//* USER CODE END 1 *//* MPU Configuration--------------------------------------------------------*/MPU_Config();/* Enable I-Cache---------------------------------------------------------*/SCB_EnableICache();/* Enable D-Cache---------------------------------------------------------*/SCB_EnableDCache();/* MCU Configuration--------------------------------------------------------*//* Reset of all peripherals, Initializes the Flash interface and the Systick. */HAL_Init();/* USER CODE BEGIN Init *//* USER CODE END Init *//* Configure the system clock */SystemClock_Config();/* USER CODE BEGIN SysInit *//* USER CODE END SysInit *//* Initialize all configured peripherals */MX_GPIO_Init();MX_FMC_Init();MX_USART1_UART_Init();/* USER CODE BEGIN 2 */if(bsp_init() < 0){printf("error:bsp_init()\r\n");Error_Handler();}/* USER CODE END 2 *//* Infinite loop *//* USER CODE BEGIN WHILE */while (1){/* USER CODE END WHILE *//* USER CODE BEGIN 3 */printf("错误数:%d\r\n",bsp_TestExtSDRAM1());//SDRAM读写测试HAL_Delay(1000);}/* USER CODE END 3 */
}/*** @brief System Clock Configuration* @retval None*/
void SystemClock_Config(void)
{RCC_OscInitTypeDef RCC_OscInitStruct = {0};RCC_ClkInitTypeDef RCC_ClkInitStruct = {0};/** Supply configuration update enable*/HAL_PWREx_ConfigSupply(PWR_LDO_SUPPLY);/** Configure the main internal regulator output voltage*/__HAL_PWR_VOLTAGESCALING_CONFIG(PWR_REGULATOR_VOLTAGE_SCALE1);while(!__HAL_PWR_GET_FLAG(PWR_FLAG_VOSRDY)) {}/** Initializes the RCC Oscillators according to the specified parameters* in the RCC_OscInitTypeDef structure.*/RCC_OscInitStruct.OscillatorType = RCC_OSCILLATORTYPE_HSE;RCC_OscInitStruct.HSEState = RCC_HSE_ON;RCC_OscInitStruct.PLL.PLLState = RCC_PLL_ON;RCC_OscInitStruct.PLL.PLLSource = RCC_PLLSOURCE_HSE;RCC_OscInitStruct.PLL.PLLM = 5;RCC_OscInitStruct.PLL.PLLN = 160;RCC_OscInitStruct.PLL.PLLP = 2;RCC_OscInitStruct.PLL.PLLQ = 2;RCC_OscInitStruct.PLL.PLLR = 2;RCC_OscInitStruct.PLL.PLLRGE = RCC_PLL1VCIRANGE_2;RCC_OscInitStruct.PLL.PLLVCOSEL = RCC_PLL1VCOWIDE;RCC_OscInitStruct.PLL.PLLFRACN = 0;if (HAL_RCC_OscConfig(&RCC_OscInitStruct) != HAL_OK){Error_Handler();}/** Initializes the CPU, AHB and APB buses clocks*/RCC_ClkInitStruct.ClockType = RCC_CLOCKTYPE_HCLK|RCC_CLOCKTYPE_SYSCLK|RCC_CLOCKTYPE_PCLK1|RCC_CLOCKTYPE_PCLK2|RCC_CLOCKTYPE_D3PCLK1|RCC_CLOCKTYPE_D1PCLK1;RCC_ClkInitStruct.SYSCLKSource = RCC_SYSCLKSOURCE_PLLCLK;RCC_ClkInitStruct.SYSCLKDivider = RCC_SYSCLK_DIV1;RCC_ClkInitStruct.AHBCLKDivider = RCC_HCLK_DIV2;RCC_ClkInitStruct.APB3CLKDivider = RCC_APB3_DIV2;RCC_ClkInitStruct.APB1CLKDivider = RCC_APB1_DIV2;RCC_ClkInitStruct.APB2CLKDivider = RCC_APB2_DIV2;RCC_ClkInitStruct.APB4CLKDivider = RCC_APB4_DIV2;if (HAL_RCC_ClockConfig(&RCC_ClkInitStruct, FLASH_LATENCY_2) != HAL_OK){Error_Handler();}
}/* USER CODE BEGIN 4 *//* USER CODE END 4 *//* MPU Configuration */void MPU_Config(void)
{MPU_Region_InitTypeDef MPU_InitStruct = {0};/* Disables the MPU */HAL_MPU_Disable();/** Initializes and configures the Region and the memory to be protected*/MPU_InitStruct.Enable = MPU_REGION_ENABLE;MPU_InitStruct.Number = MPU_REGION_NUMBER0;MPU_InitStruct.BaseAddress = 0x24000000;MPU_InitStruct.Size = MPU_REGION_SIZE_512KB;MPU_InitStruct.SubRegionDisable = 0x0;MPU_InitStruct.TypeExtField = MPU_TEX_LEVEL1;MPU_InitStruct.AccessPermission = MPU_REGION_FULL_ACCESS;MPU_InitStruct.DisableExec = MPU_INSTRUCTION_ACCESS_ENABLE;MPU_InitStruct.IsShareable = MPU_ACCESS_NOT_SHAREABLE;MPU_InitStruct.IsCacheable = MPU_ACCESS_CACHEABLE;MPU_InitStruct.IsBufferable = MPU_ACCESS_BUFFERABLE;HAL_MPU_ConfigRegion(&MPU_InitStruct);/** Initializes and configures the Region and the memory to be protected*/MPU_InitStruct.Number = MPU_REGION_NUMBER1;MPU_InitStruct.BaseAddress = 0x60000000;MPU_InitStruct.Size = MPU_REGION_SIZE_64KB;MPU_InitStruct.TypeExtField = MPU_TEX_LEVEL0;MPU_InitStruct.IsCacheable = MPU_ACCESS_NOT_CACHEABLE;HAL_MPU_ConfigRegion(&MPU_InitStruct);/** Initializes and configures the Region and the memory to be protected*/MPU_InitStruct.Number = MPU_REGION_NUMBER2;MPU_InitStruct.BaseAddress = 0xC0000000;MPU_InitStruct.Size = MPU_REGION_SIZE_32MB;MPU_InitStruct.IsCacheable = MPU_ACCESS_CACHEABLE;MPU_InitStruct.IsBufferable = MPU_ACCESS_NOT_BUFFERABLE;HAL_MPU_ConfigRegion(&MPU_InitStruct);/* Enables the MPU */HAL_MPU_Enable(MPU_PRIVILEGED_DEFAULT);}/*** @brief This function is executed in case of error occurrence.* @retval None*/
void Error_Handler(void)
{/* USER CODE BEGIN Error_Handler_Debug *//* User can add his own implementation to report the HAL error return state */__disable_irq();printf("void Error_Handler(void)\r\n");while (1){}/* USER CODE END Error_Handler_Debug */
}#ifdef USE_FULL_ASSERT
/*** @brief Reports the name of the source file and the source line number* where the assert_param error has occurred.* @param file: pointer to the source file name* @param line: assert_param error line source number* @retval None*/
void assert_failed(uint8_t *file, uint32_t line)
{/* USER CODE BEGIN 6 *//* User can add his own implementation to report the file name and line number,ex: printf("Wrong parameters value: file %s on line %d\r\n", file, line) *//* USER CODE END 6 */
}
#endif /* USE_FULL_ASSERT *//************************ (C) COPYRIGHT STMicroelectronics *****END OF FILE****/三、测试结果及完整工程
测试结果ok
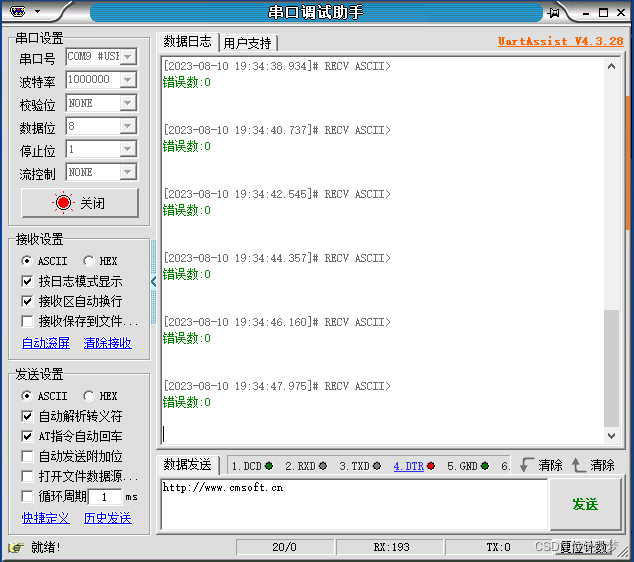
完整工程:
链接:https://pan.baidu.com/s/1SfxQO7QM_e1GsVD_yJOckg
提取码:hk7u


