官网地址和文档地址:https://www.xuxueli.com/xxl-job/
一、快速入门
1.1 下载源码
https://github.com/xuxueli/xxl-job
https://gitee.com/xuxueli0323/xxl-job
下载完成后有以下模块
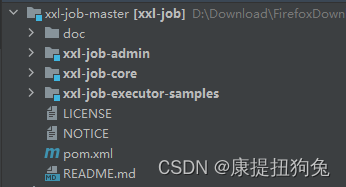
1.2 初始化数据库
官方指定mysql8.0+,但我是mysql5.7
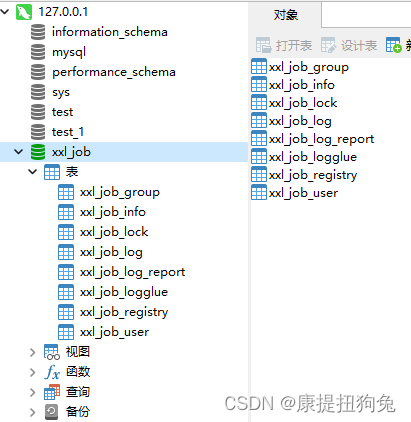
执行/xxl-job/doc/db/tables_xxl_job.sql文件,执行成功后有如下表
1.3 修改配置
修改xxl-job-admin项目的配置文件application.properties,把数据库账号密码配置上
### xxl-job, datasource
spring.datasource.url=jdbc:mysql://127.0.0.1:3306/xxl_job?useUnicode=true&characterEncoding=UTF-8&autoReconnect=true&serverTimezone=Asia/Shanghai
spring.datasource.username=root
spring.datasource.password=root
spring.datasource.driver-class-name=com.mysql.cj.jdbc.Driver
1.4 启动项目
运行XxlJobAdminApplication程序即可.
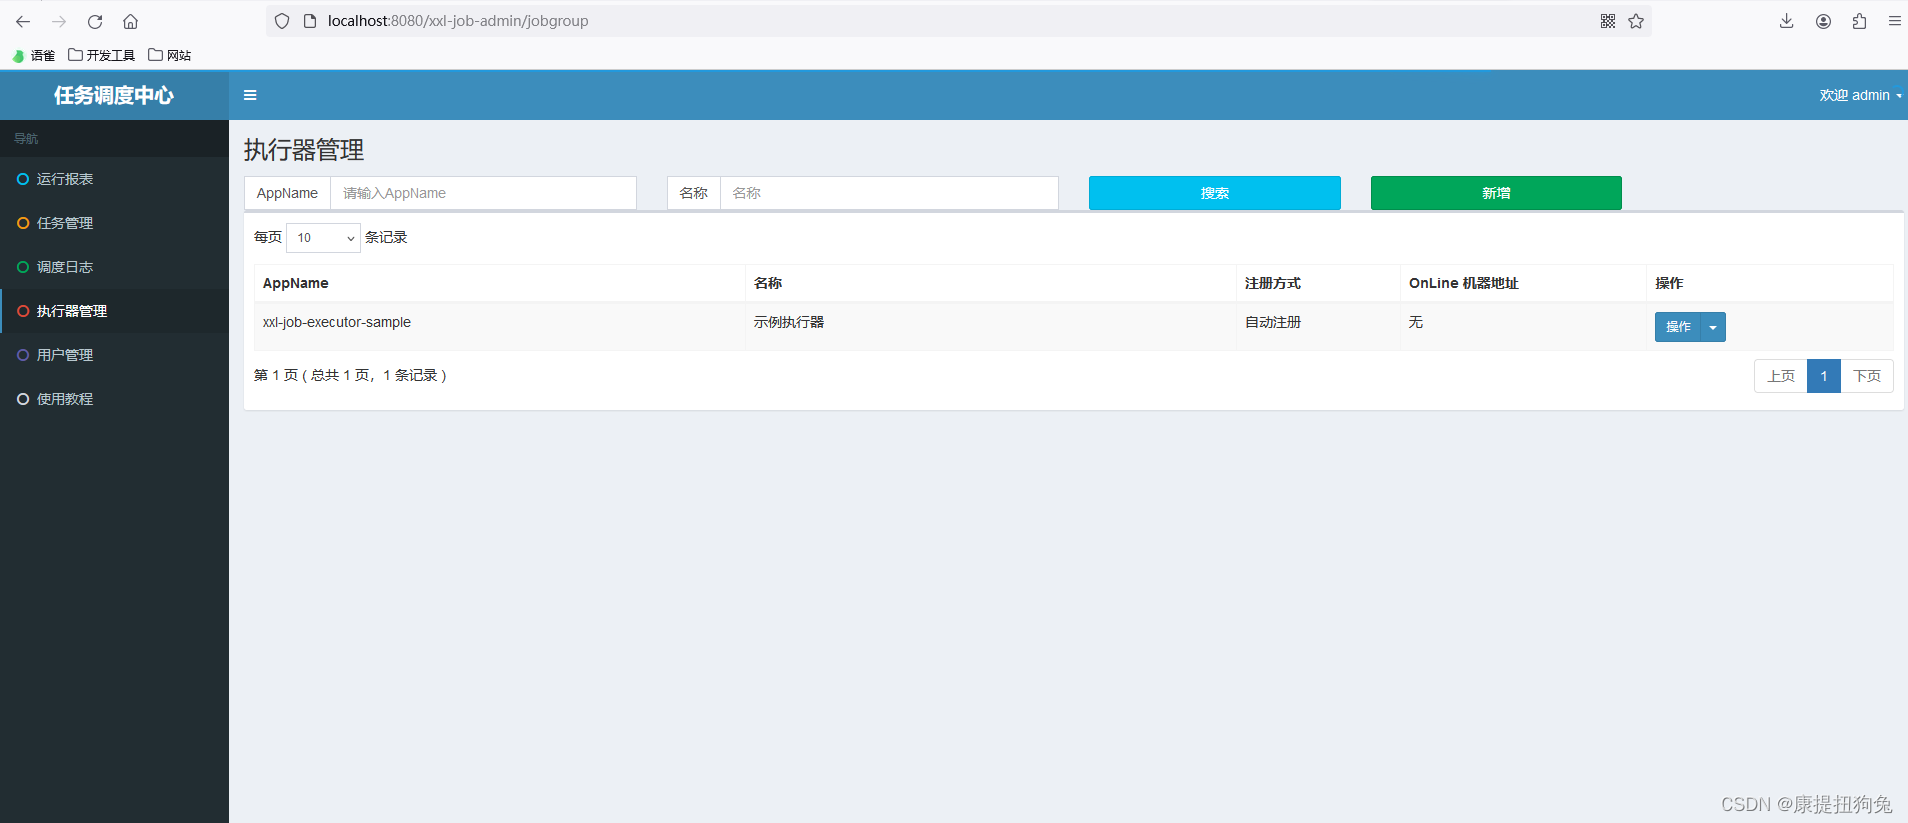
调度中心访问地址: http://localhost:8080/xxl-job-admin
默认登录账号 “admin/123456”, 登录后运行界面如下图所示。
二、定时任务测试
2.1. 构建定时任务
2.1.1 新建springboot项目
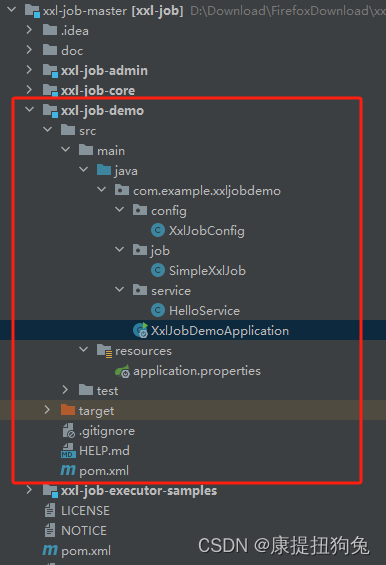
2.1.2 配置xxljob
application.properties
### 调度中心部署根地址 [选填]:如调度中心集群部署存在多个地址则用逗号分隔。执行器将会使用该地址进行"执行器心跳注册"和"任务结果回调";为空则关闭自动注册;
xxl.job.admin.addresses=http://127.0.0.1:8080/xxl-job-admin
### 执行器通讯TOKEN [选填]:非空时启用;
xxl.job.accessToken=default_token
### 执行器AppName [选填]:执行器心跳注册分组依据;为空则关闭自动注册
xxl.job.executor.appname=xxl-job-executor-sample
### 执行器注册 [选填]:优先使用该配置作为注册地址,为空时使用内嵌服务 ”IP:PORT“ 作为注册地址。从而更灵活的支持容器类型执行器动态IP和动态映射端口问题。
xxl.job.executor.address=
### 执行器IP [选填]:默认为空表示自动获取IP,多网卡时可手动设置指定IP,该IP不会绑定Host仅作为通讯实用;地址信息用于 "执行器注册" 和 "调度中心请求并触发任务";
xxl.job.executor.ip=127.0.0.1
### 执行器端口号 [选填]:小于等于0则自动获取;默认端口为9999,单机部署多个执行器时,注意要配置不同执行器端口;
xxl.job.executor.port=9999
### 执行器运行日志文件存储磁盘路径 [选填] :需要对该路径拥有读写权限;为空则使用默认路径;
xxl.job.executor.logpath=/data/applogs/xxl-job/jobhandler
### 执行器日志文件保存天数 [选填] : 过期日志自动清理, 限制值大于等于3时生效; 否则, 如-1, 关闭自动清理功能;
xxl.job.executor.logretentiondays=30
XxlJobConfig类
@Configuration
public class XxlJobConfig {@Value("${xxl.job.admin.addresses}")private String adminAddresses;@Value("${xxl.job.accessToken}")private String accessToken;@Value("${xxl.job.executor.appname}")private String appname;@Value("${xxl.job.executor.address}")private String address;@Value("${xxl.job.executor.ip}")private String ip;@Value("${xxl.job.executor.port}")private int port;@Value("${xxl.job.executor.logpath}")private String logPath;@Value("${xxl.job.executor.logretentiondays}")private int logRetentionDays;@Beanpublic XxlJobSpringExecutor xxlJobExecutor() {XxlJobSpringExecutor xxlJobSpringExecutor = new XxlJobSpringExecutor();xxlJobSpringExecutor.setAdminAddresses(adminAddresses);xxlJobSpringExecutor.setAppname(appname);xxlJobSpringExecutor.setAddress(address);xxlJobSpringExecutor.setIp(ip);xxlJobSpringExecutor.setPort(port);xxlJobSpringExecutor.setAccessToken(accessToken);xxlJobSpringExecutor.setLogPath(logPath);xxlJobSpringExecutor.setLogRetentionDays(logRetentionDays);return xxlJobSpringExecutor;}
}
2.1.3 新建定时任务
SimpleXxlJob 类
@Component
public class SimpleXxlJob {@XxlJob("demoJobHandler1")public void demoJobHandler() throws Exception {System.out.println("执行定时任务,执行时间:"+new Date());}
}
执行XxlJobDemoApplication,加上VM Options:-Dserver.port=8081
2.2 执行任务
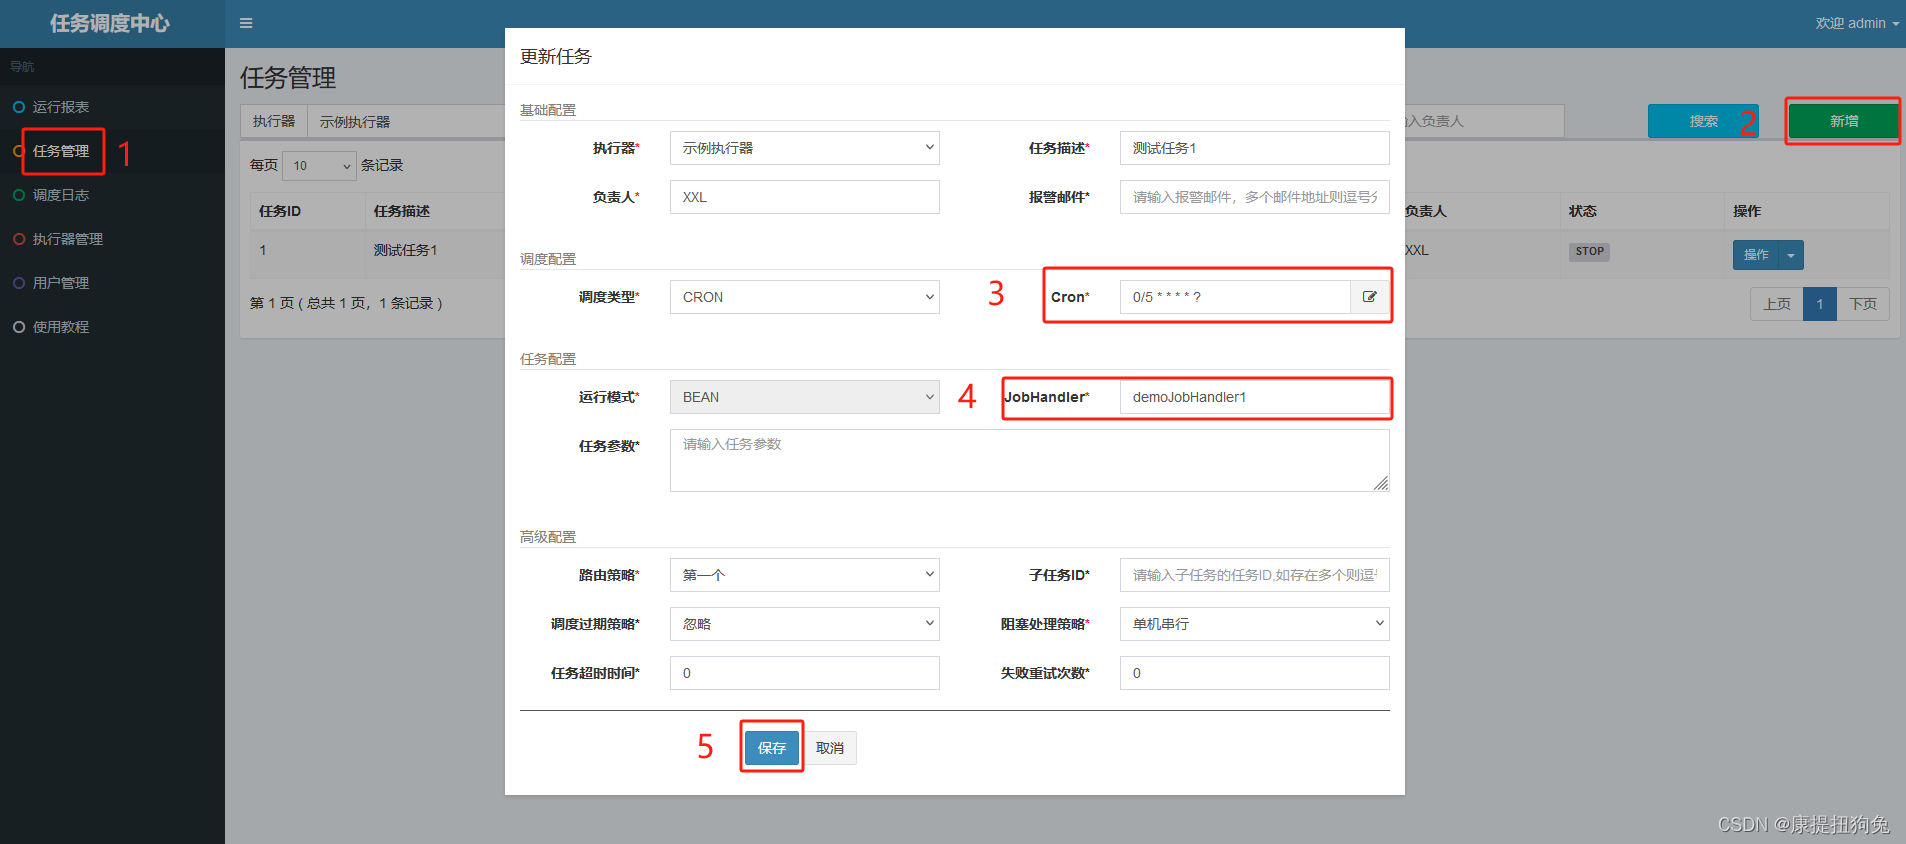
然后选择执行,不用输入任务参数和机器地址,点击保存
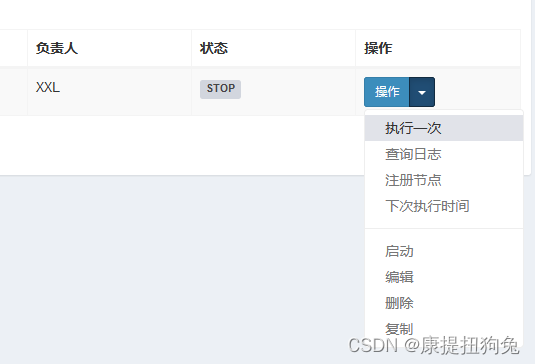
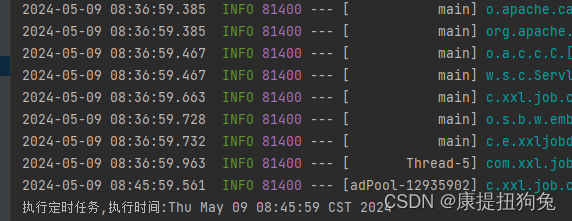
发现控制台执行了任务
如果要按照表达式执行任务,就点击启动
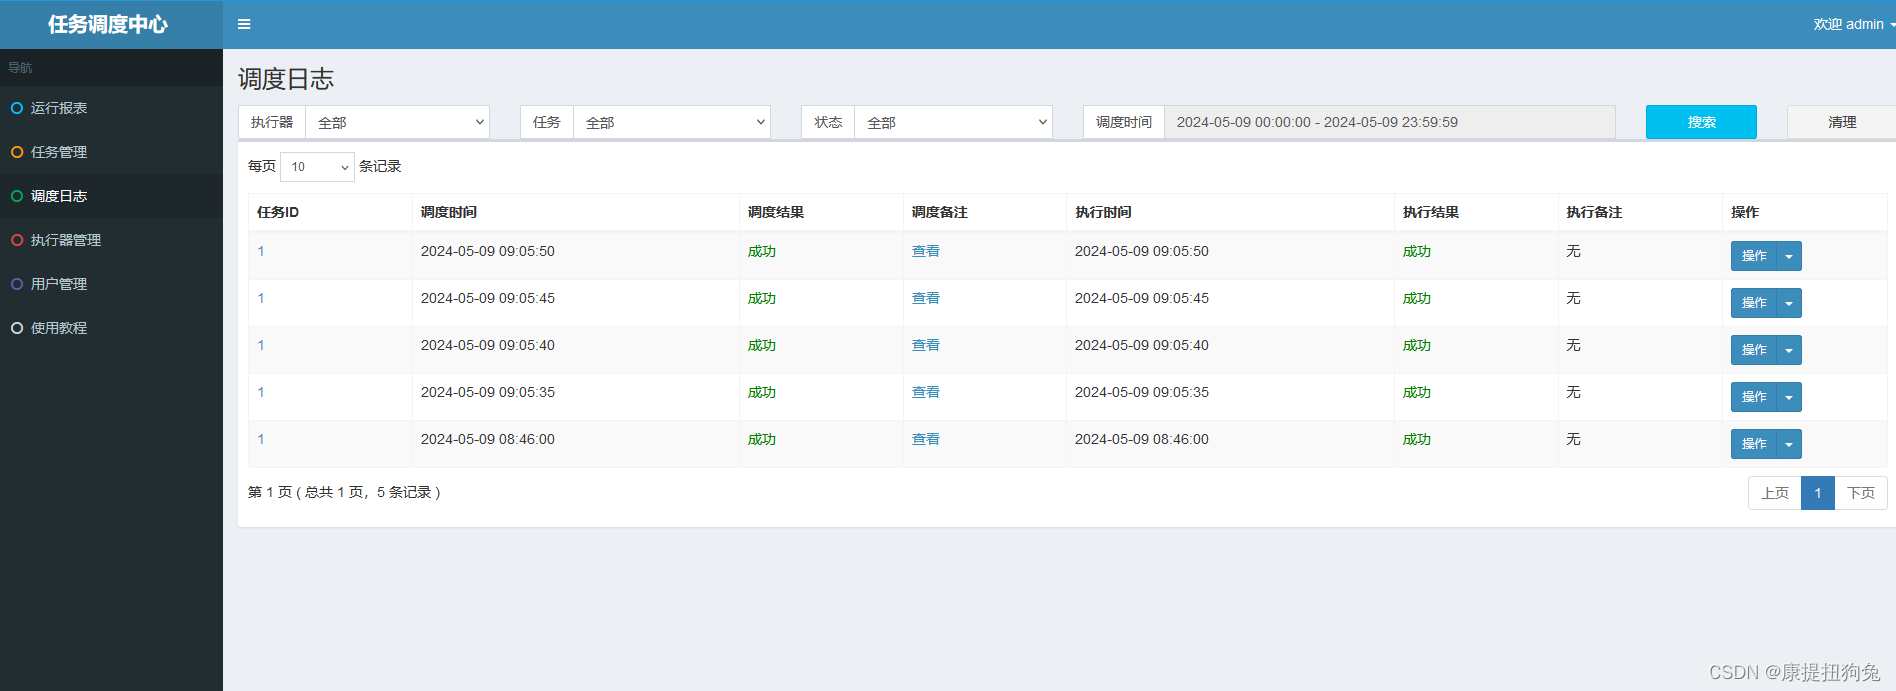
可以看到任务执行的日志
三、GLUE模式
3.1 新建HelloService
@Service
public class HelloService {public void methodA(){System.out.println("执行MethodA的方法");}public void methodB(){System.out.println("执行MethodB的方法");}
}
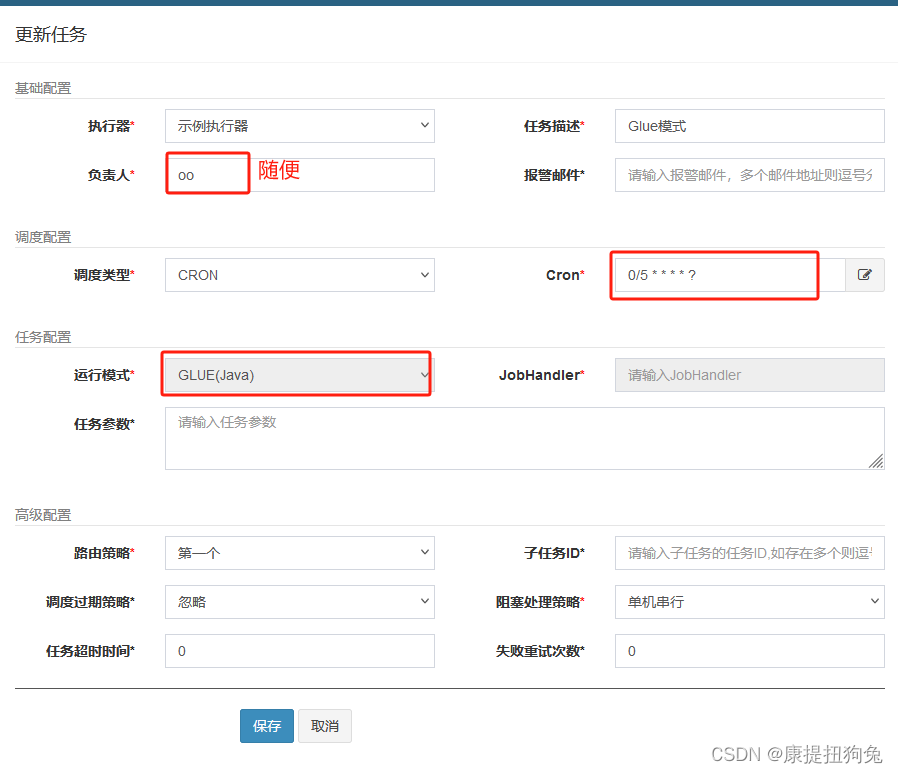
3.2 新增任务
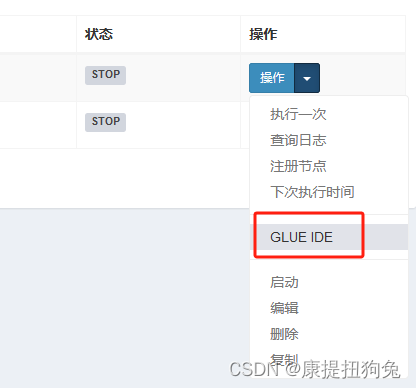
 选择GLUE IDE
输入以下代码,就能实现无需重启项目,动态执行调度任务,这里是执行了helloService.methodA();
package com.xxl.job.service.handler;import com.xxl.job.core.handler.IJobHandler;
import org.springframework.beans.factory.annotation.Autowired;
import com.example.xxljobdemo.service.HelloService;public class DemoGlueJobHandler extends IJobHandler {@Autowiredprivate HelloService helloService;@Overridepublic void execute() throws Exception {helloService.methodA();}
}
3.3 启动
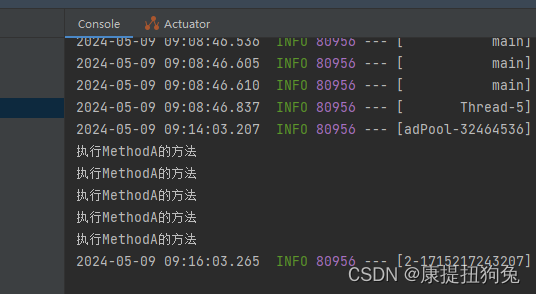
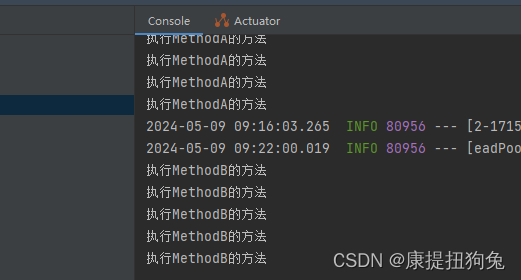
修改GLUE IDE代码,让他执行helloService.methodB();
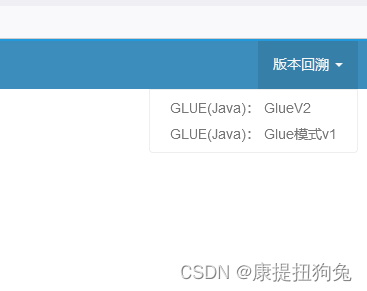
GLUE IDE可以看到代码版本
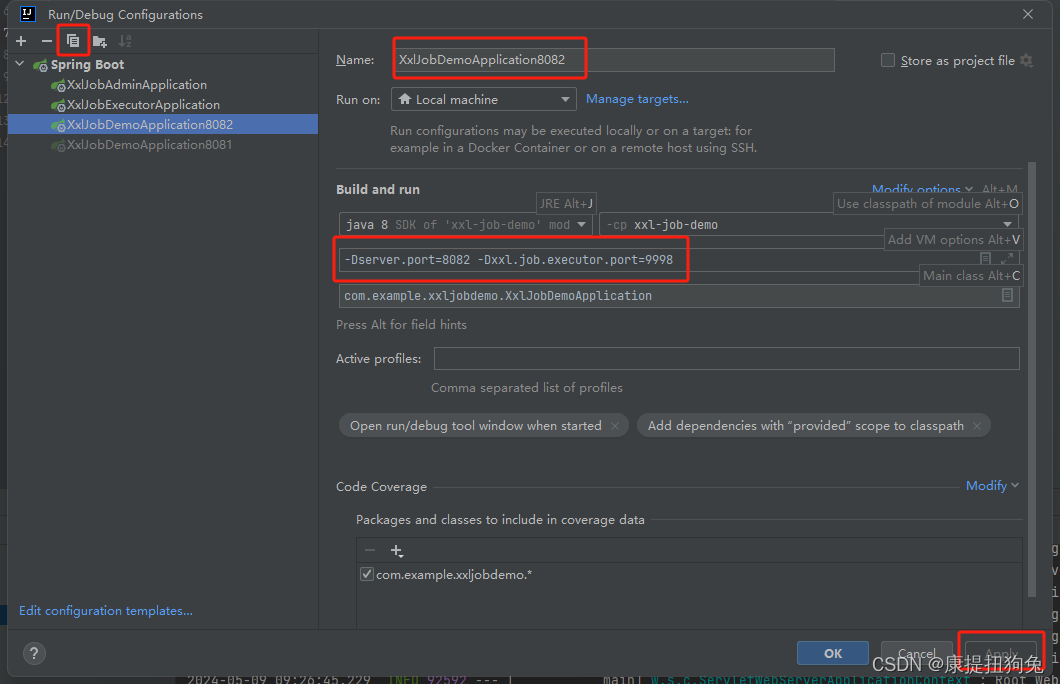
四、执行器集群
4.1 copy一个XxlJobDemoApplication
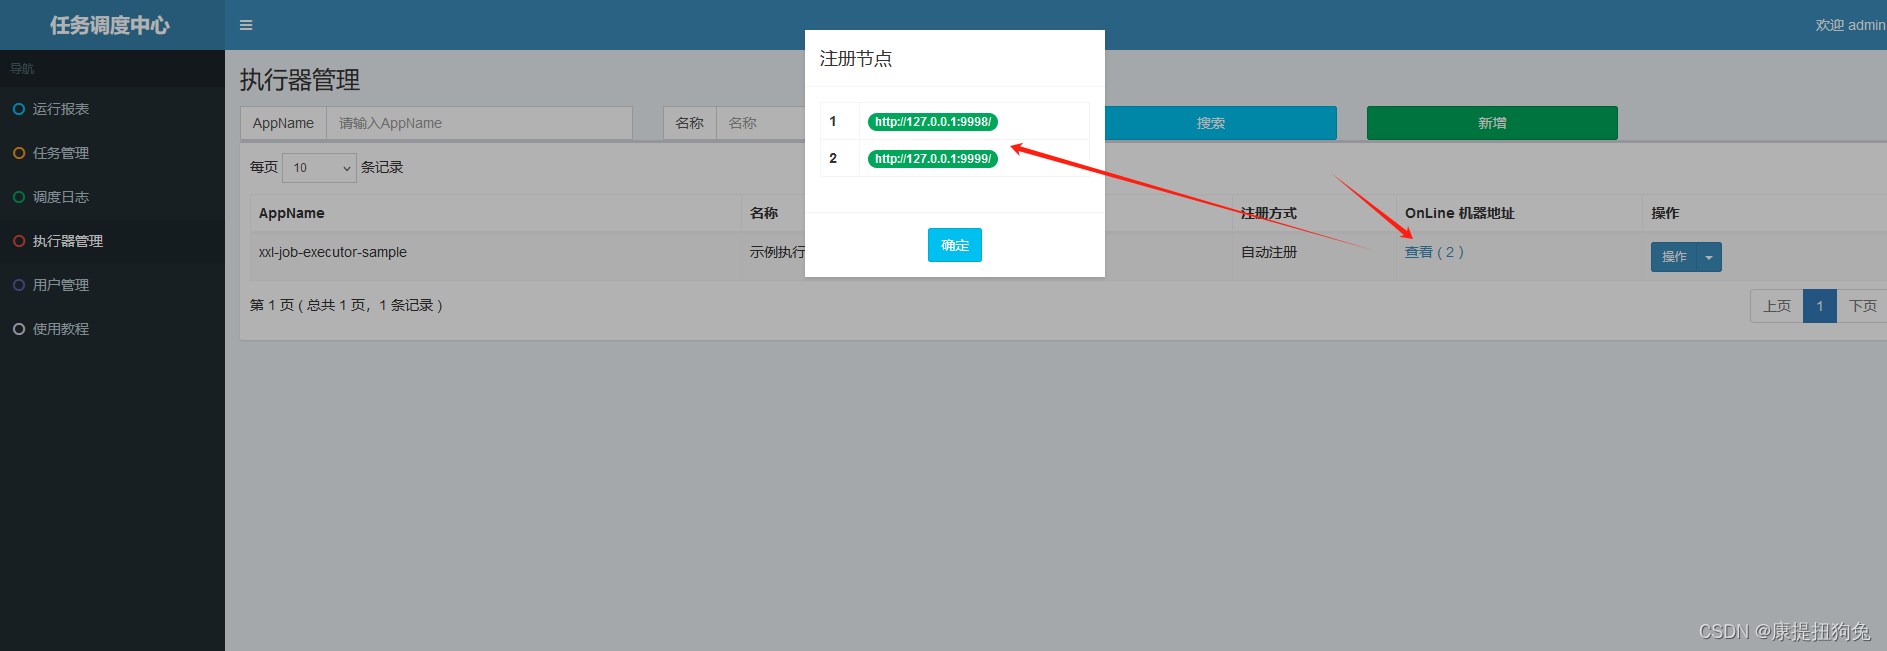
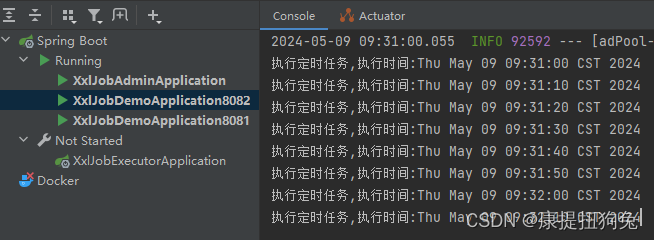
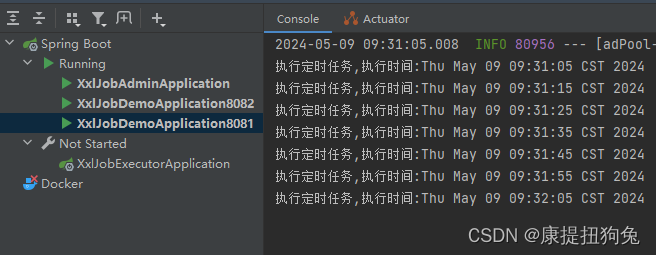
启动2个XxlJobDemoApplication,然后在执行器管理处找到了2个节点
4.2 修改测试任务1,轮询方式
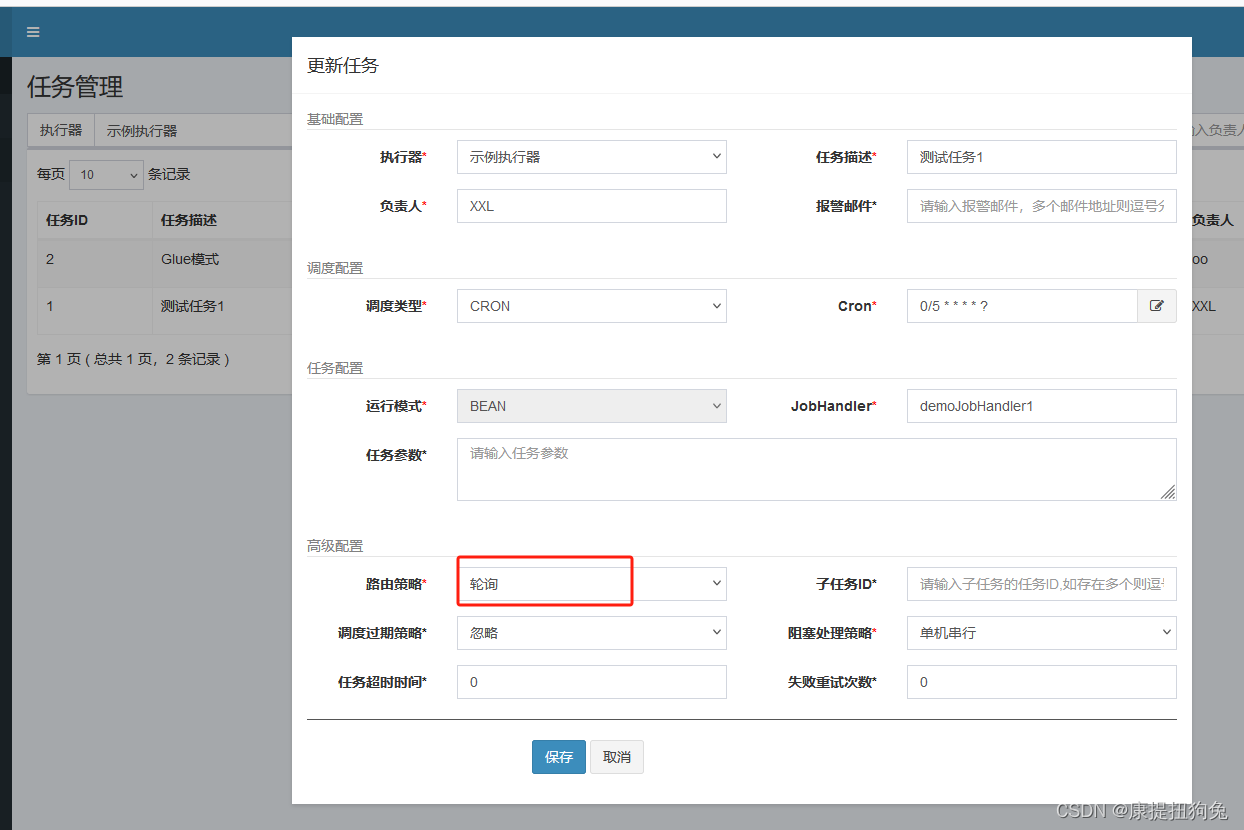
启动,发现2个应用轮流执行任务
四、分片广播
这一节借鉴了网上的资料,懒得自己测了
4.1 案例需求讲解
需求:我们现在实现这样的需求,在指定节假日,需要给平台的所有用户去发送祝福的短信。如果单机执行任务(30000个用户)需要100秒,那么把任务量均分给3台机器(每台机器给10000个用户发短信),那么时间可缩短为之前1/3.。
4.1.1 初始化数据
在数据库中导入xxl_job_demo.sql数据
4.1.2 集成Druid&MyBatis
添加依赖
<!--MyBatis驱动-->
<dependency><groupId>org.mybatis.spring.boot</groupId><artifactId>mybatis-spring-boot-starter</artifactId><version>1.2.0</version>
</dependency>
<!--mysql驱动-->
<dependency><groupId>mysql</groupId><artifactId>mysql-connector-java</artifactId>
</dependency>
<!--lombok依赖-->
<dependency><groupId>org.projectlombok</groupId><artifactId>lombok</artifactId><scope>provided</scope>
</dependency>
<dependency><groupId>com.alibaba</groupId><artifactId>druid</artifactId><version>1.1.10</version>
</dependency>
添加配置
spring.datasource.url=jdbc:mysql://localhost:3306/xxl_job_demo?serverTimezone=GMT%2B8&useUnicode=true&characterEncoding=UTF-8
spring.datasource.driverClassName=com.mysql.jdbc.Driver
spring.datasource.type=com.alibaba.druid.pool.DruidDataSource
spring.datasource.username=root
spring.datasource.password=root
添加实体类
@Setter@Getter
public class UserMobilePlan {private Long id;//主键private String username;//用户名private String nickname;//昵称private String phone;//手机号码private String info;//备注
}
添加Mapper处理类
@Mapper
public interface UserMobilePlanMapper {@Select("select * from t_user_mobile_plan")List<UserMobilePlan> selectAll();
}
4.1.3 业务功能实现
任务处理方法实现
@XxlJob("sendMsgHandler")
public void sendMsgHandler() throws Exception{List<UserMobilePlan> userMobilePlans = userMobilePlanMapper.selectAll();System.out.println("任务开始时间:"+new Date()+",处理任务数量:"+userMobilePlans.size());Long startTime = System.currentTimeMillis();userMobilePlans.forEach(item->{try {//模拟发送短信动作TimeUnit.MILLISECONDS.sleep(10);} catch (InterruptedException e) {e.printStackTrace();}});System.out.println("任务结束时间:"+new Date());System.out.println("任务耗时:"+(System.currentTimeMillis()-startTime)+"毫秒");
}
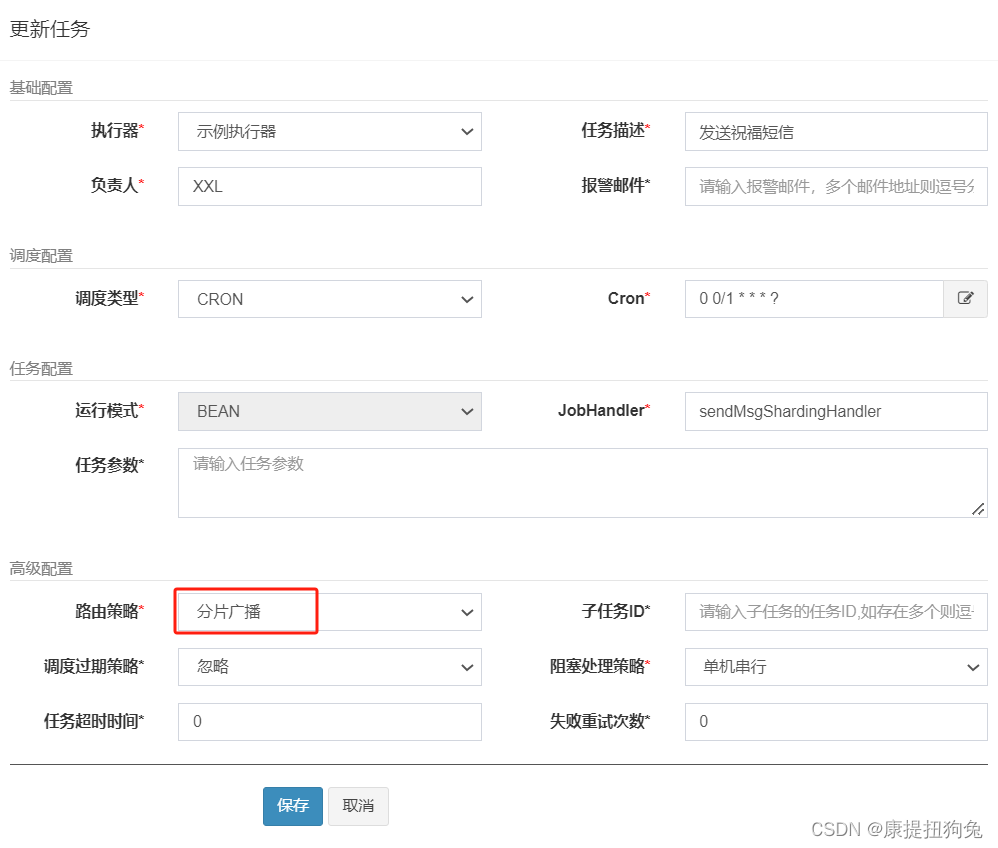
任务配置信息
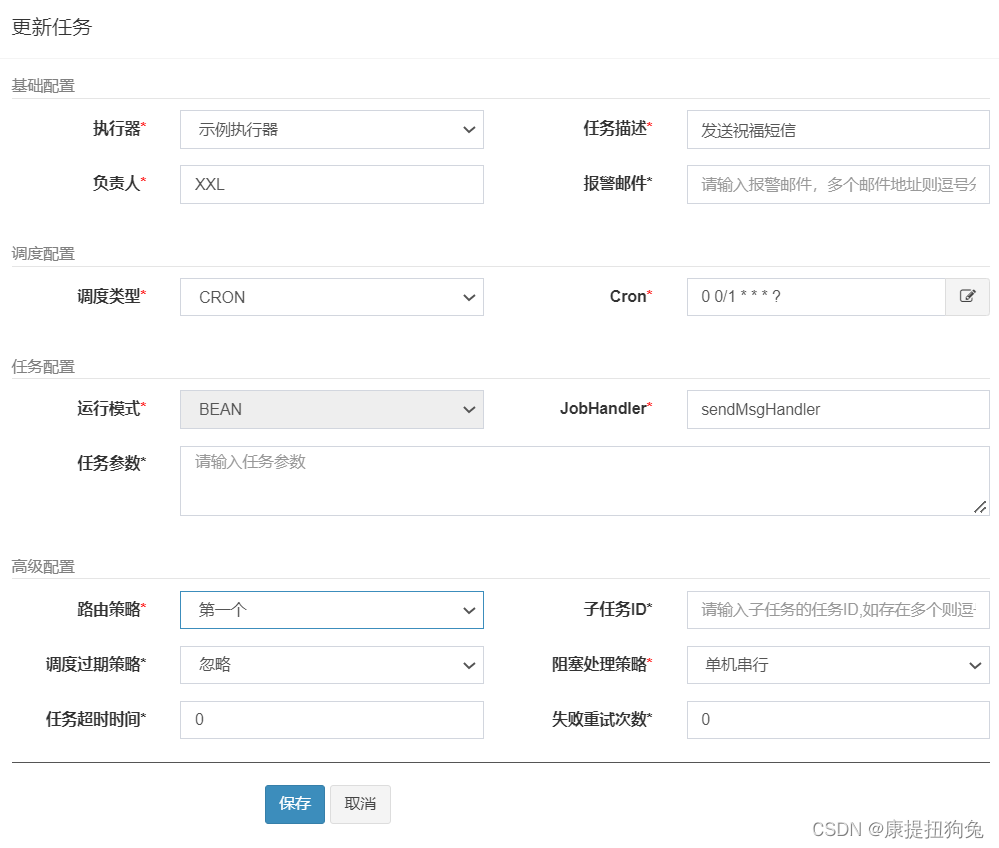
4.2 分片概念讲解
比如我们的案例中有2000+条数据,如果不采取分片形式的话,任务只会在一台机器上执行,这样的话需要20+秒才能执行完任务.
如果采取分片广播的形式的话,一次任务调度将会广播触发对应集群中所有执行器执行一次任务,同时系统自动传递分片参数;可根据分片参数开发分片任务;
获取分片参数方式:
// 可参考Sample示例执行器中的示例任务"ShardingJobHandler"了解试用
int shardIndex = XxlJobHelper.getShardIndex();
int shardTotal = XxlJobHelper.getShardTotal();
通过这两个参数,我们可以通过求模取余的方式,分别查询,分别执行,这样的话就可以提高处理的速度.
之前2000+条数据只在一台机器上执行需要20+秒才能完成任务,分片后,有两台机器可以共同完成2000+条数据,每台机器处理1000+条数据,这样的话只需要10+秒就能完成任务
4.3 案例改造成任务分片
Mapper增加查询方法。这里除了取模,也可以分页实现,计算pagesize,使页的数量为节点数。
@Mapper
public interface UserMobilePlanMapper {@Select("select * from t_user_mobile_plan where mod(id,#{shardingTotal})=#{shardingIndex}")List<UserMobilePlan> selectByMod(@Param("shardingIndex") Integer shardingIndex,@Param("shardingTotal")Integer shardingTotal);@Select("select * from t_user_mobile_plan")List<UserMobilePlan> selectAll();
}
任务类方法
@XxlJob("sendMsgShardingHandler")
public void sendMsgShardingHandler() throws Exception{System.out.println("任务开始时间:"+new Date());int shardTotal = XxlJobHelper.getShardTotal();int shardIndex = XxlJobHelper.getShardIndex();List<UserMobilePlan> userMobilePlans = null;if(shardTotal==1){//如果没有分片就直接查询所有数据userMobilePlans = userMobilePlanMapper.selectAll();}else{userMobilePlans = userMobilePlanMapper.selectByMod(shardIndex,shardTotal);}System.out.println("处理任务数量:"+userMobilePlans.size());Long startTime = System.currentTimeMillis();userMobilePlans.forEach(item->{try {TimeUnit.MILLISECONDS.sleep(10);} catch (InterruptedException e) {e.printStackTrace();}});System.out.println("任务结束时间:"+new Date());System.out.println("任务耗时:"+(System.currentTimeMillis()-startTime)+"毫秒");
}
任务设置
五、项目集成
核心在于直接在项目里使用RestTemplate发送http请求给xxl-job
5.1 配置
/*** xxl-job config** @author xuxueli 2017-04-28*/
@Configuration
public class XxlJobConfig {private Logger logger = LoggerFactory.getLogger(XxlJobConfig.class);@Value("${xxl.job.admin.addresses}")private String adminAddresses;@Value("${xxl.job.accessToken}")private String accessToken;@Value("${xxl.job.executor.appname}")private String appname;@Value("${xxl.job.executor.address}")private String address;@Value("${xxl.job.executor.ip}")private String ip;@Value("${xxl.job.executor.port}")private int port;@Value("${xxl.job.executor.logpath}")private String logPath;@Value("${xxl.job.executor.logretentiondays}")private int logRetentionDays;@Beanpublic XxlJobSpringExecutor xxlJobExecutor() {XxlJobSpringExecutor xxlJobSpringExecutor = new XxlJobSpringExecutor();xxlJobSpringExecutor.setAdminAddresses(adminAddresses);xxlJobSpringExecutor.setAppname(appname);xxlJobSpringExecutor.setAddress(address);xxlJobSpringExecutor.setIp(ip);xxlJobSpringExecutor.setPort(port);xxlJobSpringExecutor.setAccessToken(accessToken);xxlJobSpringExecutor.setLogPath(logPath);xxlJobSpringExecutor.setLogRetentionDays(logRetentionDays);return xxlJobSpringExecutor;}}
5.2 自定义执行器
/**** 实现远程调用*/
@Component
public class RemoteJobHandler {//xxl-admin的服务地址@Value("${xxl.job.admin.addresses}")private String adminAddresses;//添加的URI地址private String ADD_URI="/jobinfo/json/add";//登录身份信息@Value("${xxl.token}")private String token;@Autowiredprivate RestTemplate restTemplate;//Cron表达式格式private static SimpleDateFormat simpleDateFormat = new SimpleDateFormat("ss mm HH dd MM ? yyyy");//传入到远程的参数public static Map<String,Object> parameterMap = new HashMap<String,Object>();static {//任务分组 固定parameterMap.put("jobGroup",3);parameterMap.put("author","aaaa");parameterMap.put("scheduleType","CRON");parameterMap.put("glueType","BEAN");//任务名称 固定parameterMap.put("executorHandler","syncArticle");parameterMap.put("executorRouteStrategy","ROUND");parameterMap.put("misfireStrategy","DO_NOTHING");parameterMap.put("executorBlockStrategy","SERIAL_EXECUTION");parameterMap.put("executorTimeout",0);parameterMap.put("executorFailRetryCount",0);parameterMap.put("glueRemark","GLUE代码初始化");}/***** 远程添加任务作业* 1)读取令牌信息* 2)读取远程请求地址* 3)初始化远程请求参数 + 将任务参数信息传入* 4)使用RestTemplate实现远程调用*/public void remoteAddTaskConfig(Date datetime,Integer id){//cron表达式获取String cron = simpleDateFormat.format(datetime);//初始化远程请求参数 + 将任务参数信息传入Map<String, Object> params = loadParameters(cron, id);//使用RestTemplate实现远程调用String url = adminAddresses+ADD_URI;//请求数据封装->请求头、请求体HttpHeaders headers = new HttpHeaders();headers.add("XXL_JOB_LOGIN_IDENTITY",token);HttpEntity<Map> entity = new HttpEntity<Map>(params,headers);//远程请求ResponseEntity<Map> response = restTemplate.postForEntity(url, entity, Map.class);Map body = response.getBody();System.out.println("body:"+body);}/**** 远程数据处理* @param cron* @param id* @return*/public Map<String, Object> loadParameters(String cron, Integer id){Map<String,Object> parameters = new HashMap<String,Object>();//BeanUtils.copyProperties(parameterMap,parameters);parameters.putAll(parameterMap);//CRON表达式parameters.put("scheduleConf",cron);parameters.put("cronGen_display",cron);parameters.put("schedule_conf_CRON",cron);//文章IDparameters.put("executorParam",id);//描述parameters.put("jobDesc","商品定时发布,文章ID="+id);return parameters;}
}
5.3 bootsrap.yml
xxl:job:accessToken: ''admin:addresses: http://127.0.0.1:8080/xxl-job-adminexecutor:address: ''appname: hmttip: ''logpath: /data/applogs/xxl-job/jobhandlerlogretentiondays: 30port: 9999token: 7b226964223a312c22757365726e616d65223a2261646d696e222c2270617373776f7264223a226531306164633339343962613539616262653536653035376632306638383365222c22726f6c65223a312c227065726d697373696f6e223a6e756c6c7d
5.4 创建定时任务
......
//判断->当前时间是否小于发布时间,如果小于,则status=8
if(status==9 && wmNews.getPublishTime().getTime()>System.currentTimeMillis()){status=8;//创建定时任务remoteJobHandler.remoteAddTaskConfig(wmNews.getPublishTime(),wmNews.getId());
}
......




![Lora训练Windows[笔记]](https://img-blog.csdnimg.cn/direct/36027f1c45324ac1964b3318575b121a.png)

