前沿
MyBatis-Plus 在使用这个时候的
它通过提供简洁、强大的 API 和注解支持,简化了常见的数据库操作。
以下是关于 MyBatis-Plus 中注解的解释和示例,理解和使用
1. 实体类注解
@TableName:用于指定数据库表的名称。
@TableId:用于指定主键字段。
@TableField:用于指定非主键字段的属性配置。
2. 逻辑删除注解
@TableLogic:用于实现逻辑删除。
3. 字段填充注解
@TableField:其中的 fill 属性可以用于指定字段的自动填充策略,如插入和更新时自动填充时间戳等。
创建项目的
pom.xml

<?xml version="1.0" encoding="UTF-8"?>
<project xmlns="http://maven.apache.org/POM/4.0.0" xmlns:xsi="http://www.w3.org/2001/XMLSchema-instance"xsi:schemaLocation="http://maven.apache.org/POM/4.0.0 https://maven.apache.org/xsd/maven-4.0.0.xsd"><modelVersion>4.0.0</modelVersion><parent><groupId>org.springframework.boot</groupId><artifactId>spring-boot-starter-parent</artifactId><version>3.3.0</version><relativePath/> <!-- lookup parent from repository --></parent><groupId>org.yanfan</groupId><artifactId>hello-mp</artifactId><version>0.0.1-SNAPSHOT</version><name>hello-mp</name><description>hello-mp</description><properties><java.version>17</java.version></properties><dependencies><dependency><groupId>org.springframework.boot</groupId><artifactId>spring-boot-starter</artifactId></dependency><dependency><groupId>com.baomidou</groupId><!--3.5.4开始,支持SpringBoot3使用此版本--><artifactId>mybatis-plus-spring-boot3-starter</artifactId>
<!--        <artifactId>mybatis-plus-boot-starter</artifactId>--><version>3.5.5</version></dependency><dependency><groupId>com.mysql</groupId><artifactId>mysql-connector-j</artifactId><scope>runtime</scope></dependency><dependency><groupId>org.projectlombok</groupId><artifactId>lombok</artifactId><optional>true</optional></dependency><dependency><groupId>org.springframework.boot</groupId><artifactId>spring-boot-starter-test</artifactId><scope>test</scope></dependency></dependencies><build><plugins><plugin><groupId>org.springframework.boot</groupId><artifactId>spring-boot-maven-plugin</artifactId><configuration><excludes><exclude><groupId>org.projectlombok</groupId><artifactId>lombok</artifactId></exclude></excludes></configuration></plugin></plugins></build></project>
注入依赖
        <dependency><groupId>com.baomidou</groupId><!--3.5.4开始,支持SpringBoot3使用此版本--><artifactId>mybatis-plus-spring-boot3-starter</artifactId>
<!--        <artifactId>mybatis-plus-boot-starter</artifactId>--><version>3.5.5</version></dependency>
配合mysql 8 以上要使用3.5.5的 mybatis-plus
项目的目录
-
UserServiceImpl类:- 这是一个服务实现类,用于处理
User实体的业务逻辑。 - 继承了
ServiceImpl<UserMapper, User>,意味着这个类自动拥有了ServiceImpl提供的所有方法,例如save、remove、getById、list等。
- 这是一个服务实现类,用于处理
-
ServiceImpl类:ServiceImpl是 MyBatis-Plus 提供的一个基础服务实现类,它实现了IService接口,提供了基础的 CRUD 操作。- 通过继承
ServiceImpl,你的服务实现类无需自己编写这些常用的数据库操作代码。
-
UserMapper接口:UserMapper是 MyBatis-Plus 的 Mapper 接口,用于定义User实体对应的数据库操作方法。它通常继承自 MyBatis-Plus 的BaseMapper接口。
-
User实体类:User是一个实体类,表示数据库中的用户表。
-
UserService接口:UserService是一个自定义的服务接口,定义了User实体的业务操作。该接口可以继承 MyBatis-Plus 的IService<User>接口。
然后在src 下面的数据库建立
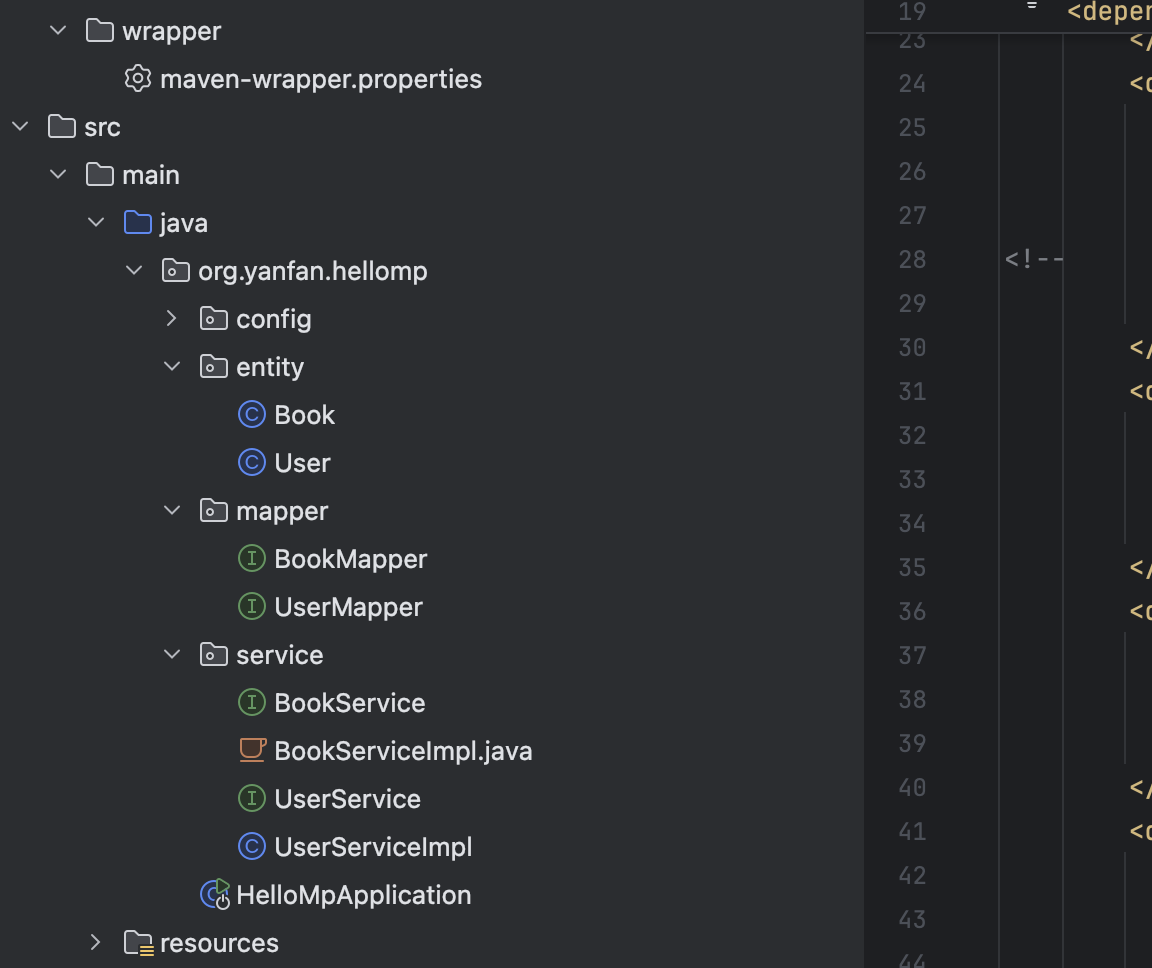
config 新建 MpConfiguration 配置 mybatisPlus
package org.yanfan.hellomp.config;import com.baomidou.mybatisplus.annotation.DbType;
import com.baomidou.mybatisplus.extension.plugins.MybatisPlusInterceptor;
import com.baomidou.mybatisplus.extension.plugins.inner.PaginationInnerInterceptor;
import org.springframework.context.annotation.Bean;
import org.springframework.context.annotation.Configuration;@Configuration
public class MpConfiguration {@Beanpublic MybatisPlusInterceptor mybatisPlusInterceptor() {MybatisPlusInterceptor interceptor = new MybatisPlusInterceptor();interceptor.addInnerInterceptor(new PaginationInnerInterceptor(DbType.MYSQL));return interceptor;}
}
然后就是实体类
package org.yanfan.hellomp.entity;import com.baomidou.mybatisplus.annotation.IdType;
import com.baomidou.mybatisplus.annotation.TableField;
import com.baomidou.mybatisplus.annotation.TableId;
import com.baomidou.mybatisplus.annotation.TableName;
import lombok.Data;@Data
@TableName("user")
public class User {@TableId(value = "id", type = IdType.AUTO)private Long id;@TableField("name")private String name;@TableField("age")private Integer age;@TableField("email")private String email;
}
再就是 mapper 映射数据库
package org.yanfan.hellomp.mapper;import com.baomidou.mybatisplus.core.mapper.BaseMapper;
import org.apache.ibatis.annotations.Mapper;
import org.yanfan.hellomp.entity.User;// Mapper 的接口
@Mapper             //实体类的泛型
public interface UserMapper extends BaseMapper<User> {
}
service
服务接口 UserService
package org.yanfan.hellomp.service;import com.baomidou.mybatisplus.extension.service.IService;
import org.yanfan.hellomp.entity.User;// IService 都是基于BaseMapper 的底沉的封装
public interface UserService extends IService<User> {
}
服务实现类 UserServiceImpl
package org.yanfan.hellomp.service;import com.baomidou.mybatisplus.extension.service.impl.ServiceImpl;
import org.springframework.stereotype.Service;
import org.yanfan.hellomp.entity.User;
import org.yanfan.hellomp.mapper.UserMapper;@Service
// 把方法都继承过来 就不需要自己再实现了 ServiceImpl
public class UserServiceImpl extends ServiceImpl<UserMapper, User> implements UserService {}
如何使用
在控制器中使用 UserService
package org.yanfan.hellomp.controller;import org.springframework.beans.factory.annotation.Autowired;
import org.springframework.web.bind.annotation.*;
import org.yanfan.hellomp.entity.User;
import org.yanfan.hellomp.service.UserService;import java.util.List;@RestController
@RequestMapping("/users")
public class UserController {@Autowiredprivate UserService userService;@GetMappingpublic List<User> getAllUsers() {return userService.list();}@GetMapping("/{id}")public User getUserById(@PathVariable Long id) {return userService.getById(id);}@PostMappingpublic void saveUser(@RequestBody User user) {userService.save(user);}@DeleteMapping("/{id}")public void deleteUser(@PathVariable Long id) {userService.removeById(id);}
}
然后就是测试test
package org.yanfan.hellomp.service;import org.junit.jupiter.api.Test;
import org.springframework.beans.factory.annotation.Autowired;
import org.springframework.boot.test.context.SpringBootTest;
import org.springframework.stereotype.Service;
import org.yanfan.hellomp.entity.User;import java.util.List;import static org.junit.jupiter.api.Assertions.*;@SpringBootTest
class UserServiceImplTest {@Autowiredprivate UserService userService;@Testpublic void TestById() {User user = userService.getById(2);System.out.println(user);}@Testpublic void TestSaveOrUpdate() {User user1 = userService.getById(1);user1.setName("我的");User user2 = new User();user2.setName("joke");user2.setAge(12);userService.saveOrUpdate(user1);userService.saveOrUpdate(user2);}@Testpublic void TestSaveBatch() {User user1 = new User();user1.setName("role");user1.setAge(21);user1.setEmail("name@email.com");User user2 = new User();user2.setName("joke");user2.setAge(12);user2.setEmail("fe@email.com");List<User> users = List.of(user1, user2);userService.saveBatch(users);}
}


