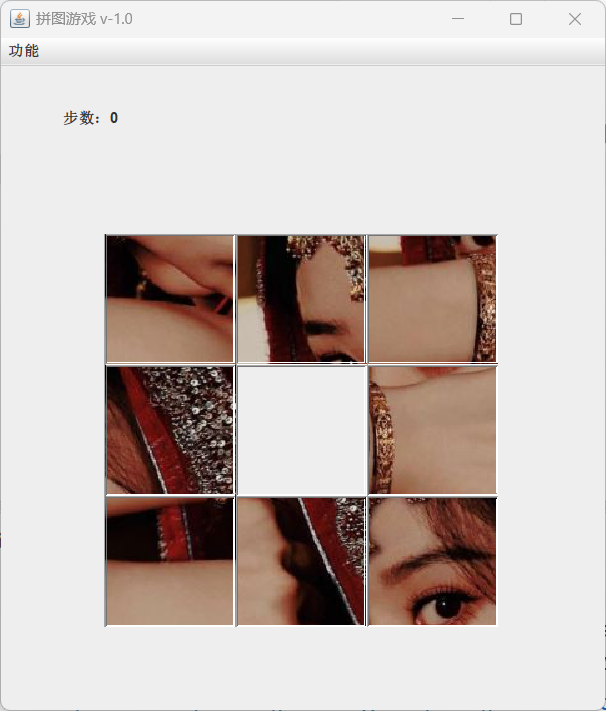
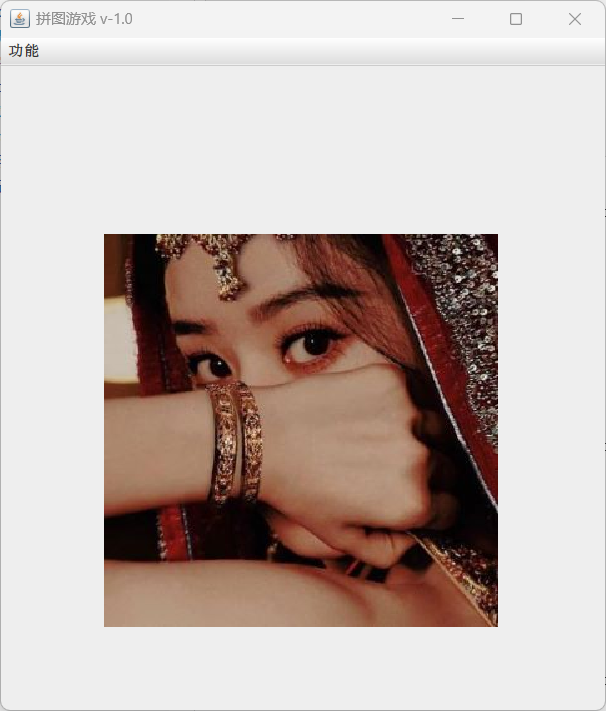
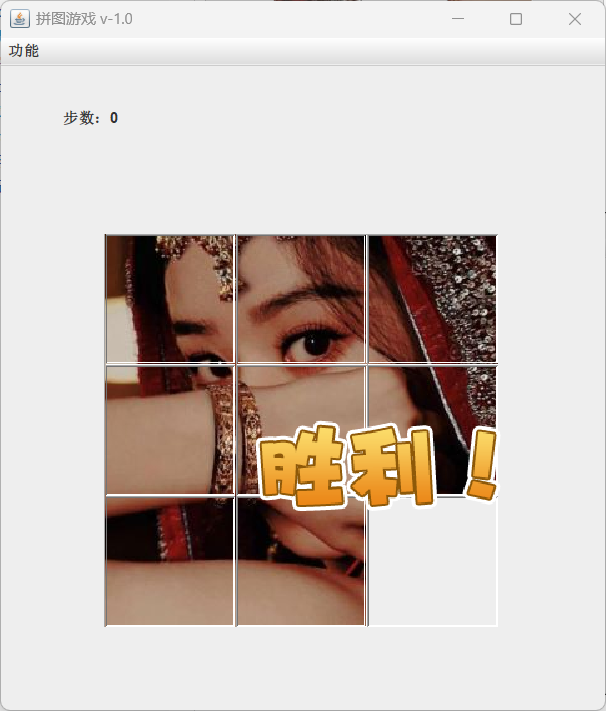
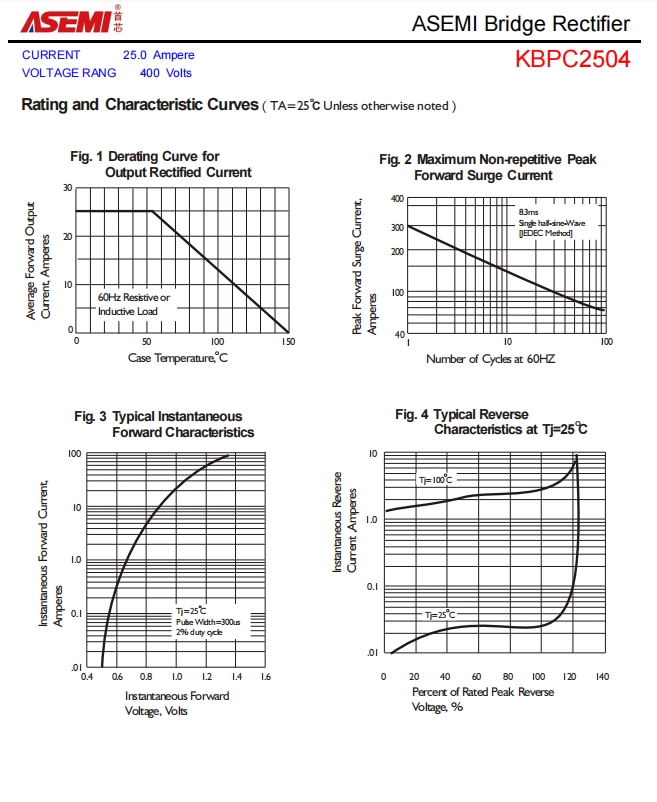
今天完全实现了九宫格拼图游戏,具备一键通关功能按下W键,查看原图功能按住A键不松,移动图片按上下左右键,如果你自己想要实现这个功能,需要自己的图片,图片格式要求。
每个小图片是105*105,完整图片是315*315.有人想要做一下,可以试一试。代码如下
启动类
 1 import com.itheima.ui.GameJFrame;
 2
 3
 4
 5 public class App {
 6     public static void main(String[] args) {
 7         //表示程序的启动入口
 8         //new LoginJFrame();
 9         new GameJFrame();
10         //new RegisterJFrame();
11     }
12 }
实现游戏类
  1 package com.itheima.ui;
  2
  3 import javax.swing.*;
  4 import javax.swing.border.BevelBorder;
  5 import java.awt.event.ActionEvent;
  6 import java.awt.event.ActionListener;
  7 import java.awt.event.KeyEvent;
  8 import java.awt.event.KeyListener;
  9 import java.util.Random;
 10
 11 public class GameJFrame extends JFrame implements KeyListener, ActionListener {
 12
 13     //创建一个二位数组
 14     //用来管理数据
 15     int[][] data = new int[3][3];
 16
 17     //记录空白方块在二维数组中的位置
 18     int x=0;
 19     int y=0;
 20
 21     //定义一个正确的数组,用来存放正确的数据
 22     int[][] win = {
 23             {1,2,3},
 24             {4,5,6},
 25             {7,8,0},
 26     };
 27
 28     //定义一个变量来统计步数
 29     int step = 0;
 30
 31     //记录图片路径
 32     String path ="D:\\ideaworkplace\\puzzlegame2\\image\\";
 33
 34     //创建选项中的条目
 35     JMenuItem replayItem = new JMenuItem("重新游戏");
 36     JMenuItem closeItem = new JMenuItem("关闭游戏");
 37
 38     public GameJFrame(){
 39         //初始化界面
 40         initJFrame();
 41
 42         //初始化菜单
 43         initJMenuBar();
 44
 45         //初始化数据
 46         initData();
 47
 48         //初始化图片
 49         initImage();
 50
 51         //使界面显示出来
 52         this.setVisible(true);
 53     }
 54
 55     //初始化数据
 56     private void initData() {
 57         int[] tempArr = {0, 1, 2, 3, 4, 5, 6, 7, 8};
 58
 59         Random r = new Random();
 60         for (int i = 0; i < tempArr.length; i++) {
 61             int index = r.nextInt(tempArr.length);
 62             int temp = tempArr[i];
 63             tempArr[i] = tempArr[index];
 64             tempArr[index] = temp;
 65         }
 66
 67
 68         for (int i = 0; i < tempArr.length; i++) {
 69
 70             if(tempArr[i] ==0 ){
 71                 x=i/3;
 72                 y=i%3;
 73             }
 74             data[i / 3][i % 3] = tempArr[i];
 75
 76         }
 77
 78     }
 79
 80     private void initImage() {
 81
 82         //清空原先的缓存
 83         this.getContentPane().removeAll();
 84
 85         //加载图片是判断是否胜利
 86         if (victory()) {
 87             JLabel winJLabel = new JLabel(new ImageIcon("D:\\ideaworkplace\\puzzlegame2\\image\\win.png"));
 88             winJLabel.setBounds(203,283,197,73);
 89             this.getContentPane().add(winJLabel);
 90         }
 91
 92         //把步数添加到界面当中
 93         JLabel stepJLabel = new JLabel("步数:" + step);
 94         stepJLabel.setBounds(50,30,100,20);
 95         this.getContentPane().add(stepJLabel);
 96
 97
 98         for (int i = 0; i < 3; i++) {
 99             for (int j = 0; j < 3; j++) {
100                 int num = data[i][j];
101                 //创建一个ImageIcon对象
102                 //创建一个JLabel对象(管理容器)
103                 JLabel jLabel = new JLabel(new ImageIcon(path+num+".jpg"));
104                 //移动图片的坐标
105                 jLabel.setBounds(105*j+83,105*i+134,105,105);
106                 //给图片添加边框
107                 jLabel.setBorder(new BevelBorder(1));
108                 //把管理容器添加到界面当中
109                 //this.add(jLabel);
110                 this.getContentPane().add(jLabel);
111             }
112         }
113
114 ////        //添加背景图片
115 //        JLabel background = new JLabel(new ImageIcon("D:\\ideaworkplace\\puzzlegame2\\image\\background.jpg"));
116 //        background.setBounds(40,40,508,560);
117 //        //把背景图片加到界面当中
118 //        this.getContentPane().add(background);
119
120
121         //刷新一下界面
122         this.getContentPane().repaint();
123     }
124
125     private void initJMenuBar() {
126         //创建整个菜单对象
127         JMenuBar jMenuBar = new JMenuBar();
128
129         //创建菜单上两个选项的对象
130         JMenu functionMenu = new JMenu("功能");
131
132
133         //把条目放到选项当中
134         functionMenu.add(replayItem);
135
136         functionMenu.add(closeItem);
137
138
139         //把选项放到菜单中
140         jMenuBar.add(functionMenu);
141
142         //给条目绑定监听事件
143         replayItem.addActionListener(this);
144
145         closeItem.addActionListener(this);
146
147
148         //把菜单放到界面中
149         this.setJMenuBar(jMenuBar);
150     }
151
152     private void initJFrame() {
153         //设置界面长宽
154         this.setSize(498,575);
155         //设置界面的标题
156         this.setTitle("拼图游戏 v-1.0");
157         //设置游戏总是置顶
158         this.setAlwaysOnTop(true);
159         //设置游戏界面居中
160         this.setLocationRelativeTo(null);
161         //设置关闭模式
162         this.setDefaultCloseOperation(3);
163         //取消默认放置
164         this.setLayout(null);
165         //添加键盘监听
166         this.addKeyListener(this);
167     }
168
169     @Override
170     public void keyTyped(KeyEvent e) {
171
172     }
173
174     @Override
175     public void keyPressed(KeyEvent e) {
176         //按下A键显示完整的图片
177         int code = e.getKeyCode();
178         if(code == 65){
179             //先删除整个界面的图片
180             this.getContentPane().removeAll();
181             //加载完整的图片
182             JLabel all = new JLabel(new ImageIcon(path+"all.jpg"));
183             all.setBounds(83,134,315,315);
184             this.getContentPane().add(all);
185
186 //            //加载背景图片
187 //            JLabel background = new JLabel(new ImageIcon("D:\\ideaworkplace\\puzzlegame2\\image\\background.jpg"));
188 //            background.setBounds(40,40,508,560);
189 //            //把背景图片加到界面当中
190 //            this.getContentPane().add(background);
191
192             //刷新一下界面
193             this.getContentPane().repaint();
194         }
195
196     }
197
198     @Override
199     public void keyReleased(KeyEvent e) {
200         //如果胜利就不能再进行游戏
201         if(victory()){
202             return;
203         }
204
205         //对上下左右进行判断
206         //左上右下:分别为37,38,39,40
207         int code = e.getKeyCode();
208         if(code == 37){
209             System.out.println("向左移动");
210             if(y==2){
211                 return;
212             }
213             //空白方块:x,y
214             //右边方块:x,y+1
215             data[x][y] = data[x][y+1];
216             data[x][y+1] = 0;
217             y++;
218             //步数加1
219             step++;
220             //更新界面
221             initImage();
222         }
223         if(code == 38){
224
225             //逻辑:把空白方块和下面的方块交换位置
226             //空白方块:x,y
227             //下面方块:x+1,y
228             System.out.println("向上移动");
229             if(x==2){
230                 return;
231             }
232             data[x][y] = data[x+1][y];
233             data[x+1][y] = 0;
234             x++;
235             //步数加1
236             step++;
237             //更新界面
238             initImage();
239         }
240         if(code == 39){
241
242             System.out.println("向右移动");
243             if(y==0){
244                 return;
245             }
246             //空白方块:x,y
247             //下面方块:x,y-1
248             data[x][y] = data[x][y-1];
249             data[x][y-1] = 0;
250             y--;
251             //步数加1
252             step++;
253             //更新界面
254             initImage();
255         }
256         if(code == 40){
257             System.out.println("向下移动");
258             if(x==0){
259                 return;
260             }
261             //空白方块:x,y
262             //下面方块:x-1,y
263             data[x][y] = data[x-1][y];
264             data[x-1][y] = 0;
265             x--;
266             //步数加1
267             step++;
268             //更新界面
269             initImage();
270         }
271         //显示正确的图片
272         if(code == 65){
273             initImage();
274         }
275         //一键通关
276         if(code == 87){
277             data = new int[][]{
278                     {1,2,3},
279                     {4,5,6},
280                     {7,8,0},
281             };
282             initImage();
283         }
284     }
285
286     //判断游戏是否胜利
287     public boolean victory(){
288         for (int i = 0; i < data.length; i++) {
289             for (int j = 0; j < data[i].length; j++) {
290                 //如果有一个不等于正确的,就退出
291                 if(data[i][j] != win[i][j]){
292                     return false;
293                 }
294             }
295         }
296         return true;
297     }
298
299     @Override
300     public void actionPerformed(ActionEvent e) {
301         Object obj = e.getSource();
302         if(obj == replayItem){
303             System.out.println("1");
304             //重新加载步数
305             step = 0;
306             //重新打乱数组
307             initData();
308             //重新加载打乱的页面
309             initImage();
310
311         }  else if (obj == closeItem) {
312             System.out.println("3");
313             //关闭游戏
314             System.exit(0);
315         }
316     }
317 }
效果图