前言
随着vue3.0的越来越受欢迎,开始有许多公司和个人开始学习并使用vue3开发项目。我从接触学习并使用vue2,到现在的vue3,工作中也一直在使用vue。vue3也发布很长时间了,目前vue3+vite+ts再结合一些优秀的UI框架,如Element plus,Ant design,Naive UI,移动端的Vant UI,成为了较为流行的前端技术之一。那么今天就带大家一起来搭建一个Vue3的项目吧!
一、使用 Vite 快速搭建脚手架
兼容性注意
Vite 需要 Node.js 版本 >= 12.0.0。
1. 命令行选项直接指定项目名称和想要使用的模板,Vite + Vue 项目,运行(推荐使用yarn)
-
# npm 6.x
-
npm init vite@latest my-vue-app --template vue
-
-
# npm 7+, 需要额外的双横线:
-
npm init vite@latest my-vue-app -- --template vue
-
-
# yarn
-
yarn create vite my-vue-app --template vue
-
-
# pnpm
-
pnpm create vite my-vue-app -- --template vue
这里我们想要直接生成一个Vue3+Vite2+ts的项目模板,因此我们执行的命令是: yarn create vite my-vue-app --template vue-ts,这样我们就不需要你单独的再去安装配置ts了。

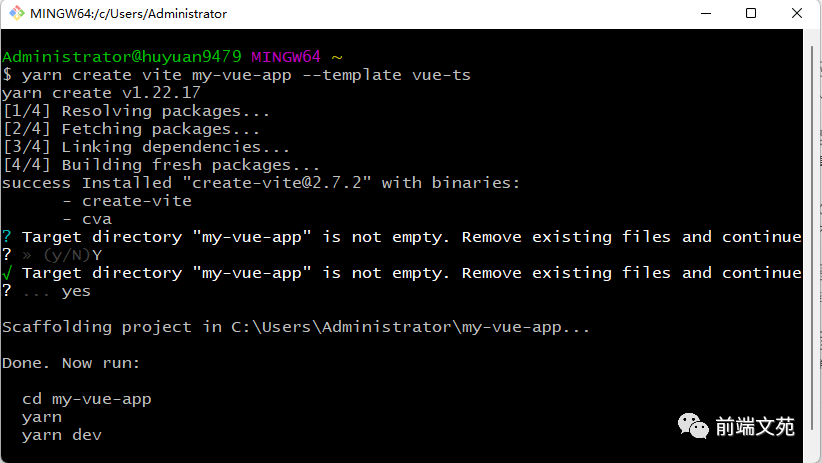
2. cd 到项目文件夹,安装node_modules依赖,运行项目

-
# cd进入my-vue-app项目文件夹
-
cd my-vue-app
-
# 安装依赖
-
yarn
-
# 运行项目
-
yarn dev
项目结构如下:
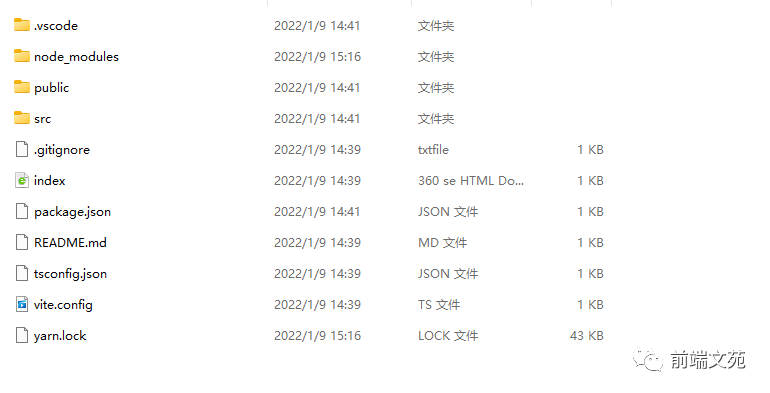
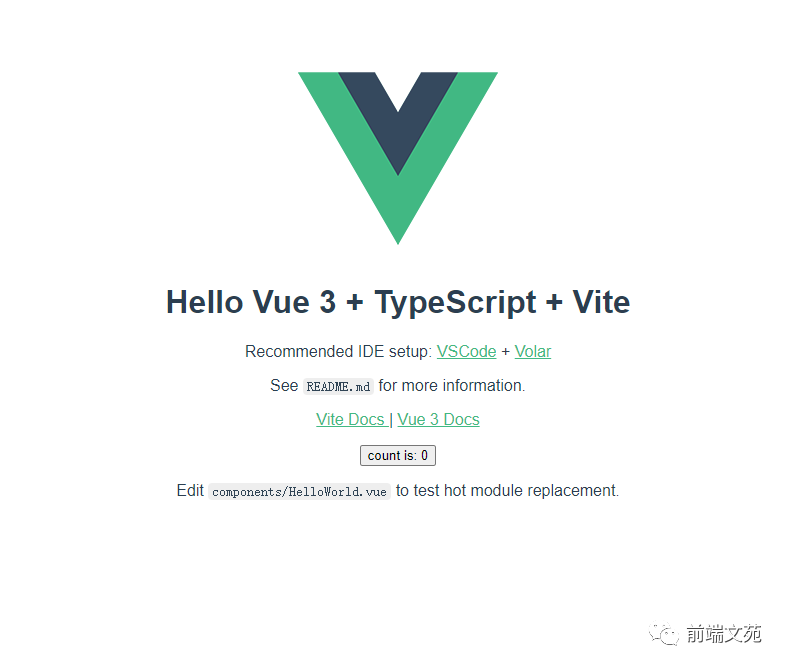
至此,一个最纯净的vue3.0+vite2+typescript项目就完成了。在浏览地址栏中输入http://localhost:3000/,就看到了如下的启动页,然后就可以安装所需的插件了。


二、配置文件路径引用别名 alias
修改vite.config.ts中的reslove的配置

-
import { defineConfig } from 'vite'
-
import vue from '@vitejs/plugin-vue'
-
import path from 'path'
-
-
// https://vitejs.dev/config/
-
export default defineConfig({
-
plugins: [vue()],
-
resolve: {
-
alias: {
-
'@': path.resolve(__dirname, 'src'),
-
},
-
},
-
})
在修改tsconfig.json文件的配置

-
{
-
"compilerOptions": {
-
"target": "esnext",
-
"module": "esnext",
-
"moduleResolution": "node",
-
"strict": true,
-
"jsx": "preserve",
-
"sourceMap": true,
-
"resolveJsonModule": true,
-
"esModuleInterop": true,
-
"lib": ["esnext", "dom"],
-
"baseUrl": ".",
-
"paths": {
-
"@/*":["src/*"]
-
}
-
},
-
"include": [
-
"src/**/*.ts",
-
"src/**/*.d.ts",
-
"src/**/*.tsx",
-
"src/**/*.vue"
-
]
-
}

三、配置路由
1. 安装

-
# npm
-
npm install vue-router@4
-
-
# yarn
-
yarn add vue-router@4
2. 在src下新建router文件夹,用来集中管理路由,在router文件夹下新建 index.ts文件。

-
import { createRouter, createWebHistory, RouteRecordRaw } from 'vue-router'
-
-
const routes: RouteRecordRaw[] = [
-
{
-
path: '/',
-
name: 'Login',
-
// 注意这里要带上文件后缀.vue
-
component: () => import('@/pages/login/Login.vue'),
-
meta: {
-
title: '登录',
-
},
-
},
-
]
-
-
const router = createRouter({
-
history: createWebHistory(),
-
routes,
-
strict: true,
-
// 期望滚动到哪个的位置
-
scrollBehavior(to, from, savedPosition) {
-
return new Promise(resolve => {
-
if (savedPosition) {
-
return savedPosition;
-
} else {
-
if (from.meta.saveSrollTop) {
-
const top: number =
-
document.documentElement.scrollTop || document.body.scrollTop;
-
resolve({ left: 0, top });
-
}
-
}
-
});
-
}
-
})
-
-
export function setupRouter(app: App) {
-
app.use(router);
-
}
-
-
export default router
3. 修改入口文件 mian.ts

-
import { createApp } from "vue";
-
import App from "./App.vue";
-
import router, { setupRouter } from './router';
-
-
const app = createApp(App);
-
// 挂在路由
-
setupRouter(app);
-
// 路由准备就绪后挂载APP实例
-
await router.isReady();
-
-
app.mount('#app', true);
更多的路由配置可以移步vue-router(https://next.router.vuejs.org/zh/introduction.html)。
vue-router4.x支持typescript,路由的类型为RouteRecordRaw。meta字段可以让我们根据不同的业务需求扩展 RouteMeta 接口来输入它的多样性。以下的meta中的配置仅供参考:
-
// typings.d.ts or router.ts
-
import 'vue-router'
-
-
declare module 'vue-router' {
-
interface RouteMeta {
-
// 页面标题,通常必选。
-
title: string;
-
// 菜单图标
-
icon?: string;
-
// 配置菜单的权限
-
permission: string[];
-
// 是否开启页面缓存
-
keepAlive?: boolean;
-
// 二级页面我们并不想在菜单中显示
-
hidden?: boolean;
-
// 菜单排序
-
order?: number;
-
// 嵌套外链
-
frameUrl?: string;
-
}
-
}

四、配置 css 预处理器 scss
1. 安装

-
yarn ass sass-loader --dev
-
yarn add dart-sass --dev
-
yarn add sass --dev
2.配置全局 scss 样式文件
在 src文件夹下新增 styles 文件夹,用于存放全局样式文件,新建一个 varibles.scss文件,用于统一管理声明的颜色变量:

-
$white: #FFFFFF;
-
$primary-color: #1890ff;
-
$success-color: #67C23A;
-
$warning-color: #E6A23C;
-
$danger-color: #F56C6C;
-
$info-color: #909399;
3. 组件中使用
在vite.config.ts中将这个样式文件全局注入到项目即可全局使用,
不需要在任何组件中再次引入这个文件或者颜色变量。

-
css: {
-
preprocessorOptions: {
-
scss: {
-
modifyVars: {},
-
javascriptEnabled: true,
-
// 注意这里的引入的书写
-
additionalData: '@import "@/style/varibles.scss";'
-
}
-
}
-
},
在组件中使用

-
.div {
-
color: $primary-color;
-
background-color: $success-color;
-
}

五、统一请求封装
在src文件夹下,新建http文件夹,在http文件夹下新增index.ts,config.ts,core.ts,types.d.ts,utils.ts

core.ts
-
import Axios, { AxiosRequestConfig, CancelTokenStatic, AxiosInstance } from "axios";
-
import NProgress from 'nprogress'
-
import { genConfig } from "./config";
-
import { transformConfigByMethod } from "./utils";
-
import {
-
cancelTokenType,
-
RequestMethods,
-
HttpRequestConfig,
-
HttpResoponse,
-
HttpError
-
} from "./types.d";
-
-
class Http {
-
constructor() {
-
this.httpInterceptorsRequest();
-
this.httpInterceptorsResponse();
-
}
-
// 初始化配置对象
-
private static initConfig: HttpRequestConfig = {};
-
-
// 保存当前Axios实例对象
-
private static axiosInstance: AxiosInstance = Axios.create(genConfig());
-
-
// 保存 Http实例
-
private static HttpInstance: Http;
-
-
// axios取消对象
-
private CancelToken: CancelTokenStatic = Axios.CancelToken;
-
-
// 取消的凭证数组
-
private sourceTokenList: Array<cancelTokenType> = [];
-
-
// 记录当前这一次cancelToken的key
-
private currentCancelTokenKey = "";
-
-
public get cancelTokenList(): Array<cancelTokenType> {
-
return this.sourceTokenList;
-
}
-
-
// eslint-disable-next-line class-methods-use-this
-
public set cancelTokenList(value) {
-
throw new Error("cancelTokenList不允许赋值");
-
}
-
-
/**
-
* @description 私有构造不允许实例化
-
* @returns void 0
-
*/
-
// constructor() {}
-
-
/**
-
* @description 生成唯一取消key
-
* @param config axios配置
-
* @returns string
-
*/
-
// eslint-disable-next-line class-methods-use-this
-
private static genUniqueKey(config: HttpRequestConfig): string {
-
return `${config.url}--${JSON.stringify(config.data)}`;
-
}
-
-
/**
-
* @description 取消重复请求
-
* @returns void 0
-
*/
-
private cancelRepeatRequest(): void {
-
const temp: { [key: string]: boolean } = {};
-
-
this.sourceTokenList = this.sourceTokenList.reduce<Array<cancelTokenType>>(
-
(res: Array<cancelTokenType>, cancelToken: cancelTokenType) => {
-
const { cancelKey, cancelExecutor } = cancelToken;
-
if (!temp[cancelKey]) {
-
temp[cancelKey] = true;
-
res.push(cancelToken);
-
} else {
-
cancelExecutor();
-
}
-
return res;
-
},
-
[]
-
);
-
}
-
-
/**
-
* @description 删除指定的CancelToken
-
* @returns void 0
-
*/
-
private deleteCancelTokenByCancelKey(cancelKey: string): void {
-
this.sourceTokenList =
-
this.sourceTokenList.length < 1
-
? this.sourceTokenList.filter(
-
cancelToken => cancelToken.cancelKey !== cancelKey
-
)
-
: [];
-
}
-
-
/**
-
* @description 拦截请求
-
* @returns void 0
-
*/
-
-
private httpInterceptorsRequest(): void {
-
Http.axiosInstance.interceptors.request.use(
-
(config: HttpRequestConfig) => {
-
const $config = config;
-
NProgress.start(); // 每次切换页面时,调用进度条
-
const cancelKey = Http.genUniqueKey($config);
-
$config.cancelToken = new this.CancelToken(
-
(cancelExecutor: (cancel: any) => void) => {
-
this.sourceTokenList.push({ cancelKey, cancelExecutor });
-
}
-
);
-
this.cancelRepeatRequest();
-
this.currentCancelTokenKey = cancelKey;
-
// 优先判断post/get等方法是否传入回掉,否则执行初始化设置等回掉
-
if (typeof config.beforeRequestCallback === "function") {
-
config.beforeRequestCallback($config);
-
return $config;
-
}
-
if (Http.initConfig.beforeRequestCallback) {
-
Http.initConfig.beforeRequestCallback($config);
-
return $config;
-
}
-
return $config;
-
},
-
error => {
-
return Promise.reject(error);
-
}
-
);
-
}
-
-
/**
-
* @description 清空当前cancelTokenList
-
* @returns void 0
-
*/
-
public clearCancelTokenList(): void {
-
this.sourceTokenList.length = 0;
-
}
-
-
/**
-
* @description 拦截响应
-
* @returns void 0
-
*/
-
private httpInterceptorsResponse(): void {
-
const instance = Http.axiosInstance;
-
instance.interceptors.response.use(
-
(response: HttpResoponse) => {
-
const $config = response.config;
-
// 请求每次成功一次就删除当前canceltoken标记
-
const cancelKey = Http.genUniqueKey($config);
-
this.deleteCancelTokenByCancelKey(cancelKey);
-
-
NProgress.done();
-
// 优先判断post/get等方法是否传入回掉,否则执行初始化设置等回掉
-
if (typeof $config.beforeResponseCallback === "function") {
-
$config.beforeResponseCallback(response);
-
return response.data;
-
}
-
if (Http.initConfig.beforeResponseCallback) {
-
Http.initConfig.beforeResponseCallback(response);
-
return response.data;
-
}
-
return response.data;
-
},
-
(error: HttpError) => {
-
const $error = error;
-
// 判断当前的请求中是否在 取消token数组理存在,如果存在则移除(单次请求流程)
-
if (this.currentCancelTokenKey) {
-
const haskey = this.sourceTokenList.filter(
-
cancelToken => cancelToken.cancelKey === this.currentCancelTokenKey
-
).length;
-
if (haskey) {
-
this.sourceTokenList = this.sourceTokenList.filter(
-
cancelToken =>
-
cancelToken.cancelKey !== this.currentCancelTokenKey
-
);
-
this.currentCancelTokenKey = "";
-
}
-
}
-
$error.isCancelRequest = Axios.isCancel($error);
-
NProgress.done();
-
// 所有的响应异常 区分来源为取消请求/非取消请求
-
return Promise.reject($error);
-
}
-
);
-
}
-
-
public request<T>(
-
method: RequestMethods,
-
url: string,
-
param?: AxiosRequestConfig,
-
axiosConfig?: HttpRequestConfig
-
): Promise<T> {
-
const config = transformConfigByMethod(param, {
-
method,
-
url,
-
...axiosConfig
-
} as HttpRequestConfig);
-
// 单独处理自定义请求/响应回掉
-
return new Promise((resolve, reject) => {
-
Http.axiosInstance
-
.request(config)
-
.then((response: undefined) => {
-
resolve(response);
-
})
-
.catch((error: any) => {
-
reject(error);
-
});
-
});
-
}
-
-
public post<T>(
-
url: string,
-
params?: T,
-
config?: HttpRequestConfig
-
): Promise<T> {
-
return this.request<T>("post", url, params, config);
-
}
-
-
public get<T>(
-
url: string,
-
params?: T,
-
config?: HttpRequestConfig
-
): Promise<T> {
-
return this.request<T>("get", url, params, config);
-
}
-
}
-
-
export default Http;
config.ts
-
import { AxiosRequestConfig } from "axios";
-
import { excludeProps } from "./utils";
-
/**
-
* 默认配置
-
*/
-
export const defaultConfig: AxiosRequestConfig = {
-
baseURL: "",
-
//10秒超时
-
timeout: 10000,
-
headers: {
-
Accept: "application/json, text/plain, */*",
-
"Content-Type": "application/json",
-
"X-Requested-With": "XMLHttpRequest"
-
}
-
};
-
-
export function genConfig(config?: AxiosRequestConfig): AxiosRequestConfig {
-
if (!config) {
-
return defaultConfig;
-
}
-
-
const { headers } = config;
-
if (headers && typeof headers === "object") {
-
defaultConfig.headers = {
-
...defaultConfig.headers,
-
...headers
-
};
-
}
-
return { ...excludeProps(config!, "headers"), ...defaultConfig };
-
}
-
-
export const METHODS = ["post", "get", "put", "delete", "option", "patch"];
utils.ts
-
import { HttpRequestConfig } from "./types.d";
-
-
export function excludeProps<T extends { [key: string]: any }>(
-
origin: T,
-
prop: string
-
): { [key: string]: T } {
-
return Object.keys(origin)
-
.filter(key => !prop.includes(key))
-
.reduce((res, key) => {
-
res[key] = origin[key];
-
return res;
-
}, {} as { [key: string]: T });
-
}
-
-
export function transformConfigByMethod(
-
params: any,
-
config: HttpRequestConfig
-
): HttpRequestConfig {
-
const { method } = config;
-
const props = ["delete", "get", "head", "options"].includes(
-
method!.toLocaleLowerCase()
-
)
-
? "params"
-
: "data";
-
return {
-
...config,
-
[props]: params
-
};
-
}
types.d.ts
-
import Axios, {
-
AxiosRequestConfig,
-
Canceler,
-
AxiosResponse,
-
Method,
-
AxiosError
-
} from "axios";
-
-
import { METHODS } from "./config";
-
-
export type cancelTokenType = { cancelKey: string; cancelExecutor: Canceler };
-
-
export type RequestMethods = Extract<
-
Method,
-
"get" | "post" | "put" | "delete" | "patch" | "option" | "head"
-
>;
-
-
export interface HttpRequestConfig extends AxiosRequestConfig {
-
// 请求发送之前
-
beforeRequestCallback?: (request: HttpRequestConfig) => void;
-
// 相应返回之前
-
beforeResponseCallback?: (response: HttpResoponse) => void;
-
}
-
-
export interface HttpResoponse extends AxiosResponse {
-
config: HttpRequestConfig;
-
}
-
-
export interface HttpError extends AxiosError {
-
isCancelRequest?: boolean;
-
}
-
-
export default class Http {
-
cancelTokenList: Array<cancelTokenType>;
-
clearCancelTokenList(): void;
-
request<T>(
-
method: RequestMethods,
-
url: string,
-
param?: AxiosRequestConfig,
-
axiosConfig?: HttpRequestConfig
-
): Promise<T>;
-
post<T>(
-
url: string,
-
params?: T,
-
config?: HttpRequestConfig
-
): Promise<T>;
-
get<T>(
-
url: string,
-
params?: T,
-
config?: HttpRequestConfig
-
): Promise<T>;
-
}
index.ts
-
import Http from "./core";
-
export const http = new Http();

六、统一api管理
在src下新增api文件夹,对项目中接口做统一管理,按照模块来划分。
例如,在 api 文件下新增 user.ts和types.ts ,分别用于存放登录,注册等模块的请求接口和数据类型。

-
// login.ts
-
import { http } from "@/http/index";
-
import { ILoginReq, ILoginRes } from "./types";
-
-
export const getLogin = async(req: ILoginParams): Promise<ILoginRes> => {
-
const res:any = await http.post('/login/info', req)
-
return res as ILoginRes
-
}
-
# 或者
-
export const getLogin1 = async(req: ILoginParams): Promise<ILoginRes> => {
-
const res:any = await http.request('post', '/login/info', req)
-
return res as ILoginRes
-
}
-
// types.ts
-
export interface ILoginReq {
-
userName: string;
-
password: string;
-
}
-
-
export interface ILoginRes {
-
access_token: string;
-
refresh_token: string;
-
scope: string
-
token_type: string
-
expires_in: string
-
}
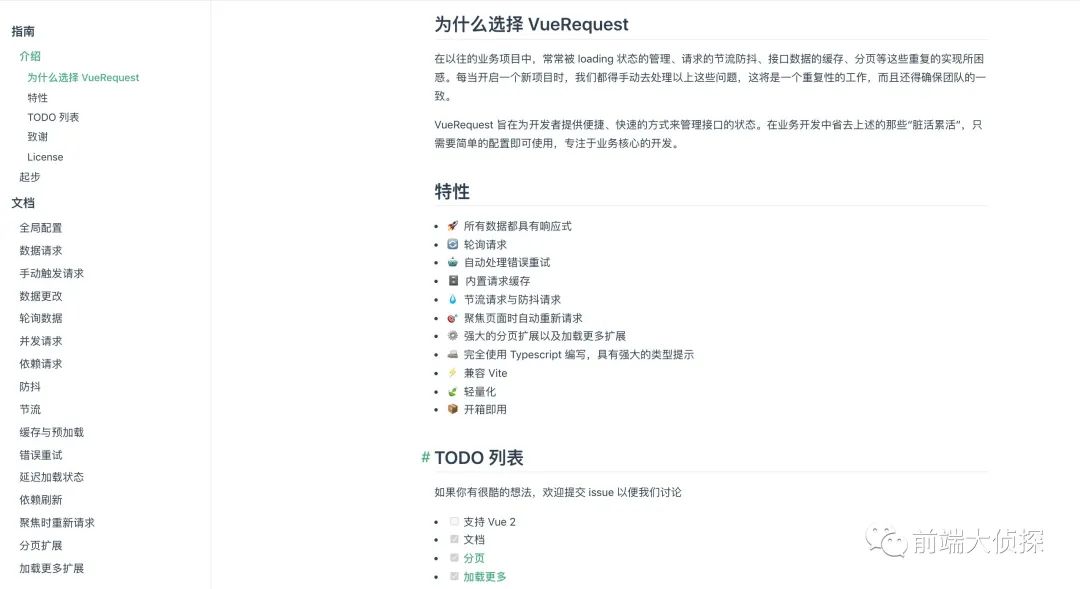
除了自己手动封装 axios ,这里还推荐一个十分非常强大牛皮的 vue3 的请求库: VueRequest,里面的功能非常的丰富(偷偷告诉你我也在使用中)。官网地址:https://www.attojs.com/



七、状态管理 Pinia
Pinia 是 Vue.js 的轻量级状态管理库,最近很受欢迎。它使用 Vue 3 中的新反应系统来构建一个直观且完全类型化的状态管理库。
由于 vuex 4 对 typescript 的支持很不友好,所以状态管理弃用了 vuex 而采取了 pinia, pinia 的作者是 Vue 核心团队成员,并且pinia已经正式加入了Vue,成为了Vue中的一员。尤大佬 pinia 可能会代替 vuex,所以请放心使用(公司项目也在使用中)。
Pinia官网地址(https://pinia.vuejs.org)

Pinia的一些优点:
(1)Pinia 的 API 设计非常接近 Vuex 5 的提案。
(2)无需像 Vuex 4 自定义复杂的类型来支持 typescript,天生具备完美的类型推断。
(3)模块化设计,你引入的每一个 store 在打包时都可以自动拆分他们。
(4)无嵌套结构,但你可以在任意的 store 之间交叉组合使用。
(5)Pinia 与 Vue devtools 挂钩,不会影响 Vue 3 开发体验。


Pinia的成功可以归功于其管理存储数据的独特功能(可扩展性、存储模块组织、状态变化分组、多存储创建等)。
另一方面,Vuex也是为Vue框架建立的一个流行的状态管理库,它也是Vue核心团队推荐的状态管理库。Vuex高度关注应用程序的可扩展性、开发人员的工效和信心。它基于与Redux相同的流量架构。
Pinia和Vuex都非常快,在某些情况下,使用Pinia的web应用程序会比使用Vuex更快。这种性能的提升可以归因于Pinia的极轻的体积,Pinia体积约1KB。

1.安装

-
# 安装
-
yarn add pinia@next
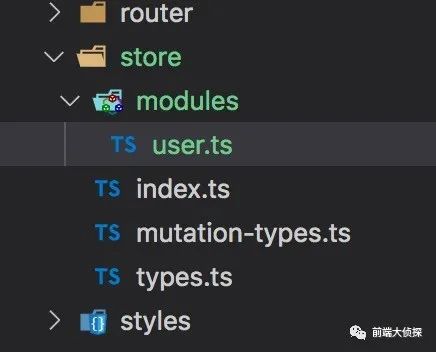
2.在src下新建store文件夹,在store文件夹下新建index.ts,mutation-types(变量集中管理),types.ts(类型)和modules文件夹(分模块管理状态)

-
// index.ts
-
import type { App } from "vue";
-
import { createPinia } from "pinia";
-
-
const store = createPinia();
-
export function setupStore(app: App<Element>) {
-
app.use(store)
-
}
-
-
export { store }
-
// modules/user.ts
-
import { defineStore } from 'pinia';
-
import { store } from '@/store';
-
import { ACCESS_TOKEN } from '@/store/mutation-types';
-
import { IUserState } from '@/store/types'
-
-
export const useUserStore = defineStore({
-
// 此处的id很重要
-
id: 'app-user',
-
state: (): IUserState => ({
-
token: localStorge.getItem(ACCESS_TOKEN)
-
}),
-
getters: {
-
getToken(): string {
-
return this.token;
-
}
-
},
-
actions: {
-
setToken(token: string) {
-
this.token = token;
-
},
-
// 登录
-
async login(userInfo) {
-
try {
-
const response = await login(userInfo);
-
const { result, code } = response;
-
if (code === ResultEnum.SUCCESS) {
-
localStorage.setItem(ACCESS_TOKEN, result.token);
-
this.setToken(result.token);
-
}
-
return Promise.resolve(response);
-
} catch (e) {
-
return Promise.reject(e);
-
}
-
},
-
}
-
})
-
-
// Need to be used outside the setup
-
export function useUserStoreHook() {
-
return useUserStore(store);
-
}
-
/// mutation-types.ts
-
// 对变量做统一管理
-
export const ACCESS_TOKEN = 'ACCESS-TOKEN'; // 用户token
3.修改main.ts

-
import { createApp } from 'vue'
-
import App from './App.vue'
-
import { setupStore } from '@/store'
-
import router from './router/index'
-
-
const app = createApp(App)
-
// 挂载状态管理
-
setupStore(app);
-
-
app.use(router)
-
-
app.mount('#app')
4.在组件中使用

-
<template>
-
<div>{{userStore.token}}</div>
-
</template>
-
-
<script lang="ts">
-
import { defineComponent } from 'vue'
-
import { useUserStoreHook } from "@/store/modules/user"
-
-
export default defineComponent({
-
setup() {
-
const userStore = useUserStoreHook()
-
-
return {
-
userStore
-
}
-
},
-
})
-
</script>
5.getters的用法介绍

-
// modules/user.ts
-
import { defineStore } from 'pinia';
-
import { store } from '@/store';
-
import { ACCESS_TOKEN } from '@/store/mutation-types';
-
import { IUserState } from '@/store/types'
-
-
export const useUserStore = defineStore({
-
// 此处的id很重要
-
id: 'app-user',
-
state: (): IUserState => ({
-
token: localStorge.getItem(ACCESS_TOKEN),
-
name: ''
-
}),
-
getters: {
-
getToken(): string {
-
return this.token;
-
},
-
nameLength: (state) => state.name.length,
-
},
-
actions: {
-
setToken(token: string) {
-
this.token = token;
-
},
-
// 登录
-
async login(userInfo) {
-
// 调用接口,做逻辑处理
-
}
-
}
-
})
-
-
// Need to be used outside the setup
-
export function useUserStoreHook() {
-
return useUserStore(store);
-
}
-
<template>
-
<div>
-
<span>{{userStore.name}}</span>
-
<span>{{userStore.nameLength}}</span>
-
<buttton @click="changeName"></button>
-
</div>
-
</template>
-
-
<script lang="ts">
-
import { defineComponent } from 'vue'
-
import { useUserStoreHook } from "@/store/modules/user"
-
-
export default defineComponent({
-
setup() {
-
const userStore = useUserStoreHook()
-
-
const changeName = ()=>{
-
// $patch 修改 store 中的数据
-
userStore.$patch({
-
name: '名称被修改了,nameLength也改变了'
-
})
-
}
-
-
return {
-
userStore,
-
updateName
-
}
-
},
-
})
-
</script>
6.actions


这里与 Vuex 有极大的不同,Pinia 仅提供了一种方法来定义如何更改状态的规则,放弃 mutations 只依靠 Actions,这是一项重大的改变。
Pinia 让 Actions 更加的灵活
-
可以通过组件或其他 action 调用
-
可以从其他 store 的 action 中调用
-
直接在商店实例上调用
-
支持同步或异步
-
有任意数量的参数
-
可以包含有关如何更改状态的逻辑(也就是 vuex 的 mutations 的作用)
-
可以
$patch方法直接更改状态属性更多详细的用法请参考Pinia中的actions官方网站:
actions的用法(https://pinia.vuejs.org/core-concepts/actions.html)

八、环境变量配置
vite 提供了两种模式:具有开发服务器的开发模式(development)和生产模式(production)。在项目的根目录中我们新建开发配置文件.env.development和生产配置文件.env.production。

-
# 网站根目录
-
VITE_APP_BASE_URL= ''
组件中使用:

console.log(import.meta.env.VITE_APP_BASE_URL)配置 package.json,打包区分开发环境和生产环境

-
"build:dev": "vue-tsc --noEmit && vite build --mode development",
-
"build:pro": "vue-tsc --noEmit && vite build --mode production",
九、使用组件库
根据自己的项目需要选择合适的组件库即可,这里推荐两个优秀的组件库Element-plus和Naive UI。下面简单介绍它们的使用方法。

1.使用element-plus(https://element-plus.gitee.io/zh-CN/)

yarn add element-plus推荐按需引入的方式:
按需引入需要安装unplugin-vue-components和unplugin-auto-import两个插件。

yarn add -D unplugin-vue-components unplugin-auto-import再将vite.config.ts写入一下配置,即可在项目中使用element plus组件,无需再引入。

-
// vite.config.ts
-
import AutoImport from 'unplugin-auto-import/vite'
-
import Components from 'unplugin-vue-components/vite'
-
import { ElementPlusResolver } from 'unplugin-vue-components/resolvers'
-
-
export default {
-
plugins: [
-
// ...
-
AutoImport({
-
resolvers: [ElementPlusResolver()],
-
}),
-
Components({
-
resolvers: [ElementPlusResolver()],
-
}),
-
],
-
}
2.Naive UI(https://www.naiveui.com/zh-CN/os-theme)

-
# 安装naive-ui
-
npm i -D naive-ui
-
-
# 安装字体
-
npm i -D vfonts
按需全局安装组件

-
import { createApp } from 'vue'
-
import {
-
// create naive ui
-
create,
-
// component
-
NButton
-
} from 'naive-ui'
-
-
const naive = create({
-
components: [NButton]
-
})
-
-
const app = createApp()
-
app.use(naive)
安装后,你可以这样在 SFC 中使用你安装的组件。

-
<template>
-
<n-button>naive-ui</n-button>
-
</template>

十、Vite 常用基础配置
1.基础配置

运行代理和打包配置

-
server: {
-
host: '0.0.0.0',
-
port: 3000,
-
open: true,
-
https: false,
-
proxy: {}
-
},
生产环境去除 console debugger

-
build:{
-
...
-
terserOptions: {
-
compress: {
-
drop_console: true,
-
drop_debugger: true
-
}
-
}
-
}
生产环境生成 .gz 文件,开启 gzip 可以极大的压缩静态资源,对页面加载的速度起到了显著的作用。使用 vite-plugin-compression 可以 gzip 或 brotli 的方式来压缩资源,这一步需要服务器端的配合,vite 只能帮你打包出 .gz 文件。此插件使用简单,你甚至无需配置参数,引入即可。

-
# 安装
-
yarn add --dev vite-plugin-compression
-
// vite.config.ts中添加
-
import viteCompression from 'vite-plugin-compression'
-
-
// gzip压缩 生产环境生成 .gz 文件
-
viteCompression({
-
verbose: true,
-
disable: false,
-
threshold: 10240,
-
algorithm: 'gzip',
-
ext: '.gz',
-
}),
最终 vite.config.ts文件配置如下(自己根据项目需求配置即可)

-
import { defineConfig } from 'vite'
-
import vue from '@vitejs/plugin-vue'
-
import path from 'path'
-
//@ts-ignore
-
import viteCompression from 'vite-plugin-compression'
-
-
// https://vitejs.dev/config/
-
export default defineConfig({
-
base: './', //打包路径
-
plugins: [
-
vue(),
-
// gzip压缩 生产环境生成 .gz 文件
-
viteCompression({
-
verbose: true,
-
disable: false,
-
threshold: 10240,
-
algorithm: 'gzip',
-
ext: '.gz',
-
}),
-
],
-
// 配置别名
-
resolve: {
-
alias: {
-
'@': path.resolve(__dirname, 'src'),
-
},
-
},
-
css:{
-
preprocessorOptions:{
-
scss:{
-
additionalData:'@import "@/assets/style/mian.scss";'
-
}
-
}
-
},
-
//启动服务配置
-
server: {
-
host: '0.0.0.0',
-
port: 8000,
-
open: true,
-
https: false,
-
proxy: {}
-
},
-
// 生产环境打包配置
-
//去除 console debugger
-
build: {
-
terserOptions: {
-
compress: {
-
drop_console: true,
-
drop_debugger: true,
-
},
-
},
-
},
-
})

