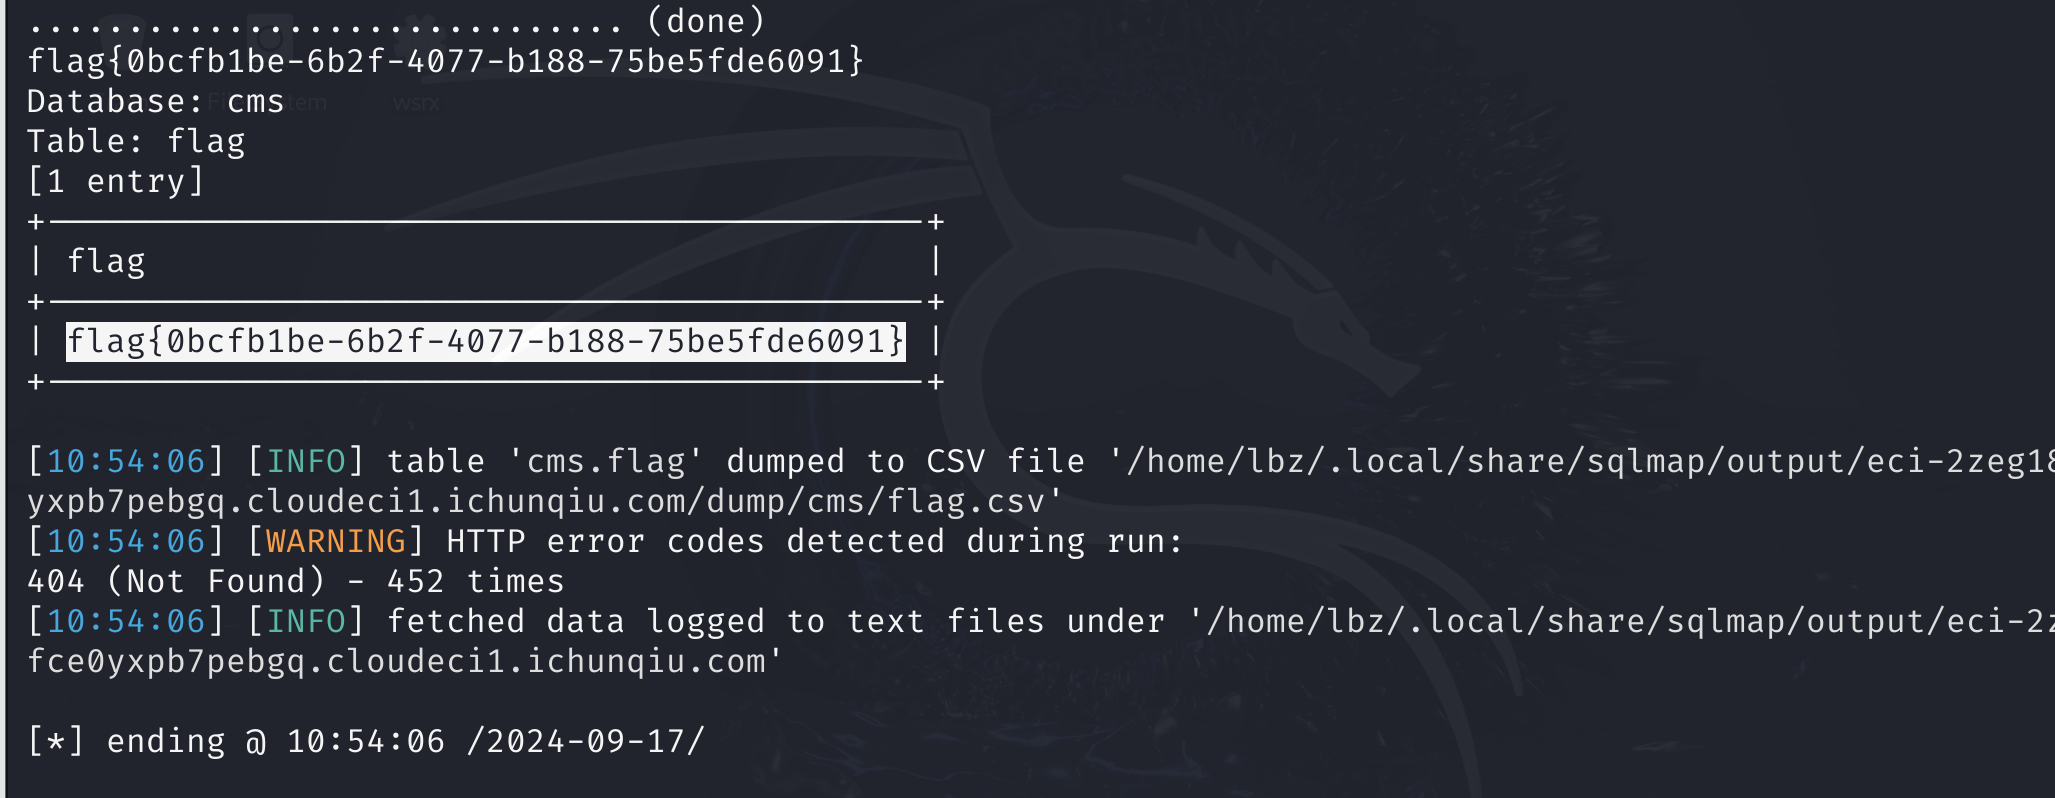
48730-32548, Cyber Security Week-6
Lab designed by Ashish Nanda, based on documents “SEED Labs” provided by Wenliang Du, Syracuse University1
Understanding TCP/IP based Attacks Continued
Lab Environment Setup
You need to follow the Lab-4 (Week 5) virtual environment setup to perform the remaining tasks relatedto TCP/IP based attacks.
Netwox/Netwag
We need tools to send out network packets of different types and with different contents. We can useNetwag to do that. However, the GUI interface of Netwag makes it difficult for us to automate our process.Therefore, we strongly suggest that you use its command-line version, the Netwox command, which isthe underlying command invoked by Netwag.Netwox consists of a suite of tools, each having a specific number. You can run the command as followingthe parameters depend on which tool you are using). For some of the tools, you have to run it with theroot privilege:
➢ netwox <number> [parameters ...] If you are not sure how to set the parameters, you can look at the manual by issuing "netwox <number> --
help". You can also learn the parameter settings by running Netwag for each command you execute from thegraphic interface, Netwag actually invokes a corresponding Netwox command, and it displays the parametersettings. Therefore, you can simply copy and paste the displayed command.
Wireshark Tool.
You also need a good network-traffic sniffer tool for this lab. Although Netwox comes with a sniffer, youwill find that another tool called Wireshark is a much better sniffer tool.Both Netwox and Wireshark can be downloaded. If you are using our pre-built virtual machine, both toolsare already installed. To sniff all the network traffic, both tools need to be run with root privilege.
Lab Tasks
In this lab, you need to conduct attacks on the TCP/IP protocols. You can use the Netwag, Wireshark,Tshark tools in the attacks. All the attacks are performed on Linux operating systems. However, you canalso conduct the same attack on the other operating system and compare the observations after labclasses. You are supposed to use all the above three different tolls for the experiments.To simplify the “guess” of TCP sequence numbers and source port numbers, we assume that attacks areon the same physical network as the victims (Think of where such attacks may happen?). Therefore, youcan use sniffer tools to get that information. The following is the list of attacks that need to beimplemented and 代 写48730-32548, Cyber Security studied in this lab. 48730-32548, Cyber Security Week-6 Lab designed by Ashish Nanda, based on documents “SEED Labs” provided by Wenliang Du, Syracuse Universit2Before starting the task, disconnect the internet from the Server VM. 48730-32548, Cyber Security Week-6 Lab designed by Ashish Nanda, based on documents “SEED Labs” provided by Wenliang Du, Syracuse University3
Task 4: TCP RST Attacks on Telnet and SSH Connections
The TCP RST Attack can terminate an established TCP connection between two victims. For example, ifthere is an established telnet connection (TCP) between two users A and B, attackers can spoof a RSTpacket from A to B, breaking this existing connection. To succeed in this attack, attackers need to correctlyconstruct the TCP RST packet.In this task, you need to launch a TCP RST attack to break an existing telnet connection between A and B.After that, try the same attack on an SSH connection.In this task, we use Netwag Tool 78 to conduct the attack, and wireshark tool to capture the packets.
Steps:
- Open Wireshark on Client VM by entering “sudo wireshark” in the terminal.
- Establish a telnet connection with Client from the Server. Enter “telnet <IP address>”and fill the username and password of the Client to establish a telnet connection.
(Screenshot required)
- Go to Attacker VM, run Netwag using the terminal. (sudo netwag)
- Select Tool 78: Reset every TCP packet.
- Select the interface and the “spoofip: IP spoof initialization type”. (Screenshot
required)
- Click “Run It”.
- Go to Server, generate some data by typing something in terminal where a telnetconnection with Client is established. (Screenshot Required)For performing the same attack on SSH connection, establish an SSH connection with Clientfrom the Server by entering “ssh username@IPaddress” instead of a telnet connection. Similarscreenshots are required for TCP RST attack on SSH connection.
Task 5: ICMP Blind Connection-Reset and Source-Quench Attacks
(i) ICMP Blind Connection-Reset
ICMP messages can also be used achieve the connection-resetting attack. To do this, attackers send anICMP error message that indicates a “hard error” to either of the two endpoints of a TCP connection. Theconnection can be immediately torn down as RFC 1122 states that a host should abort the correspondingconnection when receiving such an ICMP error message. RFC 1122 defines “hard errors” as ICMP errormessages of type 3 (Destination Unreachable) with code 2 (protocol unreachable), 3 (port unreachable),or 4 (fragmentation needed and DF bit set).Use the Netwag Tool 82 to conduct the attack, and then use wireshark tool to capture the packets. 48730-32548, Cyber Security Week-6 Lab designed by Ashish Nanda, based on documents “SEED Labs” provided by Wenliang Du, Syracuse University4
Steps:
- Open Wireshark on Client VM by entering “sudo wireshark” in the terminal. Set icmp as
filter.
- Ping Server from the Client.
- Check the Wireshark capture. (Screenshot Required)
- Go to Attacker VM, run Netwag using the terminal.
- Select Tool 82: Sniff and send ICMP4/ICMP6 destination unreachable.
- Select the interface and “spoofip: IP spoof initialization type”, input the ICMP code (2)
and source IP address. (Screenshot Required)
- Click “Run It”.
- Check the Wireshark capture. (Screenshot required)
(ii) Source-Quench Attacks
The ICMP source quench message is used by the congested routers to tell the TCP senders to slow down.Attackers can forge such messages to conduct the denial of services attacks on TCP senders.In this task, you need to launch the ICMP blind connect-reset attacks and the ICMP source quench attacks.You need to be noted that some systems may reasonably ignore this type of ICMP errors in certain TCPstate.
Use the Netwag Tool 85 to conduct the attack, and then use wireshark tool to capture the packets.Steps:
- Open Wireshark on Client VM by entering “sudo wireshark” in the terminal. Set icmp asfilter.
- Ping Server from the Client.
- Check the Wireshark capture. (Screenshot Required)
- Go to Attacker VM, run Netwag using the terminal.
- Select Tool 85: Sniff and send ICMP4 source quench.
- Select the interface and “spoofip: IP spoof initialization type”, and input the source IP
address. (Screenshot Required)
- Click “Run It”.
- Check the Wireshark capture. (Screenshot required)
Task 6: TCP Session Hijacking
The objective of the TCP Session Hijacking attack is to hijack an existing TCP connection (session) betweentwo victims by injecting malicious contents into this session. If this connection is a telnet session, attackers
can inject malicious commands into this session, causing the victims to execute the malicious commands.You can use telnet in this task. You can also assume that the attackers and the victims are on the sameLAN. Following figure illustrates the attack. 48730-32548, Cyber Security Week-6
Lab designed by Ashish Nanda, based on documents “SEED Labs” provided by Wenliang Du, Syracuse University5Note: If you use Wireshark to observe the network traffic, you should be aware that when Wireshark displaysthe TCP sequence number, by default, it displays the relative sequence number, which equals to the actual
sequence number minus the initial sequence number. If you want to see the actual sequence number in apacket, you need to right click the TCP section of the Wireshark output, and select "Protocol Preference". Inthe popup window, uncheck the "Relative Sequence Number and Window Scaling" option.
Use the Netwag Tool 36 to conduct the attack, and then use wireshark tool to capture the packets.
Steps:
- Open Wireshark on Client VM by entering “sudo wireshark” in the terminal. Set telnet asfilter.
- Establish a telnet connection with Client from the Server. Enter “telnet <IP address>”and fill the username and password of the Client to establish a telnet connection.(Screenshot required)
- Generate some data by typing something in terminal where a telnet connection withClient is established.
- Go to Wireshark on Client, look for last telnet packet sent from Server to the Client.(Screenshot required)
- Ensure that “Relative sequence numbers” is disabled. (Check the Protocol Preferences)
- Look into the details of TCP and telnet for last telnet packet sent from Server to theClient. (Screenshot Required)
- Convert ‘mkdir hello’ + return key to hexadecimal.https://www.browserling.com/tools/text-to-hex)
- Go to Attacker VM, run Netwag using the terminal.
- Select Tool 36: Spoof EthernetIp4Tcp packet. 48730-32548, Cyber Security Week-6Lab designed by Ashish Nanda, based on documents “SEED Labs” provided by Wenliang Du, Syracuse University6
- Provide the following information:
Device
Select Eth0
Ethernet Src
From the wireshark output
Ethernet Dst
From the wireshark output
IP4 ttl
64
IP4 Src
10.0.2.6
IP4 Dst
10.0.2.8
TCP Src
From the wireshark output
TCP Dst
From the wireshark output
TCP Seqnum
From the wireshark output
TCP Acknum
From the wireshark output: TCP Acknum
+ size of the data ‘/177’
TCP urg
Tick
TCP ack
Tick
TCP psh
Tick
TCP window
From the wireshark output
mixed data
Hex for ‘mkdir hello’ + return key : 6d 6b
64 69 72 20 68 65 6c 6c 6f 0a
(Screenshot required)
- Click “Run It”.
- Go back to Wireshark on Client, look for the last telnet packet sent from Server to Clientbefore TCP Retransmission. (Screenshot Required)
- Look into the details of Telnet for that packet. (Screenshot Required)
- Check the home directory of Client.