1. 说明
- LNMP经典网站环境, Linux系统,Nginx网站服务,MySQL数据库(Mariadb),PHP(运行环境)
- Wordpress PHP代码.
2. 建议的搭建顺序
- MySQL数据库(mariadb)
- PHP环境 php 7.x
- Nginx 直接安装即可
2.1. 部署数据库
查看代码
# 1.安装mariadb数据库
root@iZ2zei5cw2j6q770mgp5kvZ:~# apt install -y mariadb-server mariadb-clientroot@iZ2zei5cw2j6q770mgp5kvZ:~# $?
0: command not found
root@iZ2zei5cw2j6q770mgp5kvZ:~# # 2.启动数据库
root@iZ2zei5cw2j6q770mgp5kvZ:~# systemctl enable --now mariadb
Synchronizing state of mariadb.service with SysV service script with /lib/systemd/systemd-sysv-install.
Executing: /lib/systemd/systemd-sysv-install enable mariadb
root@iZ2zei5cw2j6q770mgp5kvZ:~# # 3.检查
root@iZ2zei5cw2j6q770mgp5kvZ:~# ss -lntup | grep 3306
tcp   LISTEN 0      80               127.0.0.1:3306      0.0.0.0:*    users:(("mariadbd",pid=26731,fd=17))
root@iZ2zei5cw2j6q770mgp5kvZ:~#
root@iZ2zei5cw2j6q770mgp5kvZ:~# ps -ef | grep mariadb
mysql      26731       1  0 09:37 ?        00:00:00 /usr/sbin/mariadbd
root       27117   26056  0 09:40 pts/2    00:00:00 grep --color=auto mariadb
root@iZ2zei5cw2j6q770mgp5kvZ:~#
root@iZ2zei5cw2j6q770mgp5kvZ:~# sytstemctl status mysqld
Command 'sytstemctl' not found, did you mean:command 'systemctl' from deb systemd (249.11-0ubuntu3.12)command 'systemctl' from deb systemctl (1.4.4181-1.1)
Try: apt install <deb name>
root@iZ2zei5cw2j6q770mgp5kvZ:~# apt install -y systemctl
Reading package lists... Done
Building dependency tree... Done
Reading state information... Done
Some packages could not be installed. This may mean that you have
requested an impossible situation or if you are using the unstable
distribution that some required packages have not yet been created
or been moved out of Incoming.
The following information may help to resolve the situation:The following packages have unmet dependencies:init : PreDepends: systemd-sysv but it is not going to be installed
E: Error, pkgProblemResolver::Resolve generated breaks, this may be caused by held packages.
root@iZ2zei5cw2j6q770mgp5kvZ:~#
root@iZ2zei5cw2j6q770mgp5kvZ:~# systemctl status mariadb
● mariadb.service - MariaDB 10.6.18 database serverLoaded: loaded (/lib/systemd/system/mariadb.service; enabled; vendor preset: enabled)Active: active (running) since Sat 2024-09-14 09:37:46 CST; 15min agoDocs: man:mariadbd(8)https://mariadb.com/kb/en/library/systemd/root@iZ2zei5cw2j6q770mgp5kvZ:~# systemctl status mysql
● mariadb.service - MariaDB 10.6.18 database serverLoaded: loaded (/lib/systemd/system/mariadb.service; enabled; vendor preset: enabled)Active: active (running) since Sat 2024-09-14 09:37:46 CST; 15min agoDocs: man:mariadbd(8)https://mariadb.com/kb/en/library/systemd/root@iZ2zei5cw2j6q770mgp5kvZ:~# systemctl status mysqld
● mariadb.service - MariaDB 10.6.18 database serverLoaded: loaded (/lib/systemd/system/mariadb.service; enabled; vendor preset: enabled)Active: active (running) since Sat 2024-09-14 09:37:46 CST; 16min agoDocs: man:mariadbd(8)https://mariadb.com/kb/en/library/systemd/
root@iZ2zei5cw2j6q770mgp5kvZ:~# # 4.数据库初始化(优化)
root@iZ2zei5cw2j6q770mgp5kvZ:~# mysql_secure_installationNOTE: RUNNING ALL PARTS OF THIS SCRIPT IS RECOMMENDED FOR ALL MariaDBSERVERS IN PRODUCTION USE!  PLEASE READ EACH STEP CAREFULLY!In order to log into MariaDB to secure it, we'll need the current
password for the root user. If you've just installed MariaDB, and
haven't set the root password yet, you should just press enter here.Enter current password for root (enter for none):   #回车
OK, successfully used password, moving on...Setting the root password or using the unix_socket ensures that nobody
can log into the MariaDB root user without the proper authorisation.You already have your root account protected, so you can safely answer 'n'.Switch to unix_socket authentication [Y/n] no   #no ... skipping.You already have your root account protected, so you can safely answer 'n'.Change the root password? [Y/n] y     #Y
New password:
Re-enter new password:
Password updated successfully!
Reloading privilege tables..... Success!By default, a MariaDB installation has an anonymous user, allowing anyone
to log into MariaDB without having to have a user account created for
them.  This is intended only for testing, and to make the installation
go a bit smoother.  You should remove them before moving into a
production environment.Remove anonymous users? [Y/n] y... Success!Normally, root should only be allowed to connect from 'localhost'.  This
ensures that someone cannot guess at the root password from the network.Disallow root login remotely? [Y/n] y... Success!By default, MariaDB comes with a database named 'test' that anyone can
access.  This is also intended only for testing, and should be removed
before moving into a production environment.Remove test database and access to it? [Y/n] y- Dropping test database...... Success!- Removing privileges on test database...... Success!Reloading the privilege tables will ensure that all changes made so far
will take effect immediately.Reload privilege tables now? [Y/n] y... Success!Cleaning up...All done!  If you've completed all of the above steps, your MariaDB
installation should now be secure.Thanks for using MariaDB!
root@iZ2zei5cw2j6q770mgp5kvZ:~# # 5.进入数据库,创建库,创建用户
root@iZ2zei5cw2j6q770mgp5kvZ:~# mysql  -uroot -p
Enter password:
Welcome to the MariaDB monitor.  Commands end with ; or \g.
Your MariaDB connection id is 39
Server version: 10.6.18-MariaDB-0ubuntu0.22.04.1 Ubuntu 22.04Copyright (c) 2000, 2018, Oracle, MariaDB Corporation Ab and others.Type 'help;' or '\h' for help. Type '\c' to clear the current input statement.MariaDB [(none)]> create database wordpress;
Query OK, 1 row affected (0.000 sec)MariaDB [(none)]> grant all  on  wordpress.* to 'wordpress'@'localhost'   identified by '123456';
Query OK, 0 rows affected (0.001 sec)MariaDB [(none)]> mysql  -uwordpress   -p123456;
ERROR 1064 (42000): You have an error in your SQL syntax; check the manual that corresponds to your MariaDB server version for the right syntax to use near 'mysql  -uwordpress   -p
123456' at line 1
MariaDB [(none)]> show databases;
+--------------------+
| Database           |
+--------------------+
| information_schema |
| mysql              |
| performance_schema |
| sys                |
| wordpress          |
+--------------------+
5 rows in set (0.000 sec)MariaDB [(none)]> exit;
Bye
root@iZ2zei5cw2j6q770mgp5kvZ:~#
其他操作
# 一些删除操作:
1. 删除数据库: drop database   wordpress;
2. 删除用户:     drop   user  'wordpress'@'localhost' ;  刷新权限  flush privileges;# 添加用户
grant all  on  wordpress.* to 'wordpress'@'localhost'   identified by '123456';说明# 设置权限
grant     all           on  wordpress.*           to 'wordpress'@'localhost'   identified by '123456';所有权限      对于wordpress库所有表       to    '用户'@白名单          密码是         123456
2.2. PHP环境部署
1.安装php
root@iZ2zei5cw2j6q770mgp5kvZ:~# apt install -y
php8.1-bcmath php8.1-bz2 php8.1-cgi php8.1-cli php8.1-common php8.1-curl \
php8.1-dba php8.1-dev php8.1-fpm php8.1-gd php8.1-http php8.1-igbinary \
php8.1-imagick php8.1-imap php8.1-intl php8.1-ldap php8.1-mbstring \
php8.1-memcache php8.1-memcached php8.1-mongodb php8.1-mysql \
php8.1-oauth php8.1-odbc php8.1-opcache php8.1-pcov php8.1-readline \
php8.1-redis php8.1-rrd php8.1-snmp php8.1-soap php8.1-solr php8.1-sqlite3 \
php8.1-ssh2 php8.1-sybase php8.1-tidy php8.1-uopz php8.1-uploadprogress php8.1-uuid \
php8.1-xdebug php8.1-xml php8.1-xmlrpc php8.1-xsl php8.1-yaml php8.1-zip php8.1root@iZ2zei5cw2j6q770mgp5kvZ:~# dpkg -l |grep php8.1|wc -l
47
root@iZ2zei5cw2j6q770mgp5kvZ:~#
2.修改配置文件,检查,启动服务
查看代码
 root@iZ2zei5cw2j6q770mgp5kvZ:~# dpkg -L php8.1-fpm/etc/php/8.1/fpm/php-fpm.conf    #php-fpm主配置文件
/etc/php/8.1/fpm/pool.d
/etc/php/8.1/fpm/pool.d/www.conf #子配置文件.root@iZ2zei5cw2j6q770mgp5kvZ:~# # 修改子配置文件(主要37行 listen = 127.0.0.1:9000)
root@iZ2zei5cw2j6q770mgp5kvZ:/etc/php/8.1/fpm/pool.d# vim www.conf
root@iZ2zei5cw2j6q770mgp5kvZ:/etc/php/8.1/fpm/pool.d#
root@iZ2zei5cw2j6q770mgp5kvZ:/etc/php/8.1/fpm/pool.d# egrep -n '^(user|group|listen)' /etc/php/8.1/fpm/pool.d/www.conf
23:user = www-data
24:group = www-data
37:listen = 127.0.0.1:9000
49:listen.owner = www-data
50:listen.group = www-data
root@iZ2zei5cw2j6q770mgp5kvZ:/etc/php/8.1/fpm/pool.d## 检查
root@iZ2zei5cw2j6q770mgp5kvZ:/etc/php/8.1/fpm/pool.d# php-fpm8.1 -t
[14-Sep-2024 12:42:10] NOTICE: PHP message: PHP Warning:  Cannot load module "http" because required module "raphf" is not loaded in Unknown on line 0
[14-Sep-2024 12:42:10] NOTICE: configuration file /etc/php/8.1/fpm/php-fpm.conf test is successfulroot@iZ2zei5cw2j6q770mgp5kvZ:/etc/php/8.1/fpm/pool.d#
root@iZ2zei5cw2j6q770mgp5kvZ:/etc/php/8.1/fpm/pool.d#  echo $?
0
root@iZ2zei5cw2j6q770mgp5kvZ:/etc/php/8.1/fpm/pool.d#
# 查看php服务名
root@iZ2zei5cw2j6q770mgp5kvZ:/etc/php/8.1/fpm/pool.d# dpkg -L php8.1-fpm  |grep service
/lib/systemd/system/php8.1-fpm.service# 开机自启
root@iZ2zei5cw2j6q770mgp5kvZ:/etc/php/8.1/fpm/pool.d# systemctl enable  --now php8.1-fpm
Synchronizing state of php8.1-fpm.service with SysV service script with /lib/systemd/systemd-sysv-install.
Executing: /lib/systemd/systemd-sysv-install enable php8.1-fpm
root@iZ2zei5cw2j6q770mgp5kvZ:/etc/php/8.1/fpm/pool.d#
root@iZ2zei5cw2j6q770mgp5kvZ:/etc/php/8.1/fpm/pool.d# echo $?
0
root@iZ2zei5cw2j6q770mgp5kvZ:/etc/php/8.1/fpm/pool.d#
root@iZ2zei5cw2j6q770mgp5kvZ:/etc/php/8.1/fpm/pool.d# systemctl  restart php8.1-fpm
root@iZ2zei5cw2j6q770mgp5kvZ:/etc/php/8.1/fpm/pool.d# # 检查端口、进程
root@iZ2zei5cw2j6q770mgp5kvZ:/etc/php/8.1/fpm/pool.d# ss -lntup | grep 9000
tcp   LISTEN 0      511              127.0.0.1:9000      0.0.0.0:*    users:(("php-fpm8.1",pid=58589,fd=9),("php-fpm8.1",pid=58588,fd=9),("php-fpm8.1",pid=58587,fd=7))
root@iZ2zei5cw2j6q770mgp5kvZ:/etc/php/8.1/fpm/pool.d#
root@iZ2zei5cw2j6q770mgp5kvZ:/etc/php/8.1/fpm/pool.d# ps -ef | grep php8.1-fpm
root       58597   27537  0 12:44 pts/3    00:00:00 grep --color=auto php8.1-fpm
root@iZ2zei5cw2j6q770mgp5kvZ:/etc/php/8.1/fpm/pool.d#
root@iZ2zei5cw2j6q770mgp5kvZ:/etc/php/8.1/fpm/pool.d# systemctl  status php8.1-fpm
● php8.1-fpm.service - The PHP 8.1 FastCGI Process ManagerLoaded: loaded (/lib/systemd/system/php8.1-fpm.service; enabled; vendor preset: enabled)Active: active (running) since Sat 2024-09-14 12:43:33 CST; 1min 29s agoDocs: man:php-fpm8.1(8)root@iZ2zei5cw2j6q770mgp5kvZ:/etc/php/8.1/fpm/pool.d#
root@iZ2zei5cw2j6q770mgp5kvZ:/etc/php/8.1/fpm/pool.d# ps -ef | grep php
root       58587       1  0 12:43 ?        00:00:00 php-fpm: master process (/etc/php/8.1/fpm/php-fpm.conf)
www-data   58588   58587  0 12:43 ?        00:00:00 php-fpm: pool www
www-data   58589   58587  0 12:43 ?        00:00:00 php-fpm: pool www
root       58604   27537  0 12:45 pts/3    00:00:00 grep --color=auto php
root@iZ2zei5cw2j6q770mgp5kvZ:/etc/php/8.1/fpm/pool.d#
2.3. nginx
2.3.1 环境检查
root@iZ2zei5cw2j6q770mgp5kvZ:/etc/php/8.1/fpm/pool.d# apt autoremove  apache2 apache2-bin
Reading package lists... Done
2.3.2 安装nginx
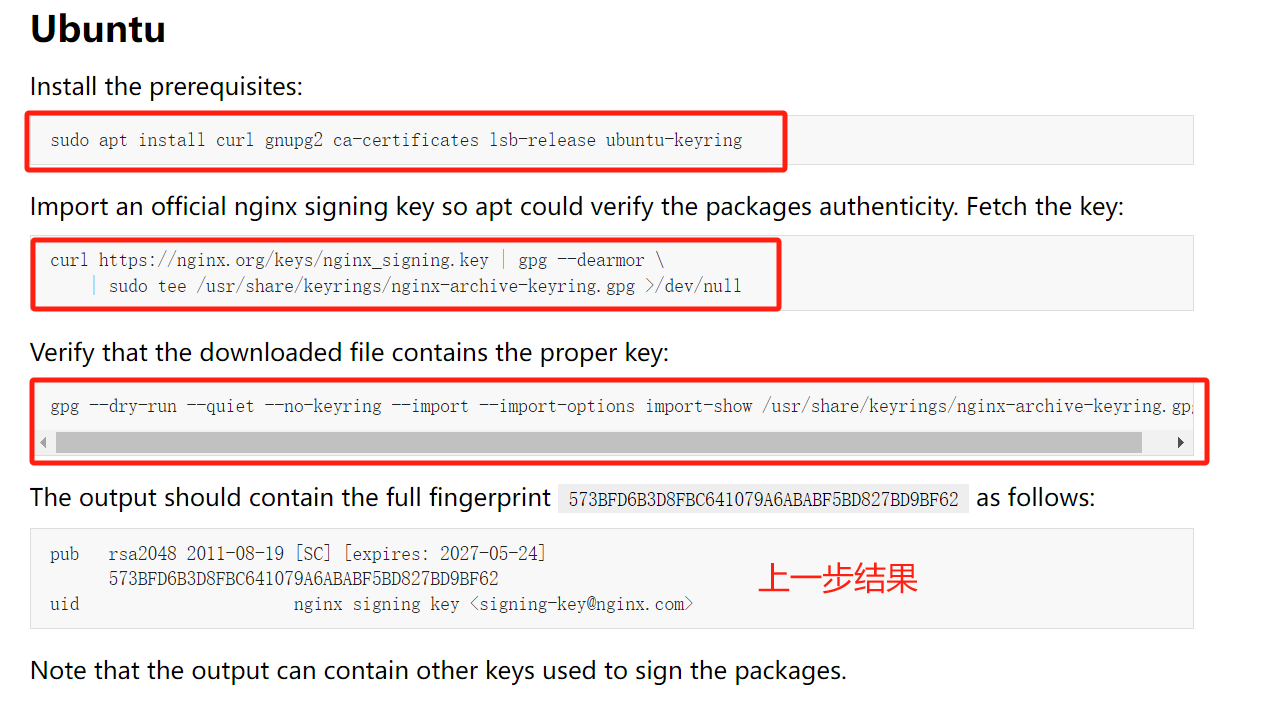
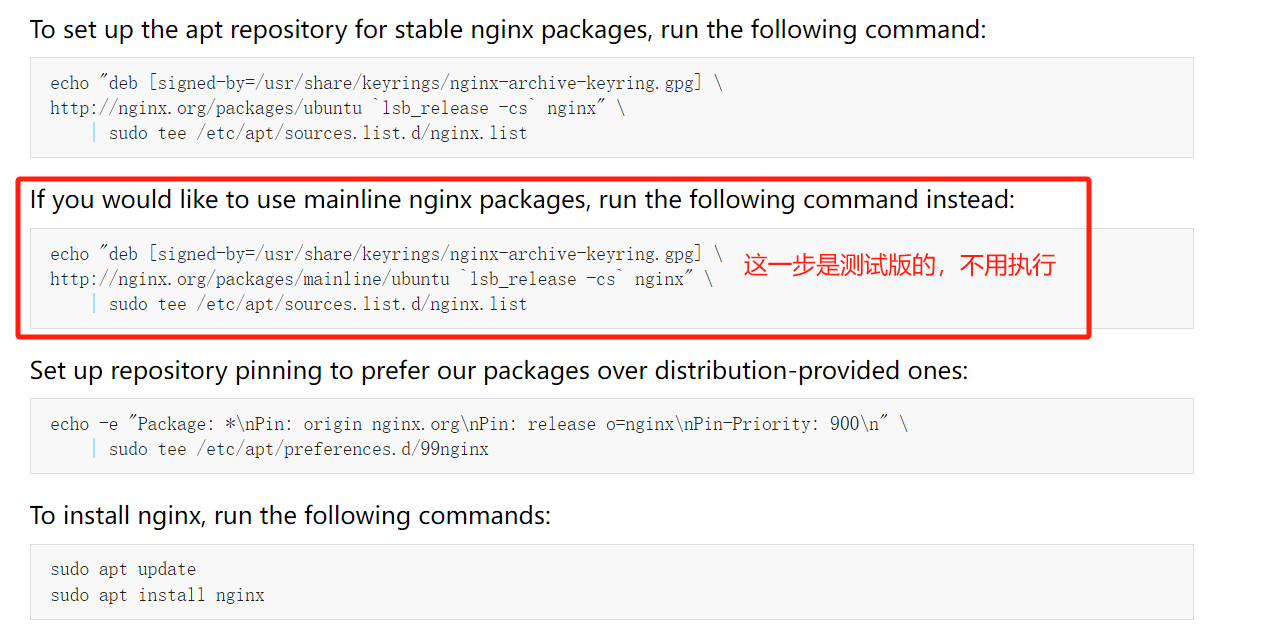
https://nginx.org/en/linux_packages.html#Ubuntu
查看代码
 root@iZ2zei5cw2j6q770mgp5kvZ:/etc/php/8.1/fpm/pool.d# apt install curl gnupg2 ca-certificates lsb-release ubuntu-keyringroot@iZ2zei5cw2j6q770mgp5kvZ:/etc/php/8.1/fpm/pool.d# curl https://nginx.org/keys/nginx_signing.key | gpg --dearmor | sudo tee /usr/share/keyrings/nginx-archive-keyring.gpg >/dev/null% Total    % Received % Xferd  Average Speed   Time    Time     Time  CurrentDload  Upload   Total   Spent    Left  Speed
100 11809  100 11809    0     0   7169      0  0:00:01  0:00:01 --:--:--  7174
root@iZ2zei5cw2j6q770mgp5kvZ:/etc/php/8.1/fpm/pool.d#
root@iZ2zei5cw2j6q770mgp5kvZ:/etc/php/8.1/fpm/pool.d#
root@iZ2zei5cw2j6q770mgp5kvZ:/etc/php/8.1/fpm/pool.d# gpg --dry-run --quiet --no-keyring --import --import-options import-show /usr/share/keyrings/nginx-archive-keyring.gpg
pub   rsa4096 2024-05-29 [SC]8540A6F18833A80E9C1653A42FD21310B49F6B46
uid                      nginx signing key <signing-key-2@nginx.com>pub   rsa2048 2011-08-19 [SC] [expires: 2027-05-24]573BFD6B3D8FBC641079A6ABABF5BD827BD9BF62
uid                      nginx signing key <signing-key@nginx.com>pub   rsa4096 2024-05-29 [SC]9E9BE90EACBCDE69FE9B204CBCDCD8A38D88A2B3
uid                      nginx signing key <signing-key-3@nginx.com>root@iZ2zei5cw2j6q770mgp5kvZ:~# echo "deb [signed-by=/usr/share/keyrings/nginx-archive-keyring.gpg] http://nginx.org/packages/ubuntu `lsb_release -cs` nginx" | sudo tee /etc/apt/sources.list.d/nginx.list
deb [signed-by=/usr/share/keyrings/nginx-archive-keyring.gpg] http://nginx.org/packages/ubuntu jammy nginx
root@iZ2zei5cw2j6q770mgp5kvZ:~#root@iZ2zei5cw2j6q770mgp5kvZ:/etc/php/8.1/fpm/pool.d# apt update
33 packages can be upgraded. Run 'apt list --upgradable' to see them.
root@iZ2zei5cw2j6q770mgp5kvZ:/etc/php/8.1/fpm/pool.d# root@iZ2zei5cw2j6q770mgp5kvZ:/etc/php/8.1/fpm/pool.d# apt install -y nginxroot@iZ2zei5cw2j6q770mgp5kvZ:/etc/php/8.1/fpm/pool.d# dpkg -l|grep nginx
ii  libnginx-mod-http-geoip2               1.18.0-6ubuntu14.4                           amd64        GeoIP2 HTTP module for Nginx
ii  libnginx-mod-http-image-filter         1.18.0-6ubuntu14.4                           amd64        HTTP image filter module for Nginx
ii  libnginx-mod-http-xslt-filter          1.18.0-6ubuntu14.4                           amd64        XSLT Transformation module for Nginx
ii  libnginx-mod-mail                      1.18.0-6ubuntu14.4                           amd64        Mail module for Nginx
ii  libnginx-mod-stream                    1.18.0-6ubuntu14.4                           amd64        Stream module for Nginx
ii  libnginx-mod-stream-geoip2             1.18.0-6ubuntu14.4                           amd64        GeoIP2 Stream module for Nginx
ii  nginx                                  1.18.0-6ubuntu14.4                           amd64        small, powerful, scalable web/proxy server
ii  nginx-common                           1.18.0-6ubuntu14.4                           all          small, powerful, scalable web/proxy server - common files
ii  nginx-core                             1.18.0-6ubuntu14.4                           amd64        nginx web/proxy server (standard version)
root@iZ2zei5cw2j6q770mgp5kvZ:/etc/php/8.1/fpm/pool.d#
2.3.3 修改nginx配置文件
查看代码
 /etc/nginx/nginx.conf  #主配置文件
/etc/nginx/conf.d
/etc/nginx/conf.d/default.conf  #子配置文件# 修改用户名(配置文件第一行,和php保持一致)
root@iZ2zei5cw2j6q770mgp5kvZ:/etc/nginx# vim /etc/nginx/nginx.conf
root@iZ2zei5cw2j6q770mgp5kvZ:/etc/nginx# grep ^user /etc/nginx/nginx.conf
user www-data;
root@iZ2zei5cw2j6q770mgp5kvZ:/etc/nginx#
root@iZ2zei5cw2j6q770mgp5kvZ:/etc/nginx/conf.d# pwd
/etc/nginx/conf.d# 备份子配置文件
root@iZ2zei5cw2j6q770mgp5kvZ:/etc/nginx/conf.d# cp /etc/nginx/conf.d/default.conf{,.bak}
root@iZ2zei5cw2j6q770mgp5kvZ:/etc/nginx/conf.d#
root@iZ2zei5cw2j6q770mgp5kvZ:/etc/nginx/conf.d# vim default.conf
# 输入如下内容:
server {listen       80;server_name  localhost;root /app/code/blog/;location / {index  index.php;}location ~ \.php$ {fastcgi_pass   127.0.0.1:9000;fastcgi_index  index.php;fastcgi_param  SCRIPT_FILENAME  $document_root$fastcgi_script_name;include        fastcgi_params;}
}
root@iZ2zei5cw2j6q770mgp5kvZ:/etc/nginx/conf.d#
# 检查语法
root@iZ2zei5cw2j6q770mgp5kvZ:/etc/nginx/conf.d# nginx -t
nginx: the configuration file /etc/nginx/nginx.conf syntax is ok
nginx: configuration file /etc/nginx/nginx.conf test is successful
root@iZ2zei5cw2j6q770mgp5kvZ:/etc/nginx/conf.d#
# 重新启动
root@iZ2zei5cw2j6q770mgp5kvZ:/etc/nginx/conf.d# systemctl enable  --now nginx
Synchronizing state of nginx.service with SysV service script with /lib/systemd/systemd-sysv-install.
Executing: /lib/systemd/systemd-sysv-install enable nginx
root@iZ2zei5cw2j6q770mgp5kvZ:/etc/nginx/conf.d#
2.4. 部署代码(业务)
# #1. 创建代码目录
root@iZ2zei5cw2j6q770mgp5kvZ:/etc/nginx/conf.d# mkdir -p /app/code/blog/
root@iZ2zei5cw2j6q770mgp5kvZ:/etc/nginx/conf.d##2.下载代码
root@iZ2zei5cw2j6q770mgp5kvZ:~# wget https://cn.wordpress.org/latest-zh_CN.zip
2024-09-14 13:07:11 (2.99 MB/s) - ‘latest-zh_CN.zip’ saved [27309922/27309922]root@iZ2zei5cw2j6q770mgp5kvZ:~#
root@iZ2zei5cw2j6q770mgp5kvZ:~# unzip -t latest-zh_CN.zip
Command 'unzip' not found, but can be installed with:
apt install unzip
root@iZ2zei5cw2j6q770mgp5kvZ:~# apt install unziproot@iZ2zei5cw2j6q770mgp5kvZ:~# unzip latest-zh_CN.ziproot@iZ2zei5cw2j6q770mgp5kvZ:~#  mv wordpress/* /app/code/blog/# /app/code/blog/赋予权限,不然无法上传文件
root@iZ2zei5cw2j6q770mgp5kvZ:~# chown  -R www-data.www-data  /app/code/blog/
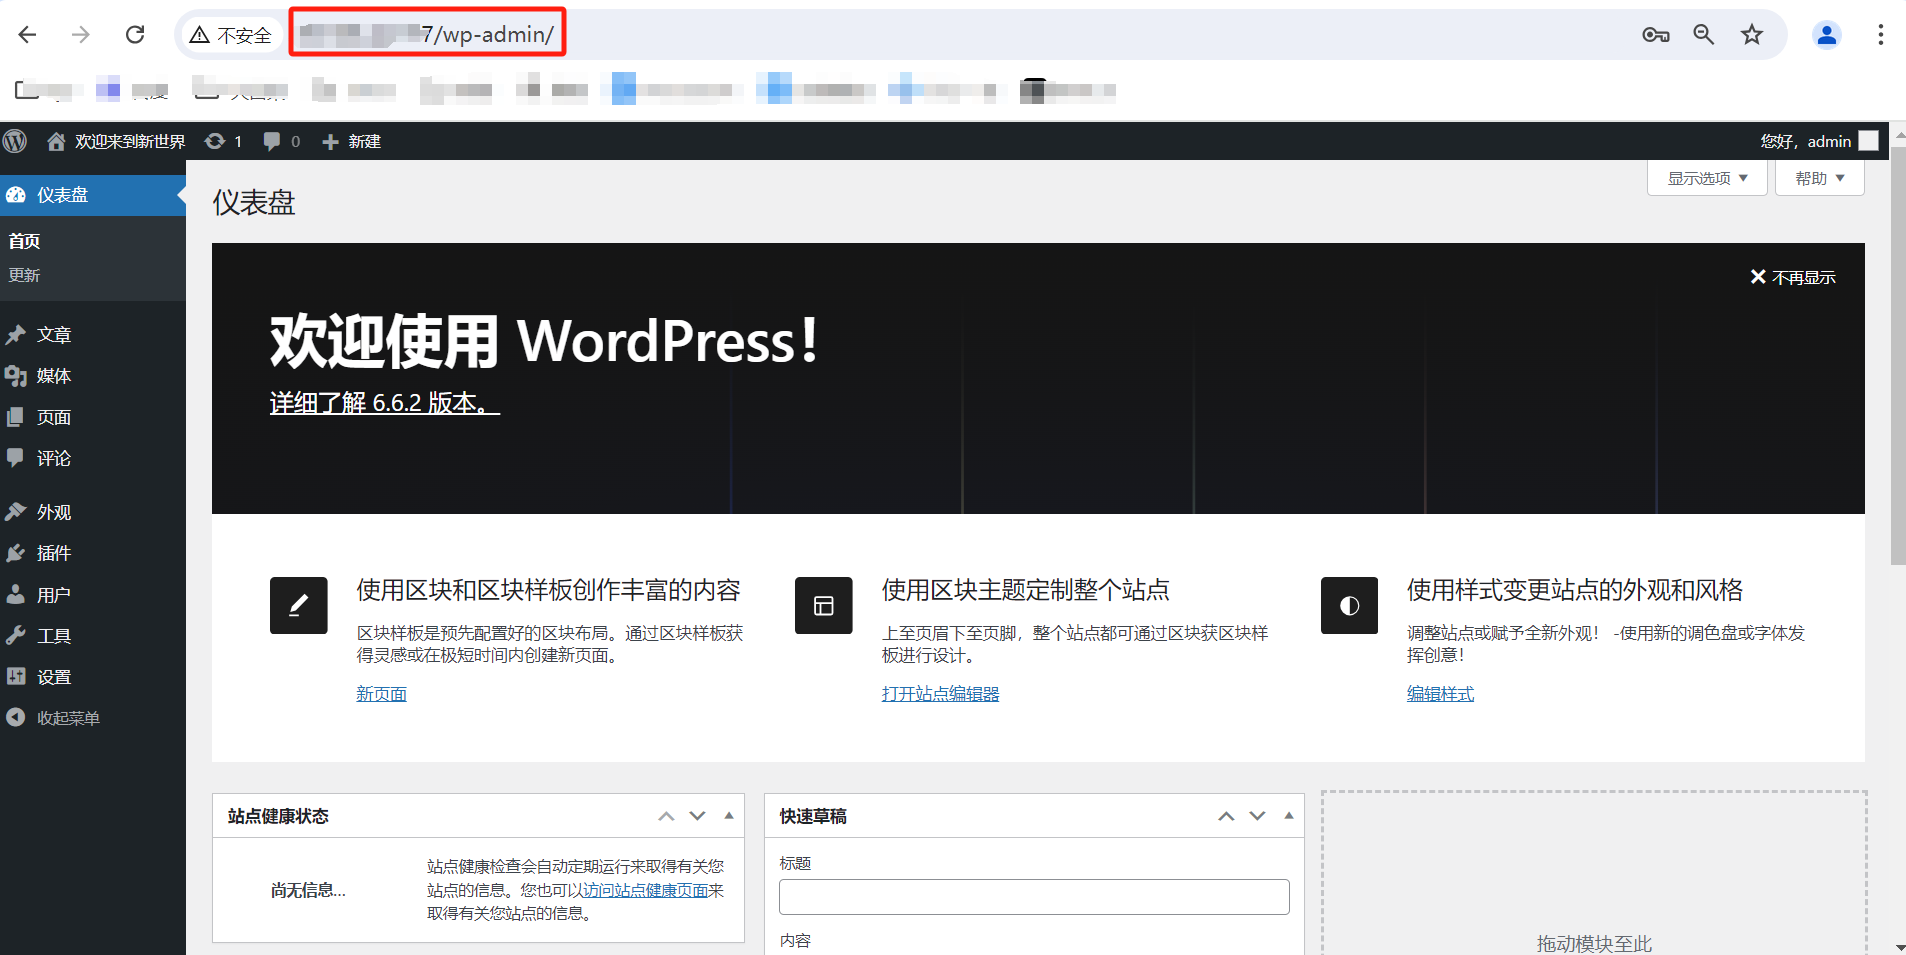
3. 浏览器访问网站(最后的配置)
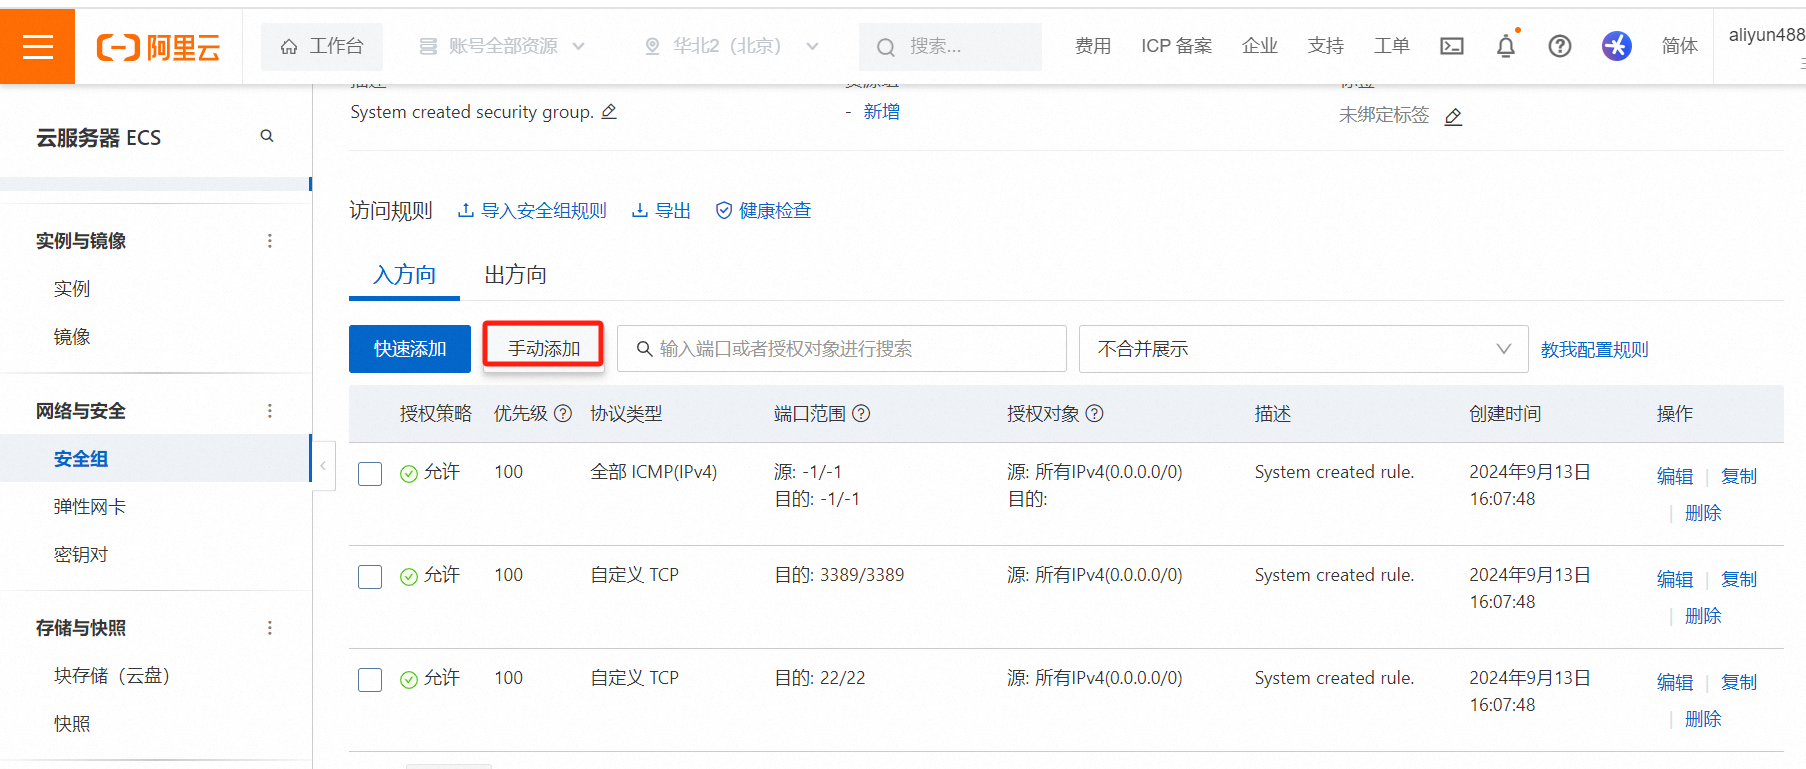
3.1 安全组添加一组规则,允许80端口进入


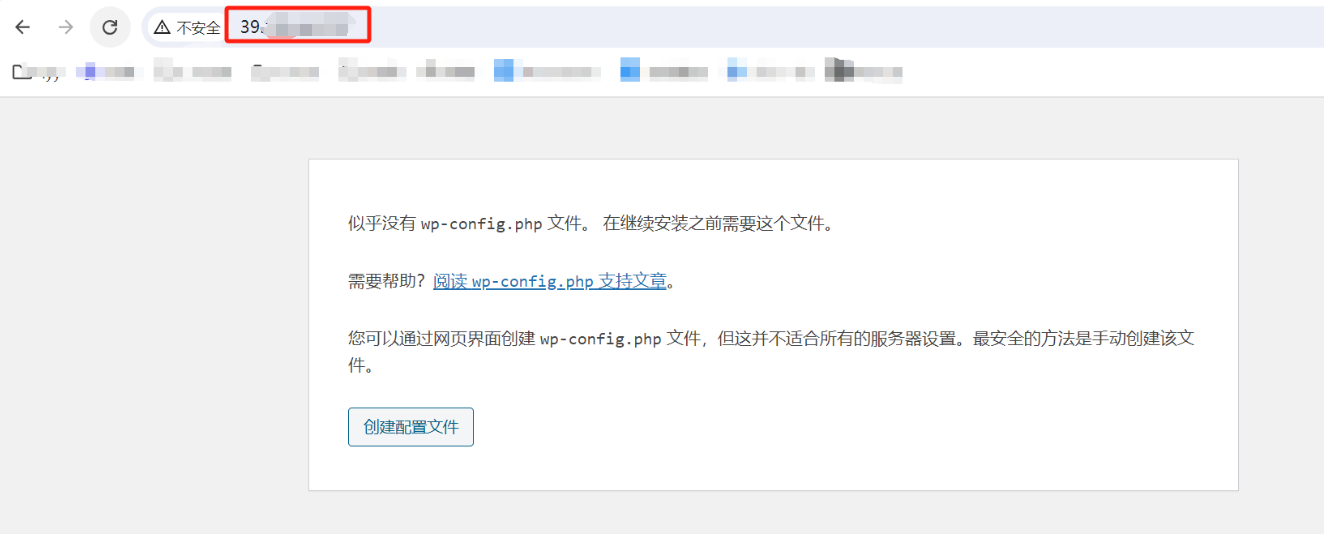
3.2 公网ip访问
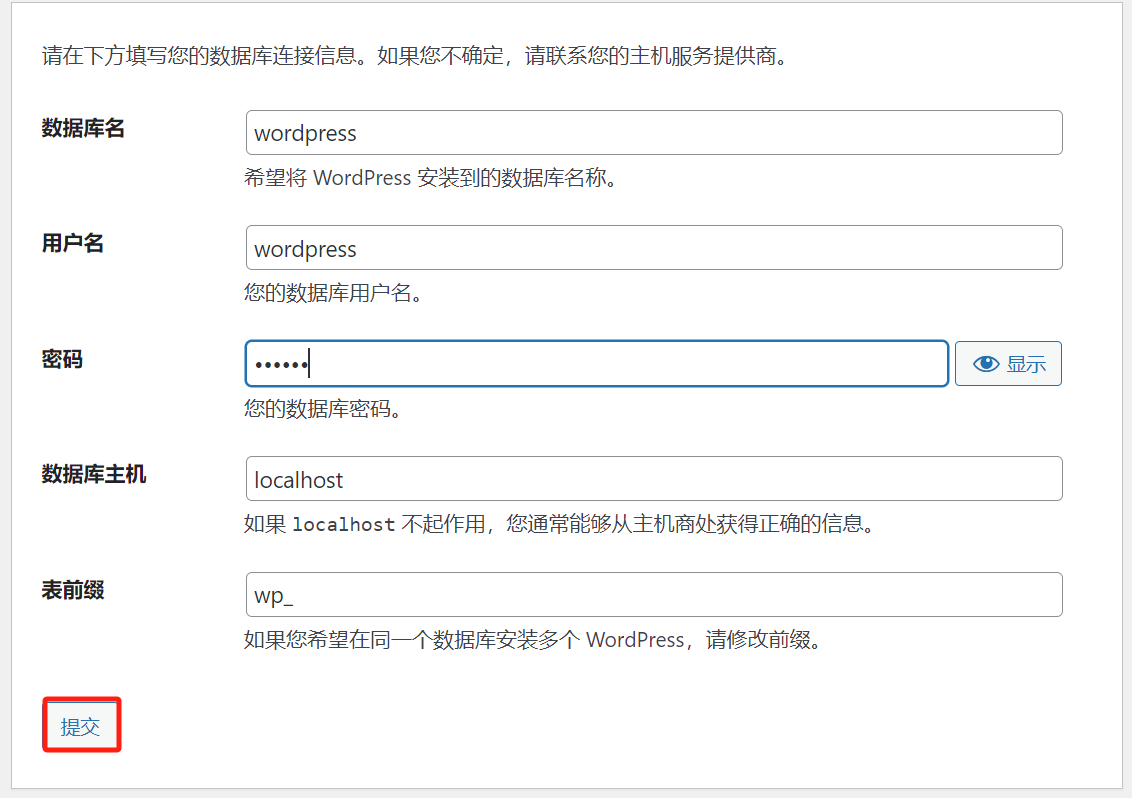

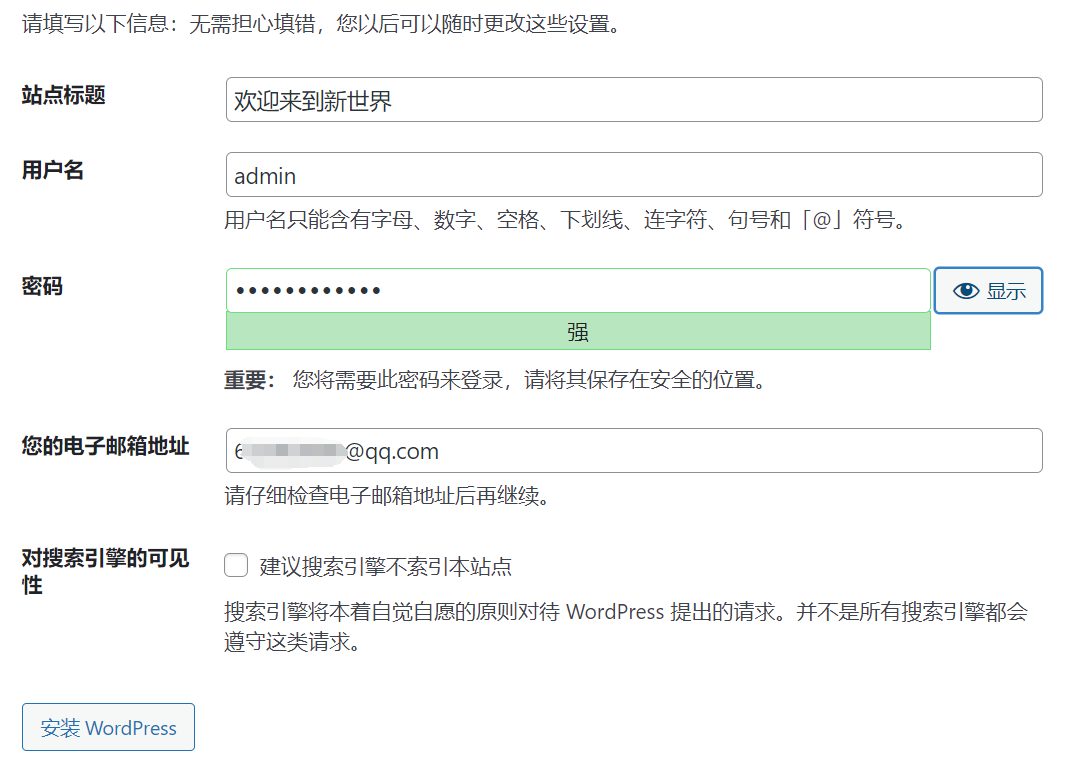
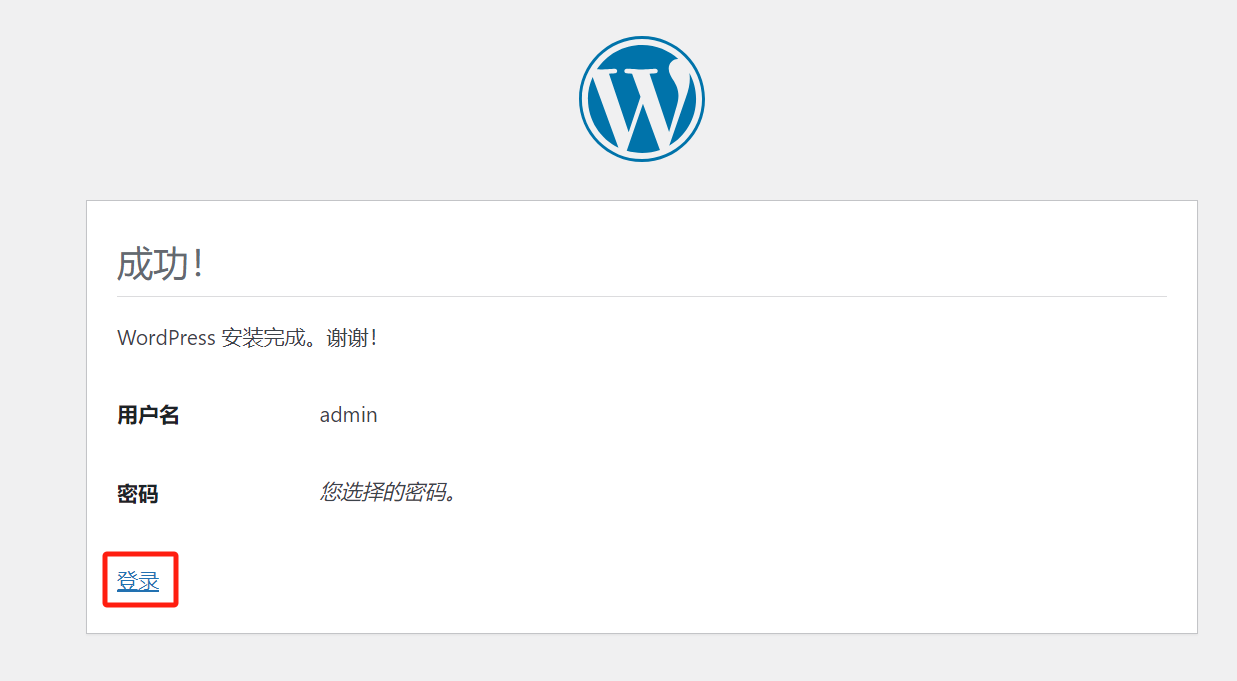

进入下入即配置成功
