原创 Zafkie1 SecLink安全空间
引言
DAC(Detection As Code),检测即代码是一种战略方法,可将安全检测机制无缝集成到软件开发生命周期中。通过将安全控制视为代码,组织可以在整个SIEM运维过程中自动部署、配置和维护安全措施。
或许很多人听说过DAC的概念,但是并没有一步步地实现过。本文结合实例引导您使用 Sigma 规则、GitLab CI/CD 和 Splunk 部署检测即代码管道。
不要害怕!如果您计划按照本文演示的内容构建检测即代码的管道,只需要对 Docker、GitLab、Git、Python、Sigma Rules 和 YAML 有基本了解。
相关概念
Sigma和Sigmac
title: Ingress/Egress Security Group Modification
id: 6fb77778-040f-4015-9440-572aa9b6b580
status: test
description: |Detects when an account makes changes to the ingress or egress rules of a security group.This can indicate that an attacker is attempting to open up new attack vectors in the account, that they are trying to exfiltrate data over the network, or that they are trying to allow machines in that VPC/Subnet to contact a C&C server.
references:- https://www.gorillastack.com/blog/real-time-events/important-aws-cloudtrail-security-events-tracking/
author: jamesc-grafana
date: 2024-07-11
tags:- attack.initial-access- attack.t1190
logsource:product: awsservice: cloudtrail
detection:selection:eventSource: 'ec2.amazonaws.com'eventName:- 'AuthorizeSecurityGroupEgress'- 'AuthorizeSecurityGroupIngress'- 'RevokeSecurityGroupEgress'- 'RevokeSecurityGroupIngress'condition: selection
falsepositives:- New VPCs and Subnets being setup requiring a different security profile to those already defined- A single port being opened for a new service that is known to be deploying- Administrators closing unused ports to reduce the attack surface
level: medium
Sigma 规则示例 (https://github.com/SigmaHQ/sigma/blob/master/rules/cloud/aws/aws_cloudtrail_disable_logging.yml)
Sigma是一个开源项目,它定义了用于开发检测内容的标准和与供应商无关的格式。这些规则以结构化 YAML 格式编写,方便人类和系统使用。对于我的“检测即代码”管道,我选择使用 Sigma 来创建检测内容,原因如下
可扩展性:一条 Sigma 规则可以部署到许多离散的 SIEM、EDR、NDR、XDR 以及任何的“DR”。
共享:Sigma规则可以轻松地与其他组织共享或从其他组织接收。
简单性:威胁检测分析师只需掌握一种创建检测内容的标准。
Sigma 项目包括sigmac,这是一个功能强大的 Python 命令行工具,可以使用“后端”转换 Sigma 规则,供 Splunk、Devo、ELK 和 CrowdStrike 等控件使用。几乎可以为任何接受检测逻辑的检测控件创建自定义后端。
在本文管道中,我们将使用 sigmac 将 Sigma 规则转换为 Splunk 友好的 SPL 对应项。
管道基础架构
为了构建管道,我们将配置以下三个 Docker 容器和一个名为“dacnet”的 Docker 网络,以提供版本控制、CI/CD、SIEM 基础设施以及它们之间的连接:
gitlab:GitLab 社区版容器。我将使用它作为 VCS 来检测内容并监督 CI/CD 管道。
gitlab-runner:用于运行 CI/CD 管道的 GitLab 运行器容器。这将用于使用额外的 docker 容器构建和部署检测内容。
splunk:Splunk 搜索头和索引器,在运行时安装了 Splunk BOTSv3 数据集。这将用作 SIEM。我将使用 BOTSv3 数据集来演示 Sigma 规则的创建和数据源配置。
搭建与配置
Docker
我制作了以下 docker-compose.yml 文件来帮助我使用 Docker Compose 动态构建基础设施:
version: '3'networks:dacnet: external: truename: dacnetservices:gitlab:networks:dacnet:aliases:- gitlabports:- '443:443'- '80:80'- '222:22'hostname: gitlab environment:GITLAB_OMNIBUS_CONFIG: |external_url 'http://gitlab'gitlab_rails['initial_root_password']='$DEFAULT_PASSWORD'container_name: gitlab-dacimage: 'gitlab/gitlab-ce:latest'gitlab-runner:networks:dacnet:aliases:- gitlab-runnerports:- '81:80'hostname: gitlab-runnercontainer_name: gitlab-runner-dacrestart: alwaysvolumes:- '/srv/gitlab-runner/config:/etc/gitlab-runner'- '/var/run/docker.sock:/var/run/docker.sock'image: 'gitlab/gitlab-runner:latest'splunk:networks: dacnet:aliases:- splunkports:- '8000:8000'- '8089:8089'hostname: splunkcontainer_name: splunk-dacenvironment:- SPLUNK_START_ARGS=--accept-license- SPLUNK_PASSWORD=$DEFAULT_PASSWORD- SPLUNK_APPS_URL=https://botsdataset.s3.amazonaws.com/botsv3/botsv3_data_set.tgzcontainer_name: splunk-dacimage: 'splunk/splunk:latest'
要使用docker-compose.yml 文件部署,首先在当前路径下创建.env文件
DEFAULT_PASSWORD=************ #设置gitlab和splunk初始密码
EXTERNAL_URL=http://192.168.1.1 #修改ip地址为宿主机内网ip
.env文件创建完成后,运行docker network create --driver bridge dacnet 创建dacnet 网络
运行docker compose up -d ,等待镜像拉取完成创建容器。

GitLab Runner
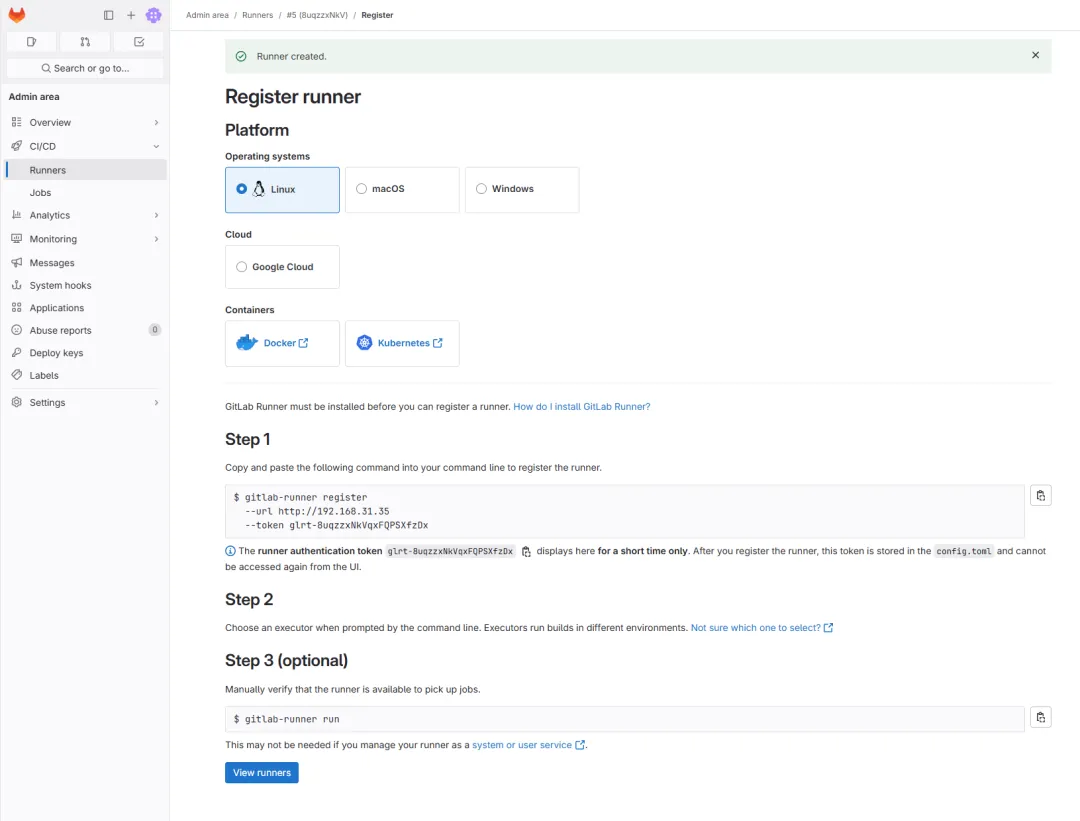
GitLab 运行程序需要在 GitLab CE 中注册,然后才能在 CI/CD 管道中使用。在 GitLab UI 中,创建runner,tag可设置为docker
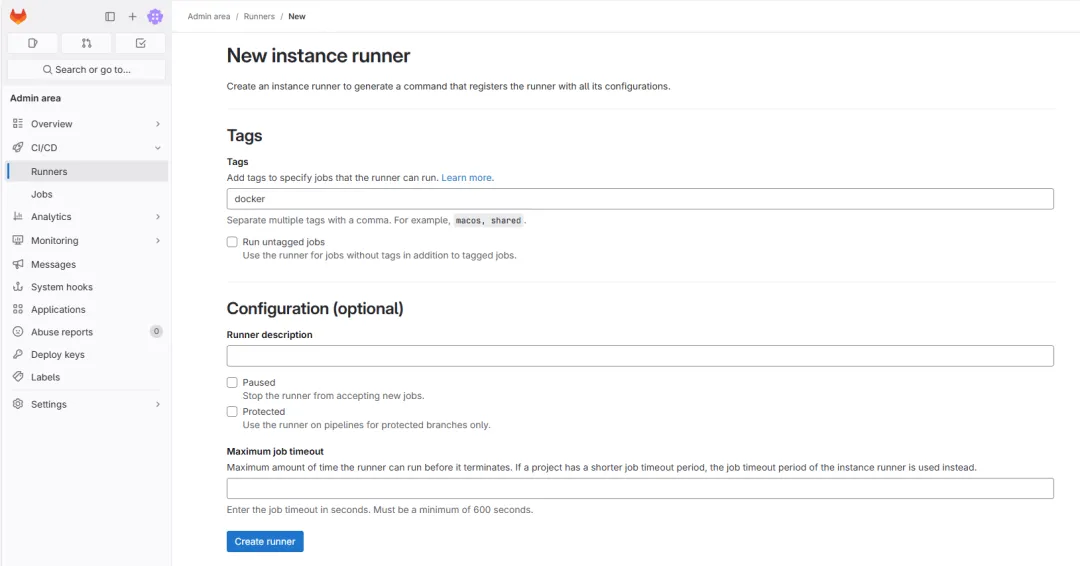
按照页面步骤使用docker exec -it gitlab-runner bash进入gitlab-runner-dac容器
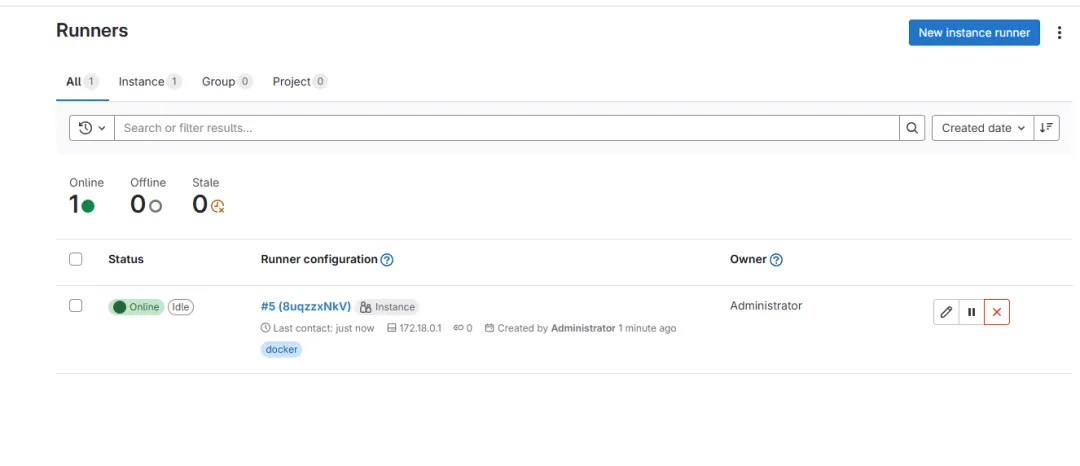
容器注册完成后会显示在runners
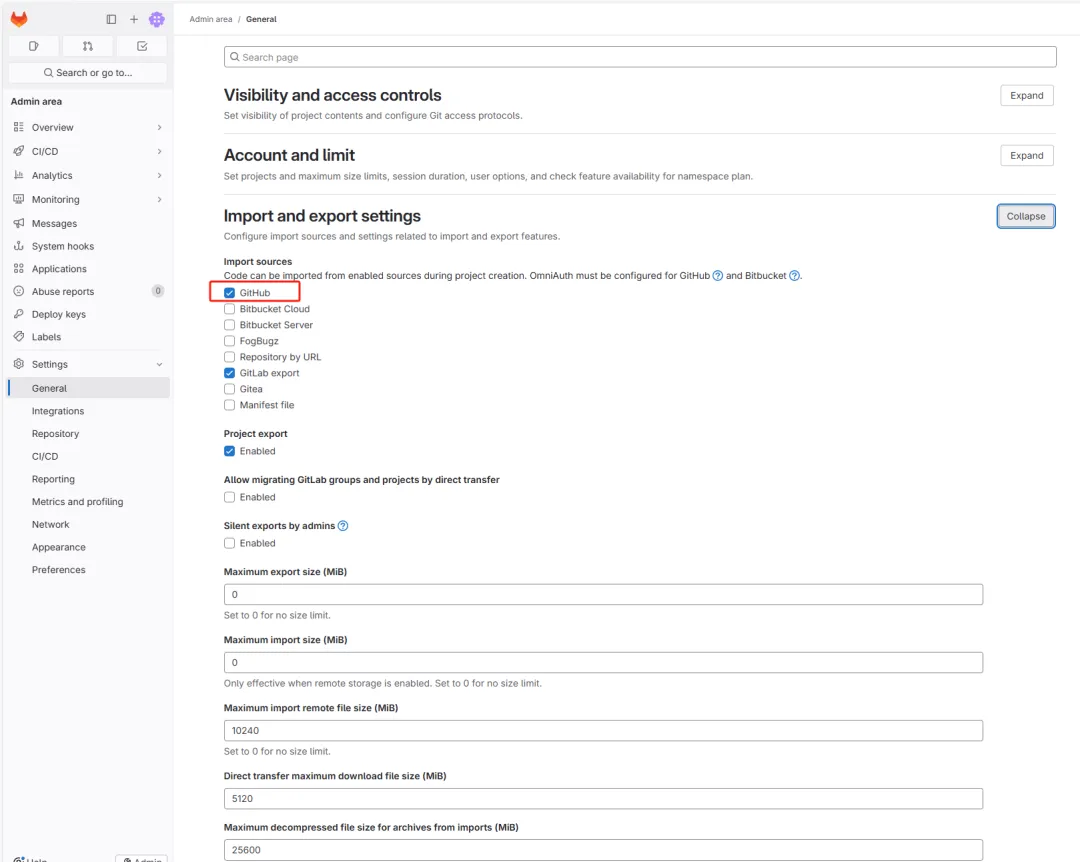
Gitlab配置 开启github import便于后续从github导入该项目
版本控制
fork (https://github.com/infosecB/detection-as-code) 该项目到个人github后,通过personal access token导入该项目 该项目作为检测内容的 CI/CD 管道和 VCS 的基础。以下是该项目结构的快速分解:
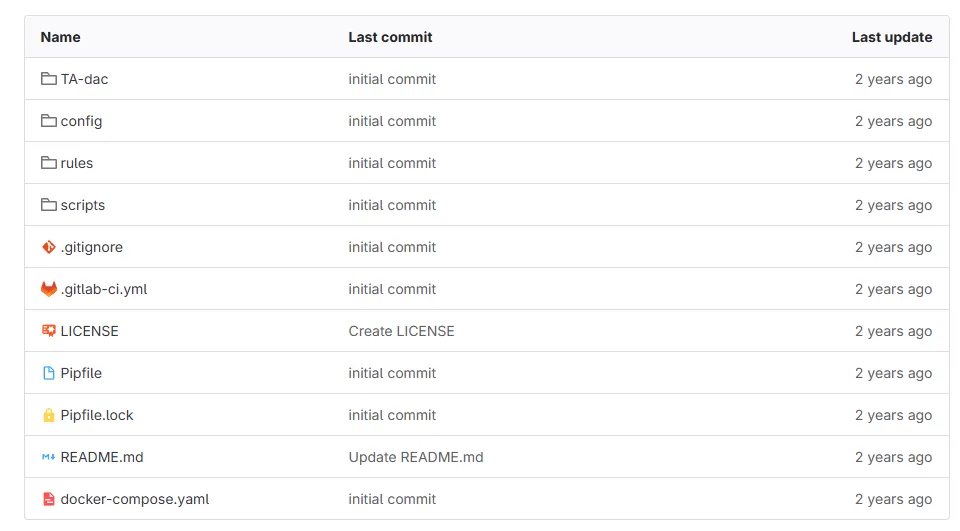
/TA-dac:包含构建和打包 Splunk 技术附加组件 (TA) 时所需的核心模板文件。在此示例中,我将构建一个名为 TA-dac 的 TA。
/config :包含 Sigma 数据源配置和映射文件。这些文件建立了 Sigma 数据源和检测控制数据源之间的关系。在此示例中,我创建了一个名为“splunk-dac.yml”的映射配置,它将 BOTSv3 PowerShell 日志 Splunk 索引、源类型和字段映射映射到适当的 Sigma 数据源。
/rules:包含以其本机 .yml 格式存储的 Sigma 规则。威胁检测团队可以在此处创建、更新和折旧检测内容。
/scripts:包含 CI/CD 管道中用于构建和部署检测内容的三个脚本。我将在下一节中深入研究这些脚本。
.gitlab-ci.yml:GitLab CI/CD 配置文件,指示 GitLab 运行程序如何构建和部署检测内容。我还将在下一节中详细介绍该文件。其他文件:Pipenv/Pipenv.lock文件由 Pipenv 在 CI/CD 作业中使用来安装所需的 Python 包及其依赖项。docker-compose.yml文件包含我在上面的管道架构部分中共享的相同代码。README.md文件包含 GitLab 项目的标题和基本说明以及 . gitignore告诉 Git 在本地开发期间要忽略哪些文件/文件夹。
GitLab CI 和脚本 GitLab CI 提供了一个构建、测试和部署任何类型软件的环境。
要在 GitLab 中创建 CI/CD 管道,必须在项目中创建 .gitlab-ci.yml 配置文件。
这是我创建的配置,我在内联注释中对此进行了解释:
### Define two seperate jobs for CI/CD pipeline.
stages:### The build job runs anytime a user commits code- build### The release job only runs when the main branch is tagged with a version- releasebuild:### Sigmac requires Python 3.8, specify the appropriate Docker imageimage: python:3.8### Identify build stagestage: build### Install Pipenv, Python dependencies and the Splunk Packaging toolkit.before_script:- pip install pipenv- pipenv install- wget https://download.splunk.com/misc/packaging-toolkit/splunk-packaging-toolkit-1.0.1.tar.gz- pipenv install splunk-packaging-toolkit-1.0.1.tar.gzscript:### Run Sigmac against all rules in the /rules folder that have been set to status=stable. ### Outputs to the out.yaml file with the resulting search logic and a few Sigma fields.- pipenv run sigmac --filter 'status=stable' --target splunk --config config/splunk-dac.yml  --output-format yaml --output out.yaml --output-fields title,id,status,author,tags --recurse rules/### Run script that converts the Sigmac produced .yml to Splunk saved search stanzas in savedsearch.conf.- pipenv run python scripts/convert_yml_to_search.py### Copies the savedsearch.conf to the appropriate Splunk TA folder- cp savedsearches.conf TA-dac/default### Sets the TA version based on either tag version number or "0.0.1" if run by an untagged Git commit.- pipenv run python scripts/set_version.py --file "TA-dac/default/app.conf" --version "${CI_COMMIT_TAG}"### Runs the splunk-sdk slim utility to package the Splunk TA.- pipenv run slim package TA-dacartifacts:### Specify the output files as artifacts that can be retrieved in release job### or downloaded via the Gitlab UIpaths:- out.yaml- savedsearches.conf- 'TA-dac-*.tar.gz'tags: ### Tag job as "docker" to call the Docker Gitlab runner- dockerrelease:### Run on latest python Docker imageimage: python:latest### Identify as release stagestage: releasebefore_script:### Install the Python splunk-sdk library for use by deploy_splunk_package.py script- pip install splunk-sdkscript:### Upload the TA to Gitlab packages- 'curl --header "JOB-TOKEN: $CI_JOB_TOKEN" --upload-file TA-dac-${CI_COMMIT_TAG}.tar.gz "${CI_API_V4_URL}/projects/${CI_PROJECT_ID}/packages/generic/TA-dac/${CI_COMMIT_TAG}/TA-dac-${CI_COMMIT_TAG}.tar.gz"'### Run the deploy_splunk_package.py to install the new TA-dac TA- python scripts/deploy_splunk_package.py --url "${CI_API_V4_URL}/projects/${CI_PROJECT_ID}/packages/generic/TA-dac/${CI_COMMIT_TAG}/TA-dac-${CI_COMMIT_TAG}.tar.gz" --user "$ENV_USERNAME" --password "$ENV_PASSWORD" --host "$ENV_HOST" --port $ENV_PORTrules:### Restrict this job to only run when the main branch is tagged- if: '$CI_COMMIT_BRANCH == "main" && $CI_COMMIT_TAG'tags:### Tag job as "docker" to call the Docker Gitlab runner- docker
构建脚本 Sigmac将 Sigma 规则逻辑转换为 Splunk SPL 查询,并输出一个 out.yaml 文件,其中包含生成的查询以及我们将在 Splunk TA 中使用的其他几个字段。
然后, convert_yml_to_search.py 将 Sigmac out.yaml 文件转换为 Splunk 保存的搜索节并输出 savingsearches.conf 文件。在此示例中,保存的搜索配置为生成 Splunk 内置“警报”,但其功能非常有限。可以轻松调整此保存的搜索配置以创建 Splunk ES 显着事件或通过 API 调用在 SOAR 等下游系统中创建事件。
import yaml
import os
import glob
from jinja2 import Templatess_template = """
[{{ title }}]
alert.expires = 5m
alert.suppress = 1
alert.suppress.period = 60m
alert.track = 1
counttype = number of events
cron_schedule = {{ cron }}
description = Detects a second malicious IP.
enableSched = 1
quantity = 0
relation = greater than
search = {{ search }}"""def priority_to_cron(priority):if priority == "low":return "0 */4 * * *"elif priority == "high":return "*/15 * * * *"elif priority == "critical":return "*/5 * * * *"else:return "0 * * * *"t = Template(ss_template)savedsearch_content = ""rules = yaml.safe_load(open("out.yaml"))
for rule in rules:if rule["status"] == "stable":print("Creating alert for " + rule["title"])savedsearch_content += t.render(title=rule["title"], search=rule["rule"][0], cron=priority_to_cron("normal"))else:print('The rule "'+ rule["title"]+ '" status is set to '+ rule["status"]+ ", skipping.")f = open("savedsearches.conf", "w")
f.write(savedsearch_content)
f.close()
set_version.py用于更新 app.conf Splunk TA 文件中包含的版本号。
import argparse
import redef set_version(conf_file, version):if version == "":version = "0.0.1"elif re.match(".*(\d)+\.(\d)+\.(\d)+.*", version):version = (re.search("(\d)+\.(\d)+\.(\d)+", version)).group()else:print("An invalid version number was tagged " + version)exit(1)print("Updating app.conf file with version number: " + version)with open(conf_file, "r") as file:lines = file.readlines()with open(conf_file, "w") as file:for line in lines:file.write(re.sub(r"VERSION", version, line))with open(".env", "w") as env_file:env_file.write(f'export VERSION="{version}"')file.close()def main():parser = argparse.ArgumentParser()parser.add_argument("--file", type=str)parser.add_argument("--version", type=str)args = parser.parse_args()set_version(args.file, args.version)if __name__ == "__main__":main()
splunk-sdk slim package命令用于构建和生成 TA .pkg 文件。发布作业脚本 最后, deploy_splunk_package.py脚本与 Splunk REST API 交互,以在管道的部署阶段上传并安装最新版本的 TA。
from logging import error
import splunklib.client as client
import os
import argparsedef upload_ta(url, user, password, host, port):service = client.connect(host=host, port=port, username=user, password=password, verify=False)service.post(path_segment="apps/local", filename=True, name=url, update=True)service.logout()def main():parser = argparse.ArgumentParser()parser.add_argument("--url", type=str)parser.add_argument("--user", type=str)parser.add_argument("--password", type=str)parser.add_argument("--host", type=str)parser.add_argument("--port", type=str)args = parser.parse_args()upload_ta(args.url, args.user, args.password, args.host, args.port)if __name__ == "__main__":main()
检测内容创建工作流程 在创建工作流之前需要对pipfile进行修改
[[source]]
url = "https://pypi.org/simple"
verify_ssl = true
name = "pypi"[packages]
sigmatools = "0.20"
"ruamel.yaml" = "0.16"
jinja2 = "*"[dev-packages]
black = "*"[requires]
python_version = "3.8"[pipenv]
allow_prereleases = true
修改.gitlab-ci.yml中的rules,监听CI时候的主分支变动(commit)
rules:- if: $CI_COMMIT_BRANCH == "main"
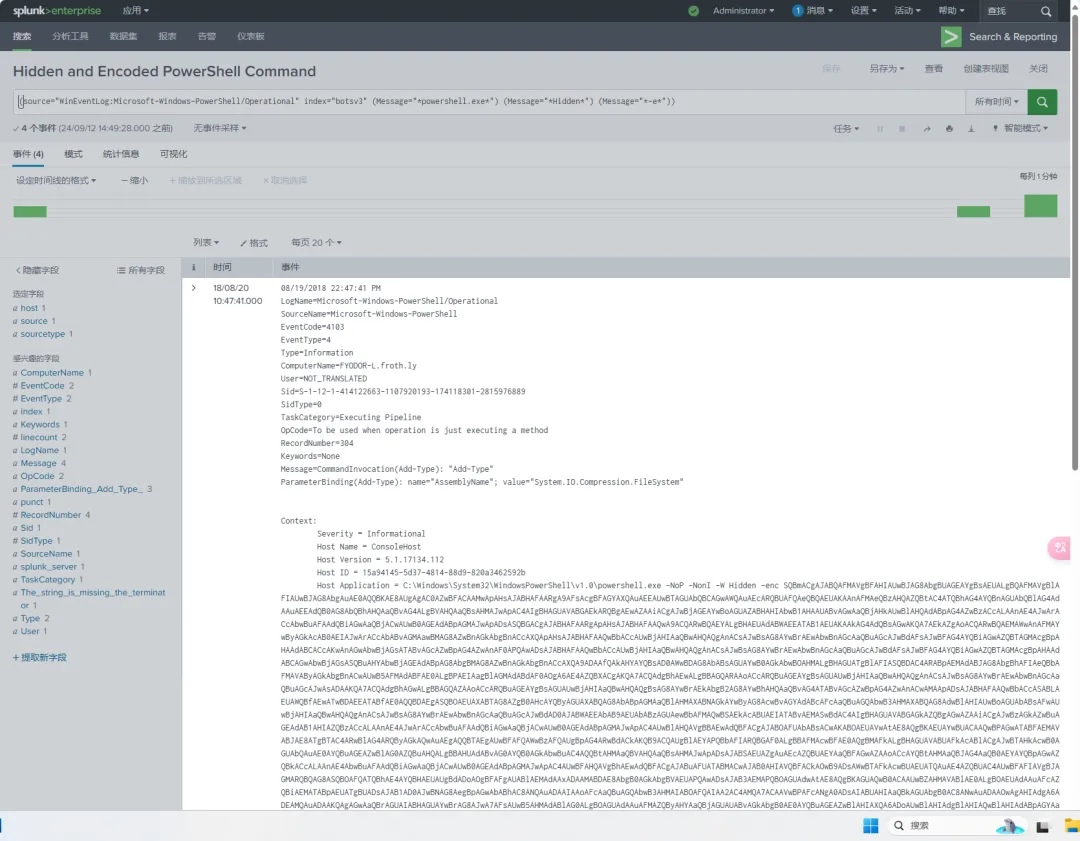
威胁检测团队人员现在可以按照简单的程序来创建、审查和部署新内容。在此示例中,我将运行在无服务器检测管道中使用的相同用例:检测 PowerShell 编码和隐藏命令的使用。
搭建验证
运行
1、在“Detection as Code”项目中为用例和关联的合并请求创建一个 GitLab issue。
2、在新分支上创建 Sigma 规则 .yml,并在完成后将合并请求标记为“就绪”。每次将提交推送到项目时,无论分支如何,都会运行“构建”作业。如果检测内容存在问题,作业将会失败并输出错误。
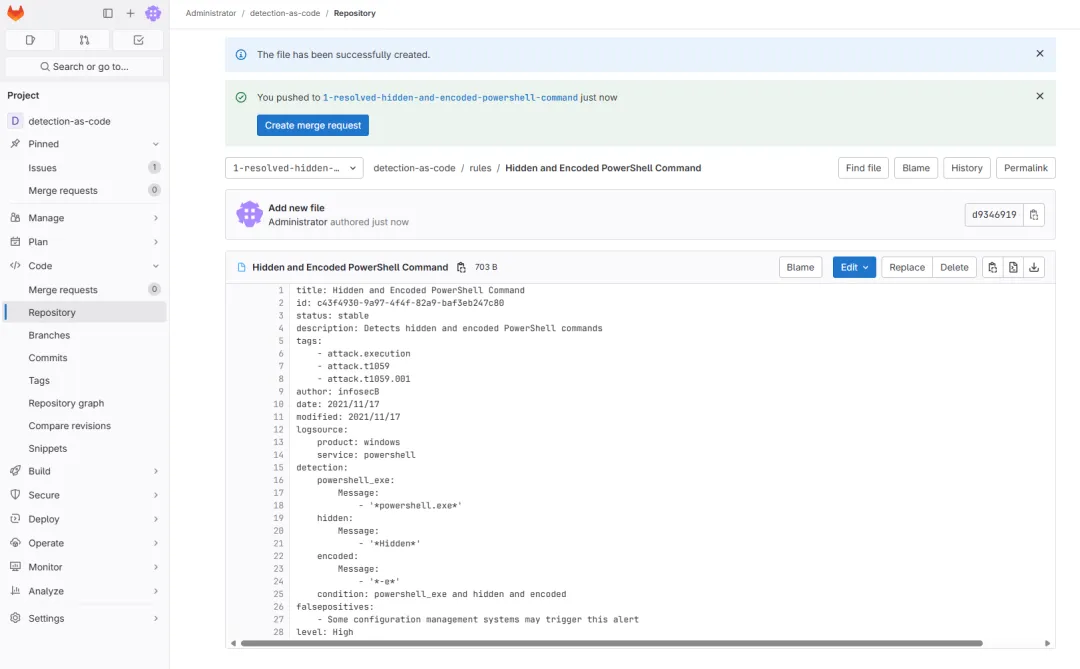
3、新建规则完成后,触发build job
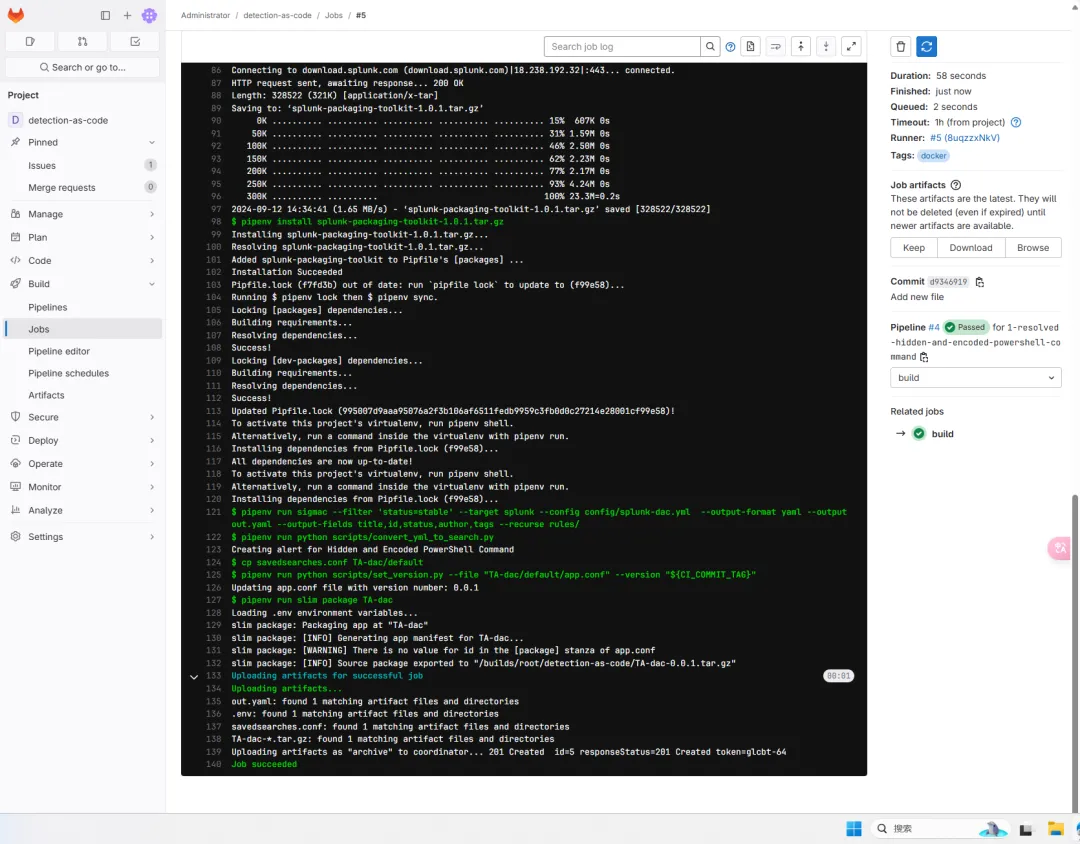
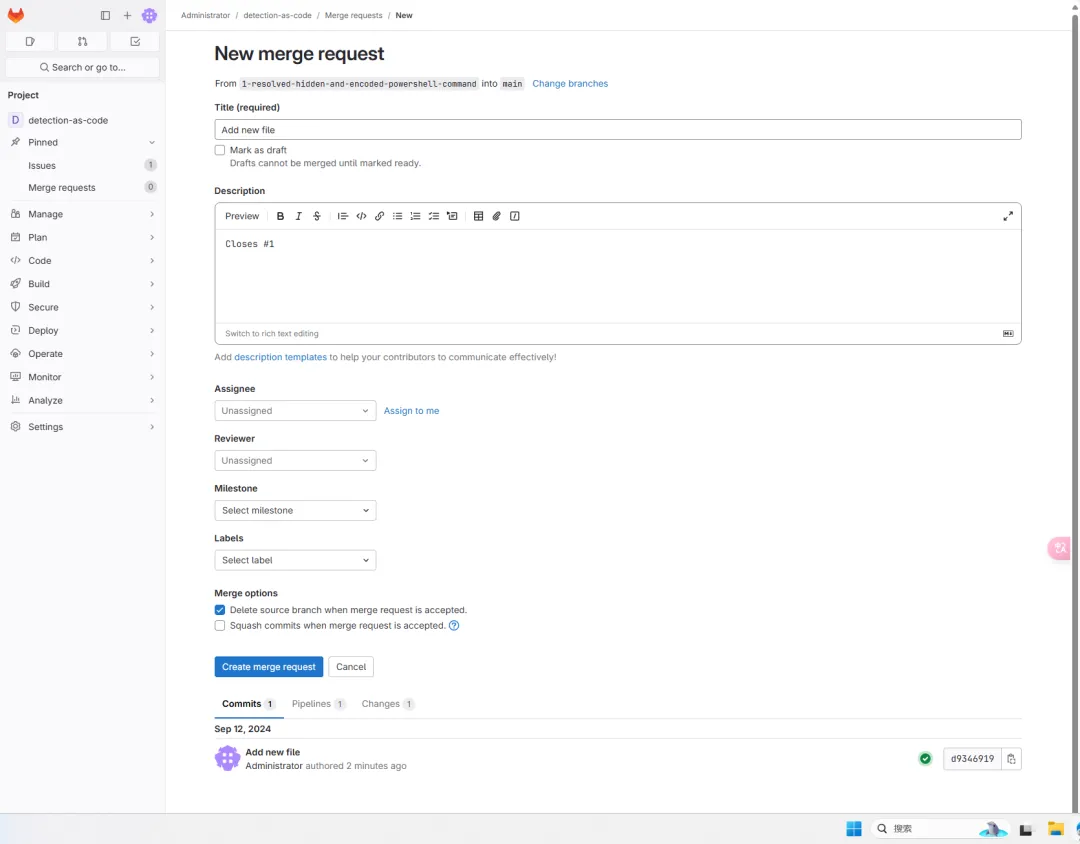
4、build job 运行成功后创建新的合并请求
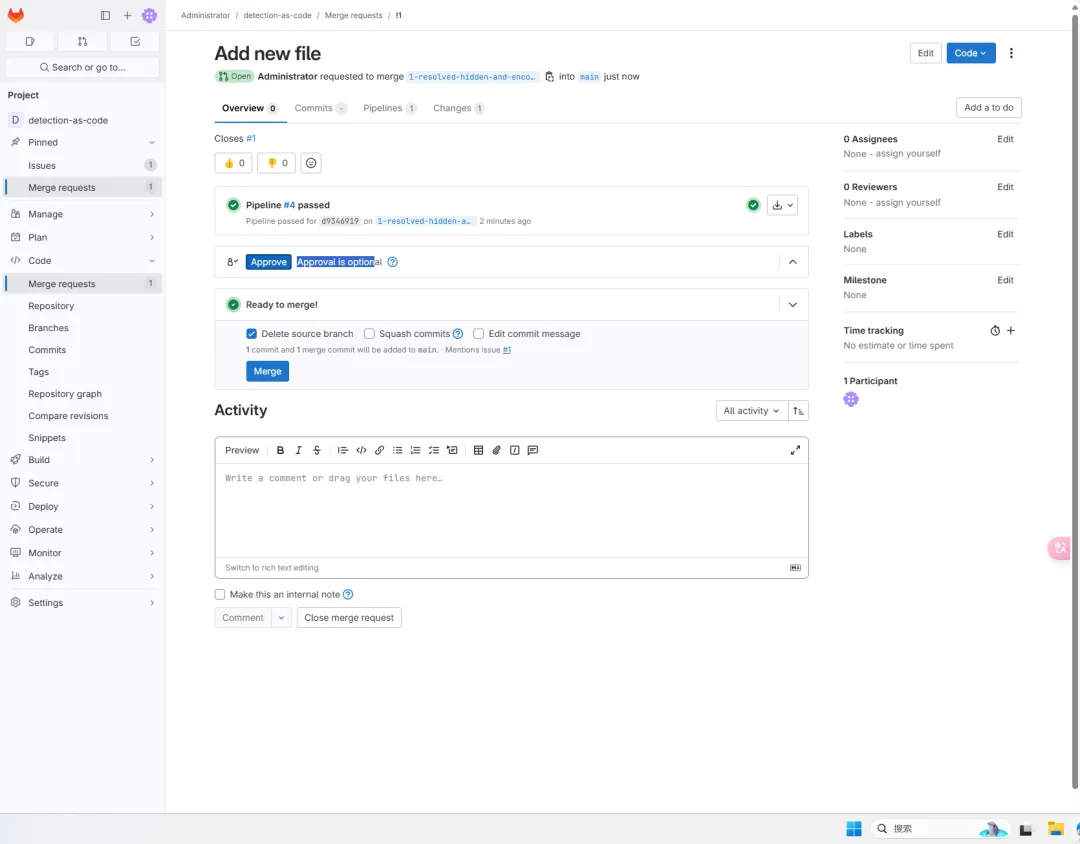
5、团队成员对检测内容进行同行评审,然后根据需要进行评论和编辑。经审核同意后,并入主分支。
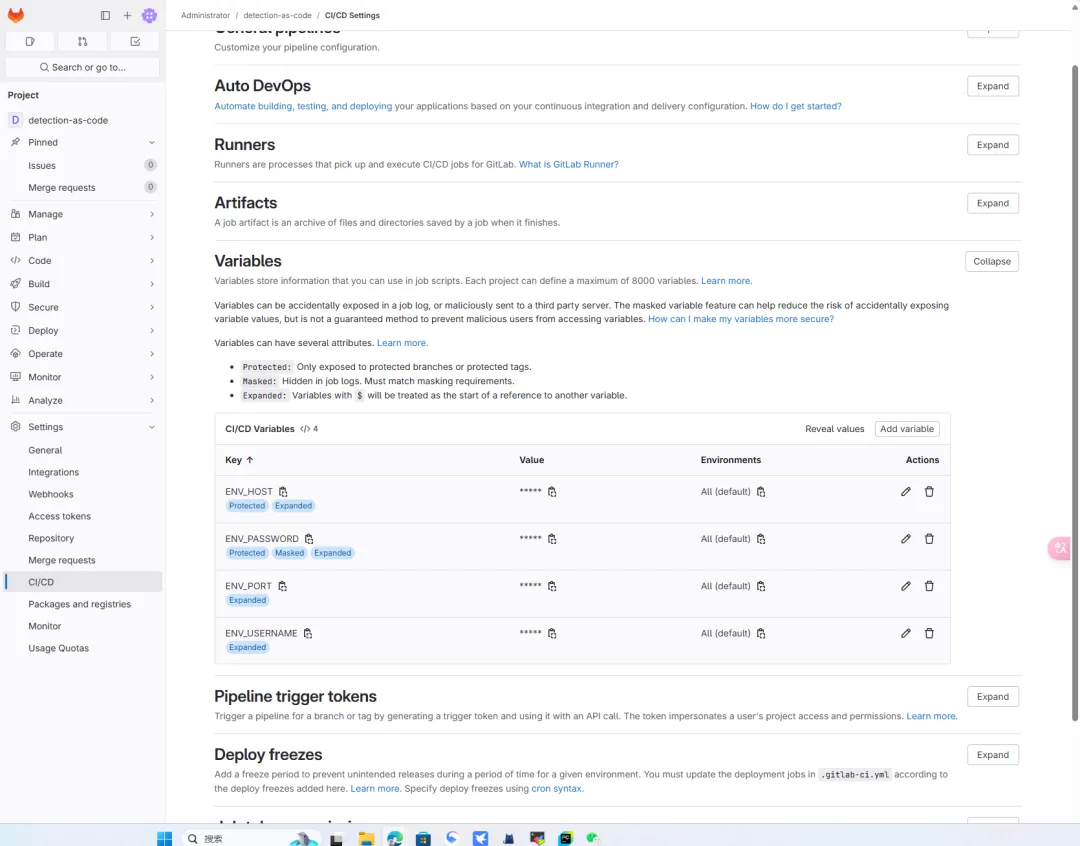
6、第一次运行pipeline需要配置运行时变量,分别为splunk地址,密码,端口,用户名。密码在添加时需要配置masked以便于job日志中遮罩,端口为splunk api端口8089。
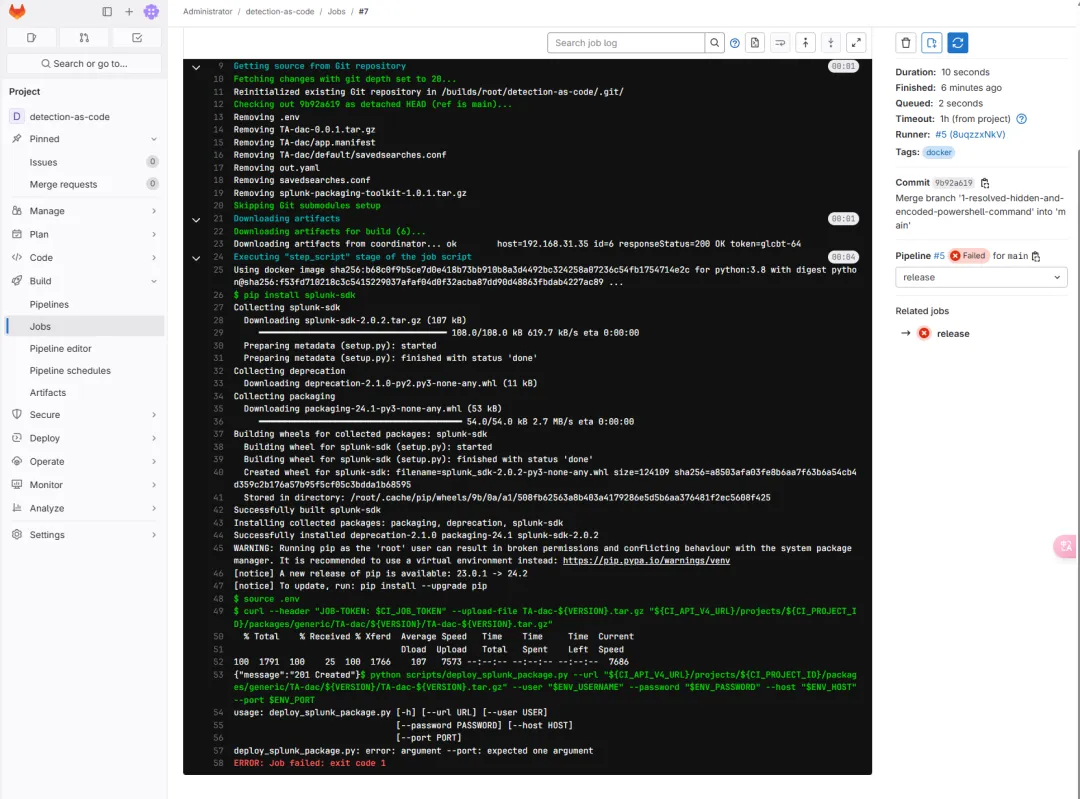
注意
第一次运行时缺少运行时变量,会导致推送任务失败。
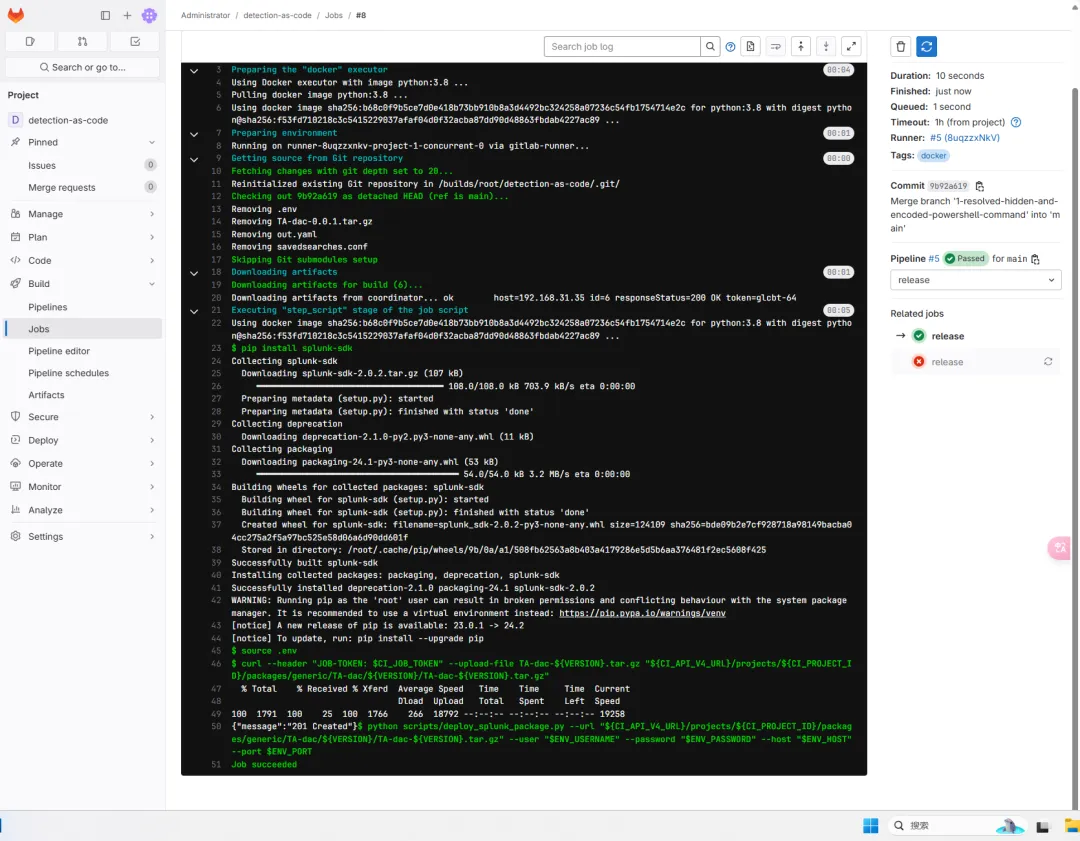
splunk地址,密码,端口,用户名配置完成后重新运行该任务。
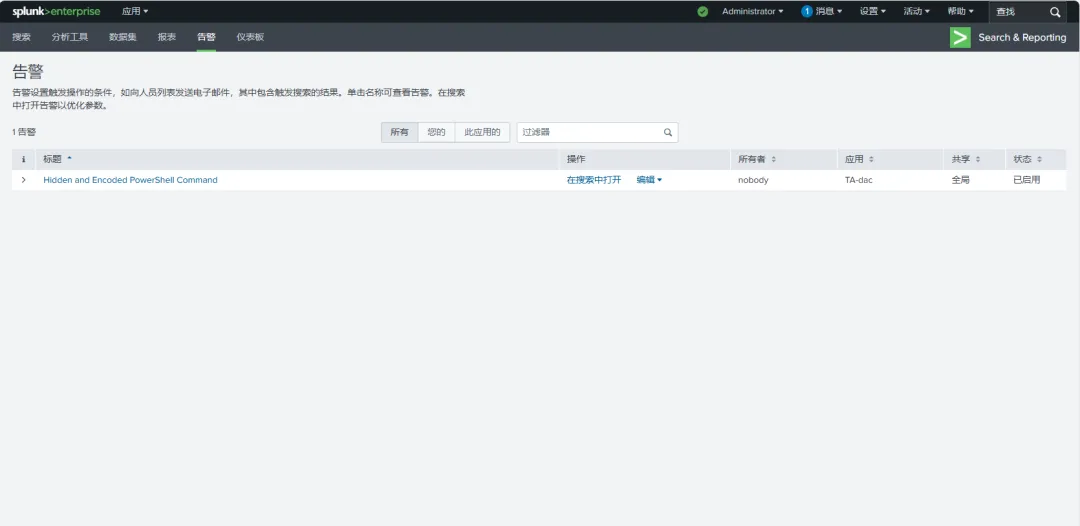
运行成功后登录splunk进行查看,可以看到splunk已经创建了新的告警规则。
在搜索中打开,可以看到已经匹配到符合检测规则的日志内容。
结论
虽然此示例管道演示了构建和发布检测内容的基本功能,但它还有很多不足之处。GitLab CI/CD 提供了更多功能来运行有效的“检测即代码”管道。
可以创建一些额外的管道作业来进行测试、文档记录和检测内容的持续审查:
自动化 Sigma 和 Splunk TA 测试:为了确保高质量的内容和平稳运行的 CI/CD 管道,应创建测试来检查 Sigma 规则和 Splunk TA 的有效性。自动化文档:检测内容文档的重要组成部分可以包含在每个 Sigma 规则中。这创造了一个机会,通过编写 .md 或 .rst 文件的创建脚本,在 CI/CD 管道中自动生成文档。持续审查检测内容:可以创建 CI/CD 管道来标记过时的检测内容,以通过创建新的 Gitlab 问题来进行审查。
参考文档
Serverless Detection Pipeline (https://infosecb.medium.com/building-a-serverless-detection-platform-in-aws-pt-i-endpoint-detection-1a0e34d9c28c)
Practical Detection-as-Code (https://detect.fyi/practical-detection-as-code-8a8fe7c65676)
detection-as-code (https://github.com/infosecB/detection-as-code)
#参考🔗
https://mp.weixin.qq.com/s?__biz=Mzk0NDcyMjU2OQ==&mid=2247484073&idx=1&sn=588452c1602f834c27a1238144fef441&chksm=c321054ff4568c59dbd83d44818abbeb7e779b6935b703fc57f40d2b9b0178cbabbf9bce42d0&cur_album_id=3633099879783628816&scene=189#wechat_redirect
