这里记录一下使用操作符重载(OO)编程方式的自动微分,其中数学实现模式则是使用反向模式(Reverse Mode),综合起来就叫做反向 OO 实现 AD 啦。
基础知识
下面一起来回顾一下操作符重载和反向模式的一些基本概念,然后一起去尝试着用 Python 去实现 PyTorch 这个 AI 框架中最核心的自动微分机制是如何实现的。
操作符重载 OO
操作符重载:操作符重载或者称运算重载(Operator Overloading,OO),利用现代语言的多态特性(例如 C++/JAVA/Python 等高级语言),使用操作符重载对语言中基本运算表达式的微分规则进行封装。同样,重载后的操作符在运行时会记录所有的操作符和相应的组合关系,最后使用链式法则对上述基本表达式的微分结果进行组合完成自动微分。
在具有多态特性的现代编程语言中,运算符重载提供了实现自动微分的最直接方式,利用了编程语言的第一特性(first class feature),重新定义了微分基本操作语义的能力。
在 C++ 中使用运算符重载实现的流行工具是 ADOL-C(Walther 和 Griewank,2012)。ADOL-C 要求对变量使用启用 AD 的类型,并在 Tape 数据结构中记录变量的算术运算,随后可以在反向模式 AD 计算期间“回放”。Mxyzptlk 库 (Michelotti, 1990) 是 C++ 能够通过前向传播计算任意阶偏导数的另一个例子。
FADBAD++ 库(Bendtsen 和 Stauning,1996 年)使用模板和运算符重载为 C++ 实现自动微分。对于 Python 语言来说,autograd 提供正向和反向模式自动微分,支持高阶导数。在机器学习 ML 或者深度学习 DL 领域,目前 AI 框架中使用操作符重载 OO 的一个典型代表是 PyTorch,其中使用数据结构 Tape 来记录计算流程,在反向模式求解梯度的过程中进行 replay Operator。
下面总结一下操作符重载的一个基本流程:
- 操作符重载:预定义了特定的数据结构,并对该数据结构重载了相应的基本运算操作符;
- Tape 记录:程序在实际执行时会将相应表达式的操作类型和输入输出信息记录至特殊数据结构;
- 遍历微分:得到特殊数据结构后,将对数据结构进行遍历并对其中记录的基本运算操作进行微分;
- 链式组合:把结果通过链式法则进行组合,完成自动微分。
操作符重载法的优点可以总结如下:
- 实现简单,只要求语言提供多态的特性能力;
- 易用性高,重载操作符后跟使用原生语言的编程方式类似。
操作符重载法的缺点可以总结如下:
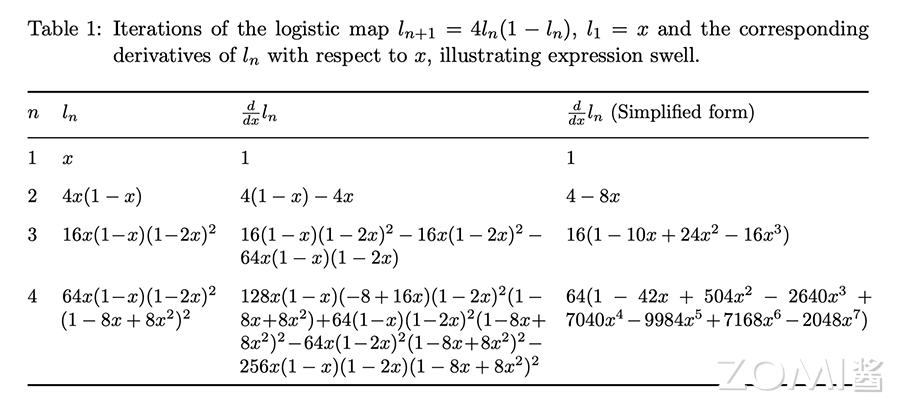
- 需要显式的构造特殊数据结构和对特殊数据结构进行大量读写、遍历操作,这些额外数据结构和操作的引入不利于高阶微分的实现;
- 对于类似 if,while 等控制流表达式,难以通过操作符重载进行微分规则定义。对于这些操作的处理会退化成基本表达式方法中特定函数封装的方式,难以使用语言原生的控制流表达式。
反向模式 Reverse Mode
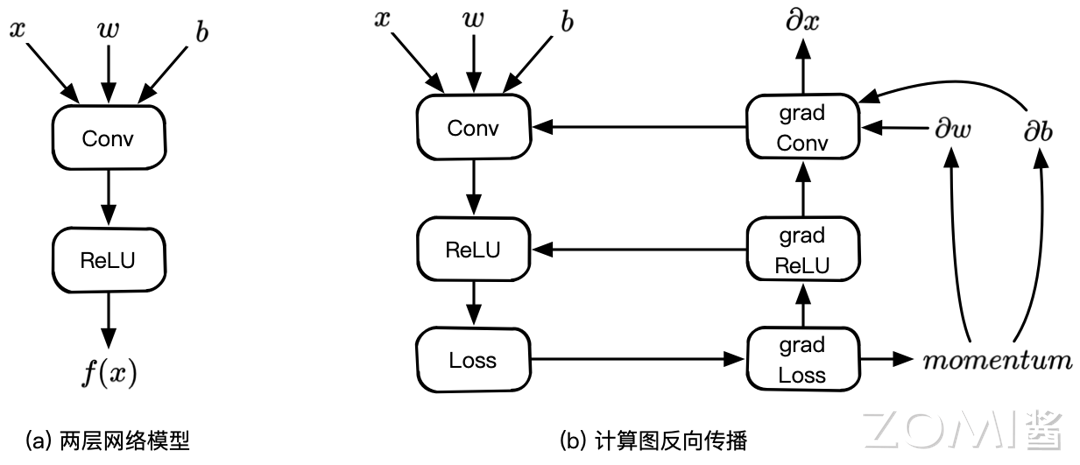
反向自动微分同样是基于链式法则。仅需要一个前向过程和反向过程,就可以计算所有参数的导数或者梯度。因为需要结合前向和后向两个过程,因此反向自动微分会使用一个特殊的数据结构,来存储计算过程。
而这个特殊的数据结构例如 TensorFlow 或者 MindSpore,则是把所有的操作以一张图的方式存储下来,这张图可以是一个有向无环(DAG)的计算图;而 PyTorch 则是使用 Tape 来记录每一个操作,他们都表达了函数和变量的关系。
反向模式根据从后向前计算,依次得到对每个中间变量节点的偏导数,直到到达自变量节点处,这样就得到了每个输入的偏导数。在每个节点处,根据该节点的后续节点(前向传播中的后续节点)计算其导数值。
整个过程对应于多元复合函数求导时从最外层逐步向内侧求导。这样可以有效地把各个节点的梯度计算解耦开,每次只需要关注计算图中当前节点的梯度计算。
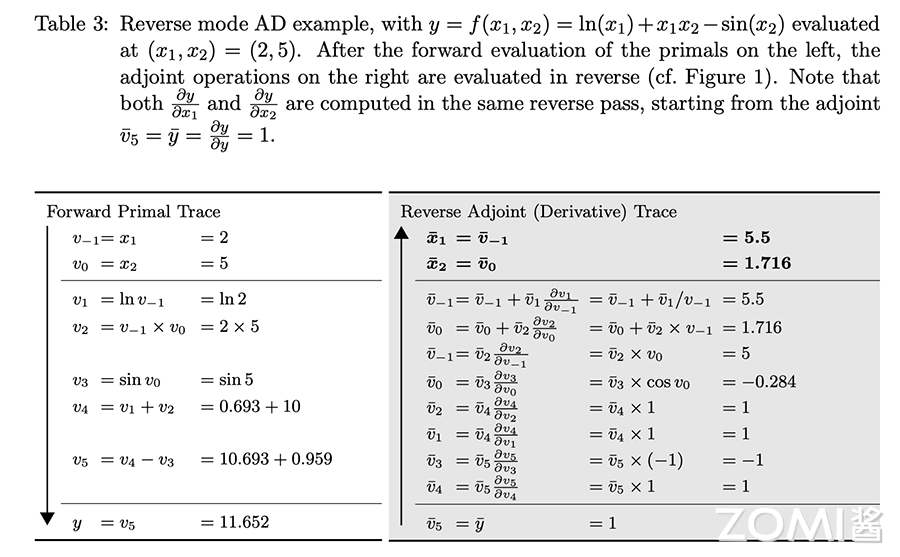
从下图可以看出来,reverse mode 和 forward mode 是一对相反过程,reverse mode 从最终结果开始求导,利用最终输出对每一个节点进行求导。下图虚线就是反向模式。
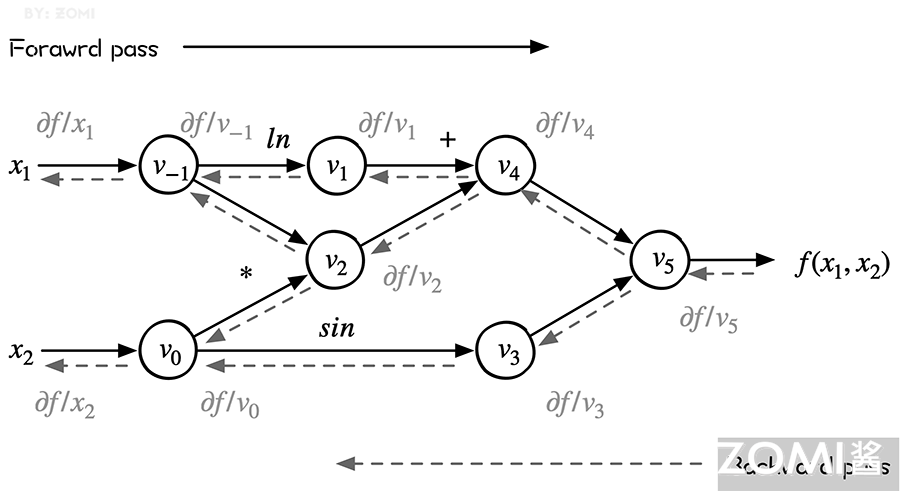
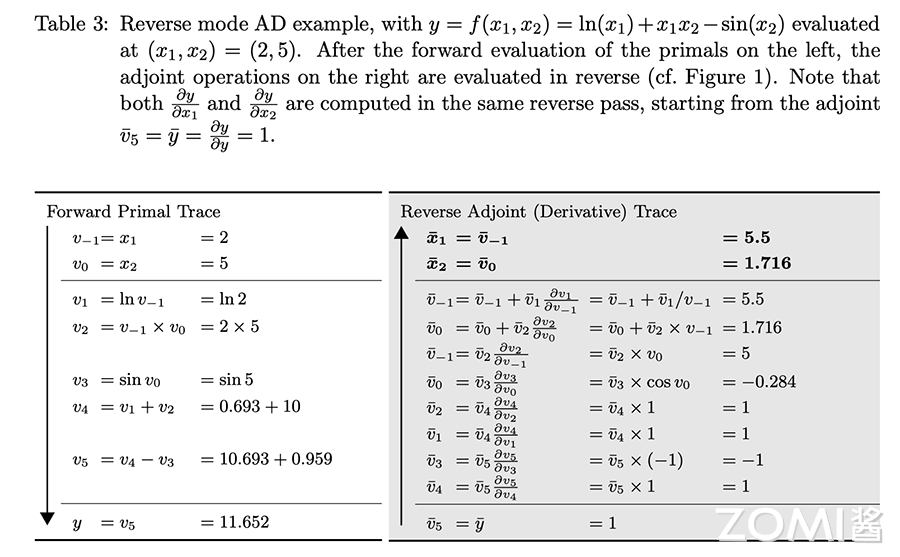
前向和后向两种模式的过程表达如下,表的左列浅色为前向计算函数值的过程,与前向计算时相同,右面列深色为反向计算导数值的过程。
反向模式的计算过程如图所示,其中:
$$ \overline{v_i}=\dfrac{\delta y}{\delta v_i} $$
根据链式求导法则展开有:
$$ \frac{\partial f}{\partial x}=\sum_{k=1}^{N} \frac{\partial f}{\partial v_{k}} \frac{\partial v_{k}}{\partial \boldsymbol{x}} $$
可以看出,左侧是源程序分解后得到的基本操作集合,而右侧则是每一个基本操作根据已知的求导规则和链式法则由下至上计算的求导结果。
反向操作符重载实现
下面的代码主要介绍反向模式自动微分的实现。目的是通过了解 PyTorch 的 auto diff 实现,来了解到上面复杂的反向操作符重载实现自动微分的原理,值的主要的是千万不要在乎这是 MindSpore 的实现还是 TensorFlow 版的实现(实际上都不是哈)。
首先,需要通过 typing 库导入一些辅助函数。
from typing import List, NamedTuple, Callable, Dict, Optional_name = 1
def fresh_name():global _namename = f'v{_name}'_name += 1return name
fresh_name 用于打印跟 tape 相关的变量,并用 _name 来记录是第几个变量。
为了能够更好滴理解反向模式自动微分的实现,实现代码过程中不依赖 PyTorch 的 autograd。代码中添加了变量类 Variable 来跟踪计算梯度,并添加了梯度函数 grad() 来计算梯度。
对于标量损失 l 来说,程序中计算的每个张量 x 的值,都会计算值 dl/dX。反向模式从 dl/dl=1 开始,使用偏导数和链式规则向后传播导数,例如:
$$
dl/dx*dx/dy=dl/dy
$$
下面就是具体的实现过程,首先我们所有的操作都是通过 Python 进行操作符重载的,而操作符重载,通过 Variable 来封装跟踪计算的 Tensor。每个变量都有一个全局唯一的名称 fresh_name,因此可以在字典中跟踪该变量的梯度。为了便于理解,__init__ 有时会提供此名称作为参数。否则,每次都会生成一个新的临时值。
为了适配上面图中的简单计算,这里面只提供了乘、加、减、sin、log 五种计算方式。
class Variable:def __init__(self, value, name=None):self.value = valueself.name = name or fresh_name()def __repr__(self):return repr(self.value)# We need to start with some tensors whose values were not computed# inside the autograd. This function constructs leaf nodes. @staticmethoddef constant(value, name=None):var = Variable(value, name)print(f'{var.name} = {value}')return var# Multiplication of a Variable, tracking gradientsdef __mul__(self, other):return ops_mul(self, other)def __add__(self, other):return ops_add(self, other)def __sub__(self, other):return ops_sub(self, other)def sin(self):return ops_sin(self)def log(self):return ops_log(self)
接下来需要跟踪 Variable 所有计算,以便向后应用链式规则。那么数据结构 Tape 有助于实现这一点。
class Tape(NamedTuple):inputs : List[str]outputs : List[str]# apply chain rulepropagate : 'Callable[List[Variable], List[Variable]]'
输入 inputs 和输出 outputs 是原始计算的输入和输出变量的唯一名称。反向传播使用链式规则,将函数的输出梯度传播给输入。其输入为 dL/dOutputs,输出为 dL/dinput。Tape 只是一个记录所有计算的累积 List 列表。
下面提供了一种重置 Tape 的方法 reset_tape,方便运行多次自动微分,每次自动微分过程都会产生 Tape List。
gradient_tape : List[Tape] = []# reset tape
def reset_tape():global _name_name = 1gradient_tape.clear()
现在来看看具体运算操作符是如何定义的,以乘法为例子啦,首先需要计算正向结果并创建一个新变量来表示,也就是 x = Variable(self.value * other.value)。然后定义了反向传播闭包 propagate,使用链规则来反向支撑梯度。
def ops_mul(self, other):# forwardx = Variable(self.value * other.value)print(f'{x.name} = {self.name} * {other.name}')# backwarddef propagate(dl_doutputs):dl_dx, = dl_doutputsdx_dself = other # partial derivate of r = self*otherdx_dother = self # partial derivate of r = self*otherdl_dself = dl_dx * dx_dselfdl_dother = dl_dx * dx_dotherdl_dinputs = [dl_dself, dl_dother]return dl_dinputs# record the input and output of the optape = Tape(inputs=[self.name, other.name], outputs=[x.name], propagate=propagate)gradient_tape.append(tape)return x
def ops_add(self, other):x = Variable(self.value + other.value)print(f'{x.name} = {self.name} + {other.name}')def propagate(dl_doutputs):dl_dx, = dl_doutputsdx_dself = Variable(1.)dx_dother = Variable(1.)dl_dself = dl_dx * dx_dselfdl_dother = dl_dx * dx_dotherreturn [dl_dself, dl_dother]# record the input and output of the optape = Tape(inputs=[self.name, other.name], outputs=[x.name], propagate=propagate)gradient_tape.append(tape)return xdef ops_sub(self, other):x = Variable(self.value - other.value)print(f'{x.name} = {self.name} - {other.name}')def propagate(dl_doutputs):dl_dx, = dl_doutputsdx_dself = Variable(1.)dx_dother = Variable(-1.)dl_dself = dl_dx * dx_dselfdl_dother = dl_dx * dx_dotherreturn [dl_dself, dl_dother]# record the input and output of the optape = Tape(inputs=[self.name, other.name], outputs=[x.name], propagate=propagate)gradient_tape.append(tape)return xdef ops_sin(self):x = Variable(np.sin(self.value))print(f'{x.name} = sin({self.name})')def propagate(dl_doutputs):dl_dx, = dl_doutputsdx_dself = Variable(np.cos(self.value))dl_dself = dl_dx * dx_dselfreturn [dl_dself]# record the input and output of the optape = Tape(inputs=[self.name], outputs=[x.name], propagate=propagate)gradient_tape.append(tape)return xdef ops_log(self):x = Variable(np.log(self.value))print(f'{x.name} = log({self.name})')def propagate(dl_doutputs):dl_dx, = dl_doutputsdx_dself = Variable(1 / self.value)dl_dself = dl_dx * dx_dselfreturn [dl_dself]# record the input and output of the optape = Tape(inputs=[self.name], outputs=[x.name], propagate=propagate)gradient_tape.append(tape)return x
grad 是将变量运算放在一起的梯度函数,函数的输入是 l 和对应的梯度结果 results。
def grad(l, results):dl_d = {} # map dL/dX for all values Xdl_d[l.name] = Variable(1.)print("dl_d", dl_d)def gather_grad(entries):return [dl_d[entry] if entry in dl_d else None for entry in entries]for entry in reversed(gradient_tape):print(entry)dl_doutputs = gather_grad(entry.outputs)dl_dinputs = entry.propagate(dl_doutputs)for input, dl_dinput in zip(entry.inputs, dl_dinputs):if input not in dl_d:dl_d[input] = dl_dinputelse:dl_d[input] += dl_dinputfor name, value in dl_d.items():print(f'd{l.name}_d{name} = {value.name}')return gather_grad(result.name for result in results)
以下面公式为例:
$$ f(x_{1},x_{2})=ln(x_{1})+x_{1}*x_{2}−sin(x_{2}) $$
因为是基于操作符重载 OO 的方式进行计算,因此在初始化自变量 x 和 y 的值需要使用变量 Variable 来初始化,然后通过代码 f = Variable.log(x) + x * y - Variable.sin(y) 来实现。
reset_tape()x = Variable.constant(2., name='v-1')
y = Variable.constant(5., name='v0')f = Variable.log(x) + x * y - Variable.sin(y)
print(f)
v-1 = 2.0v0 = 5.0v1 = log(v-1)v2 = v-1 * v0v3 = v1 + v2v4 = sin(v0)v5 = v3 - v411.652071455223084
从 print(f) 可以看到是下面图中的左边正向运算,计算出前向的结果。下面的代码 grad(f, [x, y]) 就是利用前向最终的结果,通过 Tape 一个个反向的求解。得到最后的结果啦。
dx, dy = grad(f, [x, y])
print("dx", dx)
print("dy", dy)
dl_d {'v5': 1.0}Tape(inputs=['v3', 'v4'], outputs=['v5'], propagate=<function ops_sub.<locals>.propagate at 0x7fd7a2c8c0d0>)v9 = v6 * v7v10 = v6 * v8Tape(inputs=['v0'], outputs=['v4'], propagate=<function ops_sin.<locals>.propagate at 0x7fd7a2c8c378>)v12 = v10 * v11Tape(inputs=['v1', 'v2'], outputs=['v3'], propagate=<function ops_add.<locals>.propagate at 0x7fd7a234e7b8>)v15 = v9 * v13v16 = v9 * v14Tape(inputs=['v-1', 'v0'], outputs=['v2'], propagate=<function ops_mul.<locals>.propagate at 0x7fd7a3982ae8>)v17 = v16 * v0v18 = v16 * v-1v19 = v12 + v18Tape(inputs=['v-1'], outputs=['v1'], propagate=<function ops_log.<locals>.propagate at 0x7fd7a3982c80>)v21 = v15 * v20v22 = v17 + v21dv5_dv5 = v6dv5_dv3 = v9dv5_dv4 = v10dv5_dv0 = v19dv5_dv1 = v15dv5_dv2 = v16dv5_dv-1 = v22dx 5.5dy 1.7163378145367738
如果您想了解更多AI知识,与AI专业人士交流,请立即访问昇腾社区官方网站https://www.hiascend.com/或者深入研读《AI系统:原理与架构》一书,这里汇聚了海量的AI学习资源和实践课程,为您的AI技术成长提供强劲动力。不仅如此,您还有机会投身于全国昇腾AI创新大赛和昇腾AI开发者创享日等盛事,发现AI世界的无限奥秘~
转载自:| https://www.cnblogs.com/ZOMI/articles/18562818 | header |
| ---------------------------------------------- | ------ |
| | |
