本文记录在本地安装和测试InterVL2.5(26B版本)
论文:https://arxiv.org/abs/2412.05271
Huggingface模型权重下载页:https://huggingface.co/collections/OpenGVLab/internvl25-673e1019b66e2218f68d7c1c
Github: https://github.com/OpenGVLab/InternVL
本地硬件:RTX3090
1. 创建环境并安装相关依赖
# 创建虚拟环境
conda create -n intervl python=3.10 -y
conda activate intervl# 安装基础依赖
modelscope/transformers torch等
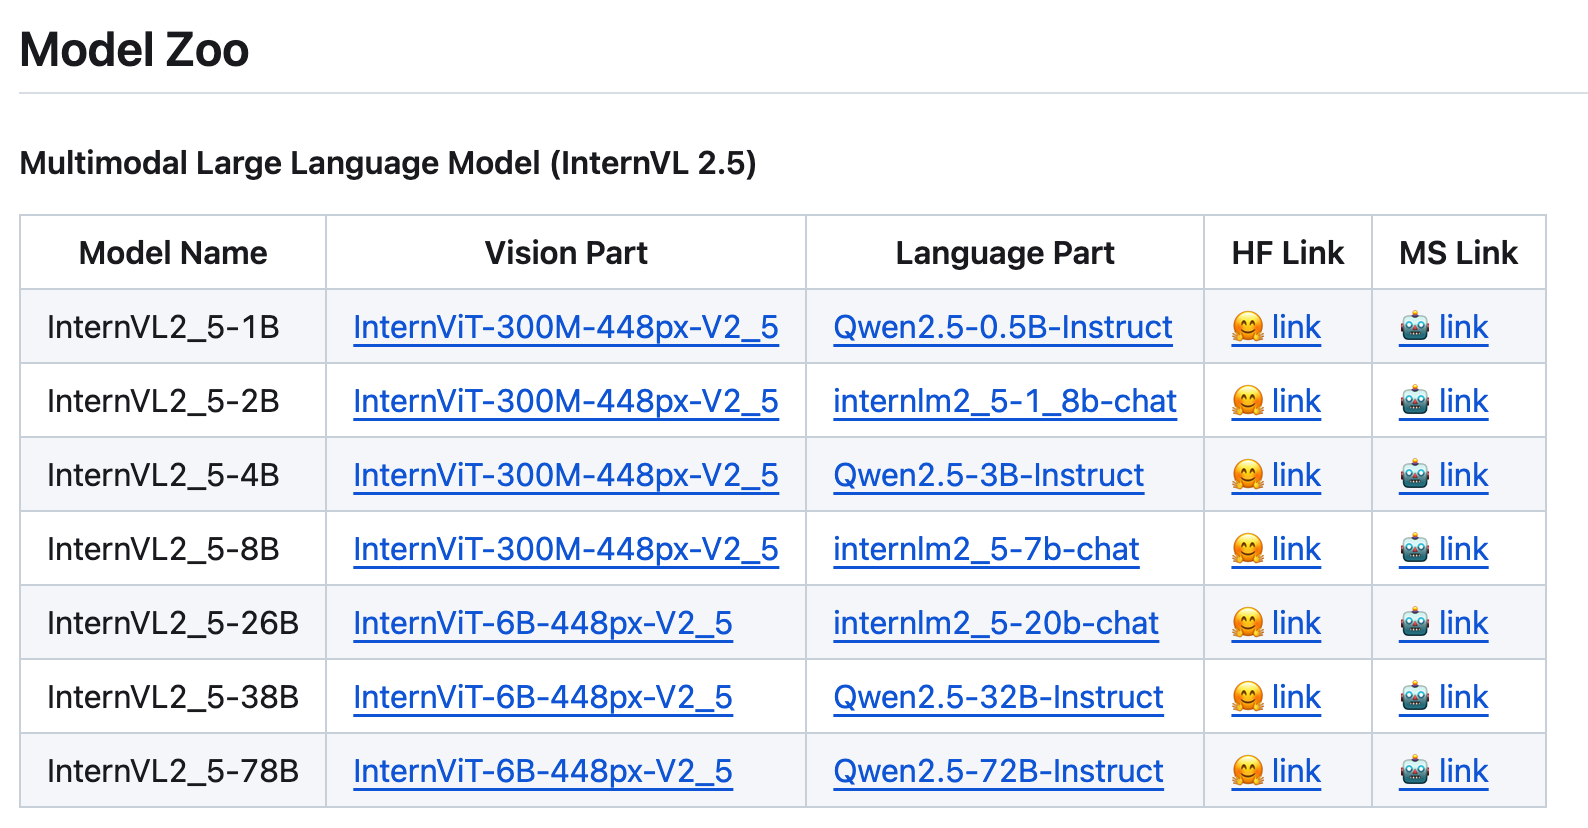
2. 下载模型:https://github.com/OpenGVLab/InternVL
这里选择视觉编码器大小为6B,语言模型为20B,共26B大小的模型。
ModelScope提供了两种方式下载,1)下载到./cache/modelscope/hub里;2)下载到本地。
这里我们选择下载原始模型文件到本地
# 1)下载完整模型repo
modelscope download --model OpenGVLab/InternVL2_5-26B# 2)下载完整文件到本地
modelscope download --model OpenGVLab/InternVL2_5-26B --local_dir /path/to/save/InternVL2_5-26B
然后就是漫长的等待下载过程(huggingface上下载可能需要换源)
from transformers import AutoModel, AutoTokenizer # 或者 from modelscope import AutoModel, AutoTokenizer path = 'OpenGVLab/InternVL2_5-26B' # 如果是本地则path = '/path/to/save/InternVL2_5-26B'
model = AutoModel.from_pretrained(path, torch_dtype=torch.bfloat16,low_cpu_mem_usage=True,use_flash_attn=True,trust_remote_code=True).eval().cuda()
tokenizer = AutoTokenizer.from_pretrained(path, trust_remote_code=True, use_fast=False)
3. 使用官方例子体验InternVL2_5
模型量化和多GPU可选:https://huggingface.co/OpenGVLab/InternVL2_5-1B-MPO#quick-start
点击查看代码
import numpy as np
import torch
import torchvision.transforms as T
from decord import VideoReader, cpu
from PIL import Image
from torchvision.transforms.functional import InterpolationMode
from transformers import AutoModel, AutoTokenizer # 或者 from modelscope import AutoModel, AutoTokenizer IMAGENET_MEAN = (0.485, 0.456, 0.406)
IMAGENET_STD = (0.229, 0.224, 0.225)def build_transform(input_size):MEAN, STD = IMAGENET_MEAN, IMAGENET_STDtransform = T.Compose([T.Lambda(lambda img: img.convert('RGB') if img.mode != 'RGB' else img),T.Resize((input_size, input_size), interpolation=InterpolationMode.BICUBIC),T.ToTensor(),T.Normalize(mean=MEAN, std=STD)])return transformdef find_closest_aspect_ratio(aspect_ratio, target_ratios, width, height, image_size):best_ratio_diff = float('inf')best_ratio = (1, 1)area = width * heightfor ratio in target_ratios:target_aspect_ratio = ratio[0] / ratio[1]ratio_diff = abs(aspect_ratio - target_aspect_ratio)if ratio_diff < best_ratio_diff:best_ratio_diff = ratio_diffbest_ratio = ratioelif ratio_diff == best_ratio_diff:if area > 0.5 * image_size * image_size * ratio[0] * ratio[1]:best_ratio = ratioreturn best_ratiodef dynamic_preprocess(image, min_num=1, max_num=12, image_size=448, use_thumbnail=False):orig_width, orig_height = image.sizeaspect_ratio = orig_width / orig_height# calculate the existing image aspect ratiotarget_ratios = set((i, j) for n in range(min_num, max_num + 1) for i in range(1, n + 1) for j in range(1, n + 1) ifi * j <= max_num and i * j >= min_num)target_ratios = sorted(target_ratios, key=lambda x: x[0] * x[1])# find the closest aspect ratio to the targettarget_aspect_ratio = find_closest_aspect_ratio(aspect_ratio, target_ratios, orig_width, orig_height, image_size)# calculate the target width and heighttarget_width = image_size * target_aspect_ratio[0]target_height = image_size * target_aspect_ratio[1]blocks = target_aspect_ratio[0] * target_aspect_ratio[1]# resize the imageresized_img = image.resize((target_width, target_height))processed_images = []for i in range(blocks):box = ((i % (target_width // image_size)) * image_size,(i // (target_width // image_size)) * image_size,((i % (target_width // image_size)) + 1) * image_size,((i // (target_width // image_size)) + 1) * image_size)# split the imagesplit_img = resized_img.crop(box)processed_images.append(split_img)assert len(processed_images) == blocksif use_thumbnail and len(processed_images) != 1:thumbnail_img = image.resize((image_size, image_size))processed_images.append(thumbnail_img)return processed_imagesdef load_image(image_file, input_size=448, max_num=12):image = Image.open(image_file).convert('RGB')transform = build_transform(input_size=input_size)images = dynamic_preprocess(image, image_size=input_size, use_thumbnail=True, max_num=max_num)pixel_values = [transform(image) for image in images]pixel_values = torch.stack(pixel_values)return pixel_values# If you have an 80G A100 GPU, you can put the entire model on a single GPU.
# Otherwise, you need to load a model using multiple GPUs, please refer to the `Multiple GPUs` section.
path = 'OpenGVLab/InternVL2_5-26B'
model = AutoModel.from_pretrained(path,torch_dtype=torch.bfloat16,low_cpu_mem_usage=True,use_flash_attn=True,trust_remote_code=True).eval().cuda()
tokenizer = AutoTokenizer.from_pretrained(path, trust_remote_code=True, use_fast=False)# set the max number of tiles in `max_num`
pixel_values = load_image('./examples/image1.jpg', max_num=12).to(torch.bfloat16).cuda()
generation_config = dict(max_new_tokens=1024, do_sample=True)# pure-text conversation (纯文本对话)
question = 'Hello, who are you?'
response, history = model.chat(tokenizer, None, question, generation_config, history=None, return_history=True)
print(f'User: {question}\nAssistant: {response}')question = 'Can you tell me a story?'
response, history = model.chat(tokenizer, None, question, generation_config, history=history, return_history=True)
print(f'User: {question}\nAssistant: {response}')# single-image single-round conversation (单图单轮对话)
question = '<image>\nPlease describe the image shortly.'
response = model.chat(tokenizer, pixel_values, question, generation_config)
print(f'User: {question}\nAssistant: {response}')# single-image multi-round conversation (单图多轮对话)
question = '<image>\nPlease describe the image in detail.'
response, history = model.chat(tokenizer, pixel_values, question, generation_config, history=None, return_history=True)
print(f'User: {question}\nAssistant: {response}')question = 'Please write a poem according to the image.'
response, history = model.chat(tokenizer, pixel_values, question, generation_config, history=history, return_history=True)
print(f'User: {question}\nAssistant: {response}')# multi-image multi-round conversation, combined images (多图多轮对话,拼接图像)
pixel_values1 = load_image('./examples/image1.jpg', max_num=12).to(torch.bfloat16).cuda()
pixel_values2 = load_image('./examples/image2.jpg', max_num=12).to(torch.bfloat16).cuda()
pixel_values = torch.cat((pixel_values1, pixel_values2), dim=0)question = '<image>\nDescribe the two images in detail.'
response, history = model.chat(tokenizer, pixel_values, question, generation_config,history=None, return_history=True)
print(f'User: {question}\nAssistant: {response}')question = 'What are the similarities and differences between these two images.'
response, history = model.chat(tokenizer, pixel_values, question, generation_config,history=history, return_history=True)
print(f'User: {question}\nAssistant: {response}')# multi-image multi-round conversation, separate images (多图多轮对话,独立图像)
pixel_values1 = load_image('./examples/image1.jpg', max_num=12).to(torch.bfloat16).cuda()
pixel_values2 = load_image('./examples/image2.jpg', max_num=12).to(torch.bfloat16).cuda()
pixel_values = torch.cat((pixel_values1, pixel_values2), dim=0)
num_patches_list = [pixel_values1.size(0), pixel_values2.size(0)]question = 'Image-1: <image>\nImage-2: <image>\nDescribe the two images in detail.'
response, history = model.chat(tokenizer, pixel_values, question, generation_config,num_patches_list=num_patches_list,history=None, return_history=True)
print(f'User: {question}\nAssistant: {response}')question = 'What are the similarities and differences between these two images.'
response, history = model.chat(tokenizer, pixel_values, question, generation_config,num_patches_list=num_patches_list,history=history, return_history=True)
print(f'User: {question}\nAssistant: {response}')# batch inference, single image per sample (单图批处理)
pixel_values1 = load_image('./examples/image1.jpg', max_num=12).to(torch.bfloat16).cuda()
pixel_values2 = load_image('./examples/image2.jpg', max_num=12).to(torch.bfloat16).cuda()
num_patches_list = [pixel_values1.size(0), pixel_values2.size(0)]
pixel_values = torch.cat((pixel_values1, pixel_values2), dim=0)questions = ['<image>\nDescribe the image in detail.'] * len(num_patches_list)
responses = model.batch_chat(tokenizer, pixel_values,num_patches_list=num_patches_list,questions=questions,generation_config=generation_config)
for question, response in zip(questions, responses):print(f'User: {question}\nAssistant: {response}')# video multi-round conversation (视频多轮对话)
def get_index(bound, fps, max_frame, first_idx=0, num_segments=32):if bound:start, end = bound[0], bound[1]else:start, end = -100000, 100000start_idx = max(first_idx, round(start * fps))end_idx = min(round(end * fps), max_frame)seg_size = float(end_idx - start_idx) / num_segmentsframe_indices = np.array([int(start_idx + (seg_size / 2) + np.round(seg_size * idx))for idx in range(num_segments)])return frame_indicesdef load_video(video_path, bound=None, input_size=448, max_num=1, num_segments=32):vr = VideoReader(video_path, ctx=cpu(0), num_threads=1)max_frame = len(vr) - 1fps = float(vr.get_avg_fps())pixel_values_list, num_patches_list = [], []transform = build_transform(input_size=input_size)frame_indices = get_index(bound, fps, max_frame, first_idx=0, num_segments=num_segments)for frame_index in frame_indices:img = Image.fromarray(vr[frame_index].asnumpy()).convert('RGB')img = dynamic_preprocess(img, image_size=input_size, use_thumbnail=True, max_num=max_num)pixel_values = [transform(tile) for tile in img]pixel_values = torch.stack(pixel_values)num_patches_list.append(pixel_values.shape[0])pixel_values_list.append(pixel_values)pixel_values = torch.cat(pixel_values_list)return pixel_values, num_patches_listvideo_path = './examples/red-panda.mp4'
pixel_values, num_patches_list = load_video(video_path, num_segments=8, max_num=1)
pixel_values = pixel_values.to(torch.bfloat16).cuda()
video_prefix = ''.join([f'Frame{i+1}: <image>\n' for i in range(len(num_patches_list))])
question = video_prefix + 'What is the red panda doing?'
# Frame1: <image>\nFrame2: <image>\n...\nFrame8: <image>\n{question}
response, history = model.chat(tokenizer, pixel_values, question, generation_config,num_patches_list=num_patches_list, history=None, return_history=True)
print(f'User: {question}\nAssistant: {response}')question = 'Describe this video in detail.'
response, history = model.chat(tokenizer, pixel_values, question, generation_config,num_patches_list=num_patches_list, history=history, return_history=True)
print(f'User: {question}\nAssistant: {response}')