背景
C++ 打包的DLL用到 OpenCV,用到 onnxruntime
C# 软件需要打包成Any CPU版本,即可以在 x86下使用,也可以在x64下使用
C# 前端想把 C++ dll与依赖放在单独的”Libs“文件夹中,不是"Dubug"下
难点:
在C++ 中, OpenCV 和 onnxruntime 分别有x64和x86两个版本,两个版本只能在对应环境下使用
DLL 和其依赖如果不放在"Dubug"下,不容易路径。
比如在C++ dll代码中,调用了"model.onnx"。将打包后的 DLL 和 model.onnx放在C# 项目中的 "Dubug/Libs"下。C# 调用DLL时,会在 Dubug下找model.onnx,即使在C#代码中指定DLL路径,也会报"找不到模型文件onnx 的错误。
系统环境
Windows 11
Visual Studio 2019
解决方案
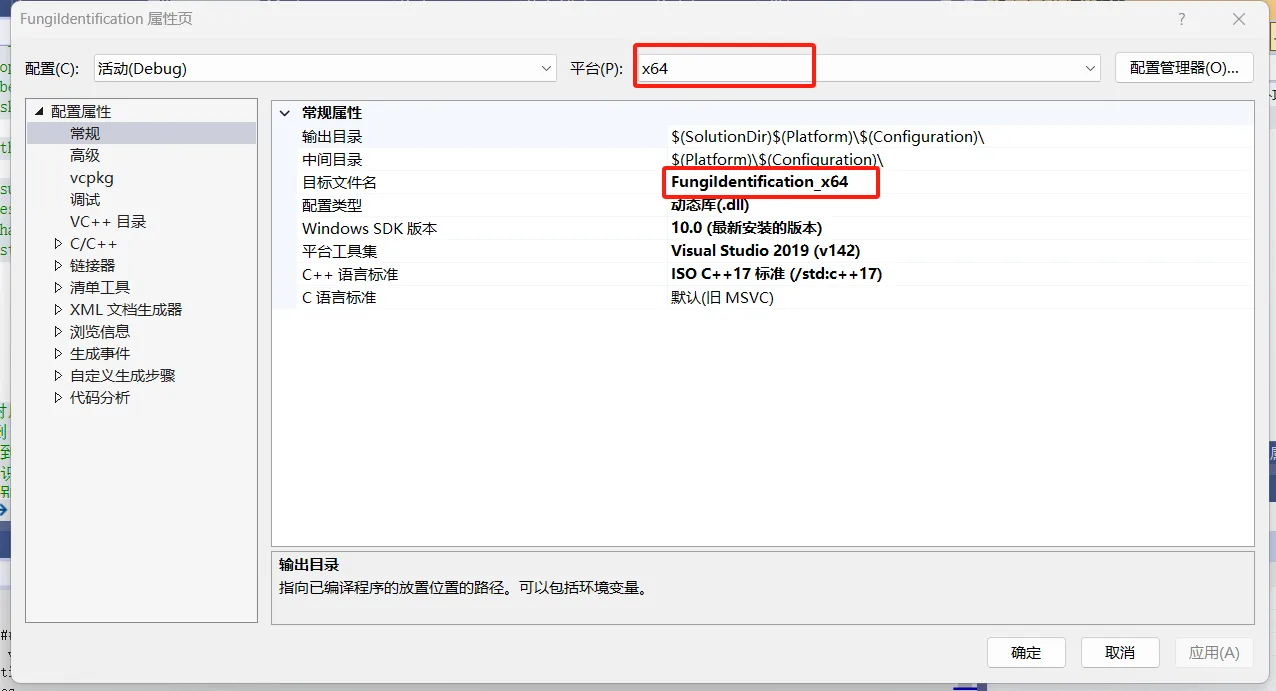
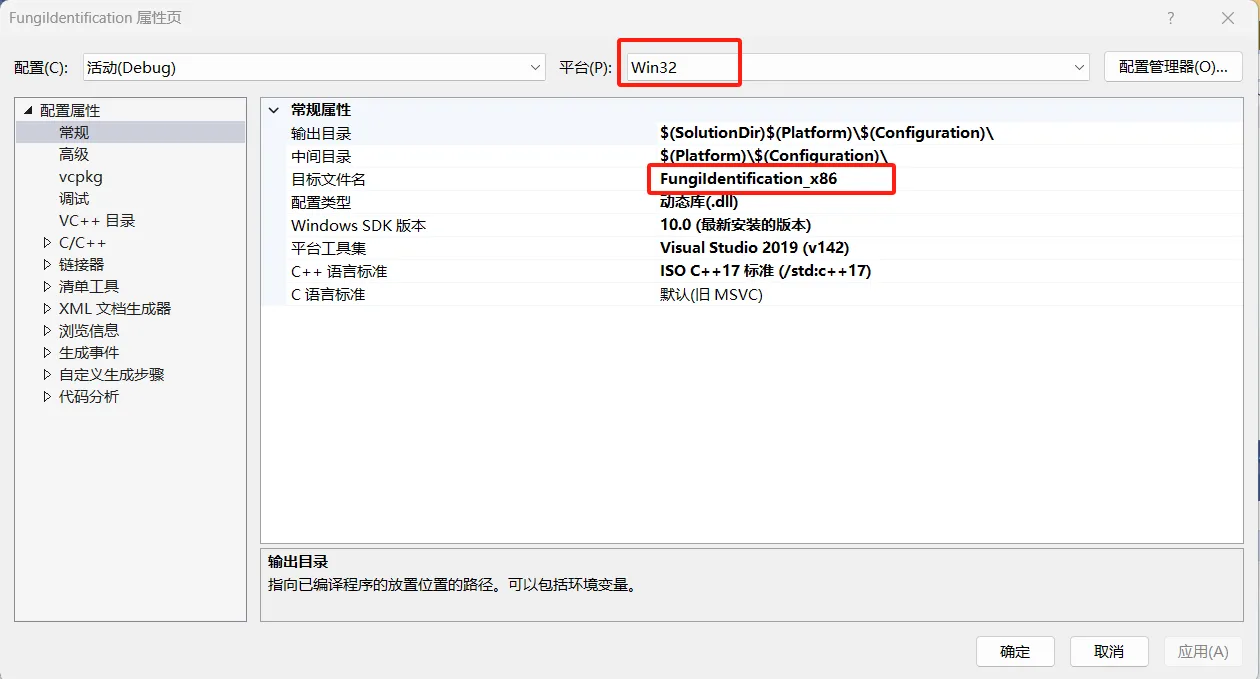
- 先用 C++ 打包两个 DLL FungiIdentification_x64.dll 和 FungiIdentification_x86.dll
- 两个DLL使用不同的函数接口 start_x64() 和 start_x86()
- 在打包时使用 getdlldir()函数获得DLL所在文件夹路径,之后使用DLL路径构建onnx模型的绝对路径(原因:DLL C++代码中设置的相对路径,C#调用后,会变成以C# exe为基准的相对路径)
- C# 调用时加载两个不同版本的DLL
- 给start_x64() 和 start_x86()再封装一个高一层的start()接口
- 使用windows系统"kernel32.dll"中的SetDllDirectory()函数,根据当前系统环境设置不同的依赖文件夹
具体步骤
省略配置 OpenCV 环境和 onnxruntime 环境的步骤
C++ 打包 x64版本
关键代码:
省略处理函数
#include "nlohmann/json.hpp"#include <fstream>
#include <iostream>
#include <ctime>
#include <sstream>
#include <windows.h>
#include <filesystem>#include "opencv2/opencv.hpp"
#include "opencv2/imgproc.hpp"
#include "opencv2/highgui.hpp"
#include "opencv2/core/utils/logger.hpp"std::string getdlldir()
{HMODULE hDllHandle = GetModuleHandleA("FungiIdentification_x64.dll");//是本代码片所属动态库名称char cDllPathBuff[MAX_PATH];memset(cDllPathBuff, 0, MAX_PATH);auto getdllpathstatus = GetModuleFileNameA((HMODULE)hDllHandle, cDllPathBuff,MAX_PATH);std::string strDllPathBuff = cDllPathBuff;auto nPathTruncLoc = strDllPathBuff.find_last_of('\\');strDllPathBuff = strDllPathBuff.substr(0, nPathTruncLoc + 1);//strDllPathBuff 为本动态库所在路径return strDllPathBuff;
}extern "C" _declspec(dllexport) const char* start_x64(char* img_path, char* img_p)
{cv::utils::logging::setLogLevel(cv::utils::logging::LOG_LEVEL_ERROR); // 取消警告std::string dlldir = getdlldir();nlohmann::json results;std::string img_path_str = img_path;process(img_path_str, dlldir, results);  // 处理函数,没放进来std::string results_s = results.dump(2);  //转储成字符串 可以使用dump(4)进行缩进char* return_char;return_char = strdup(results_s.c_str());return return_char;
}
C++ 打包 x86版本
关键代码:
省略处理函数
#include "nlohmann/json.hpp"#include <fstream>
#include <iostream>
#include <ctime>
#include <sstream>
#include <windows.h>
#include <filesystem>#include "opencv2/opencv.hpp"
#include "opencv2/imgproc.hpp"
#include "opencv2/highgui.hpp"
#include "opencv2/core/utils/logger.hpp"std::string getdlldir()
{HMODULE hDllHandle = GetModuleHandleA("FungiIdentification_x86.dll");//是本代码片所属动态库名称char cDllPathBuff[MAX_PATH];memset(cDllPathBuff, 0, MAX_PATH);auto getdllpathstatus = GetModuleFileNameA((HMODULE)hDllHandle, cDllPathBuff,MAX_PATH);std::string strDllPathBuff = cDllPathBuff;auto nPathTruncLoc = strDllPathBuff.find_last_of('\\');strDllPathBuff = strDllPathBuff.substr(0, nPathTruncLoc + 1);//strDllPathBuff 为本动态库所在路径return strDllPathBuff;
}extern "C" _declspec(dllexport) const char* start_x86(char* img_path, char* img_p)
{cv::utils::logging::setLogLevel(cv::utils::logging::LOG_LEVEL_ERROR); // 取消警告std::string dlldir = getdlldir();nlohmann::json results;std::string img_path_str = img_path;process(img_path_str, dlldir, results); // 处理函数,没放进来std::string results_s = results.dump(2);  //转储成字符串 可以使用dump(4)进行缩进char* return_char;return_char = strdup(results_s.c_str());return return_char;
}
C# 调用代码
首先将 dll与依赖放置在C# 项目的"Debug/Lib"下
|-- FungiIdentification_x64.dll
|-- FungiIdentification_x86.dll
|-- dish.onnx
|-- model_2.0.onnx
|-- x64_FungiIdentificationDependency
| |-- concrt140d.dll
| |-- msvcp140_1d.dll
| |-- msvcp140d.dll
| |-- onnxruntime.dll
| |-- opencv_world455d.dll
| |-- ucrtbased.dll
| |-- vcruntime140_1d.dll
| |-- vcruntime140d.dll
|-- x86_FungiIdentificationDependency
| |-- concrt140.dll
| |-- concrt140d.dll
| |-- msvcp140.dll
| |-- msvcp140_1d.dll
| |-- msvcp140d.dll
| |-- onnxruntime.dll
| |-- opencv_world455d.dll
| |-- ucrtbase.dll
| |-- ucrtbased.dll
| |-- vcruntime140.dll
| |-- vcruntime140d.dll
OpenCV 和 onnxruntime 都有 x64 和 x86 两个版本所以两个库的DLL与依赖都是不同的,所以分为两个文件夹放置 x64_FungiIdentificationDependency 和 x86_FungiIdentificationDependency
- opencv_world455d.dll 在 OpenCV 编译包找到(注意版本)
- 如果 onnxruntime 是用NuGet安装的,onnxruntime.dll 可以在 C++ 工程下找到(也要注意版本)
- 像 concrt140d.dll 等这些 dll 是 C/C++ 运行时所需要的库,64位的在"C:\Windows\System32", 32位的在"C:\Windows\SysWOW64"
- C++运行库的版本和使用的 Visual Studio版本有关,我用的是 VS2019,不同的VS版本使用的版本号可能不同
- ONNX模型文件不分 x64 和 x86 ,可以共用
using Newtonsoft.Json.Linq;
using System;
using System.Runtime.InteropServices;namespace ConsoleApp2._1
{class Program{[DllImport("kernel32.dll", CharSet = CharSet.Auto, SetLastError = true)]static extern bool SetDllDirectory(string lpPathName);[DllImport("Libs/FungiIdentification_x64.dll", CallingConvention = CallingConvention.Cdecl)]extern static IntPtr start_x64(string img_path);[DllImport("Libs/FungiIdentification_x86.dll", CallingConvention = CallingConvention.Cdecl)]extern static IntPtr start_x86(string img_path);static IntPtr start(string img_path){if (Environment.Is64BitOperatingSystem){return start_x64(img_path);}else{return start_x86(img_path);} }static void setDllDirectory(){if (Environment.Is64BitOperatingSystem){string dllpath = $"{AppDomain.CurrentDomain.BaseDirectory}/Libs/x64_FungiIdentificationDependency";  //BaseDirectory 有分隔符结尾bool ret = SetDllDirectory(dllpath);if (!ret) throw new System.ComponentModel.Win32Exception();}else{string dllpath = $"{AppDomain.CurrentDomain.BaseDirectory}/Libs/x86_FungiIdentificationDependency";  //BaseDirectory 有分隔符结尾bool ret = SetDllDirectory(dllpath);if (!ret) throw new System.ComponentModel.Win32Exception();}}static void Main(string[] args){try{string img_path = @"D://微信图片_20250227203052.jpg";// 1. AnyCPU 测试(生成平台选择 AnyCPU)//    因为我的笔记本是 x64位,所以【去掉“首选32位”的勾选】setDllDirectory();IntPtr result = start(img_path);string result_str = Marshal.PtrToStringAnsi(result);// 2. x64 测试 (生成平台选择 x64)// string dllpath = $"{AppDomain.CurrentDomain.BaseDirectory}/Libs/x64_FungiIdentificationDependency";  //BaseDirectory 有分隔符结尾// bool ret = SetDllDirectory(dllpath);// if (!ret) throw new System.ComponentModel.Win32Exception();// IntPtr result_x64 = start_x64(img_path);// string result_str = Marshal.PtrToStringAnsi(result_x64);// 3. x86 测试(生成平台选择 x86)//string dllpath = $"{AppDomain.CurrentDomain.BaseDirectory}/Libs/x86_FungiIdentificationDependency";  //BaseDirectory 有分隔符结尾//bool ret = SetDllDirectory(dllpath);//if (!ret) throw new System.ComponentModel.Win32Exception();//IntPtr result_x86 = start_x86(img_path);//string result_str = Marshal.PtrToStringAnsi(result_x86);// 输出Console.WriteLine(result_str);JObject result_json = JObject.Parse(result_str);Console.WriteLine(result_json["err"]);Console.WriteLine(result_json["err_info"]);// ERR = 0; 正常// ERR = 1; 找不到图片// ERR = 2; 找不到dish.onnx// ERR = 3; 找不到model_2.0.onnx// ERR = 4: 没有检测到菌}catch (Exception ex){Console.WriteLine($"ex:{ex}");}Console.ReadLine();}}
}
最后一个坑:
测试 Any CPU 时,如果你的电脑是x64,在选择生成平台时,需要去掉"首选32位"的选项


![[NCTF 2022]qrssssssssqrssssssss_revenge WP](https://img2023.cnblogs.com/blog/3485533/202502/3485533-20250227224516295-701392394.png)