1.引言
在上一篇帖子中,我们已详尽阐述了 BEVPoolV2 相较于 BEVPoolV1 的改进之处,并对 BEVPoolV2 实现的代码进行了解析。想必大家对 BEVPoolV2 算子的功能及实现已有了一定程度的理解,此篇帖子将展示 征程 6 工具链 BEVPoolV2 单算子 QAT 链路的实现范例,以进一步增进用户对 BEVPoolV2 算子使用的认知。
2.QAT 代码实现
征程 6 工具链对齐 mmdet3d 的实现,目前已经支持了 BEVPoolV2 算子,QAT 链路中的核心函数如下:
def bev_pool_v2(depth: Tensor,feat: Tensor,ranks_depth: Tensor,ranks_feat: Tensor,ranks_bev: Tensor,interval_starts: Tensor,interval_lengths: Tensor,bev_feat_shape,
):"""BEVPoolv2 implementation for Lift-Splat-Shoot view transformation.This impl is same as following
exceptthe layout of inout feature:https://github.com/HuangJunJie2017/BEVDet/blob/dev3.0/mmdet3d/ops/bev_pool_v2/bev_pool.pyArgs:depth (Tensor[b, n, d, h, w]): Input depth.feat (Tensor[b, n, c, h, w]): Input features.ranks_depth (Tensor[n_points]): Depth index of points.ranks_feat (Tensor[n_points]): Feat index of points.ranks_bev (Tensor[n_points]): Output index of points.interval_starts (Tensor[n_pillars]): Starting position in ranks_xxx for each pooled point.  # noqa: E501interval_lengths (Tensor[n_pillars]): How many points in each pooled point.  # noqa: E501bev_feat_shape: Output shape in [b, z_out, h_out, w_out, c] or[z_out, h_out, w_out] or [h_out, w_out] format.When z_out is not given, its value will be 1 by default.Returns:Tensor[b, c, z_out, h_out, w_out]: Output features."""if len(bev_feat_shape) not in (2, 3, 5):raise ValueError("Illegal bev_feat_shape length")if len(bev_feat_shape) < 5:bev_feat_shape = tuple(bev_feat_shape)if len(bev_feat_shape) == 2:bev_feat_shape = (1,) + bev_feat_shapeb = feat.size(0)c = feat.size(2)bev_feat_shape = (b,) + tuple(bev_feat_shape) + (c,)if has_torch_function((depth, feat)):return handle_torch_function(bev_pool_v2,(depth, feat),depth,feat,ranks_depth,ranks_feat,ranks_bev,interval_starts,interval_lengths,bev_feat_shape, )x = torch.ops.horizon.bev_pool_v2(depth,feat,ranks_depth,ranks_feat,ranks_bev,interval_starts,interval_lengths,bev_feat_shape,)return x
docker 中代码路径: /usr/local/lib/python3.10/dist-packages/horizon_plugin_pytorch/nn/bev_pool_v2.py
详细说明 BEVPoolV2 算子在整个 QAT 链路使用流程
下面我们将以一个简单的单算子示例来详细说明 BEVPoolV2 算子在整个 QAT 链路使用流程。
首先,我们需要了解 QAT 链路的基本概念和工作原理,读者可以自行去学习 征程 6 工具链用户手册的快速上手章节。接下来,我们将详细介绍 BEVPoolV2 算子在 QAT 链路中的使用流程,涉及模型搭建、QAT 模型改造、模型导出与编译等。
本示例只为演示流程,未涉及到浮点训练和量化训练等流程。
3.输入准备
在进行 演示 QAT 链路之前,我们首先进行输入数据构建,这里要特别注意的是, BEVPoolV2 算子的性能和输入索引强相关,建议构建模型的时候使用真实输入。后面会结合代码进行说明。
4.示例代码
本示例代码基本遵循以下图中的 QAT 链路流程:

import copy
import torch
import torch.nn as nn
import numpy as np
from horizon_plugin_pytorch.nn.bev_pool_v2 import BevPoolV2
from horizon_plugin_pytorch.quantization.hbdk4 import export
from torch.quantization import DeQuantStub
from horizon_plugin_pytorch.quantization import (QuantStub,set_fake_quantize,FakeQuantState,
)
from horizon_plugin_pytorch.quantization.qconfig_template import default_calibration_qconfig_setter
from horizon_plugin_pytorch.quantization.prepare import prepare, PrepareMethod
from horizon_plugin_pytorch.march import March, set_march
from hbdk4.compiler import convert, compile, save
def load_input(b, d, h_out, w_out, c):#load 真实输入#b:batch#d:depth数#h_out, w_out:输出特征图大小#c:通道数depth = torch.Tensor(np.load("real_inputs/depth.npy"))feat = torch.Tensor(np.load("real_inputs/feat.npy"))ranks_depth = torch.Tensor(np.load("real_inputs/new_ranks_depth.npy")).type(torch.int32) #ranks_feat = torch.Tensor(np.load("real_inputs/new_ranks_feat.npy")).type(torch.int32)ranks_bev = torch.Tensor(np.load("real_inputs/new_ranks_bev.npy")).type(torch.int32)interval_starts = torch.Tensor(np.load("real_inputs/new_interval_starts.npy")).type(torch.int32)interval_lengths = torch.Tensor(np.load("real_inputs/new_interval_lengths.npy")).type(torch.int32)bev_feat_shape = (b, d, h_out, w_out, c)return depth, feat, ranks_depth, ranks_feat, ranks_bev, interval_starts, interval_lengths, bev_feat_shape
#step1;构建复现浮点模型
class SimpleBEVModel(nn.Module):def
__init__
(self,bev_feat_shape):super(SimpleBEVModel, self).
__init__
()self.bev_feat_shape = bev_feat_shapeself.bev_pool = BevPoolV2(self.bev_feat_shape)self.quant1 = QuantStub()self.quant2 = QuantStub()self.dequant = DeQuantStub()_, _, self.ranks_depth, self.ranks_feat, self.ranks_bev, self.interval_starts, self.interval_lengths, _ = load_input(1, 1,640, 128, 64)def forward(self, data):depth = data["depth"]feat = data["feat"]#step2:改造模型#在输入/输出分别插入QuantStub和DeQuantStubdepth = self.quant1(depth)feat = self.quant2(feat)#调用BevPoolV2算子bev_feat = self.bev_pool(depth, feat, self.ranks_depth, self.ranks_feat, self.ranks_bev, self.interval_starts, self.interval_lengths)print("output shape:",bev_feat.shape)bev_feat = self.dequant(bev_feat)return bev_feat
if
name== '
__main__
':b, d, h_out, w_out, c=1,1,640, 128, 64depth, feat, ranks_depth, ranks_feat, ranks_bev, interval_starts, interval_lengths, bev_feat_shape = load_input(b, d, h_out, w_out, c)print(f"Depth shape: {depth.shape} {depth.dtype}")print(f"Feat shape: {feat.shape} {feat.dtype}")print(f"Ranks depth shape: {ranks_depth.shape} {ranks_depth.dtype}")print(f"Ranks feat shape: {ranks_feat.shape} {ranks_feat.dtype}")print(f"Ranks bev shape: {ranks_bev.shape} {ranks_bev.dtype}")print(f"Interval starts shape: {interval_starts.shape} {interval_starts.dtype}")print(f"Interval lengths shape: {interval_lengths.shape} {interval_lengths.dtype}")print(f"BEV feat shape: {bev_feat_shape}")model = SimpleBEVModel(bev_feat_shape)example_inputs = dict(depth=depth,feat=feat,)import logginglogging.basicConfig(filename='error.log', level=logging.ERROR)try:res_float = model(example_inputs)passexcept Exception as e:logging.error("An error occurred: %s", e, exc_info=True)#配置marchset_march(March.NASH_M)#step3:将浮点模型 prepare为伪量化模型calib_model = prepare(copy.deepcopy(model),example_inputs=(example_inputs,),qconfig_setter=(default_calibration_qconfig_setter,),method=PrepareMethod.JIT_STRIP,)calib_model.eval()set_fake_quantize(calib_model, FakeQuantState.CALIBRATION)res_calib = calib_model(example_inputs)#step4:export出 qat.bcqat_hbir = export(calib_model,example_inputs,name="bevpool",)save(qat_hbir,"bevpoolv2_qat.bc")#step5:将qat.bc convert为 quantized.bcquanti_hbir = convert(qat_hbir, "nash-e")save(quanti_hbir, "bevpoolv2_quantized.bc")compile(quanti_hbir,path="bevpoolv2.hbm",march='nash-e',opt=2,jobs=64,balance=100,progress_bar=True,)
运行此示例代码后,目录下会有 3 个文件生成:
- bevpoolv2_qat.bc: 单算子伪量化 bc
- bevpoolv2_quantized.bc:单算子定点 bc
- bevpoolv2.hbm:上板部署的 hbm
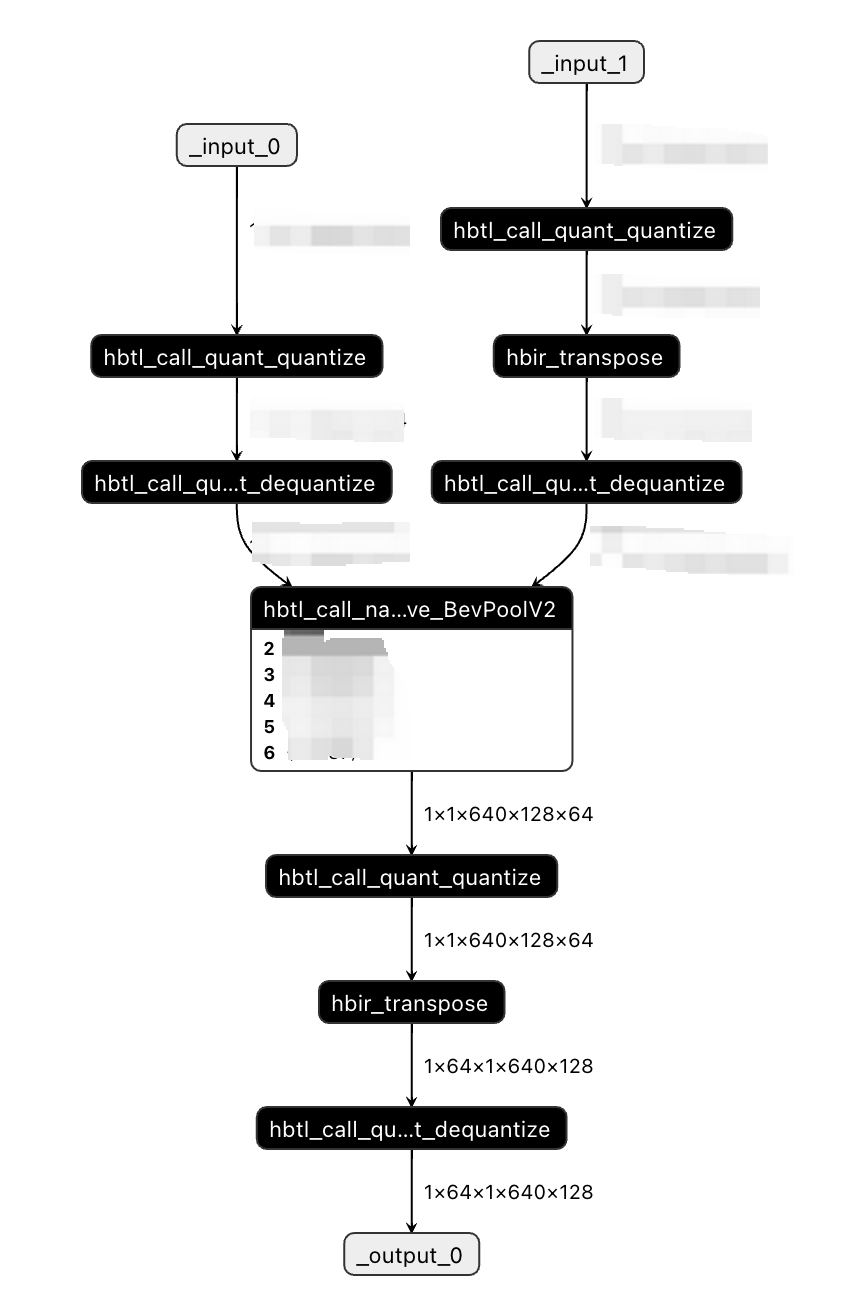
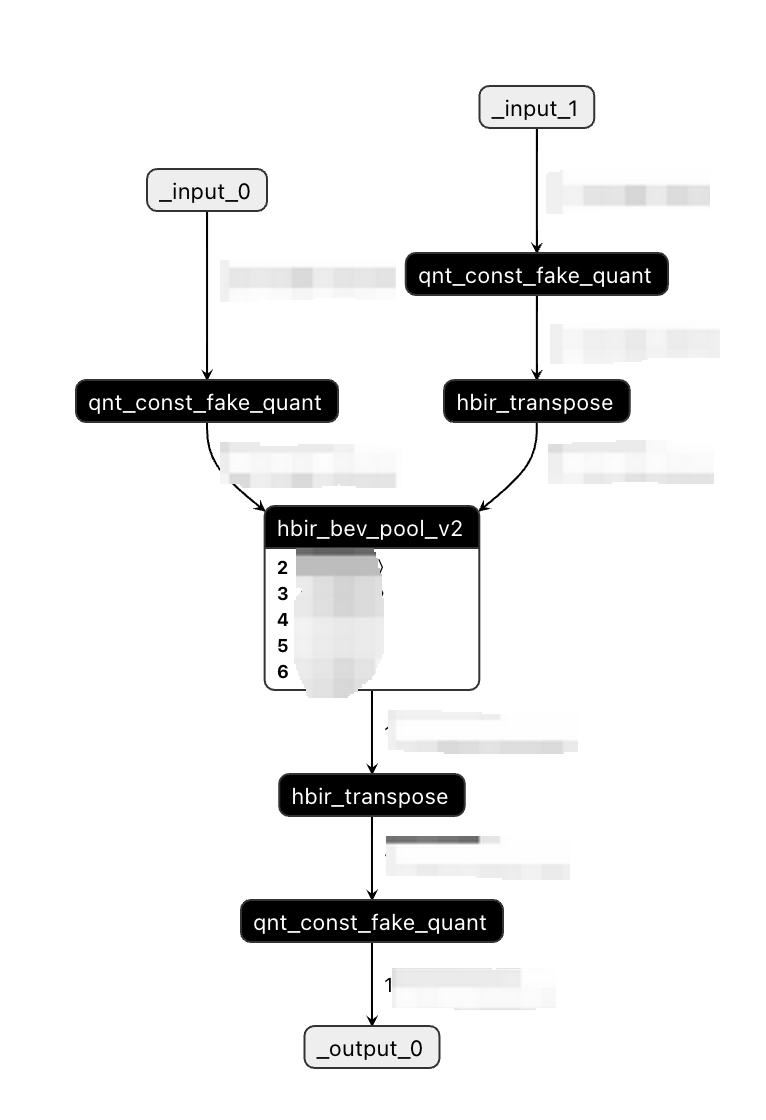
5.模型可视化
获取以上模型后,可视化查看输入输出属性是否符合预期。
可视化方式可以使用 hb_model_info 命令行工具或者 visualize 接口来可视化 bc/hbm 模型。
bevpoolv2_qat.bc可视化:
bevpoolv2_quantized.bc可视化: