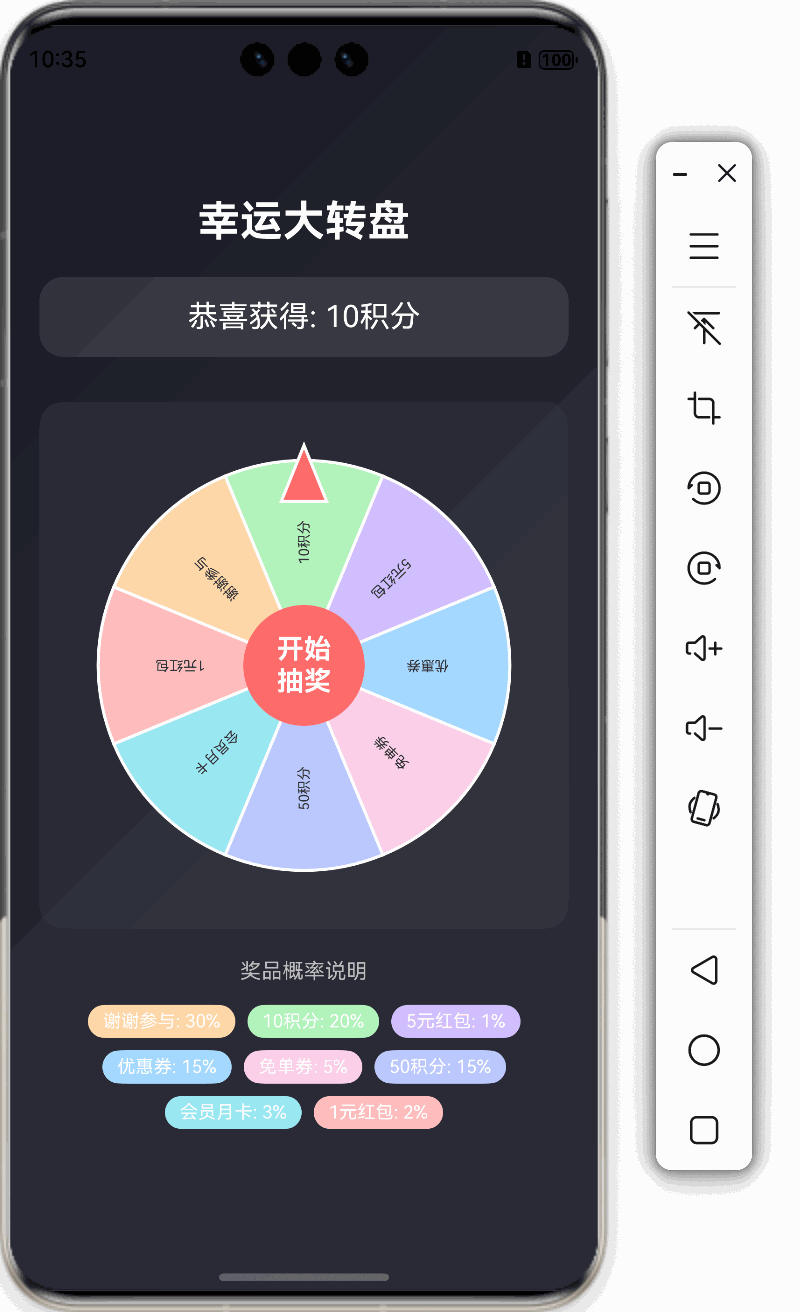
鸿蒙特效教程08-幸运大转盘抽奖
本教程将带领大家从零开始,一步步实现一个完整的转盘抽奖效果,包括界面布局、Canvas绘制、动画效果和抽奖逻辑等。
1. 需求分析与整体设计
温馨提醒:本案例有一定难度,建议先收藏起来。
在开始编码前,让我们先明确转盘抽奖的基本需求:
- 展示一个可旋转的奖品转盘
- 转盘上有多个奖品区域,每个区域有不同的颜色和奖品名称
- 点击"开始抽奖"按钮后,转盘开始旋转
- 转盘停止后,指针指向的位置即为抽中的奖品
- 每个奖品有不同的中奖概率
整体设计思路:
- 使用HarmonyOS的Canvas组件绘制转盘
- 利用动画效果实现转盘旋转
- 根据概率算法确定最终停止位置
2. 基础界面布局
首先,我们创建基础的页面布局,包括标题、转盘区域和结果显示。
@Entry
@Component
struct LuckyWheel {build() {Column() {// 标题Text('幸运大转盘').fontSize(28).fontWeight(FontWeight.Bold).fontColor(Color.White).margin({ bottom: 20 })// 抽奖结果显示Text('点击开始抽奖').fontSize(20).fontColor(Color.White).backgroundColor('#1AFFFFFF').width('90%').textAlign(TextAlign.Center).padding(15).borderRadius(16).margin({ bottom: 30 })// 转盘容器(后续会添加Canvas)Stack({ alignContent: Alignment.Center }) {// 这里稍后会添加Canvas绘制转盘// 中央开始按钮Button({ type: ButtonType.Circle }) {Text('开始\n抽奖').fontSize(18).fontWeight(FontWeight.Bold).textAlign(TextAlign.Center).fontColor(Color.White)}.width(80).height(80).backgroundColor('#FF6B6B')}.width('90%').aspectRatio(1).backgroundColor('#0DFFFFFF').borderRadius(16).padding(15)}.width('100%').height('100%').justifyContent(FlexAlign.Center).backgroundColor(Color.Black).linearGradient({angle: 135,colors: [['#1A1B25', 0],['#2D2E3A', 1]]})}
}
这个基础布局创建了一个带有标题、结果显示区和转盘容器的页面。转盘容器使用Stack组件,这样我们可以在转盘上方放置"开始抽奖"按钮。
3. 定义数据结构
接下来,我们需要定义转盘上的奖品数据结构:
// 奖品数据接口
interface PrizesItem {name: string     // 奖品名称color: string    // 转盘颜色probability: number // 概率权重
}@Entry
@Component
struct LuckyWheel {// 奖品数据private prizes: PrizesItem[] = [{ name: '谢谢参与', color: '#FFD8A8', probability: 30 },{ name: '10积分', color: '#B2F2BB', probability: 20 },{ name: '5元红包', color: '#D0BFFF', probability: 10 },{ name: '优惠券', color: '#A5D8FF', probability: 15 },{ name: '免单券', color: '#FCCFE7', probability: 5 },{ name: '50积分', color: '#BAC8FF', probability: 15 },{ name: '会员月卡', color: '#99E9F2', probability: 3 },{ name: '1元红包', color: '#FFBDBD', probability: 2 }]// 状态变量@State isSpinning: boolean = false // 是否正在旋转@State rotation: number = 0 // 当前旋转角度@State result: string = '点击开始抽奖' // 抽奖结果// ...其余代码
}
这里我们定义了转盘上的8个奖品,每个奖品包含名称、颜色和概率权重。同时定义了三个状态变量来跟踪转盘的状态。
4. 初始化Canvas
现在,让我们初始化Canvas来绘制转盘:
@Entry
@Component
struct LuckyWheel {// Canvas 相关设置private readonly settings: RenderingContextSettings = new RenderingContextSettings(true); // 启用抗锯齿private readonly ctx: CanvasRenderingContext2D = new CanvasRenderingContext2D(this.settings);// 转盘相关属性private canvasWidth: number = 0 // 画布宽度private canvasHeight: number = 0 // 画布高度// ...其余代码build() {Column() {// ...之前的代码// 转盘容器Stack({ alignContent: Alignment.Center }) {// 使用Canvas绘制转盘Canvas(this.ctx).width('100%').height('100%').onReady(() => {// 获取Canvas尺寸this.canvasWidth = this.ctx.widththis.canvasHeight = this.ctx.height// 初始绘制转盘this.drawWheel()})// 中央开始按钮// ...按钮代码}// ...容器样式}// ...外层容器样式}// 绘制转盘(先定义一个空方法,稍后实现)private drawWheel(): void {// 稍后实现}
}
这里我们创建了Canvas绘制上下文,并在onReady回调中获取Canvas尺寸,然后调用drawWheel方法绘制转盘。
5. 实现转盘绘制
接下来,我们实现drawWheel方法,绘制转盘:
// 绘制转盘
private drawWheel(): void {if (!this.ctx) returnconst centerX = this.canvasWidth / 2const centerY = this.canvasHeight / 2const radius = Math.min(centerX, centerY) * 0.85// 清除画布this.ctx.clearRect(0, 0, this.canvasWidth, this.canvasHeight)// 保存当前状态this.ctx.save()// 移动到中心点this.ctx.translate(centerX, centerY)// 应用旋转this.ctx.rotate((this.rotation % 360) * Math.PI / 180)// 绘制转盘扇形const anglePerPrize = 2 * Math.PI / this.prizes.lengthfor (let i = 0; i < this.prizes.length; i++) {const startAngle = i * anglePerPrizeconst endAngle = (i + 1) * anglePerPrizethis.ctx.beginPath()this.ctx.moveTo(0, 0)this.ctx.arc(0, 0, radius, startAngle, endAngle)this.ctx.closePath()// 填充扇形this.ctx.fillStyle = this.prizes[i].colorthis.ctx.fill()// 绘制边框this.ctx.strokeStyle = "#FFFFFF"this.ctx.lineWidth = 2this.ctx.stroke()}// 恢复状态this.ctx.restore()
}
这段代码实现了基本的转盘绘制:
- 计算中心点和半径
- 清除画布
- 平移坐标系到转盘中心
- 应用旋转角度
- 绘制每个奖品的扇形区域
运行后,你应该能看到一个彩色的转盘,但还没有文字和指针。
6. 添加奖品文字
继续完善drawWheel方法,添加奖品文字:
// 绘制转盘扇形
const anglePerPrize = 2 * Math.PI / this.prizes.length
for (let i = 0; i < this.prizes.length; i++) {// ...之前的扇形绘制代码// 绘制文字this.ctx.save()this.ctx.rotate(startAngle + anglePerPrize / 2)this.ctx.textAlign = 'center'this.ctx.textBaseline = 'middle'this.ctx.fillStyle = '#333333'this.ctx.font = '24px sans-serif'// 旋转文字,使其可读性更好// 第一象限和第四象限的文字需要额外旋转180度,保证文字朝向const needRotate = (i >= this.prizes.length / 4) && (i < this.prizes.length * 3 / 4)if (needRotate) {this.ctx.rotate(Math.PI)this.ctx.fillText(this.prizes[i].name, -radius * 0.6, 0, radius * 0.5)} else {this.ctx.fillText(this.prizes[i].name, radius * 0.6, 0, radius * 0.5)}this.ctx.restore()
}
这里我们在每个扇形区域添加了奖品文字,并根据位置进行适当旋转,确保文字朝向正确,提高可读性。
7. 添加中心圆盘和指针
继续完善drawWheel方法,添加中心圆盘和指针:
// 恢复状态
this.ctx.restore()// 绘制中心圆盘
this.ctx.beginPath()
this.ctx.arc(centerX, centerY, radius * 0.2, 0, 2 * Math.PI)
this.ctx.fillStyle = '#FF8787'
this.ctx.fill()
this.ctx.strokeStyle = '#FFFFFF'
this.ctx.lineWidth = 3
this.ctx.stroke()// 绘制指针 - 固定在顶部中央
this.ctx.beginPath()
// 三角形指针
this.ctx.moveTo(centerX, centerY - radius - 10)
this.ctx.lineTo(centerX - 15, centerY - radius * 0.8)
this.ctx.lineTo(centerX + 15, centerY - radius * 0.8)
this.ctx.closePath()
this.ctx.fillStyle = '#FF6B6B'
this.ctx.fill()
this.ctx.strokeStyle = '#FFFFFF'
this.ctx.lineWidth = 2
this.ctx.stroke()// 绘制中心文字
this.ctx.textAlign = 'center'
this.ctx.textBaseline = 'middle'
this.ctx.fillStyle = '#FFFFFF'
this.ctx.font = '18px sans-serif'// 绘制两行文字
this.ctx.fillText('开始', centerX, centerY - 10)
this.ctx.fillText('抽奖', centerX, centerY + 10)
这段代码添加了:
- 中心的红色圆盘
- 顶部的三角形指针
- 中心的"开始抽奖"文字
现在转盘的静态部分已经完成。下一步,我们将实现转盘的旋转动画。
8. 实现抽奖逻辑
在实现转盘旋转前,我们需要先实现抽奖逻辑,决定最终奖品:
// 生成随机目标索引(基于概率权重)
private generateTargetIndex(): number {const weights = this.prizes.map(prize => prize.probability)const totalWeight = weights.reduce((a, b) => a + b, 0)const random = Math.random() * totalWeightlet currentWeight = 0for (let i = 0; i < weights.length; i++) {currentWeight += weights[i]if (random < currentWeight) {return i}}return 0
}
这个方法根据每个奖品的概率权重生成一个随机索引,概率越高的奖品被选中的机会越大。
9. 实现转盘旋转
现在,让我们实现转盘旋转的核心逻辑:
// 转盘属性
private spinDuration: number = 4000 // 旋转持续时间(毫秒)
private targetIndex: number = 0 // 目标奖品索引
private spinTimer: number = 0 // 旋转定时器// 开始抽奖
private startSpin(): void {if (this.isSpinning) returnthis.isSpinning = truethis.result = '抽奖中...'// 生成目标奖品索引this.targetIndex = this.generateTargetIndex()console.info(`抽中奖品索引: ${this.targetIndex}, 名称: ${this.prizes[this.targetIndex].name}`)// 计算目标角度// 每个奖品占据的角度 = 360 / 奖品数量const anglePerPrize = 360 / this.prizes.length// 因为Canvas中0度是在右侧,顺时针旋转,而指针在顶部(270度位置)// 所以需要将奖品旋转到270度位置对应的角度// 目标奖品中心点的角度 = 索引 * 每份角度 + 半份角度const prizeAngle = this.targetIndex * anglePerPrize + anglePerPrize / 2// 需要旋转到270度位置的角度 = 270 - 奖品角度// 但由于旋转方向是顺时针,所以需要计算为正向旋转角度const targetAngle = (270 - prizeAngle + 360) % 360// 获取当前角度的标准化值(0-360范围内)const currentRotation = this.rotation % 360// 计算从当前位置到目标位置需要旋转的角度(确保是顺时针旋转)let deltaAngle = targetAngle - currentRotationif (deltaAngle <= 0) {deltaAngle += 360}// 最终旋转角度 = 当前角度 + 5圈 + 到目标的角度差const finalRotation = this.rotation + 360 * 5 + deltaAngleconsole.info(`当前角度: ${currentRotation}°, 奖品角度: ${prizeAngle}°, 目标角度: ${targetAngle}°, 旋转量: ${deltaAngle}°, 最终角度: ${finalRotation}°`)// 使用基于帧动画的方式旋转,确保视觉上平滑旋转let startTime = Date.now()let initialRotation = this.rotation// 清除可能存在的定时器if (this.spinTimer) {clearInterval(this.spinTimer)}// 创建新的动画定时器this.spinTimer = setInterval(() => {const elapsed = Date.now() - startTimeif (elapsed >= this.spinDuration) {// 动画结束clearInterval(this.spinTimer)this.spinTimer = 0this.rotation = finalRotationthis.drawWheel()this.isSpinning = falsethis.result = `恭喜获得: ${this.prizes[this.targetIndex].name}`return}// 使用easeOutExpo效果:慢慢减速const progress = this.easeOutExpo(elapsed / this.spinDuration)this.rotation = initialRotation + progress * (finalRotation - initialRotation)// 重绘转盘this.drawWheel()}, 16) // 大约60fps的刷新率
}// 缓动函数:指数减速
private easeOutExpo(t: number): number {return t === 1 ? 1 : 1 - Math.pow(2, -10 * t)
}
这段代码实现了转盘旋转的核心逻辑:
- 根据概率生成目标奖品
- 计算目标奖品对应的角度
- 计算需要旋转的总角度(多转几圈再停在目标位置)
- 使用定时器实现转盘的平滑旋转
- 使用缓动函数实现转盘的减速效果
- 旋转结束后显示中奖结果
10. 连接按钮点击事件
现在我们需要将"开始抽奖"按钮与startSpin方法连接起来:
// 中央开始按钮
Button({ type: ButtonType.Circle }) {Text('开始\n抽奖').fontSize(18).fontWeight(FontWeight.Bold).textAlign(TextAlign.Center).fontColor(Color.White)
}
.width(80)
.height(80)
.backgroundColor('#FF6B6B')
.onClick(() => this.startSpin())
.enabled(!this.isSpinning)
.stateEffect(true) // 启用点击效果
这里我们给按钮添加了onClick事件处理器,点击按钮时调用startSpin方法。同时使用enabled属性确保在转盘旋转过程中按钮不可点击。
11. 添加资源释放
为了防止内存泄漏,我们需要在页面销毁时清理定时器:
aboutToDisappear() {// 清理定时器if (this.spinTimer !== 0) {clearInterval(this.spinTimer)this.spinTimer = 0}
}
12. 添加底部概率说明(可选)
最后,我们在页面底部添加奖品概率说明:
// 底部说明
Text('奖品说明:概率从高到低排序').fontSize(14).fontColor(Color.White).opacity(0.7).margin({ top: 20 })// 概率说明
Flex({ wrap: FlexWrap.Wrap, justifyContent: FlexAlign.Center }) {ForEach(this.prizes, (prize: PrizesItem, index) => {Text(`${prize.name}: ${prize.probability}%`).fontSize(12).fontColor(Color.White).backgroundColor(prize.color).borderRadius(12).padding({left: 10,right: 10,top: 4,bottom: 4}).margin(4)})
}
.width('90%')
.margin({ top: 10 })
这段代码在页面底部添加了奖品概率说明,直观展示各个奖品的中奖概率。
13. 美化优化
为了让转盘更加美观,我们可以进一步优化转盘的视觉效果:
// 绘制转盘
private drawWheel(): void {// ...之前的代码// 绘制转盘外圆边框this.ctx.beginPath()this.ctx.arc(centerX, centerY, radius + 5, 0, 2 * Math.PI)this.ctx.fillStyle = '#2A2A2A'this.ctx.fill()this.ctx.strokeStyle = '#FFD700' // 金色边框this.ctx.lineWidth = 3this.ctx.stroke()// ...其余绘制代码// 给指针添加渐变色和阴影let pointerGradient = this.ctx.createLinearGradient(centerX, centerY - radius - 15,centerX, centerY - radius * 0.8)pointerGradient.addColorStop(0, '#FF0000')pointerGradient.addColorStop(1, '#FF6666')this.ctx.fillStyle = pointerGradientthis.ctx.fill()this.ctx.shadowColor = 'rgba(0, 0, 0, 0.5)'this.ctx.shadowBlur = 5this.ctx.shadowOffsetX = 2this.ctx.shadowOffsetY = 2// ...其余代码
}
完整代码
以下是完整的实现代码:
interface PrizesItem {name: string // 奖品名称color: string // 转盘颜色probability: number // 概率权重
}@Entry
@Component
struct Index {// Canvas 相关设置private readonly settings: RenderingContextSettings = new RenderingContextSettings(true); // 启用抗锯齿private readonly ctx: CanvasRenderingContext2D = new CanvasRenderingContext2D(this.settings);// 奖品数据private prizes: PrizesItem[] = [{ name: '谢谢参与', color: '#FFD8A8', probability: 30 },{ name: '10积分', color: '#B2F2BB', probability: 20 },{ name: '5元红包', color: '#D0BFFF', probability: 1 },{ name: '优惠券', color: '#A5D8FF', probability: 15 },{ name: '免单券', color: '#FCCFE7', probability: 5 },{ name: '50积分', color: '#BAC8FF', probability: 15 },{ name: '会员月卡', color: '#99E9F2', probability: 3 },{ name: '1元红包', color: '#FFBDBD', probability: 2 }]// 转盘属性@State isSpinning: boolean = false // 是否正在旋转@State rotation: number = 0 // 当前旋转角度@State result: string = '点击开始抽奖' // 抽奖结果private spinDuration: number = 4000 // 旋转持续时间(毫秒)private targetIndex: number = 0 // 目标奖品索引private spinTimer: number = 0 // 旋转定时器private canvasWidth: number = 0 // 画布宽度private canvasHeight: number = 0 // 画布高度// 生成随机目标索引(基于概率权重)private generateTargetIndex(): number {const weights = this.prizes.map(prize => prize.probability)const totalWeight = weights.reduce((a, b) => a + b, 0)const random = Math.random() * totalWeightlet currentWeight = 0for (let i = 0; i < weights.length; i++) {currentWeight += weights[i]if (random < currentWeight) {return i}}return 0}// 开始抽奖private startSpin(): void {if (this.isSpinning) {return}this.isSpinning = truethis.result = '抽奖中...'// 生成目标奖品索引this.targetIndex = this.generateTargetIndex()console.info(`抽中奖品索引: ${this.targetIndex}, 名称: ${this.prizes[this.targetIndex].name}`)// 计算目标角度// 每个奖品占据的角度 = 360 / 奖品数量const anglePerPrize = 360 / this.prizes.length// 因为Canvas中0度是在右侧,顺时针旋转,而指针在顶部(270度位置)// 所以需要将奖品旋转到270度位置对应的角度// 目标奖品中心点的角度 = 索引 * 每份角度 + 半份角度const prizeAngle = this.targetIndex * anglePerPrize + anglePerPrize / 2// 需要旋转到270度位置的角度 = 270 - 奖品角度// 但由于旋转方向是顺时针,所以需要计算为正向旋转角度const targetAngle = (270 - prizeAngle + 360) % 360// 获取当前角度的标准化值(0-360范围内)const currentRotation = this.rotation % 360// 计算从当前位置到目标位置需要旋转的角度(确保是顺时针旋转)let deltaAngle = targetAngle - currentRotationif (deltaAngle <= 0) {deltaAngle += 360}// 最终旋转角度 = 当前角度 + 5圈 + 到目标的角度差const finalRotation = this.rotation + 360 * 5 + deltaAngleconsole.info(`当前角度: ${currentRotation}°, 奖品角度: ${prizeAngle}°, 目标角度: ${targetAngle}°, 旋转量: ${deltaAngle}°, 最终角度: ${finalRotation}°`)// 使用基于帧动画的方式旋转,确保视觉上平滑旋转let startTime = Date.now()let initialRotation = this.rotation// 清除可能存在的定时器if (this.spinTimer) {clearInterval(this.spinTimer)}// 创建新的动画定时器this.spinTimer = setInterval(() => {const elapsed = Date.now() - startTimeif (elapsed >= this.spinDuration) {// 动画结束clearInterval(this.spinTimer)this.spinTimer = 0this.rotation = finalRotationthis.drawWheel()this.isSpinning = falsethis.result = `恭喜获得: ${this.prizes[this.targetIndex].name}`return}// 使用easeOutExpo效果:慢慢减速const progress = this.easeOutExpo(elapsed / this.spinDuration)this.rotation = initialRotation + progress * (finalRotation - initialRotation)// 重绘转盘this.drawWheel()}, 16) // 大约60fps的刷新率}// 缓动函数:指数减速private easeOutExpo(t: number): number {return t === 1 ? 1 : 1 - Math.pow(2, -10 * t)}// 绘制转盘private drawWheel(): void {if (!this.ctx) {return}const centerX = this.canvasWidth / 2const centerY = this.canvasHeight / 2const radius = Math.min(centerX, centerY) * 0.85// 清除画布this.ctx.clearRect(0, 0, this.canvasWidth, this.canvasHeight)// 保存当前状态this.ctx.save()// 移动到中心点this.ctx.translate(centerX, centerY)// 应用旋转this.ctx.rotate((this.rotation % 360) * Math.PI / 180)// 绘制转盘扇形const anglePerPrize = 2 * Math.PI / this.prizes.lengthfor (let i = 0; i < this.prizes.length; i++) {const startAngle = i * anglePerPrizeconst endAngle = (i + 1) * anglePerPrizethis.ctx.beginPath()this.ctx.moveTo(0, 0)this.ctx.arc(0, 0, radius, startAngle, endAngle)this.ctx.closePath()// 填充扇形this.ctx.fillStyle = this.prizes[i].colorthis.ctx.fill()// 绘制边框this.ctx.strokeStyle = "#FFFFFF"this.ctx.lineWidth = 2this.ctx.stroke()// 绘制文字this.ctx.save()this.ctx.rotate(startAngle + anglePerPrize / 2)this.ctx.textAlign = 'center'this.ctx.textBaseline = 'middle'this.ctx.fillStyle = '#333333'this.ctx.font = '30px'// 旋转文字,使其可读性更好// 第一象限和第四象限的文字需要额外旋转180度,保证文字朝向const needRotate = (i >= this.prizes.length / 4) && (i < this.prizes.length * 3 / 4)if (needRotate) {this.ctx.rotate(Math.PI)this.ctx.fillText(this.prizes[i].name, -radius * 0.6, 0, radius * 0.5)} else {this.ctx.fillText(this.prizes[i].name, radius * 0.6, 0, radius * 0.5)}this.ctx.restore()}// 恢复状态this.ctx.restore()// 绘制中心圆盘this.ctx.beginPath()this.ctx.arc(centerX, centerY, radius * 0.2, 0, 2 * Math.PI)this.ctx.fillStyle = '#FF8787'this.ctx.fill()this.ctx.strokeStyle = '#FFFFFF'this.ctx.lineWidth = 3this.ctx.stroke()// 绘制指针 - 固定在顶部中央this.ctx.beginPath()// 三角形指针this.ctx.moveTo(centerX, centerY - radius - 10)this.ctx.lineTo(centerX - 15, centerY - radius * 0.8)this.ctx.lineTo(centerX + 15, centerY - radius * 0.8)this.ctx.closePath()this.ctx.fillStyle = '#FF6B6B'this.ctx.fill()this.ctx.strokeStyle = '#FFFFFF'this.ctx.lineWidth = 2this.ctx.stroke()// 绘制中心文字this.ctx.textAlign = 'center'this.ctx.textBaseline = 'middle'this.ctx.fillStyle = '#FFFFFF'this.ctx.font = '18px sans-serif'// 绘制两行文字this.ctx.fillText('开始', centerX, centerY - 10)this.ctx.fillText('抽奖', centerX, centerY + 10)}aboutToDisappear() {// 清理定时器if (this.spinTimer !== 0) {clearInterval(this.spinTimer) // 改成 clearIntervalthis.spinTimer = 0}}build() {Column() {// 标题Text('幸运大转盘').fontSize(28).fontWeight(FontWeight.Bold).fontColor(Color.White).margin({ bottom: 20 })// 抽奖结果显示Text(this.result).fontSize(20).fontColor(Color.White).backgroundColor('#1AFFFFFF').width('90%').textAlign(TextAlign.Center).padding(15).borderRadius(16).margin({ bottom: 30 })// 转盘容器Stack({ alignContent: Alignment.Center }) {// 使用Canvas绘制转盘Canvas(this.ctx).width('100%').height('100%').onReady(() => {// 获取Canvas尺寸this.canvasWidth = this.ctx.widththis.canvasHeight = this.ctx.height// 初始绘制转盘this.drawWheel()})// 中央开始按钮Button({ type: ButtonType.Circle }) {Text('开始\n抽奖').fontSize(18).fontWeight(FontWeight.Bold).textAlign(TextAlign.Center).fontColor(Color.White)}.width(80).height(80).backgroundColor('#FF6B6B').onClick(() => this.startSpin()).enabled(!this.isSpinning).stateEffect(true) // 启用点击效果}.width('90%').aspectRatio(1).backgroundColor('#0DFFFFFF').borderRadius(16).padding(15)// 底部说明Text('奖品概率说明').fontSize(14).fontColor(Color.White).opacity(0.7).margin({ top: 20 })// 概率说明Flex({ wrap: FlexWrap.Wrap, justifyContent: FlexAlign.Center }) {ForEach(this.prizes, (prize: PrizesItem) => {Text(`${prize.name}: ${prize.probability}%`).fontSize(12).fontColor(Color.White).backgroundColor(prize.color).borderRadius(12).padding({left: 10,right: 10,top: 4,bottom: 4}).margin(4)})}.width('90%').margin({ top: 10 })}.width('100%').height('100%').justifyContent(FlexAlign.Center).backgroundColor(Color.Black).linearGradient({angle: 135,colors: [['#1A1B25', 0],['#2D2E3A', 1]]}).expandSafeArea()}
}
总结
本教程对 Canvas 的使用有一定难度,建议先点赞收藏。
这个幸运大转盘效果包含以下知识点:
- 使用Canvas绘制转盘,支持自定义奖品数量和概率
- 平滑的旋转动画和减速效果
- 基于概率权重的抽奖算法
- 美观的UI设计和交互效果
在实际应用中,你还可以进一步扩展这个组件:
- 添加音效
- 实现3D效果
- 添加中奖历史记录
- 连接后端API获取真实抽奖结果
- 添加抽奖次数限制
希望这篇 HarmonyOS Next 教程对你有所帮助,期待您的点赞、评论、收藏。