之前我们为您分享了【一步步开发AI运动小程序】开发系列博文,通过该系列博文,很多开发者开发出了很多精美的AI健身、线上运动赛事、AI学生体测、美体、康复锻炼等应用场景的AI运动小程序;为了帮助开发者继续深耕AI运动领域市场,今天开始我们将为您分享新系列【一步步开发AI运动APP】的博文,带您开发性能更强、体验更好的AI运动APP。
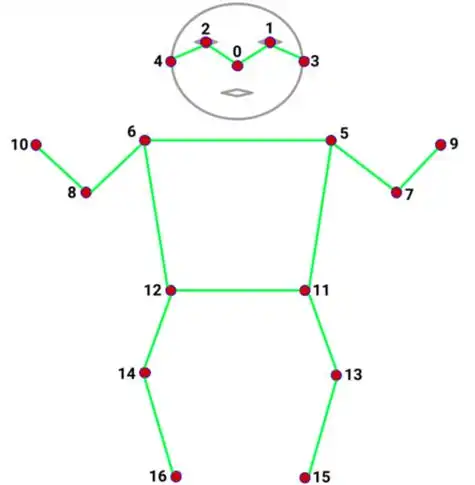
一、人体检测AI介绍
识别检测图像的人体结构,是进行运动分析检测、姿态分析、姿态交互场景前的必备步骤。APP版本插件提供了高性能、高精度、多人检测等多种人体检测模式,相较于小程序版本提供了更多性能配置参数、无需模型部署,更便捷的集成。
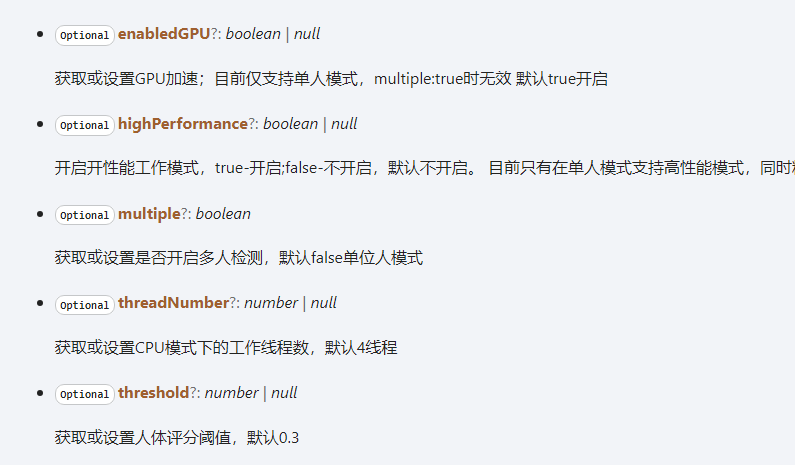
二、创建人体检测实例
插件的人体检测能力由APIcreateHumanDetector(options: DetectionOptions): IHumanDetector提供。
import {createHumanDetector} from "@/uni_modules/yz-ai-sport";function detection(){const detector = createHumanDetector({enabledGPU: true,highPerformance: false,multiple: false,threadNumber: 4,threshold: 0.3});
}
三、调用检测识别
创建好人体检测实例后,便可以将从相机抽取的帧图像,传递给实例进行识别了,抽帧见前一章代码,简略代码如下:
function detection(){const detector = createHumanDetector({enabledGPU: true,highPerformance: false,multiple: false,threadNumber: 4,threshold: 0.3});let frame = .... //从相机抽取的帧let humans = detector.estimates(frame);console.log(humans);
}
四、骨骼图绘制
若需要将识别到人体骨骼图渲染出来,实现可视效果,可以使用yz-pose-grapher组件绘制,组件调用的原生图形渲染接口,相比小程序具有更高的性能。
<template><yz-pose-grapher ref="grapher" id="grapher" class="grapher" :scale-rate="previewRate" :offset-x="previewOffsetX":offset-y="previewOffsetY" point-color="#0091ff" left-color="#009d00" line-color="#FFFFFF" />
</template>
<script>
export default {...methods:{drawing(){let humans = ...//识别到人体结果this.$refs.grapher.drawing(humans); //绘制}}
}
</script>
五、完整代码
<template><!--注意,插件内的组件属性值绑定,uni-app不支持left-color这样Kebab-case属性名,请用CamelCase属性名方式--><yz-ai-camera class="camera" :style="{width:previewWidth,height:previewHeight}" :device="cameraDevice"resolution="medium" @on-camera-ready="onCameraReady" /><!--骨骼图绘制组件不是必须的,不展示骨骼图不影响运动检测等姿态功能--><yz-pose-grapher ref="grapher" class="grapher" :style="{width:previewWidth,height:previewHeight}":scaleRate="previewRate" :offsetX="previewOffsetX" :offsetY="previewOffsetY" lineColor="#FFFFFF"pointColor="#0091ff" leftColor="#009d00" />
</template>
<script>
export default {data(){return {};}methods:{onDetecting(){let options = {multiple: false,enabledGPU: true,highPerformance: false};humanDetector = createHumanDetector(options);humanDetector.startExtractAndDetect({onDetected(result){let humans = result.humans;this.$refs.grapher.drawing(humans);}});}}
}
</script>
另外,检测实例使用完毕后,要及时调用destroy()将资源释放掉,以免拖慢应用。
下篇我们将为您介绍运动检测分析调用,敬请期待...


