PS:对于使用者来说,Redis5.0和4.0都是一样的,但是redis 4.0的集群部署需要额外安装ruby的东西,5.0中则集成到了redis-cli,部署起来更方便
1.1 安装Redis
本章基于CentOS 7.9.2009编写而成,由于Linux发行版众多,安装过程可能有些许不同,仅供参考
1、下载Redis源码:wget http://download.redis.io/releases/redis-5.0.13.tar.gz
2、解压:tar xzf redis-5.0.13.tar.gz
3、cd redis-5.0.13/deps/
4、make hiredis lua jemalloc linenoise(编译依赖的库)
5、cd ..
6、编译:make -j 4(4表示使用4核编译,默认是1核,请根据实际情况修改参数)
1.2 部署单机版Redis
1、使用cd命令切换目录到Redis主目录下
2、创建一个文件夹用于存放单机版的数据和配置:mkdir single
3、拷贝一份配置文件到single文件夹:cp redis.conf single/redis.conf
4、切换到single目录:cd single/
5、使用你熟悉的编辑器修改redis.conf文件
| 第69行:bind 127.0.0.1(注释掉)
第88行:protected-mode no
第92行:port 6379(端口号)
第136行:daemonize yes(后台运行)
第158行:pidfile /var/run/redis_6379.pid(后边的数字改成跟端口号一致)
#注意:${redis.home}替换成redis的安装目录,比如/home/iceberg/Program/redis-5.0.13
第171行:logfile ${redis.home}/single/redis.log(日志路径)
第218行:RDB持久化配置,全部注释掉并加上save ""表示关闭RDB持久化
#save 900 1(每900秒内有1个key修改则进行持久化)
#save 300 10(每300秒内有10个key修改则进行持久化)
#save 60 10000(每60秒内有10000个key修改则进行持久化)
save ""
#注意:${redis.home}替换成redis的安装目录,比如/home/iceberg/Program/redis-5.0.13
第263行:dir ${redis.home}/single/
第500行:requirepass foobared(设置redis的密码,注释掉表示不需要)
#注意:如果之前redis已经运行过,需要删除RDB文件dump.rdb!!!具体路径就是第263行的dir目录
第672行:appendonly yes(开启AOF持久化)
|
6、在single目录下新建一个文件:touch start.sh并加入以下内容
| #!/bin/sh
#注意:这个目录是指你实际的redis安装目录,比如/home/iceberg/Program/redis-5.0.13
cd /home/iceberg/Program/redis-5.0.13
src/redis-server single/redis.conf &
|
授予其可执行权限chmod 777 start.sh,运行即可启动
7、关闭redis
不要使用Kill -9的方法强制关闭Redis,不仅是Redis,任何程序都不应该使用这个方式关闭!这会使得程序预设的清理代码不执行!!!
在single目录下新建一个文件:touch stop.sh并加入以下内容
| #!/bin/sh
#注意:这个目录是指你实际的redis安装目录,比如/home/iceberg/Program/redis-5.0.13
cd /home/iceberg/Program/redis-5.0.13
src/redis-cli -p 6379 shutdown
#如果配置了密码要加上-a 你的密码
#src/redis-cli -p 6379 -a 123456 shutdown
|
8、redisson配置(redis客户端配置)
(1)包含密码
| {
"singleServerConfig": {
"address": "redis://127.0.0.1:6379",
"timeout": 5000,
"password": "123456",
"pingConnectionInterval": 2000
},
"codec": {
"class": "com.fingard.luna.framework.cache.redis.component.ExtendJsonJacksonCodec"
},
"transportMode": "NIO"
}
|
(2)不包含密码
| {
"singleServerConfig": {
"address": "redis://127.0.0.1:6379",
"timeout": 5000,
"pingConnectionInterval": 2000
},
"codec": {
"class": "com.fingard.luna.framework.cache.redis.component.ExtendJsonJacksonCodec"
},
"transportMode": "NIO"
}
|
1.3 部署主从版Redis
1、使用cd命令切换目录到Redis主目录下
2、创建一个文件夹用于存放主从版的数据和配置:mkdir replication
3、进入目录:cd replication
4、创建两个文件夹:mkdir master slave
5、切换到主目录,把配置文件分别拷贝到master和slave,cp redis.conf replication/master/redis.conf、cp redis.conf replication/slave/redis.conf
6、使用你熟悉的编辑器修改redis.conf文件
(1)主redis配置
| 第69行:bind 127.0.0.1(注释掉)
第88行:protected-mode no
第92行:port 6379(端口号,主从的端口号必须不一样)
第136行:daemonize yes(后台运行)
第158行:pidfile /var/run/redis_6379.pid(后边的数字改成跟端口号一致)
#注意:${redis.home}替换成redis的安装目录,比如/home/iceberg/Program/redis-5.0.13
第171行:logfile ${redis.home}/replication/master/redis.log
#注意:${redis.home}替换成redis的安装目录,比如/home/iceberg/Program/redis-5.0.13
第263行:dir ${redis.home}/replication/master/
#如何设置密码的话,下边两个配置必须同时存在或同时注释掉,且密码必须相同
第288行:masterauth <master-password>(设置redis的密码,注释掉表示不需要)
第500行:requirepass foobared(设置redis的密码,注释掉表示不需要)
#注意:如果之前redis已经运行过,需要删除RDB文件dump.rdb!!!具体路径就是第263行的dir目录
第672行:appendonly yes(开启AOF持久化)
|
(2)从redis配置
| 第69行:bind 127.0.0.1(注释掉)
第88行:protected-mode no
第92行:port 6380(端口号,主从的端口号必须不一样)
第136行:daemonize yes(后台运行)
第158行:pidfile /var/run/redis_6380.pid(后边的数字改成跟端口号一致)
#注意:${redis.home}替换成redis的安装目录,比如/home/iceberg/Program/redis-5.0.13
第171行:logfile ${redis.home}/replication/slave/redis.log
#注意:${redis.home}替换成redis的安装目录,比如/home/iceberg/Program/redis-5.0.13
第263行:dir ${redis.home}/replication/slave/
第281行:slaveof <masterip> <masterport>(配置主节点的ip和端口号)
#如何设置密码的话,下边两个配置必须同时存在或同时注释掉,且密码必须相同
第288行:masterauth <master-password>(设置redis的密码,注释掉表示不需要)
第500行:requirepass foobared(设置redis的密码,注释掉表示不需要)
#注意:如果之前redis已经运行过,需要删除RDB文件dump.rdb!!!具体路径就是第263行的dir目录
第672行:appendonly yes(开启AOF持久化)
|
7、启动和关闭脚本与单机版类似,把目录改成主从对应的目录,配置对端口号即可
8、配置
(1)包含密码
| {
"masterSlaveServersConfig":{
"readMode":"MASTER",
"slaveAddresses":[
"redis://127.0.0.1:6381",
"redis://127.0.0.1:6380"
],
"masterAddress": "redis://127.0.0.1:6379",
"timeout": 5000,
"password": "123456",
"pingConnectionInterval": 2000
},
"codec": {
"class": "com.fingard.luna.framework.cache.redis.component.ExtendJsonJacksonCodec"
},
"transportMode":"NIO"
}
|
(2)不包含密码
| {
"masterSlaveServersConfig":{
"readMode":"MASTER",
"slaveAddresses":[
"redis://127.0.0.1:6381",
"redis://127.0.0.1:6380"
],
"masterAddress": "redis://127.0.0.1:6379",
"timeout": 5000,
"pingConnectionInterval": 2000
},
"codec": {
"class": "com.fingard.luna.framework.cache.redis.component.ExtendJsonJacksonCodec"
},
"transportMode":"NIO"
}
1.4 部署哨兵版Redis 1、使用cd命令切换目录到Redis主目录下 2、创建一个文件夹用于存放哨兵版的数据和配置:mkdir sentinel 3、首先配置好主从节点,并启动(主从的相关配置请参考第三节) 4、创建三个文件夹:mkdir sentinel1 sentinel2 sentinel3 5、复制sentinel.conf到三个文件夹中(注意这里的配置文件不是redis.conf!) 6、sentinel.conf需要修改的地方如下(注意这里的配置文件不是redis.conf!) (1)sentinel1 | #取消注释,允许远程连接
第17行:protected-mode no
第21行:port 26379(端口号)
#注意:${redis.home}替换成redis的安装目录,比如/home/iceberg/Program/redis-5.0.13
第50行:dir ${redis.home}/replication/sentinel1/(数据存储目录)
第69行:sentinel monitor mymaster 10.60.44.87 6379 2(配置哨兵监控哪个主节点,mymaster是主节点的别名,2表示主从切换至少需要2台哨兵节点同意,一般为n/2+1,n表示哨兵节点数)
#配置密码,注释掉表示不需要密码
第71行:sentinel auth-pass mymaster 123456
#额外增加配置
#后台运行该redis节点
daemonize yes
#日志存储路径
logfile "${redis.home}/sentinel/sentinel1/redis.log"
|
(2)sentinel2 | #取消注释,允许远程连接
第17行:protected-mode no
第21行:port 26380(端口号)
#注意:${redis.home}替换成redis的安装目录,比如/home/iceberg/Program/redis-5.0.13
第50行:dir ${redis.home}/replication/sentinel2/(数据存储目录)
第69行:sentinel monitor mymaster 10.60.44.87 6379 2(配置哨兵监控哪个主节点,mymaster是主节点的别名,2表示主从切换至少需要2台哨兵节点同意,一般为n/2+1,n表示哨兵节点数)
#配置密码,注释掉表示不需要密码
第71行:sentinel auth-pass mymaster 123456
#额外增加配置
#后台运行该redis节点
daemonize yes
#日志存储路径,${redis.home}替换成redis的安装目录,比如/home/iceberg/Program/redis-5.0.13
logfile "${redis.home}/replication/sentinel2/redis.log"
|
(3)sentinel3 | #取消注释,允许远程连接
第17行:protected-mode no
第21行:port 26381(端口号)
#注意:${redis.home}替换成redis的安装目录,比如/home/iceberg/Program/redis-5.0.13
第50行:dir ${redis.home}/replication/sentinel3/(数据存储目录)
第69行:sentinel monitor mymaster 10.60.44.87 6379 2(配置哨兵监控哪个主节点,mymaster是主节点的别名,2表示主从切换至少需要2台哨兵节点同意,一般为n/2+1,n表示哨兵节点数)
#配置密码,注释掉表示不需要密码
第71行:sentinel auth-pass mymaster 123456
#额外增加配置
#后台运行该redis节点
daemonize yes
#日志存储路径,${redis.home}替换成redis的安装目录,比如/home/iceberg/Program/redis-5.0.13
logfile "${redis.home}/replication/sentinel3/redis.log"
|
7、在sentinel1文件夹中新建一个文件,touch start.sh,填入以下内容 | #!/bin/sh
#注意:这个目录是指你实际的redis安装目录
cd /home/iceberg/Program/redis-5.0.13
src/redis-sentinel sentinel/sentinel1/sentinel.conf &
|
授予其可执行权限chmod 777 start.sh,运行即可启动 其他哨兵把sentinel1改成sentinel2或sentinel3即可 8、关闭Redis与单机版类似,把目录改成哨兵对应的目录,配置对端口号即可 9、配置 (1)包含密码的配置 | {
"sentinelServersConfig":{
"readMode":"MASTER",
"sentinelAddresses":[
"redis://127.0.0.1:26379",
"redis://127.0.0.1:26389"
],
"masterName":"mymaster",
"password": "123456",
"pingConnectionInterval": 2000
},
"codec": {
"class": "com.fingard.luna.framework.cache.redis.component.ExtendJsonJacksonCodec"
},
"transportMode":"NIO"
}
|
(2)不包含密码的配置 | {
"sentinelServersConfig":{
"readMode":"MASTER",
"sentinelAddresses":[
"redis://127.0.0.1:26379",
"redis://127.0.0.1:26389"
],
"masterName":"mymaster",
"pingConnectionInterval": 2000
},
"codec": {
"class": "com.fingard.luna.framework.cache.redis.component.ExtendJsonJacksonCodec"
},
"transportMode":"NIO"
}
1.5 配置集群版Redis 1、使用cd命令切换目录到Redis主目录下 2、创建一个文件夹用于存放集群版的数据和配置:mkdir cluster 3、新建六个文件夹(Redis集群最少三主三从),mkdir master1 master2 master3 slave1 slave2 slave3 ,并复制redis.conf文件进去(这里假设的是一台机器的情况,如果你是用六台机器部署,就建一个文件夹就好) 5、集群相关配置如下 (1)master1 | 第69行:bind 127.0.0.1(注释掉)
第88行:protected-mode no
第92行:port 6381(端口号)
第136行:daemonize yes(后台运行)
第158行:pidfile /var/run/redis_6381.pid(后边的数字改成跟端口号一致)
#注意:${redis.home}替换成redis的安装目录,比如/home/iceberg/Program/redis-5.0.13
第171行:logfile ${redis.home}/cluster/master1/redis.log
#注意:${redis.home}替换成redis的安装目录,比如/home/iceberg/Program/redis-5.0.13
第263行:dir ${redis.home}/cluster/master1/
#如何设置密码的话,下边两个配置必须同时存在或同时注释掉,且密码必须相同
第288行:masterauth <master-password>(设置redis的密码,注释掉表示不需要)
第500行:requirepass foobared(设置redis的密码,注释掉表示不需要)
#注意:如果之前redis已经运行过,需要删除RDB文件dump.rdb!!!具体路径就是第263行的dir目录
第672行:appendonly yes(开启AOF持久化)
# 开启集群模式
第814行:cluster-enable yes
#集群内部配置文件
第822行:cluster-config-file “nodes-6381.conf”
|
(2)master2 | 第69行:bind 127.0.0.1(注释掉)
第88行:protected-mode no
第92行:port 6382(端口号,主从的端口号必须不一样)
第136行:daemonize yes(后台运行)
第158行:pidfile /var/run/redis_6382.pid(后边的数字改成跟端口号一致)
#注意:${redis.home}替换成redis的安装目录
第171行:logfile ${redis.home}/cluster/master2/redis.log
#注意:${redis.home}替换成redis的安装目录
第263行:dir ${redis.home}/cluster/master2/
#下边两个配置必须同时存在,且密码必须相同
第288行:masterauth <master-password>(设置redis的密码,注释掉表示不需要)
第500行:requirepass foobared(设置redis的密码,注释掉表示不需要)
#注意:如果之前redis已经运行过,需要删除RDB文件dump.rdb!!!具体路径就是第263行的dir目录
第672行:appendonly yes(开启AOF持久化)
# 开启集群模式
第814行:cluster-enable yes
#集群内部配置文件
第822行:cluster-config-file “nodes-6382.conf”
|
(3)master3 | 第69行:bind 127.0.0.1(注释掉)
第88行:protected-mode no
第92行:port 6383(端口号,主从的端口号必须不一样)
第136行:daemonize yes(后台运行)
第158行:pidfile /var/run/redis_6383.pid(后边的数字改成跟端口号一致)
#注意:${redis.home}替换成redis的安装目录
第171行:logfile ${redis.home}/cluster/master3/redis.log
第218行:RDB持久化配置,全部注释掉并加上save ""表示关闭RDB持久化
#save 900 1(每900秒内有1个key修改则进行持久化)
#save 300 10(每300秒内有10个key修改则进行持久化)
#save 60 10000(每60秒内有10000个key修改则进行持久化)
save ""
#注意:${redis.home}替换成redis的安装目录
第263行:dir ${redis.home}/cluster/master3/
#下边两个配置必须同时存在,且密码必须相同
第288行:masterauth <master-password>(设置redis的密码,注释掉表示不需要)
第500行:requirepass foobared(设置redis的密码,注释掉表示不需要)
#注意:如果之前redis已经运行过,需要删除RDB文件dump.rdb!!!具体路径就是第263行的dir目录
第672行:appendonly yes(开启AOF持久化)
# 开启集群模式
第814行:cluster-enable yes
#集群内部配置文件
第822行:cluster-config-file “nodes-6383.conf”
|
(4)slave1 | 第69行:bind 127.0.0.1(注释掉)
第88行:protected-mode no
第92行:port 6391(端口号,主从的端口号必须不一样)
第136行:daemonize yes(后台运行)
第158行:pidfile /var/run/redis_6391.pid(后边的数字改成跟端口号一致)
#注意:${redis.home}替换成redis的安装目录
第171行:logfile ${redis.home}/cluster/slave1/redis.log
#注意:${redis.home}替换成redis的安装目录
第263行:dir ${redis.home}/cluster/slave1/
#下边两个配置必须同时存在,且密码必须相同
第288行:masterauth <master-password>(设置redis的密码,注释掉表示不需要)
第500行:requirepass foobared(设置redis的密码,注释掉表示不需要)
#注意:如果之前redis已经运行过,需要删除RDB文件dump.rdb!!!具体路径就是第263行的dir目录
第672行:appendonly yes(开启AOF持久化)
# 开启集群模式
第814行:cluster-enable yes
#集群内部配置文件
第822行:cluster-config-file “nodes-6391.conf”
|
(5)slave2 | 第69行:bind 127.0.0.1(注释掉)
第88行:protected-mode no
第92行:port 6392(端口号,主从的端口号必须不一样)
第136行:daemonize yes(后台运行)
第158行:pidfile /var/run/redis_6392.pid(后边的数字改成跟端口号一致)
#注意:${redis.home}替换成redis的安装目录
第171行:logfile ${redis.home}/cluster/slave2/redis.log
#注意:${redis.home}替换成redis的安装目录
第263行:dir ${redis.home}/cluster/slave2/
#下边两个配置必须同时存在,且密码必须相同
第288行:masterauth <master-password>(设置redis的密码,注释掉表示不需要)
第500行:requirepass foobared(设置redis的密码,注释掉表示不需要)
#注意:如果之前redis已经运行过,需要删除RDB文件dump.rdb!!!具体路径就是第263行的dir目录
第672行:appendonly yes(开启AOF持久化)
# 开启集群模式
第814行:cluster-enable yes
#集群内部配置文件
第822行:cluster-config-file “nodes-6392.conf”
|
(6)slave3 | 第69行:bind 127.0.0.1(注释掉)
第88行:protected-mode no
第92行:port 6393(端口号,主从的端口号必须不一样)
第136行:daemonize yes(后台运行)
第158行:pidfile /var/run/redis_6393.pid(后边的数字改成跟端口号一致)
#注意:${redis.home}替换成redis的安装目录
第171行:logfile ${redis.home}/cluster/slave3/redis.log
#注意:${redis.home}替换成redis的安装目录
第263行:dir ${redis.home}/cluster/slave3/
#下边两个配置必须同时存在,且密码必须相同
第288行:masterauth <master-password>(设置redis的密码,注释掉表示不需要)
第500行:requirepass foobared(设置redis的密码,注释掉表示不需要)
#注意:如果之前redis已经运行过,需要删除RDB文件dump.rdb!!!具体路径就是第263行的dir目录
第672行:appendonly yes(开启AOF持久化)
# 开启集群模式
第814行:cluster-enable yes
#集群内部配置文件
第822行:cluster-config-file “nodes-6393.conf”
|
6、使用单机版的启动脚本将启动上述六个redis实例 7、切换到redis主目录下,执行 | #通过-a指定密码
src/redis-cli -a 123456 --cluster create --cluster-replicas 0 10.60.52.134:6381 10.60.52.134:6382 10.60.52.134:6383
|
输入yes,可以看到如下提示 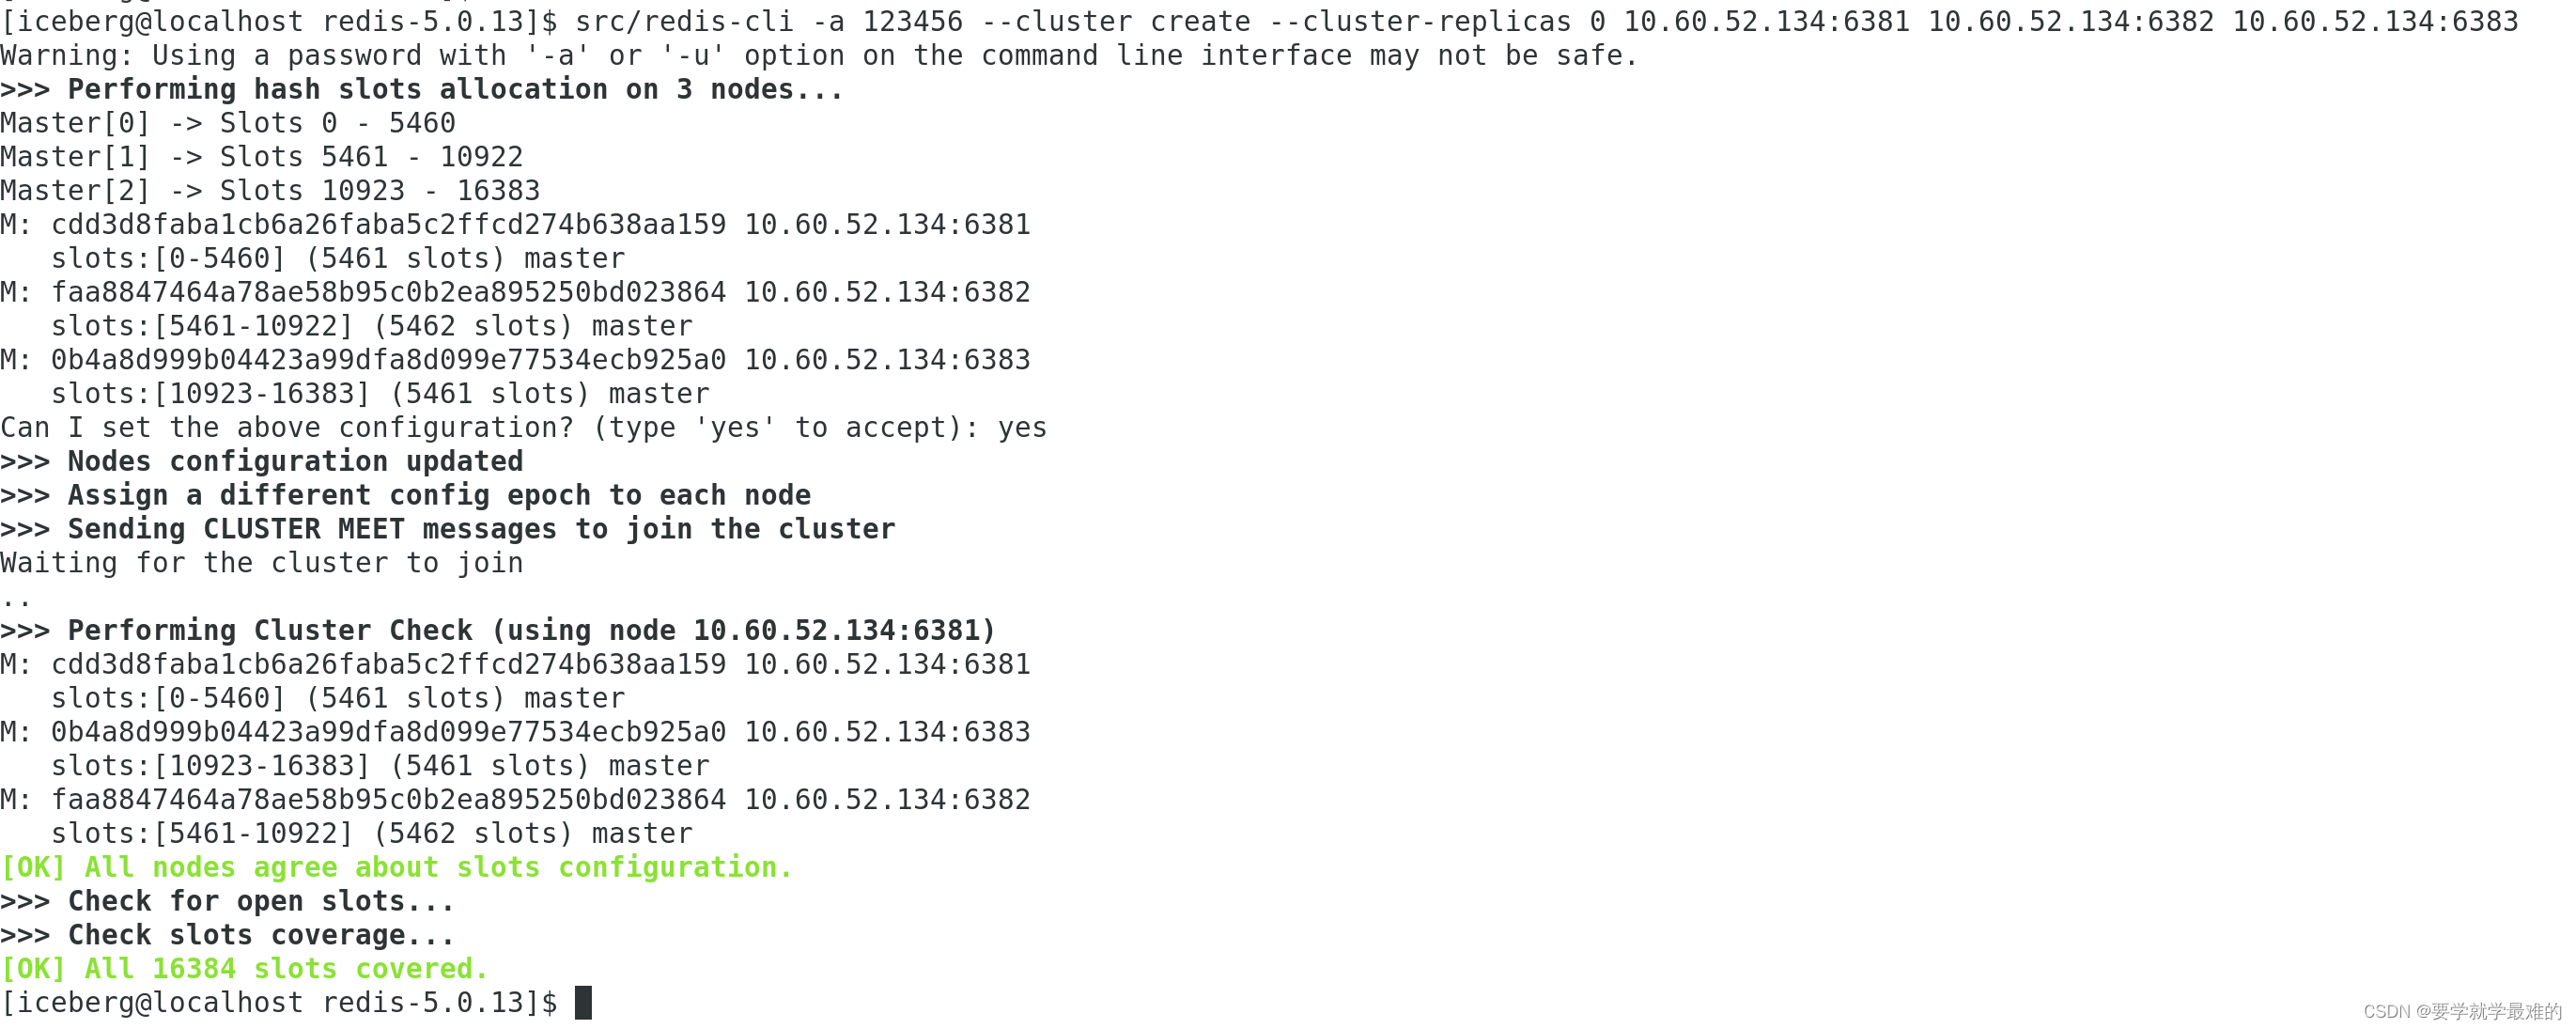
发现所有16384个槽都分配成功,集群创建完成。 不过此时只有三个主节点,还需要设置一下从节点,这里要记录一下ID和ip:port的对应关系,不要清空了,下一步有用 8、手动添加从节点 我们假设你想要的对应关系是6381(主)-6391(从)、6382(主)-6392(从)、6383(主)-6393(从) | src/redis-cli -a 123456 --cluster add-node --cluster-slave --cluster-master-id cdd3d8faba1cb6a26faba5c2ffcd274b638aa159 10.60.52.134:6391 10.60.52.134:6381
src/redis-cli -a 123456 --cluster add-node --cluster-slave --cluster-master-id faa8847464a78ae58b95c0b2ea895250bd023864 10.60.52.134:6392 10.60.52.134:6382
src/redis-cli -a 123456 --cluster add-node --cluster-slave --cluster-master-id 0b4a8d999b04423a99dfa8d099e77534ecb925a0 10.60.52.134:6393 10.60.52.134:6383
|
依次执行命令,将从节点添加到集群中,如下图所示: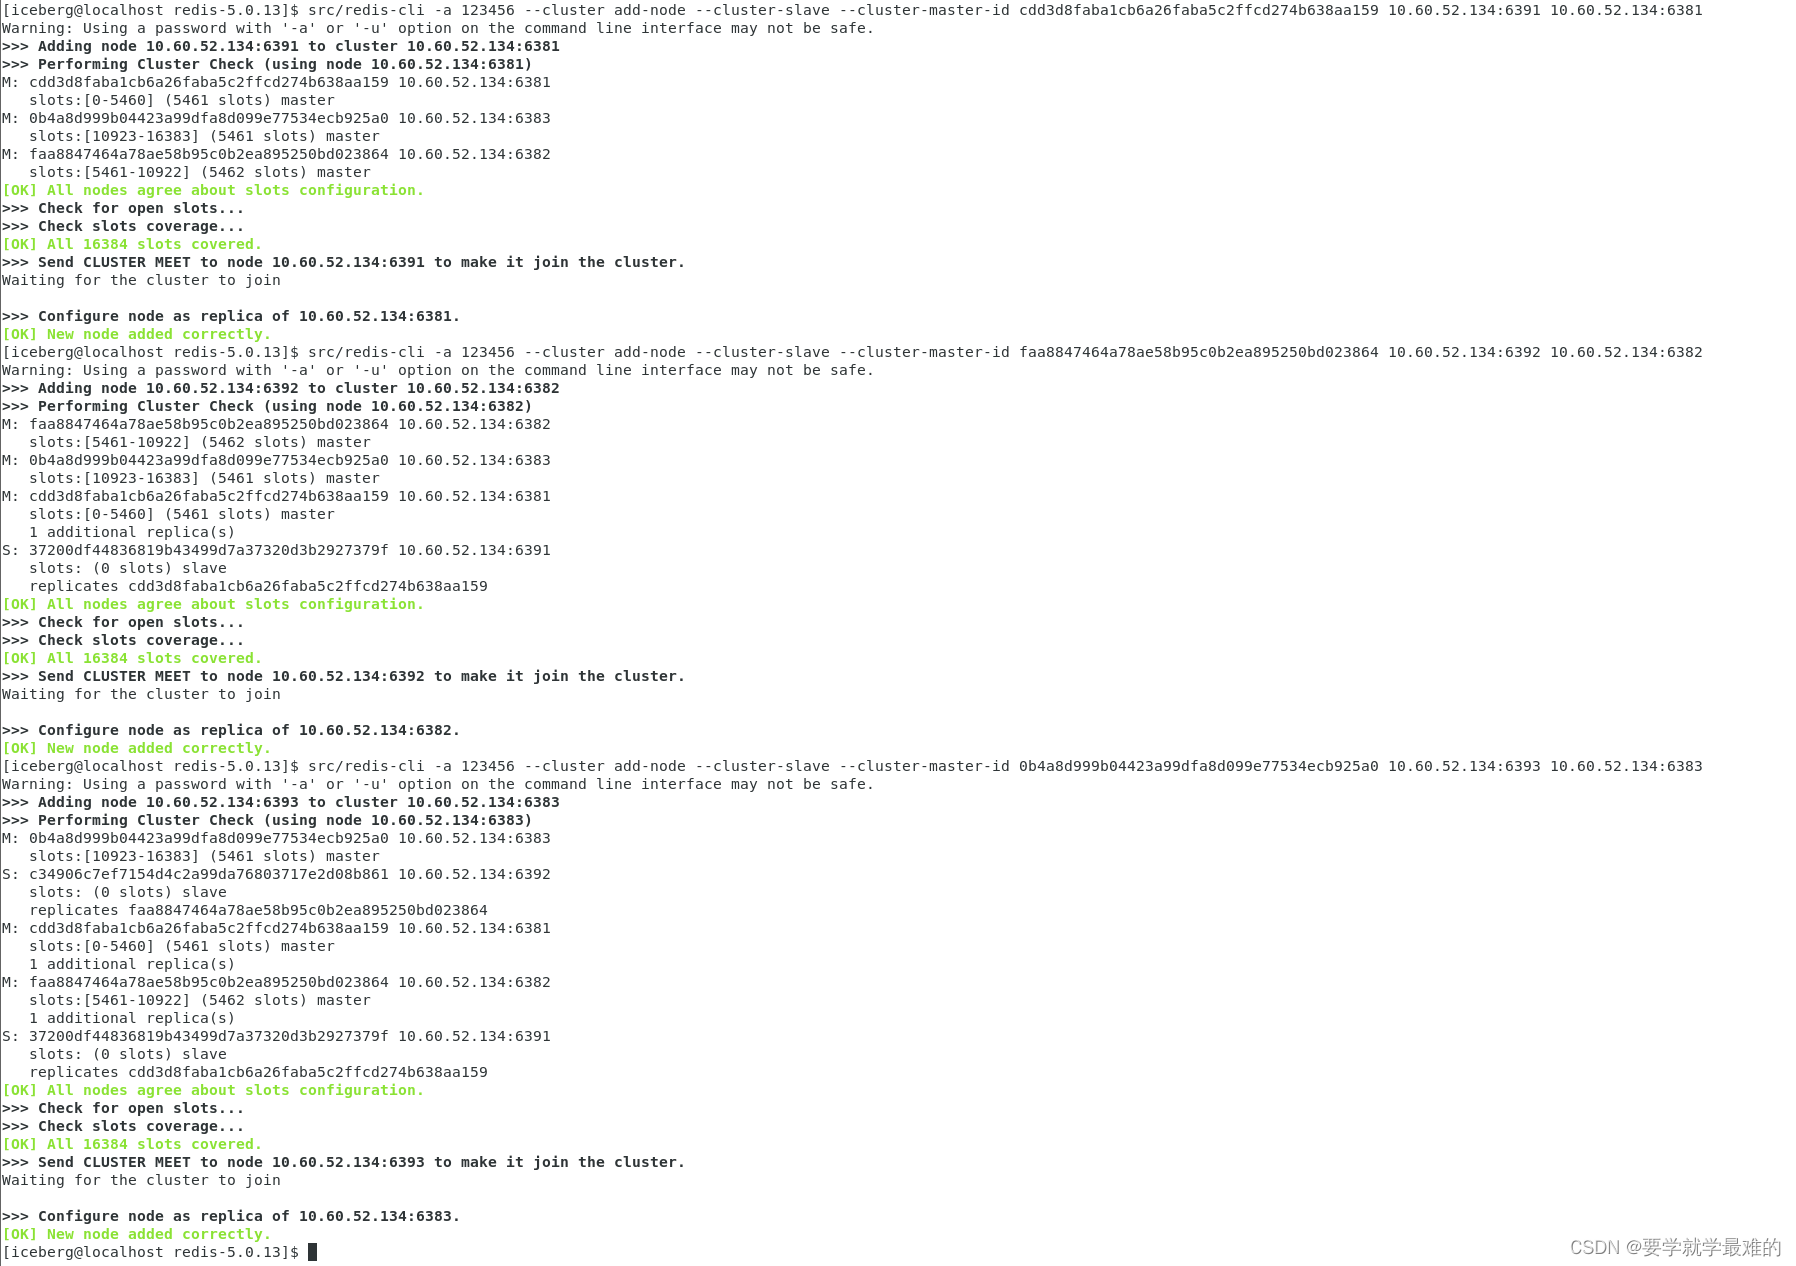 9、集群完整性检查 集群完整性指所有的槽都必须分配到存活的主节点上,只要16384个槽有一个没有分配给节点则表示集群不完整。我们可以使用check命令检测任意一个节点即可完成检查,输入: | src/redis-cli -a 123456 --cluster check 10.60.52.134:6381
|
可以看到3主3从,且16384个槽都分配完毕,表示集群完整,如下图所示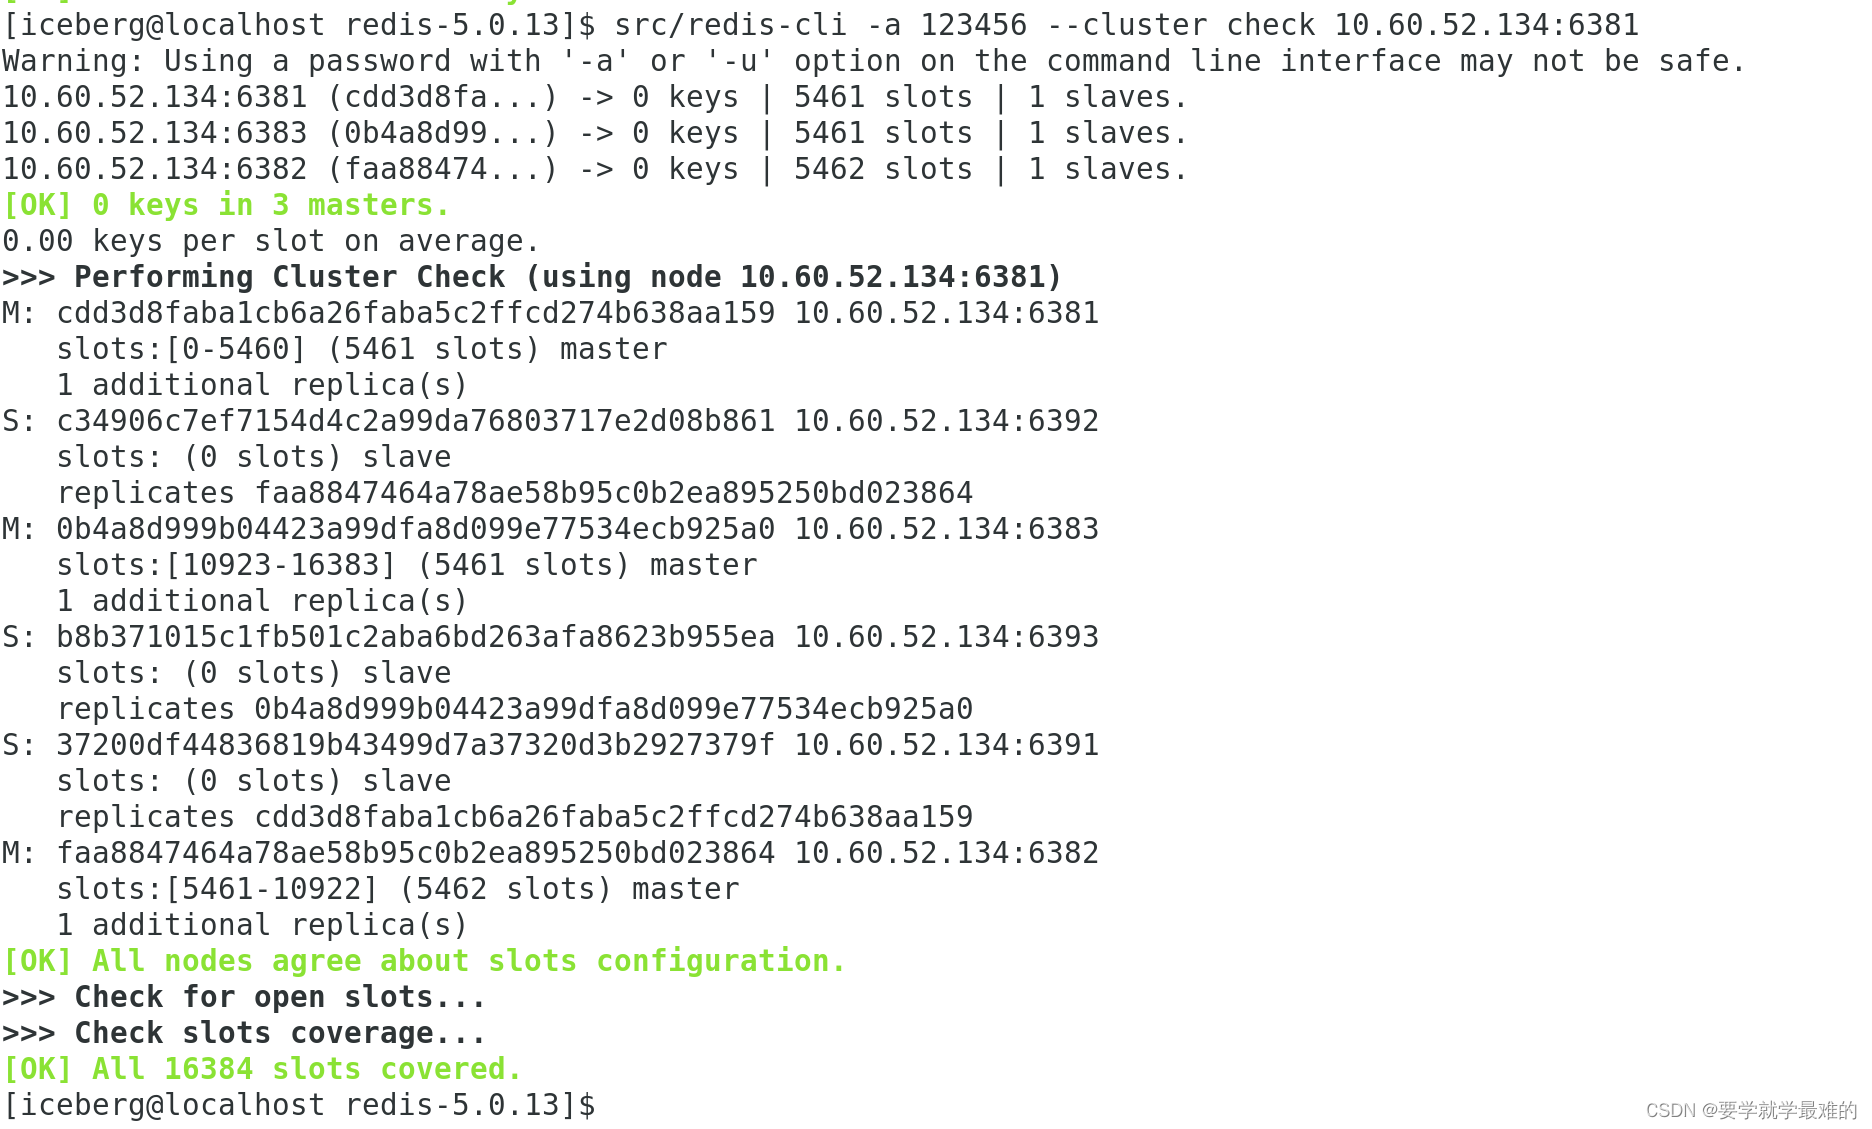 10、配置 (1)包含密码的配置 | {
"clusterServersConfig": {
"readMode": "MASTER",
"nodeAddresses": [
"redis://10.60.44.57:6371",
"redis://10.60.44.57:6372",
"redis://10.60.44.57:6373"
],
"password": "123456",
"pingConnectionInterval": 2000
},
"codec": {
"class": "com.fingard.luna.framework.cache.redis.component.ExtendJsonJacksonCodec"
},
"transportMode": "NIO"
}
|
(2)不包含密码的配置 | {
"clusterServersConfig": {
"readMode": "MASTER",
"nodeAddresses": [
"redis://10.60.44.57:6371",
"redis://10.60.44.57:6372",
"redis://10.60.44.57:6373"
].
"pingConnectionInterval": 2000
},
"codec": {
"class": "com.fingard.luna.framework.cache.redis.component.ExtendJsonJacksonCodec"
},
"transportMode": "NIO"
}
|
|
为了方便修改,以上是展开的配置,但是配置在apollo的时候需要压缩一下,可以搜索任意的在线JSON格式化网站进行压缩 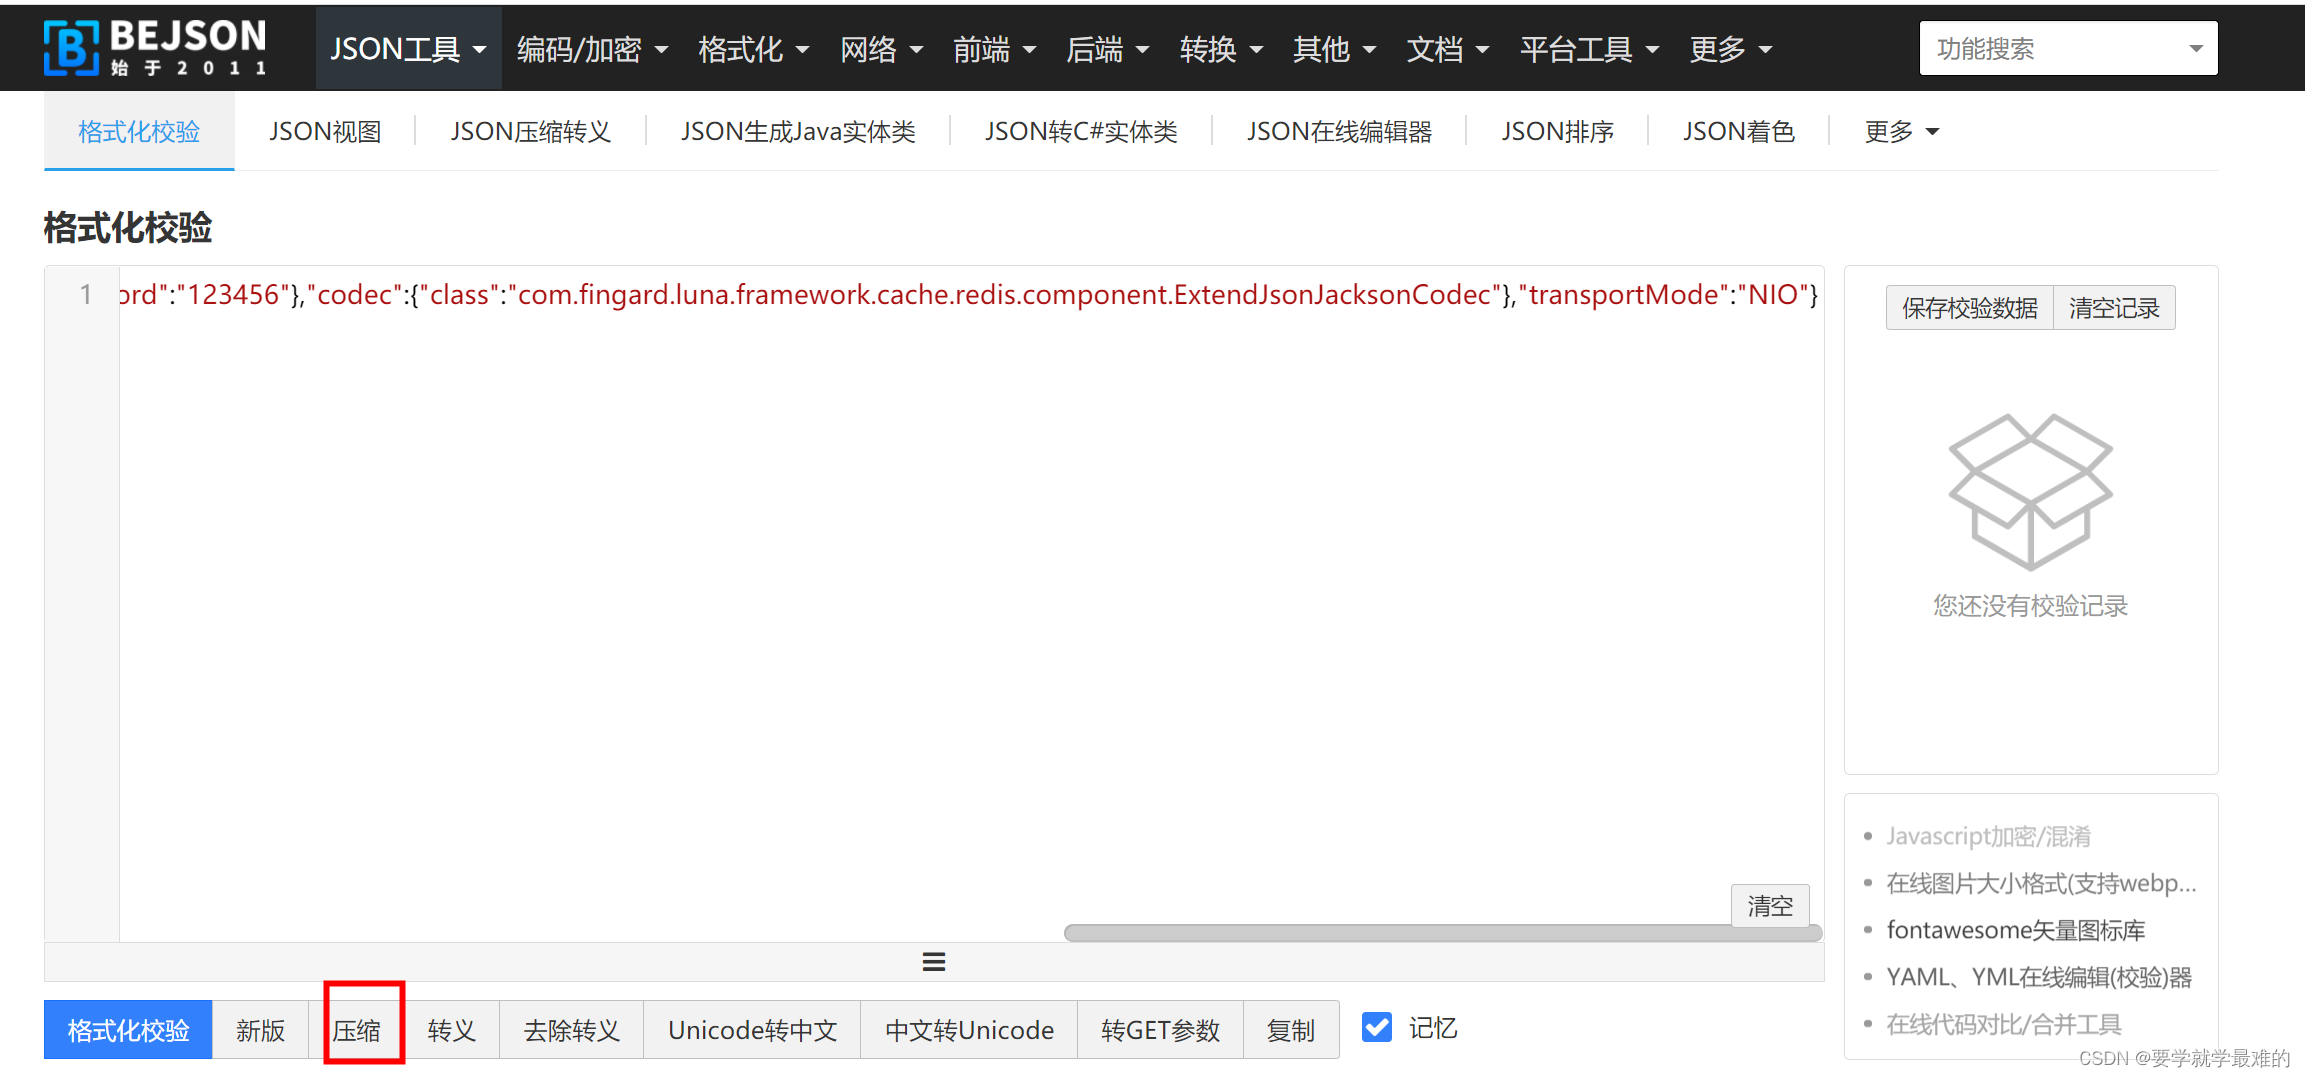
|


