安卓 tcp 客户端
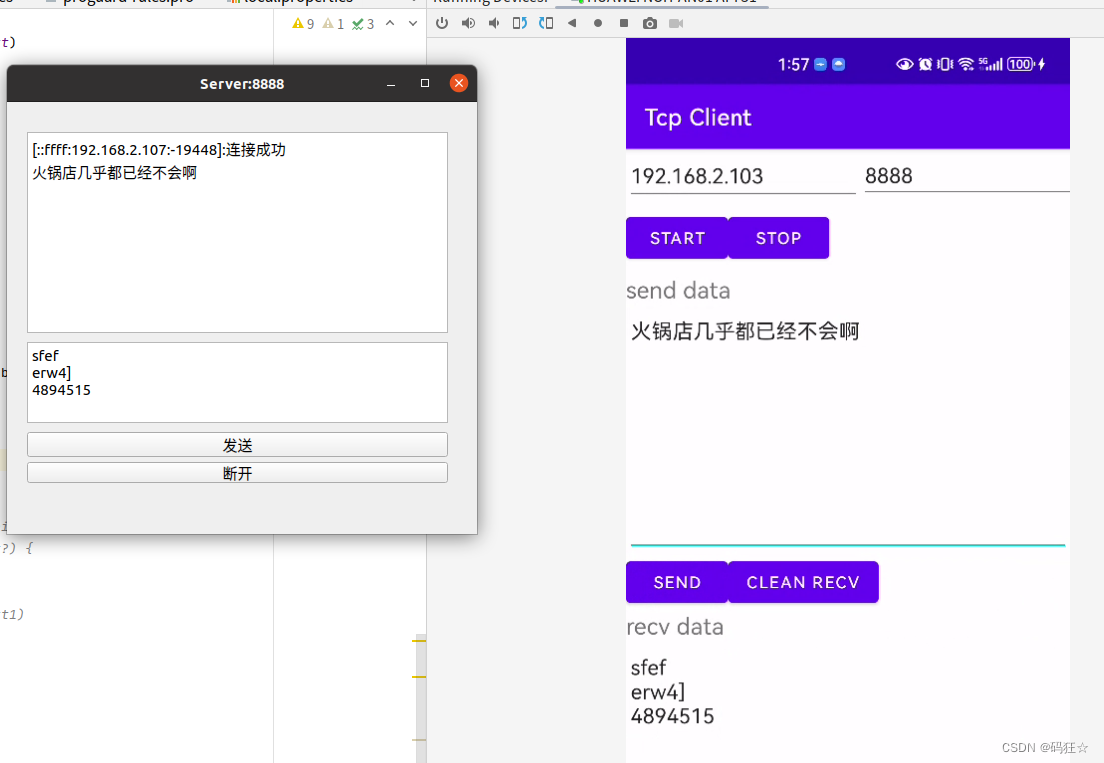
Server:8888 是Qt 写的Tcp 服务器 ip 是 192.168.2.103 port是8888
安卓手机运行 kotlin 语法的Tcp Client ,连接,收发数据
效果如下图
Tcpclient
package com.example.myapplicationimport android.os.Handler
import android.os.Looper
import android.util.Log
import java.io.BufferedReader
import java.io.BufferedWriter
import java.io.InputStreamReader
import java.io.OutputStreamWriter
import java.net.Socketclass TcpClient(private val ipAddress: String, private val port: Int) {private lateinit var socket: Socketprivate lateinit var reader: BufferedReaderprivate lateinit var writer: BufferedWriter// 接收线程private val messageReceiverThread = Thread {//主消息处理器,用于向外部发送tcp收到的数据val handler = Handler(Looper.getMainLooper())val buffer = StringBuilder()val charBuffer = CharArray(1024) // 调整缓冲区大小while (!Thread.currentThread().isInterrupted) {try {
//                val receivedData = reader.readLine() ?: ""
//                Log.d("TcpClient",receivedData)
//                handler.post {
//                    onDataReceived(receivedData)
//                }val bytesRead = reader.read(charBuffer)if (bytesRead == -1) {// 如果没有更多数据可读,则退出循环Log.d("TcpClient","continue")continue}// 清空缓冲区buffer.clear()// 将读取的数据追加到缓冲区buffer.append(charBuffer, 0, bytesRead)// 通知UI线程更新UIhandler.post {Log.d("TcpClient","buffer : "+buffer.toString())onDataReceived(buffer.toString())}} catch (e: Exception) {Log.e("TcpClient","Exception")e.printStackTrace()break}}}// 外部调用,定义数据接收监听器接口interface DataReceivedListener {fun onDataReceived(data: String)}private var dataReceivedListener: DataReceivedListener? = null// 外部调用,设置数据接收监听器fun setDataReceivedListener(listener: DataReceivedListener) {dataReceivedListener = listener}// 通知数据接收事件private fun onDataReceived(data: String) {dataReceivedListener?.onDataReceived(data)}// 1fun connectToServer() {try {socket = Socket(ipAddress, port)reader = BufferedReader(InputStreamReader(socket.getInputStream()))writer = BufferedWriter(OutputStreamWriter(socket.getOutputStream()))} catch (e: Exception) {e.printStackTrace()}}fun sendMessage(message: String) {try {writer.write(message)
//            writer.newLine()writer.flush()} catch (e: Exception) {e.printStackTrace()}}// 2fun startMessageReceiver() {messageReceiverThread.start()}fun stopMessageReceiver() {messageReceiverThread.interrupt()}fun close() {try {socket.close()} catch (e: Exception) {e.printStackTrace()}}
}
MainActivity
package com.example.myapplicationimport android.content.BroadcastReceiver
import android.content.Context
import android.content.Intent
import android.content.IntentFilter
import androidx.appcompat.app.AppCompatActivity
import android.os.Bundle
import android.os.Handler
import android.os.Looper
import android.text.Editable
import android.util.Log
import android.widget.Button
import android.widget.EditText
import android.widget.TextViewclass MainActivity : AppCompatActivity() {private lateinit var ipAddress: Stringprivate var port: Int = 0private lateinit var recvText: EditTextprivate lateinit var tcpClient: TcpClientoverride fun onCreate(savedInstanceState: Bundle?) {super.onCreate(savedInstanceState)setContentView(R.layout.activity_main)recvText = findViewById(R.id.recvText)// start tcpval startButton: Button = findViewById(R.id.startBtn)// 设置按钮点击事件startButton.setOnClickListener {// 设置IP地址和端口(请根据需要修改)ipAddress = findViewById<EditText?>(R.id.ipText).text.toString()port = findViewById<EditText?>(R.id.portNum).text.toString().toInt()// 创建TcpClient实例tcpClient = TcpClient(ipAddress, port)// 设置数据接收监听器tcpClient.setDataReceivedListener(object : TcpClient.DataReceivedListener {override fun onDataReceived(data: String) {// 在数据接收回调中更新UIupdateUI(data)}})// 在新线程中执行连接操作Thread {tcpClient.connectToServer()tcpClient.startMessageReceiver()}.start()}// stop tcpval stopBtn: Button = findViewById(R.id.stopBtn)stopBtn.setOnClickListener {Thread {tcpClient.stopMessageReceiver()tcpClient.close()}.start()}// send on threadval sendBtn: Button = findViewById(R.id.sendBtn)sendBtn.setOnClickListener {Thread {var sendText : EditText= findViewById(R.id.sendText)tcpClient.sendMessage(sendText.text.toString())}.start()}var cleanBtn:Button = findViewById(R.id.cleanBtn)cleanBtn.setOnClickListener {recvText.text.clear()}}private fun updateUI(data: String) {Log.d("MainActivity","data:"+data)val editableText = Editable.Factory.getInstance().newEditable(data)recvText.text?.append(editableText)}}
activity_main.xml
<?xml version="1.0" encoding="utf-8"?>
<LinearLayout xmlns:android="http://schemas.android.com/apk/res/android"xmlns:app="http://schemas.android.com/apk/res-auto"xmlns:tools="http://schemas.android.com/tools"android:id="@+id/linearLayout"android:layout_width="match_parent"android:layout_height="match_parent"android:orientation="vertical"tools:context=".MainActivity"><LinearLayoutandroid:layout_width="406dp"android:layout_height="53dp"android:orientation="horizontal"><EditTextandroid:id="@+id/ipText"android:layout_width="204dp"android:layout_height="47dp"android:layout_weight="4"android:ems="10"android:inputType="text"android:text="192.168.2.103" /><EditTextandroid:id="@+id/portNum"android:layout_width="204dp"android:layout_height="45dp"android:layout_weight="1"android:ems="10"android:inputType="number"android:text="8888" /></LinearLayout><LinearLayoutandroid:layout_width="409dp"android:layout_height="55dp"android:orientation="horizontal"><Buttonandroid:id="@+id/startBtn"android:layout_width="wrap_content"android:layout_height="wrap_content"android:text="start" /><Buttonandroid:id="@+id/stopBtn"android:layout_width="wrap_content"android:layout_height="wrap_content"android:text="stop" /><Spaceandroid:layout_width="wrap_content"android:layout_height="wrap_content"android:layout_weight="1" /></LinearLayout><TextViewandroid:id="@+id/textView2"android:layout_width="wrap_content"android:layout_height="wrap_content"android:text="send data"android:textSize="20sp" /><EditTextandroid:id="@+id/sendText"android:layout_width="match_parent"android:layout_height="148dp"android:layout_weight="4"android:ems="10"android:gravity="start|top"android:inputType="textMultiLine" /><LinearLayoutandroid:layout_width="match_parent"android:layout_height="wrap_content"android:orientation="horizontal"><Buttonandroid:id="@+id/sendBtn"android:layout_width="wrap_content"android:layout_height="wrap_content"android:text="send" /><Buttonandroid:id="@+id/cleanBtn"android:layout_width="wrap_content"android:layout_height="wrap_content"android:text="clean recv" /></LinearLayout><TextViewandroid:id="@+id/textView3"android:layout_width="wrap_content"android:layout_height="wrap_content"android:text="recv data"android:textSize="20sp" /><EditTextandroid:id="@+id/recvText"android:layout_width="match_parent"android:layout_height="202dp"android:layout_weight="4"android:ems="10"android:gravity="start|top"android:inputType="textMultiLine" /></LinearLayout>
AndroidManifest.xml 配置清单
<?xml version="1.0" encoding="utf-8"?>
<manifest xmlns:android="http://schemas.android.com/apk/res/android"package="com.example.myapplication"><uses-permission android:name="android.permission.INTERNET" /><uses-permission android:name="android.permission.ACCESS_WIFI_STATE" /><uses-permission android:name="android.permission.CHANGE_WIFI_STATE" /><applicationandroid:allowBackup="true"android:icon="@mipmap/ic_launcher"android:label="@string/app_name"android:roundIcon="@mipmap/ic_launcher_round"android:supportsRtl="true"android:theme="@style/Theme.MyApplication"><activityandroid:name=".MainActivity"android:exported="false"><intent-filter><action android:name="android.intent.action.MAIN" /><category android:name="android.intent.category.LAUNCHER" /></intent-filter></activity></application></manifest>
build.gradle (app)
plugins {id 'com.android.application'id 'org.jetbrains.kotlin.android'
}android {compileSdkVersion 30buildToolsVersion "30.0.3"defaultConfig {applicationId "com.example.myapplication"minSdkVersion 28targetSdkVersion 30versionCode 1versionName "1.0"testInstrumentationRunner "androidx.test.runner.AndroidJUnitRunner"}buildTypes {release {minifyEnabled falseproguardFiles getDefaultProguardFile('proguard-android-optimize.txt'), 'proguard-rules.pro'}}compileOptions {sourceCompatibility JavaVersion.VERSION_1_8targetCompatibility JavaVersion.VERSION_1_8}
}dependencies {implementation 'androidx.appcompat:appcompat:1.2.0'implementation 'com.google.android.material:material:1.2.1'implementation 'androidx.constraintlayout:constraintlayout:2.0.1'testImplementation 'junit:junit:4.+'androidTestImplementation 'androidx.test.ext:junit:1.1.2'androidTestImplementation 'androidx.test.espresso:espresso-core:3.3.0'
}
build.gradle (my proj )
使用国内镜像
// Top-level build file where you can add configuration options common to all sub-projects/modules.
buildscript {repositories {maven { url 'https://maven.aliyun.com/repository/google' }maven { url 'https://maven.aliyun.com/repository/jcenter' }maven { url 'https://maven.aliyun.com/repository/public' }maven { url 'https://maven.aliyun.com/repository/gradle-plugin' }
//        google()
//        mavenCentral()}dependencies {classpath "com.android.tools.build:gradle:4.2.1"classpath 'org.jetbrains.kotlin:kotlin-gradle-plugin:1.4.0'// NOTE: Do not place your application dependencies here; they belong// in the individual module build.gradle files}
}allprojects {repositories {maven { url 'https://maven.aliyun.com/repository/google' }maven { url 'https://maven.aliyun.com/repository/jcenter' }maven { url 'https://maven.aliyun.com/repository/public' }maven { url 'https://maven.aliyun.com/repository/gradle-plugin' }
//        google()
//        mavenCentral()
//        jcenter() // Warning: this repository is going to shut down soon}
}task clean(type: Delete) {delete rootProject.buildDir
}