文章目录
- 0 前言
- 1 课题描述
- 2 实现效果
- 3 算法实现原理
- 3.1 数据集
- 3.2 深度学习识别算法
- 3.3 特征提取主干网络
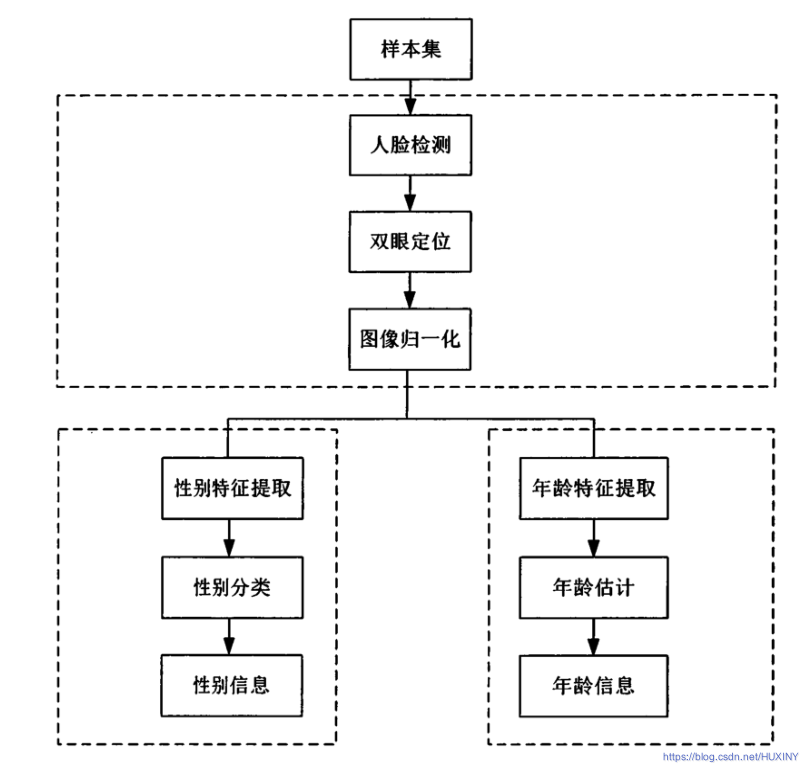
- 3.4 总体实现流程
- 4 具体实现
- 4.1 预训练数据格式
- 4.2 部分实现代码
- 5 最后
0 前言
🔥 优质竞赛项目系列,今天要分享的是
🚩 毕业设计 人脸性别年龄识别系统 - 图像识别 opencv
该项目较为新颖,适合作为竞赛课题方向,学长非常推荐!
🥇学长这里给一个题目综合评分(每项满分5分)
- 难度系数:3分
- 工作量:3分
- 创新点:3分
🧿 更多资料, 项目分享:
https://gitee.com/dancheng-senior/postgraduate
1 课题描述
随着大数据与人工智能逐渐走入人们的生活,计算机视觉应用越发广泛。如医疗影像识别、无人驾驶车载视觉、通用物体识别、自然场景下的文本识别等,根据不同的应用场景,人脸研究方向可以分为人脸检测、身份识别、性别识别、年龄预测、种族识别、表情识别等。近年来,人脸身份识别技术发展迅猛,在生活应用中取得了较好的效果,也逐渐趋于成熟,而年龄识别与性别预测,仍然是生物特征识别研究领域中一项具有挑战性的课题。
课题意义
相比人脸性别属性而言,人脸年龄属性的研究更富有挑战性。主要有两点原因,首先每个人的年龄会随着身体健康状况、皮肤保养情况而表现得有所不同,即便是在同一年,表现年龄会随着个人状态的不同而改变,人类识别尚且具有较高难度。其次,可用的人脸年龄估计数据集比较少,不同年龄的数据标签收集不易,现有大多数的年龄数据集都是在不同的复杂环境下的照片、人脸图片存在光照变化较复杂、部分遮挡、图像模糊、姿态旋转角度较大等一系列问题,对人脸模型的鲁棒性产生了较大的影响。
2 实现效果
这里废话不多说,先放上大家最关心的实现效果:
输入图片:

识别结果:
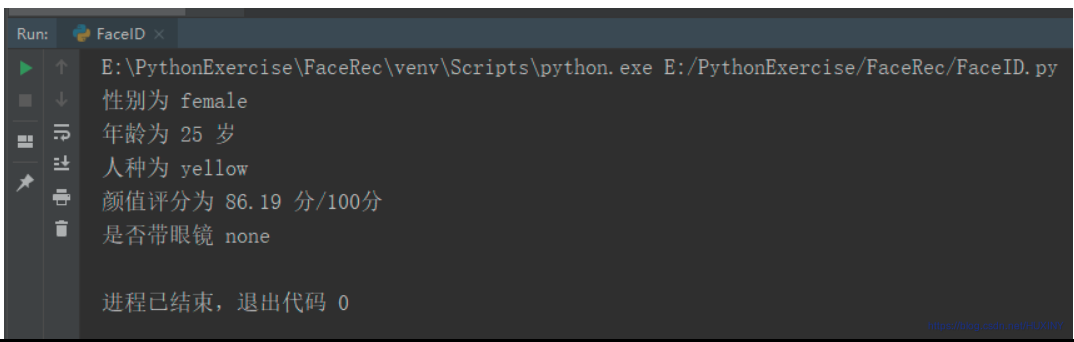
或者实时检测


3 算法实现原理
3.1 数据集
学长收集的数据集:
该人脸数据库的图片来源于互联网的爬取,而非研究机构整理,一共含有13000多张人脸图像,在这个数据集中大约有1860张图片是成对出现的,即同一个人的2张不同照片,有助于人脸识别算法的研究,图像标签中标有人的身份信息,人脸坐标,关键点信息,可用于人脸检测和人脸识别的研究,此数据集是对人脸算法效果验证的权威数据集.

该数据集包含的人脸范围比较全面,欧亚人种都有。
3.2 深度学习识别算法
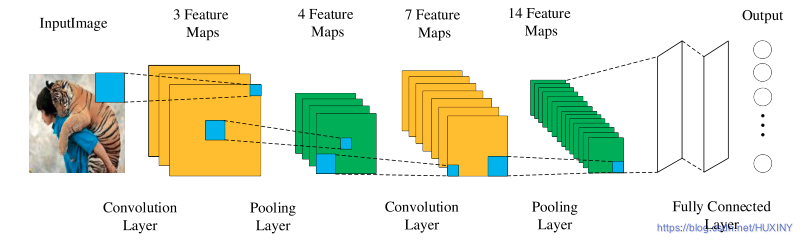
卷积神经网络是常见的深度学习架构,而在CNN出现之前,图像需要处理的数据量过大,导致成本很高,效率很低,图像在数字化的过程中很难保留原有的特征,导致图像处理的准确率不高。CNN的出现使得提取特征的能力变得更强,为更多优秀网络的研究提供了有力的支撑。CNN的核心思想是利用神经网络模拟人脑视觉神经系统,构造多个神经元并建立彼此之间的联系。不同的神经元进行分工,浅层神经元处理低纬度图像特征,深层神经元处理图像高级特征、语义信息等,CNN的网络结构主要由卷积层、BN层、激活层、池化层、全连接层、损失函数层构成,多个层协同工作实现了特征提取的功能,并通过特有的网络结构降低参数的数量级,防止过拟合,最终得到输出结果.
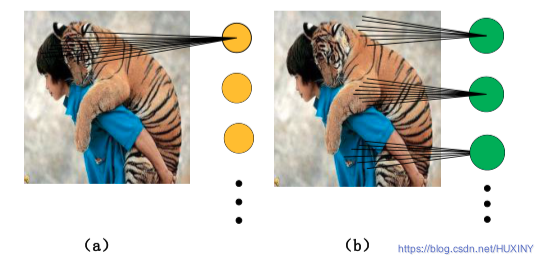
CNN传承了多层感知机的思想,并受到了生物神经科学的启发,通过卷积的运算模拟人类视觉皮层的“感受野”。不同于传统的前馈神经网络,卷积运算对图像的区域值进行加权求和,最终以神经元的形式进行输出。前馈神经网络对每一个输入的信号进行加权求和:
- (a)图是前馈神经网络的连接方式
- (b)图是CNN的连接方式。
cnn框架如下:
3.3 特征提取主干网络
在深度学习算法研究中,通用主干特征提取网络结合特定任务网络已经成为一种标准的设计模式。特征提取对于分类、识别、分割等任务都是至关重要的部分。下面介绍本文研究中用到的主干神经网络。
ResNet网络
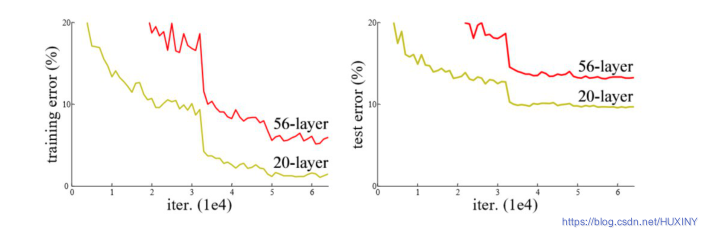
ResNet是ILSVRC-2015的图像分类任务冠军,也是CVPR2016的最佳论文,目前应用十分广泛,ResNet的重要性在于将网络的训练深度延伸到了数百层,而且取得了非常好的效果。在ResNet出现之前,网络结构一般在20层左右,对于一般情况,网络结构越深,模型效果就会越好,但是研究人员发现加深网络反而会使结果变差。
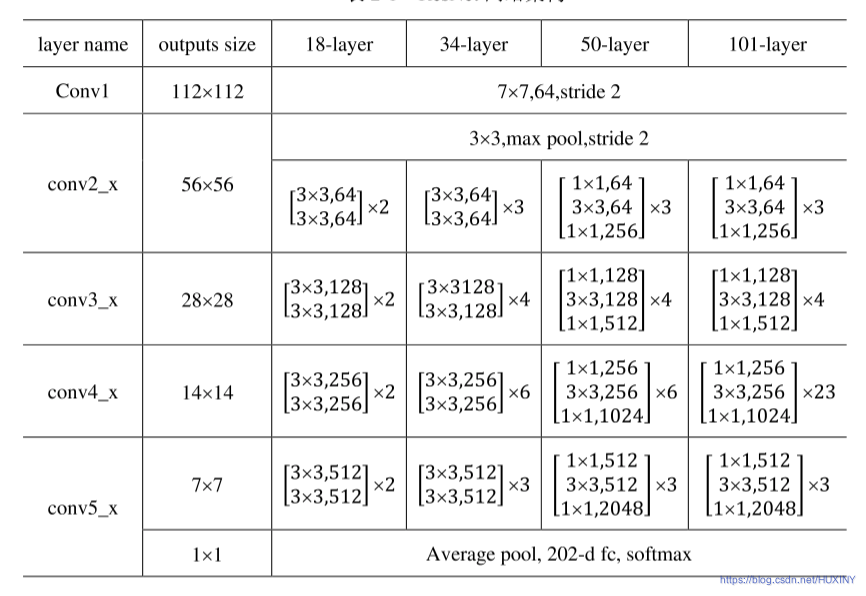
人脸特征提取我这里选用ResNet,网络结构如下:
3.4 总体实现流程
4 具体实现
4.1 预训练数据格式

4.2 部分实现代码
训练部分代码:
from __future__ import absolute_importfrom __future__ import divisionfrom __future__ import print_functionfrom six.moves import xrangefrom datetime import datetimeimport timeimport osimport numpy as npimport tensorflow as tffrom data import distorted_inputsfrom model import select_modelimport jsonimport reLAMBDA = 0.01MOM = 0.9tf.app.flags.DEFINE_string('pre_checkpoint_path', '',"""If specified, restore this pretrained model """"""before beginning any training.""")tf.app.flags.DEFINE_string('train_dir', '/home/dpressel/dev/work/AgeGenderDeepLearning/Folds/tf/test_fold_is_0','Training directory')tf.app.flags.DEFINE_boolean('log_device_placement', False,"""Whether to log device placement.""")tf.app.flags.DEFINE_integer('num_preprocess_threads', 4,'Number of preprocessing threads')tf.app.flags.DEFINE_string('optim', 'Momentum','Optimizer')tf.app.flags.DEFINE_integer('image_size', 227,'Image size')tf.app.flags.DEFINE_float('eta', 0.01,'Learning rate')tf.app.flags.DEFINE_float('pdrop', 0.,'Dropout probability')tf.app.flags.DEFINE_integer('max_steps', 40000,'Number of iterations')tf.app.flags.DEFINE_integer('steps_per_decay', 10000,'Number of steps before learning rate decay')tf.app.flags.DEFINE_float('eta_decay_rate', 0.1,'Learning rate decay')tf.app.flags.DEFINE_integer('epochs', -1,'Number of epochs')tf.app.flags.DEFINE_integer('batch_size', 128,'Batch size')tf.app.flags.DEFINE_string('checkpoint', 'checkpoint','Checkpoint name')tf.app.flags.DEFINE_string('model_type', 'default','Type of convnet')tf.app.flags.DEFINE_string('pre_model','',#'./inception_v3.ckpt','checkpoint file')FLAGS = tf.app.flags.FLAGS# Every 5k steps cut learning rate in halfdef exponential_staircase_decay(at_step=10000, decay_rate=0.1):print('decay [%f] every [%d] steps' % (decay_rate, at_step))def _decay(lr, global_step):return tf.train.exponential_decay(lr, global_step,at_step, decay_rate, staircase=True)return _decaydef optimizer(optim, eta, loss_fn, at_step, decay_rate):global_step = tf.Variable(0, trainable=False)optz = optimif optim == 'Adadelta':optz = lambda lr: tf.train.AdadeltaOptimizer(lr, 0.95, 1e-6)lr_decay_fn = Noneelif optim == 'Momentum':optz = lambda lr: tf.train.MomentumOptimizer(lr, MOM)lr_decay_fn = exponential_staircase_decay(at_step, decay_rate)return tf.contrib.layers.optimize_loss(loss_fn, global_step, eta, optz, clip_gradients=4., learning_rate_decay_fn=lr_decay_fn)def loss(logits, labels):labels = tf.cast(labels, tf.int32)cross_entropy = tf.nn.sparse_softmax_cross_entropy_with_logits(logits=logits, labels=labels, name='cross_entropy_per_example')cross_entropy_mean = tf.reduce_mean(cross_entropy, name='cross_entropy')tf.add_to_collection('losses', cross_entropy_mean)losses = tf.get_collection('losses')regularization_losses = tf.get_collection(tf.GraphKeys.REGULARIZATION_LOSSES)total_loss = cross_entropy_mean + LAMBDA * sum(regularization_losses)tf.summary.scalar('tl (raw)', total_loss)#total_loss = tf.add_n(losses + regularization_losses, name='total_loss')loss_averages = tf.train.ExponentialMovingAverage(0.9, name='avg')loss_averages_op = loss_averages.apply(losses + [total_loss])for l in losses + [total_loss]:tf.summary.scalar(l.op.name + ' (raw)', l)tf.summary.scalar(l.op.name, loss_averages.average(l))with tf.control_dependencies([loss_averages_op]):total_loss = tf.identity(total_loss)return total_lossdef main(argv=None):with tf.Graph().as_default():model_fn = select_model(FLAGS.model_type)# Open the metadata file and figure out nlabels, and size of epochinput_file = os.path.join(FLAGS.train_dir, 'md.json')print(input_file)with open(input_file, 'r') as f:md = json.load(f)images, labels, _ = distorted_inputs(FLAGS.train_dir, FLAGS.batch_size, FLAGS.image_size, FLAGS.num_preprocess_threads)logits = model_fn(md['nlabels'], images, 1-FLAGS.pdrop, True)total_loss = loss(logits, labels)train_op = optimizer(FLAGS.optim, FLAGS.eta, total_loss, FLAGS.steps_per_decay, FLAGS.eta_decay_rate)saver = tf.train.Saver(tf.global_variables())summary_op = tf.summary.merge_all()sess = tf.Session(config=tf.ConfigProto(log_device_placement=FLAGS.log_device_placement))tf.global_variables_initializer().run(session=sess)# This is total hackland, it only works to fine-tune iv3if FLAGS.pre_model:inception_variables = tf.get_collection(tf.GraphKeys.VARIABLES, scope="InceptionV3")restorer = tf.train.Saver(inception_variables)restorer.restore(sess, FLAGS.pre_model)if FLAGS.pre_checkpoint_path:if tf.gfile.Exists(FLAGS.pre_checkpoint_path) is True:print('Trying to restore checkpoint from %s' % FLAGS.pre_checkpoint_path)restorer = tf.train.Saver()tf.train.latest_checkpoint(FLAGS.pre_checkpoint_path)print('%s: Pre-trained model restored from %s' %(datetime.now(), FLAGS.pre_checkpoint_path))run_dir = '%s/run-%d' % (FLAGS.train_dir, os.getpid())checkpoint_path = '%s/%s' % (run_dir, FLAGS.checkpoint)if tf.gfile.Exists(run_dir) is False:print('Creating %s' % run_dir)tf.gfile.MakeDirs(run_dir)tf.train.write_graph(sess.graph_def, run_dir, 'model.pb', as_text=True)tf.train.start_queue_runners(sess=sess)summary_writer = tf.summary.FileWriter(run_dir, sess.graph)steps_per_train_epoch = int(md['train_counts'] / FLAGS.batch_size)num_steps = FLAGS.max_steps if FLAGS.epochs < 1 else FLAGS.epochs * steps_per_train_epochprint('Requested number of steps [%d]' % num_steps)for step in xrange(num_steps):start_time = time.time()_, loss_value = sess.run([train_op, total_loss])duration = time.time() - start_timeassert not np.isnan(loss_value), 'Model diverged with loss = NaN'if step % 10 == 0:num_examples_per_step = FLAGS.batch_sizeexamples_per_sec = num_examples_per_step / durationsec_per_batch = float(duration)format_str = ('%s: step %d, loss = %.3f (%.1f examples/sec; %.3f ' 'sec/batch)')print(format_str % (datetime.now(), step, loss_value,examples_per_sec, sec_per_batch))# Loss only actually evaluated every 100 steps?if step % 100 == 0:summary_str = sess.run(summary_op)summary_writer.add_summary(summary_str, step)if step % 1000 == 0 or (step + 1) == num_steps:saver.save(sess, checkpoint_path, global_step=step)if __name__ == '__main__':tf.app.run()5 最后
🧿 更多资料, 项目分享:
https://gitee.com/dancheng-senior/postgraduate