目录
- 一 MyBatisPlus简介
- 1. 入门案例
- 问题导入
- 1.1 SpringBoot整合MyBatisPlus入门程序
- ①:创建新模块,选择Spring初始化,并配置模块相关基础信息
- ②:选择当前模块需要使用的技术集(仅保留JDBC)
- ③:手动添加MyBatisPlus起步依赖
- ④:制作实体类与表结构
- ⑤:设置Jdbc参数(application.yml)
- ⑥:定义数据接口,继承BaseMapper
- ⑦:测试类中注入dao接口,测试功能
- 2. MyBatisPlus概述
- 问题导入
- 2.1 MyBatis介绍
- 二 标准数据层开发
- 1. MyBatisPlus的CRUD操作
- 2. Lombok插件介绍
- 问题导入
- 2.1 @Getter和@Setter
- 2.2 @ToString
- 2.3 @EqualsAndHashCode
- 2.4 @NoArgsConstructor和@AllArgsConstructor
- 2.5 @Data
- 2.6 @Builder
- 2.7 @Slf4j
- 总结
- 3. MyBatisPlus分页功能
- 问题导入
- 3.1 分页功能接口
- 3.2 MyBatisPlus分页使用
- 3.3 开启MyBatisPlus日志
- 3.4 解决日志打印过多问题
- 3.4.1 取消初始化spring日志打印
- 3.4.2 取消SpringBoot启动banner图标
- 3.4.3 取消MybatisPlus启动banner图标
- 三 DQL编程控制(查)
- 1. 条件查询方式
- 1.1 条件查询
- 1.1.1 方式一:按条件查询
- 1.1.2 方式二:lambda格式按条件查询
- 1.1.3 方式三:lambda格式按条件查询(推荐)
- 1.2 组合条件
- 1.2.1 并且关系(and)
- 1.2.2 或者关系(or)
- 1.3 NULL值处理
- 问题导入
- 1.3.1 if语句控制条件追加
- 1.3.2 条件参数控制
- 1.3.3 条件参数控制(链式编程)
- 2. 查询投影-设置【查询字段、分组、分页】
- 2.1 查询结果包含模型类中部分属性
- 2.2 查询结果包含模型类中未定义的属性
- 3. 查询条件设定
- 问题导入
- 3.1 查询条件
- 3.2 查询API
- 4. 字段映射与表名映射
- 问题导入
- 4.1 问题一:表字段与编码属性设计不同步
- 4.2 问题二:编码中添加了数据库中未定义的属性
- 4.3 问题三:采用默认查询开放了更多的字段查看权限
- 4.4 问题四:表名与编码开发设计不同步
- 四 DML编程控制(增删改)
- 1. id生成策略控制(Insert)
- 问题导入
- 1.1 id生成策略控制(@TableId注解)
- 1.2 全局策略配置
- id生成策略全局配置
- 表名前缀全局配置
- 2. 多记录操作(批量Delete/Select)
- 问题导入
- 2.1 按照主键删除多条记录
- 2.2 根据主键查询多条记录
- 3. 逻辑删除(Delete/Update)
- 问题导入
- 3.1 逻辑删除案例
- ①:数据库表中添加逻辑删除标记字段默认值为0
- ②:实体类中添加对应字段,并设定当前字段为逻辑删除标记字段
- ③:配置逻辑删除字面值
- 4. 乐观锁(Update)
- 问题导入
- 4.1 乐观锁案例
- ①:数据库表中添加锁标记字段默认值为1
- ②:实体类中添加对应字段,并设定当前字段为逻辑删除标记字段
- ③:配置乐观锁拦截器实现锁机制对应的动态SQL语句拼装
- ④:使用乐观锁机制在修改前必须先获取到对应数据的verion方可正常进行
- 五 快速开发-代码生成器
- 问题导入
- 1. MyBatisPlus提供模板
- 2. 工程搭建和基本代码编写
- 3. 开发者自定义配置
一 MyBatisPlus简介
1. 入门案例
问题导入
MyBatisPlus环境搭建的步骤?
1.1 SpringBoot整合MyBatisPlus入门程序
①:创建新模块,选择Spring初始化,并配置模块相关基础信息
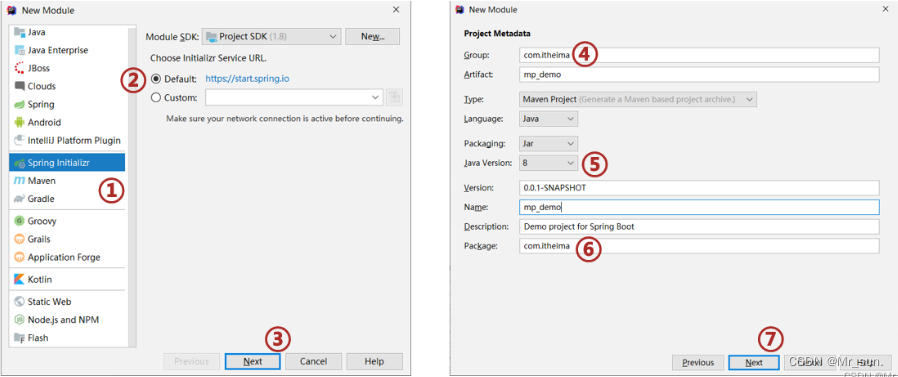
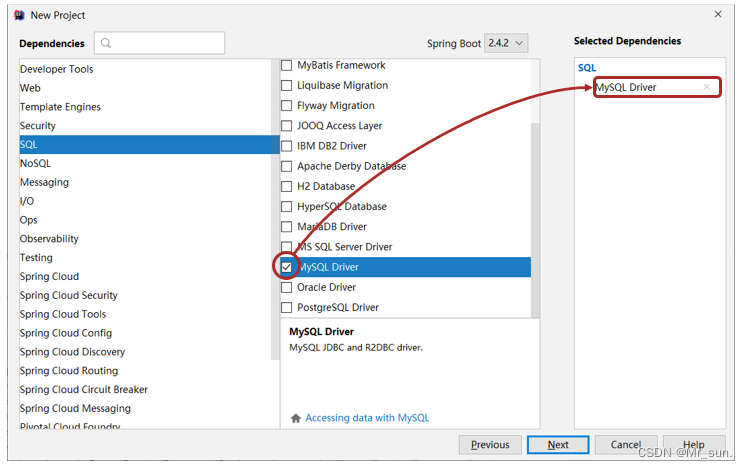
②:选择当前模块需要使用的技术集(仅保留JDBC)
③:手动添加MyBatisPlus起步依赖
<dependency><groupId>com.baomidou</groupId><artifactId>mybatis-plus-boot-starter</artifactId><version>3.5.2</version>
</dependency>
<dependency><groupId>com.alibaba</groupId><artifactId>druid</artifactId><version>1.2.8</version>
</dependency>
注意事项1:由于mp并未被收录到idea的系统内置配置,无法直接选择加入
注意事项2:如果使用Druid数据源,需要导入对应坐标
④:制作实体类与表结构
(类名与表名对应,属性名与字段名对应)
create database if not exists mybatisplus_db character set utf8;
use mybatisplus_db;
CREATE TABLE user (id bigint(20) primary key auto_increment,name varchar(32) not null,password  varchar(32) not null,age int(3) not null ,tel varchar(32) not null
);
insert into user values(null,'tom','123456',12,'12345678910');
insert into user values(null,'jack','123456',8,'12345678910');
insert into user values(null,'jerry','123456',15,'12345678910');
insert into user values(null,'tom','123456',9,'12345678910');
insert into user values(null,'snake','123456',28,'12345678910');
insert into user values(null,'张益达','123456',22,'12345678910');
insert into user values(null,'张大炮','123456',16,'12345678910');
public class User {private Long id;private String name;private String password;private Integer age;private String tel;public Long getId() {return id;}public void setId(Long id) {this.id = id;}public String getName() {return name;}public void setName(String name) {this.name = name;}public String getPassword() {return password;}public void setPassword(String password) {this.password = password;}public Integer getAge() {return age;}public void setAge(Integer age) {this.age = age;}public String getTel() {return tel;}public void setTel(String tel) {this.tel = tel;}@Overridepublic String toString() {return "User{" +"id=" + id +", name='" + name + '\'' +", password='" + password + '\'' +", age=" + age +", tel='" + tel + '\'' +'}';}
}
⑤:设置Jdbc参数(application.yml)
spring:datasource:type: com.alibaba.druid.pool.DruidDataSourcedriver-class-name: com.mysql.cj.jdbc.Driverurl: jdbc:mysql://localhost:3306/mybatisplus_db?characterEncoding=utf8&useSSL=false&serverTimezone=Asia/Shanghai&rewriteBatchedStatements=trueusername: rootpassword: root
⑥:定义数据接口,继承BaseMapper
package com.itheima.dao;import com.baomidou.mybatisplus.core.mapper.BaseMapper;
import com.itheima.domain.User;
import org.apache.ibatis.annotations.Mapper;@Mapper
public interface UserDao extends BaseMapper<User> {
}
⑦:测试类中注入dao接口,测试功能
package com.itheima;import com.itheima.dao.UserDao;
import com.itheima.domain.User;
import org.junit.jupiter.api.Test;
import org.springframework.beans.factory.annotation.Autowired;
import org.springframework.boot.test.context.SpringBootTest;import java.util.List;@SpringBootTest
public class Mybatisplus01QuickstartApplicationTests {@Autowiredprivate UserDao userDao;@Testvoid testGetAll() {List<User> userList = userDao.selectList(null);System.out.println(userList);}
}
2. MyBatisPlus概述
问题导入
通过入门案例制作,MyBatisPlus的优点有哪些?
2.1 MyBatis介绍
- MyBatisPlus(简称MP)是基于MyBatis框架基础上开发的增强型工具,旨在简化开发、提高效率
- 官网:
- https://mybatis.plus/
- https://mp.baomidou.com/
- 无侵入:只做增强不做改变,不会对现有工程产生影响
- 强大的 CRUD 操作:内置通用 Mapper,少量配置即可实现单表CRUD 操作
- 支持 Lambda:编写查询条件无需担心字段写错
- 支持主键自动生成
- 内置分页插件
- ……
二 标准数据层开发
1. MyBatisPlus的CRUD操作
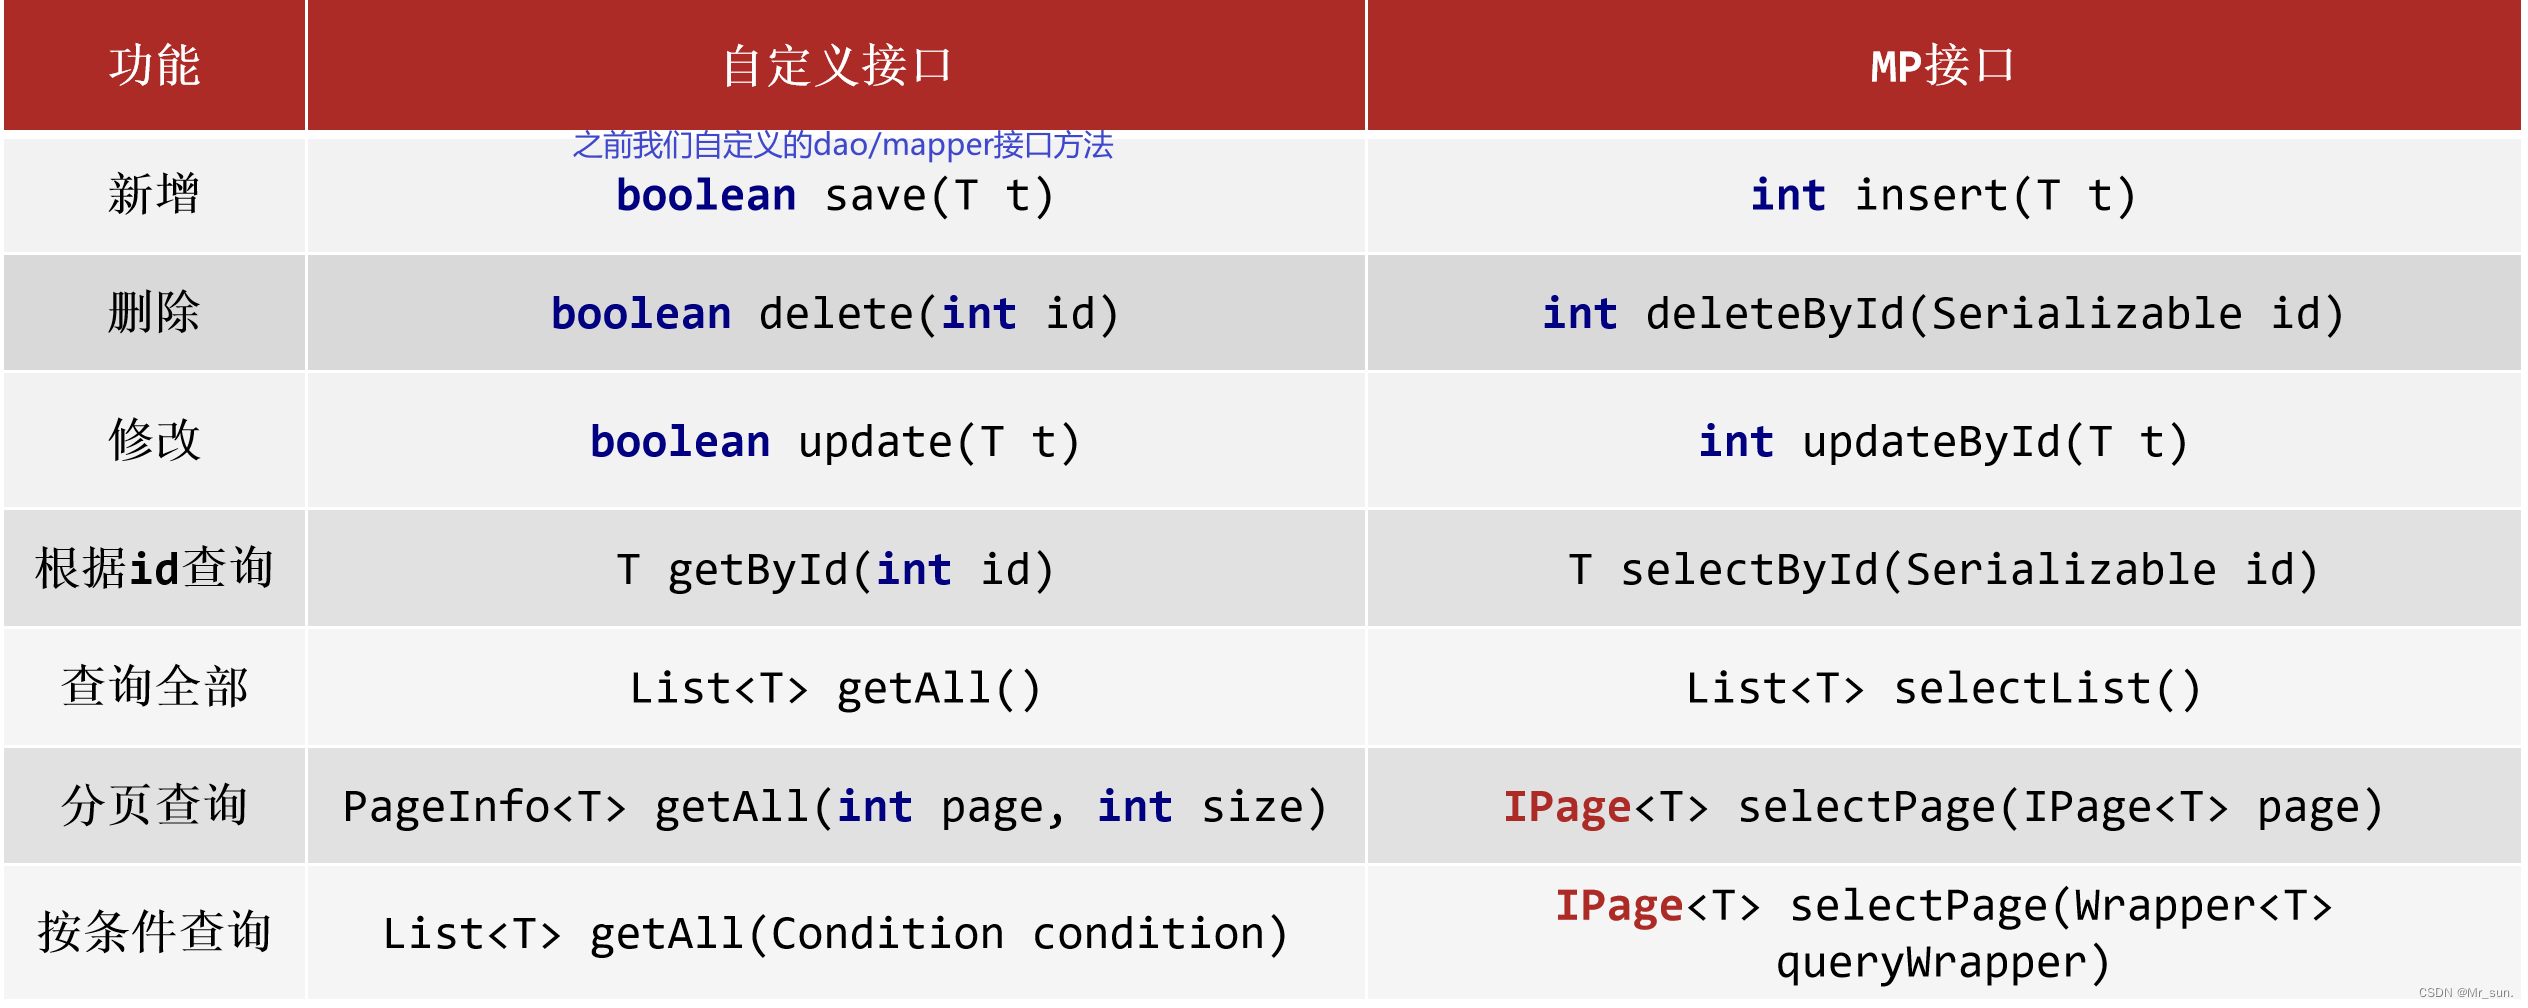
package com.itheima;import com.itheima.dao.UserDao;
import com.itheima.domain.User;
import org.junit.jupiter.api.Test;
import org.springframework.beans.factory.annotation.Autowired;
import org.springframework.boot.test.context.SpringBootTest;import java.util.List;@SpringBootTest
class Mybatisplus01QuickstartApplicationTests {@Autowiredprivate UserDao userDao;@Testvoid testSave() {User user = new User();user.setName("黑马程序员");user.setPassword("itheima");user.setAge(12);user.setTel("4006184000");userDao.insert(user);}@Testvoid testDelete() {userDao.deleteById(1401856123725713409L);}@Testvoid testUpdate() {User user = new User();user.setId(1L);user.setName("Tom888");user.setPassword("tom888");userDao.updateById(user);}@Testvoid testGetById() {User user = userDao.selectById(2L);System.out.println(user);}@Testvoid testGetAll() {List<User> userList = userDao.selectList(null);System.out.println(userList);}
}
2. Lombok插件介绍
问题导入
有什么简单的办法可以自动生成实体类的GET、SET方法?
- Lombok,一个Java类库,提供了一组注解,简化POJO实体类开发。
<dependency><groupId>org.projectlombok</groupId><artifactId>lombok</artifactId><version>1.18.24</version>
</dependency>
- 常用注解:@Data,为当前实体类在编译期设置对应的get/set方法,无参/无参构造方法,toString方法,hashCode方法,equals方法等
package com.itheima.domain;import lombok.*;
/*1 生成getter和setter方法:@Getter、@Setter生成toString方法:@ToString生成equals和hashcode方法:@EqualsAndHashCode2 统一成以上所有:@Data3 生成空参构造: @NoArgsConstructor生成全参构造: @AllArgsConstructor4 lombok还给我们提供了builder的方式创建对象,好处就是可以链式编程。 @Builder【扩展】*/
@Data
public class User {private Long id;private String name;private String password;private Integer age;private String tel;
}
2.1 @Getter和@Setter
@Getter和@Setter是Lombok中最常用的注解之一,它们用于自动生成Java Bean类的Getters和Setters方法。使用这两个注解可以减少代码量,提高代码的可读性和可维护性。
使用方式:
import lombok.Getter;
import lombok.Setter;
@Getter
@Setter
public class User {private String name;private int age;
}
注解的作用:
在上面的代码中,我们使用了@Getter和@Setter注解来自动生成User类的Getters和Setters方法,这样我们就可以通过下列代码来访问User类的属性:
User user = new User();
user.setName("Tom");
user.setAge(20);
System.out.println(user.getName());
System.out.println(user.getAge());
2.2 @ToString
@ToString注解可以自动生成toString方法。这个方法可以将一个对象的属性转换成一个字符串,方便输出调试信息。
使用方式:
import lombok.ToString;@ToString
public class User {private String name;private int age;
}
注解的作用:
在上面的代码中,我们使用了@ToString注解来自动生成User类的toString方法,这样我们就可以通过下列代码来输出User对象的属性:
User user = new User();
user.setName("Tom");
user.setAge(20);
System.out.println(user);
输出结果为:
User(name=Tom, age=20)
2.3 @EqualsAndHashCode
@EqualsAndHashCode注解可以自动生成equals和hashCode方法。这个方法可以用来比较两个对象是否相等。
使用方式:
import lombok.EqualsAndHashCode;@EqualsAndHashCode
public class User {private String name;private int age;
}
注解的作用:
在上面的代码中,我们使用了@EqualsAndHashCode注解来自动生成User类的equals和hashCode方法,这样我们就可以通过下列代码来比较两个User对象是否相等:
User user1 = new User();
user1.setName("Tom");
user1.setAge(20);
User user2 = new User();
user2.setName("Tom");
user2.setAge(20);
System.out.println(user1.equals(user2));
输出结果为:
true
2.4 @NoArgsConstructor和@AllArgsConstructor
@NoArgsConstructor和@AllArgsConstructor注解可以自动生成无参构造方法和全参构造方法。
使用方式:
import lombok.AllArgsConstructor;
import lombok.NoArgsConstructor;@NoArgsConstructor
@AllArgsConstructor
public class User {private String name;private int age;
}
注解的作用:
在上面的代码中,我们使用了@NoArgsConstructor和@AllArgsConstructor注解来自动生成User类的无参构造方法和全参构造方法,这样我们就可以通过下列代码来创建User对象:
User user1 = new User();
User user2 = new User("Tom", 20);
2.5 @Data
@Data注解可以自动生成Getter、Setter、equals、hashCode和toString方法,相当于同时使用了@Getter、@Setter、@EqualsAndHashCode和@ToString注解。
使用方式:
import lombok.Data;@Data
public class User {private String name;private int age;
}
注解的作用:
在上面的代码中,我们使用了@Data注解来自动生成User类的Getter、Setter、equals、hashCode和toString方法,这样我们就可以通过下列代码来访问User类的属性、比较两个User对象是否相等以及输出User对象的属性:
User user1 = new User();
user1.setName("Tom");
user1.setAge(20);
User user2 = new User();
user2.setName("Tom");
user2.setAge(20);
System.out.println(user1.equals(user2));
System.out.println(user1.toString());
输出结果为:
true
User(name=Tom, age=20)
2.6 @Builder
@Builder注解可以自动生成Builder模式的代码。Builder模式是一种创建对象的设计模式,它可以让我们更加灵活地创建对象,同时也可以提高代码的可读性和可维护性。
使用方式:
import lombok.Builder;@Builder
public class User {private String name;private int age;
}
注解的作用:
在上面的代码中,我们使用了@Builder注解来自动生成User类的Builder模式的代码,这样我们就可以通过下列代码来创建User对象:
User user = User.builder().name("Tom").age(20).build();
2.7 @Slf4j
@Slf4j注解可以自动生成日志记录代码。日志记录是一种常用的调试和错误处理方法,它可以帮助我们更好地了解程序的运行情况。
使用方式:
import lombok.extern.slf4j.Slf4j;@Slf4j
public class User {private String name;private int age;public void hello() {log.info("Hello, {}!", name);}
}
注解的作用:
在上面的代码中,我们使用了@Slf4j注解来自动生成User类的日志记录代码,这样我们就可以通过下列代码来记录User对象的hello方法的调用情况:
User user = new User();
user.setName("Tom");
user.hello();
输出结果为:
INFO User:9 - Hello, Tom!
总结
Lombok是一个非常实用的Java库,它可以帮助我们简化Java代码的编写,减少样板代码的重复,提高代码的可读性和可维护性。本文介绍了Lombok中常用的注解及其用法,包括@Getter、@Setter、@ToString、@EqualsAndHashCode、@NoArgsConstructor、@AllArgsConstructor、@Data、@Builder和@Slf4j。通过学习这些注解,我们可以更加高效地编写Java代码。
3. MyBatisPlus分页功能
问题导入
思考一下Mybatis分页插件是如何用的?
3.1 分页功能接口
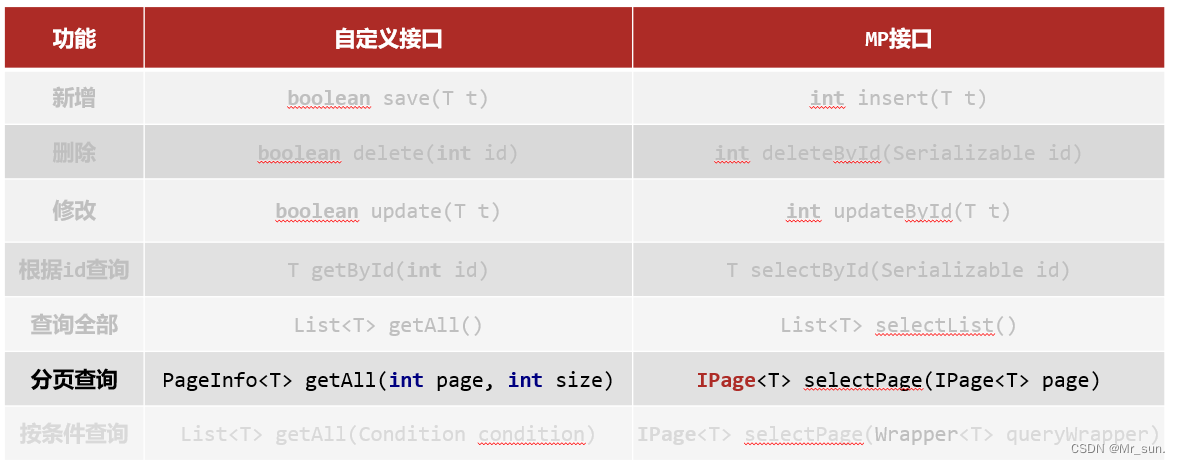
3.2 MyBatisPlus分页使用
①:设置分页拦截器作为Spring管理的bean
package com.itheima.config;import com.baomidou.mybatisplus.extension.plugins.MybatisPlusInterceptor;
import com.baomidou.mybatisplus.extension.plugins.inner.PaginationInnerInterceptor;
import org.springframework.context.annotation.Bean;
import org.springframework.context.annotation.Configuration;@Configuration
public class MybatisPlusConfig {@Beanpublic MybatisPlusInterceptor mpInterceptor(){//1 创建MybatisPlusInterceptor拦截器对象MybatisPlusInterceptor mpInterceptor = new MybatisPlusInterceptor();//2 添加分页拦截器mpInterceptor.addInnerInterceptor(new PaginationInnerInterceptor());return mpInterceptor;}
}
②:执行分页查询
//分页查询
@Test
void testSelectPage(){//1 创建IPage分页对象,设置分页参数IPage<User> page=new Page<>(1,3);//2 执行分页查询userDao.selectPage(page,null);//3 获取分页结果System.out.println("当前页码值:"+page.getCurrent());System.out.println("每页显示数:"+page.getSize());System.out.println("总页数:"+page.getPages());System.out.println("总条数:"+page.getTotal());System.out.println("当前页数据:"+page.getRecords());
}
3.3 开启MyBatisPlus日志
spring:datasource:type: com.alibaba.druid.pool.DruidDataSourcedriver-class-name: com.mysql.cj.jdbc.Driverurl: jdbc:mysql://localhost:3306/mybatisplus_db?characterEncoding=utf8&useSSL=false&serverTimezone=Asia/Shanghai&rewriteBatchedStatements=trueusername: rootpassword: root# 开启mp的日志(输出到控制台)
mybatis-plus:configuration:log-impl: org.apache.ibatis.logging.stdout.StdOutImpl
3.4 解决日志打印过多问题
3.4.1 取消初始化spring日志打印

做法: 在resources下新建一个logback.xml文件,名称固定,内容如下:
<?xml version="1.0" encoding="UTF-8"?>
<configuration></configuration>
关于logback参考播客:https://www.jianshu.com/p/75f9d11ae011
3.4.2 取消SpringBoot启动banner图标

spring:main:banner-mode: off # 关闭SpringBoot启动图标(banner)
3.4.3 取消MybatisPlus启动banner图标

# mybatis-plus日志控制台输出
mybatis-plus:configuration:log-impl: org.apache.ibatis.logging.stdout.StdOutImplglobal-config:banner: off # 关闭mybatisplus启动图标
三 DQL编程控制(查)
1. 条件查询方式
- MyBatisPlus将书写复杂的SQL查询条件进行了封装,使用编程的形式完成查询条件的组合
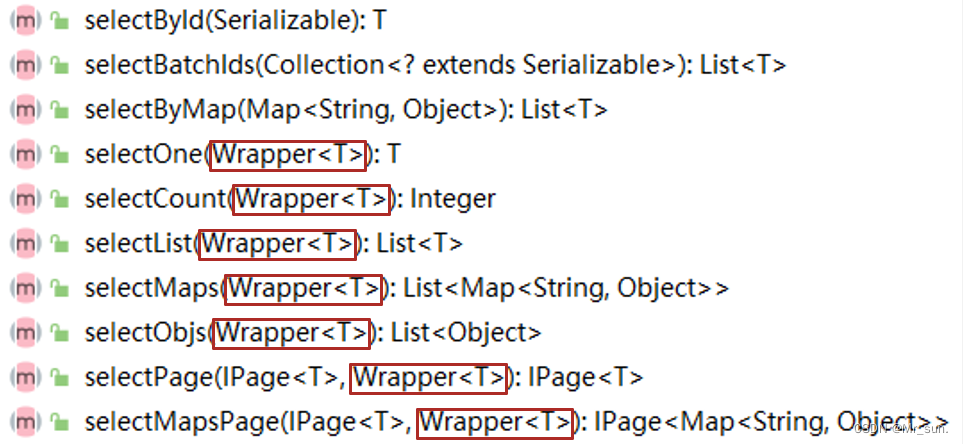
1.1 条件查询
1.1.1 方式一:按条件查询
//方式一:按条件查询
QueryWrapper<User> qw=new QueryWrapper<>();
qw.lt("age", 18);
List<User> userList = userDao.selectList(qw);
System.out.println(userList);
1.1.2 方式二:lambda格式按条件查询
//方式二:lambda格式按条件查询
QueryWrapper<User> qw = new QueryWrapper<User>();
qw.lambda().lt(User::getAge, 10);
List<User> userList = userDao.selectList(qw);
System.out.println(userList);
1.1.3 方式三:lambda格式按条件查询(推荐)
//方式三:lambda格式按条件查询
LambdaQueryWrapper<User> lqw = new LambdaQueryWrapper<User>();
lqw.lt(User::getAge, 10);
List<User> userList = userDao.selectList(lqw);
System.out.println(userList);
1.2 组合条件
1.2.1 并且关系(and)
//并且关系 10到30岁之间
LambdaQueryWrapper<User> lqw = new LambdaQueryWrapper<User>();
lqw.lt(User::getAge, 30).gt(User::getAge, 10);
List<User> userList = userDao.selectList(lqw);
System.out.println(userList);
1.2.2 或者关系(or)
//或者关系 小于10岁或者大于30岁
LambdaQueryWrapper<User> lqw = new LambdaQueryWrapper<User>();
lqw.lt(User::getAge, 10).or().gt(User::getAge, 30);
List<User> userList = userDao.selectList(lqw);
System.out.println(userList);
1.3 NULL值处理
问题导入
如下搜索场景,在多条件查询中,有条件的值为空应该怎么解决?
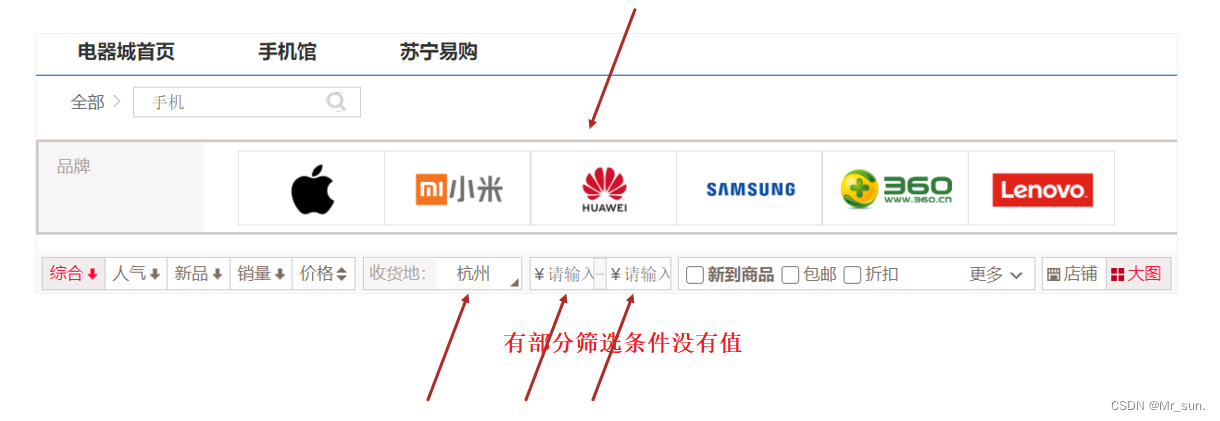
1.3.1 if语句控制条件追加
Integer minAge=10;  //将来有用户传递进来,此处简化成直接定义变量了
Integer maxAge=null;  //将来有用户传递进来,此处简化成直接定义变量了
LambdaQueryWrapper<User> lqw = new LambdaQueryWrapper<User>();
if(minAge!=null){lqw.gt(User::getAge, minAge);
}
if(maxAge!=null){lqw.lt(User::getAge, maxAge);
}
List<User> userList = userDao.selectList(lqw);
userList.forEach(System.out::println);
1.3.2 条件参数控制
Integer minAge=10;  //将来有用户传递进来,此处简化成直接定义变量了
Integer maxAge=null;  //将来有用户传递进来,此处简化成直接定义变量了
LambdaQueryWrapper<User> lqw = new LambdaQueryWrapper<User>();
//参数1:如果表达式为true,那么查询才使用该条件
lqw.gt(minAge!=null,User::getAge, minAge);
lqw.lt(maxAge!=null,User::getAge, maxAge);
List<User> userList = userDao.selectList(lqw);
userList.forEach(System.out::println);
1.3.3 条件参数控制(链式编程)
Integer minAge=10;  //将来有用户传递进来,此处简化成直接定义变量了
Integer maxAge=null;  //将来有用户传递进来,此处简化成直接定义变量了
LambdaQueryWrapper<User> lqw = new LambdaQueryWrapper<User>();
//参数1:如果表达式为true,那么查询才使用该条件
lqw.gt(minAge!=null,User::getAge, minAge).lt(maxAge!=null,User::getAge, maxAge);
List<User> userList = userDao.selectList(lqw);
userList.forEach(System.out::println);
2. 查询投影-设置【查询字段、分组、分页】
2.1 查询结果包含模型类中部分属性
//使用Lambda表达式写法
LambdaQueryWrapper<User> lqw = new LambdaQueryWrapper<User>();
lqw.select(User::getId,User::getName,User::getAge);
List<User> userList = userDao.selectList(lqw);
System.out.println(userList);
//不适用Lambda表达式写法
QueryWrapper<User> lqw = new QueryWrapper<User>();
lqw.select("id","name","age","tel");
List<User> userList = userDao.selectList(lqw);
System.out.println(userList);
2.2 查询结果包含模型类中未定义的属性
QueryWrapper<User> lqw = new QueryWrapper<User>();
lqw.select("count(*) as count, tel");
lqw.groupBy("tel");
List<Map<String, Object>> userList = userDao.selectMaps(lqw);
System.out.println(userList);
3. 查询条件设定
问题导入
多条件查询有哪些组合?
- 范围匹配(> 、 = 、between)
- 模糊匹配(like)
- 空判定(null)
- 包含性匹配(in)
- 分组(group)
- 排序(order)
- ……
3.1 查询条件
- 用户登录(eq匹配)
LambdaQueryWrapper<User> lqw = new LambdaQueryWrapper<User>();
//eq等同于=
lqw.eq(User::getName, "Jerry").eq(User::getPassword, 123456);
User loginUser = userDao.selectOne(lqw);
System.out.println(loginUser);
- 购物设定价格区间、户籍设定年龄区间(le ge匹配 或 between匹配)
LambdaQueryWrapper<User> lqw = new LambdaQueryWrapper<User>();
//范围查询 lt(小于等于) le(小于等于) gt(大于) ge(大于等于) eq between
lqw.between(User::getAge, 10, 30);
List<User> userList = userDao.selectList(lqw);
System.out.println(userList);
- 查信息,搜索新闻(非全文检索版:like匹配)
LambdaQueryWrapper<User> lqw = new LambdaQueryWrapper<User>();
//模糊匹配 like  likeLeft相当于百分号加在左边,right即加在右边
lqw.likeLeft(User::getName, "J");
List<User> userList = userDao.selectList(lqw);
System.out.println(userList);
- 统计报表(分组查询聚合函数)
QueryWrapper<User> qw = new QueryWrapper<User>();
qw.select("gender","count(*) as nums");
qw.groupBy("gender");
List<Map<String, Object>> maps = userDao.selectMaps(qw);
System.out.println(maps);
3.2 查询API
- 更多查询条件设置参看 https://mybatis.plus/guide/wrapper.html

4. 字段映射与表名映射
问题导入
思考表的字段和实体类的属性不对应,查询会怎么样?
4.1 问题一:表字段与编码属性设计不同步
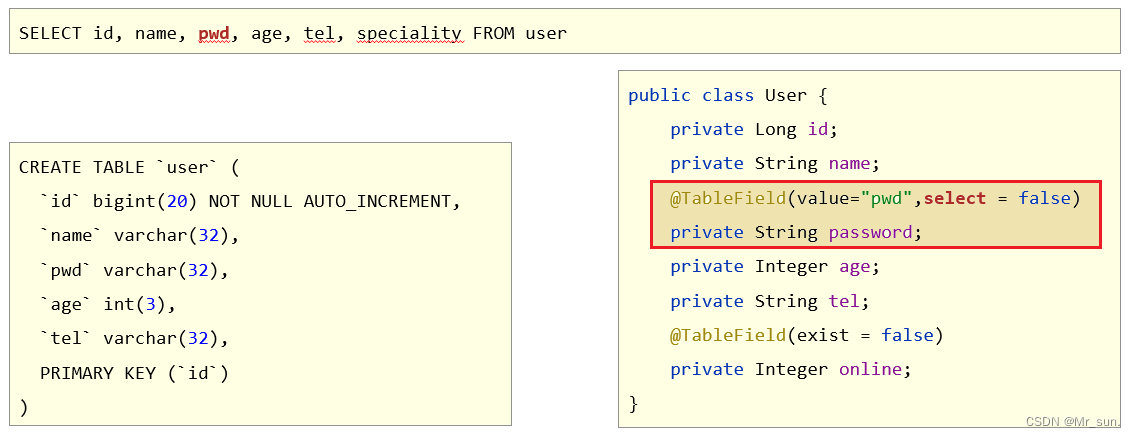
- 在模型类属性上方,使用 @TableField 属性注解,通过 value 属性,设置当前属性对应的数据库表中的字段关系。

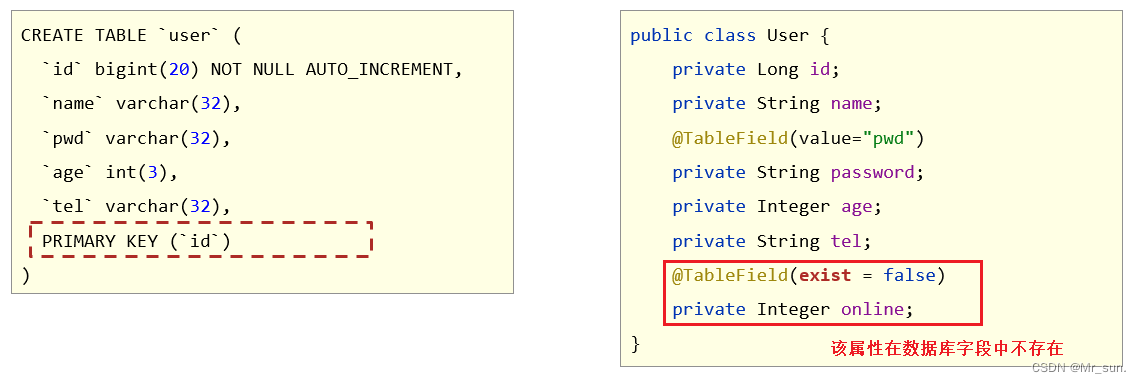
4.2 问题二:编码中添加了数据库中未定义的属性
- 在模型类属性上方,使用 @TableField 注解,通过 exist 属性,设置属性在数据库表字段中是否存在,默认为true。此属性无法与value合并使用。
4.3 问题三:采用默认查询开放了更多的字段查看权限
- 在模型类属性上方,使用 @TableField 注解,通过 select 属性:设置该属性是否参与查询。此属性与select()映射配置不冲突。
4.4 问题四:表名与编码开发设计不同步
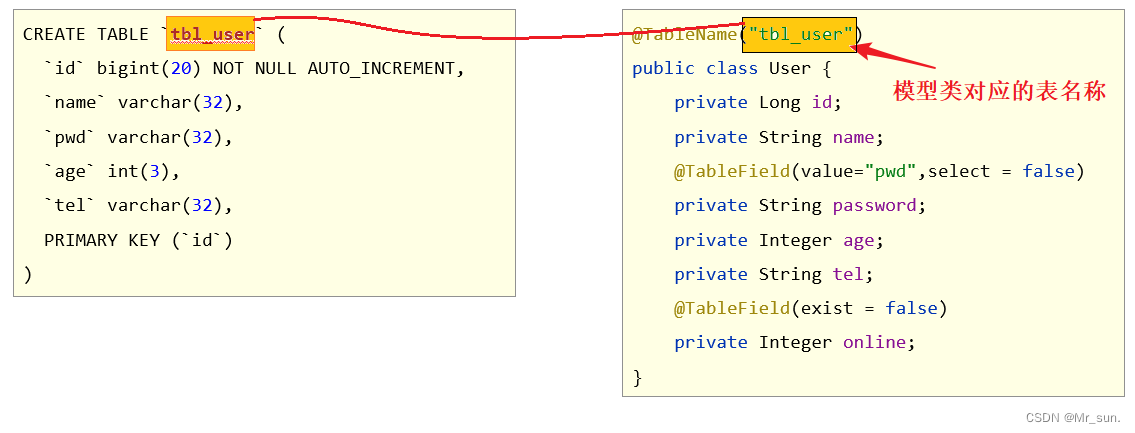
- 在模型类上方,使用 @TableName 注解,通过 value 属性,设置当前类对应的数据库表名称。
@Data
@TableName("tbl_user")
public class User {/*id为Long类型,因为数据库中id为bigint类型,并且mybatis有自己的一套id生成方案,生成出来的id必须是Long类型*/private Long id;private String name;@TableField(value = "pwd",select = false)private String password;private Integer age;private String tel;@TableField(exist = false) //表示online字段不参与CRUD操作private Boolean online;
}
四 DML编程控制(增删改)
1. id生成策略控制(Insert)
问题导入
主键生成的策略有哪几种方式?
不同的表应用不同的id生成策略
- 日志:自增(1,2,3,4,……)
- 购物订单:特殊规则(FQ23948AK3843)
- 外卖单:关联地区日期等信息(10 04 20200314 34 91)
- 关系表:可省略id
- ……
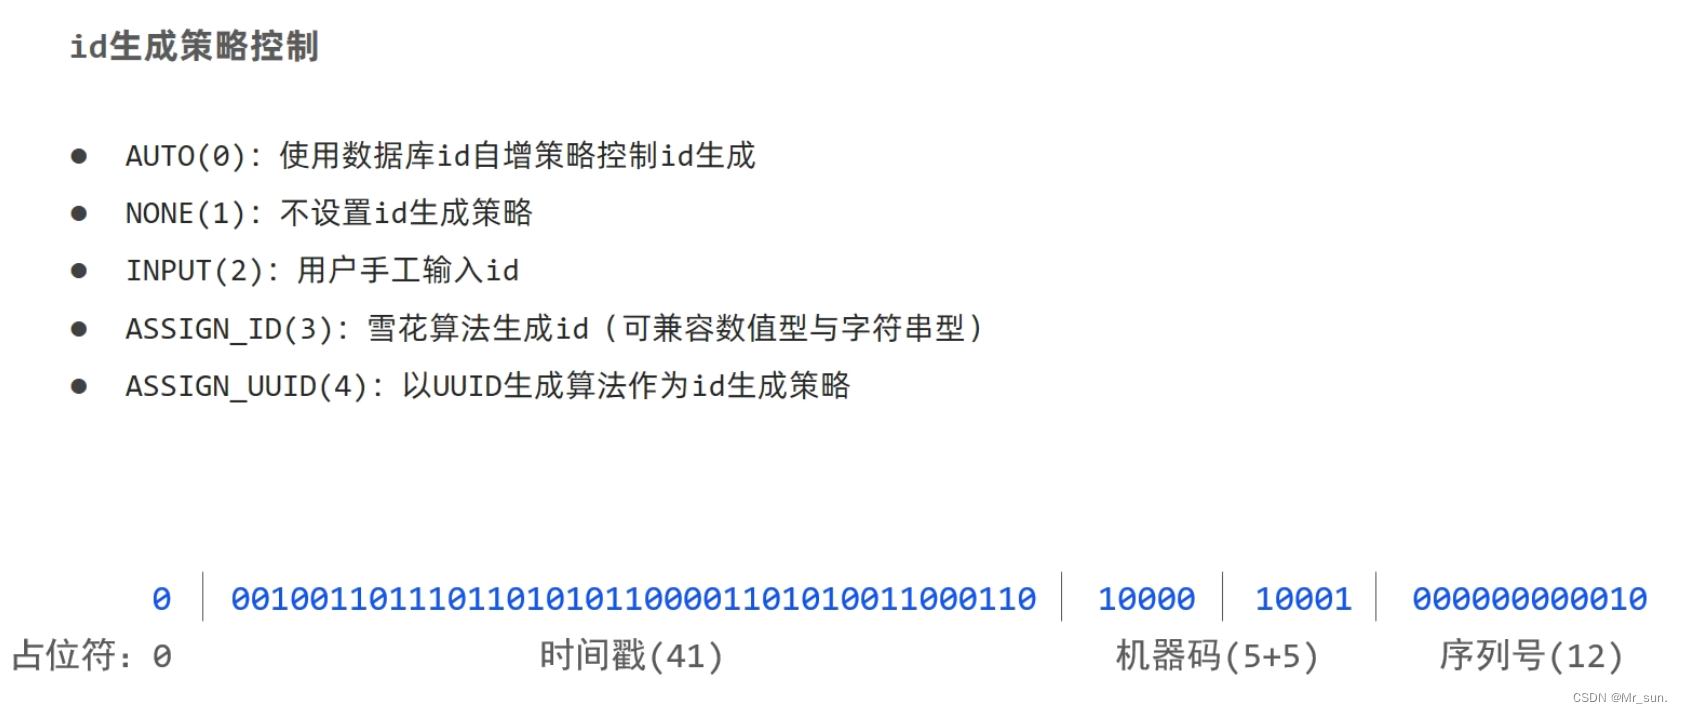
1.1 id生成策略控制(@TableId注解)
- 名称:@TableId
- 类型:属性注解
- 位置:模型类中用于表示主键的属性定义上方
- 作用:设置当前类中主键属性的生成策略
- 相关属性
- type:设置主键属性的生成策略,值参照IdType枚举值
- value:设置数据库主键名称

1.2 全局策略配置
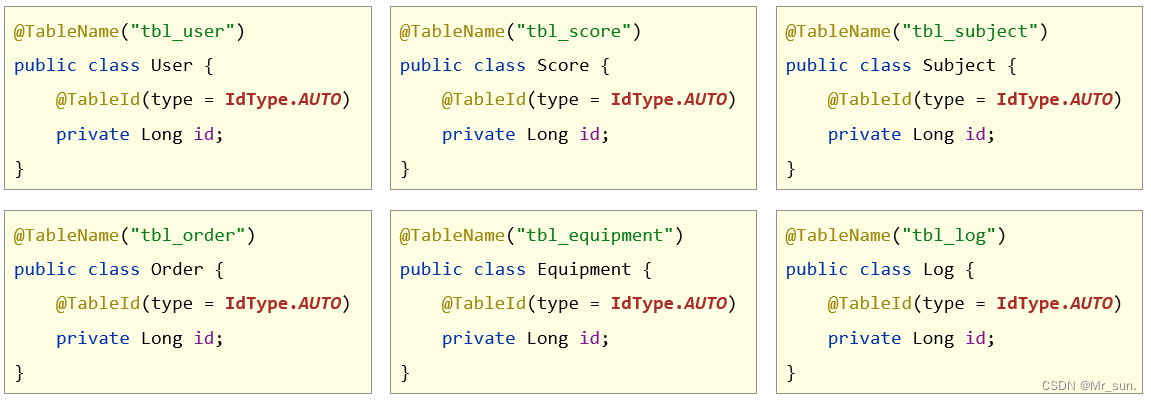
mybatis-plus:global-config:db-config:id-type: autotable-prefix: tbl_
id生成策略全局配置
表名前缀全局配置

2. 多记录操作(批量Delete/Select)
问题导入
MyBatisPlus是否支持批量操作?

2.1 按照主键删除多条记录
//删除指定多条数据
List<Long> list = new ArrayList<>();
list.add(1402551342481838081L);
list.add(1402553134049501186L);
list.add(1402553619611430913L);
userDao.deleteBatchIds(list);
2.2 根据主键查询多条记录
//查询指定多条数据
List<Long> list = new ArrayList<>();
list.add(1L);
list.add(3L);
list.add(4L);
userDao.selectBatchIds(list);
3. 逻辑删除(Delete/Update)
问题导入
在实际环境中,如果想删除一条数据,是否会真的从数据库中删除该条数据?
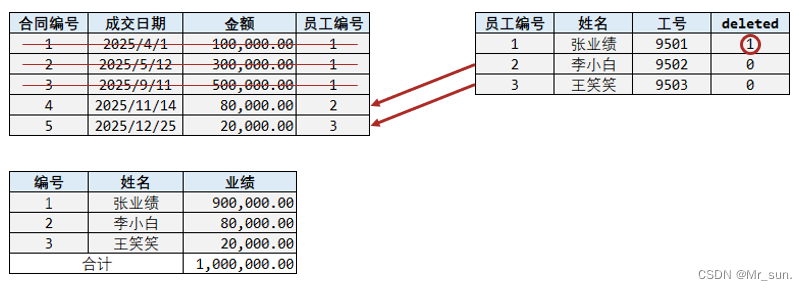
- 删除操作业务问题:业务数据从数据库中丢弃
- 逻辑删除:为数据设置是否可用状态字段,删除时设置状态字段为不可用状态,数据保留在数据库中
3.1 逻辑删除案例
①:数据库表中添加逻辑删除标记字段默认值为0

②:实体类中添加对应字段,并设定当前字段为逻辑删除标记字段
package com.itheima.domain;import com.baomidou.mybatisplus.annotation.*;import lombok.Data;@Data
public class User {private Long id;//逻辑删除字段,标记当前记录是否被删除@TableLogic(value = "0",delval = "1")private Integer deleted;
}
③:配置逻辑删除字面值
mybatis-plus:global-config:db-config:table-prefix: tbl_# 逻辑删除字段名logic-delete-field: deleted# 逻辑删除字面值:未删除为0logic-not-delete-value: 0# 逻辑删除字面值:删除为1logic-delete-value: 1
逻辑删除本质:逻辑删除的本质其实是修改操作。如果加了逻辑删除字段,查询数据时也会自动带上逻辑删除字段。

4. 乐观锁(Update)
问题导入
乐观锁主张的思想是什么?
- 业务并发现象带来的问题:秒杀

4.1 乐观锁案例
①:数据库表中添加锁标记字段默认值为1

②:实体类中添加对应字段,并设定当前字段为逻辑删除标记字段
package com.itheima.domain;import com.baomidou.mybatisplus.annotation.TableField;
import com.baomidou.mybatisplus.annotation.TableLogic;
import com.baomidou.mybatisplus.annotation.Version;
import lombok.Data;@Data
public class User {private Long id;@Versionprivate Integer version;
}
③:配置乐观锁拦截器实现锁机制对应的动态SQL语句拼装
package com.itheima.config;import com.baomidou.mybatisplus.extension.plugins.MybatisPlusInterceptor;
import com.baomidou.mybatisplus.extension.plugins.inner.OptimisticLockerInnerInterceptor;
import com.baomidou.mybatisplus.extension.plugins.inner.PaginationInnerInterceptor;
import org.springframework.context.annotation.Bean;
import org.springframework.context.annotation.Configuration;@Configuration
public class MpConfig {@Beanpublic MybatisPlusInterceptor mpInterceptor() {//1.定义Mp拦截器MybatisPlusInterceptor mpInterceptor = new MybatisPlusInterceptor();//2.添加乐观锁拦截器mpInterceptor.addInnerInterceptor(new OptimisticLockerInnerInterceptor());return mpInterceptor;}
}
④:使用乐观锁机制在修改前必须先获取到对应数据的verion方可正常进行
@Test
public void testUpdate() {/*User user = new User();user.setId(3L);user.setName("Jock666");user.setVersion(1);userDao.updateById(user);*///1.先通过要修改的数据id将当前数据查询出来//User user = userDao.selectById(3L);//2.将要修改的属性逐一设置进去//user.setName("Jock888");//userDao.updateById(user);//1.先通过要修改的数据id将当前数据查询出来User user = userDao.selectById(3L);     //version=3User user2 = userDao.selectById(3L);    //version=3user2.setName("Jock aaa");userDao.updateById(user2);              //version=>4user.setName("Jock bbb");userDao.updateById(user);               //verion=3?条件还成立吗?
}


五 快速开发-代码生成器
问题导入
如果只给一张表的字段信息,能够推演出Domain、Dao层的代码?
1. MyBatisPlus提供模板
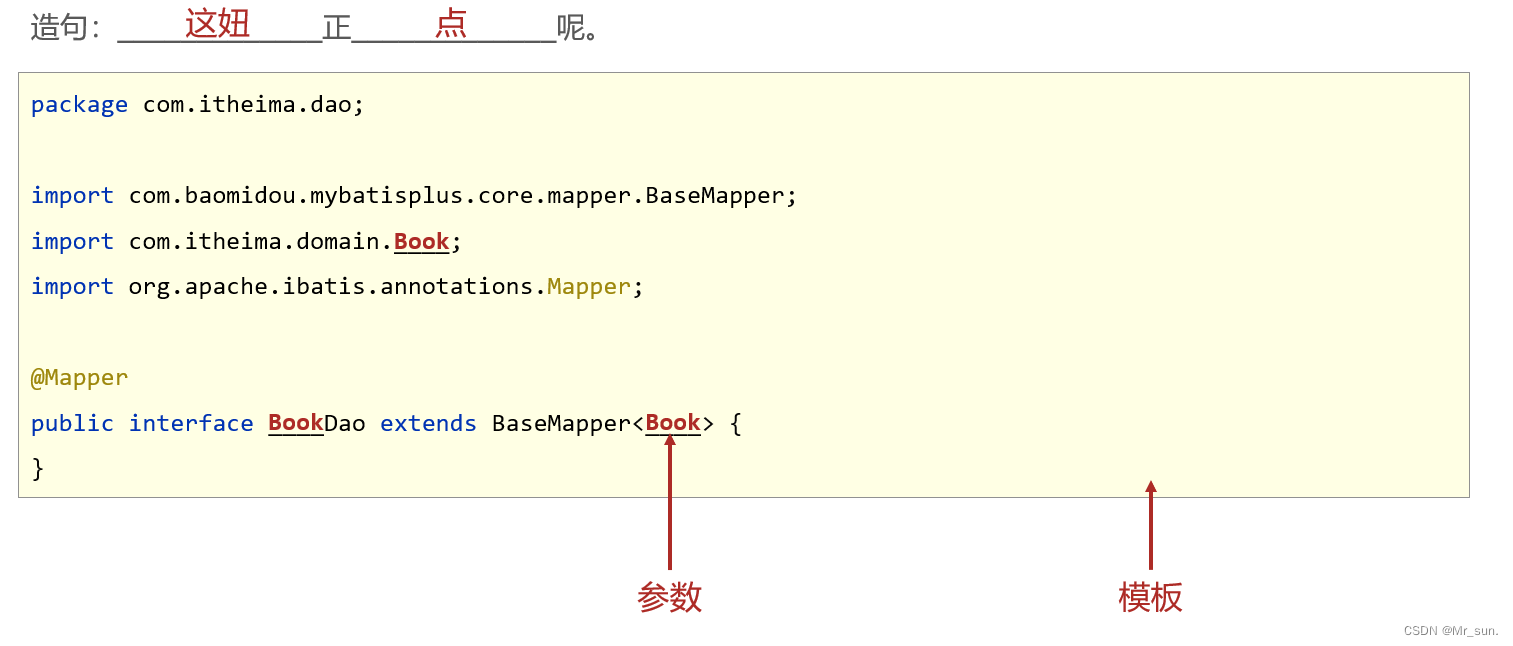
- Mapper接口模板
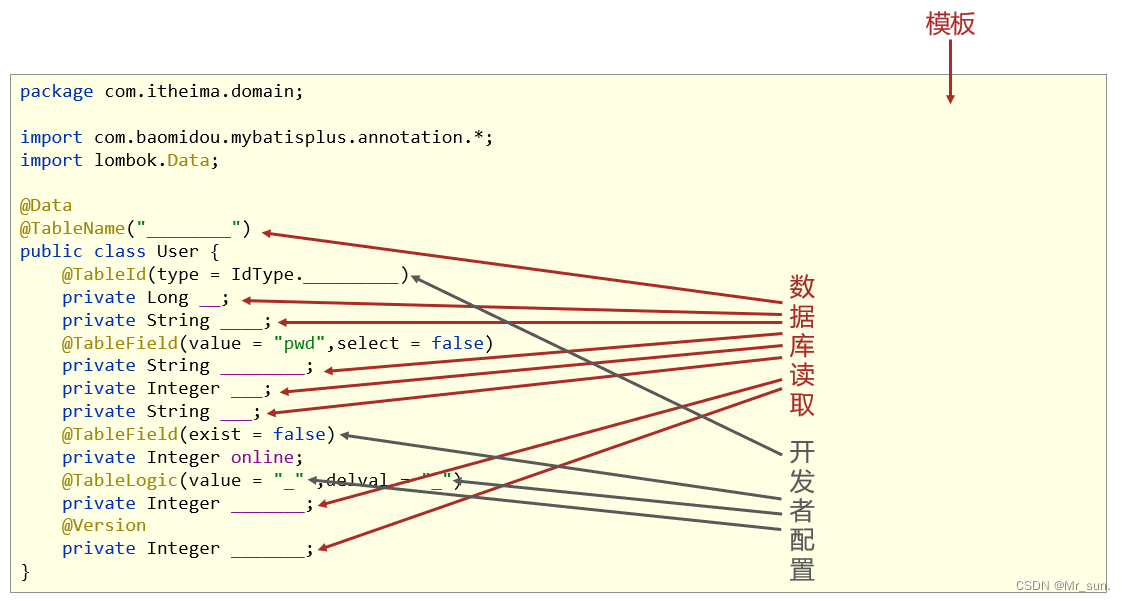
- 实体对象类模板
2. 工程搭建和基本代码编写
- 第一步:创建SpringBoot工程,添加代码生成器相关依赖
<dependencies><!--spring webmvc--><dependency><groupId>com.baomidou</groupId><artifactId>mybatis-plus-boot-starter</artifactId><version>3.5.2</version></dependency><!--druid--><dependency><groupId>com.alibaba</groupId><artifactId>druid</artifactId><version>1.2.8</version></dependency><!--mybatisplus--><dependency><groupId>org.springframework.boot</groupId><artifactId>spring-boot-starter</artifactId></dependency><!--mysql--><dependency><groupId>mysql</groupId><artifactId>mysql-connector-java</artifactId><scope>runtime</scope></dependency><!--test--><dependency><groupId>org.springframework.boot</groupId><artifactId>spring-boot-starter-test</artifactId><scope>test</scope></dependency><!--lombok--><dependency><groupId>org.projectlombok</groupId><artifactId>lombok</artifactId><version>1.18.20</version></dependency><!--代码生成器--><dependency><groupId>com.baomidou</groupId><artifactId>mybatis-plus-generator</artifactId><version>3.4.1</version></dependency><!--velocity模板引擎--><dependency><groupId>org.apache.velocity</groupId><artifactId>velocity-engine-core</artifactId><version>2.3</version></dependency>
</dependencies>
- 第二步:编写代码生成器类
package com.itheima;import com.baomidou.mybatisplus.generator.AutoGenerator;
import com.baomidou.mybatisplus.generator.config.DataSourceConfig;public class Generator {public static void main(String[] args) {//1. 创建代码生成器对象,执行生成代码操作AutoGenerator autoGenerator = new AutoGenerator();//2. 数据源相关配置:读取数据库中的信息,根据数据库表结构生成代码DataSourceConfig dataSource = new DataSourceConfig();dataSource.setDriverName("com.mysql.cj.jdbc.Driver");dataSource.setUrl("jdbc:mysql://localhost:3306/mybatisplus_db?characterEncoding=utf8&useSSL=false&serverTimezone=Asia/Shanghai&rewriteBatchedStatements=true");dataSource.setUsername("root");dataSource.setPassword("root");autoGenerator.setDataSource(dataSource);//3. 执行生成操作autoGenerator.execute();}
}
3. 开发者自定义配置
- 设置全局配置
//设置全局配置
GlobalConfig globalConfig = new GlobalConfig();
globalConfig.setOutputDir(System.getProperty("user.dir")+"/mybatisplus_04_generator/src/main/java");    //设置代码生成位置
globalConfig.setOpen(false);    //设置生成完毕后是否打开生成代码所在的目录
globalConfig.setAuthor("黑马程序员");    //设置作者
globalConfig.setFileOverride(true);     //设置是否覆盖原始生成的文件
globalConfig.setMapperName("%sDao");    //设置数据层接口名,%s为占位符,指代模块名称
globalConfig.setIdType(IdType.ASSIGN_ID);   //设置Id生成策略
autoGenerator.setGlobalConfig(globalConfig);
- 设置包名相关配置
//设置包名相关配置
PackageConfig packageInfo = new PackageConfig();
packageInfo.setParent("com.aaa");   //设置生成的包名,与代码所在位置不冲突,二者叠加组成完整路径
packageInfo.setEntity("domain");    //设置实体类包名
packageInfo.setMapper("dao");   //设置数据层包名
autoGenerator.setPackageInfo(packageInfo);
- 策略设置
//策略设置
StrategyConfig strategyConfig = new StrategyConfig();
strategyConfig.setInclude("tbl_user");  //设置当前参与生成的表名,参数为可变参数
strategyConfig.setTablePrefix("tbl_");  //设置数据库表的前缀名称,模块名 = 数据库表名 - 前缀名  例如: User = tbl_user - tbl_
strategyConfig.setRestControllerStyle(true);    //设置是否启用Rest风格
strategyConfig.setVersionFieldName("version");  //设置乐观锁字段名
strategyConfig.setLogicDeleteFieldName("deleted");  //设置逻辑删除字段名
strategyConfig.setEntityLombokModel(true);  //设置是否启用lombok
autoGenerator.setStrategy(strategyConfig);
- 以后如需使用修改配置即可使用
package com.itheima;import com.baomidou.mybatisplus.annotation.IdType;
import com.baomidou.mybatisplus.generator.AutoGenerator;
import com.baomidou.mybatisplus.generator.config.DataSourceConfig;
import com.baomidou.mybatisplus.generator.config.GlobalConfig;
import com.baomidou.mybatisplus.generator.config.PackageConfig;
import com.baomidou.mybatisplus.generator.config.StrategyConfig;public class CodeGenerator {public static void main(String[] args) {//1.获取代码生成器的对象AutoGenerator autoGenerator = new AutoGenerator();//设置数据库相关配置DataSourceConfig dataSource = new DataSourceConfig();dataSource.setDriverName("com.mysql.cj.jdbc.Driver");dataSource.setUrl("jdbc:mysql://localhost:3306/mybatisplus_db?characterEncoding=utf8&useSSL=false&serverTimezone=Asia/Shanghai&rewriteBatchedStatements=true");dataSource.setUsername("root");dataSource.setPassword("root");autoGenerator.setDataSource(dataSource);//设置全局配置GlobalConfig globalConfig = new GlobalConfig();globalConfig.setOutputDir(System.getProperty("user.dir")+"/mybatisplus_04_generator/src/main/java");    //设置代码生成位置globalConfig.setOpen(false);    //设置生成完毕后是否打开生成代码所在的目录globalConfig.setAuthor("程序员");    //设置作者globalConfig.setFileOverride(true);     //设置是否覆盖原始生成的文件globalConfig.setMapperName("%sDao");    //设置数据层接口名,%s为占位符,指代模块名称globalConfig.setIdType(IdType.ASSIGN_ID);   //设置Id生成策略autoGenerator.setGlobalConfig(globalConfig);//设置包名相关配置PackageConfig packageInfo = new PackageConfig();packageInfo.setParent("com.aaa");   //设置生成的包名,与代码所在位置不冲突,二者叠加组成完整路径packageInfo.setEntity("domain");    //设置实体类包名packageInfo.setMapper("dao");   //设置数据层包名autoGenerator.setPackageInfo(packageInfo);//策略设置StrategyConfig strategyConfig = new StrategyConfig();strategyConfig.setInclude("tbl_user");  //设置当前参与生成的表名,参数为可变参数strategyConfig.setTablePrefix("tbl_");  //设置数据库表的前缀名称,模块名 = 数据库表名 - 前缀名  例如: User = tbl_user - tbl_strategyConfig.setRestControllerStyle(true);    //设置是否启用Rest风格strategyConfig.setVersionFieldName("version");  //设置乐观锁字段名strategyConfig.setLogicDeleteFieldName("deleted");  //设置逻辑删除字段名strategyConfig.setEntityLombokModel(true);  //设置是否启用lombokautoGenerator.setStrategy(strategyConfig);//2.执行生成操作autoGenerator.execute();}
}
