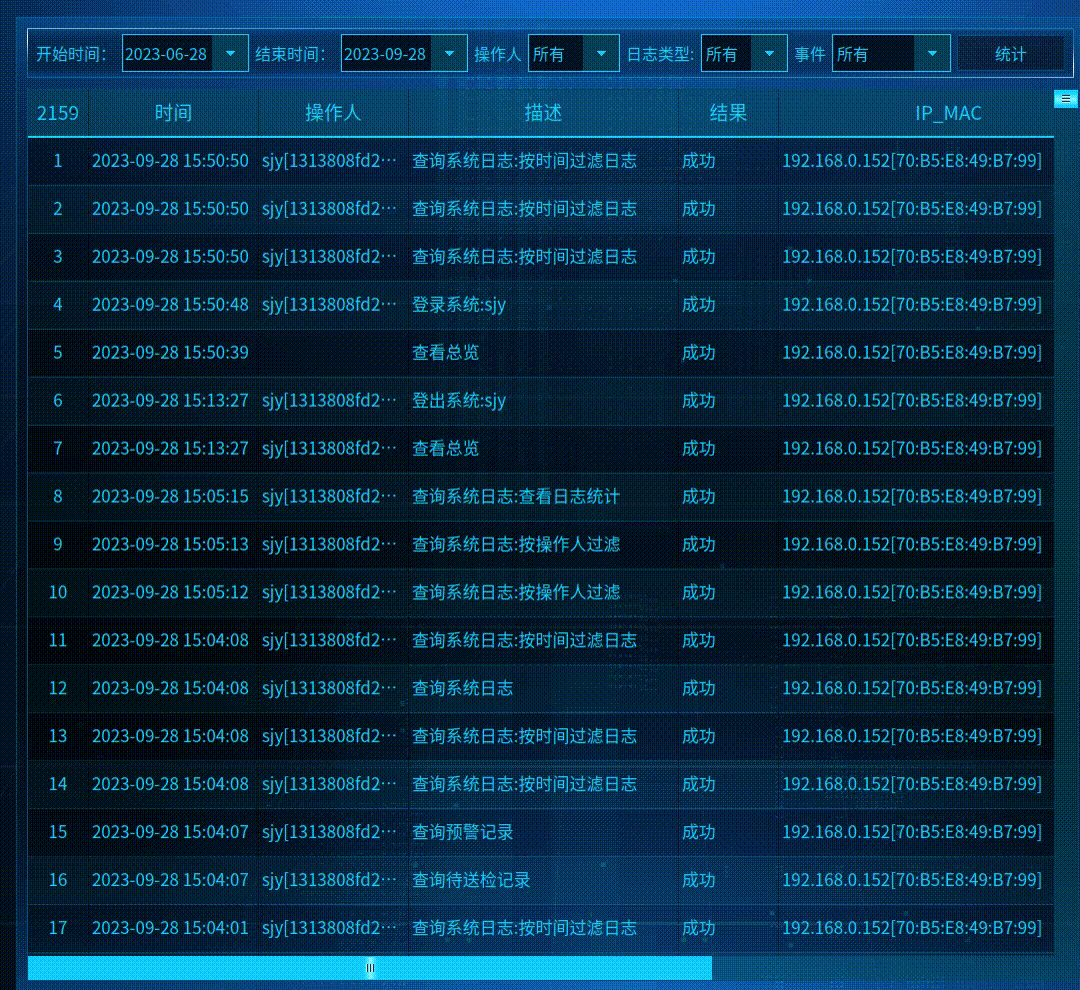
先给出结果图,这个例子是将各种事件分类然后统计的其比例,然后画饼图显示出来
这个是我仿照官方给的例子,让后自己理解后,修改的,要生成饼图,需要QT的 charts 支持,安装QT 没有选择这个的,需要下载这个模块,然后在.pro文件中年添加
QT += charts
首先重写饼图块,让鼠标悬浮在某个饼图块时,让这个块弹出来,然后显示块的信息,这个比较简单,如下所示
//头文件
#include <QtCharts/QPieSlice>QT_CHARTS_USE_NAMESPACEclass CustomSlice : public QPieSlice
{Q_OBJECTpublic:CustomSlice(QString label, qreal value);public Q_SLOTS:void showHighlight(bool show);};//cpp文件#include "customslice.h"QT_CHARTS_USE_NAMESPACECustomSlice::CustomSlice(QString label, qreal value): QPieSlice(label, value)
{connect(this, &CustomSlice::hovered, this, &CustomSlice::showHighlight);
}void CustomSlice::showHighlight(bool show)
{setLabelVisible(show);//显示标签setExploded(show); // 弹出
}
主体代码如下,主要是初始化饼图,创建饼图,为饼图块随机上色,为饼图数据的显示做排序,只需要调用接口函数把相应的数据塞进去即可生成可视化的饼图
statisticwindow.h
#ifndef STATISTICCHARTSWINDOW_H
#define STATISTICCHARTSWINDOW_H#include <QWidget>
#include <QVBoxLayout>
#include <QtCharts/QPieSeries>
#include <QtCharts/QBarCategoryAxis>
#include <QtCharts/QValueAxis>
#include <QtCharts/QChartView>class QPushButton;
class CustomSlice;
QT_CHARTS_USE_NAMESPACEclass StatisticChartsWindow : public QWidget
{Q_OBJECT
public:explicit StatisticChartsWindow(QWidget *parent = nullptr);~StatisticChartsWindow();//创建一个饼图1void createPie1(QMap<QString, int> data, QString title);//创建一个饼图2void createPie2(QMap<QString, int> data, QString title);// 为饼图1添加块信息void appendSlice1(QString lable, int value);// 为饼图2添加块信息void appendSlice2(QString lable, int value);// 移除所有块信息void removeAllSlice();// 获取随机颜色为饼图的每个块上色Qt::GlobalColor getRandomColor();//获取排序后的数据QList<QMap<QString, int>> getsortListByValue(QMap<QString, int> &data);QVBoxLayout *VBoxLayout;QPieSeries *series1;QPieSeries *series2;QChart *chart1;QChart *chart2;QChartView *chartView1;QChartView *chartView2;QPushButton *closeButton;QList<CustomSlice*> CustomSlice1List;QList<CustomSlice*> CustomSlice2List;QList<Qt::GlobalColor> colorList;signals:void closeSig();public slots:
};#endif // STATISTICCHARTSWINDOW_H
statisticwindow.cpp
#include "statisticwindow.h"
#include <QtCharts/QBarSeries>
#include <QtCharts/QBarSet>
#include <QtCharts/QLegend>
#include <QtCharts/QPieSeries>
#include <QtCharts/QBarCategoryAxis>
#include <QtCharts/QValueAxis>
#include <QtCharts/QChartView>
#include <QVBoxLayout>
#include <QHBoxLayout>
#include <QSpacerItem>
#include <QRandomGenerator>
#include "customslice.h"
#include <QPushButton>
#include "pushbutton.h"StatisticChartsWindow::StatisticChartsWindow(QWidget *parent) : QWidget(parent)
{VBoxLayout = new QVBoxLayout(this);series1 = new QPieSeries(this);// 饼图一chart1 = new QChart();chart1->setAnimationOptions(QChart::AllAnimations);chart1->legend()->setVisible(true);chart1->legend()->setAlignment(Qt::AlignRight);//设置标签在右侧chartView1 = new QChartView(chart1);series2 = new QPieSeries(this);// 饼图一chart2 = new QChart();chart2->setAnimationOptions(QChart::AllAnimations);chart2->legend()->setVisible(true);chart2->legend()->setAlignment(Qt::AlignRight);//设置标签在右侧chartView2 = new QChartView(chart2);//底部添加关闭按钮closeButton = new QPushButton("关闭", this);QHBoxLayout *hlayout = new QHBoxLayout();hlayout->addItem(new QSpacerItem(20, 20, QSizePolicy::Expanding, QSizePolicy::Minimum));hlayout->addWidget(closeButton);hlayout->addItem(new QSpacerItem(20, 20, QSizePolicy::Expanding, QSizePolicy::Minimum));//SC3C::Valwell::PushButton::initStyle(closeButton);QPalette palette = closeButton->palette();QColor color(19, 46, 74); // RGB红色palette.setColor(QPalette::Button, color);closeButton->setPalette(palette);closeButton->setStyleSheet("color: white;");colorList<<Qt::red<<Qt::white<<Qt::darkGray<<Qt::gray<<Qt::lightGray<<Qt::red<<Qt::green<<Qt::blue<<Qt::cyan<<Qt::magenta<<Qt::yellow<<Qt::darkRed<<Qt::darkGreen<<Qt::darkBlue<<Qt::darkCyan;chartView1->chart()->setTheme(QChart::ChartThemeBlueCerulean);chartView2->chart()->setTheme(QChart::ChartThemeBlueCerulean);VBoxLayout->addWidget(chartView1);VBoxLayout->addWidget(chartView2);VBoxLayout->addLayout(hlayout);VBoxLayout->layout()->setSpacing(1);//底部添加关闭connect(closeButton, &QPushButton::clicked, [=]() {this->hide();emit closeSig();});this->setWindowFlags(this->windowFlags() | Qt::WindowCloseButtonHint);this->setStyleSheet("background-color: rgb(19, 46, 74);");
}StatisticChartsWindow::~StatisticChartsWindow()
{if(chart1) {delete  chart1;}if(chart2) {delete  chart2;}
}void StatisticChartsWindow::createPie1(QMap<QString, int> data, QString title)
{// 创建一个饼图系列series1->clear();int count=0; //计算总数QMap<int, QList<QString>> map;for(auto it=data.begin(); it!=data.end(); it++) {count += it.value();}QList<QMap<QString, int>> sortList = getsortListByValue(data);// 根据条数比例排序,从大到小for(QMap<QString, int> map: sortList) {QString keyLable = map.firstKey();int num = map.value(keyLable);double ratio = num/1.0/count*100;QString ratioStr = QString::number(ratio, 'f', 1);QString lable = QString("%1,条数:%2,占比,%3%").arg(keyLable).arg(num).arg(ratioStr);appendSlice1(lable, num); // 添加到饼图中}// 创建一个新的图表并添加系列chart1->setTitle(title);//chart1->removeAllSeries();chart1->addSeries(series1);
}void StatisticChartsWindow::createPie2(QMap<QString, int> data, QString title)
{// 创建一个饼图系列series2->clear();int count=0; //计算总数QMap<int, QList<QString>> map;for(auto it=data.begin(); it!=data.end(); it++) {count += it.value();}QList<QMap<QString, int>> sortList = getsortListByValue(data);for(QMap<QString, int> map: sortList) {QString keyLable = map.firstKey();int num = map.value(keyLable);double ratio = num/1.0/count*100;QString ratioStr = QString::number(ratio, 'f', 1);QString lable = QString("%1,条数:%2,占比,%3%").arg(keyLable).arg(num).arg(ratioStr);appendSlice2(lable, num);}// 创建一个新的图表并添加系列chart2->setTitle(title);//chart2->removeAllSeries();chart2->addSeries(series2);
}void StatisticChartsWindow::appendSlice1(QString lable, int value)
{CustomSlice *customSlice = new  CustomSlice(lable, value);customSlice->setBrush(QBrush(getRandomColor())); //设置填充颜色//customSlice->setPen(QPen(Qt::black)); //设置线条颜色CustomSlice1List.append(customSlice);*series1 << customSlice;
}void StatisticChartsWindow::appendSlice2(QString lable, int value)
{CustomSlice *customSlice = new  CustomSlice(lable, value);customSlice->setBrush(QBrush(getRandomColor())); //设置填充颜色CustomSlice2List.append(customSlice);*series2 << customSlice;}void StatisticChartsWindow::removeAllSlice()
{for(CustomSlice* custom: CustomSlice1List) {series1->remove(custom);}for(CustomSlice* custom: CustomSlice2List) {series2->remove(custom);}qDeleteAll(CustomSlice1List);qDeleteAll(CustomSlice2List);CustomSlice1List.clear();CustomSlice2List.clear();
}Qt::GlobalColor StatisticChartsWindow::getRandomColor()
{int randomValue = QRandomGenerator::global()->bounded(0, colorList.size()-1);return colorList.takeAt(randomValue);
}QList<QMap<QString, int>> StatisticChartsWindow::getsortListByValue(QMap<QString, int> &data)
{QList<QMap<QString, int>> sortList;QList<int> valueList;for(auto it=data.begin(); it!=data.end(); it++) {if(!valueList.contains(it.value())) {valueList.append(it.value());}}//根据值逆序排序std::sort(valueList.begin(), valueList.end(), std::greater<int>());for(int value: valueList) {for(QString key: data.keys(value)) {QMap<QString, int> map;map.insert(key, value);sortList.append(map);}}return sortList;
}
我的这个例子是,点击统计按钮之后,获取相应的数据,然后生成相应的饼图
QObject::connect(ui.statisticsBtn, &QPushButton::clicked, [=]() {g_dataCache->setSystemLog(SC3C::eSystemLogType::QUERY_SYSTEMLOG, QString("成功"),"查看日志统计");StatisticChartsWindow window;if(StatisticWindow) {tableView->hide();StatisticWindow->show();return;}StatisticWindow = new StatisticChartsWindow(q);QObject::connect(StatisticWindow, &StatisticChartsWindow::closeSig, q, [=]() {tableView->show();});// 标签名, 数量QMap<QString, int> map1 = { };QMap<QString, int> map2 = { };int logType = ui.logType->currentData().toInt();int eventType = ui.eventType->currentData().toInt();QString Name = ui.operatorName->currentText();tableModel.second->setFilterOperator("所有");// 获取数据,map1表示饼图一需要的数据getEventTypeStatisticHash(map1, map2);//恢复之前显示的tableModel.second->setFilterType(logType, eventType);tableModel.second->setFilterOperator(Name);//SC3C::Valwell::Widget::setBackgroundCommon2WithMargins(window);StatisticWindow->setFixedSize(q->size());//StatisticWindow->setStyleSheet("background-color: transparent;");StatisticWindow->createPie1(map1, "事件类型统计");StatisticWindow->createPie2(map2, "日志类型统计");StatisticWindow->show();tableView->hide();});只需要把map放入创建饼图的函数即可,map中对应的是QMap<标签名,数量>,也就是饼图右侧的标签
StatisticWindow->createPie1(map1, "事件类型统计");StatisticWindow->createPie2(map2, "日志类型统计");这样就可以出饼图了