文章目录
- 讯飞平台使用
- python实现讯飞接口的语音识别
- 第一步:导入需要的依赖库
- 第二步:声明全局变量
- 第三步:初始化讯飞接口对象
- 第四步:收到websocket建立连接后的处理函数
- 第五步:收到websocket消息的处理函数
- 第六步:整合运行各函数
- 完整代码
讯飞平台使用
1.注册讯飞平台账号讯飞官网网址。
2.打开讯飞控制台。
3.点击“创建新应用”。
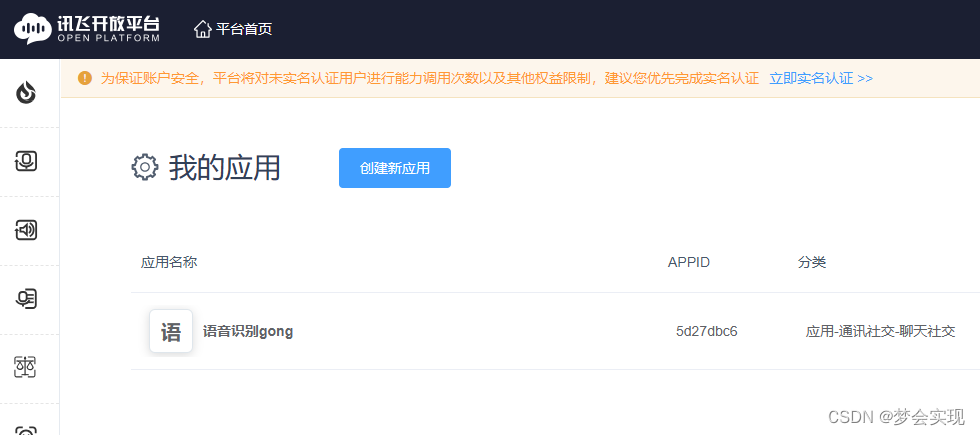
4.输入“应用名称”,“应用分类”,“应用功能描述”(这些都是自定义的)。
5.创建成功后,记住“APPID”,“APISecret”,“APIKey”这三个关键。

python实现讯飞接口的语音识别
第一步:导入需要的依赖库
import websocket
import hashlib
import base64
import hmac
import json
from urllib.parse import urlencode
import time
import ssl
from wsgiref.handlers import format_date_time
from datetime import datetime
from time import mktime
import _thread as thread
import pyaudio
如果有没有的依赖库,通过pip在Anaconda的配置虚拟环境进行依赖库的下载。
例如:
pip install pyaudio
第二步:声明全局变量
在Python中,全局变量是在程序的任何地方都可以访问的变量。
作用和意义:1.共享数据:全局变量能够在整个程序中共享数据,不受作用域的限制。2.存储常量或配置:全局变量可以用来存储常量或配置项,这些值在整个程序中都需要使用,并且不会变化。3.减少参数传递:全局变量可以减少函数或方法之间的参数传递。
存在的问题:1.命名空间污染:全局变量可能导致命名空间的污染,特别是在大型程序或模块化开发中。如果多个模块或函数定义了相同名称的全局变量,会导致冲突和意外的行为。2.难以追踪和维护:使用全局变量会使代码更难理解和维护。
因此,在使用全局变量时应谨慎,仅在必要的情况下使用。
声明的是音频
STATUS_FIRST_FRAME = 0  # 第一帧的标识
STATUS_CONTINUE_FRAME = 1  # 中间帧标识
STATUS_LAST_FRAME = 2  # 最后一帧的标识
第三步:初始化讯飞接口对象
class Ws_Param(object):# 初始化接口对象def __init__(self,APPID,APIKey,APISecret):# 初始化讯飞接口的ID,Key,Secretself.APPID=APPIDself.APIKey=APIKeyself.APISecret=APISecret# 公共参数(common)self.CommonArgs={"app_id":self.APPID}# 业务参数(business)self.BusinessArgs={"domain":"iat","language":"zh_cn","accent":"mandarin","vinfo":1,"vad_eos":1000}def create_url(self):# 生成urlurl='wss://ws-api.xfyun.cn/v2/iat'now=datetime.now()date=format_date_time(mktime(now.timetuple()))# 生成RFC1123格式的时间戳signature_origin = "host: " + "ws-api.xfyun.cn" + "\n"signature_origin += "date: " + date + "\n"signature_origin += "GET " + "/v2/iat " + "HTTP/1.1"# 拼接字符串signature_sha = hmac.new(self.APISecret.encode('utf-8'),signature_origin.encode('utf-8'),digestmod=hashlib.sha256).digest()signature_sha = base64.b64encode(signature_sha).decode(encoding='utf-8')# 进行hmac_sha256进行加密authorization_origin = "api_key=\"%s\", algorithm=\"%s\", headers=\"%s\", " \"signature=\"%s\"" % (self.APIKey, "hmac-sha256","host date request-line", signature_sha)authorization = base64.b64encode(authorization_origin.encode('utf-8')).decode(encoding='utf-8')v={"authorization": authorization,"date": date,"host": "ws-api.xfyun.cn"}# 将请求的鉴权参数组合为字典url=url+'?'+urlencode(v)# 拼接鉴权参数,生成urlreturn url第四步:收到websocket建立连接后的处理函数
def on_open(ws):# 收到websocket连接建立的处理def run(*args):# 在线音频处理并发送到讯飞status=STATUS_FIRST_FRAME# 音频的状态信息,标识音频是第一帧,还是中间帧、最后一帧CHUNK = 520 # 定义数据流块FORMAT = pyaudio.paInt16 # 16bit编码格式CHANNELS = 1 # 单声道RATE = 16000 # 16000采样频率p=pyaudio.PyAudio() # 录音# 实例化pyaudio对象stream = p.open(format=FORMAT, # 音频流wav格式channels=CHANNELS, # 单声道rate=RATE, # 采样率16000input=True,frames_per_buffer=CHUNK)# 创建音频流,使用这个对象去打开声卡,设置采样深度、通道数、采样率、输入和采样点缓存数量print("---------------开始录音-----------------")# 开始录音global textfor i in range(0,int(RATE/CHUNK*60)):# 录制特定时间的音频buf=stream.read(CHUNK)# 读出声卡缓冲区的音频数据if not buf:status=STATUS_LAST_FRAMEif status==STATUS_FIRST_FRAME:# 首帧处理d = {"common": wsParam.CommonArgs,"business": wsParam.BusinessArgs,"data": {"status": 0, "format": "audio/L16;rate=16000","audio": str(base64.b64encode(buf), 'utf-8'),"encoding": "raw"}}d = json.dumps(d)# 将拼接的字符串d数据结构转换为jsonws.send(d)status=STATUS_CONTINUE_FRAMEelif status==STATUS_CONTINUE_FRAME:# 中间帧处理d = {"data": {"status": 1, "format": "audio/L16;rate=16000","audio": str(base64.b64encode(buf), 'utf-8'),"encoding": "raw"}}ws.send(json.dumps(d))elif status==STATUS_LAST_FRAME:# 最后一帧处理d = {"data": {"status": 2, "format": "audio/L16;rate=16000","audio": str(base64.b64encode(buf), 'utf-8'),"encoding": "raw"}}ws.send(json.dumps(d))time.sleep(1)breakthread.start_new_thread(run,())第五步:收到websocket消息的处理函数
def on_message(ws,message):# 收到websocket消息的正常处理try:# print(json.loads(message))code = json.loads(message)["code"]# 解码返回的message的json数据中的codesid = json.loads(message)["sid"]if code != 0:errMsg = json.loads(message)["message"]# 解码message中错误信息print("sid:%s call error:%s code is:%s" % (sid, errMsg, code))else:data = json.loads(message)["data"]["result"]["ws"]# 解码message中ws数据result = ""for i in data:for w in i["cw"]:result += w["w"]if result == '。' or result == '.。' or result == ' .。' or result == ' 。':passelse:# t.insert(END, result) # 把上边的标点插入到result的最后print("翻译结果: %s。" % (result))global recording_resultsrecording_results=resultexcept Exception as e:# 异常处理,参数异常print("receive msg,but parse exception:", e)def on_error(ws,error):# 收到websocket后错误的处理print("### error ### : ",error)run()# 重新启动监听def on_close(ws):# 收到websocket关闭的处理pass第六步:整合运行各函数
在这里面有三个关键的地方:“APPID”,“APIKey”,“APISecret”。
将上面讯飞控制台应用项目中的“APPID”,“APIKey”,“APISecret”粘贴到代码中。
def run():global wsParamwsParam=Ws_Param(APPID='5d27db6',APIKey='d61163a9bdb5d0508f98dee66e0383',APISecret='ZTQ5NTAwZTk05MDdhNWViZjcyYjVh')# 初始化讯飞接口编码websocket.enableTrace(False)# True表示默认在控制台打印连接和信息发送接收情况wsUrl=wsParam.create_url()# 生成讯飞的url进行连接ws=websocket.WebSocketApp(wsUrl, on_message=on_message, on_error=on_error, on_close=on_close)ws.on_open=on_open # 进行websocket连接ws.run_forever(sslopt={"cert_reqs": ssl.CERT_NONE}, ping_timeout=2)# 无限循环,只要这个websocket连接未断开,这个循环就会一直进行下去
开始运行。
if __name__ == '__main__':run()
完整代码
''' 在线语音识别 '''
import websocket
import hashlib
import base64
import hmac
import json
from urllib.parse import urlencode
import time
import ssl
from wsgiref.handlers import format_date_time
from datetime import datetime
from time import mktime
import _thread as thread
import pyaudiorecording_results=""   # 识别结果
STATUS_FIRST_FRAME = 0  # 第一帧的标识
STATUS_CONTINUE_FRAME = 1  # 中间帧标识
STATUS_LAST_FRAME = 2  # 最后一帧的标识class Ws_Param(object):# 初始化接口对象def __init__(self,APPID,APIKey,APISecret):# 初始化讯飞接口的ID,Key,Secretself.APPID=APPIDself.APIKey=APIKeyself.APISecret=APISecret# 公共参数(common)self.CommonArgs={"app_id":self.APPID}# 业务参数(business)self.BusinessArgs={"domain":"iat","language":"zh_cn","accent":"mandarin","vinfo":1,"vad_eos":1000}def create_url(self):# 生成urlurl='wss://ws-api.xfyun.cn/v2/iat'now=datetime.now()date=format_date_time(mktime(now.timetuple()))# 生成RFC1123格式的时间戳signature_origin = "host: " + "ws-api.xfyun.cn" + "\n"signature_origin += "date: " + date + "\n"signature_origin += "GET " + "/v2/iat " + "HTTP/1.1"# 拼接字符串signature_sha = hmac.new(self.APISecret.encode('utf-8'),signature_origin.encode('utf-8'),digestmod=hashlib.sha256).digest()signature_sha = base64.b64encode(signature_sha).decode(encoding='utf-8')# 进行hmac_sha256进行加密authorization_origin = "api_key=\"%s\", algorithm=\"%s\", headers=\"%s\", " \"signature=\"%s\"" % (self.APIKey, "hmac-sha256","host date request-line", signature_sha)authorization = base64.b64encode(authorization_origin.encode('utf-8')).decode(encoding='utf-8')v={"authorization": authorization,"date": date,"host": "ws-api.xfyun.cn"}# 将请求的鉴权参数组合为字典url=url+'?'+urlencode(v)# 拼接鉴权参数,生成urlreturn urldef on_open(ws):# 收到websocket连接建立的处理def run(*args):# 在线音频处理并发送到讯飞status=STATUS_FIRST_FRAME# 音频的状态信息,标识音频是第一帧,还是中间帧、最后一帧CHUNK = 520  # 定义数据流块FORMAT = pyaudio.paInt16  # 16bit编码格式CHANNELS = 1  # 单声道RATE = 16000  # 16000采样频率p=pyaudio.PyAudio()  # 录音# 实例化pyaudio对象stream = p.open(format=FORMAT,  # 音频流wav格式channels=CHANNELS,  # 单声道rate=RATE,  # 采样率16000input=True,frames_per_buffer=CHUNK)# 创建音频流,使用这个对象去打开声卡,设置采样深度、通道数、采样率、输入和采样点缓存数量print("---------------开始录音-----------------")# 开始录音global textfor i in range(0,int(RATE/CHUNK*60)):# 录制特定时间的音频buf=stream.read(CHUNK)# 读出声卡缓冲区的音频数据if not buf:status=STATUS_LAST_FRAMEif status==STATUS_FIRST_FRAME:# 首帧处理d = {"common": wsParam.CommonArgs,"business": wsParam.BusinessArgs,"data": {"status": 0, "format": "audio/L16;rate=16000","audio": str(base64.b64encode(buf), 'utf-8'),"encoding": "raw"}}d = json.dumps(d)# 将拼接的字符串d数据结构转换为jsonws.send(d)status=STATUS_CONTINUE_FRAMEelif status==STATUS_CONTINUE_FRAME:# 中间帧处理d = {"data": {"status": 1, "format": "audio/L16;rate=16000","audio": str(base64.b64encode(buf), 'utf-8'),"encoding": "raw"}}ws.send(json.dumps(d))elif status==STATUS_LAST_FRAME:# 最后一帧处理d = {"data": {"status": 2, "format": "audio/L16;rate=16000","audio": str(base64.b64encode(buf), 'utf-8'),"encoding": "raw"}}ws.send(json.dumps(d))time.sleep(1)breakthread.start_new_thread(run,())def on_message(ws,message):# 收到websocket消息的正常处理try:# print(json.loads(message))code = json.loads(message)["code"]# 解码返回的message的json数据中的codesid = json.loads(message)["sid"]if code != 0:errMsg = json.loads(message)["message"]# 解码message中错误信息print("sid:%s call error:%s code is:%s" % (sid, errMsg, code))else:data = json.loads(message)["data"]["result"]["ws"]# 解码message中ws数据result = ""for i in data:for w in i["cw"]:result += w["w"]if result == '。' or result == '.。' or result == ' .。' or result == ' 。':passelse:# t.insert(END, result)  # 把上边的标点插入到result的最后print("翻译结果: %s。" % (result))global recording_resultsrecording_results=resultexcept Exception as e:# 异常处理,参数异常print("receive msg,but parse exception:", e)def on_error(ws,error):# 收到websocket后错误的处理print("### error ### : ",error)run()# 重新启动监听def on_close(ws):# 收到websocket关闭的处理passdef run():global wsParamwsParam=Ws_Param(APPID='5d27dbc6',APIKey='d61163a9bdb5d0a0508f98dee66e0383',APISecret='ZTQ5NTAwZTk0YzQ5MDdhNWViZjcyYjVh')# 初始化讯飞接口编码websocket.enableTrace(False)# True表示默认在控制台打印连接和信息发送接收情况wsUrl=wsParam.create_url()# 生成讯飞的url进行连接ws=websocket.WebSocketApp(wsUrl, on_message=on_message, on_error=on_error, on_close=on_close)ws.on_open=on_open  # 进行websocket连接ws.run_forever(sslopt={"cert_reqs": ssl.CERT_NONE}, ping_timeout=2)# 无限循环,只要这个websocket连接未断开,这个循环就会一直进行下去if __name__ == '__main__':run()
