| 时间 | 版本 | 修改人 | 描述 |
|---|---|---|---|
| 2023年1月10日14:04:15 | V0.1 | 宋全恒 | 新建文档 |
| 2023年2月6日11:03:45 | V0.2 | 宋全恒 | 添加快捷指令别名的实现方便虚拟环境的切换 |
简介
使用 PyCharm,您可以使用位于另一台计算机(服务器)上的解释器调试应用程序。
参考该博客
工具菜单
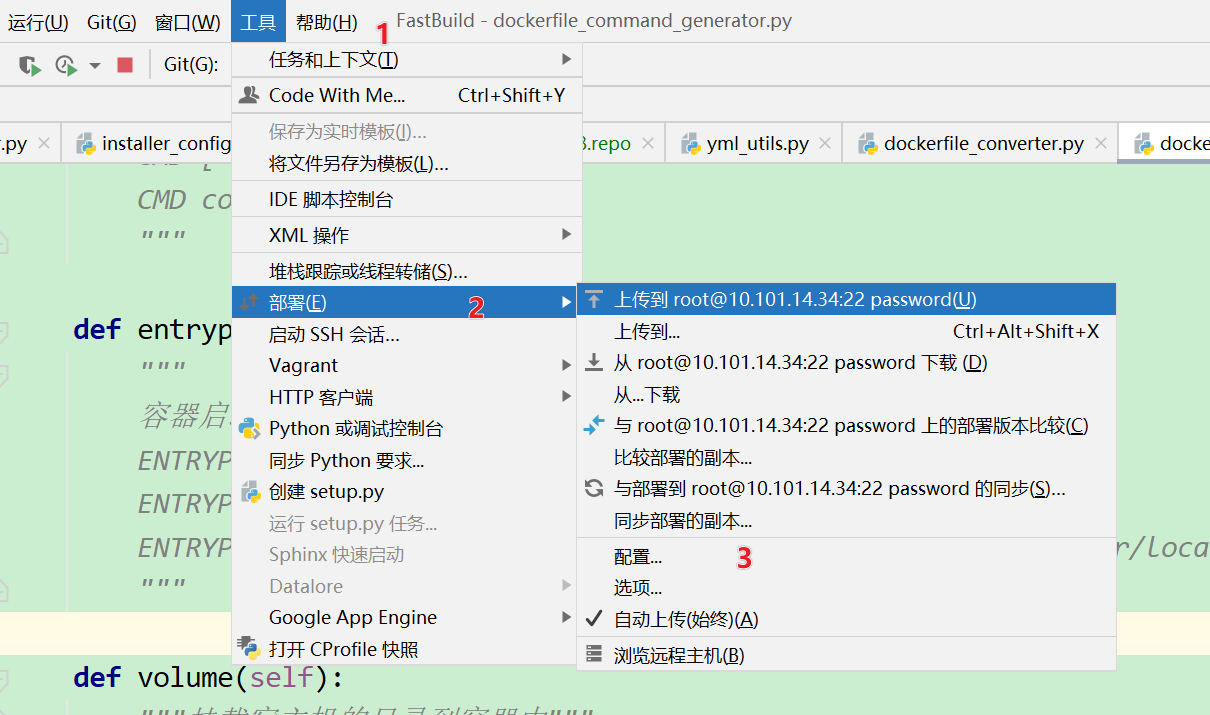
在使用PyCharm时,发现菜单栏中没有工具菜单栏,通过如下的方式进行配置。

配置过程
部署配置
这个步骤的主要目标是可以通过PyCharm自动将本地程序的变更同步到远程的Linux服务器,并且当本地文件和服务器的文件变更时,可以双向获取更新。
在工具菜单->部署-> 配置,创建SFTP连接(远程文件传输协议)、配置映射和排除的路径
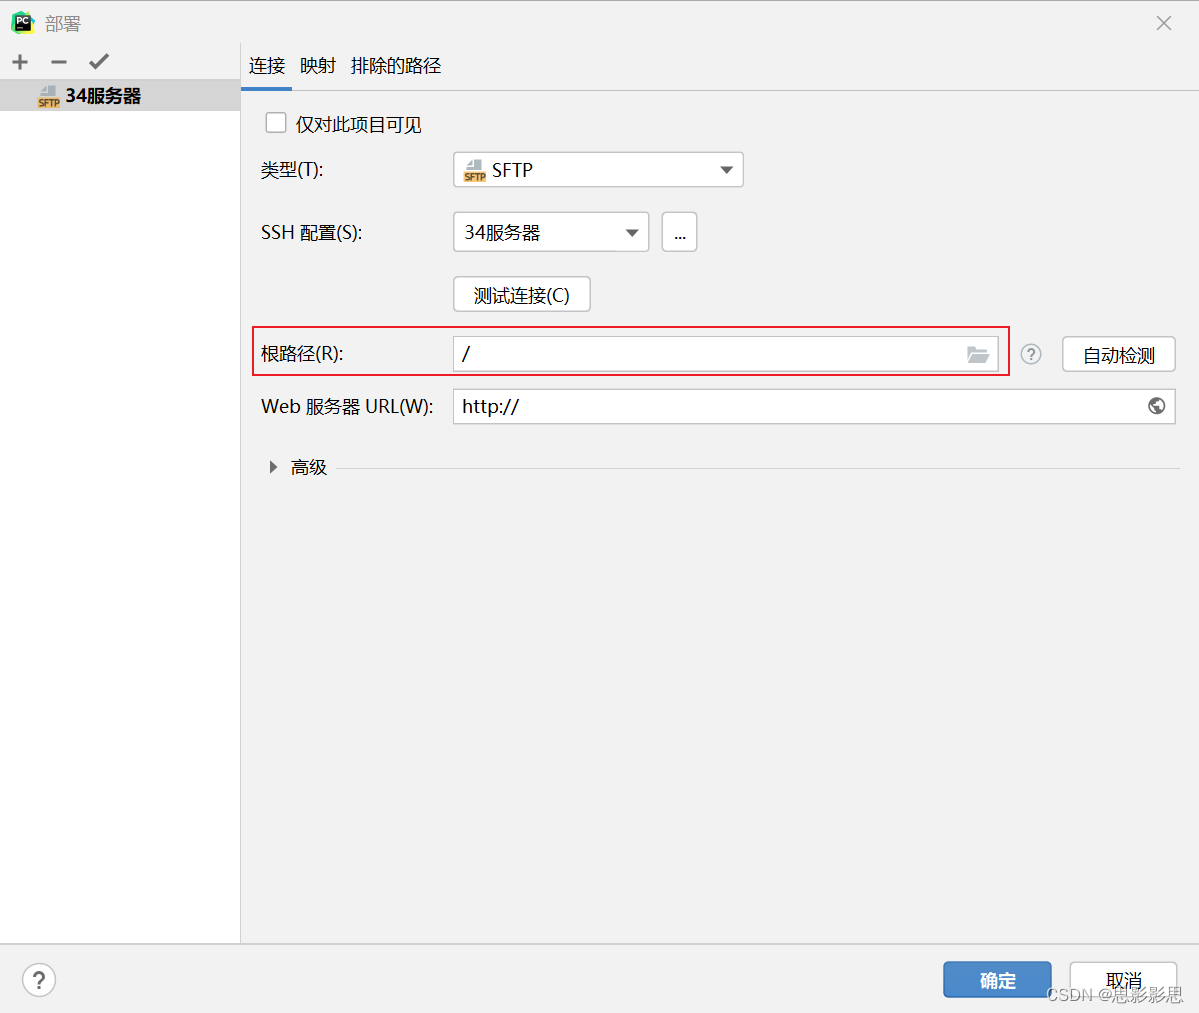
连接配置
配置过程如下:

这样连接配置就正常了,
映射配置
根路径配置
在连接配置时,注意根路径对于Linux服务器来说,为“/”即可,默认为"/root",我的项目打算部署在路径/home/sqh/FastBuild目录下,则根路径为/即可。
映射配置
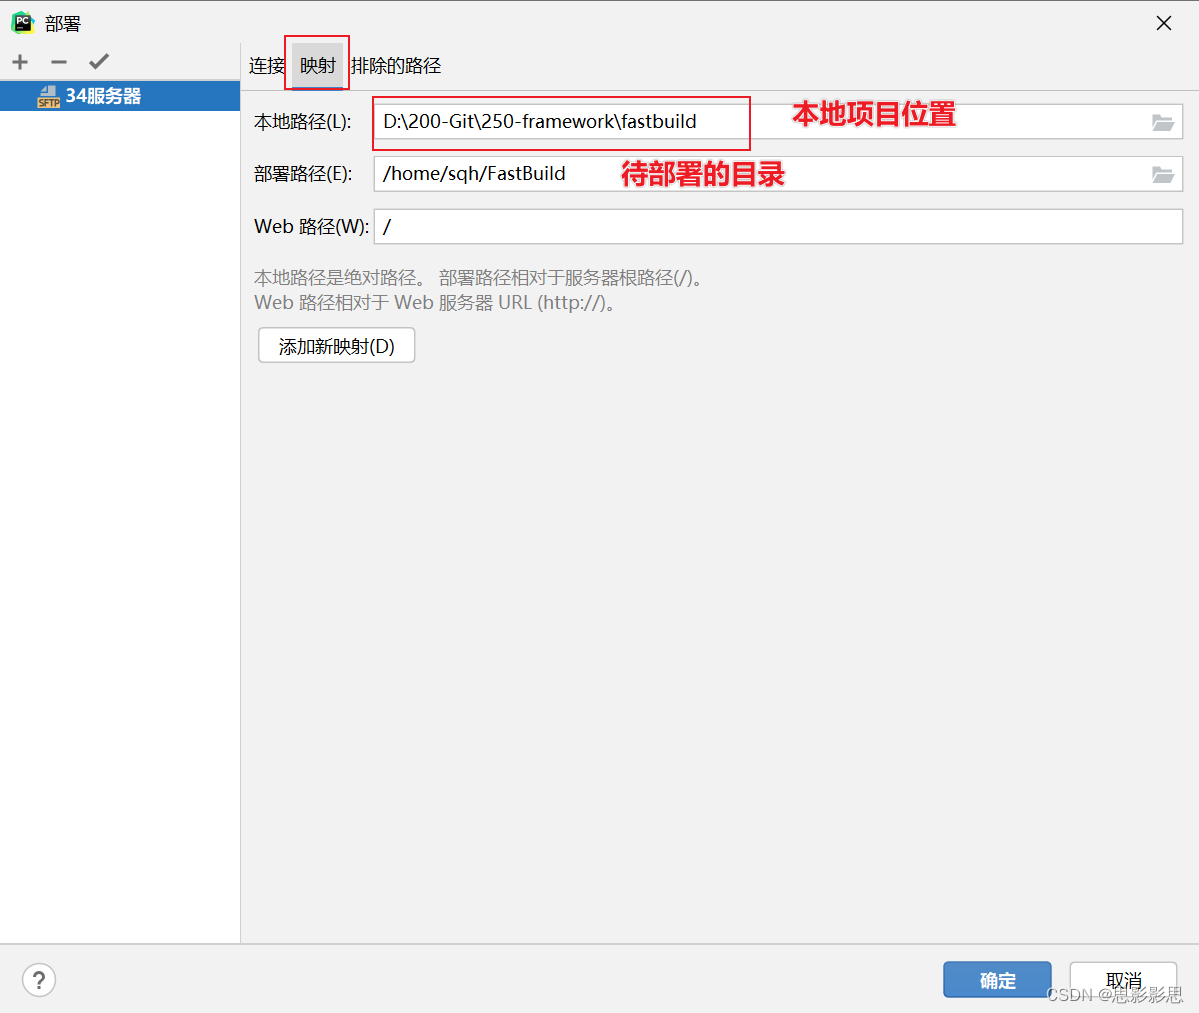
可以同时添加多个映射,在项目有多个子项目,分别部署到不同位置时。
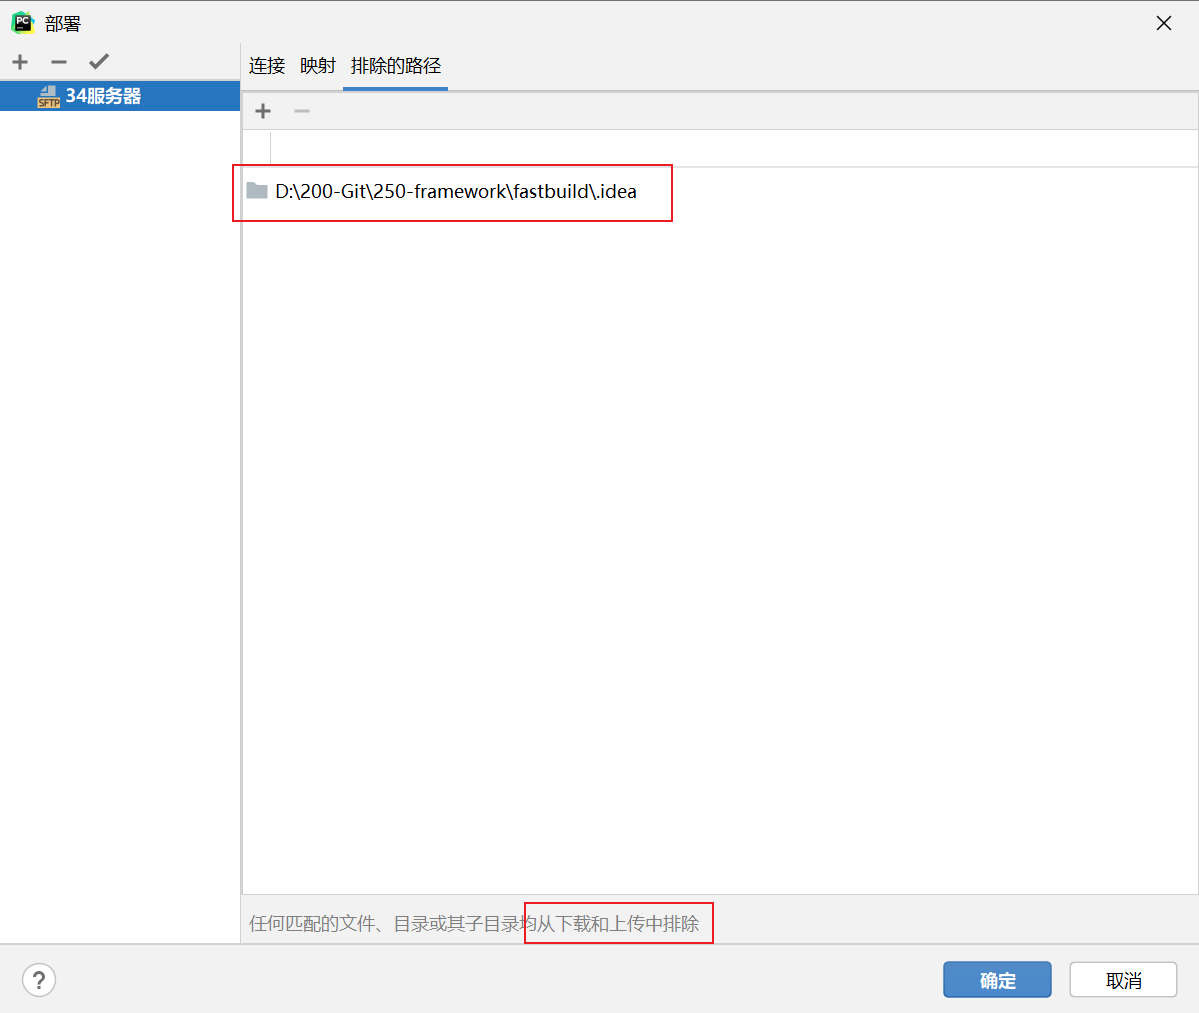
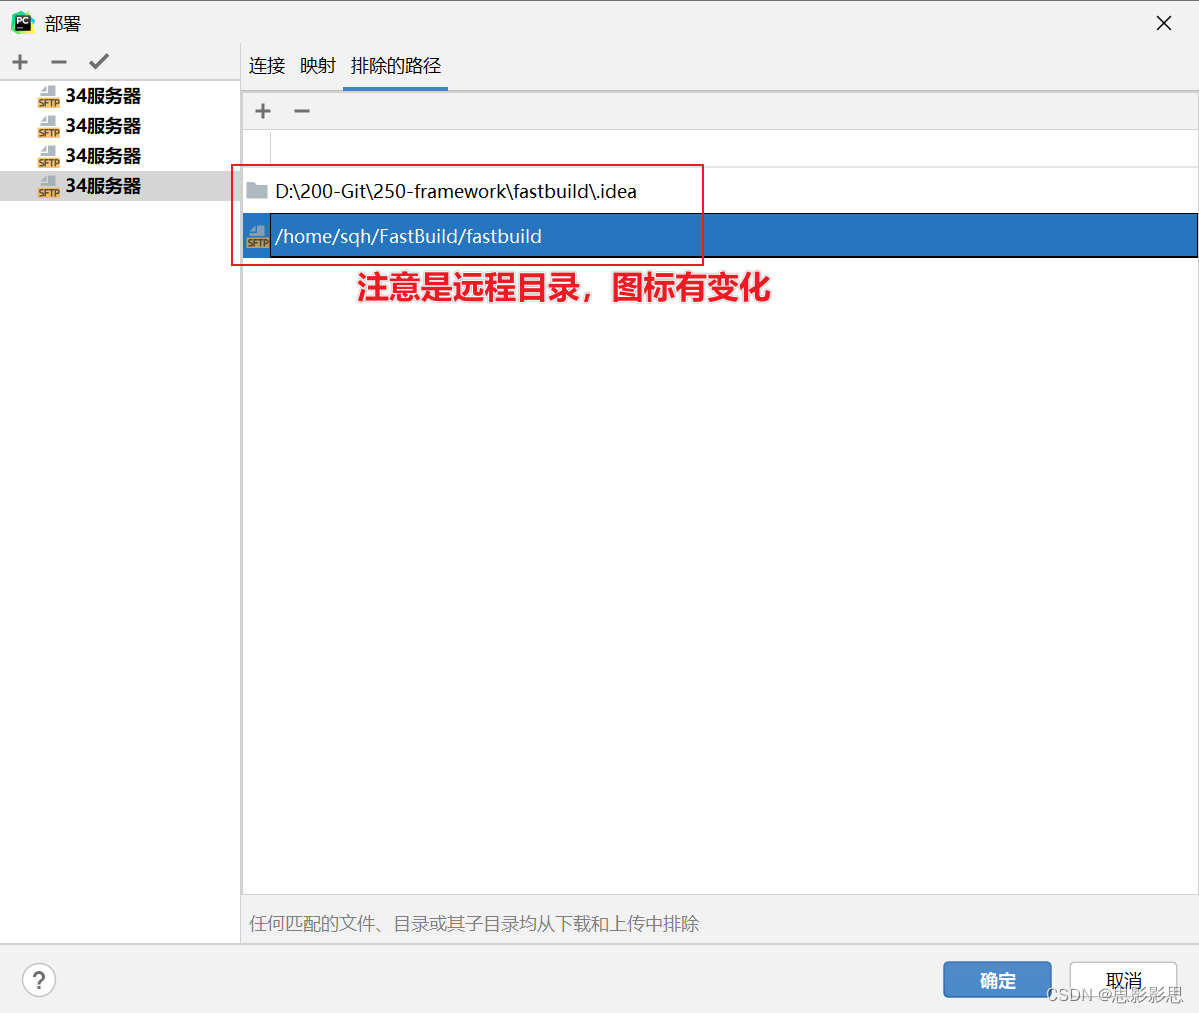
排除的路径
本小节主要用于一些不需要的同步,比如说pycharm产生的.idea目录,或者在服务器上产生的日志文件,等不需要同步的内容可以采用这种方式进行过滤。
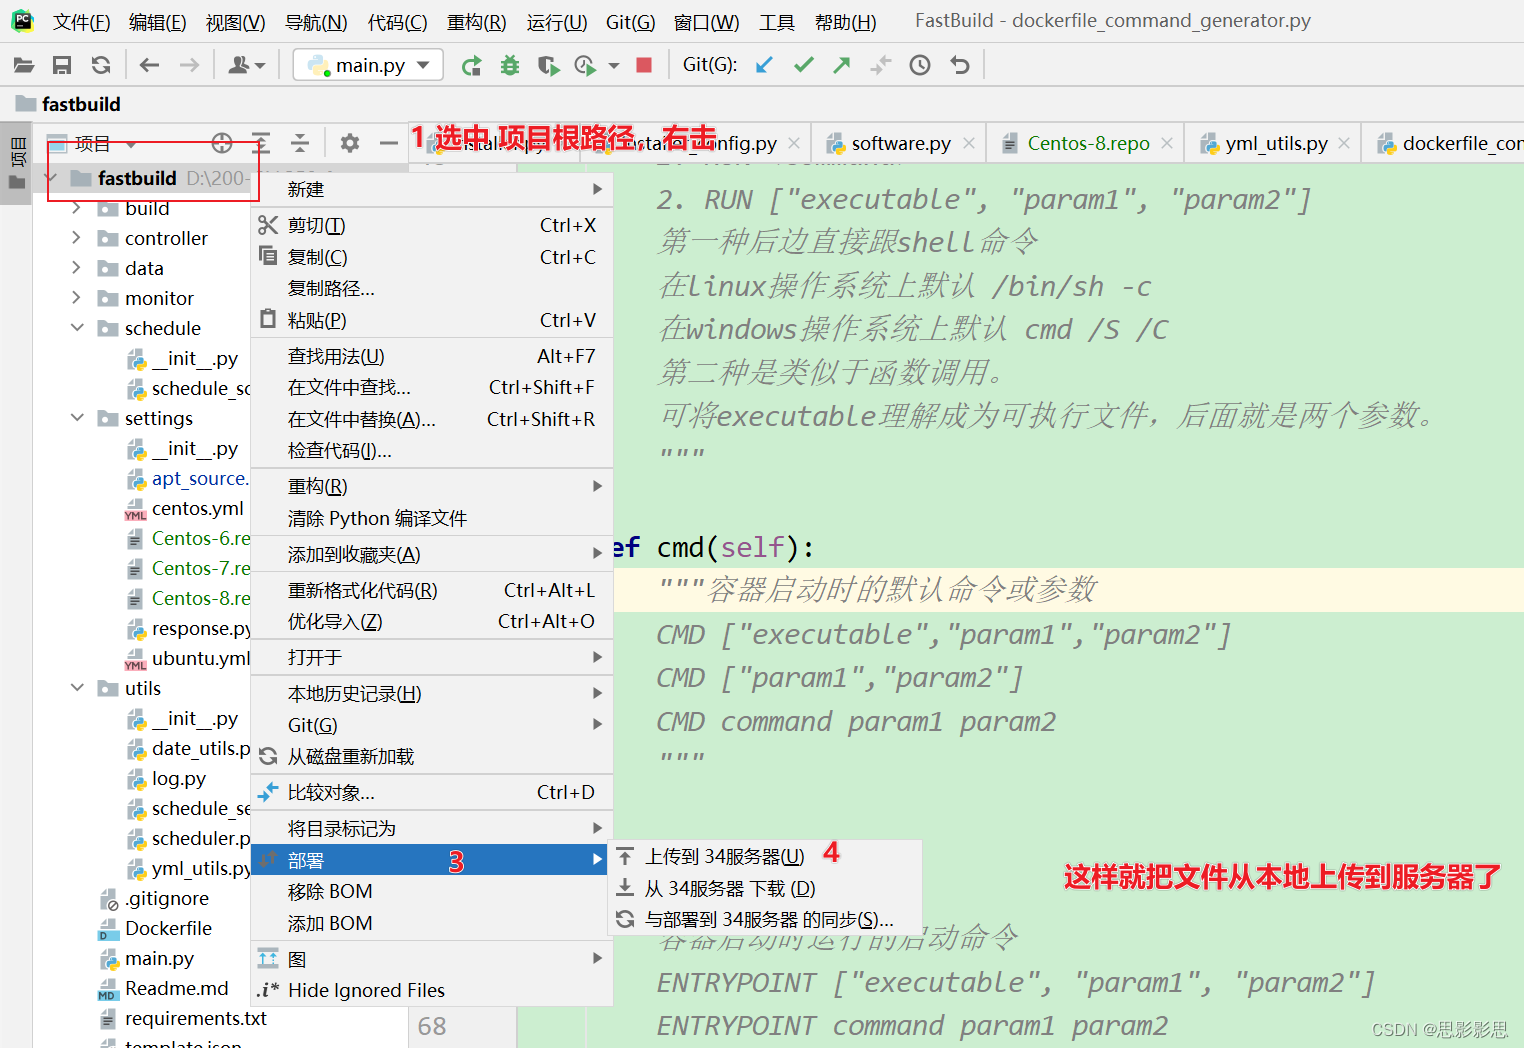
将项目部署到服务器
操作PyCharm部署项目到服务器的图示如下:
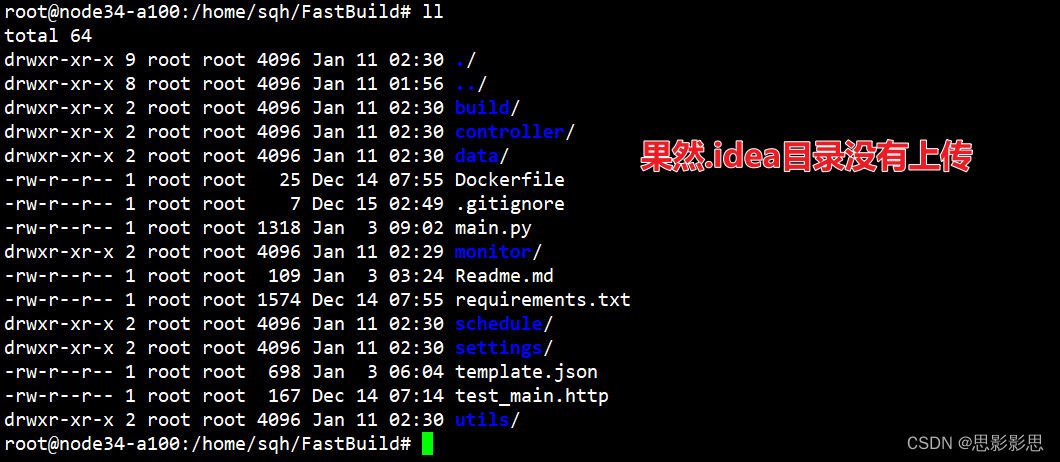
然后使用XShell连接34服务器,查看上传的文件目录

配置python解释器
在博客中,查看了上述两个方法进行远程调试,作者推荐第一种。简单浏览了一下第二种方式,需要下载pydevd-pycharm软件包,并且同时需要修改源程序,比较复杂,不再演示。有问题参考博客即可。
创建python虚拟环境
首先创建python虚拟环境,主要使用virtualenv实现的。
下载virtualenv软件
软件安装需要使用pip工具。
$ pip3 install virtualenv -i https://pypi.tuna.tsinghua.edu.cn/simple/
创建虚拟环境
# cd /home/sqh/FastBuild
$ virtualenv envname # 创建一个名字为envname的虚拟环境
$ virtualenv -p python2 envname # 如果安装了多个python版本,如py2和py3,需要指定使用哪个创建虚拟环境
# 注意,要指定python3.7以上的环境为FastBuild搭建环境
$ virtualenv -p /usr/local/dros/python/bin/python3 fastbuild
# 下面的程序用于验证
(fastbuild) root@szfyd-alg02:/home/sqh/FastBuild# /usr/local/dros/python/bin/python3 -V
Python 3.7.14
具体执行如下:
(fastbuild) root@node34-a100:/home/sqh/FastBuild# virtualenv fastbuild
created virtual environment CPython3.7.0.final.0-64 in 353mscreator CPython3Posix(dest=/home/sqh/FastBuild/fastbuild, clear=False, no_vcs_ignore=False, global=False)seeder FromAppData(download=False, pip=bundle, setuptools=bundle, wheel=bundle, via=copy, app_data_dir=/root/.local/share/virtualenv)added seed packages: pip==22.3.1, setuptools==65.6.3, wheel==0.38.4activators BashActivator,CShellActivator,FishActivator,NushellActivator,PowerShellActivator,PythonActivatorroot@node34-a100:/home/sqh/FastBuild# cd fastbuild/
root@node34-a100:/home/sqh/FastBuild/fastbuild# ls
bin  lib  pyvenv.cfgroot@node34-a100:/home/sqh/FastBuild/fastbuild# source bin/activate
(fastbuild) root@node34-a100:/home/sqh/FastBuild/fastbuild# pip list
Package    Version
---------- -------
pip        22.2.2
setuptools 63.4.1
wheel      0.37.1[notice] A new release of pip available: 22.2.2 -> 22.3.1
[notice] To update, run: pip install --upgrade pip
可以看到在/home/sqh/FastBuild创建了虚拟环境fastbuild:
(fastbuild) root@node34-a100:/home/sqh/FastBuild/fastbuild# ll
total 24
drwxr-xr-x  4 root root 4096 Jan 11 02:52 ./
drwxr-xr-x 10 root root 4096 Jan 11 02:52 ../
drwxr-xr-x  2 root root 4096 Jan 11 02:52 bin/
-rw-r--r--  1 root root   40 Jan 11 02:52 .gitignore
drwxr-xr-x  3 root root 4096 Jan 11 02:52 lib/
-rw-r--r--  1 root root  245 Jan 11 02:52 pyvenv.cfg
激活虚拟环境
root@node34-a100:/home/sqh/FastBuild/fastbuild# cd /home/sqh/FastBuild/fastbuild
root@node34-a100:/home/sqh/FastBuild/fastbuild# source bin/activate
(fastbuild) root@node34-a100:/home/sqh/FastBuild/fastbuild# ll
虚拟环境操作
# 在虚拟环境下查看当前python版本
python -V
# 在虚拟环境下查看当前pip版本
pip -V
# 查看当前虚拟环境安装的模块
pip list
# 于虚拟环境下安装模块
pip install module_name
取消虚拟环境
(fastbuild) root@node34-a100:/home/sqh/FastBuild/fastbuild# which python
/home/sqh/FastBuild/fastbuild/bin/python
(fastbuild) root@node34-a100:/home/sqh/FastBuild/fastbuild# pip -V
pip 22.2.2 from /home/sqh/FastBuild/fastbuild/lib/python3.7/site-packages/pip (python 3.7)(fastbuild) root@node34-a100:/home/sqh/FastBuild# deactivate
root@node34-a100:/home/sqh/FastBuild#
root@node34-a100:/home/sqh/FastBuild# which python
/root/anaconda3/bin/python
root@node34-a100:/home/sqh/FastBuild# which pip
/root/anaconda3/bin/pip
在虚拟环境中配置FastBuild依赖
项目的依赖均位于requirements.txt.
可以看到起初创建的虚拟环境中没有什么软件,执行软件安装,下载需要的依赖。
确保已经激活了fastbuild环境。
(fastbuild) root@node34-a100:/home/sqh/FastBuild# pip list
Package    Version
---------- -------
pip        22.2.2
setuptools 63.4.1
wheel      0.37.1[notice] A new release of pip available: 22.2.2 -> 22.3.1
[notice] To update, run: pip install --upgrade pip
(fastbuild) root@node34-a100:/home/sqh/FastBuild# pip install -r requirements.txt
Collecting anyio==3.6.1Using cached anyio-3.6.1-py3-none-any.whl (80 kB)
Collecting APScheduler==3.9.1Using cached APScheduler-3.9.1-py2.py3-none-any.whl (59 kB)
Collecting autopep8==1.7.0Using cached autopep8-1.7.0-py2.py3-none-any.whl (45 kB)
Collecting bcrypt==4.0.0Using cached bcrypt-4.0.0-cp36-abi3-manylinux_2_24_x86_64.whl (594 kB)
Collecting certifi==2022.6.15Using cached certifi-2022.6.15-py3-none-any.whl (160 kB)
Collecting cffi==1.15.1Using cached cffi-1.15.1-cp37-cp37m-manylinux_2_17_x86_64.manylinux2014_x86_64.whl (427 kB)
Collecting charset-normalizer==2.1.0Using cached charset_normalizer-2.1.0-py3-none-any.whl (39 kB)
Collecting click==8.1.3Using cached click-8.1.3-py3-none-any.whl (96 kB)
Collecting colorama==0.4.5Using cached colorama-0.4.5-py2.py3-none-any.whl (16 kB)
Collecting cryptography==38.0.1Using cached cryptography-38.0.1-cp36-abi3-manylinux_2_24_x86_64.whl (4.0 MB)
Collecting distlib==0.3.5Using cached distlib-0.3.5-py2.py3-none-any.whl (466 kB)
Collecting fastapi==0.85.0Using cached fastapi-0.85.0-py3-none-any.whl (55 kB)
Collecting filelock==3.8.0Using cached filelock-3.8.0-py3-none-any.whl (10 kB)
Collecting greenlet==1.1.3Using cached greenlet-1.1.3-cp37-cp37m-manylinux_2_17_x86_64.manylinux2014_x86_64.whl (150 kB)
Collecting h11==0.14.0Using cached h11-0.14.0-py3-none-any.whl (58 kB)
Collecting httptools==0.5.0Downloading httptools-0.5.0-cp37-cp37m-manylinux_2_5_x86_64.manylinux1_x86_64.manylinux_2_17_x86_64.manylinux2014_x86_64.whl (404 kB)━━━━━━━━━━━━━━━━━━━━━━━━━━━━━━━━━━━━━━━━ 404.7/404.7 kB 1.7 MB/s eta 0:00:00
Collecting idna==3.3Using cached idna-3.3-py3-none-any.whl (61 kB)
Collecting loguru==0.6.0Using cached loguru-0.6.0-py3-none-any.whl (58 kB)
Collecting paramiko==2.11.0Using cached paramiko-2.11.0-py2.py3-none-any.whl (212 kB)
Collecting platformdirs==2.5.2Using cached platformdirs-2.5.2-py3-none-any.whl (14 kB)
Collecting pycodestyle==2.9.1Using cached pycodestyle-2.9.1-py2.py3-none-any.whl (41 kB)
Collecting pycparser==2.21Using cached pycparser-2.21-py2.py3-none-any.whl (118 kB)
Collecting pydantic==1.10.2Using cached pydantic-1.10.2-cp37-cp37m-manylinux_2_17_x86_64.manylinux2014_x86_64.whl (11.8 MB)
Collecting PyNaCl==1.5.0Using cached PyNaCl-1.5.0-cp36-abi3-manylinux_2_17_x86_64.manylinux2014_x86_64.manylinux_2_24_x86_64.whl (856 kB)
Collecting python-dotenv==0.21.0Downloading python_dotenv-0.21.0-py3-none-any.whl (18 kB)
Collecting pytz==2022.4Using cached pytz-2022.4-py2.py3-none-any.whl (500 kB)
Collecting pytz-deprecation-shim==0.1.0.post0Using cached pytz_deprecation_shim-0.1.0.post0-py2.py3-none-any.whl (15 kB)
Collecting PyYAML==6.0Using cached PyYAML-6.0-cp37-cp37m-manylinux_2_5_x86_64.manylinux1_x86_64.manylinux_2_12_x86_64.manylinux2010_x86_64.whl (596 kB)
Collecting requests==2.28.1Using cached requests-2.28.1-py3-none-any.whl (62 kB)
Collecting six==1.16.0Using cached six-1.16.0-py2.py3-none-any.whl (11 kB)
Collecting sniffio==1.3.0Using cached sniffio-1.3.0-py3-none-any.whl (10 kB)
Collecting SQLAlchemy==1.4.41Using cached SQLAlchemy-1.4.41-cp37-cp37m-manylinux_2_5_x86_64.manylinux1_x86_64.manylinux_2_17_x86_64.manylinux2014_x86_64.whl (1.6 MB)
Collecting starlette==0.20.4Using cached starlette-0.20.4-py3-none-any.whl (63 kB)
Collecting toml==0.10.2Using cached toml-0.10.2-py2.py3-none-any.whl (16 kB)
Collecting typing_extensions==4.3.0Using cached typing_extensions-4.3.0-py3-none-any.whl (25 kB)
Collecting tzdata==2022.4Using cached tzdata-2022.4-py2.py3-none-any.whl (336 kB)
Collecting tzlocal==4.2Using cached tzlocal-4.2-py3-none-any.whl (19 kB)
Collecting urllib3==1.26.11Using cached urllib3-1.26.11-py2.py3-none-any.whl (139 kB)
Collecting utils==1.0.1Downloading utils-1.0.1-py2.py3-none-any.whl (21 kB)
Collecting uvicorn==0.18.3Using cached uvicorn-0.18.3-py3-none-any.whl (57 kB)
Collecting virtualenv==20.16.3Using cached virtualenv-20.16.3-py2.py3-none-any.whl (8.8 MB)
Collecting watchfiles==0.18.1Downloading watchfiles-0.18.1-cp37-abi3-manylinux_2_17_x86_64.manylinux2014_x86_64.whl (1.2 MB)━━━━━━━━━━━━━━━━━━━━━━━━━━━━━━━━━━━━━━━━ 1.2/1.2 MB 9.0 MB/s eta 0:00:00
Collecting websockets==10.4Downloading websockets-10.4-cp37-cp37m-manylinux_2_5_x86_64.manylinux1_x86_64.manylinux_2_17_x86_64.manylinux2014_x86_64.whl (106 kB)━━━━━━━━━━━━━━━━━━━━━━━━━━━━━━━━━━━━━━━━ 106.7/106.7 kB 31.8 MB/s eta 0:00:00
Collecting win32-setctime==1.1.0Using cached win32_setctime-1.1.0-py3-none-any.whl (3.6 kB)
Requirement already satisfied: setuptools>=0.7 in ./fastbuild/lib/python3.7/site-packages (from APScheduler==3.9.1->-r requirements.txt (line 2)) (63.4.1)
Collecting importlib-metadataDownloading importlib_metadata-6.0.0-py3-none-any.whl (21 kB)
Collecting backports.zoneinfoUsing cached backports.zoneinfo-0.2.1-cp37-cp37m-manylinux1_x86_64.whl (70 kB)
Collecting zipp>=0.5Downloading zipp-3.11.0-py3-none-any.whl (6.6 kB)
WARNING: The candidate selected for download or install is a yanked version: 'apscheduler' candidate (version 3.9.1 at https://files.pythonhosted.org/packages/e4/9f/c3937d4babe62504b874d4bf2c0d85aa69c7f59fa84cf6050f3b9dc5d83e/APScheduler-3.9.1-py2.py3-none-any.whl (from https://pypi.org/simple/apscheduler/) (requires-python:>=2.7, !=3.0.*, !=3.1.*, !=3.2.*, !=3.3.*, !=3.4.*, <4))
Reason for being yanked: Not compatible with Python 2.7
Installing collected packages: pytz, distlib, zipp, win32-setctime, websockets, utils, urllib3, tzdata, typing_extensions, toml, sniffio, six, PyYAML, python-dotenv, pycparser, pycodestyle, platformdirs, loguru, idna, httptools, greenlet, filelock, colorama, charset-normalizer, certifi, bcrypt, backports.zoneinfo, requests, pytz-deprecation-shim, pydantic, importlib-metadata, h11, cffi, autopep8, anyio, watchfiles, virtualenv, tzlocal, starlette, SQLAlchemy, PyNaCl, cryptography, click, uvicorn, paramiko, fastapi, APScheduler
Successfully installed APScheduler-3.9.1 PyNaCl-1.5.0 PyYAML-6.0 SQLAlchemy-1.4.41 anyio-3.6.1 autopep8-1.7.0 backports.zoneinfo-0.2.1 bcrypt-4.0.0 certifi-2022.6.15 cffi-1.15.1 charset-normalizer-2.1.0 click-8.1.3 colorama-0.4.5 cryptography-38.0.1 distlib-0.3.5 fastapi-0.85.0 filelock-3.8.0 greenlet-1.1.3 h11-0.14.0 httptools-0.5.0 idna-3.3 importlib-metadata-6.0.0 loguru-0.6.0 paramiko-2.11.0 platformdirs-2.5.2 pycodestyle-2.9.1 pycparser-2.21 pydantic-1.10.2 python-dotenv-0.21.0 pytz-2022.4 pytz-deprecation-shim-0.1.0.post0 requests-2.28.1 six-1.16.0 sniffio-1.3.0 starlette-0.20.4 toml-0.10.2 typing_extensions-4.3.0 tzdata-2022.4 tzlocal-4.2 urllib3-1.26.11 utils-1.0.1 uvicorn-0.18.3 virtualenv-20.16.3 watchfiles-0.18.1 websockets-10.4 win32-setctime-1.1.0 zipp-3.11.0[notice] A new release of pip available: 22.2.2 -> 22.3.1
[notice] To update, run: pip install --upgrade pip(fastbuild) root@node34-a100:/home/sqh/FastBuild# pip list
Package               Version
--------------------- -----------
anyio                 3.6.1
APScheduler           3.9.1
autopep8              1.7.0
backports.zoneinfo    0.2.1
bcrypt                4.0.0
certifi               2022.6.15
cffi                  1.15.1
charset-normalizer    2.1.0
click                 8.1.3
colorama              0.4.5
cryptography          38.0.1
distlib               0.3.5
...
配置shell快捷命令
由于在调试时,需要频繁的使用fastbuild,切换到目录,并激活虚拟环境,因此可以使用别名的方式引入shell命令,比如说我们引入fb命令,来自动的切换到工作目录,并激活虚拟环境。可以使用如下配置:
修改配置文件~/.bashrc,添加alias语句命令,如下所示:
80 # some more ls aliases81 alias ll='ls -alF'82 alias la='ls -A'83 alias l='ls -CF'84 alias fb='cd /home/sqh/FastBuild; source fastbuild/bin/activate'
然后
source ~/.bashrc
可以看到,在连接服务器之后,可以直接键入命令fb实现目录切换和虚拟环境的激活。
*** System restart required ***
Last login: Mon Feb  6 02:13:29 2023 from 10.11.12.108
root@node34-a100:~# fb
(fastbuild) root@node34-a100:/home/sqh/FastBuild#
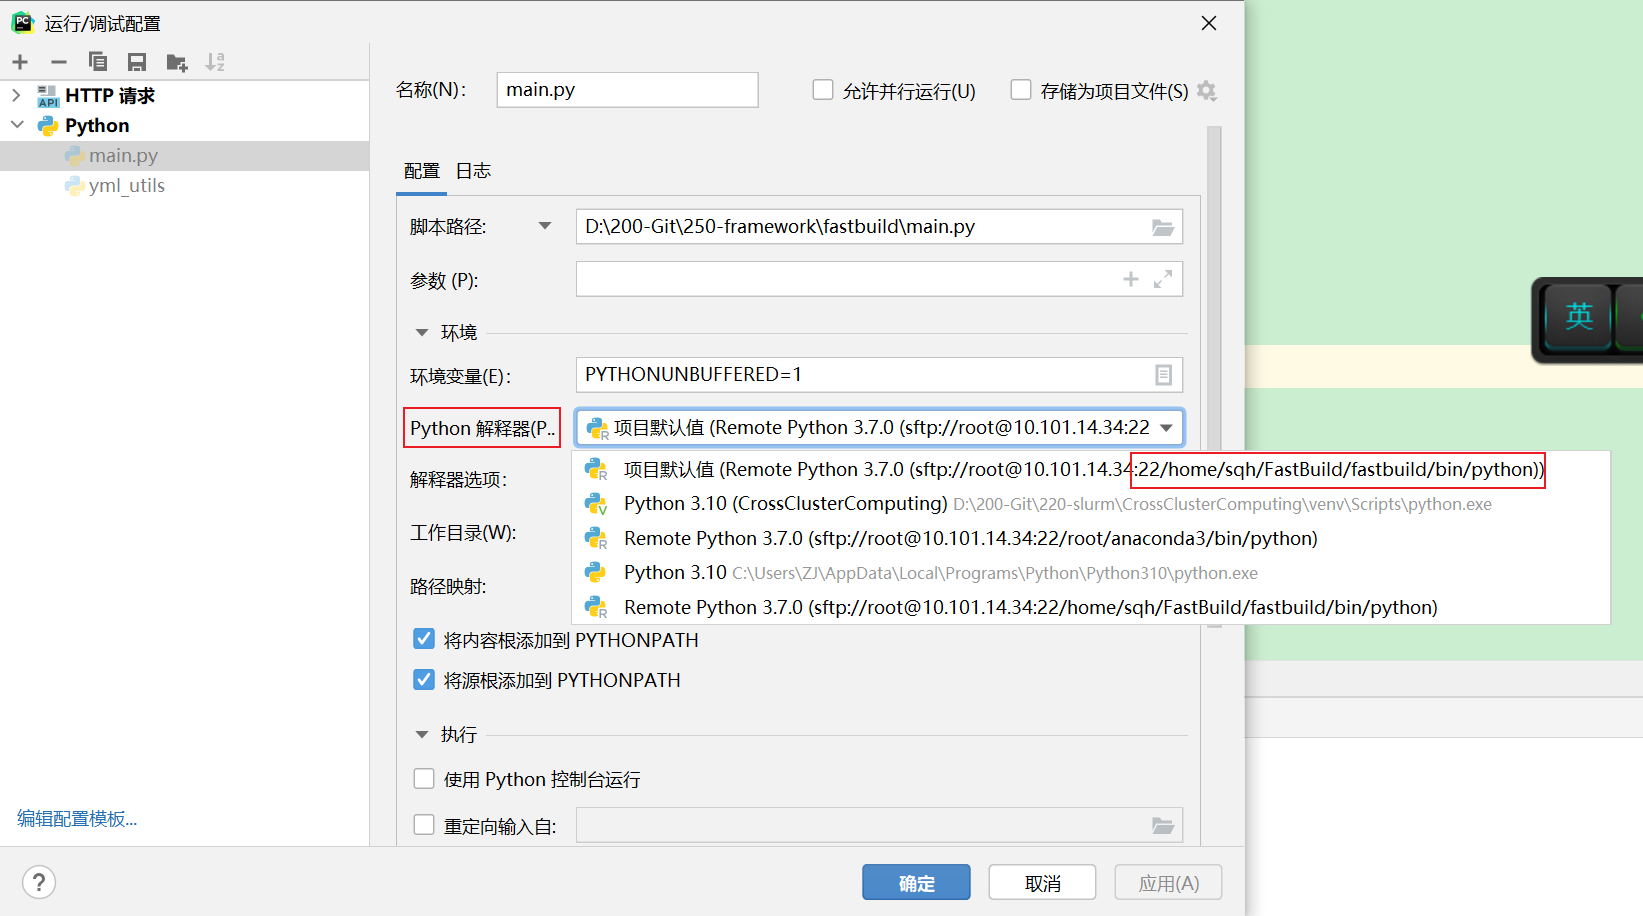
配置远程python解释器
注: 主要是配置项目解释器(通过SSH选取服务端的python解释器)
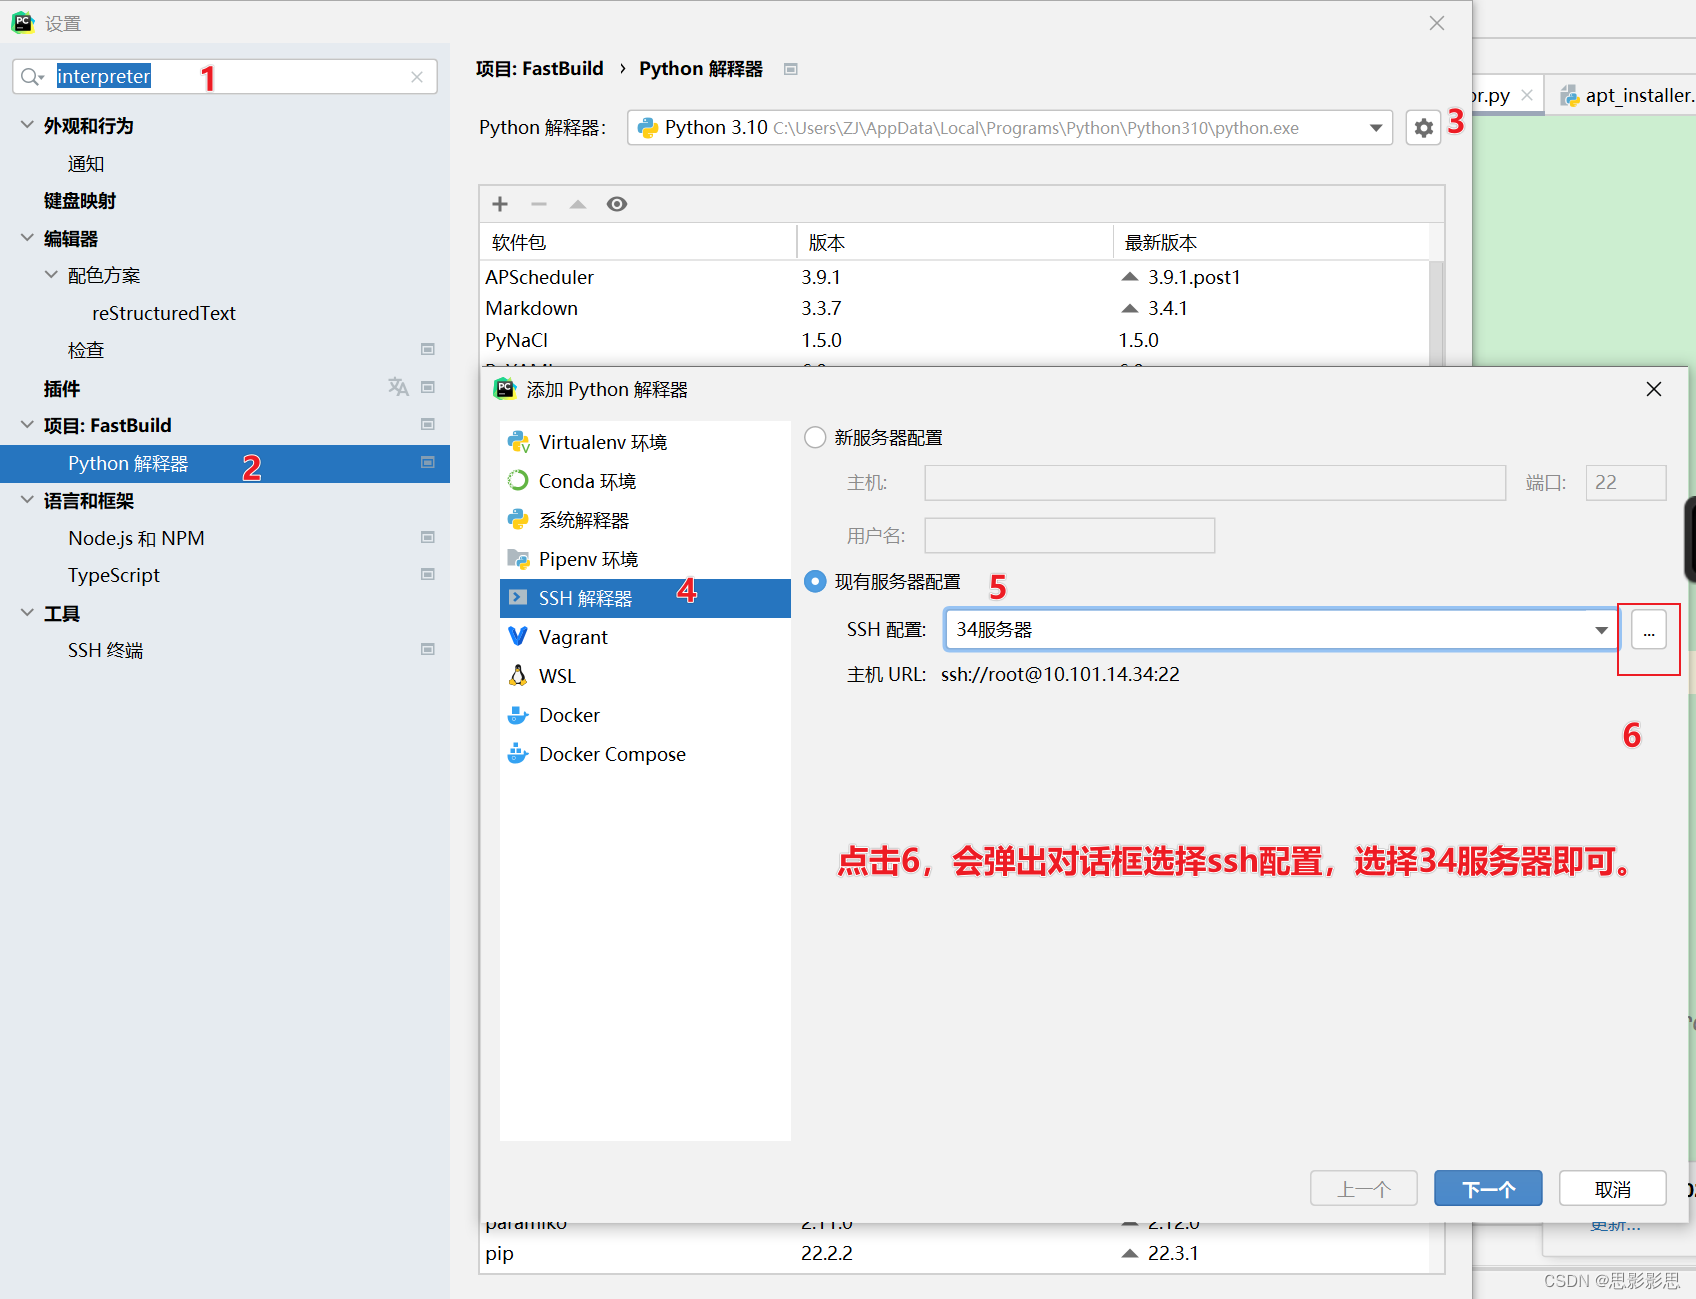
点击下一步,选择Python解释器
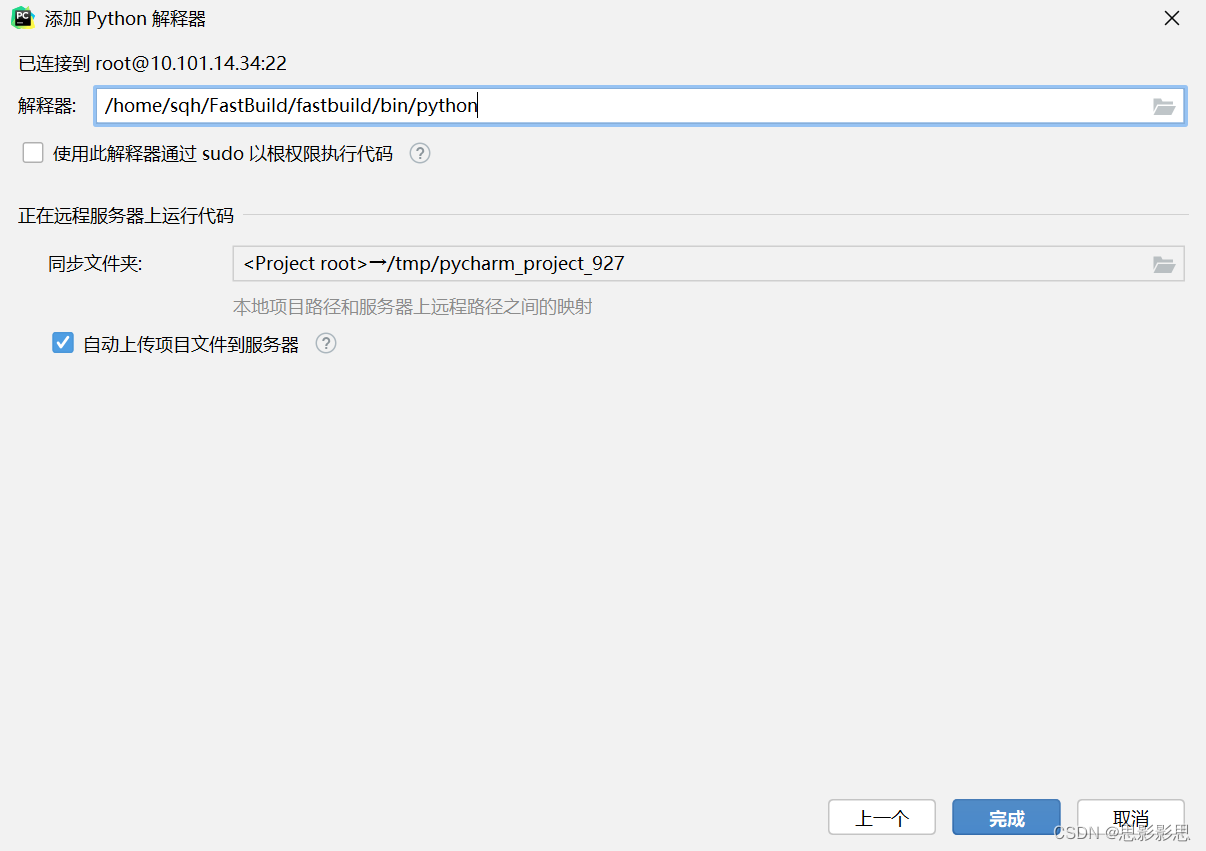
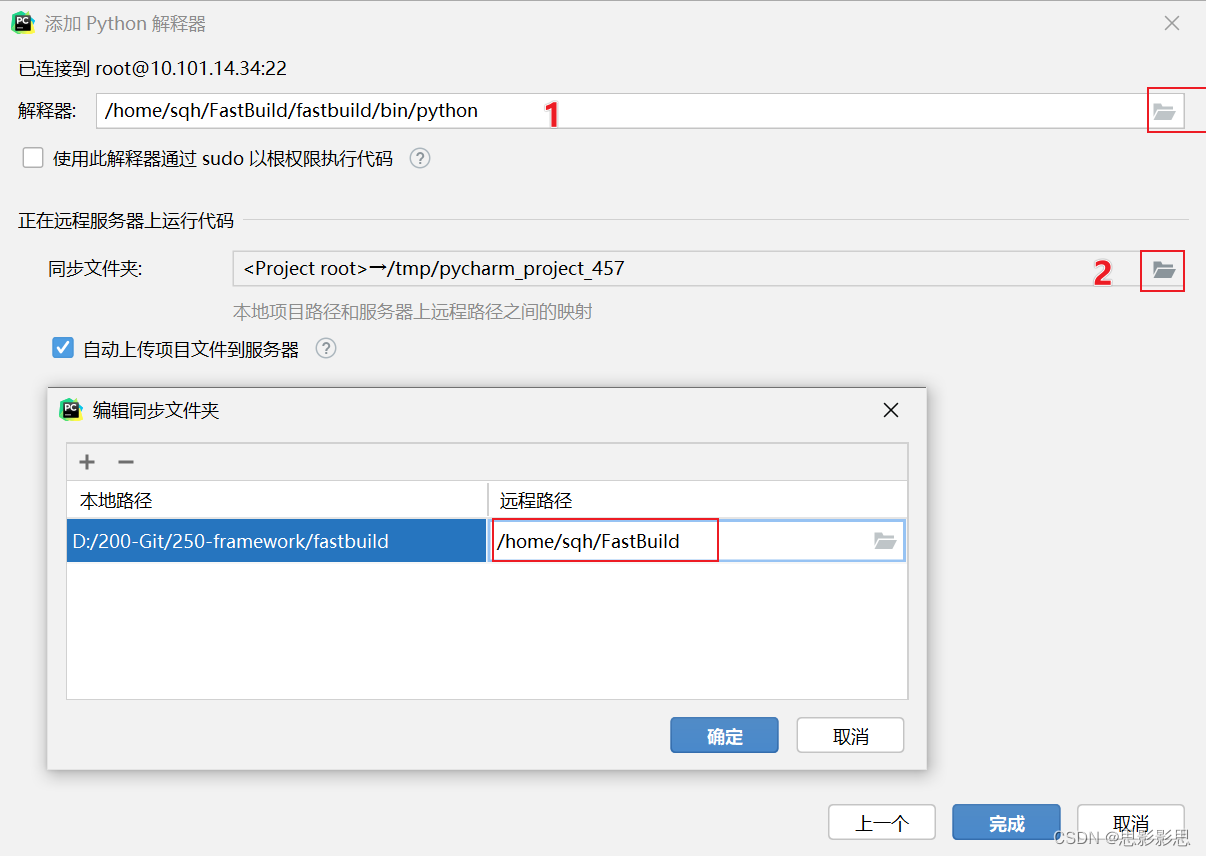
注: 勾选同步文件夹,由于服务器在FastBuild目录下产生了目录fastbuild虚拟环境,因此可以使用之前排除的路径,把该目录排除,以防止服务器该目录同步到本机。
相当于在PyCharm中新建了一个python解释器变量。接下来要指定项目使用该解释器
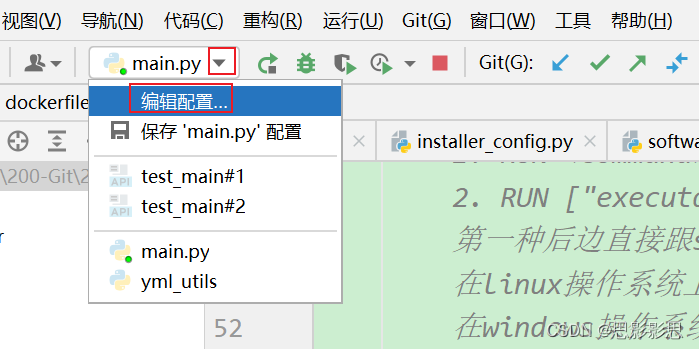
配置使用Python解释器
修改项目调试的python解释器环境
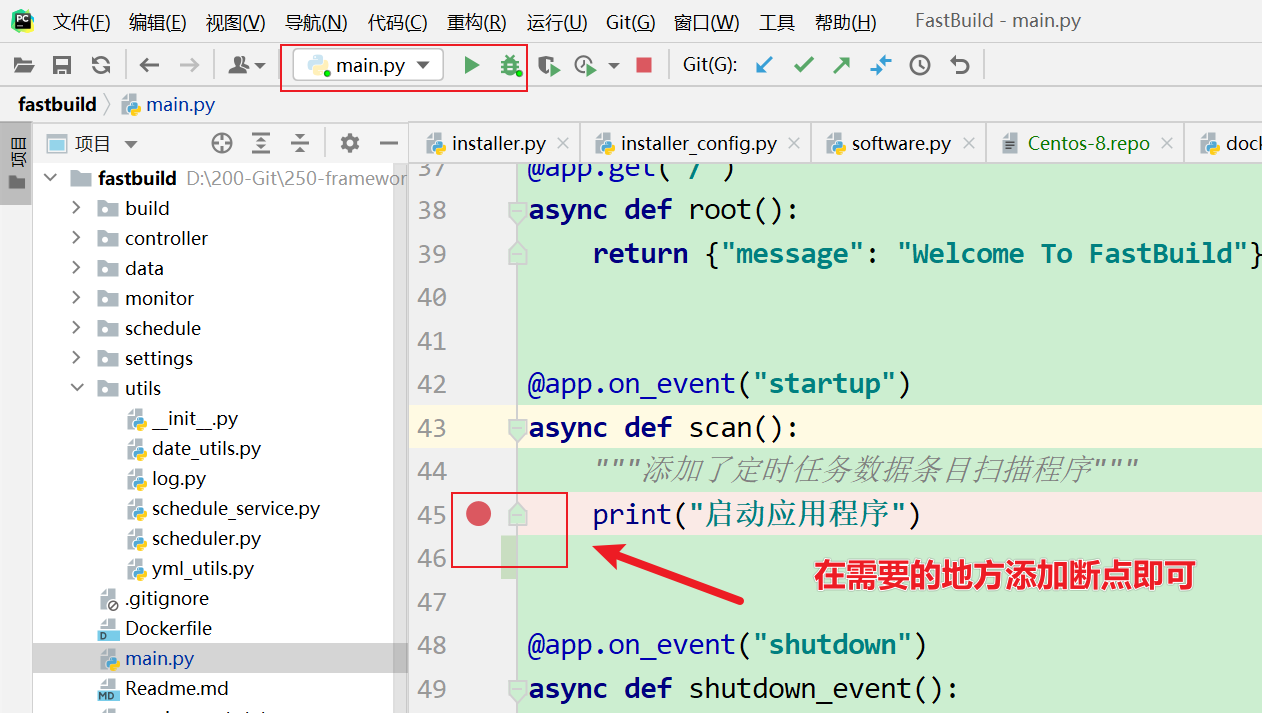
远程调试
远程调试服务器代码,就可以通过pycharm来启动项目了。
总结
本文详细的描述了使用PyCharm来调试远程Linux服务器的代码,通过直接调试服务器上的的代码,可以解决在Windows上的差异(比如说路径分隔符),而且在使用FastBuild进行镜像构建的时候,需要使用docker运行环境,在真实环境上运行能够更加方便快捷的开发。