vue2-org-tree 用于创建和显示组织结构树状图,帮助开发者轻松地可视化组织结构,例如公司的层级、部门之间的关系、团队成员等。其主要功能有:自定义节点、可折叠节点、支持拖放、搜索、导航等功能。
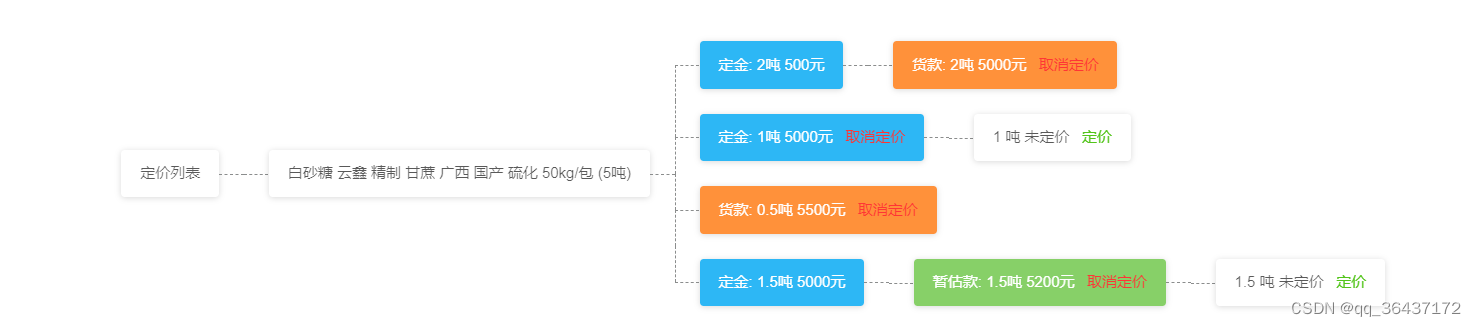
这里我们主要使用 vue2-org-tree 进行多次数、多种类对商品信息定价,以可视化的结构图展示,使其更易于理解和浏览。
1. 安装依赖
# use npm
npm i vue2-org-tree# use yarn
yarn add vue2-org-tree
2. 引入平台
import Vue from 'vue'
import Vue2OrgTree from 'vue2-org-tree'Vue.use(Vue2OrgTree)
3. 实现效果图
3. 代码实现
<vue2-org-tree:data="data":horizontal="true":collapsable="false":label-class-name="labelClassName":render-content="renderContent"
/>
3.1 样式配置
<style lang="less">
.org-tree-node,
.org-tree-node-children {position: relative;margin: 0;padding: 0;list-style-type: none;&:before, &:after {transition: all .35s;}
}
.org-tree-node-label {position: relative;display: inline-block;.org-tree-node-label-inner {padding: 10px 15px;text-align: center;border-radius: 3px;box-shadow: 0 1px 5px rgba(0, 0, 0, .15);}
}
.org-tree-node-btn {position: absolute;top: 100%;left: 50%;width: 20px;height: 20px;z-index: 10;margin-left: -11px;margin-top: 9px;background-color: #fff;border: 1px dashed @colors;border-radius: 50%;box-shadow: 0 0 2px rgba(0, 0, 0, .15);cursor: pointer;transition: all .35s ease;&:hover {background-color: #e7e8e9;transform: scale(1.15);}&:before, &:after {content: '';position: absolute;}&:before {top: 50%;left: 4px;right: 4px;height: 0;border-top: 1px dashed @colors;}&:after {top: 4px;left: 50%;bottom: 4px;width: 0;// border-left: 1px dashed @colors;}&.expanded:after {border: none;}
}
.org-tree-node {padding-top: 20px;display: table-cell;vertical-align: top;&.is-leaf, &.collapsed {padding-left: 10px;padding-right: 10px;}&:before, &:after {content: '';position: absolute;top: 0;left: 0;width: 50%;height: 19px;}&:after {left: 50%;border-left: 1px dashed @colors;}&:not(:first-child):before,&:not(:last-child):after {border-top: 1px dashed @colors;}}
.collapsable .org-tree-node.collapsed {padding-bottom: 30px;.org-tree-node-label:after {content: '';position: absolute;top: 100%;left: 0;width: 50%;height: 20px;border-right: 1px dashed @colors;}
}
.org-tree > .org-tree-node {padding-top: 0;&:after {border-left: 0;}
}
.org-tree-node-children {padding-top: 20px;display: table;&:before {content: '';position: absolute;top: 0;left: 0;width: 50%;height: 20px;border-right: 1px dashed @colors;border-left: none;}&:after {content: '';display: table;clear: both;}
}.horizontal {.org-tree-node {display: inline-flex;justify-content: center;align-items: center;width: 100%;// display: table-cell;float: none;padding-top: 0;padding-left: 20px;&.is-leaf, &.collapsed {padding-top: 10px;padding-bottom: 10px;}&:before, &:after {width: 19px;height: 50%;}&:after {top: 50%;left: 0;border-left: 0;}&:only-child:before {top: 1px;border-bottom: 1px dashed @colors;}&:not(:first-child):before,&:not(:last-child):after {border-top: 0;border-left: 1px dashed @colors;}&:not(:only-child):after {border-top: 1px dashed @colors;}.org-tree-node-inner {display: table;}}.org-tree-node-label {display: table-cell;vertical-align: middle;}&.collapsable .org-tree-node.collapsed {padding-right: 30px;.org-tree-node-label:after {top: 0;left: 100%;width: 20px;height: 50%;border-right: 0;border-bottom: 1px dashed @colors;}}.org-tree-node-btn {top: 50%;left: 100%;margin-top: -11px;margin-left: 9px;}& > .org-tree-node:only-child:before {border-bottom: 0;}.org-tree-node-children {display: table-cell;padding-top: 0;padding-left: 20px;&:before {top: 50%;left: 0;width: 20px;height: 0;border-left: 0;border-top: 1px dashed @colors;}&:after {display: none;}& > .org-tree-node {display: block;}}
}
</style>
3.2 定义 label 样式
使用 labelClassName API 给 label 上的 class,从而实现定义 label 样式。
const colorObj = {'DEPOSIT': 'bg-blue','ESTIMATE': 'bg-green','PAYMENTS': 'bg-orange',
}
// 定义 label 样式
labelClassName (item) {if (item.pricingType) {return colorObj[item.pricingType]}
},
我们可以看到常量 colorObj,其对象中的 key 值是定价类型,value 值是所对应的 class 名称。
<style lang="less">
.bg-green {color: #fff;background-color: #87d068;
}
.bg-blue {color: #fff;background-color: #2db7f5;
}
.bg-orange {color: #fff;background-color: #FF913A;
}
</style>
3.3 渲染节点
使用 renderContent API 来渲染子节点。
renderContent (h, item) {return (<div><span class="item_name">{this.getTitle(item)}</span>{!item.name && !item.skuName && !item.pricingType && ['add'].includes(this.mode) && <a class="m-l-10" onClick={() => this.$emit('open', item)}>定价</a>}</div >)
},
去除商品和已定价的数据,其余添加定价按钮进行定价操作。由于 data 数据是树型结构,不同层级的渲染逻辑不同,因此我们将渲染逻辑抽离到 getTitle 方法中。代码如下:
getTitle (item) {const max = this.getPricingQtyMax(item)if (item.name) { // 根节点return item.name} else if (item.skuName) { // 商品信息return `${item.skuName} (${item.planMainQty}吨)`} else if (item.pricingType) { // 已定价return <span>{pricingType._find(item.pricingType).name}: {item.pricingQty}吨 {item.price}元{(max > 0) && ['add'].includes(this.mode) && <a class="c-red m-l-10" onClick={() => this.$emit('cancel', { ...item, pricingQtyMax: max, pricingQty: max })}>取消定价</a>}</span>} else { // 未定价return `${item.pricingQty} 吨 未定价`}
},
对于取消定价按钮显示逻辑由 getPricingQtyMax 方法处理的,具体代码如下:
getPricingQtyMax () {return function (item) {/* 货款:未申请支付 | 定金/暂估款:未定价部分 */if (['PAYMENTS'].includes(item.pricingType)) {return NP.minus(item.pricingQty, item.applyQty || 0)} else if (['DEPOSIT', 'ESTIMATE'].includes(item.pricingType)) {return NP.minus(item.pricingQty, handleTableTotal('pricingQty', item.children.filter(item => item.pricingType)))}}
},


![[Machine Learning][Part 6]Cost Function代价函数和梯度正则化](https://img-blog.csdnimg.cn/a7a14b84cdf746c380d7ed4ced762320.png)