es8.8 集群安装笔记
- 配置集群
- 第一步 修改配置文件
本次安装使用centos8
3节点安装:
192.168.182.142
192.168.182.143
192.168.182.144
官网 可以查看详细的安装,安装步骤比较简单
https://www.elastic.co/guide/en/elasticsearch/reference/8.8/rpm.html#rpm-repo
直接安装,需要配置仓库cd  /etc/yum.repos.d/vielasticsearch.repo[elasticsearch]
name=Elasticsearch repository for 8.x packages
baseurl=https://artifacts.elastic.co/packages/8.x/yum
gpgcheck=1
gpgkey=https://artifacts.elastic.co/GPG-KEY-elasticsearch
enabled=0
autorefresh=1
type=rpm-mdsudo yum install --enablerepo=elasticsearch elasticsearch  -y开机启动
sudo /bin/systemctl daemon-reload
sudo /bin/systemctl enable elasticsearch.service
启动/停止
sudo systemctl start elasticsearch.service
sudo systemctl stop elasticsearch.service
查看状态
sudo systemctl status elasticsearch.servicejournalctl --unit elasticsearch修改系统最大文件句柄数(修改后需要重启系统才能生效)
# vi /etc/security/limits.conf
*       soft    nproc   65535
*       hard    nproc   65535
*       soft    nofile  65535
*       hard    nofile  65535reboot修改最大虚拟内存vi /etc/sysctl.conf
vm.max_map_count=655360
访问需要用https https://127.0.0.1:9200/
默认用户 elastic
密码就是安装的时候打印到屏幕上的密码
配置集群
8.8 使用 创建token 这一招,没有奏效,于是乎在官网各种爬。
第一步 修改配置文件
node1
# ======================== Elasticsearch Configuration =========================
#
# NOTE: Elasticsearch comes with reasonable defaults for most settings.
#       Before you set out to tweak and tune the configuration, make sure you
#       understand what are you trying to accomplish and the consequences.
#
# The primary way of configuring a node is via this file. This template lists
# the most important settings you may want to configure for a production cluster.
#
# Please consult the documentation for further information on configuration options:
# https://www.elastic.co/guide/en/elasticsearch/reference/index.html
#
# ---------------------------------- Cluster -----------------------------------
#
# Use a descriptive name for your cluster:
#
cluster.name: es
#
# ------------------------------------ Node ------------------------------------
#
# Use a descriptive name for the node:
#
node.name: node1
#
# Add custom attributes to the node:
#
#node.attr.rack: r1
#
# ----------------------------------- Paths ------------------------------------
#
# Path to directory where to store the data (separate multiple locations by comma):
#
path.data: /var/lib/elasticsearch
#
# Path to log files:
#
path.logs: /var/log/elasticsearch
#
# ----------------------------------- Memory -----------------------------------
#
# Lock the memory on startup:
#
#bootstrap.memory_lock: true
#
# Make sure that the heap size is set to about half the memory available
# on the system and that the owner of the process is allowed to use this
# limit.
#
# Elasticsearch performs poorly when the system is swapping the memory.
#
# ---------------------------------- Network -----------------------------------
#
# By default Elasticsearch is only accessible on localhost. Set a different
# address here to expose this node on the network:
#
network.host: 192.168.182.143
#
# By default Elasticsearch listens for HTTP traffic on the first free port it
# finds starting at 9200. Set a specific HTTP port here:
#
http.port: 9200
#
# For more information, consult the network module documentation.
#
# --------------------------------- Discovery ----------------------------------
#
# Pass an initial list of hosts to perform discovery when this node is started:
# The default list of hosts is ["127.0.0.1", "[::1]"]
#
discovery.seed_hosts: ["192.168.182.142", "192.168.182.143","192.168.182.144"]
#
# Bootstrap the cluster using an initial set of master-eligible nodes:
#
cluster.initial_master_nodes: ["node1", "node2", "node3"]
#
# For more information, consult the discovery and cluster formation module documentation.
#
# ---------------------------------- Various -----------------------------------
#
# Allow wildcard deletion of indices:
#
#action.destructive_requires_name: false#----------------------- BEGIN SECURITY AUTO CONFIGURATION -----------------------
#
# The following settings, TLS certificates, and keys have been automatically
# generated to configure Elasticsearch security features on 01-07-2023 14:38:29
#
# --------------------------------------------------------------------------------# Enable security features
xpack.security.autoconfiguration.enabled : true
xpack.security.enabled: truexpack.security.enrollment.enabled: true
xpack.security.transport.ssl.verification_mode: none# Enable encryption for HTTP API client connections, such as Kibana, Logstash, and Agents
xpack.security.http.ssl:enabled: truekeystore.path: certs/http.p12# Enable encryption and mutual authentication between cluster nodes
xpack.security.transport.ssl:enabled: trueverification_mode: certificatekeystore.path: certs/elastic-certificates.p12truststore.path: certs/elastic-certificates.p12
# Create a new cluster with the current node only
# Additional nodes can still join the cluster later
#cluster.initial_master_nodes: ["localhost.localdomain"]# Allow HTTP API connections from anywhere
# Connections are encrypted and require user authentication
http.host: 0.0.0.0# Allow other nodes to join the cluster from anywhere
# Connections are encrypted and mutually authenticated
transport.host: 0.0.0.0
transport.port: 9300#----------------------- END SECURITY AUTO CONFIGURATION -------------------------
node.roles: [master,data]
主要修改点:
····
cluster.name: es
node.name: node1
network.host: 192.168.182.143
添加如下两个节点启动之后不会自动创建集群
discovery.seed_hosts: [“192.168.182.142”, “192.168.182.143”,“192.168.182.144”]
cluster.initial_master_nodes: [“node1”, “node2”, “node3”]
transport.host: 0.0.0.0
transport.port: 9300
node.roles: [master,data]
····
配置文件修改完成之后,启动节点。报错如下:
[2023-07-08T00:24:27,553][WARN ][o.e.x.c.s.t.n.SecurityNetty4Transport] [node2] client did not trust this server's certificate, closing connection Netty4TcpChannel{localAddress=/192.168.182.143:9300, remoteAddress=/192.168.182.144:36500, profile=default}
[2023-07-08T00:24:28,420][WARN ][o.e.d.PeerFinder         ] [node2] address [192.168.182.142:9300], node [null], requesting [false] discovery result: [][192.168.182.142:9300] connect_exception: Failed execution:
原因是因为没有配置通信证书。
找到一篇安全配置的文章
es安全配置
生成证书:
生成集群节点证书:
生成ca证书
./bin/elasticsearch-certutil ca
使用ca证书生成集群通信证书
./bin/elasticsearch-certutil cert --ca elastic-stack-ca.p12
把证书复制到其他节点/etc/elasticsearch/certs 目录中
把证书密钥添加至本地密钥库
./bin/elasticsearch-keystore add xpack.security.transport.ssl.keystore.secure_password./bin/elasticsearch-keystore add xpack.security.transport.ssl.truststore.secure_password
节点更新完成之后重启各个节点,查看节点状态,集群创建成功。
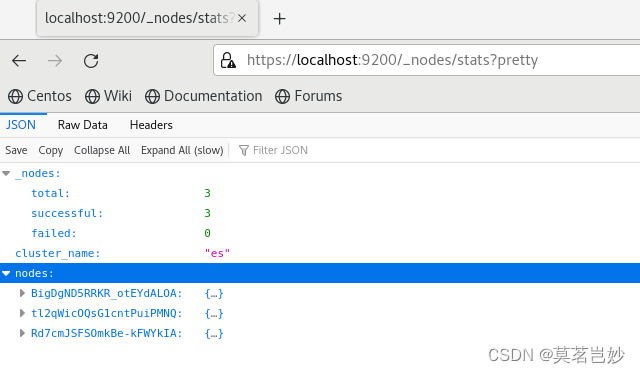
状态查询
curl -XGET"http://localhost:9200/_cluster/health?pretty=true"
查询Elasticsearch运行状态
curl --cacert /etc/elasticsearch/certs/http_ca.crt -u elastic https://localhost:9200
查询集群节点信息
curl --cacert /etc/elasticsearch/certs/http_ca.crt -u elastic https://localhost:9200/_cluster/health?pretty=true
curl --cacert /etc/elasticsearch/certs/http_ca.crt -u elastic https://localhost:9200/_cat/nodes
142 qvKpUo1_T1yqgkpn_KMk
生成token
/usr/share/elasticsearch/bin/elasticsearch-create-enrollment-token -s node
/usr/share/elasticsearch/bin/elasticsearch-certutil cert
/usr/share/elasticsearch/bin/elasticsearch --enrollment-token eyJ2ZXIiOiI4LjguMiIsImFkciI6WyIxOTIuMTY4LjE4Mi4xNDI6OTIwMCJdLCJmZ3IiOiIxNDdjOWE5NGMwZDUwNTk2NWMwYWE0MmEyNDg3YzVkMjUyMWYzNjc5Y2QxZmMxOTBmYTg5ZDUxOTJlOTM1NjE4Iiwia2V5IjoibTkzMUZJa0JtRy1SVjJfNjZfYzk6M0hZN0Mxam5Uak9LWEVJQTJpN3BjUSJ9
常见问题汇总:
1.ERROR: Skipping security auto configuration because it appears that the node is not starting up for the first time. The node might already be part of a cluster and this auto setup utility is designed to configure Security for new clusters only
这个是因为安装好之后启动过一次,之后注册节点没成功。
2.Skipping security auto configuration because this node is configured to bootstrap or to join a multi-node cluster, which is not supported
不能删除安全项配置,
xpack.security.enabled: truexpack.security.enrollment.enabled: true# Enable encryption for HTTP API client connections, such as Kibana, Logstash, and Agents
xpack.security.http.ssl:enabled: truekeystore.path: certs/http.p12# Enable encryption and mutual authentication between cluster nodes
xpack.security.transport.ssl:enabled: trueverification_mode: certificatekeystore.path: certs/transport.p12truststore.path: certs/transport.p12
-
ERROR: Skipping security auto configuration because it appears that security is already configured
安装好之后配置了集群但是注册失败,具体原因还得继续排除
-
java.security.cert.CertPathValidatorException: Path does not chain with any of the trust anchors
这种问题是开启了安全模式,各个节点没有配置证书的原因导致