目录
角色定制:roles
角色定制实例:利用角色部署wordpress
1.在roles目录下生成对应的目录结构
2.定义配置文件
①nginx
②php
③mysql
④定义剧本文件
⑤启动服务
角色定制:roles
对于普通的剧本(playbook)有个弊端就是无法实现复用假设在同时部署Web、db、ha 时或不同服务器组合不同的应用就需要写多个yml文件。很难实现灵活的调用。
roles 用于层次性、结构化地组织playbook。roles 能够根据层次型结构自动装载变量文件、tasks以及handlers等。要使用roles只需要在playbook中使用include指令即可。简单来讲,roles就是通过分别将变量(vars)、文件(file)、任务(tasks)、模块(modules)及处理器(handlers)放置于单独的目录中,并可以便捷地include它们的一种机制。
角色定制实例:利用角色部署wordpress
192.168.134.165 server01
192.168.134.166 server02
192.168.134.163 server03
server01管理其他两个服务器资产。
1.在roles目录下生成对应的目录结构
[root@server01 ~]# mkdir roles
#生成相应的目录
[root@server01 roles]# ansible-galaxy init nginx
[root@server01 roles]# ansible-galaxy init mysql
[root@server01 roles]# ansible-galaxy init php
[root@server01 roles]# tree
.
├── mysql
│   ├── defaults
│   │   └── main.yml
│   ├── files
│   ├── handlers
│   │   └── main.yml
│   ├── meta
│   │   └── main.yml
│   ├── README.md
│   ├── tasks
│   │   └── main.yml
│   ├── templates
│   ├── tests
│   │   ├── inventory
│   │   └── test.yml
│   └── vars
│       └── main.yml
├── nginx
│   ├── defaults
│   │   └── main.yml
│   ├── files
│   ├── handlers
│   │   └── main.yml
│   ├── meta
│   │   └── main.yml
│   ├── README.md
│   ├── tasks
│   │   └── main.yml
│   ├── templates
│   │   └── nginx.conf
│   ├── tests
│   │   ├── inventory
│   │   └── test.yml
│   └── vars
│       └── main.yml
├── php
│   ├── defaults
│   │   └── main.yml
│   ├── files
│   ├── handlers
│   │   └── main.yml
│   ├── meta
│   │   └── main.yml
│   ├── README.md
│   ├── tasks
│   │   └── main.yml
│   ├── templates
│   ├── tests
│   │   ├── inventory
│   │   └── test.yml
│   └── vars
│       └── main.yml
2.定义配置文件
我们需要修改每个文件对应的配置。
①nginx
- [root@server01 roles]# vim nginx/tasks/main.yml
[root@server01 roles]# vim nginx/tasks/main.yml
---
# tasks file for nginx- name: install {{ server }}yum: name={{ server }},epel-release  state=present- name: start {{ server }}service: name={{ server }} state=started- name: 拷贝wordpress源代码unarchive: src=/root/wordpress-6.4.1-zh_CN.tar.gz dest=/usr/share/nginx/html- name: copy wordpresscopy: src=/root/roles/wp-config.php  dest=/usr/share/nginx/html/wordpress/- name: copytemplate: src=/root/roles/nginx/templates/nginx.conf dest=/etc/nginx/  #将nginx的配置文件模板发送到资产上notify: restartnginxtags: rs#上传wordpress的包
[root@server01 ~]# rz
[root@server01 ~]# ll
-rw-r--r--  1 root root 25302043 11月 13 09:58 wordpress-6.4.1-zh_CN.tar.gz
- 创建 /root/roles/wp-config.php文件写入一下内容
<?php
/*** The base configuration for WordPress** The wp-config.php creation script uses this file during the installation.* You don't have to use the web site, you can copy this file to "wp-config.php"* and fill in the values.** This file contains the following configurations:** * Database settings* * Secret keys* * Database table prefix* * ABSPATH** @link https://wordpress.org/documentation/article/editing-wp-config-php/** @package WordPress*/// ** Database settings - You can get this info from your web host ** //
/** The name of the database for WordPress */
define( 'DB_NAME', 'wordpress' );/** Database username */
define( 'DB_USER', 'wordpress' );/** Database password */
define( 'DB_PASSWORD', 'Aren@123' );/** Database hostname */
define( 'DB_HOST', '192.168.134.166' );/** Database charset to use in creating database tables. */
define( 'DB_CHARSET', 'utf8mb4' );/** The database collate type. Don't change this if in doubt. */
define( 'DB_COLLATE', '' );/**#@+* Authentication unique keys and salts.** Change these to different unique phrases! You can generate these using* the {@link https://api.wordpress.org/secret-key/1.1/salt/ WordPress.org secret-key service}.** You can change these at any point in time to invalidate all existing cookies.* This will force all users to have to log in again.** @since 2.6.0*/
define( 'AUTH_KEY',         'ug.ct&MB!sL1_o/6t.}Xt4|f?;%|@.Zw6>wUwM3uSXcgB_nnOaZF-m^oUAuV.i-n' );
define( 'SECURE_AUTH_KEY',  'EP#~FNQDJRfL4C8Lboja}KVrc:fhdq_L~gn#wN>^qrn.DHZQwkjl=]-:QFcv:aY-' );
define( 'LOGGED_IN_KEY',    '3NQgD!)H{lR=,s(EQm7!jYrlR*T|3:h:Ag>_|#6qAO k6U#vvF)gXqb EKdcu[]v' );
define( 'NONCE_KEY',        ',LMJd60b=Qj1]B)ut!JAYCuJ)xN?`Dlnc>P8Tl_hCTk3Sl+qyAvpi_[VbCTAR?:/' );
define( 'AUTH_SALT',        'uj<)Ftb_ZA8+;ms%1AqGik.P@35[]r?.d~jc4J?]und3^vEV*=noZ}z^Gbj?u,oQ' );
define( 'SECURE_AUTH_SALT', '-CoV$a0F^9AF ?Zk()y<{}*WB`QP;$++T`F2NC6OUb]2=i9GW`*/1RjLb&sTO>}/' );
define( 'LOGGED_IN_SALT',   '2)?iJr4fi!gqk5~76^f1}Apdwynt:;$JoNdw]ty:kL]tEfy[%$H(oLNdCX/bFhJy' );
define( 'NONCE_SALT',       'zU(c-T%ayYW17wFle,oVj0@VG&m,e#Ujs~M|@>q[^|RCp*q)GbGTbRh*zh_#V5h6' );/**#@-*//*** WordPress database table prefix.** You can have multiple installations in one database if you give each* a unique prefix. Only numbers, letters, and underscores please!*/
$table_prefix = 'wp_';
define( 'WP_DEBUG', false );/* Add any custom values between this line and the "stop editing" line. *//* That's all, stop editing! Happy publishing. *//** Absolute path to the WordPress directory. */
if ( ! defined( 'ABSPATH' ) ) {define( 'ABSPATH', __DIR__ . '/' );
}/** Sets up WordPress vars and included files. */
require_once ABSPATH . 'wp-settings.php';- [root@server01 roles]# vim nginx/vars/main.yml
[root@server01 roles]# vim nginx/vars/main.yml
---
# vars file for nginxserver: nginxport: 80
- [root@server01 roles]# vim nginx/templates/nginx.conf
user nginx;
worker_processes auto;
error_log /var/log/nginx/error.log;
pid /run/nginx.pid;# Load dynamic modules. See /usr/share/doc/nginx/README.dynamic.
include /usr/share/nginx/modules/*.conf;events {worker_connections 1024;
}http {log_format main '$remote_addr - $remote_user [$time_local] "$request" ''$status $body_bytes_sent "$http_referer" ''"$http_user_agent" "$http_x_forwarded_for"';access_log /var/log/nginx/access.log main;sendfile on;tcp_nopush on;tcp_nodelay on;keepalive_timeout 65;types_hash_max_size 4096;include /etc/nginx/mime.types;default_type application/octet-stream;# Load modular configuration files from the /etc/nginx/conf.d directory.# See http://nginx.org/en/docs/ngx_core_module.html#include# for more information.include /etc/nginx/conf.d/*.conf;server {listen {{ port }};server_name localhost;root /usr/share/nginx/html/wordpress;index index.php;# Load configuration files for the default server block.include /etc/nginx/default.d/*.conf;location ~ \.php$ {root /usr/share/nginx/html/wordpress; #指定网站目录fastcgi_pass 127.0.0.1:9000; #指定访问地址fastcgi_index index.php; #指定默认文件fastcgi_param SCRIPT_FILENAME $document_root$fastcgi_script_name; #站点根目录,取决于root配置项include fastcgi_params; #包含nginx常量定义}error_page 404 /404.html;location = /404.html {}error_page 500 502 503 504 /50x.html;location = /50x.html {}}}- 定义handlers文件 [root@server01 roles]# vim nginx/handlers/main.yml
---
# handlers file for nginx- name: restartnginxservice: name={{ server }} state=restarted
②php
- root@server01 roles]# vim php/tasks/main.yml
---
# tasks file for php- name: install phpyum: name=php80-php-xsl,php80-php,php80-php-cli,php80-php-devel,php80-php-gd,php80-php-pdo,php80-php-mysql,php80-php-fpm state=present- name: start phpservice: name=php80-php-fpm state=started
③mysql
- [root@server01 roles]# vim mysql/tasks/main.yml
---
# tasks file for mysql- name: install mariadbyum: name=mariadb-server,mariadb state=present disablerepo=mysql-5.7-community- name: start dbservice: name=mariadb state=started enabled=true- name: change passwdshell: mysql -e "create database {{ db_name }}; grant all on wordpress.* to 'wordpress'@'%' identified by '{{ db_pass }}'; flush privileges"tags: db - [root@server01 roles]# vim mysql/vars/main.yml
---
# vars file for mysqldb_name: 'wordpress'db_pass: Aren@123
④定义剧本文件
接下来,我们就来定义剧本文件,由于大部分设置我们都单独配置在了roles里面,所以,接下来剧本就只需要写一点点内容即可:
[root@server01 roles]# vim roles.yaml
---- hosts: allremote_user: rootroles:- nginx- php- mysql
⑤启动服务
- [root@server01 roles]# ansible-playbook /root/roles/roles.yaml

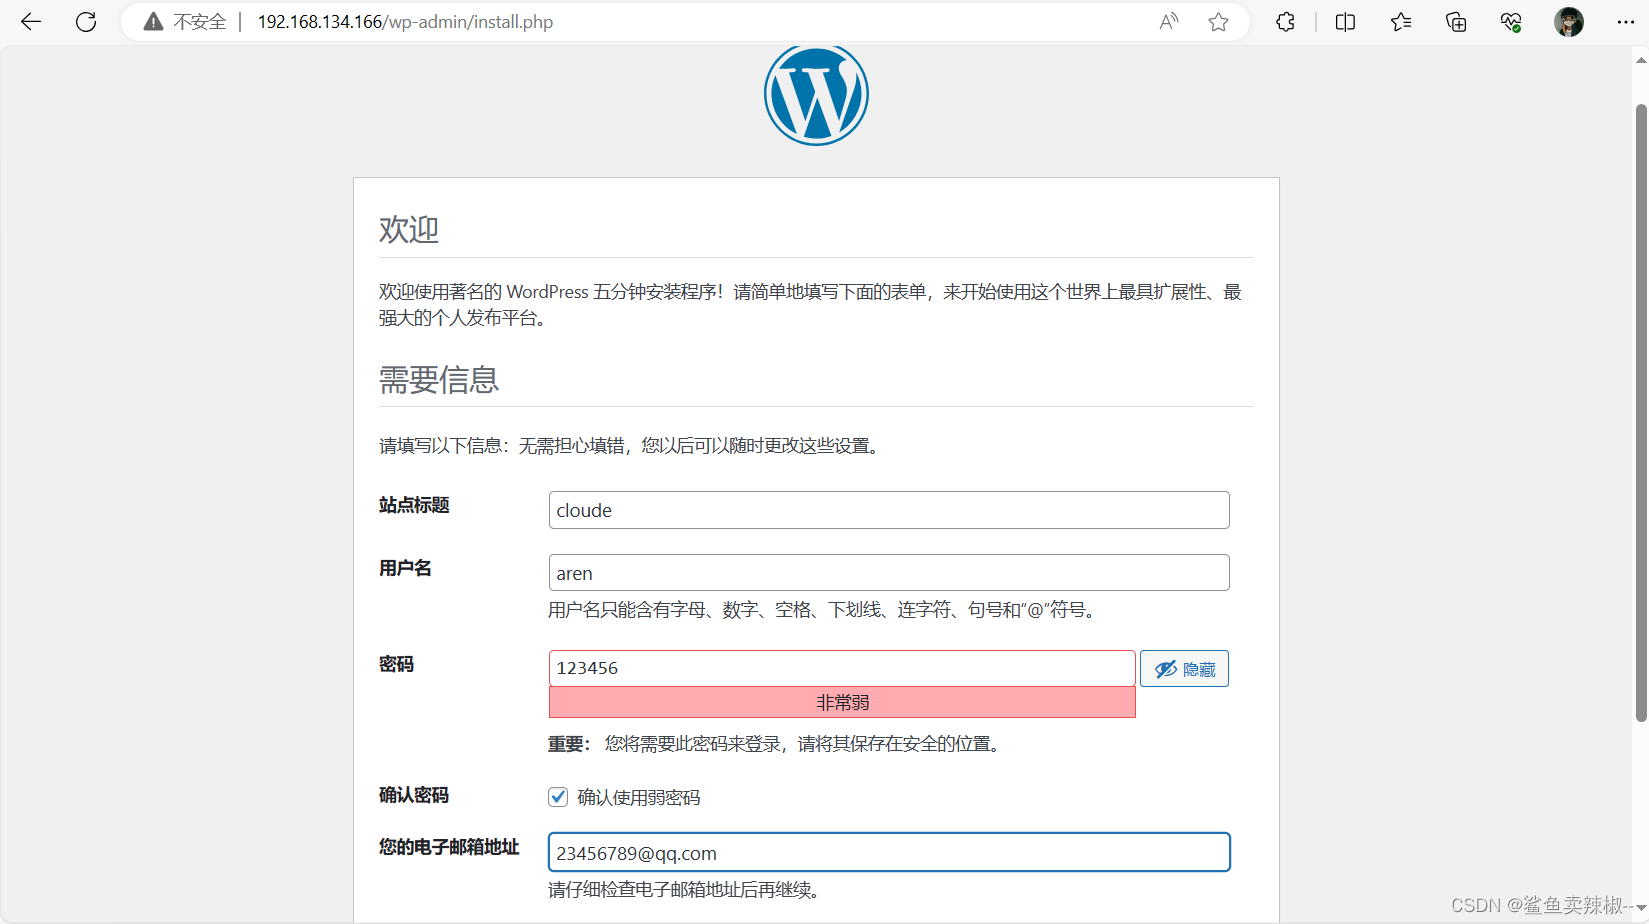
进入web页面