Linux文件描述符+缓冲区
📟作者主页:慢热的陕西人
🌴专栏链接:Linux
📣欢迎各位大佬👍点赞🔥关注🚓收藏,🍉留言
本博客主要内容讲解了文件描述符以及文件描述符的分配规则,重定向,以及对我们的极简shell实现重定向。最后如何理解FILE和缓冲区的概念
文章目录
1.文件描述符
我们用一个之前的例子来引入今天的只是,为什么我们打开成功之后这个fd返回的是3呢?为什么不是1,不是0;

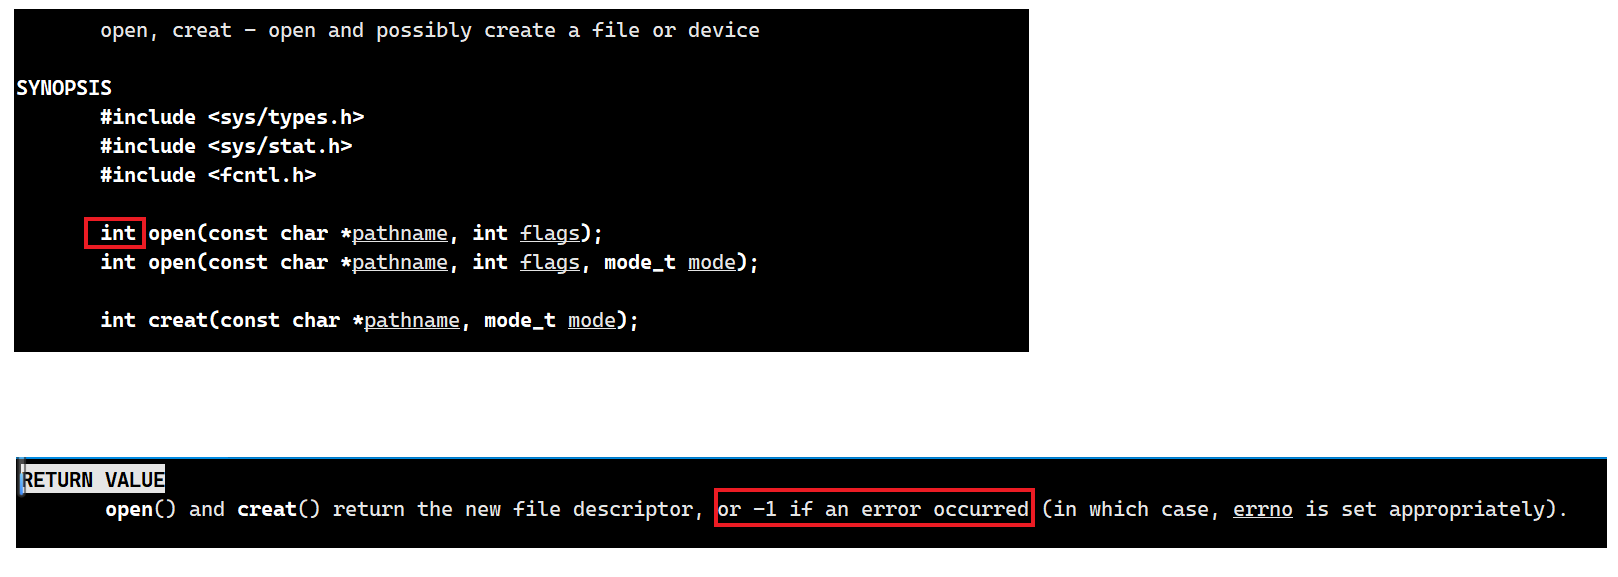
那么我们再来查看一下open函数手册:
open函数的返回值:如果打开成功返回一个新的文件描述符,打开失败,则返回-1;
那么为什么我们之前所有的例子都返回的是3,而不是0,1,2呢?那么他们是不是被其他文件占用了呢?
那么其实进程在启动的似乎后默认会打开当前进程的三个文件:
| 操作系统 | 标准输入 | 标准输出 | 标准错误 |
|---|---|---|---|
| c | stdin | stdout | stderr |
| c++ | cin | cout | cerr |
那么标准输入,标准输出,标准错误本质都是文件,然后stdin,stdout,stderr是他们三个在语言层面的表现:
查看手册可以看到他们三个的类型都是C库内部封装的文件类型!那么C++中的这三个和C库中的也是类似;

C++/C的程序例子:
#include<iostream>
#include<cstdio>    using namespace std;    int main()
{    //C    printf("hello printf -> stdout\n");    fprintf(stdout, "hello printf -> stdout\n");                                                                                                               fprintf(stderr, "hello printf -> stderr\n");    //C++    cout << "hello cout -> cout" << endl;    cerr << "hello cerr -> cerr" << endl;    return 0;
}

那么标准输出和标准错误有什么区别呢?
虽然他们都可以向屏幕打印,但是是不一样的。
我们尝试重定向一下./demo到这个log.txt可是我们发现只有标准输出被重定向进了文件,而标准错误却没有。
原因我们后面再说。

Linux下一切皆文件,那么我们向屏幕打印字符串,本质也是向文件写入字符串,该作何理解?我们后面再解答。
那么说到这里我们也可以揭晓了那么我们为什么之前打开文件返回的文件描述符是3,却没有0,1,2。
原因是0, 1,2 分别被他们几个占用了标准输入,标准输出,标准错误,他们本质都是文件。
那么这样的从0开始排序的方式,是不是和我们的数组非常的类似!
那么我们再运行一段程序看看:
#include<stdio.h>
#include <sys/types.h>
#include <sys/stat.h>
#include <fcntl.h>    #define LOG "log.txt"    int main()
{    int fd1 = open(LOG, O_CREAT | O_TRUNC | O_WRONLY, 0666);    int fd2 = open(LOG, O_CREAT | O_TRUNC | O_WRONLY, 0666);    int fd3 = open(LOG, O_CREAT | O_TRUNC | O_WRONLY, 0666);    int fd4 = open(LOG, O_CREAT | O_TRUNC | O_WRONLY, 0666);    int fd5 = open(LOG, O_CREAT | O_TRUNC | O_WRONLY, 0666);    printf("fd1 = %d\n", fd1);    printf("fd2 = %d\n", fd2);    printf("fd3 = %d\n", fd3);    printf("fd4 = %d\n", fd4);    printf("fd5 = %d\n", fd5);                                                                                                                                 return 0;
}
运行结果:

那么我们从原理上来解释一下:
在我们的进程的pcb内部对应到linux也就是我们的task_struct内部,有一个struct files_struct *file 的指针,它指向的是该进程对应的一个files struct结构体:那么这个结构体的内部就有一个对应我们文件描述符的数组,叫做:struct file fd_array[];文件描述符(open的返回值)的本质就是:数组下标!
那么我们的进程就是通过文件描述符fd来访问struct files struct来找到对应的文件指针,然后再在内存中找到对应的struct file
来进行对文件进行操作的的。

那么其实在内存中的管理文件的数据结构:struct file对应每个文件都有一个缓冲区,所以我们所谓的IO类函数read/write本质上是拷贝函数,都是在向对应的缓冲区读或者写,那么我们写入到缓冲区后,何时刷新到文件对应的磁盘位置这个是由操作系统决定的。
如何深度理解Linux中的**“一切皆文件”**:
对应到我们的外设,对于Linux内部来说,他们也是一个个的文件,首先他们有各自的write和read方法:
那么对应到我们内存中外设所对应的struct file中都有一个个对应的函数指针,指向对应外设的读写方法;
在网上到我们的进程中对应的struct files struct 中对应的函数指针数组(下标对应我们的文件标识符);
如下图的这个过程也是用C语言面向对象编程的过程!
所以后来的面向对象的语言都是经过很多的实践总结出来而设计的。

我们使用操作系统的本质:都是通过进程的方式进行OS的访问的。
1.1文件描述符的分配规则
文件描述符的分配规则:在files_struct数组当中,找到当前没有被使用的最小的一个下标,作为新的文件描述符
代码:
  #include<stdio.h>
#include<sys/types.h>
#include<sys/stat.h>
#include<fcntl.h>
#include<string.h>
#include<unistd.h>#define LOG "log.txt"int main()
{fclose(stdin); //等价于close(0);int fd1 = open(LOG, O_CREAT | O_TRUNC | O_WRONLY, 0666);int fd2 = open(LOG, O_CREAT | O_TRUNC | O_WRONLY, 0666);int fd3 = open(LOG, O_CREAT | O_TRUNC | O_WRONLY, 0666);int fd4 = open(LOG, O_CREAT | O_TRUNC | O_WRONLY, 0666);int fd5 = open(LOG, O_CREAT | O_TRUNC | O_WRONLY, 0666);printf("fd1 = %d\n", fd1);printf("fd2 = %d\n", fd2);printf("fd3 = %d\n", fd3);printf("fd4 = %d\n", fd4);printf("fd5 = %d\n", fd5);return 0;
}
运行结果:
那么我们可以看到我们的fd1变成了0,完美印证了规则!

注意上面的代码中我们关闭的是0,并没有选择关闭1;
2.重定向
2.1输出重定向<
那如果关闭1呢?看代码:
#include<stdio.h>#include<sys/types.h>#include<sys/stat.h>#include<fcntl.h>#include<string.h>#include<unistd.h>#define LOG "log.txt"int main(){int fd1 = open(LOG, O_CREAT | O_WRONLY | O_TRUNC, 0666);// int fd2 = open(LOG, O_CREAT | O_TRUNC | O_WRONLY, 0666);// int fd3 = open(LOG, O_CREAT | O_TRUNC | O_WRONLY, 0666);// int fd4 = open(LOG, O_CREAT | O_TRUNC | O_WRONLY, 0666);// int fd5 = open(LOG, O_CREAT | O_TRUNC | O_WRONLY, 0666);printf("hello xupt\n"); printf("hello xupt\n"); printf("hello xupt\n"); printf("hello xupt\n"); printf("hello xupt\n"); // printf("fd1 = %d\n", fd1); // printf("fd2 = %d\n", fd2); // printf("fd3 = %d\n", fd3); // printf("fd4 = %d\n", fd4); // printf("fd5 = %d\n", fd5); return 0; }
运行结果:
我们发现printf函数运行的结果没有出现在屏幕上,而是出现在log.txt文件中。

原理:
因为我们一开始执行了close(1)关闭文件描述符1对应的文件,其实也就是我们的stdout,那么我们再打开log.txt文件,根据文件描述符的规则:分配的是当前最小的没有被占用的文件描述符!那么我们的log.txt就顺理成章的拿到了fd = 1;这时候printf函数内部肯定是封装了操作系统接口write的,write只会根据文件描述符来区分文件,所以它默认的就是向文件描述符为1的文件中写入,所以就写入到了log.txt中!
那么其实这也是重定向的本质:在上层无法感知的情况下,在操作系统内部,更改进程对应的文件描述符表中,特定下标的指向!!!
2.2输入重定向>
我们再来看一个例子:
我们事先将log.txt中的内容修改成123 456,然后再运行下面的程序:
#include<stdio.h> #include<sys/types.h> #include<sys/stat.h> #include<fcntl.h> #include<string.h> #include<unistd.h> #define LOG "log.txt" int main() { close(0); int fd = open(LOG, O_RDONLY);int a, b;scanf("%d %d", &a, &b);printf("a = %d, b = %d\n", a, b);return 0;}
运行结果:

原理:
因为我们一开始执行了close(0)关闭文件描述符1对应的文件,其实也就是我们的stdin,那么我们再打开log.txt文件,根据文件描述符的规则:分配的是当前最小的没有被占用的文件描述符!那么我们的log.txt就顺理成章的拿到了fd = 0;这时候printf函数内部肯定是封装了操作系统接口read的,read只会根据文件描述符来区分文件,所以它默认的就是向文件描述符为0的文件中读取,所以就读取到了log.txt中的123 和 456!
2.3追加重定向>>
我们只需要修改输出重定向中的代码:在open函数的参数中添加上追加的参数即可!
#include<stdio.h>#include<sys/types.h>#include<sys/stat.h>#include<fcntl.h>#include<string.h>#include<unistd.h>#define LOG "log.txt"int main(){int fd1 = open(LOG, O_CREAT | O_WRONLY | O_APPEND, 0666);// int fd2 = open(LOG, O_CREAT | O_TRUNC | O_WRONLY, 0666);// int fd3 = open(LOG, O_CREAT | O_TRUNC | O_WRONLY, 0666);// int fd4 = open(LOG, O_CREAT | O_TRUNC | O_WRONLY, 0666);// int fd5 = open(LOG, O_CREAT | O_TRUNC | O_WRONLY, 0666);printf("hello xupt\n"); printf("hello xupt\n"); printf("hello xupt\n"); printf("hello xupt\n"); printf("hello xupt\n"); // printf("fd1 = %d\n", fd1); // printf("fd2 = %d\n", fd2); // printf("fd3 = %d\n", fd3); // printf("fd4 = %d\n", fd4); // printf("fd5 = %d\n", fd5); return 0; }
看看运行结果:
我们看到,内容是追加输出到文件中的。这就叫做我们的追加重定向。

这里我们就可以解释之前的一个问题:
stdout,cout都是向文件描述符为1的文件写入;而stderr,cerr都是向文件描述符为2的文件写入;然而输出重定向只是修改了描述符1的指向并没有修改文件描述符2的指向;


那么接下来我们尝试解决一个问题:请帮我把常规消息打印到log.normal,异常消息打印到log.error:
代码:
#include<stdio.h>
#include<sys/types.h>
#include<sys/stat.h>
#include<fcntl.h>
#include<string.h>
#include<unistd.h>    #define LOG_NORMAL "lognor.txt"
#define LOG_ERROR "logerr.txt"    int main()
{    close(1);    open(LOG_NORMAL, O_CREAT | O_TRUNC | O_WRONLY, 0666);    close(2);    open(LOG_ERROR, O_CREAT | O_TRUNC | O_WRONLY, 0666);    fprintf(stdout,"log.normal\n");    fprintf(stdout,"log.normal\n");    fprintf(stdout,"log.normal\n");    fprintf(stdout,"log.normal\n");    fprintf(stdout,"log.normal\n");    fprintf(stdout,"log.normal\n");    fprintf(stdout,"log.normal\n");    fprintf(stderr,"log.error\n");    fprintf(stderr,"log.error\n");    fprintf(stderr,"log.error\n");    fprintf(stderr,"log.error\n");    fprintf(stderr,"log.error\n");    fprintf(stderr,"log.error\n");    fprintf(stderr,"log.error\n");    fprintf(stderr,"log.error\n");                                                                                                                                                                                                            return 0;
}
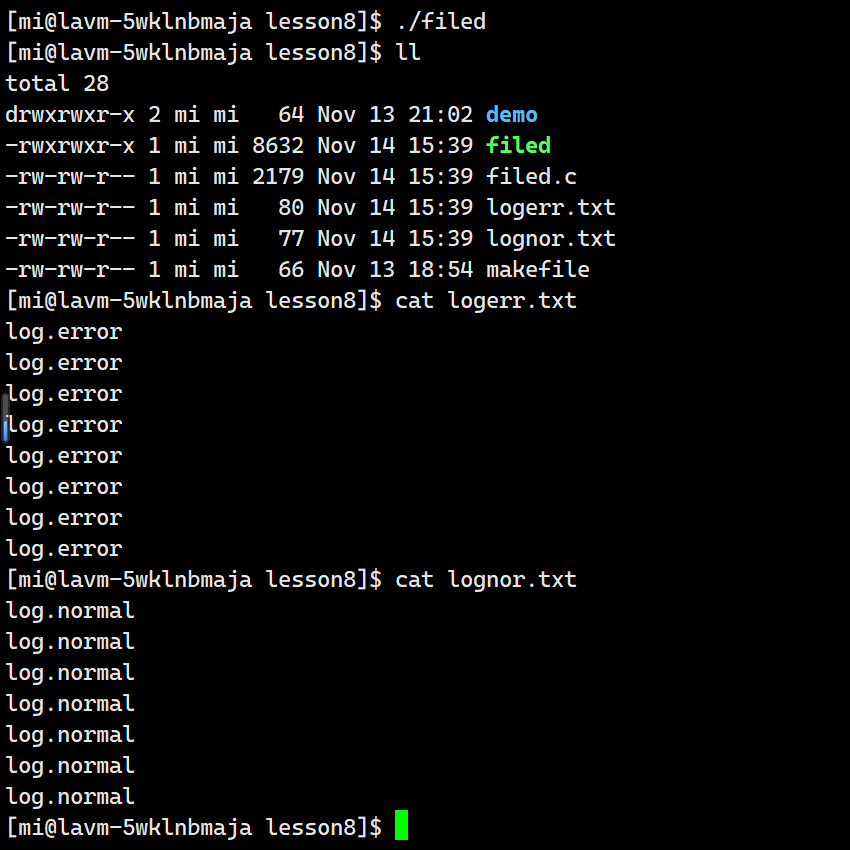
操作:
代码:
#include<stdio.h>
#include<sys/types.h>
#include<sys/stat.h>
#include<fcntl.h>
#include<string.h>
#include<unistd.h>    int main()
{    fprintf(stdout,"log.normal\n");    fprintf(stdout,"log.normal\n");    fprintf(stdout,"log.normal\n");    fprintf(stdout,"log.normal\n");    fprintf(stdout,"log.normal\n");    fprintf(stdout,"log.normal\n");    fprintf(stdout,"log.normal\n");    fprintf(stderr,"log.error\n");    fprintf(stderr,"log.error\n");    fprintf(stderr,"log.error\n");    fprintf(stderr,"log.error\n");    fprintf(stderr,"log.error\n");    fprintf(stderr,"log.error\n");    fprintf(stderr,"log.error\n");    fprintf(stderr,"log.error\n");                                                                                                                                                                                                            return 0;
}
操作:
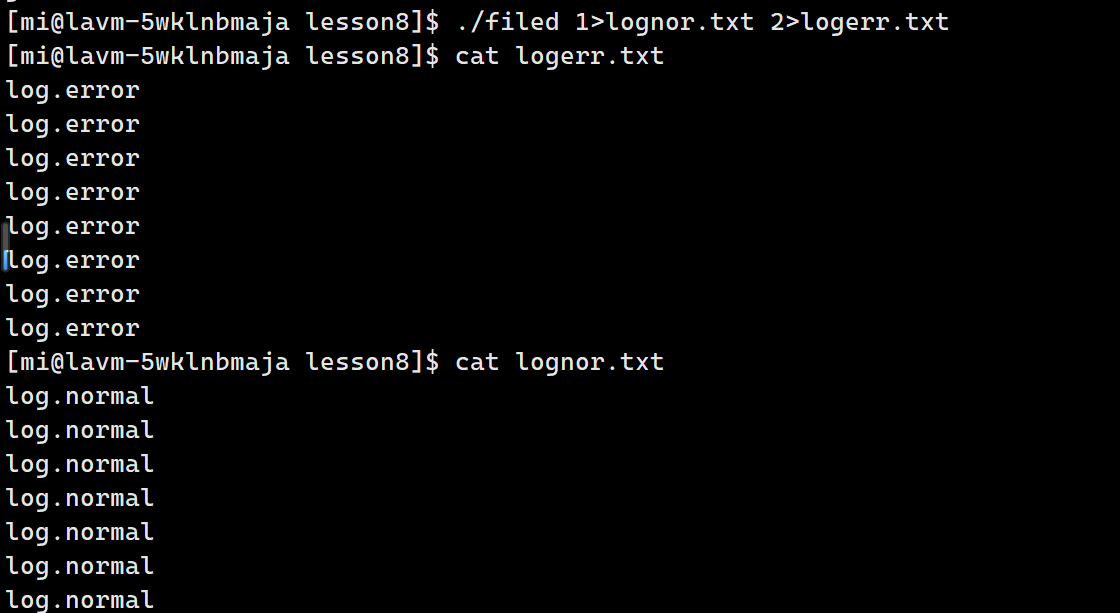

3.使用 dup2 系统调用
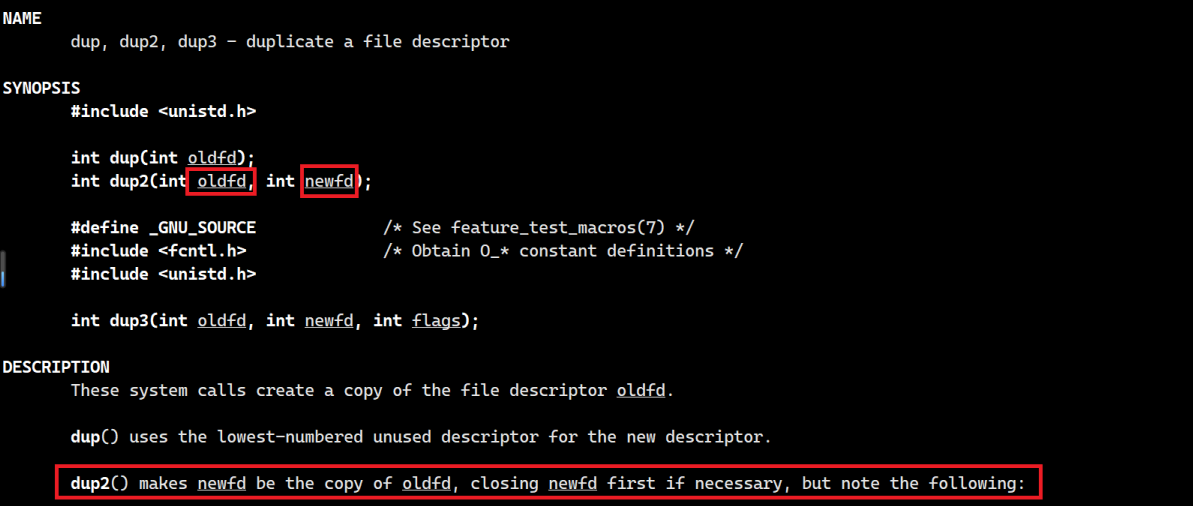
这个函数的作用是:将数组中oldfd为下标的文件指针拷贝到newfd为下标的位置,以达到重定向的目的;
我们来应用一下:
代码:
#include<stdio.h>
#include<sys/types.h>
#include<sys/stat.h>
#include<fcntl.h>
#include<string.h>
#include<unistd.h>#define LOG "log.txt"    int main()
{      int fd = open(LOG, O_CREAT | O_TRUNC | O_WRONLY, 0666);    dup2(fd, 1);fprintf(stdout,"log.normal\n");fprintf(stdout,"log.normal\n");fprintf(stdout,"log.normal\n");fprintf(stdout,"log.normal\n");fprintf(stdout,"log.normal\n");fprintf(stdout,"log.normal\n");fprintf(stdout,"log.normal\n");return 0;
}
4.使我们的极简shell增加重定向的功能
首先我们要写一个函数来检测命令中是否包含了重定向的三个符号>,>>,<.
大体框架:
char *checkDir(char commandstr[], redir &redir_type)
{//1. 检测commandstr内部是否有 > >> <//2. 如果有要根据> >> < 设置redir_type = ?//3. 将 > >> < -> \0, 将commandstr设置成为两部分//4. 保存文件名,并返回//5. 如果上面不满足,直接返回return NULL;
}
实现:
char *checkDir(char commandstr[], enum redir* redir_type)
{char* start = commandstr;char* end = commandstr + strlen(commandstr);//1. 检测commandstr内部是否有 > >> <while(start < end){if(*start == '>'){if(*(start + 1) == '>'){                                                                                                                                                                                     *redir_type = REDIR_APPEND;//细节处理为后续命令行分割做铺垫*start = '\0';return start + 2;}else{*redir_type = REDIR_OUTPUT;//细节处理为后续命令行分割做铺垫*start = '\0';return start + 1;}}else if(*start  == '<'){*redir_type = REDIR_INPUT;//细节处理为后续命令行分割做铺垫*start = '\0';return start + 1;}start++;}return NULL;
}
再处理主函数内部:
首先将函数的返回值也就是我们的文件名存储在filename中。
char *filename = checkDir(commondstr, &redir_type);
在到子进程的那部分:
注意这里一定要将umask先置成0000在执行,要不然可能会出现权限不够写入错误的问题:

if(id == 0){int fd = -1;if(redir_type != REDIR_NONE){//表示找到了文件,并且重定向类型确定if(redir_type == REDIR_INPUT){fd = open(filename , O_RDONLY);dup2(fd, 0);}else if(redir_type == REDIR_OUTPUT){fd = open(filename , O_CREAT | O_TRUNC | O_WRONLY, 0666);dup2(fd, 1);}else{fd = open(filename , O_CREAT | O_APPEND | O_WRONLY, 0666);dup2(fd, 1);}}//childexecvp(argv[0], argv);exit(0);}5.FILE
5.1如何理解缓冲区
当时我们在写进度条的时候也提到了缓冲区–输出缓冲区,那么这个缓冲区在哪里?为什么要存在?和struct file[缓冲区],两个是一回事吗?
来段代码在研究一下 :
#include <stdio.h>
#include <string.h>
int main()
{
const char *msg0="hello printf\n";
const char *msg1="hello fwrite\n";
const char *msg2="hello write\n";
printf("%s", msg0);
fwrite(msg1, strlen(msg0), 1, stdout);
write(1, msg2, strlen(msg2));
fork();
return 0;
}
运行结果:
我们发现了奇怪的一幕,为什么通过stdout向屏幕输出的内容在文件中显示了两次,而直接采用文件描述符的方式只有一次

提出缓冲区:
我们发现 printf 和 fwrite (库函数)都输出了2次,而 write 只输出了一次(系统调用)。为什么呢?肯定和
fork有关 。
- 一般C库函数写入文件时是全缓冲的,而写入显示器是行缓冲
- printf fwrite 库函数会自带缓冲区(进度条例子就可以说明),当发生重定向到普通文件时,数据
的缓冲方式由行缓冲变成了全缓冲- 而我们放在缓冲区中的数据,就不会被立即刷新,甚至fork之后
- 但是进程退出之后,会统一刷新,写入文件当中
- 但是fork的时候,父子数据会发生写时拷贝,所以当你父进程准备刷新的时候,子进程也就有了同样的
一份数据,随即产生两份数据- write 没有变化,说明没有所谓的缓冲
综上: printf fwrite 库函数会自带缓冲区,而 write 系统调用没有带缓冲区。另外,我们这里所说的缓冲区,都是用户级缓冲区。其实为了提升整机性能,OS也会提供相关内核级缓冲区,不过不再我们讨论范围之内。
那这个缓冲区谁提供呢? printf fwrite 是库函数, write 是系统调用,库函数在系统调用的“上层”, 是对系统
调用的“封装”,但是write没有缓冲区,而 printf fwrite 有,足以说明,该缓冲区是二次加上的,又因为是C,所以由C标准库提供
那么在操作系统层面,**我们必须要访问fd,我们才能找到文件,任何语言访问外设,或者文件,必须经历操作系统。**所以C库当中的FILE结构体内部,必定封装了fd 。
那么我们以C语言的
fopen函数为例:FILE *fopen(const char *path, const char *mode);我们看到,这个函数的返回值是一个
FILE*类型,那么首先FILE*是什么?它是谁提供的?和操作系统内核的struct file有关系吗?
FILE是一个结构体,它是由C标准库提供的,它和操作系统内核的struct file没有任何关系,如果非要扯上关系,他们两个是上下层的关系。
缓冲区就在FILE结构体内部!
FILE结构体的代码:这个结构体代码中也可以看到缓冲区相关的代码!
typedef struct _IO_FILE FILE; 在/usr/include/stdio.h在/usr/include/libio.h
struct _IO_FILE {
int _flags; /* High-order word is _IO_MAGIC; rest is flags. */
#define _IO_file_flags _flags
//缓冲区相关
/* The following pointers correspond to the C++ streambuf protocol. */
/* Note: Tk uses the _IO_read_ptr and _IO_read_end fields directly. */
char* _IO_read_ptr; /* Current read pointer */
char* _IO_read_end; /* End of get area. */
char* _IO_read_base; /* Start of putback+get area. */
char* _IO_write_base; /* Start of put area. */char* _IO_write_ptr; /* Current put pointer. */
char* _IO_write_end; /* End of put area. */
char* _IO_buf_base; /* Start of reserve area. */
char* _IO_buf_end; /* End of reserve area. */
/* The following fields are used to support backing up and undo. */
char *_IO_save_base; /* Pointer to start of non-current get area. */
char *_IO_backup_base; /* Pointer to first valid character of backup area */
char *_IO_save_end; /* Pointer to end of non-current get area. */
struct _IO_marker *_markers;
struct _IO_FILE *_chain;
int _fileno; //封装的文件描述符
#if 0
int _blksize;
#else
int _flags2;
#endif
_IO_off_t _old_offset; /* This used to be _offset but it's too small. */
#define __HAVE_COLUMN /* temporary */
/* 1+column number of pbase(); 0 is unknown. */
unsigned short _cur_column;
signed char _vtable_offset;
char _shortbuf[1];
/* char* _save_gptr; char* _save_egptr; */
_IO_lock_t *_lock;
#ifdef _IO_USE_OLD_IO_FILE
};
到这本篇博客的内容就到此结束了。
如果觉得本篇博客内容对你有所帮助的话,可以点赞,收藏,顺便关注一下!
如果文章内容有错误,欢迎在评论区指正


