诸神缄默不语-个人CSDN博文目录
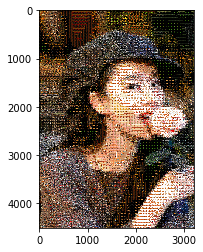
在这里的图像拼接画指的是一张大图由很多小图组成,效果就像这样:
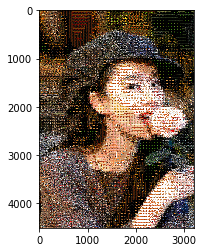
原理:将大图拆成很多小块,每一块计算平均颜色,用平均颜色最相近的小图来替代,就可以。
直接遍历就可以,也就跑几个小时。如果想要加速的话可以考虑研究一下用多线程或者多进程来实现。
注意本博文中涉及的实验都是在Windows平台上实现的,如果要转成其他系统需要尤其注意文件路径格式。
文章目录
- 1. 预处理小图:计算每张图的平均颜色,并放到一个新的文件夹中
- 2. 用小图拼大图
1. 预处理小图:计算每张图的平均颜色,并放到一个新的文件夹中
jupyter notebook格式的代码文件:https://github.com/PolarisRisingWar/all-notes-in-one/blob/main/小图拼大图1-计算小图平均RGB颜色.ipynb
我是直接用CIFAR10的图片来作为小图了。
CIFAR10我是之前做PyTorch 60分钟速成的时候就下载过。这个教程我写过笔记:60分钟闪击速成PyTorch(Deep Learning with PyTorch: A 60 Minute Blitz)学习笔记
下载的核心代码是:
trainset = torchvision.datasets.CIFAR10(root='./data', train=True,  download=True, transform=transform)
testset = torchvision.datasets.CIFAR10(root='./data', train=False,  download=True, transform=transform)
代码:
调包→设置参数和工具函数→展示示例图片
import pickleimport numpy as np
import matplotlib.pyplot as pltdef unpickle(file):"""cifar10数据官方提供的导入代码"""with open(file, 'rb') as fo:dict = pickle.load(fo, encoding='bytes')return dict#设置参数
cifar10_path=r'data\cifar-10-batches-py'
cifar10_file_name=[r'\data_batch_'+str(i) for i in range(1,6)]
cifar10_file_name.append(r'\test_batch')cifa10_avgcolor_folder=r"data\cifar10-avgcolor"#展示一张示例图
p='data\cifar-10-batches-py\data_batch_1'
d=unpickle(p)e=d[b'data']
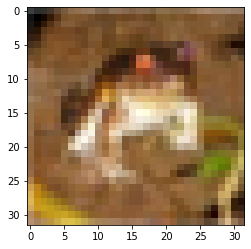
for i in range(100):image=e[i]red_image=image[:1024].reshape(32,32)green_image=image[1024:2048].reshape(32,32)blue_image=image[2048:].reshape(32,32)result_img=np.ones((32, 32, 3), dtype=np.uint8)result_img[:,:,0]=red_imageresult_img[:,:,1]=green_imageresult_img[:,:,2]=blue_imageplt.imshow(result_img)break
%%time
#遍历所有图片,计算其平均RGB颜色,将其分别存储至对应文件中
for file_name in cifar10_file_name:  #遍历所有batchcifar10_batch=cifar10_path+file_name  #该batch对应的路径cifar10_batch_unpickle=unpickle(cifar10_batch)file_r=open(cifa10_avgcolor_folder+"\\"+file_name+'_r',mode='w')file_g=open(cifa10_avgcolor_folder+"\\"+file_name+'_g',mode='w')file_b=open(cifa10_avgcolor_folder+"\\"+file_name+'_b',mode='w')for picture in cifar10_batch_unpickle[b'data']:file_r.write(str(np.mean(picture[:1024]))+'\n')file_g.write(str(np.mean(picture[1024:2048]))+'\n')file_b.write(str(np.mean(picture[2048:]))+'\n')file_r.close()file_g.close()file_b.close()
2. 用小图拼大图
jupyter notebook格式的代码文件:https://github.com/PolarisRisingWar/all-notes-in-one/blob/main/小图拼大图2.ipynb
大图原始图像是我从网上随便找的一张刘亦菲的写真:

代码:
调包→设置参数和功能函数→展示大图原图
#导包
import picklefrom PIL import Imageimport numpy as np
import matplotlib.pyplot as pltdef unpickle(file):"""cifar10数据官方提供的导入代码"""with open(file, 'rb') as fo:dict = pickle.load(fo, encoding='bytes')return dict#参数配置
portrait_path=r'liuyifei.jpeg'block=5  #5*5为一个色块#小图
cifar10_path=r'data\cifar-10-batches-py'
cifar10_file_names=[r'\data_batch_'+str(i) for i in range(1,6)]
cifar10_file_names.append(r'\test_batch')cifa10_avgcolor_folder=r"data\cifar10-avgcolor"#展示原图
portrait_picture=Image.open(portrait_path)
plt.imshow(portrait_picture)
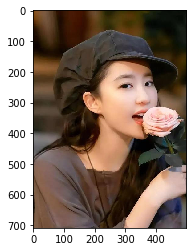
将图片加载到内存中→设置图像拼接的功能函数
#将图片转换为np.ndarray
portrait_matrix=portrait_picture.convert("RGB")
portrait_ndarray = np.array(portrait_matrix)#将小图的RGB加载到内存中
little_rgbs={}
for file_name in cifar10_file_names:with open(cifa10_avgcolor_folder+"\\"+file_name+'_r') as f:little_rgbs[file_name+'_r']=f.readlines()with open(cifa10_avgcolor_folder+"\\"+file_name+'_g') as f:little_rgbs[file_name+'_g']=f.readlines()with open(cifa10_avgcolor_folder+"\\"+file_name+'_b') as f:little_rgbs[file_name+'_b']=f.readlines()#将小图的batch加载到内存中
cifar10_batches=[]
for file_name in cifar10_file_names:  #遍历所有batchcifar10_batch=cifar10_path+file_name  #该batch对应的路径cifar10_batches.append(unpickle(cifar10_batch)[b'data'])def convert_smalls_to_big(block_dim:int):"""将一堆小图转换为大图,入参为大图色块的维度,返回新图"""old_shape=portrait_ndarray.shapeheng_dim=int(old_shape[0]/block_dim)zong_dim=int(old_shape[1]/block_dim)new_picture=np.ndarray(shape=(heng_dim*32,zong_dim*32,3),dtype=np.int16)for i in range(heng_dim):for j in range(zong_dim):old_matrix=portrait_ndarray[i*block_dim:(i+1)*block_dim,j*block_dim:(j+1)*block_dim,:]r=np.mean(old_matrix[:,:,0])g=np.mean(old_matrix[:,:,1])b=np.mean(old_matrix[:,:,2])least_distance=450  #理论最大值应该是np.sqrt(255*255+255*255+255*255)≈442least_distance_batch_index=0least_distance_picture_index=0for index in range(6):#遍历每一个batchfor picture_index in range(len(cifar10_batches[index])):#遍历每一张小图,找到平均RGB跟色块RGB最相近的小图,用这个小图来顶替大图的对应色块little_r=float(little_rgbs[cifar10_file_names[index]+'_r'][picture_index])little_g=float(little_rgbs[cifar10_file_names[index]+'_g'][picture_index])little_b=float(little_rgbs[cifar10_file_names[index]+'_b'][picture_index])distance=np.sqrt((little_r-r)**2+(little_g-g)**2+(little_b-b)**2)if distance<least_distance:least_distance=distanceleast_distance_batch_index=indexleast_distance_picture_index=picture_indexlittle_picture=cifar10_batches[least_distance_batch_index][least_distance_picture_index]new_picture[i*32:(i+1)*32,j*32:(j+1)*32,0]=np.reshape(little_picture[:1024],(32,32)).copy()new_picture[i*32:(i+1)*32,j*32:(j+1)*32,1]=little_picture[1024:2048].reshape(32,32)new_picture[i*32:(i+1)*32,j*32:(j+1)*32,2]=little_picture[2048:].reshape(32,32)plt.imshow(new_picture)plt.savefig("picture1.png")
拼接图像:
%%time
convert_smalls_to_big(block)
Wall time: 1h 23min 27s
![CNVD-2021-09650:锐捷NBR路由器(guestIsUp.php)RCE漏洞复现 [附POC]](https://img-blog.csdnimg.cn/3bbdd73a265042e0bd1a44574a789d2a.png)
